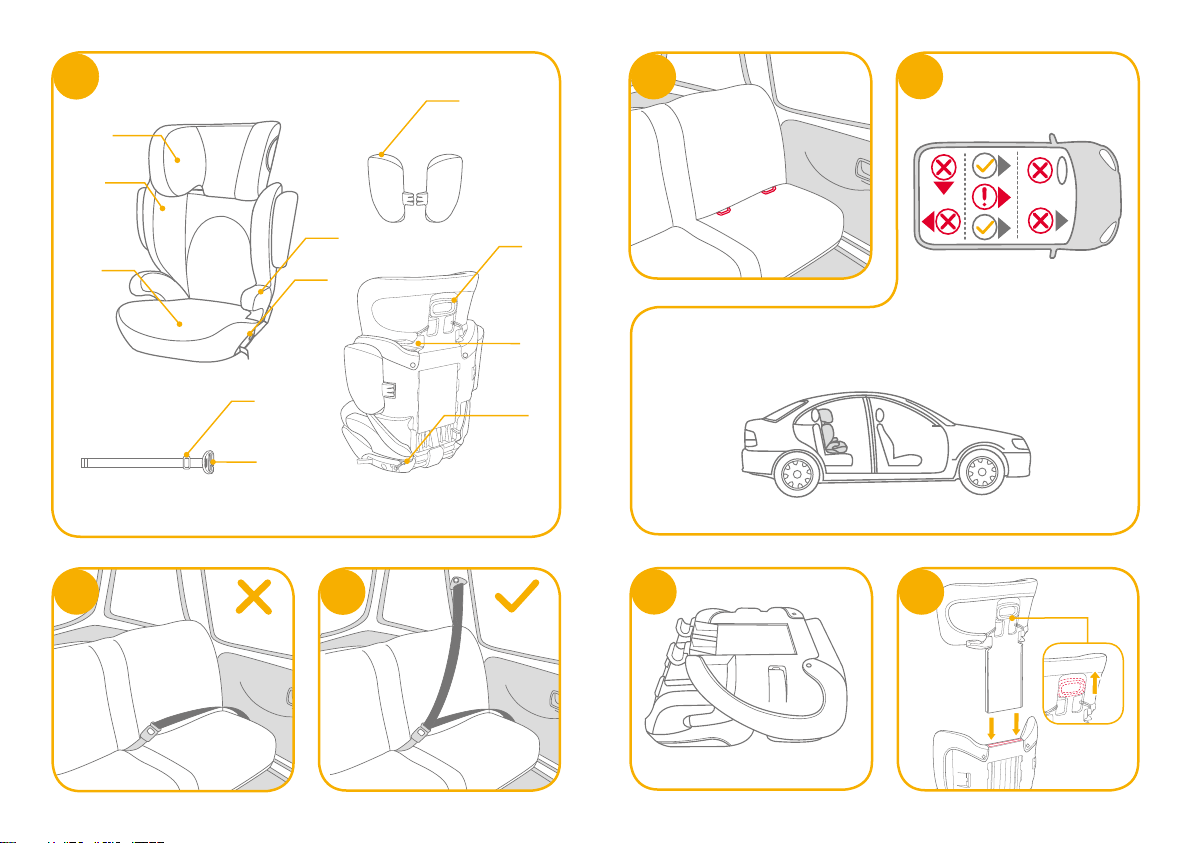
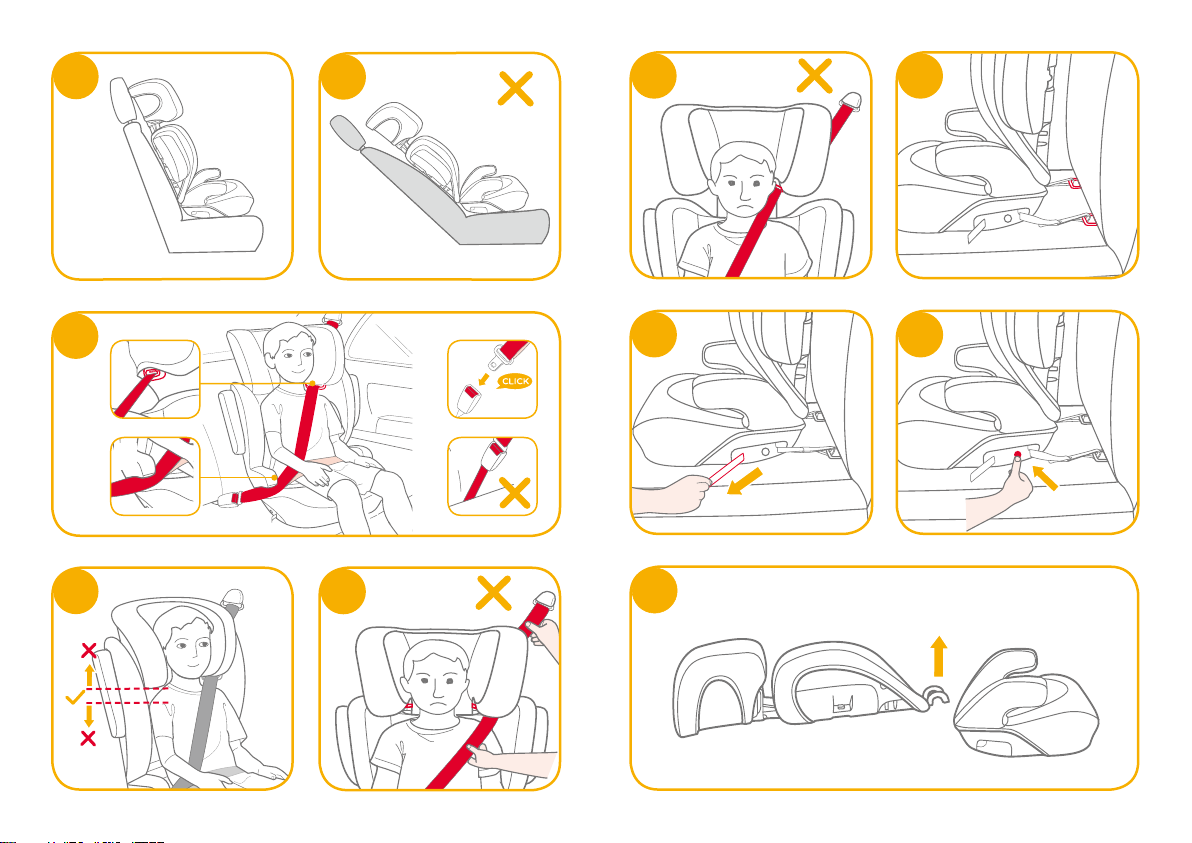
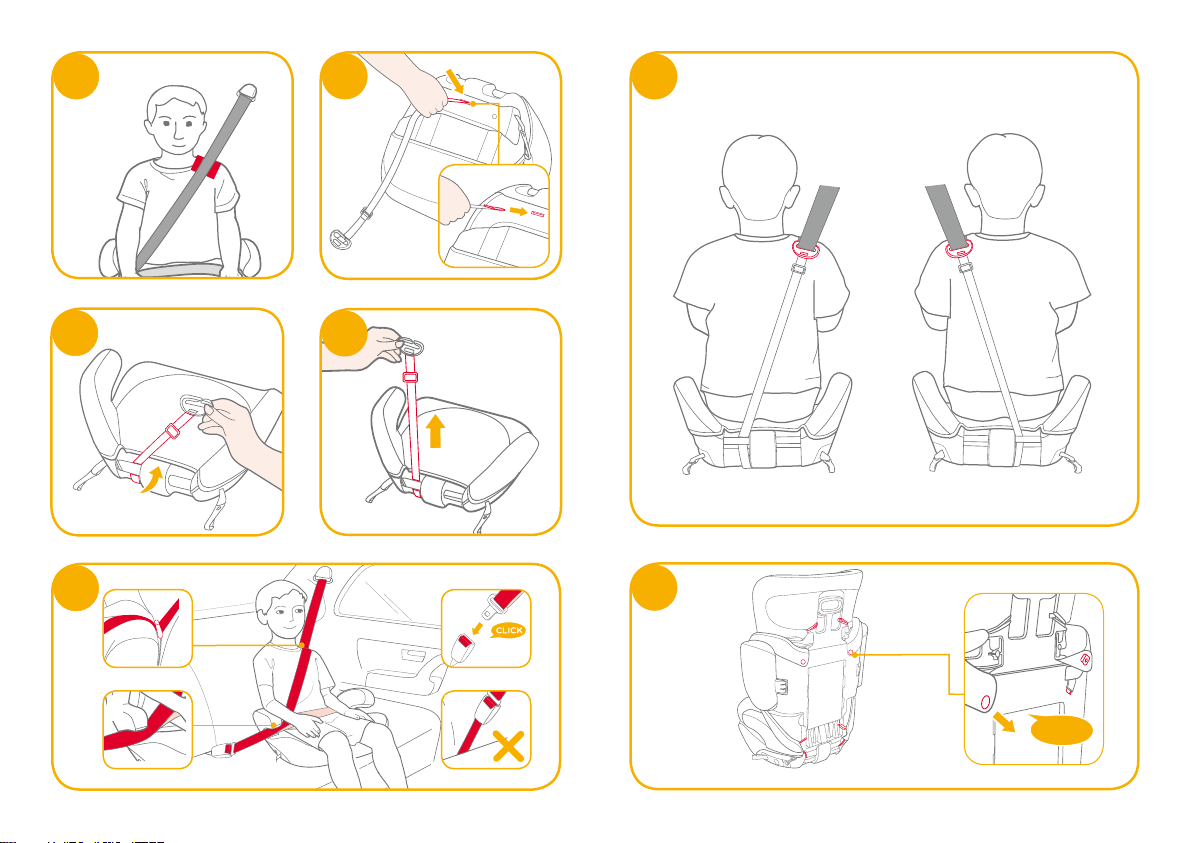
Joie TRILLO C1118C User manual

Ⅱ/Ⅲ(15–36kg)
trillo
兒童成長汽車安全座椅
使用說明書
本產品符合安全標準
CNS 11497及歐盟標準
ECE R44測 試 和認證
組裝及使用本產品前
請先閱讀說明書全文

恭喜您
恭喜您成為Joie家族的一員﹗很高興能與您的寶貝共度行車旅程。乘坐本產品
時,您的寶貝享受的是一台高品質和通過安全標準及歐盟安全標準檢測的Ⅱ/Ⅲ
級兒童成長汽車安全座椅,這台兒童成長汽車安全座椅適用於體重
15-36
公
斤(約
3-12
歲)的兒童。請仔細研讀並依照本說明書的指示操作, 如此才能保
障並提供您的寶貝一個安全又舒適的行車旅程。
請確定
請確定您的汽車有三點式安全帶裝置。依照各種汽車的品牌、年份和型號,安
全帶可以有不同的設計和長度。本兒童成長汽車安全座椅適用於符合歐盟安全
標準
ECE
R16和安全標準
CNS 3972
的三點式安全帶的汽車,因本兒童成長
汽車安全座椅是依安全標準
CNS 11497
及歐盟標準
ECE R44
去做測試和認
證 的。
底 座
! 重要︰請仔細閱讀並妥善保存本說明書,以便日後參考。
本說明書不使用時,請存放在底座下方座布內(如下圖)。安裝和使用本產品前,
請先閱讀說明書全文。
目錄
參照圖示
1-8
中文
警告 9
緊急情況處理 11
產品資訊 11
體重及高度限制 11
產品組件及各部位名稱 13
安裝注意事項 13
兒童成長汽車安全座椅組裝14
安裝頭靠 14
安裝背靠 14
安裝側向保護14
頭靠高度調整 15
用3點式安全帶安裝 15
配合背靠頭靠使用 15
不配合背靠頭靠使用 16
拆卸座布 17
保養與維護 17
English 20-35

1 2
1
23
1
2
3
4
1
2
2
1
3
5
67
4
5
9
11
7
8
10
6
1
2

3 4
10
8 9
14
13
12
11 15

5 6
18 3
16
1
2
22
20
19
23 24
25
!
!
17 21
4

7 8
32
27
30
29
31
26
28
1
2
!!
!!
PULL
4
3

910
警告
! 必須小心定位和安裝兒童成長汽車安全座椅,以免被活動式座椅
或 車 門 卡 住。
! 兒童成長汽車安全座椅適用於體重15-36公斤(大約3-12歲
的 兒 童 )。
! 任何束縛兒童保護裝置至車輛之織帶應束緊,任何束縛兒童之織
帶應根據兒童身體進行調節,且此織帶不應扭曲。
! 將寶寶放在本車用兒童保護裝置後,必須正確的扣合及使用車用
兒童保護裝置安全帶,並確保腰部織帶能有效束縛骨盆部位。
! 不正確使用或安裝本兒童成長汽車安全座椅,當緊急剎車和急轉
彎時,可能會導致嚴重受傷或死亡的危險。
! 請勿使用其它廠商生產的車用兒童保護裝置座墊。請與代理商聯
繫只可使用Joie配件更換零件。
! 請勿使用說明中未有顯示的任何配件。
! 請勿將此產品安裝在前座上,防止意外發生時造成乘坐的
兒 童 傷 亡。
! 在無人照料下,不得讓兒童留在兒童保護裝置內。
! 請勿將未使用汽車安全帶固定住的兒童座椅留在車內,以免緊急
剎車時,傷害到其他乘客。若不經常使用兒童成長汽車安全座椅
時,請將其搬離汽車座椅。
! 任 何 行 李 或 其 他 可能 在 碰 撞中 造 成傷 害 之 物 品 應 適 當 牢 固。
! 本兒童保護裝置若於意外中遭受劇烈撞擊後,不可繼續使用,
應立即更換兒童保護裝置。意外可能導致兒童保護裝置產生潛在
危 險。
! 請勿在兒童保護裝置上進行未經驗證許可之改裝或增加其他裝置
以及未依兒童保護裝置製造商提供之安裝說明使用,以免造成受
傷或死亡。
! 請勿使用已經損壞或缺失零件的兒童成長汽車安全座椅。請勿使
用切割過的、磨損的或損壞的車輛安全座椅。
! 請讓座椅遠離日光,以免產品溫度過高對兒童的皮膚造成傷害。
! 請勿在未閱讀或了解本兒童成長汽車安全座椅說明書及汽車說明
書之前,使用或安裝本兒童成長汽車安全座椅。因為可能會導致
嚴重受傷或死亡的危險。
! 請勿使用二手兒童成長汽車安全座椅或來歷不明的兒童成長汽車
安全座椅,因為它們可能存在危害乘坐兒童安全的潛在危險。
! 當本車用兒童保護裝置沒有座布時,請勿使用,因座布為車用兒
童保護裝置束縛性能之整體構成要件。
! 請勿使用非本製造商推薦的座布,否則會影響兒童成長汽車安全
座椅的總體性能。
! 有 關 零 件 更 換 或 維 修 問 題,請 向 代 理 商 咨 詢。
! 請勿把本兒童成長汽車安全座椅當作平常的椅子使用,會容易翻
倒 造 成 傷 害。
! 不可使用繩子等其他物件代替汽車安全帶,以免兒童被意外勒住。
! 請勿讓您的寶寶穿著過大的衣物,所穿的衣物必須能讓車用兒童
保護裝置的安全帶適當而安全地扣在寶寶兩腿之間。
! 使用本產品前,請取掉PE袋和包裝材料,並放到嬰兒和兒童觸摸
不 到 的 地 方。
! 請勿搬運乘坐有兒童的車用兒童保護裝置。
! 不要使用非說明書中所述以及兒童約束系統中所標示的其他受
力 點。
! 請勿後向使用兒童成長汽車安全座椅。

11 12
緊急情況處理
遇緊急事故時,需將安全帶剪斷,迅速將乘坐的兒童移離現場。
產品資訊
使 用 本 產 品 前,請 仔 細 閱 讀 說 明 書。如 有 疑 問,請 洽 兒 童 座 椅 製
造 商 和 代 理 商。
體重及高度限制
您的孩子必須完全符合以下要求,才可以使用本產品。
配合背靠頭靠使用(約3-12歲)︰
體重15-36公斤(身高96-150公分)
如(圖18)所示,肩帶必須穿過肩帶導向器並跨過孩子的肩膀,腰帶部
份須固定在孩子骨盆較低的地方。
不配合背靠頭靠使用(約4-12歲)︰
體重15-36公斤(身高101-150公分)
如(圖30)所示,肩帶必須穿過肩帶固定夾並跨過孩子的肩膀,腰帶部
份須固定在孩子骨盆較低的地方。
1.這是“通用型”兒童保護裝置,符合安全標準
CNS11497及歐盟標準ECER44。作為通用兒
童保護裝置,適合大多數,而不是全部的汽車
座椅。
2.如果汽車製造商在使用手冊中述明可以讓適用
此年齡段的“通用型”兒童保護裝置配合的
話,那麼更容易達到正確的匹配。
ECE.R44/04
15-36kg
UNIVERSAL
E
11
041509
3.此兒童保護裝置歸類為“通用型”,比其他無標示此注意事項的
兒童保護裝置可適用於較多車輛。
4.若有疑問,請洽兒童保護裝置代理商或撥 0800-001-256 /
02-25781188
Allison Baby UK Ltd,
Venture Point, Towers Business Park,
Rugeley, Staffordshire, WS15 1UZ
www.joiebaby.com
產品名稱汽車用兒童保護裝置-兒童成長汽車安全座椅
產品型號C1118C
適用範圍15-36公斤(約3-12歲)的 兒 童
主要材質塑 膠、五 金、布
質量等級Ⅱ/Ⅲ
淨 重 4.24公斤
產品尺寸
580mmx400mmx685mm
製造日期
詳見產品上貼紙日期(年/月/日)
專利號碼專利申請中
產 地 中國
委 製 商
英商巧兒宜實業有限公司台灣分公司
進 口 商
巧兒宜國際股份有限公司
地 址
台北市內湖區瑞光路431號2樓
電 話
02-27973000
統一編號
52603333
代 理 商奇哥股份有限公司Chickabiddy Co., Ltd
地 址台北市南京東路四段186號5樓
服 務 專 線 0800-001-256/02-25781188
統一編號04222671
網 址www.chick.com.tw

13 14
產品組件及各部位名稱
請確認產品組件是否有遺漏,如有遺漏,請聯繫代理商。
安裝注意事項
!
請勿將此兒童成長汽車安全座椅安裝在二點式安全帶的汽車座
椅上
(圖2)(圖5.1)
!
此兒童成長汽車安全座椅適合安裝在設置有三點式安全帶的汽
車座椅上,如果有ISOFIX連接系統,強烈建議安裝在三點式安全
帶和ISOFIX連接系統上
(圖3)(圖4)
!
請勿將此兒童成長汽車安全座椅安裝在相對於汽車的行駛方向
橫向
(圖5.1)
!
關於兒童成長汽車安全座椅安裝位置請參考汽車說明的相關說明。
!
請將此產品安裝在後座上,防止意外發生時造成乘坐兒童傷亡
(圖5.2)
!
請勿將此兒童成長汽車安全座椅安裝於可移動的汽車座椅上。
圖1.1 頭靠
圖1.2 背靠
圖1.3 底座
圖1.4 扶手
圖1.5 調整按鈕
圖1.6 肩帶固定栓
圖1.7 肩帶固定夾
圖1.8 側向保護塑膠
圖1.9 調整拉桿
圖1.10 肩帶導向器
圖1.11 連接器
兒童成長汽車安全座椅組裝
安裝頭靠
1.兒童成長汽車安全座椅從紙箱取出如
圖6
所 示。
2.按壓頭靠調整按鈕
(圖7.1)
,並 對 齊 背 靠 垂 直 插 入
(圖7.2)
!
按壓頭靠調整按鈕並推動它們直到卡合。
! 請嘗試拉動,以便檢查兩部份是否已正確卡合。
3
.頭靠座布需要在背靠座布下方
(圖8)
! 為了方便插入座布,可按壓頭靠調整按鈕,滑動上下兩部份。
安裝背靠
1.當背靠安裝到底座上時先用力把背靠下壓,背靠上的U型鉤與
底座上橫桿會相互卡合
(圖9)
! 當背靠安裝到底座上時,請確保座布不會相互干涉。
2.
當背靠正確安裝在底座上時,請依圖10向 前 推 起 背 靠。
! 請先用手按住底座,再向前推起背靠。
安裝側向保護
1
.
使側向保護塑膠凸台和背靠上的凹槽對齊插入(圖11)
2
.
按壓側向保護上的鎖定按鈕(圖12), 聽 到“ 咔 噠 ”聲 表 示 安 裝 到
位 (圖13)
! 為了保護兒童更安全,請必須使用側向保護塑膠。
! 側向保護塑膠在背靠座布上方。
兒童成長汽車安全座椅安裝完成如圖14所 示。

15 16
頭靠高度調整
1.
請根據兒童的身高,將頭靠調整到合適高度。
2.
按壓調整拉桿,同時上下滑動頭靠到合適高度,頭靠高度共有7個
段 位,調 整 如 圖15所 示。
! 在頭靠調整高度之前,請讓乘坐的兒童稍微向前傾。
用3點式安全帶安裝
配合背靠頭靠使用
1
.
兒童成長汽車安全座椅背靠必須緊貼汽車座椅(圖16)
! 兒童成長汽車安全座椅不能超越汽車座位的前方。
! 請勿在斜躺角度使用兒童座椅(圖17)
2.
將汽車安全帶穿過安全帶路徑如圖18所示。並扣合安全帶
夾器(圖18.3)
! 肩帶必須要穿過紅色肩帶導向器(圖18.1)
! 安全帶必須通過扶手下方(圖18.2)
! 汽車安全帶母扣段若太長,汽車安全帶無法綁緊不能使用。
(圖18.4)
! 安全帶必須
固定在孩子骨盆較低的地方。
安全帶安裝如圖18所 示。
! 如圖19所示,為保證正確的頭靠高度,頭靠的底部必須與兒
童 肩 膀 的 最 高 點 水 平 或 略 高。
! 在汽車後座內,兒童成長汽車安全座椅前向使用時必須正確使
用 安 全 帶。
! 當您的孩子坐在兒童座椅時,讓他的背部平貼在兒童成長汽
車 安 全 座 椅 靠 背 上。
! 請勿如圖20所 示,肩 帶 沒 有 穿 過 肩 帶 導 向 器 就 拉 緊 織 帶。
! 如果安全帶橫跨了兒童的脖子、頭部或面孔,須重新調整頭靠
高度(圖21)
! 安裝調整過程中,須注意安全帶不能扭曲。
如果在座椅背靠下方有鐵環,可以使用連接器去連接。對它的位置
和使用要求可以參考汽車使用說明。
1
.
從布環上取下連接器固定在鐵環上(圖22)
! 請勿將兩個連接器固定在同一個鐵環上。
2
.
可以透過膝蓋或手按住底座,拉動連接器上的織帶固定兒童成長
汽車安全座椅在汽車座椅上(圖23)
3
.
按壓連接器的釋鎖按鈕,可以調整織帶長度,方便連接器釋鎖
(圖24)
不配合背靠頭靠使用
1
.
平躺背靠,用手按住底座拆開背靠圖25,底 座 可 以 單 獨 使 用。
! 請 妥 善 保 管 背 靠 和 頭 靠。
2
.
肩帶必須穿過紅色區域橫跨兒童肩膀(圖26)
! 單獨使用底座時,必須使用肩帶固定夾。
3
.
肩帶固定夾的織帶末端須插入底座的固定孔(圖27)
! 請檢查肩帶固定栓的方向,正確如圖28。避免肩帶固定栓反向
卡 到 兒 童 背 部。
! 輕輕提起肩帶固定夾的織帶,確保織帶已固定在底座上。
4
.
將肩帶固定夾的織帶和夾子通過底座橫桿並拉緊織帶
(圖28)(圖29)
! 透過肩帶固定栓可以調整織帶長度。
5
.
滑動肩帶固定夾,確保安全帶已緊貼兒童肩膀(圖30.1)
並扣合安全帶夾器(圖30.3)
! 安全帶必須從扶手下方穿過(圖30.2)

17 18
! 汽車安全帶母扣段若太長,汽車安全帶無法綁緊不能使用。
(圖30.4)
6
.
兒童坐在底座上時的背面圖如圖31
! 請正確選擇肩帶固定夾穿過底座橫桿的位置。保證該處是肩
帶跨過孩子肩膀的最遠位置(圖31)
! 安全帶必須通過扶手下方和腰帶部份須固定在孩子骨盆較低
的 地 方。
! 肩帶固定夾不使用時,可以存放在底座下方。
如果在座椅背靠下方有鐵環,可以使用連接器去連接。對它的位置
和使用要求可以參考汽車使用說明。
連接器操作請參考圖22到圖24的文字說明。
拆卸座布
打開2對鈕扣和6對鬆緊帶,即可除去座布(圖32)
! 向下拉移除鈕扣如圖32.1
依相反步驟即可重新組裝座布。
保養與維護
!請以30度以下水溫清洗。
!請 勿 使 用 熨 斗 熨 燙。
!請勿使用漂白劑及乾洗。
!請勿使用未經稀釋的中性清潔劑、汽油或其他有機溶劑清洗本
兒童保護裝置,否則可能對保護裝置造成損壞。
!請勿大力扭乾,過分大力扭乾可能留下皺褶。
!請於陰涼處鋪平晾乾。
!當長時間不使用兒童成長汽車安全座椅時,請 將 兒 童 成 長 汽 車 安
全座椅從汽 車 座椅上拆除,並存放於陰涼處及兒童不易接觸的
地 方。
Note

Ⅱ/Ⅲ(15–36kg)
trillo
booster
This booster is approved to
CNS 11497 and UN ECE
regulation 44, 04
series of amendments.
Please read all the instructions
in this manual before installing
and using the product.
Instruction Manual

21 22
Welcome to Joie
Congratulations on becoming part of the Joie family! We are so excited
to be part of your journey with your little one. While traveling with the
Joie TRILLO™ booster you are using a high quality, fully certified safety
Ⅱ/ Ⅲ booster. This product is suitable for use with children weighing
15-36kg (approximately 3-12 years old). Please carefully read this manu-
al and follow each step to ensure a comfortable ride and best protection
for your child.
Please Confirm
This booster can be installed using a 3 point retractable adult seat belt
approved to ECE Regulation No. 16 and CNS 3972.
This booster is approved to CNS 11497 and UN ECE regulation 44, 04
series of amendments.
Booster
! IMPORTANT: KEEP FOR FUTURE REFERENCE. PLEASE READ
CAREFULLY.
Please keep the instruction manual in the
storage compartment at the bottom of
the booster as right figure.
Contents
Reference Figures 1 - 8
English
WARNINGS 23
Emergency 25
Product Information 26
Weight and Height Limits 26
Parts List 28
Concerns on Installation 28
Booster Assembly 29
Assemble Head Support 29
Assemble Lower Back Support 29
Assemble Side Impact Shield 30
Height Adjustment for Head Support 30
Installation with 3-point-belt 31
With back support 31
Without back support 33
Detach Soft Goods 34
Care and Maintenance 35

23 24
WARNING
!DO take care to locate and install the booster seat
so that it is not liable to become trapped by a
moveable seat or in a door of the vehicle.
!This booster is designed ONLY for child weighing
15-36kg (approximately 3-12 years old).
!Any straps holding the restraint to the vehicle should-
be tight, that any straps restraining the child should-
be adjusted to the child’s body, and that straps
should not be twisted.
!After your child is placed in this booster, the safety
belt must be used correctly, and ensure that any lap
strap is worn low down, so that the pelvis is firmly
engaged.
!Failure to properly use this booster seat increases
the risk of serious injury or death in a sharp turn,
sudden stop or crash.
!DO NOT use another manufacturers soft goods
with this booster seat. See your retailer for Joie
replacement parts only.
!DO NOT use any load bearing contact points other
than those described in the instructions and
marked in the booster.
!DO NOT place a booster seat on front seat, death
or serious injury may occur. Please reference
vehicle owner’s manual for more information.
!Child is not left in the booster system una tended.
!DO NOT leave this booster unsecured in your
vehicle because an unsecured booster can be
thrown around and may injure occupants in a
sharp turn, sudden stop, or collision. Remove it if
not in regular use.
!Any luggage or other objects liable to cause
injuries in the event of a collision shall be properly
secured.
!The booster should be changed when it has been
subject to violent stresses in an accident. An
accident can cause damage to the booster that
you cannot see.
!Concern the danger of making any alterations or
additions to the device without the approval of the
Type Approval Authority, and a danger of not
following closely the installation instructions
provided by the booster manufacturer.
!NEVER use a booster seat if it has damaged or
missing parts. DO NOT use a cut, frayed or dam-
aged vehicle seat belt.
!Please keep this booster away from sunlight,
otherwise it may be too hot for the child’s skin.
!DO NOT install or use this booster withoutfollow-
ing the instructions and warnings in thismanual or
you may put your child at serious risk of injury or
death.
!NEVER use a second-hand booster or a booster
whose history you do not know because they may
have structural damage that endangers your
child’s safety.

25 26
!The booster shall not be used without the soft
goods.
!The soft goods should not be replaced with any
other than the one recommended by the manufac-
turer, because the soft goods constitutes an
integral part of the restraint performance.
!Consult the retailer for issues concerning mainte-
nance, repair and part replacement.
!DO NOT use this booster as a regular chair as it
tends to fall down and injure the child.
!NEVER use ropes or any other substitutes in place
of seat belts in case of injuries from restraint.
!DO NOT have your child in swaddled clothes when
using this booster in baby or toddler mode, be-
cause this may prevent your child from beingprop-
erly and securely fastened by the shoulderhar-
nesses and the harnesses between thighs.
!To avoid suffocation, remove plastic bag and
packaging materials before using this product. The
plastic bag and packaging materials should then
be kept away from babies and children.
!DO NOT carry this booster with a child in it.
!DO NOT use any load bearing contact points other
than those described in the instructions and
marked on the booster.
!DO NOT face your booster toward the rear of the
vehicle.
Emergency
In case of emergency, please cut the seat belt and move the
child for away from the scene as soon as possible.
Product Information
Read all the instructions in this manual before using this
product. If in doubt, consult either the child restraint
manufacturer or the retailer.
Weight and Height Limits
To use this Joie booster seat, your child must meet all of the
following requirements.
With back support (approximately 3 to 12 years old) :
Weigh between 15-36 kg, and is between 96 and 150 cm in
height.
Vehicle seat shoulder belt must through the should belt guide
and lay cross child's shoulders. (Fig. 18)
Without back support (approximately 4 to 12 years old) :
Weigh between 15-36 kg, and is between 101 and 150 cm in
height.
Vehicle seat shoulder belt must through the shoulder belt
positioning clip and lay cross child's shoulders. (Fig. 30)
ECE.R44/04
15-36kg
UNIVERSAL
E
11
041509
1. This booster is a ‘Universal’ child
restraint. It is approved to CNS 11497
and UN ECE regulation 44, 04 series of
amendments, for general use in vehicles
and it will fit most, but not all, car seats.
2. A correct fit is likely if the vehicle
manufacturer has declared in the vehicle
handbook that the vehicle is capable of
accepting a ‘Universal’ child restraint for
this age group.

27 28
3. This booster has been classified as ‘Universal’ under
more stringent conditions than those which applied to earlier
designs which do not carry this notice.
4. If in doubt, please consult the child restraint distributor or
call 0800-001-256 / 02-25781188 directly.
Allison Baby UK Ltd,
Venture Point, Towers Business Park,
Rugeley, Staffordshire, WS15 1UZ
www.joiebaby.com
Product Trillo
Model C1118C
Suitable for Child weighing is 15-36kg
(approximately 3-12 years old )
Materials Plastics, metal, fabrics
Mass Group Ⅱ/Ⅲ
Net Weight 4.24kg
Product Size 580mmx400mmx685mm
Date Please see detailed date on label (year / month / day)
Patent No. Patents pending
Made in China
Distributor Chickabiddy Co., Ltd
Address 5th FL, 186, Nanking E. Rd, Sec. 4, Taipei, Taiwan
10595
Tel. 0800-001-256 / 02-25781188
Website www.chick.com.tw
Parts List
Fig. 1.1 Head Support
Fig. 1.2 Lower Back Support
Fig. 1.3 Base
Fig. 1.4 Armrest
Fig. 1.5 Adjustment Button
Fig. 1.6 Shoulder Harness
Anchor
Concerns on Installation
!DO NOT install this booster on vehicle seats with Lap Belts
(Fig. 2)(Fig. 5.1)
!This booster is suitable for vehicle seats with a 3-point
Retractor Safety Belt (Fig. 3). If you vehicle has ISOFIX
Anchorage System, we strongly recommend that you
connect the latch Connector to the ISOFIX Anchorage
System together. (Fig. 4)
!DO NOT install this booster on vehicle seats that face
sideways or rearward with respect to the moving direction of
the vehicle. (Fig. 5.1)
!Please refer to vehicle owner’s manual for recommended or
suggested installation position.
!This booster must be installed in the rear vehicle seat.
(Fig. 5.2)
!DO NOT install this booster on movable vehicle seats during
installation.
Please make sure there are no missing parts. Please contact
the retailer if anything is missing.
Fig. 1.7 Shoulder Belt
Positioning Clip
Fig. 1.8 Side Impact Shield
Fig. 1.9 Head Support
Adjustment Lever
Fig. 1.10 Should Belt Guide
Fig. 1.11 Latch Connector

29 30
Booster Assembly
Assemble Head Support
1. Booster taken from the carton as Fig.6
2. Flip head support and lower back support over as shown.
(Fig.7)
!Squeeze adjustment lever (Fig.7.1) and slide two pieces
together until they snap into place. (Fig.7.2)
!CHECK to make sure two pieces are securely snapped
together by pulling on them.
3. Flip seat over and insert the fabric from the head support
underneath the fabric on the lower back support as shown.
(Fig.8)
!To make insertion of fabric easier, slide the upper and
lower back pieces apart by squeezing the red adjustment
button.
Assemble Lower Back Support
1. When attaching backrest to base, please press backrest
down strongly.“U”-shaped hooks on bottom of backrest will
interlock with bars on base. (Fig.9)
!Make sure that no part of the seat covering interferes
when attaching backrest to the base.
2. Once backrest is securely attached to the base, push
backrest forward as shown. (Fig.10)
!Please first hold the base with one hand, and then push
the backrest forward.
Assemble Side Impact Shield
1. Align the side impact shield with the slot of lower back
support plastics mounts, and then insert to lock. (Fig.11)
2. Press side impact shield locking button (Fig.12),a click
sound means the side impact shield is close completely.
(Fig.13)
!You always must to use side impact shield for child’s safty
concern.
!Side impact shield assembled should be upon the back
support cover.
The completely assembled booster is shown as Fig.14
Height Adjustment
for Head Support
1. Please adjust the head support to proper height according
to the child's height.
2. Squeeze the head support adjustment lever, meanwhile pull
up or push down the head support until it snaps into one of
the 7 positions. The head support positions are shown as
Fig. 15
!Before adjusting the head support height have you child
lean forward slightly.

31 32
Installation with 3-point-belt
With back support
1. The back of the booster seat MUST fit tight against the
vehicle seat back as shown. (Fig. 16)
!The front of booster seat MUST NOT hang over front of
vehicle seat.
!DO NOT use a booster seat in reclined position. (Fig. 17)
2. Open the route of the vehicle safety belt through the belt
path (Fig. 18), and lock it into the buckle. (Fig. 18.3)
!Position shoulder belt through the shoulder belt guide
shown in Fig. 18.1
!DO NOT position vehicle belt over top of the armrests. It
must pass underneath the armrests. (Fig. 18.2)
!The booster can not be used if the vehicle safety belt with
female buckle is too long to tie the booster. (Fig. 18.4)
!The importance of ensuring that any lap strap is worn low
down, so that the pelvis is firmly engaged, shall be
stressed.
The vehicle safety belt assembled as Fig. 18
!To ensure the correct head support height is obtained,
the bottom of headrest must be level with the highest
point of children shoulder or higher it slightly as shown in
Fig. 19
!At the back seat of vehicle, a booster used for forward-
facing must use the vehicle safety belt correctly.
!Have your child sit in a booster seat with their back flat
against back of a booster seat.
!NOT as shown in Fig. 20. Fasten buckle and pull up on
the shoulder belt to tighten.
!If the belt lays across child neck, head or face, readjust
head support height. (Fig.21)
!Belt must not be twisted.
If vehicle is equipped with ISOFIX, the vehicle lower anchor
points may be visible at the vehicle seat crease. See your
vehicle owner’s manual for exact locations, anchor
identification, and requirements for use .
1. Place the booster in forward-facing position on a forward-
facing vehicle seat with anchors, attach thelatch which
removed from soft goods rings to vehicle anchors. (Fig.22)
!NEVER put two latch connectors on one vehicle ISOFIX
anchor unless specifically allowed by the vehicle
manufacturer.
2. Secure the booster firmly by pushing it downward with knee
or hand while pulling the adjustment belt. (Fig.23)
3. For ease of unhooking, extend the adjustment belt to its
maximum length while pressing the adjustment button.
(Fig.24)

33 34
Without back support
1. Adjust backrest to flat position, then one hand to detach
backrest as Fig.25 to use base assembly independently.
!Please take good care of back support and head support.
2. Check whether the shoulder belt lay across child’s shoulder
in red zone (Fig.26).
!Must use shoulder belt positioning clip when use base
independently.
3. Insert the end of shoulder belt positioning Clip webbing
into the hole on the base. (Fig.27)
!Please check the direction of shoulder harness anchor as
Fig.28 to avoid hurting child back if shoulder harness
anchor is in the opposite direction.
!Pull the shoulder belt positioning clip webbing slightly to
make sure the webbing fixed on the base.
4. Make the webbing and clip wind round bar, then tension
webbing. (Fig.28)(Fig.29)
!Slide shoulder harness anchor to adjust webbing length.
5. Slide the shoulder belt positioning clip to make sure the
clip close to child shoulder, (Fig.30.1) buckle the vehicle
safety belt. (Fig.30.3)
!Through vehicle safety belt out from bottom of armrest.
(Fig.30.2)
!The booster can not be used if the vehicle safety belt with
female buckle is too long to tie the base. (Fig.30.4)
6. Rear view of child sitting in seat. (Fig.31)
!The shoulder belt positioning clip must through the
vertical bar of the base farthest from where the vehicle
shoulder belt lays across the child. (Fig.31)
!The importance of ensuring that any lap strap is worn low
down, so that the pelvis is firmly engaged, shall be
stressed.
!Please store shoulder belt positioning clip on the bottom
of base when don't use it.
If vehicle is equipped with ISOFIX, the vehicle lower anchor
points may be visible at the vehicle seat crease.
See your vehicle owner’s manual for exact locations, anchor
identification, and requirements for use.
Please refer to the description of Fig.22 ~ Fig.24 to attach
base.
Detach Soft Goods
Open 2 pairs of buttons and 6 pairs of elastics on the back
of soft goods to remove it. (Fig.32)
!Pull down to remove button as Fig.32.1
To refit the seat pad simply reverse the steps above.

35
Care and Maintenance
!Please wash the soft goods and inner padding with cold
water under 30°C.
!Do not iron the soft goods.
!Do not bleach or dry clean the soft goods.
!Do not use undiluted neutral detergent, gasoline or other
organic solvent to wash the booster. It may cause damage
to the booster.
!Do not twist the soft goods and inner padding to dry with
great force. It may leave the soft goods and inner padding
with wrinkles.
!Please hang dry the soft goods and inner padding in the
shade.
!Please remove the booster from the vehicle seat if not in
use for a long period of time. Put the booster in a cool, dry
place and somewhere your child cannot access it.
Note
Table of contents
Other Joie Car Seat manuals

Joie
Joie gemm I0911DA User manual

Joie
Joie trillo shield User manual

Joie
Joie i-Spin Safe User manual

Joie
Joie i-Venture User manual

Joie
Joie Trillo C1220GA User manual

Joie
Joie spin 360 signature User manual

Joie
Joie every stage User manual

Joie
Joie i-Spin 360 E User manual

Joie
Joie Stages User manual

Joie
Joie i-Quest signature User manual

Joie
Joie i-Traver User manual

Joie
Joie Curve C 0925 User manual

Joie
Joie gemm User manual

Joie
Joie signature i-Spin XL User manual

Joie
Joie juva User manual

Joie
Joie juva User manual

Joie
Joie trillo User manual

Joie
Joie i-Jemini User guide

Joie
Joie fortifi R129 User manual

Joie
Joie signature i-Plenti User manual