Joie Trillo C1220GA User manual

Trillo
IMPORTANT: KEEP THIS INSTRUCTION BOOKLET IN
THE PLACE PROVIDED ON THE CHILD RESTRAINT
booster seat
MODEL C1220GA
Instruction Manual

2
Welcome to Joie™
Congratulations on becoming part of the Joie family! We are so excited
to be part of your journey with your little one. While traveling with the
Joie TrilloTM booster seat you are using a high quality, fully certified
product.
Please carefully read this manual and follow each step to ensure a com-
fortable ride and best protection for your child.
Please keep this Instruction Booklet in the storage area under the seat
for future reference.
DO NOT USE THIS CHILD RESTRAINT UNTIL YOU HAVE
READ AND UNDERSTOOD THE INSTRUCTIONS IN THIS
USER GUIDE AND IN YOUR VEHICLE OWNERS MANUAL
Visit us at joiebaby.com to download manuals, and see
more exciting Joie products.
Contents
Quick Reference .................................................................... 3
WARNINGS ........................................................................... 4
Features .......................................................................... 5 & 6
IMPORTANT INFORMATION ................................................ 7
Shoulder Height Labels ......................................................... 8
Installation - seating location ................................................ 9
Installation - correct seat belt .............................................. 10
Airbags ................................................................................. 10
Installation - select a stable position ................................... 11
Installation - reclining backrest ........................................... 12
Use - headrest adjustment .................................................. 13
Use - correct vehicle belt placement .................................. 14
Use - vehicle belt checklist .................................................. 15
Cover - removing and refitting ............................................. 16
After this booster seat ......................................................... 17
TETHER STRAP WARNINGS .............................................. 18
Tether Strap - Use ....................................................... 19 & 20
Tether Strap Anchorage - Installation ......................... 21 & 22
Care, Maintainance and Storage .......................................... 23
Accessories and Spare Parts .............................................. 24

4
WARNINGS
3
• DO NOT LEAVE CHILDREN UNATTENDED IN THE CAR
• Use the restraint exactly as shown in the Instructions.
• Supervision of children is needed because they may be
able to undo buckles.
• DO NOT USE WITH JUST A LAP BELT. You must use with
a lap-sash seat belt.
• Do not alter or modify this restraint.
• This child restraint is not approved for use with any con-
nectors that connect to the car’s ISOFIX low anchorages
• The lap part of the seatbelt must be rmly across the thighs
and the sash strap tted diagonally across the chest and
shoulder.
• Do not allow the restraint to come into contact with pol-
ishes, oils, bleach and other chemicals.
• Destroy the restraint if it has been in a severe crash, even if
no damage is visible.
• Repairs must only be done by the manufacturer or agent.
• DO NOT USE THIS RESTRAINT WITHOUT THE COVER.
THIS RESTRAINT MUST BE USED IN CARS WITH
FORWARD-FACING SEATS WITH A LAP-SASH SEAT-
BELT. THIS BOOSTER SEAT IS NOT SUITABLE FOR
USE WITH A CHILD HARNESS.
NOTE: The warnings on this page are those required by the
Australian and New Zealand Standard AS/NZS 1754 for this type
of child restraint. Other warnings specic to this particular child
restraint will be found throughout these instructions.
Quick Reference
Suitable for children from approximately 4 years of age
to approximately 8 years.
See page 8 for more detailed information
IMPORTANT: Also read the detailed instructions that follow this quick reference
DO NOT use with a
Lap only seatbelt.
page 10
Always use the
Tether Strap.
page 19
Always t the sash
belt through the
headrest guide.
page 14 & 15
Both Lap and Sash belt
pass under the armrest.
page 14 & 15
Lap belt passes over the child’s
upper thighs, not across the
stomach.
page 14 & 15
Booster Seat must
sit rmly back
against the vehicle
seat. page 12
Sash belt
must make
good contact
with the child’s
chest.
pages 14 & 15
Vehicle Belt must always
be securely latched.
page 14
No heavy or sharp objects in
the cupholders.
Headrest adjusted to
suit the child’s height.
pages 13 & 15

56
Features
Features
Height Adjustable
Headrest
Vehicle Sash
Belt Guide
Armrest
Cupholder Cupholder
Lower Vehicle
Belt Path
Lower Vehicle
Belt Path
Tether
Strap
Tether Anchorage
Headrest Adjuster
Storage Bag
for Tether End
Lower Shoulder
Height Label
Upper Shoulder
Height Label
Lower Vehicle
Belt Path
Vehicle Sash
Belt Guide
Armrest

8
7
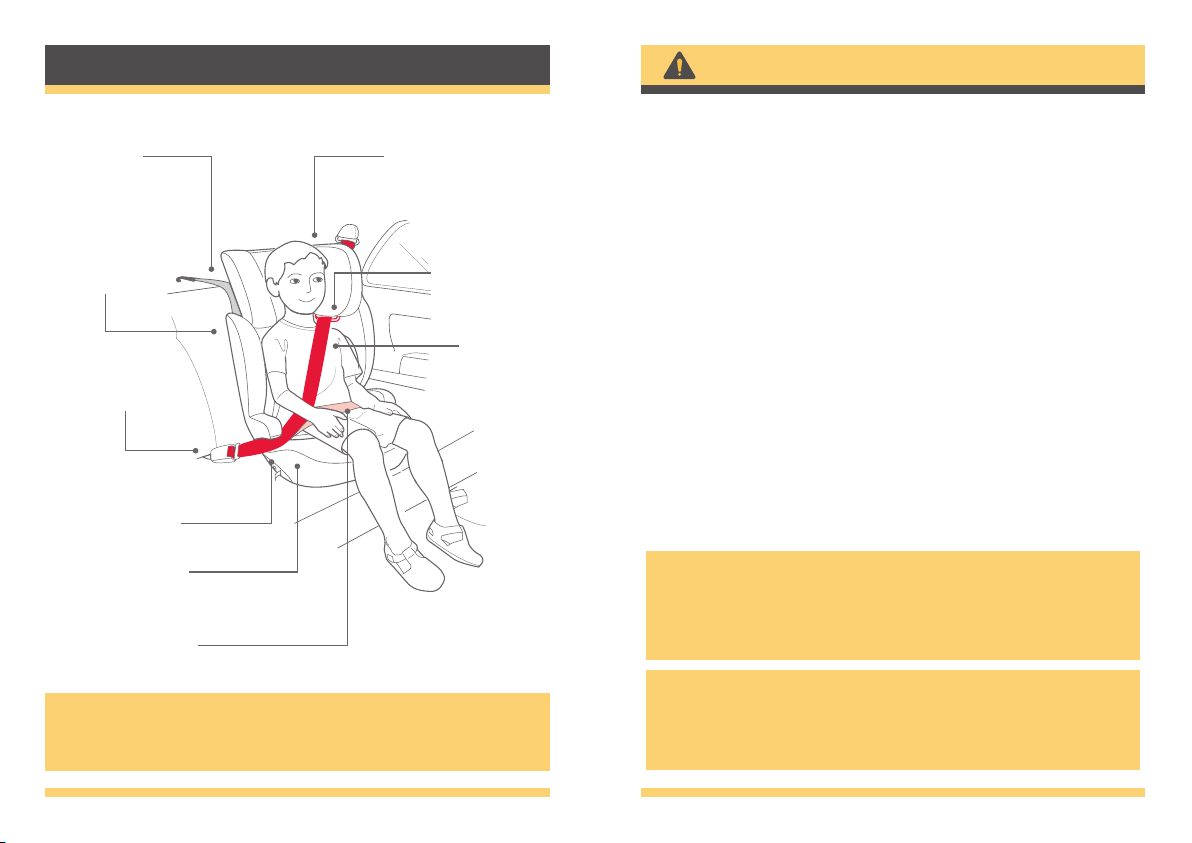
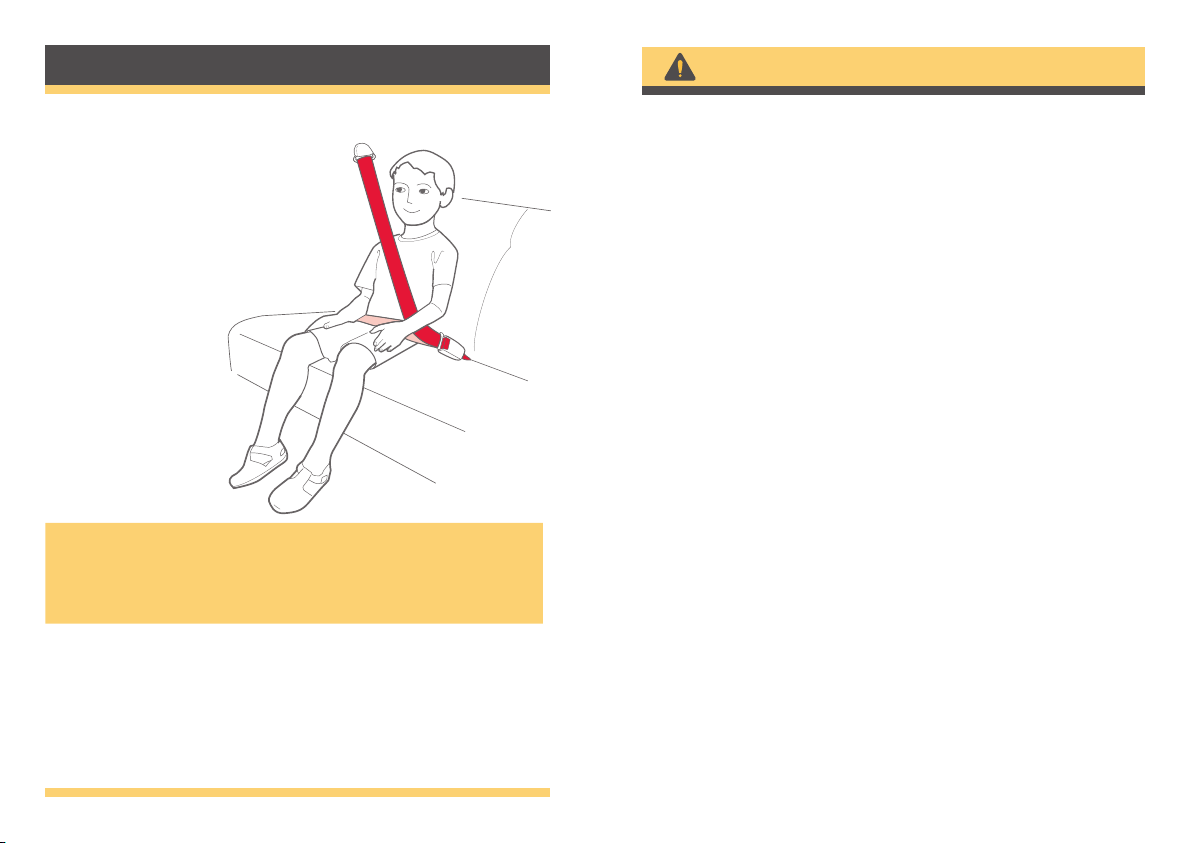
This Child Restraint is: To be used with a lap-sash seatbelt
by a child whose shoulders are above the lower shoulder
height marker with head restraint in the lowest position (ap-
proximately 4 years of age) until the child’s shoulders reach
the upper shoulder height marker with the head restraint
in highest position (approximately 6 to 8 years of age). See
facing page.
• Continue to use this booster seat until the child reaches this
limit. Children are safest in a booster seat until their shoulders
reach the upper shoulder height marker of the booster seat.
• Do not use this restraint until child’s shoulders are above
the lower shoulder height marker with the head restraint in the
lowest position.
• If the knees do not bend in front of the vehicle seat cushion
continue to use a booster seat.
• Ensure that children have adequate ventilation and shade
when in the vehicle.
• Seat Belt extenders are not recommended. If the vehicle
seat belt is not long enough to secure the restraint seek advice
from a child restraint tter.
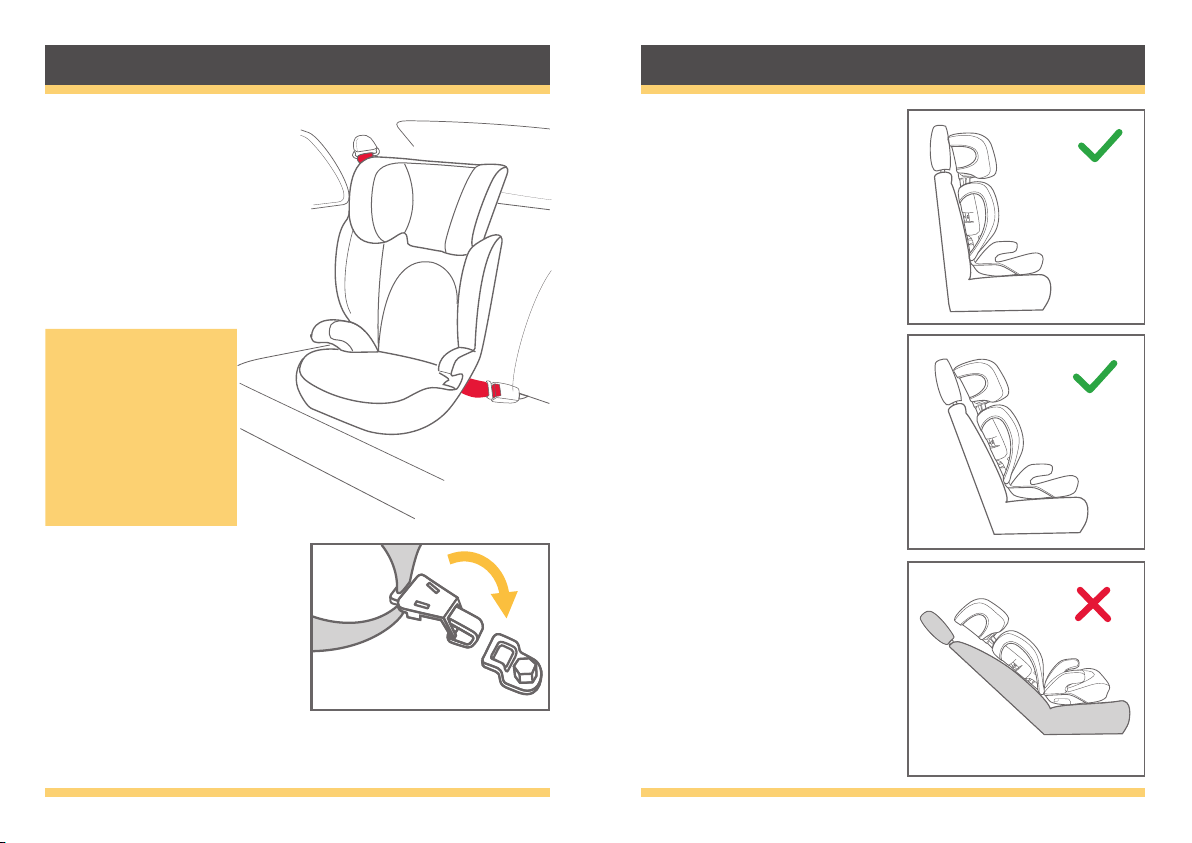
• An unsecured booster seat can be thrown around and may
injure occupants in a sharp turn, sudden stop or crash.
Remove it or make sure that it is securely belted in the vehicle.
• Read carefully the whole of the instructions for the instal-
lation, and in the event of doubt about the method of instal-
lation, consult the child restraint manufacturer or agent, or a
child restraint tting station authorized by the relevant trans-
port authority, or in New Zealand, consult the agent for the
vehicle.
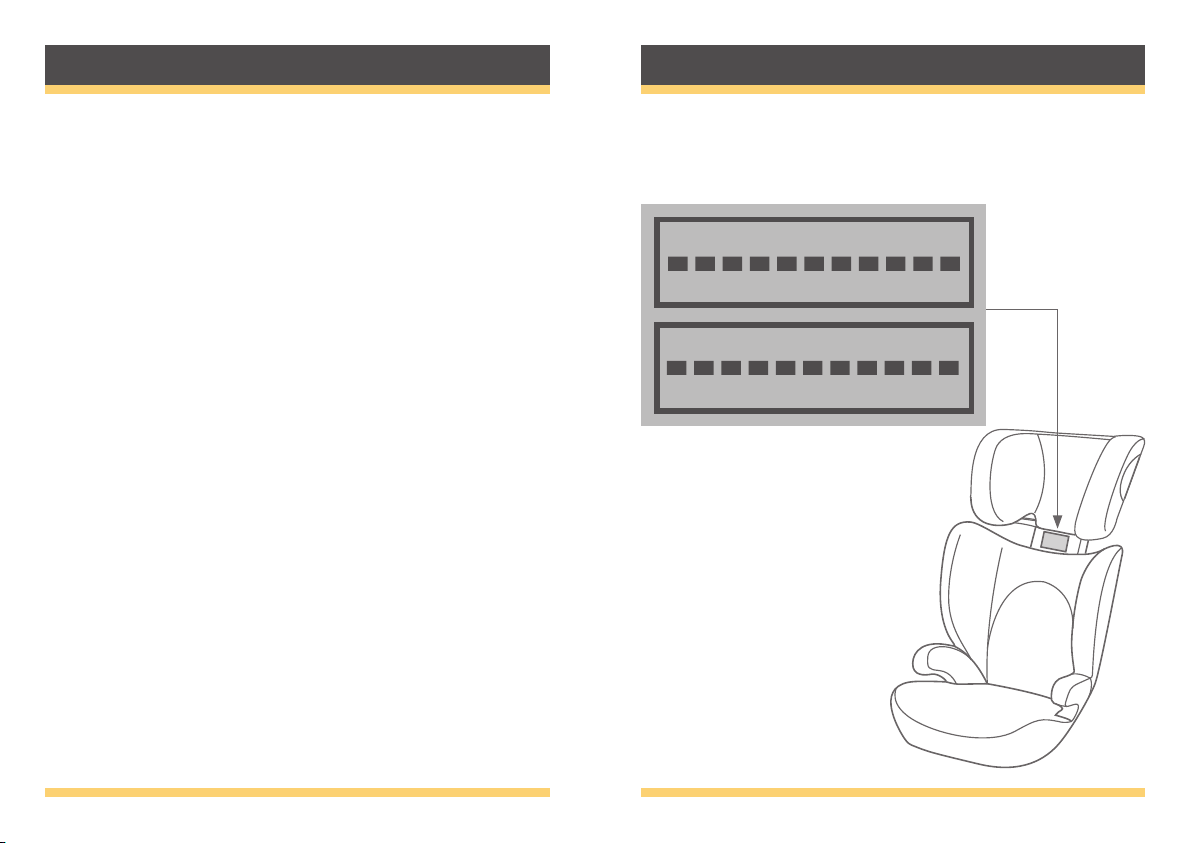
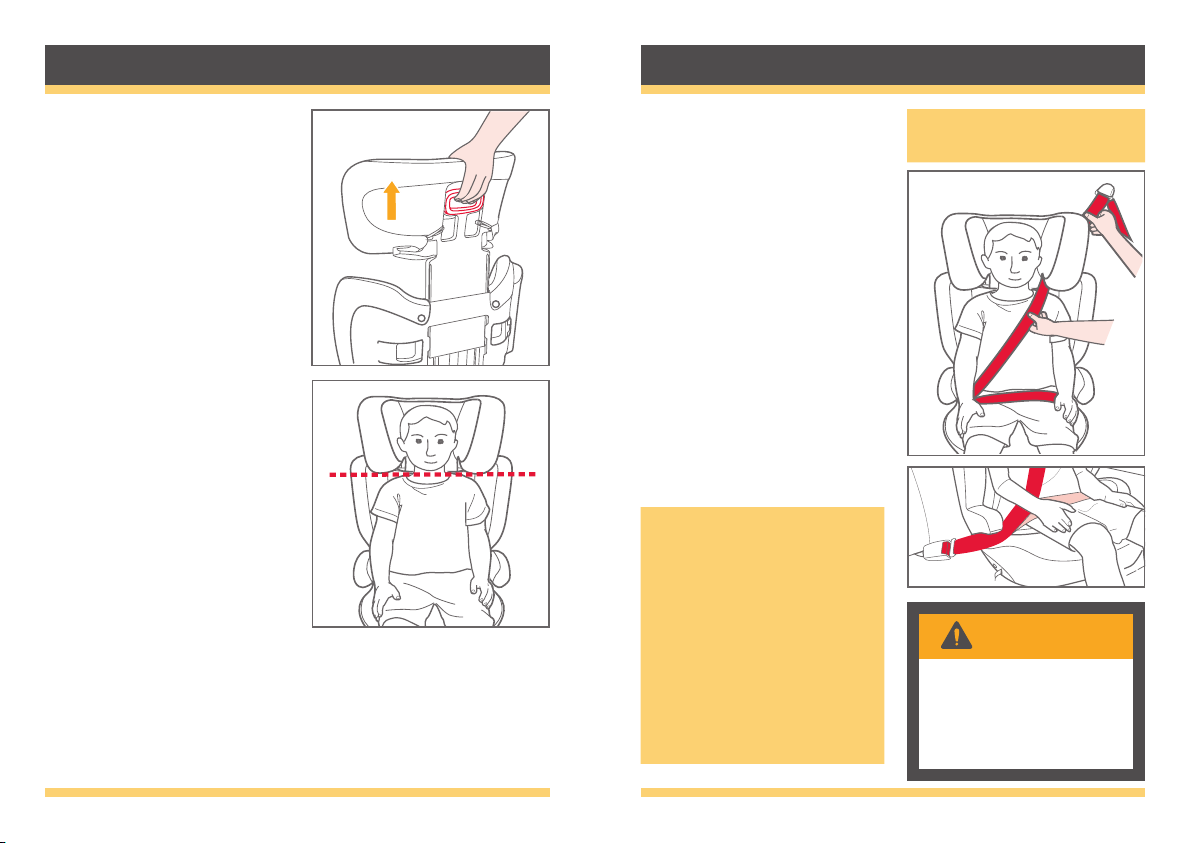
IMPORTANT INFORMATION Shoulder height Labels
Shoulder Height Labels: this booster seat is rated as suitable
for children from approximately 4 years to 8 years, the exact
sizing is determined by the shoulder height labels.
When a child is sitting on the
booster seat with their back
rmly up against backrest,
the top of their shoulders
must be between the dotted
lines on the lower and upper
shoulder height labels.
Adjust the headrest height if
necessary to reposition the
lines.
If their shoulders are above
or below these lines do not
use the booster seat.
SHOULDERS BELOW THIS LINE WHEN
SHOULDERS ABOVE THIS LINE WHEN
HEADREST AT HIGHEST POSITION
HEADREST AT LOWEST POSITION

910
Installation - correct seat belt
Use only the vehicle’s lap and
shoulder belt when restraining
a child in this booster seat.
DO NOT use a lap belt only.
The center rear seating
position can be used ONLY
if there is a lap and shoulder
belt seat belt in that seating
position.
DO NOT use the center rear
position if there is a lap belt
only.
Front Seat Airbags - if using
the front seating position
and the vehicle is tted with
a front airbag in this position
move the front seat back as
far as possible.
Side or Seatbelt Airbags
- if your vehicle has side or
seatbelt airbags consult the
Vehicle Owners Handbook
for information regarding suit-
able child restraint installation
positions. if in doubt refer to
a licenced child restraint fitter
for advice.
Installation -airbags
Installation - seating location
The safest position for this
booster seat is in the centre
rear of the back seat provided
it is fitted with a lap/sash seat
belt and a tether anchorage.
DO NOT use the front seating
position unless there is no
rear seat and there is a tether
strap mounting position avail-
able behind the front seat.
NOTE: In some vehicles
(mostly utes or pickups), the
tether strap mounting position
is behind the vehicle seat
backrest and is so close to
the back of the booster seat
that the tether cannot be
tensioned. In this case refer to
a licenced child restraint fitter
for advice.
CHILD RESTRAINT INSTALLATION LAW (AUSTRALIA)
For Booster Seats: A passenger who is 4 years old or
older, but is less than 7 years old, must not be in the front
row of a motor vehicle that has 2 or more rows of seats
unless all of the other seats in the row or rows behind the
front row are occupied by passengers who are also under
7 years old.

11 12
Installation - select a stable position
If the Booster Seat is stable
connect the Tether Strap (see
pages 19 and 20).
Before using the Booster Seat
check the suitability of the
seating position.
Place the Booster Seat on the
vehicle seat. Push it rmly into
place. Check that it is stable
and if not try another position
in the vehicle.
Installation - reclining backrest
Vehicle seats have different
shapes and some have a
greater backrest angle than
others.
The backrest of the Trillo can
be pushed back to better fit a
more reclined vehicle seat.
Always have the backrest a
close fit to the back of the
vehicle seat backrest.
DO NOT try to recline the
backrest more than shown in
the middle picture above.
NOTE: in some
vehicles the
recommended centre
rear position is raised
and the booster will
not sit securely on it.
In this case use an
outboard position.

13 14
Use - correct vehicle belt placement
Place child on seat. Check
headrest height and adjust if
necesssary. See page 13.
Pass sashbelt through the
guide under the headrest.
Connect the vehicle belt.
Check that it is securely
engaged.
Ensure the belt is not putting
pressure on the child's neck
and can slide freely through
the guide. Ensure the sash
belt has good contact against
the child's chest.
WARNING
A SASH BELT UNDER
THE ARM OR BEHIND
THE BACK
IS DANGEROUS
Use - headrest adjustment
Headrest Adjustment
Squeeze headrest release
lever until locking mechanism
disengages, raise or lower
headrest as required.
Release lever.
Headrest should be just above
the shoulders.
NOTE: the belts must pass
under the armrests and
across the child's upper
thighs.
The lap belt must not be
in contact with the child's
stomach. In the event of a
crash or sudden stop a lap
belt moving into a child's
stomach can cause serious
injury.
ALWAYS USE THE
SASH GUIDE

15 16
Cover - removing and refitting
Headrest Cover
Release elastic straps at back
of headrest and pull the cover
firmly forward starting at the
top.
Backrest Cover
Release the two sliding fixings
at the top back and two
elastics from the bottom and
pull cover forward.
Note: the top fastenings slide
out of engagement. They are
not press studs.
Seat Pad
Release two elastics at the
back and pull the cover
forward.
To replace reverse the
procedure above.
VERY IMPORTANT: Only replace the cover with a
manufacturer's supplied replacement cover with
identical shoulder height markers or a replace-
ment cover meeting AS/NZS 8005.
Use - vehicle belt checklist
CORRECT VEHICLE BELT PATH
The cover has labels marking the correct ve-
hicle belt path.
Belts must
pass under
the armrests
Sash belts must
pass through the
red guide in the
headrest
Engage vehicle
buckle securely
DO NOT LEAVE
CHILDREN UNATTENDED
IN THE CAR
WARNING
BOOSTER
SEATBELT PATH
BOOSTER SASH
BELT PATH
ALWAYS USE THIS
SASH GUIDE

18
17
THIS RESTRAINT MUST BE ATTACHED TO A CHILD RE-
STRAINT UPPER ANCHORAGE POINT IN THE CAR.
REFER TO CAR OWNERS HANDBOOK FOR LOCATION OF
ANCHORAGE POINTS.
REFER TO A CHILD RESTRAINT FITTING STATION IF NO
ANCHORAGE POINTS ARE IN THE MOTOR CAR.
Always secure the loose end of the top tether strap to
prevent it hanging out of the car or being accessible by the
child. It should be stored in the bag attached to the back of
the cover.
THIS RESTRAINT IS NOT SUITABLE FOR USE WHERE THE
TOP TETHER STRAP MAY FALL INTO A SPLIT IN THE SEAT
BACK OR OFF THE SIDE OF THE SEAT.
ALWAYS ATTACH HOOK AND REMOVE SLACK.
In some vehicles without a xed parcel shelf an
extension tether strap may be required. These are
available in several different lengths and can be
obtained from child restraint retail outlets.
CAUTION: CHILDREN CAN BE INJURED OR RESTRAINTS
AND TOP TETHER STRAP DAMAGED BY UNSECURED
CARGO IN A COLLISION.
SECURE OR REMOVE HAZARDOUS CARGO BEFORE US-
ING THIS CHILD RESTRAINT.
TETHER STRAP WARNINGS
After this Booster Seat
After your child has out-
grown this booster seat they
will be big enough to sit on a
vehicle seat without a child
restraint.
IMPORTANT: if when sitting on the vehicle seat, the
child’s lower legs are not able to bend at the knees they
should remain in the booster seat

19 20
Tether Strap - use Tether Strap - use
centre-line of seating position
Always connect the snap
hook securely to the anchor-
age fitting.
Adjust the tether as shown.
The anchor fitting must be
aligned as shown unless
stated otherwise in the ve-
hicle owners handbook.
If drilling a new hole, select a
position on the centre line of
the seating position, and no
closer than 100 mm from the
front edge of the parcel shelf.
This booster seat has a tether strap permanently attached to
the backrest. This is an essential part of the booster seat’s
safety systems and must always be used.
Storage Bag for
unused webbing
Tether
Strap
Tether Anchorage
IMPORTANT
Even when the booster seat is not occupied ensure the
tether strap is connected so that in the event of a sudden
stop or accident the booster seat will not move about
and possibly cause injury.
Pull to increase tension
100 mm
minmum

21 22
Tether Strap Installation Tether Strap Installation
If the car is fitted with a
child restraint anchorage
point:
Locate the anchorage point
behind the rear seating
position (consult the vehicle
owners handbook for loca-
tion of the anchorage point).
Remove the thread plug from
the parcel shelf/oor/roof and
install the attachment bolt as
shown opposite.
CAUTION:
DO NOT OVERTIGHTEN THE
ATTACHMENT BOLT.
MAXIMUM TORQUE 20Nm.
Attachment
Bolt
Lock
Washer
Spacers
(if required)
Anchor
Fitting
Vehicle
Metal
Structure
Vehicle
Trim
FRONT OF VEHICLE
FRONT OF VEHICLE
Attachment
Bolt
Spacers
(if required)
Anchor
Fitting
Vehicle
Metal
Structure
Vehicle Trim
Lock Washer
Nut
Reinforcing
Washer
WARNING
CHILD RESTRAINTS MUST NOT BE ATTACHED TO UN-
SOUND METAL OR WOOD OR SYNTHETIC STRUCTURES.
WHEN DRILLING THE 9 MM HOLE DO NOT DRILL THROUGH
FUEL LINES, FUEL TANKS, ELECTRICAL WIRING, OR RADIO
SPEAKERS. WEBBING STRAPS MUST BE PROTECTED
FROM SHARP CORNERS AND EDGES.
THE ANCHOR FITTING MUST BE USED ONLY AS DESCRIBED
ABOVE. IT MUST NOT BE HOOKED ONTO ANY OTHER OBJECT.
If the car is not fitted with
a child restraint anchor-
age point:
For sedans only - drill a 9
mm hole in the parcel shelf
on the centre line of the
seating position as shown
on page 20.
Install the anchor bolt as
shown opposite.
For vehicles other than se-
dans - In Australia, consult
your nearest child restraint
tting station or trafc
authority for vehicle inspec-
tion to nd the best, correct
position for the placement
of the anchorage point,
and for the correct attach-
ment bolt length and use of
spacers.
In New Zealand, consult the
agent for the vehicle.

23 24
Care, Maintenance and Storage Accessories and Spare Parts
Spares
If spare parts are required
contact the retail outlet from
where the restraint was
purchased or contact the
Australian distributor for
the location of your nearest
repair agent.
Repairs must only be done
by an approved repair agent.
Seat Cover
Wash with warm water (under
30°C) and mild detergent.
Do not iron.
Do not bleach or dry clean.
Do not twist the soft goods
to dry with great force. It may
leave the seat cover with
wrinkles.
Hang dry the seat cover in the
shade.
Plastic and Metal Parts
Use only mild detergent,
water and a soft cloth to clean
the car seat shell, handle and
harness straps. Air dry.
Do not use undiluted
detergent, or other solvents
to clean - these may cause
damage.
Accessories
DO NOT add accessories,
toys, padding or other items
to the child restraint unless
provided by Joie.
Aftermarket accessories (i.e.
items not provided in the box
with the child restraint), may
not have been tested for use
with this child restraint and if
used, may lower the level of
protection offered possibly
leading to injury or death.
Any aftermarket accessory
used should be compliant
with AS/NZS 8005 (Accesso-
ries for child restraints for use
in motor vehicles) and stated
as suitable for use with this
child restraint.
Top Tether Straps
Either spot clean or replace.
DO NOT IMMERSE THE
TETHER STRAP IN WATER.
Storage
Remove the booster seat from
the vehicle seat if not in use
for a long period of time.
Store the booster seat in a
cool, dry place where your
child cannot access it.


Australia’s Power Brands Pty Ltd
ACN 081952561
82 Bellingara Road, Miranda, NSW 2228
P.O. Box 2145, Taren Point, NSW 2229,
Australia.
Phone: (02) 8543 5570 Fax: (02) 8543 5571
P-IM0248B
Table of contents
Other Joie Car Seat manuals

Joie
Joie Stages User manual

Joie
Joie Signature i-Spin Grow User manual

Joie
Joie transcend User manual

Joie
Joie every stage R129 User manual

Joie
Joie i-Spin Safe R User manual

Joie
Joie elevate R129 User manual

Joie
Joie i-Gemm2 User manual

Joie
Joie gemm User manual

Joie
Joie elevate User manual

Joie
Joie fortifi R129 User manual

Joie
Joie I1404C User manual

Joie
Joie i-Traver User manual

Joie
Joie Steadi R129 User manual

Joie
Joie steadi User manual

Joie
Joie signature i-Spin XL User manual

Joie
Joie i-Quest signature User manual

Joie
Joie spin 360 signature User manual

Joie
Joie Tilt Locking Clip User manual

Joie
Joie i-Spin 360 E User manual

Joie
Joie Tilt User manual