JOYTECH DET-306b User manual

Owner's Manual
Infrared Forehead Thermometer
Model DET-306b
Contents Introduction
1 2
Please read all instructions carefully and thoroughly
before using this product.
The DET-306b infrared forehead thermometer is specifically designed
for safe use on the forehead. The Infrared Forehead Thermometer is
a device capable of measuring people's body temperature by
detecting the intensity of infrared light emitted from the forehead.
It converts the measured heat into a temperature reading displayed
on the LCD. The infrared forehead thermometer is intended for the
intermittent measurement of human body temperature from the skin
surface of forehead by people of all ages. When properly used, it will
quickly assess your temperature in an accurate manner.
forehead thermometer.
2. Do not touch the temperature probe with hands.
3. Use of this Forehead thermometer is not intended as a
substitute for consultation with your physician.
4.
some parts are small enough to be swallowed.
5. Never immerse this device in water or other liquids(not
waterproof).
6. Do not modify this equipment without authorization of
manufacturer.
7. Do not expose the thermometer to temperature extremes
(below -25℃/-13℉ or over 55℃/131℉) nor excessive
humidity (>95%RH).
8. Keep the battery away from children.
1. There is no gender or age limitation for using infrared
Do not allow children to take their temperatures unsupervised,
9.Remove battery from the device when not in operation for
a long time.
Warning:
Introduction ......................................................02
Product Description
LCD Display Introduction
Basic Functions
Forehead Thermometer Advantages
Real Time Clock Setting ................................. . 07
Temperature Taking Hints
Memory Mode
Care And Cleaning
Battery Replacement
Specifications
Troubleshooting
Calibration
Service
Warranty
Electromagnetic Compatibility Information
..
............................................... 03
....................................... 04
................................................... 05
......................... 06
..
...................................09
Illustration For Use ..............................................11
........................................................16
Selecting A Temperature Scale ...............................17
...............................................18
............................................19
.....................................................20
...................................................21
.............................................................23
...............................................................24
...............................................................25
...............28
FCC Information .....................................................26
Document No.: JDET-0604-021
Article No.: 001
Version:
Date of Issue: 2020-
Z
09

Vital Organs
Product Description
1. Probe
2. START Button
3. Button
4. / Button
5. Battery Cover
Forehead Thermometer Advantages
Infrared Forehead Thermometer measures core body temperature,
which is the temperature of a body's vital organs. (See Figure 1)
This thermometer is designed to measure the temperature of the
skin surface over the temporal artery, a major artery of the head.
The temporal artery is connected to the heart via the carotid artery,
directly leading from the aorta, the main trunk of the arterial system.
It offers constant blood flow. Therefore, body temperature changes
are reflected sooner in the forehead than they are in other parts of
the body such as oral, rectal and underarm.
3
6
Figure 1
1
2
35
4
Real Time Clock
Forehead Mode
Object Mode
The object mode shows the actual, unadjusted surface
temperatures, which is different from the body temperature. It can
help you to monitor if the object temperature is suitable for the baby
or patient, for example the baby's milk.
→ Please see the section to learn how to
measure the object temperature.
Illustration For Use
The real time clock will be recorded with the memory function and
help you to recognize each measurement result.
→ Please see the Real time clock setting section to learn how to
setup the time in the first use.
The thermometer has been designed for practical use. It's not
meant to replace a visit to the doctor. Please also remember to
compare the measurement result to your regular body temperature.
→ Please see the section to learn how to
measure the body temperature.
Illustration For Use
Memory Mode
There are each 10 sets memories for forehead and object
measurements. Each memory also records the measurement
date/time/mode icon.
Please see the Selecting A Temperature Scale section to learn
how to change between Celsius and Fahrenheit.
Basic Functions
LCD Display Introduction
4
5
/ Switch℃ ℉
AM and PM
Low voltage sign
Forehead mode
Temperature Indicator
Unit sign: ℃ or ℉
Temperature result
Time and Date sign in Time mode
Memory mode
Object mode
Beep Alarm
If thermometer detects a body temperature ≥ 37.8℃ 100.0)
under forehead mode, there will be a long beep sound followed by
three short beep sound to warn the user.
( ℉
Distance Detection If the object is too far away from the probe, the temperature will not
be measured until the probe is moved within the measured range.

78
Set the time format
①
Set the hour
②
Set the minute
③
Set the year
④
Set the month
.
⑤
Set the date
⑥
910
When using thermometer for the first time, please set the parameters
of the thermometer. With the thermometer off, press and hold
BUTTON to enter into setting mode for 3 seconds.
The device can display the time
in either an AM/PM (12-hour) or
a 24:00(24-hour) format. Press
and release START BUTTON to
select the format. With the preferred
time format on the display, press
BUTTON, the Hour figure is
flashing automatically.
Press and release the START BUTTON to advance
one hour until the correct hour appears.
After the hour is set, press BUTTON, the Minute
figure is flashing automatically.
Press and release the START BUTTON to advance
one minute until the correct minute appears.
After the minute is set, press BUTTON, the Year
figure is flashing automatically.
Press and release the START BUTTON to advance
one year until the correct year appears.
After the year is set, press BUTTON, the Month
figure will appear.
Press and release the START BUTTON to advance
one month until the correct month appears.
After the month is set, press BUTTON, the Date
figure is flashing automatically.
Press and release the START BUTTON to advance
one day until the correct month appears.
After the day is set, press BUTTON to exit the
setting mode.
Real Time Clock Setting Real Time Clock Setting
To ensure that the reading always reflects the body temperature
accurately, you need to take account of the following factors which
may affect an accurate reading.
1. It is important to know each individual's normal temperature
when they are well. This is the only way to accurately diagnose
a fever. To determine normal temperature, take multiple readings
when healthy. Re-measure with a standard digital thermometer
for confirmation.
2. Users
3.
. Oils or cosmetics on the forehead may give a lower temperature
reading than the actual one.
must be inside for 30 minutes before taking a measurement.
Note: Users and the thermometer should be in the same ambient
temperature for at least 10 minutes before taking a reading.
Users should not drink, eat, or be physically active such as
bathing, showering, shampooing and hair drying before/while
taking the measurement. Remove hat and hair and wait 10 minutes
before taking a reading.
4
Remove dirt from the forehead before
taking a measurement. Wait at least 10 minutes after washing the
forehead area before taking a reading.
Temperature Taking Hints Temperature Taking Hints
5. Holding a hand on the forehead for any length of time will affect
the temperature reading.
6. Do not take temperature over scar tissue, open sores or abrasions.
7. Do not use the thermometer on a perspiring or sweating forehead,
as this may affect the reading.
8. Don't take a measurement while or immediately after nursing a
baby.
9. Do not take temperatures with this thermometer near places that
are very hot, such as fireplaces and stoves.
10. The probe window of the thermometer is the most delicate part
of the device. Do not touch the probe window. The accuracy of
the reading may be affected if the probe window is damaged or
dirty.
11. If the thermometer is stored in a significantly different
environment than testing location, place it in the testing location
for approximately 30 minutes prior to use.
12. It is not intended for use in the oxygen rich environment and
presence of flammable anesthetic mixture with air, oxygen or
nitrous oxide.

Illustration For Use Illustration For Use
7
Illustration For Use
13
12
11
To measure object temperature:
1.
the object temperature after hearing two beep sounds.(see figure 5)
2. Aim the thermometer at the center of the object you want to
measure with a distance
e temperature on the
display.
4. Press the BUTTON to turn off.
Press the BUTTON to turn on the thermometer, you can take
less than 5cm.
3. Press the START BUTTON and then read th
Figure 5
How to change the forehead mode and object mode:
You can press / BUTTON to switch the mode between
Forehead mode and Object mode.
After measurement:
1. Power off: Device will automatically shut off if left idle for
more than 1 minute to extend battery life.
2. Clean the probe after each use to ensure an accurate reading and
avoid cross contamination.
(See the section of Care and Cleaning for details.)
BackLight:
In Forehead mode:
1. The display will be lighted GREEN for 3 seconds with a happy
face when the unit is ready for measurement and a measurement
is completed with a reading less than 37.3 (99.1 ).
2. The display will be lighted YELLOW for 3 seconds with a happy
face when a measurement is completed with a reading less than
37.8℃(100.0 ).
3. The display will be lighted RED for 3 seconds with a bad face
when a measurement is completed with a reading equal to or higher
than 37.8℃(100.0 ).
In Object mode:
The display will only be lighted GREEN for 3 seconds when the
unit is ready for measurement and a measurement is completed.
℃℉
℉
℉
1. Press the BUTTON, The display is activated to show all
segments.
3. Read the temperature on the display.
4. Press the BUTTON to turn off.
After self-checking Figure 2 appears on the display
screen with beeps, so you can start a new measurement.
2. Aim the thermometer at the center of the forehead with a distance
less than 5cm (See figure 3) and then press the START BUTTON.
Note1: Do not remove the thermometer from the forehead before
hearing the final beep. A waiting period of 1 seconds between
testing is recommended to ensure complete accuracy.
Note2:If the object to be tested is too far from the probe, a
prompt will appear(See figure 4).
To measure forehead temperature:
Figure 3Figure 2 Figure 4
14
Bluetooth requirements
The thermometer requires a bluetooth device with:
. Bluetooth 4.0 or later
. Android 6.0 or later
. IOS 8.0 or later
And works with:
. iphone , iPod, iPad
. Android Phones and Tablets
Using for the first time
1. Download the "JoyHeath" App from Website or APP Store (Such
as Apple Store).
2.Open the App on your phone or tablet. If requested, you should
enable Bluetooth on your device. You can enable Bluetooth under
the Settings menu on your smart phone or tablet.
3. Create a new user login, or login with your existing user name and
password.
4. Selection device “Thermometer”.
Illustration For Use

17 18
Selecting A Temperature Scale
1. Temperature readings are available in the Celsius (℃) or
Fahrenheit (℉) scale.
2. With the thermometer off, press and hold the START BUTTON
for 3 seconds
3. Press and release START BUTTON to select the unit.
4. When the preferred unit on the display, press BUTTON t
to enter into unit changing mode.
o
exit the unit changing mode.
Figure 8
Care And Cleaning
1. The probe window must be kept clean, dry, and undamaged at all
times to ensure accurate readings. The accuracy of temperature
readings can be affected by damage to the probe window, or the
presence of dirt, fingerprints, earwax, dust and other soiling
compounds on the probe window. Degraded sensors can degrade
performance or cause other problems.
2. The probe window is the most delicate part of the thermometer.
Use a soft cloth slightly moistened with a 75% isopropyl alcohol
solution to disinfect probe window and the thermometer. Do not
use abrasive cleaners. After cleaning, allow at least 10 minutes
drying time before taking temperatures.
Note: Do not use any chemical other than isopropyl alcohol to
clean the probe window.
3. Use a soft, dry cloth to clean the thermometer display and
exterior.
4.
5. Store the thermometer in a dry location, free from dust and
contamination and away from direct sunlight.
6. Strong electromagnetic fields may interfere with the proper
operation of the thermometer. The device needs special
pre-cautions regarding EMC according to the EMC information.
Do not put the thermometer into water directly.
7. Put the thermometer back to the original packaging after using.
15
Match your with a Smart Device
1. If this is your first time using it, bind first.Open "SETTING
menu,choose“Bind and unbind device" and select the
appropriate model.
The date and time on your thermometer will automatically be
updated when it's connected with your phone.
2. Confirm that your thermometer is connected successfully.
When your thermometer is connected successfully to your smart
phone, the “ ” symbol stop flashing and keep showing.
Transfer your readings
1. As soon as your measurement is finished, open the app on
your smart phone to transfer the reedings.
Note: On the matched smart phone, Bluetooth must be enabled.
2. You can view your temperature readings in the app.
thermometer
"
Illustration For Use
16
Memory Mode
Figure 7
Figure 6
3.
The user can press the START BUTTON to take new
measurements.
In the memory mode, mark or mark will not change.
1. The Memory Mode can be accessed ether in forehead mode or
object mode:
When the thermometer has been turned on and followed by
Figure 2/4 or finished testing, press and hold the BUTTON
for three seconds. The letter M will appear in the center right
corner of the display. (See Figure 6)
2. The thermometer will automatically memorize the last 30
temperature readings.
Each time the BUTTON
is pressed, the screen displays past readings that correspond
with a number 1-30. The number 1 reflects the most recent
reading, while the number 30 reveals the oldest reading stored
in memory.(See Figure 7)
Each memory also records the
measurement date/time/mode icon.

Troubleshooting Troubleshooting
In Forehead mode:
Temperature taken is
higher than 43.0 ℃
(109.4℉).
In Object mode:
Temperature taken is
higher than 100 ℃
(212℉).
Problem Problem
Solution Solution
The thermometer could
not work due to low
battery.
Replace two new
alkaline batteries
size AAA.
Error message Error message
22
In Forehead mode:
Temperature taken is
lower than 34.0 ℃
(93.2℉).
In Object mode:
Temperature taken is
lower than 0℃
(32℉).
21
The thermometer is not
functioning properly.
Unload the battery,
wait for 1 minute and
repower it. If the
message reappears,
contact the retailer
for service.
The ambient temperature
is not within the range
between 10℃ and 40℃
(50℉~104℉).
Place the
in a room for at least 30
minutes at room
temperature between
10℃ and 40℃
(50℉~104℉)
thermometer
Read Temperature Taking
Hints Thoroughly, then
take a new temperature
measurement.
Read Temperature
Taking Hints thoroughly ,
then make sure the lens
filter are clean, then take
a new temperature
measurement.
19 20
Battery Replacement
1. Replace battery when " appears in the upper right corner "
of LCD display. (See Figure 9)
2. Slide battery cover down as shown in Figure 10.
3. Remove battery and install 2 new AAA alkaline batteries
as shown . in Figure 11
4. Slide battery cover back on.
Figure 9
Figure 10
Figure 11
Specifications
Forehead mode: 34.0℃~43.0℃(93.2℉~109.4℉)
Object mode: 0℃~100℃(32℉~212℉)
Forehead mode:
±0.2℃ (0.4℉) during 35.5℃~42.0℃ (95.9℉~107.6℉)
at 15℃~35℃ (59.0℉~95.0℉) operating temperature range
±0.3℃ (0.5℉) for other measuring and operating
temperature range
Object mode: ±4% or ±2℃(4℉) whichever is greater
10℃~40℃(50℉~104℉), 15%~85%RH, non-condensing
700hPa ~ 1060hPaAtmospheric Pressure :
153*41*44mm
Approx.84grams(with batteries)
DC3V(2×AAA battery)
Measuring range
Laboratory accuracy
Display resolution 0.1℃ or 0.1℉
Measure time Approximately 1 second
Operating temperature
range:
Storage and transport
temperature range
-25℃~ 55℃ (-13℉~131℉), 15%~95%RH, non-condensing
700hPa ~ 1060hPaAtmospheric Pressure :
Clinical accuracy
Dimension
Weight
Battery
Battery life Approx. 1 year/6000 readings
Measuring site Forehead(Forehead Mode)
Oral (This thermometer converts the forehead temperature
to display its “oral equivalent.”)
Reference body site
Operation mode Forehead mode(Adjust mode)
Ingress protecting rating
IP22
Shock withstands drop of 3 feet
Expected service life Three years
Clinical bias: -0.09℃(-0.16℉)
Clinical repeatability: 0.13℃(0.23℉)
Limits of agreement: 0.87℃(1.57℉)

Warranty
25
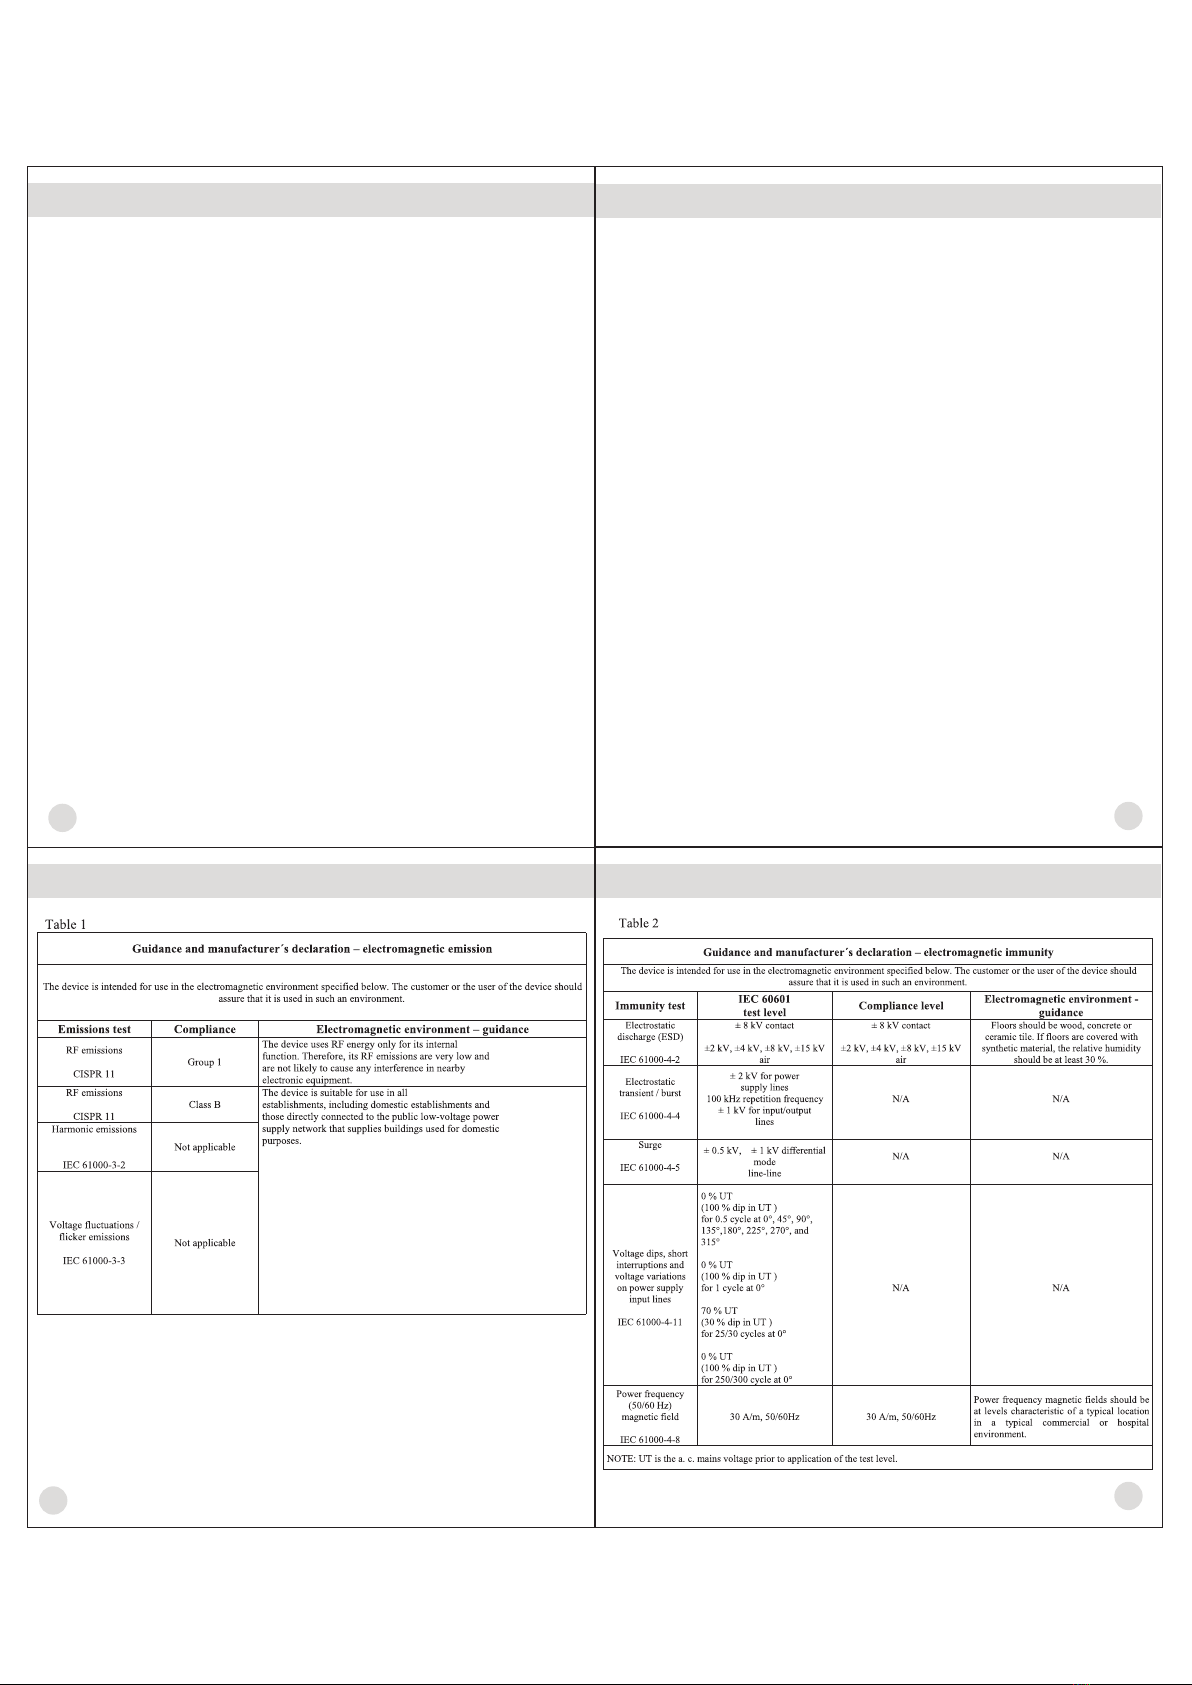
This appliance conforms to the following standards:
ISO 80601-2-56 Medical electrical equipment —Part 2-56:
Particular requirements for basic safety and essential performance
of clinical thermometers for body temperature measurement,
IEC 60601-1-11 Medical electrical equipment —Part 1-11: General
requirements for basic safety and essential performance –Collateral
Standard: Requirements for medical electrical equipment and
medical electrical systems used in the home healthcare environment
and complies with the requirements of IEC 60601-1-2(EMC) ,
IEC 60601-1(Safety) standards. And the manufacturer is ISO 13485
certified.
Thermometer is warranted by manufacture to be free from defects in
material and workmanship under normal use and service for a period
of one year from the date of delivery to the first user who purchases
the instrument. This warranty does not cover batteries, damage to the
probe window, or damage to the instrument caused by misuse,
negligence or accident, and extends to only to the first purchaser of
the product.
26
23 24
Service
The thermometer has a limited one year warranty. Do not attempt
to disassemble or repair the thermometer by yourself. Should
service be required during or after the warranty period you must
contact the manufacturer. Repackage the thermometer carefully in
its original packaging or securely pack to avoid damage during
shipping. Include the original sales slip indicating the date of
purchase, a note describing the problem, and your return address.
Send the thermometer prepaid and insured.
The lay operator or lay responsible organization should contact the
manufacturer or the manufacturer's representative:
– for assistance, if needed, in setting up, using or maintaining the
thermometer; or
– to report unexpected operation or events.
Calibration
The thermometer is initially calibrated at the time of manufacture.
If the thermometer is used according to the use instruction, periodic
readjustment is not required. However, We recommends checking
calibration every two years or whenever clinical accuracy of the
thermometer is in question. Please send the complete device to the
dealers or manufacturer.
The above recommendations do not supersede the legal requirements.
The user must always comply with legal requirements for the control
of the measurement, functionality, and accuracy of the device which
are required by the scope of relevant laws, directives or ordinances
where the device is used.
A clinical summary and procedures for checking calibration are
available upon request.(Turn on the thermometer and press the power
button long time until entering into calibrate mode, software version
will be displayed.)
Direct Current
Disposal of this product and used batteries should be carried out in accordance
with the national regulations for the disposal of electronic products
Type B F applied part
Consult Accompanying Documents
LOT Batch Code
Storage and Transportation Temperature Limit:
-13℉~131℉(-25℃~55℃)
-2 5℃
55℃
The product is in compliance with the requirements of
MDD 93/42/EEC, "0197" is the identification number
of notify body;
0197
European Authorized Representative:
Shanghai International Holding Corp. GmbH (Europe)
Eiffestrasse 80, 20537 Hamburg, Germany
EC REP
Telephone: +86-571-81957767
Fax: +86-571-81957750
Manufacturer:
JOYTECH HEALTHCARE CO. LTD.
Area C,Building 2,No.365,Wuzhou Road,Yuhang Economic
Development Zone,Hangzhou City,311100 Zhejiang,China
Caution: Changes or modifications to this unit not expressly
approved by the party responsible for compliance could void the
user authority to operate the equipment.
*Note:
This equipment has been tested and found to comply with the limits
for a Class B digital device, pursuant to Part 15 of the FCC Rules.
These limits are designed to provide reasonable protection against
harmful interference in a residential installation. This equipment
generates, uses, and can radiate radio frequency energy. If this
equipment does cause harmful interference to radio or television
reception, which can be determined by turning the equipment off
and on, the user is encouraged to try and correct the interference by
one or more of the following measures:
- Reorient or relocate the receiving antenna.
- Increase the distance between the equipment and the receiver.
- Connect the equipment to an outlet on a circuit different from that
to which the receiver is connected.
- Consult the dealer or an experienced radio/TV technician for help.
FCC Information

29 30
Electromagnetic Compatibility Information Electromagnetic Compatibility Information
27 28
The device satisfies the EMC requirements of the international
standard IEC 60601-1-2.The requirements are satisfied under the
conditions described in the table below.The device is an electrical
medical product and is subject to special precautionary measures
with regard to EMC which must be published in the instructions
for use.Portable and mobile HF communications equipment can
affect the device.Use of the unit in conjunction with non-approved
accessories can affect the device negatively and alter the
electromagnetic compatibility.The device should not be used
directly adjacent to or between other electrical equipment.
Electromagnetic Compatibility Information
This device complies with part 15 of the FCC Rules. Operation is
subject to the following two conditions:
(1) This device may not cause harmful interference, and
(2) this device must accept any interference received, including
interference that may cause undesired operation.
The device has been evaluated to meet general RF exposure
requirement. The device can be used in portable exposure
condition without restriction.
FCC Information

34
33
Electromagnetic Compatibility Information
32
Electromagnetic Compatibility Information
31
Electromagnetic Compatibility InformationElectromagnetic Compatibility Information
NOTE 1At 80 MHz and 800 MHz, the higher frequency range applies.NOTE 2
These guidelines may not apply in all situations. Electromagnetic propagation is
affected by absorption and reflection from structures, objects and people.
a The ISM(industrial, scientific and medical) bands between 0,15 MHz and 80 MHz
are 6,765 MHzto6,795 MHz;13,553 MHz to 13,567 MHZ;26,957 MHz to 27,283
MHz; and 40,66 MHz to 40,70 MHz. The amateur radio bands between 0,15 MHz
and 80 MHz are 1,8 MHz to 2,0 MHz,3,5 MHz to 4,0 MHz,5,3 MHz to 5,4 MHz,7
MHz to 7,3 MHz,10,1 MHz to 10,15 MHz,14 MHz to 14,2 MHz,18,07 MHz to 18,17
MHz,21,0MHz to 21,4MHz,24,89 MHz to 24,99 MHz,28,0 MHz to 29,7 MHz and
50,0 MHz to 54,0 MHZ.
b The compliance levels in the ISM frequency bands between 150 kHz and 80 MHz
and in the frequency range 80 MHz to 2,7 GHz are intended to decrease the
likelihood that mobile/portable communications equipment could cause
interference if it is inadvertently brought into patient areas. For this reason, an
additional factor of 10/3 has been incorporated into the formulae used in
calculating the recommended separation distance for transmitters in these
frequency ranges.
c Field strengths from fixed transmitters, such as base stations for radio(cellular/
cordless) telephones and land mobile radios, amateur radio, AM and FM radio
broadcast and TV broadcast cannot be predicted theoretically with accuracy. To
assess the electromagnetic environment due to fixed RF transmitters, an
electromagnetic site survey should be considered. If the measured field strength in
the location in which the device is used exceeds the applicable RF compliance level
above, the device should be observed to verify normal operation. If abnormal
performance is observed, additional measures may be necessary, such as
re-orienting or relocating the device.
d Over the frequency range 150 kHz to 80 MHz, field strengths should be less than
3 V/m.
Table 3 continued

35
Electromagnetic Compatibility Information
WARNINGS!
· This device should not be used in the vicinity or on the top of other
electronic equipment such as cell phone, transceiver or radio
control products. If you have to do so, the device should be
observed to verify normal operation.
· The use of accessories and power cord other than those specified,
with the exception of cables sold by the manufacturer of the
equipment or system as replacement parts for internal components,
may result in increased emissions or decreased immunity of the
equipment or system.
Table of contents
Other JOYTECH Thermometer manuals

JOYTECH
JOYTECH HNK-ECT-1 User manual

JOYTECH
JOYTECH DET-1215b User manual

JOYTECH
JOYTECH DMT-4751 User manual

JOYTECH
JOYTECH DET-1013b User manual

JOYTECH
JOYTECH DET-3015b User manual

JOYTECH
JOYTECH DET-3011b User manual

JOYTECH
JOYTECH DET-3024b User manual

JOYTECH
JOYTECH DMT-101 User manual

JOYTECH
JOYTECH DMT-4735b User manual

JOYTECH
JOYTECH DET-3023b User manual