JOYTECH Owlhealth DET-1015 User manual

Infrared Ear Thermometer
User
Manual
DET-1015
Document No.: JDET-1504-008
Article No.: 003
Version: B
Date of Issue: 2023.02
JOYTECH Healthcare Co., Ltd.
No.365, Wuzhou Road, Yuhang Economic
Development Zone, Hangzhou city, 311100
Zhejiang P.R. China
European Authorized Representative:
Shanghai International Holding Corp.
GmbH (Europe) Eiffestrasse 80, 20537
Hamburg, Germany
The product is in compliance with the
requirements of MDD 93/42/EEC, "0197" is
the identification number of notify body;
SUNGO Certification Company Limited
3rd floor, 70 Gracechurch Street, London.
EC3V 0HR
Made in China
0197
UKRP

1
EN
DE
FR
IT
ES
English
Deutsch
Francais
ltaliano
Español
------------------------------------------------- 02
------------------------------------------------- 10
------------------------------------------------- 14
------------------------------------------------- 18
------------------------------------------------- 22

32
Introduction and Intended Use
The DET-1015 thermometer is specifically designed for safe use in the
eardrum. The Infrared Ear Thermometer is a device capable of measuring
people's body temperature by detecting the intensity of infrared light
emitted from the ear canal of human. It converts the measured heat into
a temperature reading displayed on the LCD. When properly used, it will
quickly assess your temperature in an accurate manner.
This appliance conforms to the following standards: EN 12470-5 Clinical
thermometers —Part 5:Performance of infrared ear thermometers(with
maximum device), ISO 80601-2-56 Medical electrical equipment —Part
2-56: Particular requirements for basic safety and essential performance
of clinical thermometers for body temperature measurement, IEC 60601-
1-11 Medical electrical equipment —Part 1-11: General requirements for basic
safety and essential performance –Collateral Standard: Requirements for
medical electrical equipment and medical electrical systems used in the
home healthcare environment and complies with the requirements of IEC
60601-1-2(EMC) , IEC 60601-1(Safety) standards. And the manufacturer is
ISO 13485 certified.
DET-1015
Product Information
Product Description
1. Probe Cover
2. Probe
3. Test Button
4. " "Button
5. Battery Cover
6. Setting Button
Intended Use
The infrared thermometer is intended for the intermittent measurement of
human body temperature by people of all ages.
Package contents
1 Infrared ear Thermometer
1 Operating Manual
2 Battery (AA)
25 disposable hygienic lens filters
Package contents
1. This thermometer is intended for home use only. It's not meant to
replace a visit to the doctor. Please consult with a doctor if you have
health concerns.
2. There is no gender or age limitation for using infrared ear thermometer.
3. To avoid inaccurate readings, always attach a new, clean probe cover
for each temperature reading.
4. Do not expose the thermometer to temperature extremes (below
-25°C/-13°F or over 55°C/131°F) nor excessive humidity (>95%RH).
5. This thermometer must only be used with this brand of thermometer
probe covers.
6. Keep the battery away from children.
7. Remove battery from the device when not in operation for a long time.
8. Do not put the thermometer in direct sunlight or with cotton wool,
otherwise the accuracy will be affected.
9. Portable and mobile RF communications can affect the device. The
device needs special precaution regarding EMC according to the EMC
information provided in the accompany documents.
10. ME equipment should not be cleaned while in use.
1
2
5
3
4
6
EN

54
Display description
1. The right ear reading may differ from the reading taken in the left ear.
Therefore, always take the temperature in the same ear.
2. The ear must be free from obstructions or excess earwax buildup to take
accurate reading.
3. External factors may influence ear temperatures such as:
- lying on one ear or the other
- their ears covered
- exposed to very hot or very cold temperatures
- recently swimming or bathing
In these cases, remove the individual from the situation and wait 20
minutes prior to taking a temperature.
4. For people wearing hearing aids or ear plugs, remove the device and
wait 20 minutes prior to taking a temperature.
5. When using the thermometer on infants under age 1, pull the ear up
making sure the sensor faces the eardrum. (See Figure 5)
6. When using the thermometer on individuals over the age of 1, pull the
ear back making sure the sensor faces the eardrum. (See Figure 6)
7. Do not touch the probe window. A cotton swab and rubbing alcohol
may be used to clean the sensor window.
8. If the thermometer is stored in a significantly different environment
than testing location, place it in the testing location for approximately 30
minutes prior to use.
9. It is not intended for use in the oxygen rich environment and presence
of flammable anesthetic mixture with air, oxygen or nitrous oxide.
10. The Applied part is the probe. 11.The patient is an intended operator.
Temperature taking tips
Ear Thermometer Advantages
Clinical studies have shown that the ear is an excellent site for
temperature measurement because temperatures taken in the ear
reflect the body,s core temperature. Body temperature is regulated by
the hypothalamus, which shares the same blood supply as the tympanic
membrane. Changes in core body temperature are usually seen sooner
at the tympanic membrane than at other sites, such as the rectum, mouth
or under the arm.
Advantages of taking temperatures at the ear versus other sites:
- Axillary temperature readings only reflect skin temperature which may
not indicate the internal body temperature.
- Rectal temperatures often lag significantly behind internal body
temperature changes, especially at times of rapidly changing
temperatures.
- Oral temperatures are often influenced by eating, drinking, thermometer
placement, breathing through the mouth, or the inability of the person to
close their mouth completely.
Body Temperature
The temperature of a healthy person is affected by various factors: the
person's individual metabolism, their age(body temperature is higher
in babies and toddlers and decreases with age. Greater temperature
fluctuations occur faster and more often in children. e.g.due to growth
spurts), their clothing, the ambient temperature the time ofday(body
temperature is lower in the morning and increases throughout the day
towards evening), the preceding physical and, to a lesser extent, mental
activity.
Itis suggested that users develop the habit of daily measurement. and
use this product to establish a private normal temperature range for
themselves and their families as a reference for measurement.
Infrared Ear Thermometer measures core body temperature, which is
the temperature of a body's vital organs. (See Figure 1) Ear temperatures
accurately reflect core body temperatures since the eardrum is in the
cranial cavity and is not affected by the environment. The eardrum shares
blood supply with the hypothalamus (part of the brain.) Therefore, body
temperature changes are reflected sooner in the ear than they are in
other parts of the body.
Vita l Organ s
EN
Figure 1
Figure 5 Figure 6
Time and date AM and PM
sign in Time mode
Ear temperature mode
Voice sign
Menory mode
Voltage sign
Temperature result
Temperature indictor
Unit sign: °C or °F
Probe cover sign

76
How to use your thermometer
Real Time Clock Setting
When using thermometer for the first time, please set the parameters
of the thermometer. With the thermometer off, press and hold Setting
BUTTON to enter into setting mode.
Set the unit
Press " " Button to select the unit
you want. After the unit is set,press
Setting Button ,the time format
figure will appear.
Set the minute
Press and release the " " Button to advance one
minute until the correct minute appears. After the
minute is set, press Setting Button, the Year figure is
flashing automatically.
Set the year
Press and release the " " Button to advance one
year until the correct year appears.
After the year is set, press Setting Button, the Month
figure will appear.
Set the time format
The device can display the time in
either an AM/PM (12-hour) or a 24:00
(24-hour) format. Press and release
" " button to select the format.
With the preferred time format on
the display, press Setting Button, the
Hour figure is flashing automatically.
Set the hour
Press and release the " " Button to advance one
hour until the correct hour appears. After the hour is
set, press Setting Button, the Minute figure is flashing
automatically.
EN
Set the month
Press and release the " " Button to advance one
month until the correct month appears. After the
month is set, press Setting Button, the Date figure is
flashing automatically.
Set the date
Press and release the " " Button to advance one
day until the correct month appears. After the day is
set, press Setting Button to exit the setting mode.
llustration For Use
To measure ear temperature:
1. 1. DET-1015 must be used with the probe protection cover. If the probe
protection cover is not installed, the display will display CAP (as shown in
Figure). To reduce the risk of cross-contamination, it is recommended to
use a new and clean probe cover for each measurement.
2. When the probe protective cover symbol only displays the symbol,
it means that you are preparing to use the probe protective cover for
measurement (as shown in Figure 2). When the display symbol is flashing
from left to right, it means that you are not using the probe protective
cover for measurement (such as Figure 3)
3. Insert the probe along the ear canal as deep as possible into the ear
as depicted in Figure 3. Then press the Test BUTTON once to start the
measurement. A long beep will sound approximately 1 second after the
Test BUTTON is activated. This signals the end of the process as results are
displayed on the LCD screen.
Figure 1
Figure 2 Figure 3

98
EN
X
Figure 4
After measurement:
1. Power off:
- Device will automatically shut off if left idle for more than 1 minute to
extend battery life.
- Press " " Button to turn it off .
2. Clean the probe after each use to ensure an accurate reading and
avoid cross contamination.
(See the section of Care and Cleaning for details.)
BackLight:
In Ear mode:
1. The display will be lighted GREEN for 3 seconds with a happy face
" " when the unit is ready for measurement and a measurement is
completed with a reading less than 37.3°C(99.1°F).
2. The display will be lighted YELLOW for 3 seconds with a happy face " "
when a measurement is completed with a reading less than 37.8°C(100.0°F).
3. The display will be lighted RED for 3 seconds with a bad face " " when
a measurement is completed with a reading equal to or higher than
37.8°C(100.0°F).
4. The thermometer is ready for testing again once an ear mark
displays on the LCD. A waiting period of 20 seconds between testing is
recommended to avoid excessive cooling of the skin.
5. The thermometer will shut off automatically after 60 seconds of
inactivity. To prolong battery life, press“ ”Button to turn the unit off.
Figure 5 Figure 6
Memory Mode
1. The Memory Mode can be accessed in ear mode:
When the thermometer has been turned on and followed by Figure 2
or finished testing, press and hold the " " Button for three seconds. The
letter MEM will appear at the bottom of the display. (See Figure 5)
2. The thermometer will automatically memorize the last 30 temperature
readings. Each memory also records the measurement date/time/
mode icon. Each time the " " Button is pressed, the screen displays
past readings that correspond with a number 1-30. The number 1 reflects
the most recent reading, while the number 30 reveals the oldest reading
stored in memory.(See Figure 6)
3. In the memory mode, " " mark will not change. The user can press
the Test Button to take new measurements.

1110
Einstellung der Echtzeituhr
Wenn Sie das Thermometer zum ersten Mal verwenden, stellen Sie bitte
die Parameter des Thermometers ein. Halten Sie bei ausgeschaltetem
Thermometer die Einstelltaste gedrückt, um in den Einstellmodus zu
gelangen.
Einheit einstellen
Drücken Sie " " Taste zur Auswahl
der gewünschten Einheit. Nachdem
die Einheit eingestellt ist, drücken
Sie die Einstelltaste, das Zeitformat
erscheint.
Stellen Sie das Zeitformat ein
Das Gerät kann die Uhrzeit
entweder im Format AM/PM (12
Stunden) oder im Format 24:00
(24 Stunden) anzeigen. Drücken
und Loslassen " " Taste, um das
Format auszuwählen. Wenn das
bevorzugte Zeitformat auf dem
Display angezeigt wird, drücken Sie
die Einstelltaste, die Stundenzahl
blinkt automatisch.
Stellen Sie die Stunde ein
Drücken und loslassen " " Taste zum Vorrücken
um eine Stunde, bis die richtige Stunde erscheint.
Nachdem die Stunde eingestellt ist, drücken Sie die
Einstelltaste, die Minutenzahl blinkt automatisch.
Minuten einstellen
Drücken und loslassen " " Taste zum Vorrücken
um eine Minute, bis die richtige Minute angezeigt
wird. Nachdem die Minute eingestellt ist, drücken Sie
die Einstelltaste, die Jahreszahl blinkt automatisch.
Stellen Sie das Jahr ein
Drücken und loslassen " " Schaltfläche zum
Vorrücken um ein Jahr, bis das richtige Jahr
erscheint.
Nachdem das Jahr eingestellt ist, drücken Sie die
Einstelltaste, die Zahl für den Monat erscheint.
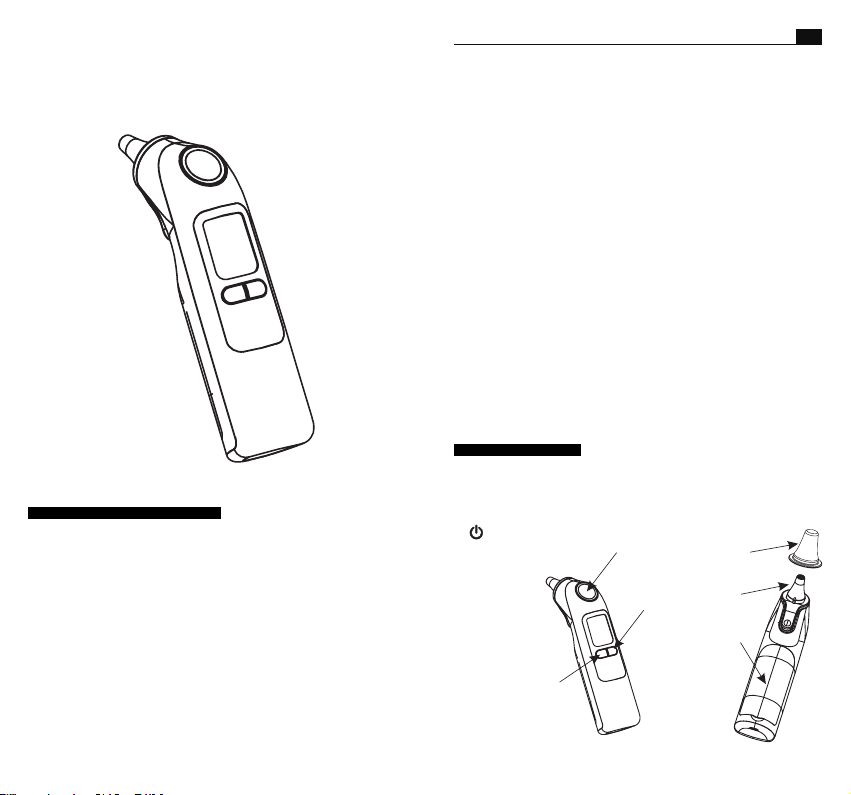
Abbildung zur Verwendung
So messen Sie die Ohrtemperatur:
1. DET-1015 muss mit der Sondenschutzabdeckung verwendet werden.
Wenn die Sondenschutzabdeckung nicht installiert ist, zeigt das Display
CAP an (wie in Abbildung gezeigt). Um das Risiko einer Kreuzkontamination
zu verringern, wird empfohlen, für jede Messung eine neue und saubere
Sondenabdeckung zu verwenden.
2. Wenn das Symbol für die Sondenschutzhülle nur das Symbol anzeigt,
bedeutet dies, dass Sie sich darauf vorbereiten, die Sondenschutzhülle
für die Messung zu verwenden (wie in Abbildung 2 gezeigt). Wenn das
Anzeigesymbol von links nach rechts blinkt, bedeutet dies, dass Sie die
Sondenschutzhülle nicht für die Messung verwenden (wie Abbildung 3).
3. Führen Sie die Sonde entlang des Gehörgangs so tief wie möglich in
das Ohr ein, wie in Abbildung 3 dargestellt. Drücken Sie dann einmal die
TEST-TASTE, um die Messung zu starten. Etwa 1 Sekunde nach Aktivierung
DE
Stellen Sie den Monat ein
Drücken und loslassen " " Schaltfläche zum
Vorrücken um einen Monat, bis der richtige Monat
angezeigt wird. Nachdem der Monat eingestellt ist,
drücken Sie die Einstelltaste, die Datumsziffer blinkt
automatisch.
Stellen Sie das Datum ein
Drücken und loslassen " " Schaltfläche zum
Vorrücken um einen Tag, bis der richtige Monat
angezeigt wird. Nachdem der Tag eingestellt ist,
drücken Sie die Einstelltaste, um den Einstellmodus
zu verlassen.
Figure 1
Figure 2 Figure 3

1312
der Testtaste ertönt ein langer Piepton. Dies signalisiert das Ende des
Prozesses, da die Ergebnisse auf dem LCD-Bildschirm angezeigt werden.
4. Das Thermometer ist wieder bereit zum Testen, sobald eine
Ohrmarkierung auf dem LCD angezeigt wird. Eine Wartezeit von 20
Sekunden zwischen den Tests wird empfohlen, um eine übermäßige
Abkühlung der Haut zu vermeiden.
5. Das Thermometer schaltet sich nach 60 Sekunden Inaktivität
automatisch aus. Um die Batterielebensdauer zu verlängern, drücken
Sie " " Taste zum Ausschalten des Geräts.
X
Figure 4
Nach der Messung:
1. Ausschalten:
- Das Gerät schaltet sich automatisch aus, wenn es länger als 1 Minute
im Leerlauf bleibt, um die Batterielebensdauer zu verlängern.
- Drücken Sie “ ” Taste zum Ausschalten.
2. Reinigen Sie die Sonde nach jedem Gebrauch, um einen genauen
Messwert zu gewährleisten und eine Kreuzkontamination zu vermeiden.
(Einzelheiten finden Sie im Abschnitt Pflege und Reinigung.)
Hintergrundbeleuchtung:
Im Ohrmodus:
1. Das Display leuchtet 3 Sekunden lang GRÜN mit einem fröhlichen
Gesicht“ ” wenn das Gerät messbereit ist und eine Messung mit einem
Messwert von weniger als 37,3°C (99,1°F) abgeschlossen wird.
2. Das Display leuchtet 3 Sekunden lang GELB mit einem fröhlichen Gesicht" "
wenn eine Messung mit einem Messwert von weniger als 37,8 °C (100,0 °F)
abgeschlossen wird.
3. Das Display leuchtet 3 Sekunden lang ROT mit einem schlechten
Gesicht" " wenn eine Messung mit einem Messwert gleich oder höher
als 37,8°C(100,0°F) abgeschlossen wird.
Speichermodus
1. AAuf den Speichermodus kann im Ohrmodus zugegriffen werden:
Wenn das Thermometer eingeschaltet und von Abbildung 2 gefolgt oder
der Test beendet wurde, halten Sie die “ ”-Taste drei Sekunden lang
gedrückt. Unten im Display erscheint der Buchstabe MEM. (Siehe
Abbildung 5)
2. Das Thermometer speichert automatisch die letzten 30
Temperaturmesswerte. Jeder Speicher zeichnet auch das Datum/die
Uhrzeit/das Modussymbol der Messung auf. Jedes Mal die " " Wenn die
Taste gedrückt wird, zeigt der Bildschirm frühere Messwerte an, die einer
Zahl von 1-30 entsprechen. Die Zahl 1 spiegelt die aktuellste wider
Messwert, während die Zahl 30 den ältesten im Speicher gespeicherten
Messwert anzeigt (siehe Abbildung 6).
3. Im Speichermodus " " markieren ändert sich nicht. Der Benutzer kann
die Test-Taste drücken, um neue Messungen vorzunehmen.
DE
Figure 5 Figure 6

1514
Réglage de l'horloge en temps réel
Lorsque vous utilisez le thermomètre pour la première fois, veuillez régler
les paramètres du thermomètre. Avec le thermomètre éteint, appuyez et
maintenez enfoncé le BOUTON de réglage pour entrer dans le mode de
réglage.
Réglage de l'unité
Presse " " Bouton pour
sélectionner l'unité souhaitée. Une
fois l'unité réglée, appuyez sur le
bouton de réglage, le chiffre du
format de l'heure apparaîtra.
Définir le format de l'heure
L'appareil peut afficher l'heure au
format AM/PM (12 heures) ou 24:00
(24 heures). appuie et relache" "
bouton pour sélectionner le format.
Avec le format d'heure préféré sur
l'écran, appuyez sur le bouton de
réglage, le chiffre de l'heure clignote
automatiquement.
Régler l'heure
Appuyez et relâchez le " " Bouton pour avancer
d'une heure jusqu'à ce que l'heure correcte
apparaisse.
Une fois l'heure réglée, appuyez sur le bouton
de réglage, le chiffre des minutes clignote
automatiquement.
Régler les minutes
Appuyez et relâchez le " " Bouton pour avancer
d'une minute jusqu'à ce que la minute correcte
apparaisse.
Une fois les minutes réglées, appuyez sur le
bouton de réglage, le chiffre de l'année clignote
automatiquement.
Régler l'année
Appuyez et relâchez le " " Bouton pour avancer
d'une année jusqu'à ce que l'année correcte
apparaisse.
Une fois l'année réglée, appuyez sur le bouton de
réglage, le chiffre du mois apparaîtra.
FR
llustrations d'utilisation
Pour mesurer la température auriculaire:
1. DET-1015 doit être utilisé avec le couvercle de protection de la sonde.
Si le couvercle de protection de la sonde n'est pas installé, l'écran
affichera CAP (comme indiqué sur la figure). Pour réduire le risque de
contamination croisée, il est recommandé d'utiliser un couvre-sonde neuf
et propre pour chaque mesure.
2. Lorsque le symbole du couvercle de protection de la sonde affiche
uniquement le symbole, cela signifie que vous vous préparez à utiliser le
couvercle de protection de la sonde pour la mesure (comme illustré à la
Figure 2). Lorsque le symbole d'affichage clignote de gauche à droite, cela
signifie que vous n'utilisez pas le couvercle de protection de la sonde pour
la mesure (comme la figure 3)
3. Insérez la sonde le long du conduit auditif aussi profondément que
possible dans l'oreille, comme illustré à la Figure 3. Appuyez ensuite une
fois sur le BOUTON Test pour démarrer la mesure. Un long bip retentira
Régler le mois
Appuyez et relâchez le " " Bouton pour avancer
d'un mois jusqu'à ce que le mois correct apparaisse.
Une fois le mois réglé, appuyez sur le bouton
de réglage, le chiffre de la date clignote
automatiquement.
Régler la date
Appuyez et relâchez le " " Bouton pour avancer
d'un jour jusqu'à ce que le mois correct apparaisse.
Une fois le jour défini, appuyez sur le bouton de
réglage pour quitter le mode de réglage.
Figure 1
Figure 2 Figure 3

1716
environ 1 seconde après l'activation du BOUTON Test. Cela signale la fin du
processus lorsque les résultats sont affichés sur l'écran LCD.
4. Le thermomètre est de nouveau prêt à être testé une fois qu'une
marque d'oreille s'affiche sur l'écran LCD. Une période d'attente de 20
secondes entre les tests est recommandée pour éviter un refroidissement
excessif de la peau.
5. Le thermomètre s'éteindra automatiquement après 60 secondes
d'inactivité. Pour prolonger la durée de vie de la batterie, appuyez sur " "
Bouton pour éteindre l'appareil.
X
Figure 4
Après la mesure:
1. Éteignez:
- L'appareil s'éteindra automatiquement s'il reste inactif pendant plus
d'une minute pour prolonger la durée de vie de la batterie.
- Presse " " Bouton pour l'éteindre.
2. Nettoyez la sonde après chaque utilisation pour assurer une lecture
précise et éviter la contamination croisée.
(Voir la section Entretien et nettoyage pour plus de détails.)
Rétroéclairage:
En mode Oreille:
1. L'écran s'allumera en VERT pendant 3 secondes avec un visage souriant
" " lorsque l'appareil est prêt pour la mesure et qu'une mesure est
terminée avec une lecture inférieure à 37,3 °C (99,1 °F).
2. L'écran s'allume en JAUNE pendant 3 secondes avec un visage souriant
" " lorsqu'une mesure est terminée avec une lecture inférieure à 37,8 °C
(100,0 °F).
3. L'écran sera allumé en ROUGE pendant 3 secondes avec un mauvais
visage " " lorsqu'une mesure est terminée avec une lecture égale ou
supérieure à 37,8°C (100,0°F).
Mode mémoire
1.Le mode mémoire est accessible en mode oreille : Lorsque le
thermomètre a été allumé et suivi de la figure 2 ou du test terminé,
appuyez et maintenez enfoncé le bouton " " pendant trois secondes. La
lettre MEM apparaîtra en bas de l'écran. (Voir Figure 5)
2. Le thermomètre mémorisera automatiquement les 30 dernières lectures
de température. Chaque mémoire enregistre également la date/l'heure/
l'icône du mode de mesure. A chaque fois le " " Le bouton est enfoncé,
l'écran affiche les lectures passées qui correspondent à un nombre 1-30.
Le chiffre 1 reflète le plus récent
lecture, tandis que le nombre 30 révèle la lecture la plus ancienne stockée
en mémoire. (Voir Figure 6)
3. En mode mémoire," " marquer ne changera pas. L'utilisateur peut
appuyer sur le bouton Test pour prendre de nouvelles mesures.
Figure 5 Figure 6
FR

1918
Impostazione dell'orologio in tempo reale
Quando si utilizza il termometro per la prima volta, impostare i parametri
del termometro. Con il termometro spento, tenere premuto il PULSANTE di
impostazione per accedere alla modalità di impostazione.
Impostare l'unità
Premere " " Pulsante per
selezionare l'unità desiderata. Dopo
aver impostato l'unità, premere
il pulsante di impostazione, verrà
visualizzato il formato dell'ora.
Impostare il formato dell'ora
Il dispositivo può visualizzare l'ora
nel formato AM/PM (12 ore) o 24:00
(24 ore). premi e rilascia " "
pulsante per selezionare il formato.
Con il formato dell'ora preferito
sul display, premere il pulsante
di impostazione, la cifra dell'ora
lampeggia automaticamente.
Impostare l'ora
Premere e rilasciare il " " Pulsante per avanzare di
un'ora finché non appare l'ora corretta. Dopo aver
impostato l'ora, premere il pulsante di impostazione,
la cifra dei minuti lampeggia automaticamente.
Impostare i minuti
Premere e rilasciare il " " Pulsante per avanzare
di un minuto finché non viene visualizzato il minuto
corretto. Dopo aver impostato i minuti, premere
il pulsante di impostazione, la cifra dell'anno
lampeggia automaticamente.
Impostare l'anno
Premere e rilasciare il " " Pulsante per avanzare
di un anno finché non viene visualizzato l'anno
corretto.Dopo aver impostato l'anno, premere il
pulsante di impostazione, verrà visualizzata la cifra
del mese.
IT
llustrazione per l'uso
Per misurare la temperatura dell'orecchio:
1. DET-1015 deve essere utilizzato con il coperchio di protezione della
sonda. Se il coperchio di protezione della sonda non è installato, il
display visualizzerà CAP (come mostrato in Figura). Per ridurre il rischio di
contaminazione incrociata, si consiglia di utilizzare un coprisonda nuovo e
pulito per ciascuna misurazione.
2. Quando il simbolo della copertura protettiva della sonda visualizza
solo il simbolo, significa che ci si sta preparando a utilizzare la copertura
protettiva della sonda per la misurazione (come mostrato nella Figura 5).
Quando il simbolo del display lampeggia da sinistra a destra, significa che
non si sta utilizzando il coperchio protettivo della sonda per la misurazione
(come nella Figura 6)
3. Inserire la sonda lungo il condotto uditivo il più profondamente possibile
nell'orecchio come illustrato nella Figura 3. Quindi premere una volta
il PULSANTE Test per avviare la misurazione. Un lungo segnale acustico
Impostare il mese
Premere e rilasciare il " " Pulsante per avanzare
di un mese finché non viene visualizzato il mese
corretto. Dopo aver impostato il mese, premere
il pulsante di impostazione, la cifra della data
lampeggia automaticamente.
Impostare la data
Premere e rilasciare il " " Pulsante per avanzare
di un giorno finché non viene visualizzato il mese
corretto. Dopo aver impostato il giorno, premere il
pulsante di impostazione per uscire dalla modalità
di impostazione.
Figure 1
Figure 2 Figure 3

2120
suonerà circa 1 secondo dopo l'attivazione del PULSANTE Test. Questo
segnala la fine del processo mentre i risultati vengono visualizzati sullo
schermo LCD.
4. Il termometro è nuovamente pronto per il test quando sul display LCD
viene visualizzato un segno auricolare. Si raccomanda un periodo di
attesa di 20 secondi tra i test per evitare un raffreddamento eccessivo
della pelle.
5. Il termometro si spegnerà automaticamente dopo 60 secondi di
inattività. Per prolungare la durata della batteria, premere " " Pulsante
per spegnere l'unità.
X
Figure 4
Retroilluminazione:
In modalità Orecchio:
1. Il display si illuminerà di VERDE per 3 secondi con una faccina felice
" " quando l'unità è pronta per la misurazione e la misurazione è stata
completata con una lettura inferiore a 37,3 °C (99,1 °F).
2. Il display si illuminerà di GIALLO per 3 secondi con una faccina felice
" " quando una misurazione viene completata con una lettura inferiore
a 37,8 °C(100,0 °F).
3. Il display si illuminerà di ROSSO per 3 secondi con una brutta faccia
" " quando una misurazione viene completata con una lettura uguale o
superiore a 37,8 °C (100,0 °F).
Dopo la misurazione:
1. Spegnimento:
- Il dispositivo si spegnerà automaticamente se lasciato inattivo per più
di 1 minuto per prolungare la durata della batteria.
- Premere " " Pulsante per spegnerlo.
2. Pulire la sonda dopo ogni utilizzo per garantire una lettura accurata ed
evitare la contaminazione incrociata.
(Vedere la sezione Cura e pulizia per i dettagli.)
Modalità Memoria
1. È possibile accedere alla modalità memoria in modalità auricolare:
quando il termometro è stato acceso e seguito dalla Figura 2 o dal test
terminato, tenere premuto il pulsante " " per tre secondi. La lettera MEM
apparirà nella parte inferiore del display. (Vedi Figura 5)
2. Il termometro memorizzerà automaticamente le ultime 30 letture
della temperatura. Ogni memoria registra anche l'icona della data/ora/
modalità della misurazione. Ogni volta il " " Premendo il pulsante, lo
schermo visualizza le letture precedenti che corrispondono a un numero
compreso tra 1 e 30. Il numero 1 riflette il più recente
lettura, mentre il numero 30 rivela la lettura più vecchia memorizzata. (Vedi
Figura 6)
3. In modalità memoria, " "segnare non cambierà. L'utente può premere
il pulsante Test per effettuare nuove misurazioni.
Figure 5 Figure 6
IT

2322
Configuración del reloj en tiempo real
Cuando use el termómetro por primera vez, configure los parámetros
del termómetro. Con el termómetro apagado, mantenga presionado el
BOTÓN de configuración para ingresar al modo de configuración.
Configurar la unidad
Prensa " " Botón para seleccionar
la unidad que desee. Después de
configurar la unidad, presione el
botón de configuración, aparecerá
la figura del formato de hora.
Establecer el formato de hora
El dispositivo puede mostrar la hora
en formato AM/PM (12 horas) o
24:00 (24 horas). presione ysuelte
" "botón para seleccionar el
formato. Con el formato de hora
preferido en la pantalla, presione
el botón de configuración, la
cifra de la hora parpadeará
automáticamente.
Establecer la hora
Presione y suelte el " " Botón para avanzar una
hora hasta que aparezca la hora correcta.
Después de configurar la hora, presione el botón
de configuración, la cifra de minutos parpadeará
automáticamente.
Configurar los minutos
Presione y suelte el " " Botón para avanzar un
minuto hasta que aparezca el minuto correcto.
Después de configurar los minutos, presione el
botón de configuración, la cifra del año parpadeará
automáticamente.
Establecer el año
Presione y suelte el " " Botón para avanzar un año
hasta que aparezca el año correcto.
Después de configurar el año, presione el botón de
configuración, aparecerá la cifra del mes.
Ilustración para uso
Para medir la temperatura del oído:
1. DET-1015 debe usarse con la cubierta de protección de la sonda. Si
la cubierta de protección de la sonda no está instalada, la pantalla
mostrará CAP (como se muestra en la figura). Para reducir el riesgo de
contaminación cruzada, se recomienda utilizar una cubierta de sonda
nueva y limpia para cada medición.
2. Cuando el símbolo de la cubierta protectora de la sonda solo muestra
el símbolo, significa que se está preparando para usar la cubierta
protectora de la sonda para la medición (como se muestra en la Figura
2). Cuando el símbolo de la pantalla parpadea de izquierda a derecha,
significa que no está utilizando la cubierta protectora de la sonda para la
medición (como la Figura 3)
3. Inserte la sonda a lo largo del canal auditivo lo más profundo posible
en el oído como se muestra en la Figura 3. Luego presione el BOTÓN
de prueba una vez para comenzar la medición. Sonará un pitido largo
Establecer el mes
Presione y suelte el " " Botón para avanzar un
mes hasta que aparezca el mes correcto.
Después de configurar el mes, presione el botón
de configuración, la cifra de la fecha parpadeará
automáticamente.
Establecer la fecha
Presione y suelte el " " Botón para avanzar un día
hasta que aparezca el mes correcto.
Después de configurar el día, presione el botón de
configuración para salir del modo de configuración.
ES
Figure 1
Figure 2 Figure 3

2524
aproximadamente 1 segundo después de activar el BOTÓN de prueba.
Esto señala el final del proceso ya que los resultados se muestran en la
pantalla LCD.
4. El termómetro está listo para volver a realizar la prueba una vez que
aparece una marca en la pantalla LCD. Se recomienda un período
de espera de 20 segundos entre pruebas para evitar un enfriamiento
excesivo de la piel.
5. El termómetro se apagará automáticamente después de 60 segundos
de inactividad. Para prolongar la duración de la batería, presione " "
Botón para apagar la unidad.
X
Figure 3
Después de la medición:
1. Apagado:
- El dispositivo se apagará automáticamente si se deja inactivo durante
más de 1 minuto para prolongar la duración de la batería.
- Prensa " " Botón para apagarlo.
2. Limpie la sonda después de cada uso para garantizar una lectura
precisa y evitar la contaminación cruzada.
(Vea la sección de Cuidado y Limpieza para más detalles.)
Luz de fondo:
En modo oído:
1. La pantalla se iluminará en VERDE durante 3 segundos con una cara
feliz" " cuando la unidad está lista para la medición y se completa una
medición con una lectura inferior a 37,3 °C (99,1 °F).
2. La pantalla se iluminará en AMARILLO durante 3 segundos con una cara
feliz " " cuando se completa una medición con una lectura inferior a
37,8 °C(100,0 °F).
3. La pantalla se iluminará en ROJO durante 3 segundos con una mala
cara " " cuando una medición se completa con una lectura igual o
superior a 37,8 °C (100,0 °F).
Modo de memoria
1. Se puede acceder al modo de memoria en el modo de oído: cuando
el termómetro se haya encendido y seguido por la Figura 2 o haya
terminado la prueba, presione y mantenga presionado el botón " "
durante tres segundos. La letra MEM aparecerá en la parte inferior de la
pantalla. (Ver Figura 5)
2. El termómetro memorizará automáticamente las últimas 30 lecturas
de temperatura. Cada memoria también registra el icono de fecha/hora/
modo de medición. Cada vez que el " " Se presiona el botón, la pantalla
muestra lecturas pasadas que corresponden con un número 1-30. El
número 1 refleja el más reciente
lectura, mientras que el número 30 revela la lectura más antigua
almacenada en la memoria. (Ver Figura 6)
3. En el modo de memoria, " " marcar no cambiará. El usuario puede
presionar el botón de prueba para tomar nuevas medidas.
Figure 5 Figure 6
ES

2726
Situation and Symbols
Troubleshooting
Symbols
106kPa
70kP a
95%
15%
0197
EC REP
-25
o
C
55
o
C
Manufacturer
Date of manufacture
Batch Code
Direct Current
TYPE BF APPLIED PART
Atmospheric pressure limitation
Storage and Transportation Humidity limitation:
15%~95%RH
General symbol for recovery/ recyclable
Authorized representative in the European
Community
Storage and Transportation Temperature Limit:
-25°C~55°C(-13°F~131°F)
Refer to instruction manual/ booklet
The first num.2:Protected against solid foreign
objects of 12,5 mm and greater.The second
num.2:Protection against vertically falling water
drops when ENCLOSURE tilted up to 15°
Disposal of this product and used batteries should
be carried out in accordance with the national
regulations for the disposal of electronic products.
CE conformity marking 0197 represent Notified Body
identification number
EN
Probe guard not installed.
Make sure the earmuffs
are on correctly, then the
( ) icon will appear on the
screen and you can take a
measurement.
Measurement before
thermometer is ready Take a measurement until or
appears on the display.
The ambient temperature
is not within the range
between 10°C and 40°C
(50°F~104°F).
Place the thermometer in a
room for at least 30 minutes
at room temperature
between 10°C and 40°C
(50°F~104°F).
The thermometer is
placed incorrectly or
unsteady.
Read Illustration For Use
thoroughly and take a new
temperature measurement.
The thermometer
showing a rapid ambient
temperature change.
Allow the thermometer
to rest in a room for at
least 30 minutes at room
temperature: between 10°C
and 40°C (50°F~104°F).
The thermometer is not
functioning properly.
Unload the battery, wait for 1
minute and repower it. If the
message reappears, contact
the retailer for service.
In Ear mode:
Temperature taken
is higher than
43.0°C(109.4°F).
Read Temperature Taking
Hints Thoroughly, then
check the integrity of the
probe cover and take a new
temperature measurement.
In Ear mode: Temperature
taken is lower than 32.0
°C (89.6°F).
Read Temperature Taking
Hints thoroughly , then make
sure the probe cover and
lens filter are clean, then
take a new temperature
measurement.
The thermometer works
properly. Use the thermometer
normally
It indicates that the
power is low, but you can
continue to measure.
The thermometer will take
a proper measurement but
batteries must be replaced
soon.
The thermometer could
not work due to low
battery.
Replace two new alkaline
batteries size AA . 24
Error message Problem Solution

2928
Care and cleaning
1. Probe covers are intended for single use only
Absent, damaged, perforated, or soiled probe covers can lead to
inaccurate temperature readings.
2. The probe window must be kept clean, dry, and undamaged at all times
to ensure accurate readings. The accuracy of temperature readings can
be affected by damage to the probe window, or the presence of dirt and
ear wax on the probe window.
3. Fingerprints, earwax, dust and other soiling compounds reduce
transparency of the window and result in lower temperature readings. If
the thermometer is accidentally placed in the ear without a probe cover
installed, the window must be cleaned immediately.
4. The probe window is the most delicate part of the thermometer. To
safely clean the window, gently wipe its surface with a cotton swab slightly
moistened with isopropyl alcohol and immediately wipe dry with a clean
cotton swab. After cleaning, allow at least 5 minutes drying time before
taking temperatures.
Note: Do not use any chemical other than isopropyl alcohol to clean the
probe window.
5. Use a soft, dry cloth to clean the thermometer display and exterior.
6. Do not put the thermometer into water directly.
7. Store the thermometer and probe cover in a dry location, free from dust
and contamination and away from direct sunlight.
8. Periodic cleaning of the device following use to prevent patient cross
infection.
-Use a soft cloth slightly moistened with a 75% isopropyl alcohol solution
to wipe the thermometer and probe. Do not use abrasive cleaners.
9. Ensure that children do not use the instrument unsupervised; some
parts are small enough to be swallowed.
10. Do not remove or modify the equipment without permission.
11. Put the thermometer back to the original packaging after using.
Calibration
The thermometer is initially calibrated at the time of manufacture. If
the thermometer is used according to the use instruction, periodic
readjustment is not required. However, We recommends checking
calibration every two years or whenever clinical accuracy of the
thermometer is in question. Please send the complete device to the
dealers or manufacturer.
The above recommendations do not supersede the legal requirements.
The user must always comply with legal requirements for the control of
the measurement, functionality, and accuracy of the device which are
required by the scope of relevant laws, directives or ordinances where the
device is used.
A clinical summary and procedures for checking calibration are available
upon request.(Turn on the thermometer and press the button long time
until entering into calibrate mode, software version will be displayed.)
Battery Replacement
1. Replace battery when " " appears in the buttom of LCD display. (See
Figure 9)
2. Slide battery cover down as shown in Figure 10.
3. Remove battery and install 2 new AA alkaline batteries as shown in
Figure 11 .
4. Slide battery cover back on.
Figure 9
Figure 10 Figure 11
EN

3130
Specifications
EN
EMC information
The device satisfies the EMC requirements of the international standard
IEC 60601-1-2.The requirements are satisfied under the conditions
described in the table below.The device is an electrical medical product
and is subject to special precautionary measures with regard to EMC
which must be published in the instructions for use.Portable and mobile
HF communications equipment can affect the device.Use of the unit
in conjunction with non-approved accessories can affect the device
negatively and alter the electromagnetic compatibility.The device should
not be used directly adjacent to or between other electrical equipment.
Guidance and manufacturers declaration - electromagnetic emission
The device is intended for use in the electromagnetic environment specified
below. The customer or the user of the device should assure that it is used in
such an environment.
Emissions test Compliance Electromagnetic environment
-guidance
RF emission
CISPR 11 Group 1,
The device uses RF energy
only for its internal function.
Therefore, its emissions are
very low and are not likely
to cause any interference in
nearby electronic equipment.
RF emission
CISPR 11 Class B The device is suitable for use
in all establishments, including
domestic establishments and
those directly connected to
the public low-voltage power
supply network that supplies
buildings used for domestic
purposes.
Harmonic emissions
IEC 61000-3-2 Not applicable
Voltage fluctuations/
flicker emissions IEC
61000-3-3 Not applicable
Table 1
Product name
Model
Measuring range
Reference body
site
Laboratory
accuracy
Measuring site
Operation mode
Display resolution
Measure time
Shock
Dimension
Battery
Weight
Battery life
Expected service
life
Ingress protecting
rating
Contraindication
Operating
temperature range:
Clinical accuracy
Storage and
transport
temperature range
Ear mode:10°C~40°C(50°F~104°F), 15%~85%RH, non-
condensing Atmospheric Pressure : 70kPa~ 106kPa
Clinical bias:0.08°C( 0.14°F) Clinical repeatability:
0.13°C( 0.23°F) Limits of agreement:0.73°C( 1.31°F)
-25°C~ 55°C (-13°F~131°F), 15%~95%RH, non-
condensing Atmospheric Pressure : 70kPa~ 106kPa
Infrared Ear Thermometer
DET-1015
Ear mode: 32.0°C~43.0°C(89.6°F~109.4°F) O
Oral (This thermometer converts the ear
temperature to display its “oral equivalent.”)
Ear mode:±0.2°C (0.4°F) during 35.5°C~42.0°C
(95.9°F~107.6°F)at 15°C~35°C (59.0°F~95.0°F)
operating temperature range±0.3°C (0.5°F) for
other measuring and operating temperature
range
Ear canal(Ear Mode)
Ear mode(Adjust mode)
0.1°C or 0.1°F
Approximately one second
withstands drop of 3 feet
146.4*37.6*57mm
DC3V(2×AA battery)
Approx.117grams(with batteries)
Approx.6000 readings
Three years
IP22
No contraindication

3332
Table 2
Guidance and manufacturer’s declaration-electromagnetic immunity
The device is intended for use in the electromagnetic environment
specified below. The customer or the user of the device should assure
that it is used in such an environment
IMMUNITY test IEC 60601 test
level Compliance
level
Electromagnetic
environment
-guidance
Electrostatic
discharge (ESD)
IEC 61000-4-2
± 8 kV contact
±2 kV,±4 kV, ±8
kV, ±15 kV air
± 8 kV
contact ±2
kV,±4 kV, ±8
kV, ±15 kV
air
Floors should be wood,
concrete or ceramic tile.
If floors are covered
with synthetic material,
the relative humidity
should be at least 30%.
Electrostatic
transient/burst
IEC 61000-4-4
± 2 kV for
power supply
lines
100 kHz
repetition
frequency
± 1 kV for input/
output lines
N/A N/A
Surge IEC
61000-4-5
± 0.5 kV,± 1
kV differential
mode line-line N/A N/A
Voltage
dips, short
interruptions
and voltage
variations on
power supply
in-put lines IEC
61000-4-11
0%UT
(100 % dip in UT)
for 0.5 cycle
at 0(。),
45(。) 90(。),
135(。),180(。),
225(。), 270(。).
and. 315(。)
0%UT
(100 % dip in UT)
for 1 cycle at
0(。)
70%UT
(30 % dip in UT)
for 25/30 cycles
at 0(。)
0%UT
(100 % dip in UT)
for 250/300
cycles at 0(。)
N/A N/A
Power
frequency
(50/60 Hz)
magnetic field
IEC 61000-4-8
30 A/m; 50Hz 30 A/m;
50Hz
Power frequency
magnetic fields
should be at levels
characteristic of a
typical location in a
typical commercial or
hospital environment.
NOTE: UT is the a. c. mains voltage prior to application of the test level.
Table 3
Guidance and manufacturer’s declaration-electromagnetic immunity
The device is intended for use in the electromagnetic environment
specified below. The customer or the user of the device should assure
that it is used in such an environment.
IMMUNITY
test IEC 60601
test level Compliance
level Electromagnetic environment
-guidance
Conducted
RF
IEC 61000-
4-6
Radiated
RF
IEC 61000-
4-3
3Vrms
150kHz to
80 MHz
6 Vrms
150 KhZ
to 80 MHz
outside ISM
bandsa
10 V/m
80 MHz to
2.7 GHz
N/A
10V/M
Portable and mobile RF
communications equipment
should be used no closer to any
part of the device, including
cables, than the recommended
separation distance
calculated from the equation
applicable to the frequency of
the transmitter.
Recommended separation
distance
where P is the maximum
output power rating of the
transmitter in watts (W)
according to the transmitter
manufacturer and d is the
recommended separation
distance in metres (m).
Field strengths from fixed RF
transmitters, as determined
by an electromagnetic site
survey, a should be less than
the compliance level in each
frequency range b.
Interference may occur in the
vicinity of equipment marked
with the following symbol:
EN

3534
Table 3 continued
NOTE 1:At 80 MHz and 800 MHz, the higher frequency range applies.
NOTE 2:These guidelines may not apply in all situations. Electromagnetic
propagation is affected by absorption and reflection from structures, objects
and people.
A. The ISM(industrial, scientific and medical) bands between 0,15 MHz and 80 MHz
are 6,765 MHz to 6,795 MHz;13,553 MHz to 13,567 MHZ;26,957 MHz to 27,283 MHz; and
40,66 MHz to 40,70 MHz. The amateur radio bands between 0,15 MHz and 80 MHz
are 1,8 MHz to 2,0 MHz,3,5 MHz to 4,0 MHz,5,3 MHz to 5,4 MHz,7 MHz to 7,3 MHz,10,1 MHz
to 10,15 MHz,14 MHz to 14,2 MHz,18,07 MHz to 18,17 MHz,21,0MHz to 21,4MHz,24,89 MHz to
24,99 MHz,28,0 MHz to 29,7 MHz and 50,0 MHz to 54,0 MHZ.
B. The compliance levels in the ISM frequency bands between 150 kHz and 80
MHz and in the frequency range 80 MHz to 2,7 GHz are intended to decrease
the likelihood that mobile/portable communications equipment could cause
interference if it is inadvertently brought into patient areas. For this reason,
an additional factor of 10/3 has been incorporated into the formulae used in
calculating the recommended separation distance for transmitters in these
frequency ranges.
C. Field strengths from fixed transmitters, such as base stations for radio(cellular/
cordless) telephones and land mobile radios, amateur radio, AM and FM radio
broadcast and TV broadcast cannot be predicted theoretically with accuracy.
To assess the electromagnetic environment due to fixed RF transmitters, an
electromagnetic site survey should be considered. If the measured field strength
in the location in which the device is used exceeds the applicable RF compliance
level above, the device should be observed to verify normal operation. If
abnormal performance is observed, additional measures may be necessary,
such as re-orienting or relocating the device.
D. Over the frequency range 150 kHz to 80 MHz, field strengths should be less than
3 V/m.
Recommended separation distances between
portable and mobile RF communications equipment and the device
The device is intended for use in an electromagnetic environment in which
radiation, therefore disturbances are controlled. The customer or the user
of the device can help prevent electromagnetic interference by maintaining
a minimum distance between portable and mobile RF communications
equipment (transmitters) and the device as recommended below, according
to the maximum output power of the communications equipment.
Rated
maximum output
power of
transmitter
W
eparation distance according to frequency of
transmitter
m
150 kHz to 80 MHz 80 MHz to 800 MHz 800 MHz to 2. 7 GHz
0.01 0.12 0.04 0.07
0.1 0.37 0.12 0.25
1 1.17 0.35 0.7
10 3.7 1.11 2.22
100 11.7 3.5 7.0
Table 4
For transmitters rated at a maximum output power not listed above, the
recommended separation distance d in metres (m) can be estimated using
the equation applicable to the frequency of the transmitter, where P is the
maximum output power rating of the transmitter in watts (W) according to the
transmitter manufacturer.
NOTE1:At 80 MHz and 800 MHz, the separation distance for the frequency range
applies.
NOTE2:These guidelines may not apply in all situations. Electromagnetic
propagation is affected by absorption and reflection from structures, objects
and people.
Table 5
Recommended separation distances between RF wireless
communications equipment
The device is intended for use in an electromagnetic environment in
which radiated RF disturbances are controlled. The customer or the
user of the device can help prevent electromagnetic interference by
maintaining a minimum distance between RF wireless communications
equipment and the device as recommended below, according to the
maximum output power of the communications equipment.
Frequency
MNz
Maximum
Power
WDistance IEC 60601
Test Level Compliance
Level
Electromagnetic
Environment -
Guidance
385 1.8 0.3 27 27 RF wireless
communications
equipment should be
used no closer to any
part of the device,
including cables, than
the recommended
separation distance
calculated from the
equation applicable to
the frequency of the
transmitter.
Recommended
separation distance
Where P is the
maximum output
power rating of the
ransmitter in watts
(W) according to
the transmitter
manufacturer and d
is the recommended
separation distance
in meters (m). Field
strengths from fixed
RF transmitter, as
determined by
an electromagnetic
site survey, should
be less than the
compliance level in
each frequency range.
Interference may
occur in the vicinity
of equipment marked
with the following
symbol:
450 2 0.3 28 28
710
0.2 0.3 9 9745
780
810
2 0.3 28 28870
930
1720
2 0.3 28 281845
1970
2450 2 0.3 28 28
5240
0.2 0.3 9 9
5900
5785
Note1: These guidelines may not apply in all situations. Electromagnetic propagation
is affected by absorption and reflection from structures,objects and people.
EN

3736
WARNINGS!
· This device should not be used in the vicinity or on the top of other
electronic equipment such as cell phone, transceiver or radio control
products. If you have to do so, the device should be observed to verify
normal operation.
· The use of accessories and power cords other than those specified,
with the exception of cables sold by the manufacturer of the equipment
or system as replacement parts for internal components, may result in
increased emissions or decreased immunity of the equipment or system.
Warranty and after-sales service
Warranty
Thermometer is warranted by manufacture to be free from defects in
material and workmanship under normal use and service for a period
of one year from the date of delivery to the first user who purchases the
instrument. This warranty does not cover batteries, damage to the probe
window, or damage to the instrument caused by misuse, negligence
or accident, and extends only to the first purchaser of the product.
Additionally this warranty becomes void, if the thermometer is operated
on anything other than this brand thermometer probe covers.
Service
The thermometer has a limited one year warranty. Do not attempt to
disassemble or repair the thermometer by yourself. Should service
be required during or after the warranty period you must contact the
manufacturer. Repackage the thermometer carefully in its original
packaging or securely pack to avoid damage during shipping. Include the
original sales slip indicating the date of purchase, a note describing the
problem, and your return address. Send the thermometer prepaid and
insured.
The lay operator or lay responsible organization should contact the
manufacturer or the manufacturer's representative:
- for assistance, if needed, in setting up, using or maintaining the
thermometer; or
- to report unexpected operation or events.
If you suspect any product issues during the warranty period, please
EN
Table of contents
Languages:
Other JOYTECH Thermometer manuals

JOYTECH
JOYTECH DET-3019b User manual

JOYTECH
JOYTECH DET-3023b User manual

JOYTECH
JOYTECH HNK-ECT-1 User manual

JOYTECH
JOYTECH DET-3011b User manual

JOYTECH
JOYTECH DET-1015b User manual

JOYTECH
JOYTECH DMT-4735b User manual

JOYTECH
JOYTECH DET-3018c User manual

JOYTECH
JOYTECH DMT-101 User manual

JOYTECH
JOYTECH DMT-427 Installation guide

JOYTECH
JOYTECH DET-306 User manual