JUKI AE-10 User manual

No.04
29345402
取扱説明書
INSTRUCTION MANUAL
AE-10, AE-15
注意
本取扱説明書は、AE-10, AE-15 についての説明書です。本製品を LU-1500N-7, LU-
1500NT-7 シリーズに取り付けて使用される際は、事前に LU-1500N-7, LU-1500NT-7
シリーズの取扱説明書の「安全についての注意事項」を読み、十分理解の上でご使用ください。
なお、AE-10, AE-15 を強調するため、LU-1500N-7, LU-1500NT-7 シリーズのイラス
トは簡略化されています。従って、安全装置のイラストも一部省略しております。
CAUTION
This Instruction Manual is intended for the AE-10 and AE-15. Read and fully understand the
instructions given under “IMPORTANT SAFETY INSTRUCTIONS” in the Instruction Manual
the LU-1500N-7 and LU-1500NT-7 series before putting the machine into service when this
device is installed to the LU-1500N-7 and LU-1500NT-7 series.
In addition, to emphasize the AE-10 and AE-15, some illustrations of the LU-1500N-7 and LU-
1500NT-7 series are simplified. Also, illustrations of the safety devices are partially omitted.
安全に使用していただくために使用前に、必ずこの取扱説明書をお読みください。
また、いつでもすぐに読めるように、この取扱説明書を保管してください。
Read safety instructions carefully and understand them before using.
Retain this Instruction Manual for future reference.
下糸残量検知装置
Bobbin Thread Remaining Amount Detecting Device


CONTENTS
!. SPECIFICATIONS......................................................................................................... 1
@. SET-UP.......................................................................................................................... 2
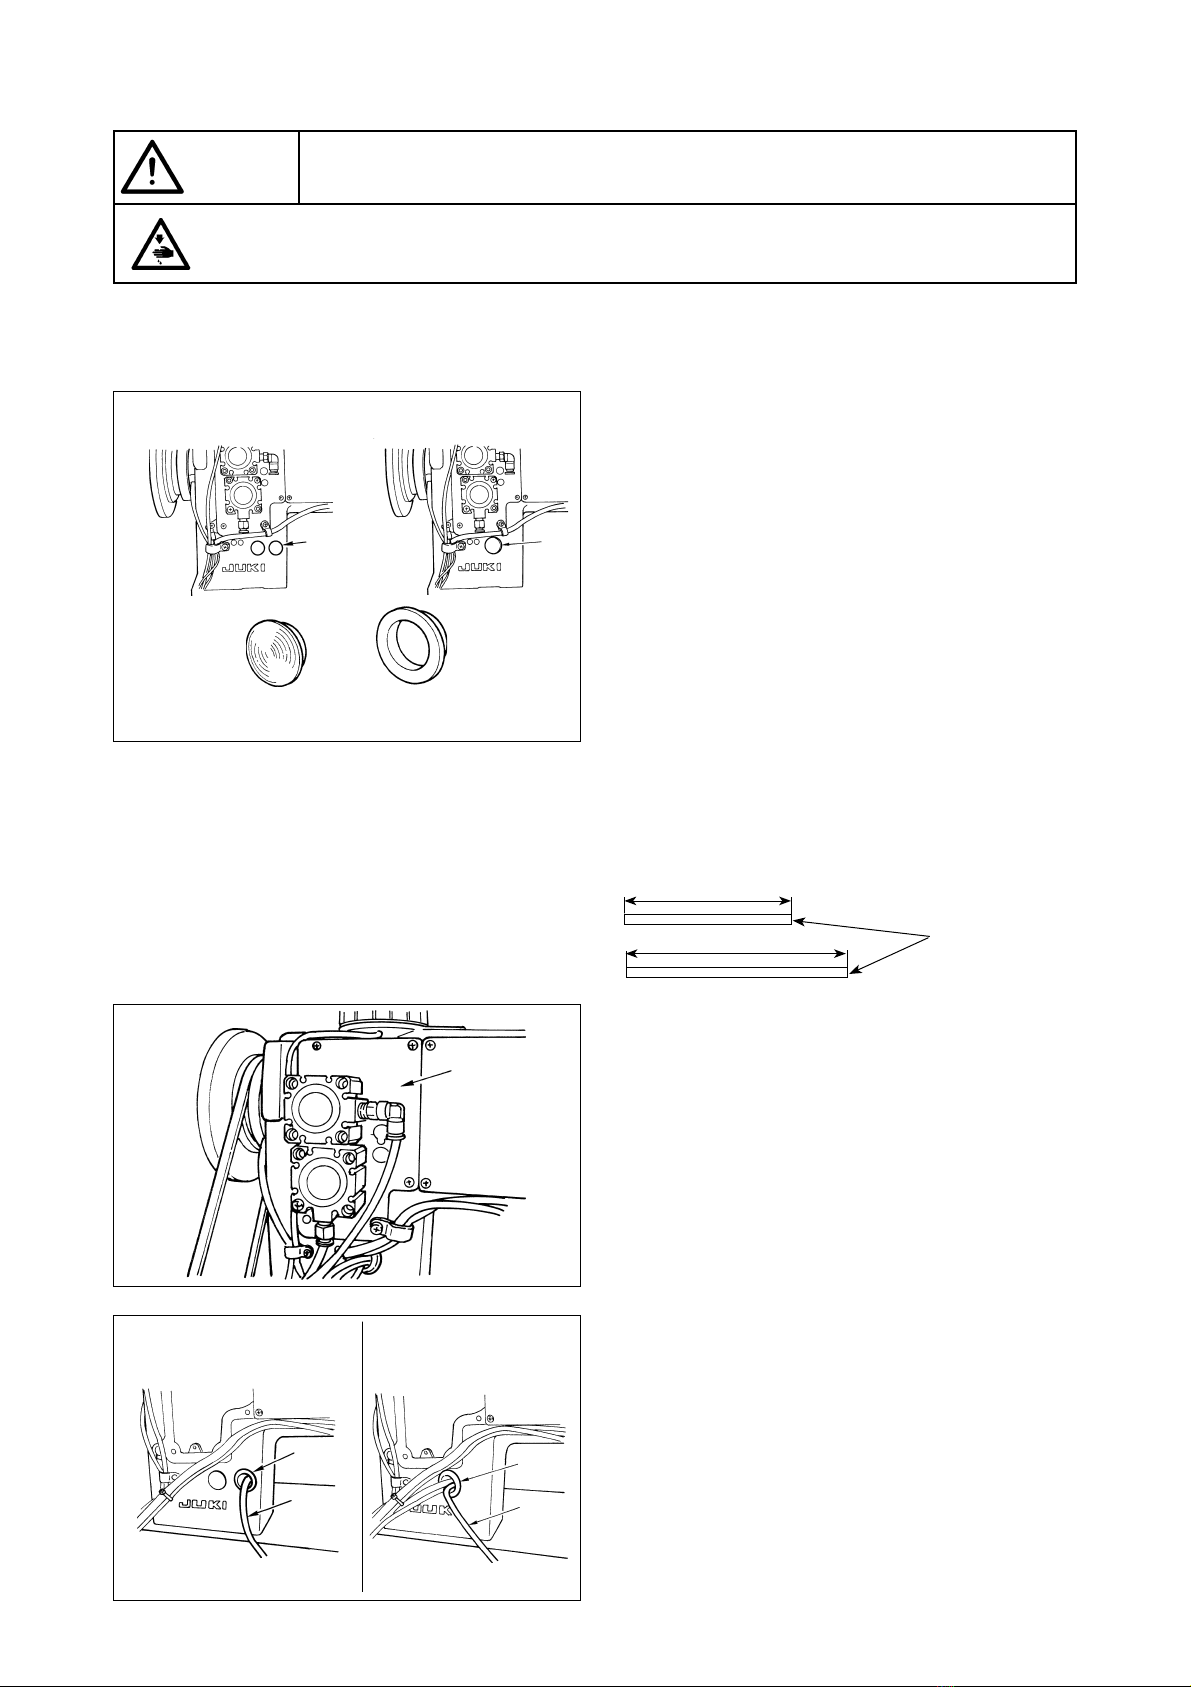
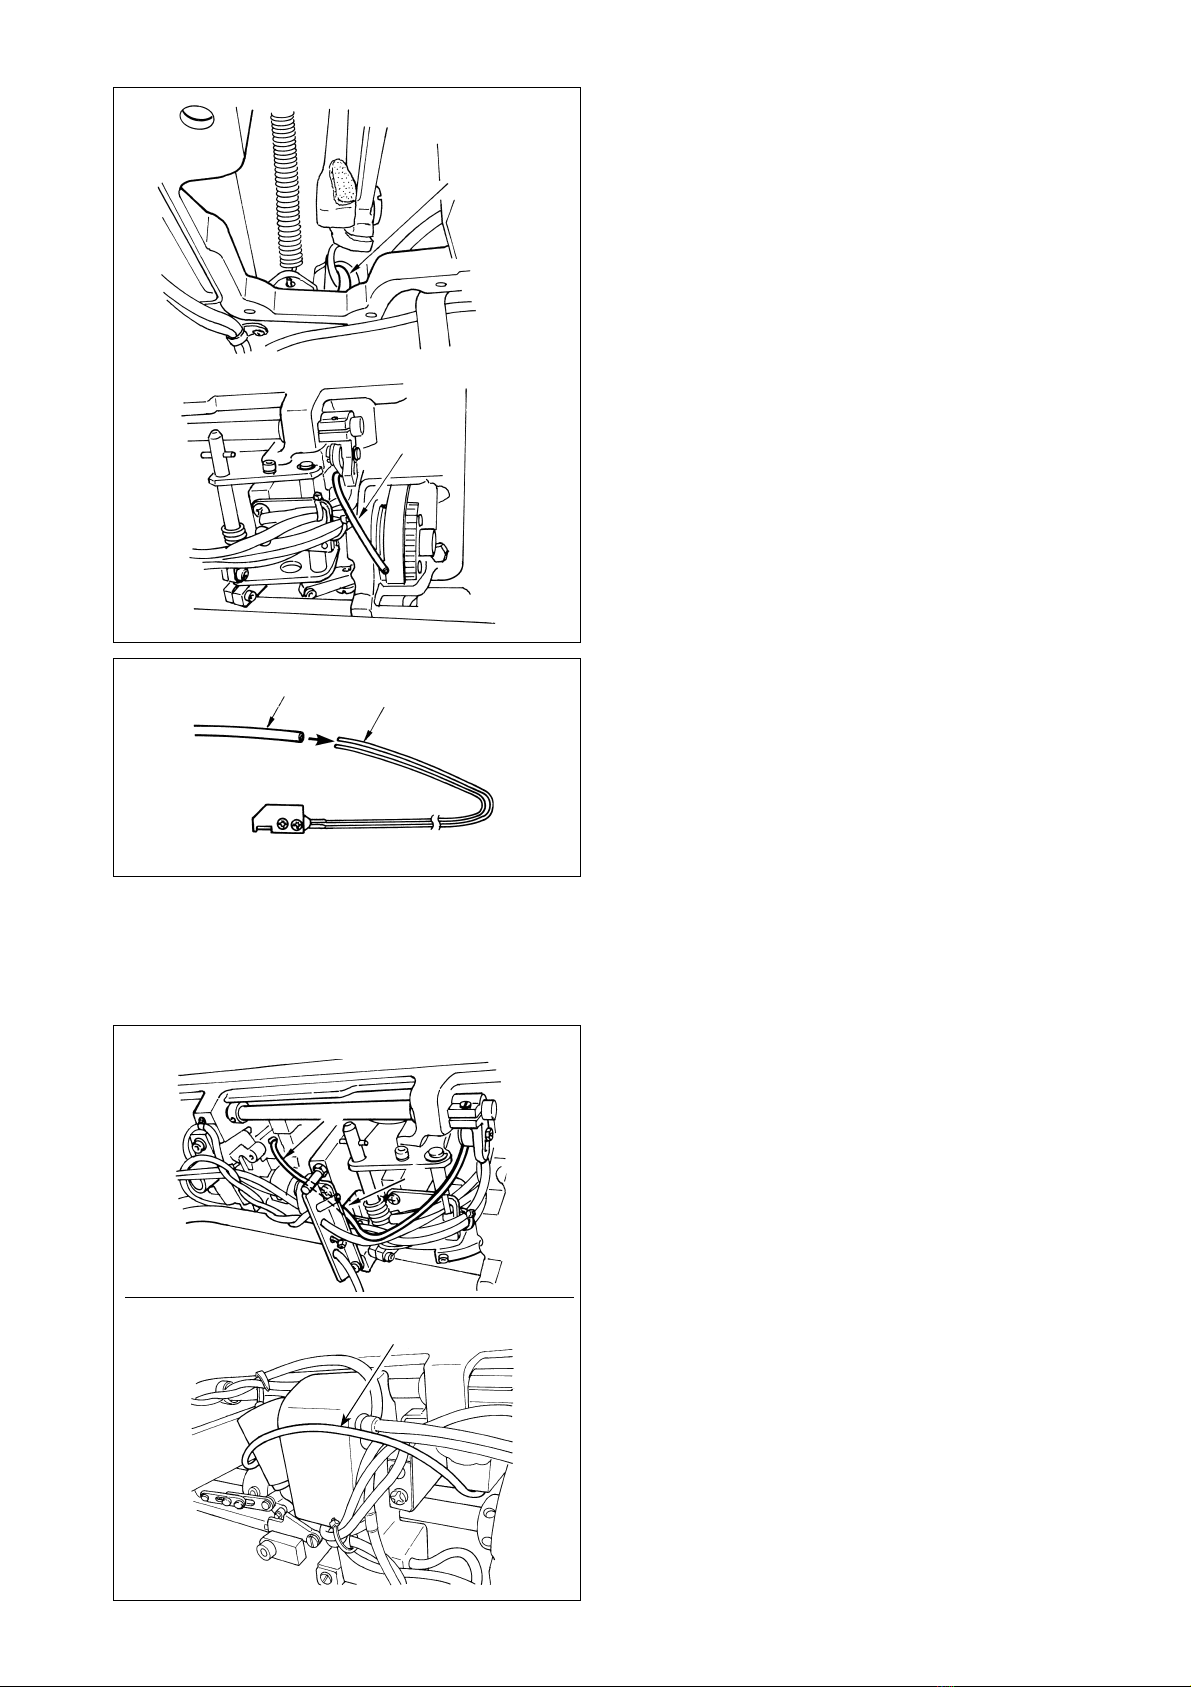
1. Piping the fiber sensor......................................................................................................................... 2
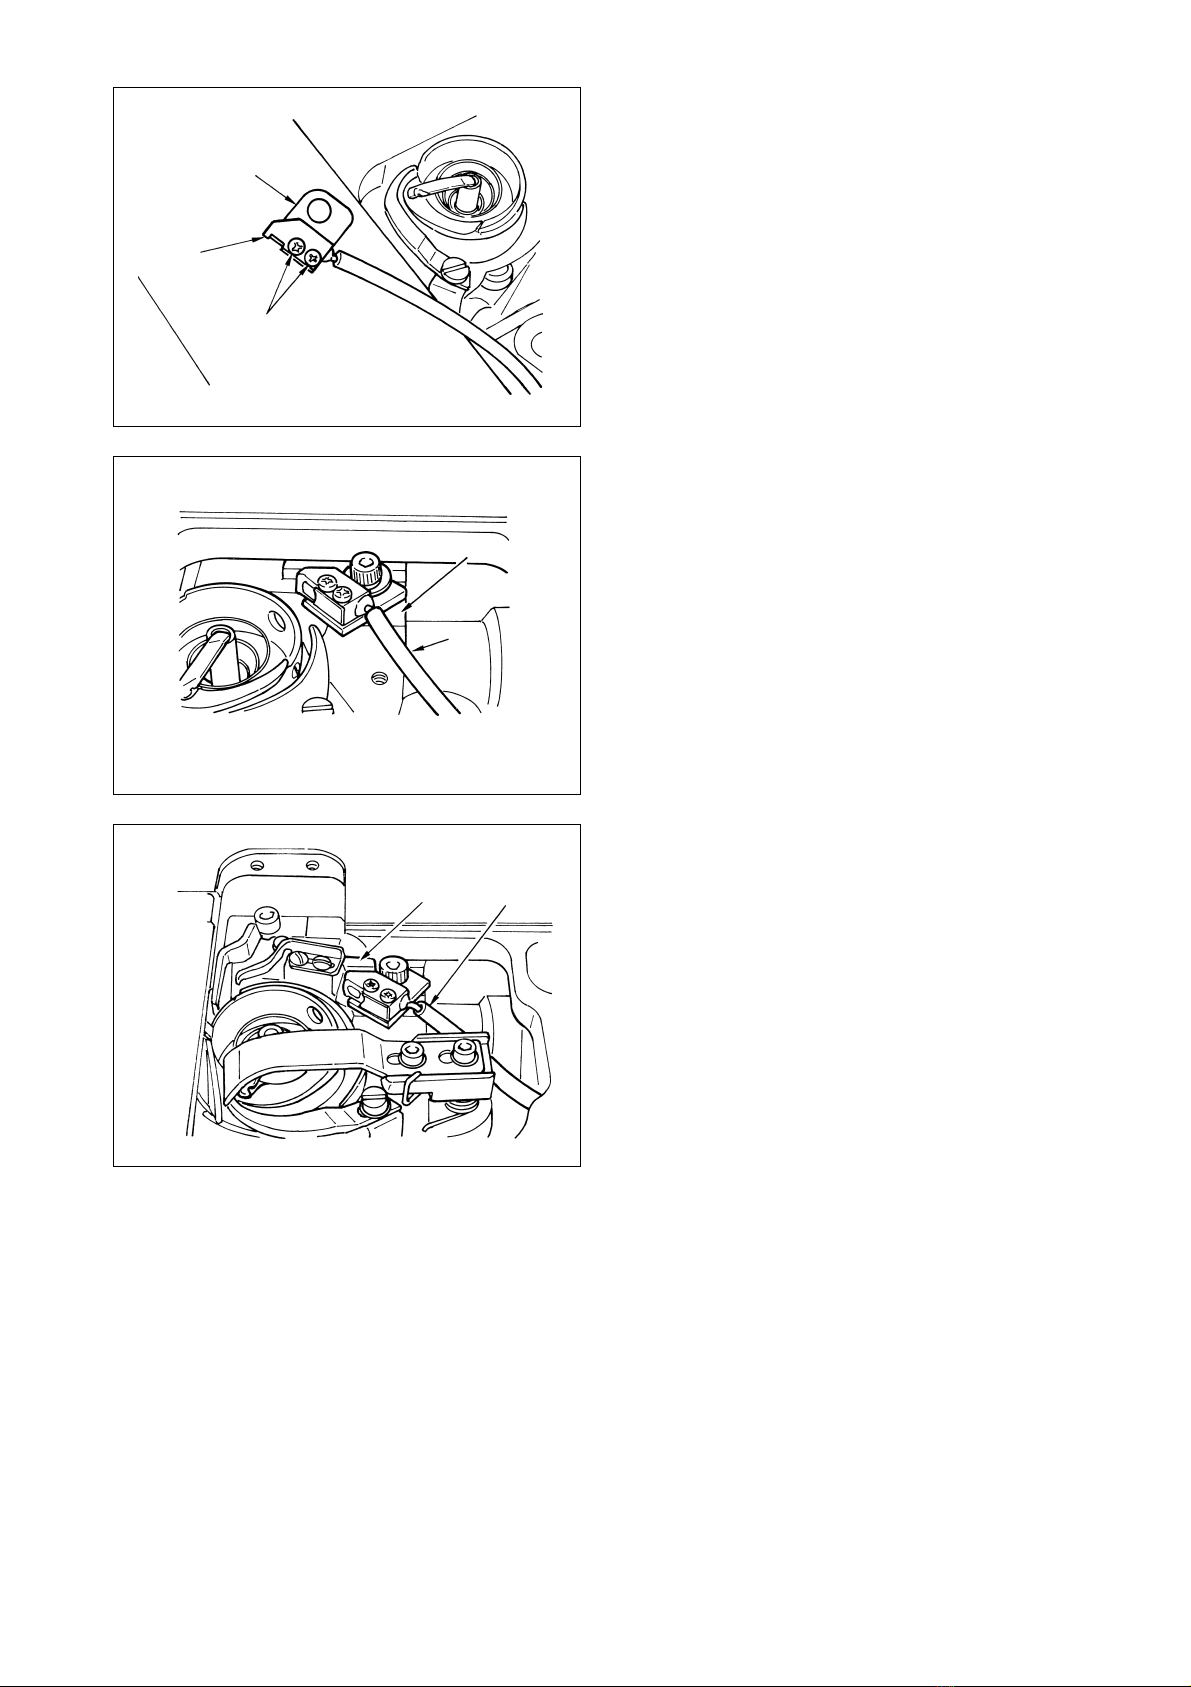
2. Piping the air tube ................................................................................................................................ 5
3. Installing the sensor amplifier............................................................................................................. 8
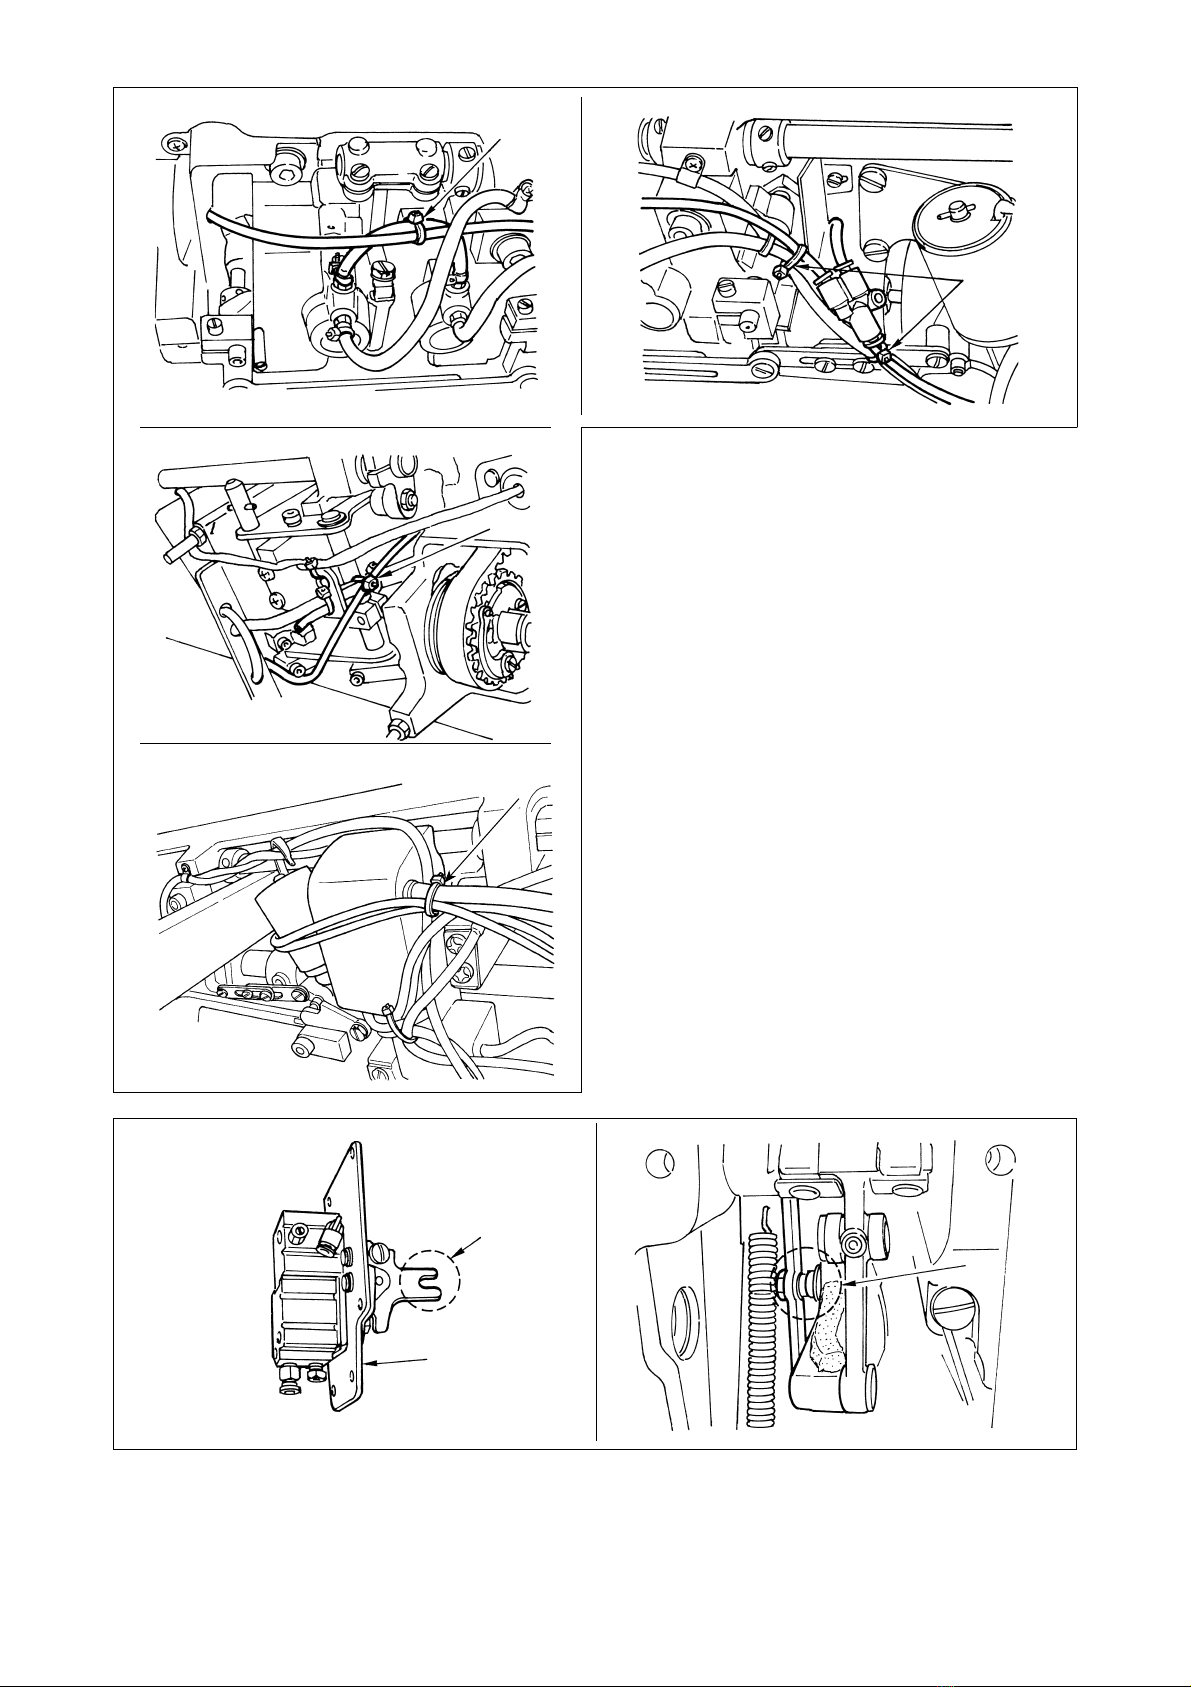
4. Installing the solenoid valve..............................................................................................................10
5. Installing the detecting switch .......................................................................................................... 12
6. Wiring the cord ................................................................................................................................... 13
#. ADJUSTING THE SENSITIVITY................................................................................. 15
1. Checking the function of the sensor amplifier ................................................................................ 15
2. Checking the sensitivity adjustment value of the sensor amplifier............................................... 16
3. Adjusting the position of the fiber sensor and the nozzle installing plate ................................... 17
$. OPERATION AND SETTING ...................................................................................... 19
1. Operation............................................................................................................................................. 19
2. Setting.................................................................................................................................................. 20
%. WINDING BOBBIN THREAD AROUND THE BOBBIN ............................................ 23
^. PHENOMENA, CAUSES AND CHECKING OR CORRECTIVE MEASURES WITH
REGARD TO THE DEVICE......................................................................................... 24
&. WIRING TABLE OF RESPECTIVE CORDS............................................................... 25
目次
!.仕様........................................................................................................................................1
@.セットアップ.........................................................................................................................2
1. ファイバーセンサの配管.............................................................................................................................2
2. エアーチューブの配管.................................................................................................................................5
3. センサアンプの取付け.................................................................................................................................8
4. 電磁弁の取付け.........................................................................................................................................10
5. 検知スイッチの取付け..............................................................................................................................12
6. コードの配線.............................................................................................................................................13
#.感度調整.............................................................................................................................15
1. センサアンプの機能の確認......................................................................................................................15
2. センサアンプの感度調整値確認..............................................................................................................16
3. ファイバーセンサ、ノズル取付板の位置調整.......................................................................................17
$.動作と設定..........................................................................................................................19
1. 動作............................................................................................................................................................19
2. 設定............................................................................................................................................................20
%.ボビンへの糸の巻き方......................................................................................................23
^.装置における現象と原因・確認又は対策.......................................................................24
&.各コードの配線表..............................................................................................................25

–1 –
!. 仕様/SPECIFICATIONS
Power voltage DC12V to 24V
Rated voltage 150mA
Operating temperature/
humidity ranges 0 to 40˚C and less than 90%
電源電圧 DC12V 〜 24V
定格電流 150mA
動作温湿度 0 〜 40℃ 90% 以下
AE-10:SC-510 用、AE-15:SC-922 用
AE-10 : For use with SC-510, AE-15 : For use with SC-922

–2 –
注意 不意の起動による事故を防ぐため、電源を切ってから行ってください。
WARNING :
Turn OFF the power before starting the work so as to prevent accidents caused by abrupt start of
the sewing machine.
1.ファイバーセンサの配管/Piping the fiber sensor
既に配管されている場合、「3. センサアンプの取付け」へ進んでください。
Proceed to “3. Installing the sensor amplifier” when the piping has been already performed.
1) ゴム栓の確認
ゴム栓 1が穴なしの場合は、穴ありに差し
替えます。
1) Checking the rubber plug
When rubber plug 1is without a hole, replace it
with a new one with a hole.
2) ファイバーセンサを右釜に取付ける場合は、センサ保護チューブ(φ 4)4を 1100 mmに切ります。
ファイバーセンサを左釜に取付ける場合は、センサ保護チューブ(φ 4)4を 1250 mmに切ります。
2)
When attaching the fiber sensor to the right-hand side hook, cut sensor protection tube (ø 4) 4in length of 1,100 mm.
When attaching the fiber sensor to the left-hand side hook, cut sensor protection tube (ø 4) 4in length of 1,250 mm.
3) 窓板 2を外します。
3) Remove window plate 2.
4) 穴 3にセンサ保護チューブ(φ 4)4を通
します。
4) Pass sensor protection tube (ø 4) 4through
hole 3.
@. セットアップ/SET-UP
1
ゴム栓
Rubber hole
穴なし 穴あり
Without a hole With a hole
2
1100mm
Right-hand side hook
右釜用
左釜用
Left-hand side hook
4
LU-151*N-7,LU-151*NT-7
LU-156*N-7
LU-152*N-7
1
1250mm
3
4
3
4
LU-151*N-7,LU-151*NT-7
LU-156*N-7
LU-152*N-7

–3 –
5) 既に配管されているエアーホース等に沿って
ベット下面よりセンサ保護チューブ(φ 4)
4を引き出します。
このときミシン駆動部にセンサ保護チューブ
(φ 4)4が接しないように注意してくださ
い。
センサ保護チューブ(φ 4)4の中に油を入
れないように注意してください。
5) Draw out sensor protection tube (ø 4) 4from
the bottom surface of the machine bed along
the air hose or the like for which piping has
been already performed.
At this time, be careful that sensor protection
tube (ø 4) 4does not come in contact with the
drive portion of the sewing machine.
Be careful that oil is not put inside sensor pro-
tection tube (ø 4) 4.
6) ファイバーセンサ 5のファイバー 2 本を、
センサ保護チューブ(φ 4)4にゆっくり少
しづつ手で挿入します。
ファイバーセンサ 5を挿入する際、ファイ
バーが屈曲しないように注意してください。
注意:ファイバーセンサーを取り扱うときに、工
具を使用したり、強引に手で引き出したり、
挿入しないでください。
6) Slowly and little by little insert two fibers of fiber sensor 5into sensor protection tube (ø 4) 4.
When inserting fiber sensor 5, be careful that the fiber is not bent.
Caution : When handling the fiber sensor, do not use tools, or do not draw or insert it forcibly by
hand.
7) センサ保護チューブ(φ 4)4を既に配管さ
れているエアーホース等に沿って、釜の方に
引き出します。LU-1500N-7 シリーズの場
合は 6の間を通します。
7) Draw out sensor protection tube (φ4) 4toward
the hook by routing it along the air hose and the
like piping for which has already been carried
out. For the LU-1500N-7 Series, pass the tube
through 6.
4
4
45
6
4
4
LU-1500N-7 シリーズ /LU-1500N-7 Series
LU-1500NT-7 シリーズ /LU-1500NT-7 Series

–4 –
8) ファイバーセンサ 5にセンサ取付板 7を取
付ねじ 8にて取付けます。
8) Attach sensor installing plate 7to fiber sensor
5with mounting screws 8.
9) ファイバーセンサの仮止め
9)-1 LU-152*N-7 の場合
釜軸台
9にファイバーセンサ 5を仮止め
します。
9) Temporary attaching of the fiber sensor
9)-1 In case of LU-152*N-7 :
Temporarily attach fiber sensor 5to hook
shaft base 9.
9)-2
LU-151*N-7,LU-151*NT-7,LU-156*NT-7
の場合
固定メス土台 !1 にファイバーセンサ 5を
仮止めします。
9)-2 In case of LU-151*N-7, LU-151*NT-7 and LU-
156*NT-7
Temporarily attach fiber sensor 5to fixed
knife base !1.
10)ファイバーセンサを左釜と右釜の両方に取付ける場合は、もう一つのファイバーセンサを 4)
〜 9) の手順で取付けます。
10) In case of attaching the fiber sensors to both left-hand and right-hand side hooks, attach another fiber
sensor in the processes of 4) to 9).
5
7
8
5
9
5
!1

–5 –
2.エアーチューブの配管 / Piping the air tube
1) 穴 1からエアーノズル用チューブ ( φ 4)2
を通します。
1) Pass tube for air nozzle (ø 4) 2through hole 1.
2) 既に配管されているエアーホース等に沿っ
て、ベット下面よりエアーノズル用チューブ
(φ4)
2を引き出します。
このときミシン駆動部にエアーノズル用
チューブ ( φ 4)2が接しないように注意し
てください。
エアーノズル用チューブ ( φ 4)2の中に油
を入れないように注意してください。
エアーノズル用チューブ ( φ 4)2の中に油
が入ると、ファイバーセンサのレンズ面に油
が掛かり、誤検知の原因になります。
2) Draw out tube for air nozzle (ø 4) 2from the
bottom surface of the machine bed along the
air hose or the like for which piping has been
already performed.
At this time, be careful that tube for air nozzle
(ø 4) 2does not come in contact with the drive
portion of the sewing machine
Be careful that oil is not put inside tube for air
nozzle (ø 4) 2.
When oil is put inside tube for air nozzle (ø 4) 2,
the lens of fiber sensor is splashed with oil and
detection failure will be caused
3) エアーノズル用チューブ ( φ 4)2を既に配
管されているエアーホース等に沿って、釜の
方に引き出します。LU-1500N-7 シリーズ
の場合は 3の間を通します。
3) Draw out air nozzle tube (φ4) 2toward the
hook by routing it along the air hose and the
like piping for which has already been carried
out. For the LU-1500N-7 Series, pass the tube
through 3.
1
2
LU-151*N-7,LU-151*NT-7
LU-156*N-7
LU-152*N-7
2
2
3
2
LU-1500N-7 シリーズ /LU-1500N-7 Series
LU-1500NT-7 シリーズ /LU-1500NT-7 Series
2
1
2

–6 –
4) エアーノズルにノズル取付板を取付けます。
4)-1 ファイバーセンサを左右釜のどちらかに 1
つ取付けた場合ノズル取付板 4にエアー
ノズル用チューブ(φ4)
2をそのまま取
付けます。
4) Attach the nozzle installing plate to the air tube.
4)-1 In case of attaching one fiber sensor to either
the left-hand side hook or the right-hand side
hook :
Directly attach tube for air nozzle (ø 4) 2to
nozzle installing plate 4.
4)-2 ファイバーセンサを左右釜に取付けた場合
は、
a) 長さ 120mm と 270mm のエアーチュー
ブφ 4 を用意します。
b) エアーノズル用チューブ ( φ 4)2に三又
継手(φ4)
5を取付けます。
c) 120mm のエアーチューブ(φ4)
7と
270mm のエアーチューブ ( φ 4)6を三
又継手(φ4)
5に取付けます。
d) エアーチューブ ( φ 4)6とエアーチュー
ブ(φ4)
7にそれぞれノズル取付板 8に
取付けます。
4)-2 In case of attaching the fiber sensors to both
of the left-hand side and the right-hand side
hooks :
a) Prepare a 120 mm length of air tube ø 4 and
a 270 mm length of air tube ø 4.
b) Attach three-way joint (ø 4) 5to tube for air
nozzle (ø 4) 2.
c) Attach 120 mm length of air tube (ø 4) 7and
270 mm length of air tube (ø 4) 6to three-
way joint (ø 4) 5.
d) Attach nozzle installing plate 8to air tube (ø
4) 6and air tube (ø 4) 7respectively.
5) ノズル取付板 8を釜軸台 9に仮止めします。
6) センサ保護チューブとエアーノズル用チュー
ブを結束バンド !1 でまとめます。
5) Temporarily attach nozzle installing plate 8to
hook shaft base 9.
6) Fix the sensor protection tube and the tube for
air nozzle with cable band !1.
2
4
8
2
5
6
7
9
!1
8

–7 –
7) ベット内もセンサ保護チューブとエアーノズ
ル用チューブをミシン駆動部に接しないよう
に結束バンド !2 でまとめます。
7) Fix the sensor protection tube and the tube for
air nozzle located inside the machine bed with
cable bands !2 as well so that the tubes do not
come in contact with the drive portion of the
sewing machine.
!2
!2
!2
!3
!5
!4
8)窓板 !3 の又部 !5 がミシン頭部の段ねじ !4 に勘合するように窓板 !3 を取付けます。
8) Attach window plate !3 so that forked portion !5 of window plate !3 fits with hinge screw !4 in the
sewing machine head.
!2
LU-1500N-7 シリーズ /LU-1500N-7 Series
LU-1500NT-7 シリーズ /LU-1500NT-7 Series

–8 –
3.センサアンプの取付け / Installing the sensor amplifier
1) アンプ取付板 1を取付けます。
1)-1 操作パネルが有る場合
アンプ取付板 1を操作パネル取付板 2と一
緒に頭部に取り付けます。
1) Install amplifier installing plate 1.
1)-1 In case of the sewing machine with the op-
eration panel
Install amplifier installing plate 1on the ma-
chine head together with operation panel in-
stalling plate 2.
1)-2操作パネルが無い場合
アンプ取付板 1を取り付けます。
1)-2 In case of the sewing machine without the
operation panel
Install amplifier installing plate 1.
2) アンプ取付金具 3を取付けます。
2) Install amplifier installing metal fitting 3.
1
2
1
3

–9 –
既にファイバーセンサが取付けられている場合は「5」へ進んでください。
Proceed to “5” when the fiber sensor has been already installed.
3) センサ保護チューブ 5から 40 mmのところでファイバーセンサ 6を「エフカッター」で切断
します。
切断の方法は、エフカッターの一番小さな穴に挿入し一気にカッターの刃を押し下げます。
注意:切断するときは、一本ずつ行い、各穴の使用は1回限りにしてください。
3) Cut fiber sensor 6at the position of 40 mm from sensor protection tube 5with “F cutter”.
Insert the fiber sensor into the smallest hole in the F cutter and press down the cutter blade at one
stroke to cut the fiber sensor.
Caution : When cutting the fiber sensor, perform cutting one by one and it has to be limited to
one time only to use the respective holes.
4) 黒色アダプター 7にファイバーセンサ 6の
太いファイバーを、灰色のアダプター 8に
細いファイバーを挿入し、各アダプターから
0 〜 1 mm出るように取付けます。
4) Insert the thick fiber of fiber sensor 6into black
adapter 7and the thin fiber into gray adapter 8,
and attach the fibers so that they protrude 0 to 1
mm from the respective adapters.
5) ファイバーセンサ 6をアンプ取付金具 3近
くまで配線します。
5) Carry out wiring of fiber sensor 6up close to
amplifier mounting bracket 3.
6) センサアンプ 4のケースカバーを開き、ロッ
クレバーをファイバーセンサ挿入穴(a,b)
側に倒します。
7) 黒色アダプタ 7をセンサ挿入穴「a」に灰色
アダプタ8をセンサ挿入穴「b」に挿入します。
6) Open the case cover of sensor amplifier 4and
tilt the lock lever on the fiber sensor inserting
hole (a and b) side.
7) Insert black adapter 7into the sensor inserting
hole “a” and gray adapter 8into the sensor in-
serting hole “b”.
エフカッター
F cutter
3
ケースカバー
ロックレバー
Case cover
Lock lever
4
7
8
黒/Black
灰/Gray
a
b
0 〜 1mm
0 to 1 mm
40mm
5
6
7
8
6

–10 –
8) ロックレバーを LCD ディスプレイ側に戻し、
ケースカバーを閉め、アンプ取付金具 3に
センサアンプ 4を取付ます。
注意:ファイバーセンサ 6が曲がらないように
取り付けてください。
曲がっていると誤検知の原因になります。
また無理な力を加えたり、衝撃を与えると
破損の原因となりますので注意してくださ
い。
8) Return the lock lever on the LCD display side, close the case cover, and attach sensor amplifier 4to
amplifier installing metal fittings 3.
Caution : Attach the sensor amplifier so that fiber sensor 6is not bent.
If it is bent, failure of detection will be caused.
In addition, if an extra load is forcibly applied or a shock is given to the fiber sensor,
breakage will be caused. So, be careful.
9) 結束バンド 9でセンサアンプ 4のコードを
止めます。このとき、コードの屈曲部をなる
べくゆるやかにしてください。
9) Secure the cord of sensor amplifier 4with ca-
ble clip band 9. At this time, be careful to bend
the cord to make a curve as gentle as possible.
3
6
4
!1
2
4
5
3
6
屈曲部
Curve
4
9
1
4.電磁弁の取付け /Installing the solenoid valve
1) レギュレータ 1に供給されるエアーを停止
します。
1) Stop air that is supplied to regulator 1.
2) レギュレータ取付板 !1 に電磁弁 2を取付ね
じ3にて取付けます。
3) 継手 4に配管したエアーチューブ 5を接続
します。
2) Attach solenoid valve 2to regulator installing
plate !1 with mounting screws 3.
3)
Connect air tube 5which has been piped to joint
4.

–11 –
1
7
8
5) 電磁弁 2の三又継手 9に取り外したエアー
チューブ 8を接続します。
6)
三又継手 9に接続されている短いエアーチュー
ブ!0 をレギュレータの継手 7に接続します。
5) Connect air tube
8which has been removed to
three-way joint 9of solenoid valve 2.
6) Connect short air tube !0 connected to three-
way joint 9to joint 7of the regulator.
7) レギュレータ 1にエアーが入るように元に
戻します。
7) Return regulator
1to its home position to let
the air in.
9
87
!0
1
4) レギュレータ 1の継手 7に接続されている
エアーチューブ 8を外します。
4) Remove air tube 8which has been connected
to joint 7of regulator 1.

–12 –
5.検知スイッチの取付け /Installing the detecting switch
1) 検知スイッチ取付板 2をアーム糸案内 4の上に乗せ、止ねじ 3にて取付けます。
頭部 LU-152*N-7 の場合は、糸掛けスイッチ取付板 5に検知スイッチ 1を取付けますので、
検知スイッチ取付板 2は使用しません。
1) Place detecting switch installing plate 2on arm thread guide 4and attach it with setscrews 3.
In case of the machine head of LU-152*N-7, detecting switch installing plate 2is not used since de-
tecting switch 1is attached to threading switch installing plate 5.
2) 検知スイッチ 1に板ばね 6を取付けます。
2) Attach plate spring 6to detecting switch 1.
3) 検知スイッチ取付板 2または糸掛けスイッ
チ取付板 5にフランジ 7を取付けます。
4) フランジ 7を押えながら、フランジの両側
の保持部 8をスイッチの長手方向の板ばね
との間に挿入し、突起部 9にフランジの角
穴部を組み合わせます。
スイッチを覆うようにカバー !2 を取付板に
押し付け、結束バンド !1 でカバー !2 を固定
します。
3) Attach flange 7to detecting switch installing plate 2or threading switch installing plate 5.
4) Pressing flange 7, insert holding portion 8on the both sides of the flange between the flange and
the plate spring located in the lengthwise direction of the switch, and combine the corner hole portion
of the flange with projection 9.
Press cover
!2 to the installing plate so as to cover the switch and fix cover !2 with cable bands !1.
5) シリンダー !3 を囲むように頭部穴 !4 から出
ているセンサ保護チューブ !0 をぐるりと引き
回し、束線バンド !1 でまとめます。このとき
センサ保護チューブ !0 が極端な曲げ方になら
ないように、また頭部を倒したときに頭部支
え棒にあたらないようにしてください。
5) Draw around sensor protection tube !0 com-
ing from hole !4 in the machine head so as to
enclose cylinders !3 and fix it with cable bands
!1. At this time, be careful that sensor protec-
tion tube !0 is not excessively bent or that the
sensor protection tube does not come in contact
with the head support rod when the machine
head is tilted.
5
1
2
3
4
1
6
9
!1
!2
7
8
9
5
!0
!3 !0
!1
!4
!1

–13 –
(1)SC-510 モータの場合 /In case of SC-510 motor
1) OP 拡張基板のジャンパー W1 〜 W6 を設定
します。
1) Set jumpers W1 to W6 of OP extension circuit
board.
2) 電装ボックスのフロントカバーを開け、OP
拡張基板 1を取付けます。
2) Open the front cover of the control box, and in-
stall OP extension circuit board 1.
ジャンパー
Jumper
W1,W2
W5,W6
W3
W4
3−4
5−6
3−4
1−2
246
135
設定位置
Setting position
246
135
246
135
3
2
1
W3,W4
W5,W6
W1,W2
1
6.コードの配線 /Wiring the cord
注意 不意の起動による人身の損傷を防ぐために、ミシンの電源スイッチを切り、5 分以上経過し
てからカバーを外してください。
WARNING :
Turn OFF the power switch to the sewing machine so as to prevent accidents caused by abrupt
start of the sewing machine and remove the cover after the elapse of five minutes or more.

–14 –
3) センサアンプコード 2を CN123-1 に接続
します。2 本針頭部の場合、もうひとつのセ
ンサアンプコードを CN123-2 に接続します。
4) 検知スイッチコードの黄色と橙色のコード 3
を CN123-3 に接続します。また、黒色と赤
色のコード 4を CN124-3 に接続します。
5) 電磁弁中継コード 5を CN124-1 に接続し
ます。
3) Connect sensor amplifier cord 2to CN-123-1.
In case of 2-needle machine head, connect an-
other sensor amplifier cord to CN123-2.
4) Connect yellow and orange cords 3of the de-
tecting switch cords to CN123-3. In addition,
connect black and red cords 4to CN124-3.
5) Connect solenoid valve relay cord 5to
CN124-1.
6) 電磁弁からのコード 6と CN124-1 に接続
した電磁弁中継コード 5を接続します。
6) Connect cord 6coming from the solenoid valve
to solenoid valve relay cord 5which has been
connected to CN124-1.
543
2
CN124-1
CN124-2
CN124-3
CN124-4
CN123-1
CN123-2
CN123-3
CN123-4
5
6
(2)SC-922 モータの場合 /In case of SC-922 motor
1)
AE用中継コードのコネクタ(22P)
4
を
SC-922 の CN51 に接続します。
2) AE 用中継コードの
コネクタ
(4P)1を検知ス
イッチコードと接続します。
3) AE 用中継コードのコネクタ(6P)2をセ
ンサアンプコードと接続します。
4) AE 用中継コードのコネクタ(2P)3を電
磁弁コード 5と接続します。
1
2
3
4
AE 用中継コード/Junction cord for AE
CN51
3
5
1) Connect connector (22P) 4of the junction cord for AE to CN51 of the SC-922.
2) Connect connector (4P) 1of the junction cord for AE to the detecting switch cord.
3) Connect connector (6P) 2of the junction cord for AE to the sensor amplifier cord.
4) Connect connector (2P) 3of the junction cord for AE to solenoid valve cord 5.

–15 –
#.感度調整 /ADJUSTING THE SENSITIVITY
1.センサアンプの機能の確認 / Checking the function of the sensor amplifier
1) ミシンの電源スイッチをONにします。
2) センサアンプの動作モード 1が「L」(ライ
トオン)であることを確認します。
1) Turn ON the power to the sewing machine.
2) Check that operation mode 1of the sensor
amplifier is “L” (light on).
もし動作モード 1が「L」でない場合は、次の 2)
-1 〜 2)-4 の手順で行なってください。
2)-1 スイッチ 2を「RUN」から「SET」
にします。
When operation mode 1is not "L", perform the ad-
justment by the procedures of 2)-1 to 2)-4 below.
2)-1 Turn switch 2from “RUN” to “SET”.
2)-2 ボタン「黒」
3を 3 秒間押し、表示部に「S
ELE」と表示させます。
2)-2 Press button “BLACK” 3for three seconds
to indicate “SELE” at the display portion.
2)-3 ボタン「黒」3を一回押すたびに動作モー
ド1が切替りますので、「L」を表示させ
ます。
2)-3 Every time button “BLACK” 3is pressed,
operation mode 1is changed over and “L” is
indicated.
2)-4 スイッチ 2を「SET」から「RUN」
に戻します。
2)-4 Return switch 2from “SET” to “RUN”.
12
3
3秒
3 seconds

–16 –
2.センサアンプの感度調整値確認
Checking the sensitivity adjustment value of the sensor amplifier
1) スイッチ 2を「RUN」から「SET」に切替
えた後、更に「RUN」に戻します。
このとき「S」が点滅します。
1) After changing over switch 2from "RUN" to
"SET", further return it to "RUN".
At this time, "S" flashes on and off.
2) 感度調整値が「300」であることを確認しま
す。
3) 約 10 秒後に自動的に「S」が消え、現在の
光量と「L」が表示されます。これで確認は、
終りです。
2) Check that the sensitivity adjustment value is
"300".
3) Automatically "S" will go out after approximately
10 seconds, and the existing quantity of light
and "L" will be displayed. Checking is complet-
ed with this operation.
2
Flash
点滅
感度調整値
Sensitivity adjustment value
2
34
もし縫製時、ボビンの反射テープが全く露出していないのに検知した場合は、感度調整値を大きく
してください。
また、ボビンの反射テープが露出しているのに全く検知しない場合は、感度調整値を小さくしてく
ださい。
感度調整値を変更するときは、上記 1)を行い、ボタン「黒」3またはボタン「赤」4を押して感
度調整値を大きくしたり、小さくしてください。
感度調整値の変更が終ったら、上記 3)のようになります。
Increase the sensitivity adjustment value if the sensor detects the bobbin thread at the time of sewing
while the reflecting tape of bobbin is not fully exposed.
In addition, decrease the sensitivity adjustment value if the sensor does not fully detect the bobbin thread
while the reflecting tape of bobbin is exposed.
When changing the sensitivity adjustment value, perform the aforementioned step 1) and press button
"BLACK" 3or "RED" 4
to increase or decrease the sensitivity adjustment value.
When the change of the sensitivity adjustment value is completed, the state becomes as described in the
aforementioned step 3).

–17 –
3.ファイバーセンサ、ノズル取付板の位置調整
Adjusting the position of the fiber sensor and the nozzle installing plate
注意: ファイバーセンサの位置調整を行うときは、必ずミシン制御ボックスのペダルレバー用コネ
クタを制御ボックスから外した後、調整を行ってください。調整終了後ペダルレバー用コネ
クタを元に戻してください。ペダルレバー用コネクタの抜き差しをするときは、必ずミシン
電源を OFF にしてから行なってください。
ファイバーセンサの感度調整を行うときは、センサのレンズにゴミが無いことを確認してか
ら行ってください。
ノズル取付板の位置調整を行なうときは、必ずミシン電源を OFF にしてから調整を行なっ
てください。
既にファイバーセンサ、ノズル取付板が取付けられている場合は、これらの位置調整をする必要は
ありません。
Caution : When performing the adjustment of the position of the fiber sensor, be sure to perform
the adjustment after disconnecting the connector for the pedal lever of the control box
of the sewing machine from the control box. After completion of the adjustment, return
the connector for the pedal lever to its home position. When connecting/disconnecting
the connector for the pedal lever, be sure to perform the operation after turning OFF the
power to the sewing machine.
When performing the adjustment of the sensitivity of the fiber sensor, perform the ad-
justment after checking that there is no dust on the lens of the sensor.
When performing the adjustment of the position of the nozzle installing plate, be sure
to perform the adjustment after turning OFF the power to the sewing machine.
When the fiber sensor and the nozzle installing plate have been already installed, it is not necessary to
adjust the position of these components.
糸が巻かれていない検知用ボビンを用意します。
1) ファイバーセンサの位置調整
1)-1 ファイバーセンサのレンズ 4を中釜の穴
5の方向に向くようにします。
Prepare one bobbin for detection around which bob-
bin thread is not wound.
1) Adjusting the position of the fiber sensor
1)-1 Adjust lens 4of the fiber sensor to the direc-
tion of hole 5of the inner hook.
4
5
This manual suits for next models
1
Table of contents
Other JUKI Sewing Machine manuals

JUKI
JUKI MO-654DE User manual

JUKI
JUKI MO-655 User manual

JUKI
JUKI LK-1903BN/BR35 User manual

JUKI
JUKI MO-734DE User manual

JUKI
JUKI TL-2200QVP Mini User manual

JUKI
JUKI DSC-246 User manual

JUKI
JUKI MO-6714S User manual

JUKI
JUKI LBH-781 User manual

JUKI
JUKI LU-2216N-7 User manual

JUKI
JUKI HZL-G Series User manual

JUKI
JUKI LK-1903B Series User manual

JUKI
JUKI MH-380 User manual

JUKI
JUKI S057 User manual

JUKI
JUKI DDL-5600N Series User manual

JUKI
JUKI PLC-2710V User manual

JUKI
JUKI K-1E User manual

JUKI
JUKI AMS-210EN Series Quick start guide

JUKI
JUKI HZL-F series User manual

JUKI
JUKI LBH-772NB-1 User manual

JUKI
JUKI MO-6704DA User manual