JUKI DNU-1541-7 User manual


DNU-1541-7
IIJlllliBJJil
INSTRUCTION
MANUAL
BETRIEBSANLEITUNG
MANUAL
DE
INSTRUCCIONES
ilmiJiaJJ~
MANUEL
D'UTILISATION
MANU
ALE
D'ISTRUZIONI
5t.it :
C::O)ttU:r~
,
~ttO)•~~a>Jil,\.t
l
fl,\ttn:~*G
~a>ontc5
t::<!I..'*Gr.:.
~~f;:ffm
~
~1.,\ftn:<
r.:~
r
;:
,
Ufitll
;:
~g.i:O)Qllt&~IIJJW~a:>H#<
n:
c!l.\.
"i!;ft,
"'::n:-
:
t~~
<:
rc::m~Q~-:;
r
c::,
C::O)Qllt.UWJ8~f*WG
~<n:c!l.\
.
NOTE:
Read safety
Instructions
carefully
and
understand them before using.
Retain
this
Instruction
Manual for
future
reference. -
HINWEIS :
Lesen
Sie
die
Slcherheitsanwelsungen aufmerksam
durch,
um
slch
mit
Ihnen
vertraut
zu
machen,
bevor
Sledlese MaschlneIn Betriebnehmen. Bewahren Sledl
ese
Bedlenungsanleltung
fUr spatere Bezugnahmeauf. .
-
NOTE : Avant d'
utlllser
Ia machine,
lire
attentivementtoutes
les
consignesde securi
te
.
Conserver
ce
manuel
pour
pouv
lor
le
consulter
en
cas
de
besoin.
NOTA :
Antes
de
comenzar
a
usar
esta
maqulna
lea
con
detencl6n
hasta
comprender
todas
las
lnstrucclones
de
sequridad. Conserve este
Manual
de
lnstrucclonesa mano
para
futurasconsultas.
-
NOTA: Leggere attentamente e compredere
tutte
le
istruzlonl perIa sicurezza prima
di
lnz
l
are
I'
uso
dl
questa
macchlna
.ConservarequestoManualed'lnstruzl
onl
per
pro
nto
riferlmento.
i!ll
:
~7
~
~~~m
.
~~~
~
mzm-~
oo
~
*~m
~
M
~
.
~~~.
il1$~·i¥W*{f
.m
~aJJ
~
.
tlilll
a:t'if
OO.
No.OO
40095656

A 1.
H7flt!i1J7f~B1~~VJ.jg~'F.
il::f'~te~tfi1iUtJtJltt'"'Fni)ffilf
.
2.
~~Vl.iE~'fl
.
iR:=f'~ffi~tli~itJ!fEt:l*f~~-~
.
§gl:f=..
3.
~iiUil~mat
~~.tt~B~~~v
~.&:mll1.
ll-;E~~It!at
.
~~
4.
-~tlliE~'fl
.
~:=f'~U~m
.
~~
-
~~-iff~~
-
v~.ttm
.
~~miff
.
~::f'~ffi~~
~itJ...tiii
.
5.
if:=f'~.r±~l'
.&:
m~~
~
.
~m~t?a!f.Jtt~m~~~tn.
.
6.
~~t!~tll.B1
.
ii~~tll.
3
...ttt-.Jtll~
~*fi;=j!ij(~~
.
A 1.
~7j(~iR:=f'~1£~l'lt!~~~tt-.ltt~iE~-~tll
.
2.
fili!tlt!iJJiitiliWJ.
ll-;E~~It!~7f~
.
'i~
3.
nm~t-t
.
~7j(~il~~~~.
tt~lt!~m~
.
I
,Ffil,
4.
M•~!f.J~:n•~~3~~~~tt-.J~:n*~~-·~-*~~*~~~n*~•
.
5.
~7m~*~
·
~;EM~M~~!tl'lt!iJJM~
.
~Sfili~!f.JmB~M·~~
.
6.
~7~JE~-=¥~itJm;§.
m~'Fift~~::f'~te~ailfMiUZ
.
1.
•~m~~ll1~~~fl~~
.
~7~~tt-.Jg~m~tt-.J•~
.
il~~::f'~~~*~lt!~
.
a
~~*F~-~M8tll.H
.
AA~~~B1il~~~-
.
:=f'~~*
-
~~~Vl.H~W
.
~::f'~U
tn.B~~~.!:JVLH~~Pm
.
9.
~~-~mll1.~~~~~*~•~t-t
.
~m~~·t!~tn.~!f.J~B
.
~ft~fflg
,
*~~:=f'~
~itJ~tti
.
xxxvi

fSI
~
::::
v:::.;iltziou(J)t::5~•
...
.
.....................................................................
...
..
.
...
...
..........
......
...
....
..........
....
.....
.................
1
fttl
................
.
.......
..
.............
.
....................................................................................
.
..
..
......
.
..................
..
.
..
.......
....
.....
4
1.
:::::;:::.;(J)~;;tMI1
..
.......
.................................................................................................................
..
..
.......
..
......
7
2.
""Jv
t--~:t.JO)IJIIIII
..
...........
........
...
......
...
.........................................................................................................
1o
3.
""Jv
t--1JJC-o.>!lllbf:tl1
..
....
.....
..
.........
..
..
............
.......
.........
.
........................................................................
11
4.
EJI1J~t>
EJI1J~;;t..t11Ml!Dl$0)I7fN!iJ.
...
..
....
...
..................
.....
.
..
......................................................
13
5.
/fttrc:gliO)JUlfil:t
.............................................
..
......
...
........
.
.......
....
.
..
........
..
........
....
...............
..
...
.............
16
6.
f85Sl
..
.
..........
.
.....................................................................................................
.
........
..
...............
........
............
17
7.
lt(J)IUlbMI:t15
..............................................................................................................................................
20
8.
"'F!ftO)i!
G15
..
..
......
..........
............................................
....
..........................................................................
....
21
9.
~t:'/?'-A<7.>Wt..,.Atl.
..................................................
........
..
...................................................................
22
10
.
!ft~l!!ft-~<1.>Illlbf:tl1
............................................
....
...
..
.............
.......
......
....
....
.
.......................................
23
11.
"'F!ftO)~l!15
.....................................................................................
.
..
...
........
...
..........................
..
...........
.
....
23
12
. ..t!ft(J)i!l.t15
..................................................................................................................................................
25
13.
St.
\13~<!0)11tili
............
....
.............
..
...............................................................
.
........................
.......
.......
..
...
26
14.
!ftl!li-T
..........
.
.....................
..
....
.....
......
...
..................
..
..
.....
.
..........
..
......
.
............
.
..............................................
27
15.
!ftllllt>
lcf~
.................
..........................................
...
.......
..
...........
..
....................
..
.......
.
....................................
29
16.
~;t..tl11\:::>l,
\"('
..............................................................................................................
..
..........................
30
17.
~;t.EE:t.J<T.>JIIO
......
...
..........................................................................................................
......
...
....
..............
31
18.
ttctii(J)~m
...
.....
..
....
....
..
.......
.
...........................
.
................................................................
...
.....
..
.............
..
.
32
1
9.
!ftt7.J
b
O)S!jfjl
.
........
...
............................
.
.....
..
............
.....
...
.
........................................................................
.....
34
20.
)1.
A(/)~
................................
.
.............................................
.
..........
...
.............
.
.........
.
................
..
..
..............
38
21
.
tltJ;{lEC:..ti2S
b
lE.l:~·<1.)··
.........................................................................................
.
.......
..
..
..............
39
22.
lill.\ii11-Ji31
............
...
............................................................................................................
.
.................
40
23.
EJI1J~;(J:[:f0)1Jall
......................................................................................................................................
42
24.
ffll::.fna<T.>Jta
.........
.
.....
..
.......
..
................
..
..
.......
..
...
........................
...
........
...
..
............................................
43
25.
&l.\I\:SI1-l>m•c.mt~
·
~M
.................
.
......................................................................
.
..........................
45
CONTENTS
BEFORE OPERATION ........................................................................................................................
...
........
..
1
SPECIFICATIONS.............................................................................................................................................4
1. INSTALLATION..........................................................................................................................................7
2. ADJUSTING
THE
BELTTENSION.......................................................................................................
..
10
3. ATTACHING
THE
BELTCOVER.............................................................................................................
11
4. THEAIR DRIVE UNITOF THE SEWING MACHINE EQUIPPED
WITH AUTOMATIC REVERSE FEED DEVICE
AND
AUTO-LIFTER ....................
....
.............................13
5. INSTALLING
THE
THREAD STAND.......................................................................................................16
6. LUBRICATION.........................................................................................................................................17
7. ATTACHING
THE
NEEDLE...................................................................
..
...............................
...
..............20
8. THREADING
THE
BOBBIN
THREAD.....................................................................................................
21
9. ATTACHING
AND
REMOVING THE BOBBIN
CASE
.................................................................
...
.........22
10. INSTALLING
THE
BOBBIN
WINDER THREAD
GUIDE
...................................................................
..
....23
11. WINDING A
BOBBIN
...............................................................................................................................23
12. THREADING
THE
MACHINEHEAD.......................................................................................................25
13. ADJUSTING
THE
STITCH LENGTH....................................................................................................
...
26
14
. THREADTENSION .......................................................................
...
...................................................
....
27
15
. THREADTAKE-UP SPRING................................................................
....
.........................................
..
....
29
16
. HANDLIFTER ......................................................................................
....
..........................................
..
...
30
17
. ADJUSTING
THE
PRESSURE OFTHE PRESSER FOOT....................................................................
31
18. NEEDLE-TO-HOOK RELATION..............................................................................................................
32
19
. ADJUSTING
THE
THREAD TRIMMING.................................................................................................34
20. HOW TO REPLACE THE KNIVES..........................................................................................................
38
21
. ADJUSTING
THE
LIFTING AMOUNT
OF
THE PRESSER FOOT AND
THE
WALKING FOOT..........
..
39
22. SEWING SPEEDTABLE.........................................................................................................................
40
23. ADJUSTING
THE
AUTOMATIC PRESSER FOOT LIFTER .................
...
............................................
...
42
24. ADJUSTING
THE
STOP POSITION........................................................................................................
43
25. TROUBLES
IN
SEWING
AND
CORRECTIVE MEASURES...................................................................
46
xxxvii

~
~
!:il~tll.m~
lltrtt..~;t•
•~
........................
..
.....................................
·········
.....................
·····················
............
··············
.............................
..3
~~
''''''''"''''"''~··••••••••••u•••••••••••••••••••••••••••••••••••
•
••"
'
''''''''''''''''''''''''''''''''"'''''''''''''''''''''''''''''''''''''''''''''''''''''''''''''''"'"''''''''''''''''''''''''''''
'
'''''.,
6
1,
!:il~tll.tr.J:£~
,
0
,,,,,.,,,,.,,,,,.,,.,,.,,.,.,,.,,.,,,,,,,,,.,,.,,,,,,,,,,,,,,,,,,,.,,,,,,,,,.,,.,,,.,,,.,,,,,.Noooo"''"'''''''''"'"'''''''''''''''''"''''''''"''''''''"''''"'''''''"'''''""'
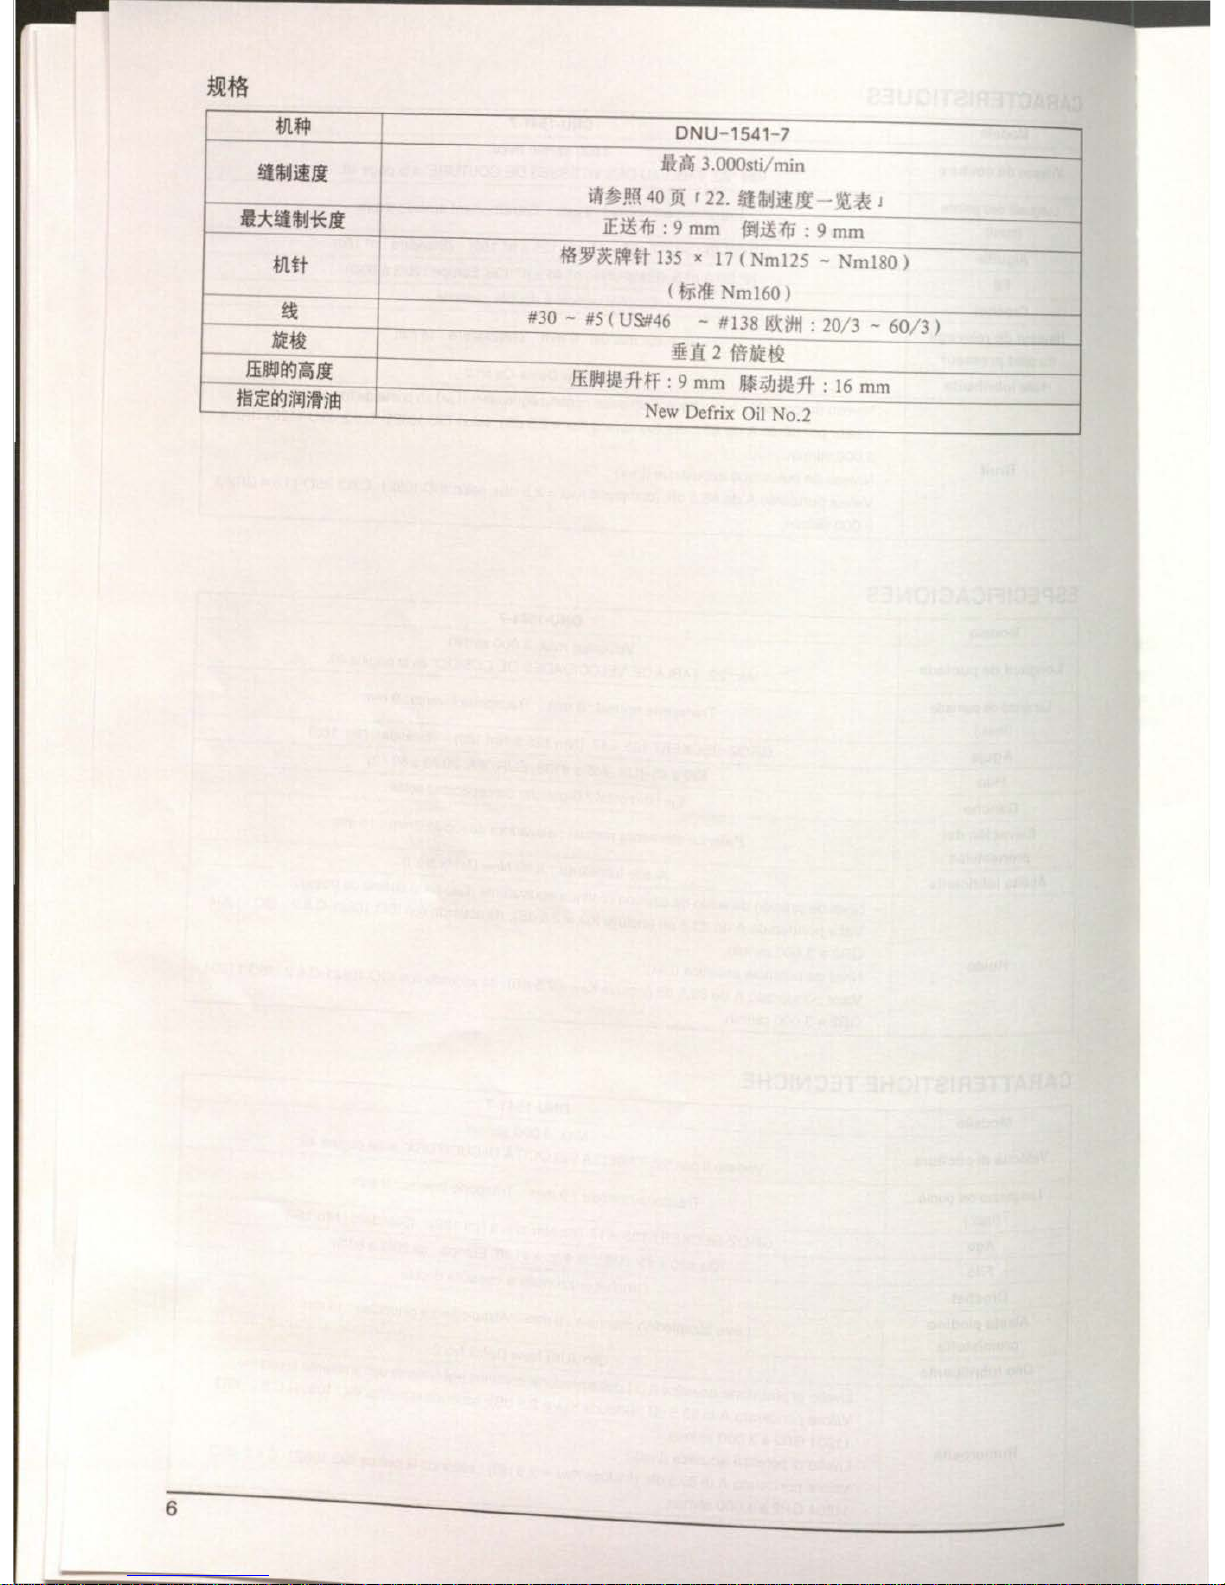
7
2
Itm~if:
tJtt..~ii!Jil
...................................................................................................................................................................................
10
3.
Itm~~.att..~:£~
.......................................................................................
.
..........................................................................................
11
4.
m~a
i;:IJiiiJ~~a
~JIJWJt~7ttJt~tt..~~~=*=~
......................
.
..
.
................
.
...........
.
........................................................................
13
5.
f:l~l¥1~~
............................................................................................................................................................................................
16
6. n
oifb
......................................................................................................................................................................................................
17
7.
tll.tti¥J~~1r
~
i
..................................................................................................................................................................................
20
8.
~~I¥J:§:~1r
~
i
................................................................
.
..................................................................................................................
21
9.
~~I¥J~tti1N.A
....................................
.
..............................................................................................................................................
22
10
.
~~~~HI¥1~~
...............................
....
....
......
.
................................................................................................................................
23
11
.
~~I¥J~~1r
~
i
...........................................................
..
.............................................
.
............................................
.
.......
.
...................
23
12.
..t~I¥J:§:~1r
~
i
......................................................................................................................................................................
..
...........
25
13.
!:il~i(:flae.JiJ!J-:p-
.......................................................................................................................................................
.
...........................
26
14.
~~if:tJ
......................................................................................................................................................................................................
27
15.
tftf:l~-·
................................................................................................................................................................................................
29
16.
1i:*=ffiN41tflft
........................................
...
.............................................................................................................................................
30
17.
.IIN41
.II
tJ
ae.Jii!J
g
...................................................................................................................................................................................
31
18.
tll.tt.!:.it£~1¥1~~
..............................................................................................................
.
...............................................................
32
19.
tJJf:ltf.Jii!J§
.................................................................................
-
....................................................................................................
34
20.
tJJJJI¥1:!:~
.........................................................................................................................................................................................
38
21
.
.IIN41~~..t~
:{fl,W..t7t:li
tf.Jii!J
1:
..............
.
.........
.
..
.
.................................................................................................
··············
.......
39
22.
tit*'1i!ll-
~
~
...........................................................................................................................
.
..................................................
.
....
40
23.
~a
i;:IJJIN4Jttrrtt-Jii!J!l
..............................
.
........................
.
.....................................
.
..............................................
..
............................
42
24.
ifll:.irr.ae.JiJ!Jfl
...................................................................................................................................................................................
43
25.
!:illt!J~WJ.Jetf.JI.l{!.at~/Ji~
.
~J11J$
.........................................................................................................................................
s1
xl

.----~
&.
j,!
1\
fltila.>!U!JtF~tltl~
<!l:t
~
ft~(;:,
~O)IIEJ
~ilf8l.J
-r
<fl:cl.\ o
•
BtJJI~fltii~flffl~:Qmlli:lct,
i!tll.\li::fl~
L
"C
<
n:~L
\o
fli3qJii:1t~"J1ti~C:
t>
~~"C!Ult>~~-
Ja)Eb~f'j"J"C
<
tc~L\
o
• iEGL
\tffm~li:ta:"J
"("l,\QfJ'il~lJ
"C<n:c!L\o
~~~~t:15~1Jfi£
L.,
(
::>tcJ:fJft\
"(l,
\QfJ'Hf~lJ
"C
(
fi:~l,
\o
•
J@~I~Uf±fJO)ftta:-=>tt~Ucffm
L~l.\c(
li:c!l.\o
•
~
:/:/O)I§JtiJJic.Jict,:1-IJOOIJ:t>Ch"C&IIUt:tJiclc"t
o
i2!1Qlfi~ttta:L
\J:31i::).UL
"C(
ti:c!l.\o
•
Wl$~(f;dJ:$7
:J?
li:~'c!:5~fb
L.,ta:l,
\3"5(;,
1@~1~~:/:/'c!:~fiiL.,ta:l,
\c
(
1i:<!l.
\o
•
iitJMfigQ~(ct,
i1{t::':/cJ:~~$1lJ
"C
<n:c!L\o
•
IUJJO)
1
t.JF]rdllct.
fiL\iii.I~~C:lJ.
2.400
sti/min
!.~"'Fct:::ffm<n:cL\
o
•
~
:/:/fJ\JI~Ii:f.Jll::
L.,
"("f.>'
S.
lct~CJJ.!fltltF~
L.,
"("
<
n:cL
\o
BEFORE OPERATION
A
CAUTION:
L..::.:).
Checkthe
following
so
as
to
prevent
maloperatlon
of
and damageto
the
machine.
• Beforeyou
put
the
machine
Into
operation
for
the
first
timeafter
the
set-up,
clean
It
thoroughly
.
Remove all
dust
gathering
during
transportation
and
oil
It
well.
• Confirm that
voltage
has been correctlyset.
Confirm that
the
power
plug
has
been properlyconnected to
the
power
supply.
• Neverusethe machine
In
the
statewhere
the
voltage
type
Is
different
from
the
designated
one
.
• Thedirection
of
normal rotation
of
the
machineIs counterclockwise as
observed
from
the
pulley
side
.
Take care
not
to
allow
the
machine
to
rotate Inthe reversedirection.
• Neveroperate the machine unlessthe machinehead
and
the
oil
tank have been filled with
oil.
•
For
a testrun, remove
the
bobbin
and the needle
thread.
• Forthefirst month, decreasethesewing speed
and
run
thesewing machineata speed
of
2,400
stVmln
or
less.
• Operatethe handwheel
after
the
machine
has
totally stopped.
VOR OEM BETRIEB ZU BEACHTEN
A VORSICHT:
L..::.:).
Oberprufen Sle
die
folgenden
Punk1e,
urn Fehlbedienung
und
Beschadigung
der
Maschlne
zu
verhuten.
• RelnlgenSie
die
Maschlnegrundlich, bevor Sle
sle
nach derInstallation erstmallgIn Betrieb nehmen.
Saubern
Sle
die
Maschlnegrundllch vonStaub,
der
slch
wiihrend
des
Transportsangesammelthat, und
olen Slesle
gut.
• Vergewlssern Sle
slch,
daB die Spannung korrektelngestellt
worden
lsl
Vergewlssern Sle
slch,
daB derNetzstecker korrekt an
das
Stromnetz angeschlossen worden
lsl
• Betreiben Sle
die
Maschlne nlemals
mit
elner
anderen
als
der vorgeschrlebenen Spannung.
• Olenormale
Laufrlchtung
derMaschlne
1st
von
der
Rlemenscheibe
aus
gesehen entgegen
dem
Uhrzelgersinn. Lassen Sle
nlcht
zu, daB
slch
die
Maschlne
nlcht
in
der
entgegengesetzten Rlchtung dreht.
• BetreibenSle dieMaschlne nlemals, ohnedaOMaschlnenkopf
und
Oltank
mit
01
getullt
worden
sind.
• EntfernenSie Spule und Nadelfaden fUrelnen Probelauf.
• Reduzieren
Sle
die Nahgeschwlndlgkelt
wah
rend
des
ersten Monats, und betrelben
Sle
die Nahmaschlne
mit
elnerGeschwlndlgkelt von maxlmal2.400stVmln.
• BetatlgenSie
das
Handrad erst, nachdem
die
Maschlnezum vollkommenen Stillstand gekommen 1st.
1

-
i±~
• •
ONU
-
1541-7
a"'
il
11
Bi'!li
3.
000
st
i/
min
40
"'-:;
r
22
.
a~
'iiM-Ji
7ru
~~
~~IJ
: 9
mm
8:*:81.\§A~
IE~IJ
: 9
mm
-
lt
~O
·
y'Y
·1'\
~
Q-Jvt--
135
X
17
(
Nm1
25 -
Nm180)
(tJ~
Nm
160
)
~
#30
-
#5
(US
#46-
#138
,
3-D
~H
: 2
0/3-
60
/3
}
-
1------
~
miS
2m~
f-
----
¥fl;{.J:I11.J
J\-
9mm
~
;tO)fclj~
O~J:I1
: 16 mm
ir:J
~
~
-
.:1.
-7"J
IJ
~
?
:;z;t4
Jv
N
o.
2
1-
--
-
1--
!I
.:0:00
JIS B
9064
I
C
~~Gt.:;Jt
U:if:
n
5
1ii
C
~Q
ru~
vi"'\JvJ
El
51~
,g
=
2.560sti
/min
u~
LJI'\
Jv
~
B4
.5dB
<~~
imtn~
•, )
S~
'M = 3.
000sti
/min
M~
I.JI'\J
v
:;
8
3.0
dB
(
M
.IM
~Bi'
F
ib~
•2)
• 1
lE*~tR!Jecl~
,
rlftl-,~
U
cBiiiW~fJ:IIJc!tt~l-\c
,
-~iDle
300mm
~6
lJ
1t
~1ir~O)&IfH!~
o
• 2
t-:t•a•tFIIJ!Jecl~
.
-~~~fll-\
H
1'-::J~1311J
H'.!I
?
.
*-
W~
O!JO)aill
~
tFib
c!
tt
~
.
300
mm
~fivttF!ilc
O)
!li§f
c 9 o
SPECIFICATIONS
Model DNU-1541-7
t--
Sewing
speed
Max 3,
000
stllm•n
See
"22
.SEWING
SPEED
TABLE" on page 40.
Stitch length (max.) I Normal feed 9 mm Reverse feed : 9 mm
N
eedle
GROZ-BECKERT135 x 17 (Nm 1
25
to
Nm
180)
(Standard:
Nm
160)
Thread #30
to
#5 (US ·146
to
1138
, Europe :
2013
to
6013)
--
Hook Horizontal-axiS 2.
0-fold
capacity
hook
--
Uft
of
presser
foot
I Hand lifter lever . 9
mm
Knee lifter : 16 mm
-
Lubri
c
at
i
ng
oil
JUKINew
Defnx
Oil
No
. 2
• Equivalent continuousemissiOn sound pressure level
(lpA)
at
the workstation .
A-weighted valueof 83.5
dB
,
(Includes~=
2.5
dB)
, according
to
ISO 10821· C.6 2
-ISO
11204 GA2
N
oi
se
at
3,000 stl/min.
• Sound
po
w
er
level (lwA) ;
A·we.ghted value
of
89
.5 dB; (Includes
KwA
=2.5
dB)
; according
to
ISO10821· C.6 2
-ISO
11204
GA
2
at
3,000 stilmin
TECHNISCHE DATEN
Modell DNU-
1541-7
Nllhgeschw
l
ndlgkeit
Max 3.
000
sti/min
t-
Siehe
"22
. NAHGESCHWINDIGKEITSTABELLE" auf Seite 40. -
-
St
i
ch
lange (
max.)
Normaltransport 9 mm Ruckwartstranspo
rt
: 9 mm
Nadel GAOZ-BECKERT135x 17 (Nm
125
b
is
Nm
180) (Standard Nm 160) -
Faden
130
bis
15 (USA .146
bis
1138,
Europa .
2013
bis
6013)
1--
- -
Greifer Horizontalachsengrerter
mit
2,0-facher
K
ap
az~ta
t
-
NahfuBhub Handlifter .9
mm
Knielifter 16mm
1--
--
Sc
hmler61
JUKI
New
De
fr
ix
Oil No. 2
-
:-
•
En
tsprechender kontinuierlicherEmiSSioos-Schalldruckpegel (lpA)
am
Arbeitsplatz:
A-bewerteter
We
rt
von 83,5
dB
; (einschlieBiich
KpA
= 2,5 dB); gemaB I
SO
1
0821·
C 6 2 -ISO 11204
Lirm
GR2
bei
3.
000
sti/min.
•
Schallle~stungspeget
(LwA)
A-bewerteter Wert
von
89
,5
dB
;(einschlieBhch K
wA
= 2,5 dB);
gemM
ISO1
082
1· C.6.2 -ISO
11
204
GR2 bei 3.
000
sti/min.
4
I
I
I
I
I
I
I
I
I
I
I
I
I
I
I
I
I
I
I
I
I
I
I
I
I
I
I
I
I
I
I
I
I
I
I
I
I
I
I
I
I
I
I

CARACTERISTIQUES
Modele O
NU
·1541-7
Vltesse
de
couture
3.
000
stilm•n maxi
Voir"22. TABLEAU
DES
VITESSES
DE
COUTURE" aIa page40.
Longueur
des
points Entrainement normal :9
mm
EntraTnement amere : 9 mm
(maxi)
Algullle
GROZ-BECKERT 135 x 17 (n• 125
ll
n• 180) (Standard : n• 160)
Fil
W 30 a n• 5 (Etats-
Un
is:
n•
46
an•
138
, Europe :
2013
ll
60/3)
Crochet
Crochet ve
rtJcal
tldouble capacltl1
Hauteur
de
relevage Releveurmanuel : 9
mm
Genoulllere : 16mm
du
pled
presseur
-
Hulle
lu
bri
fla
nte
JUKI
New
Defrix Otl N" 2
--
-Niveau
de
pressionaooustique d'em
is
sion
continueqUivalent (lpA) au poste de travail :
Valeur ponderoo A
de
83
,5
dB
, (comprend
l<pA
=2,5
dB)
; selon
ISO
10821- C.6.2 -I
SO
11204 GR2
t1
Bruit
3.
000
sti/min.
- Niveau
de
puissance
acoust~que
(LwA) ,
Valeurponderee A de
89
,5
dB
, (comprend
KwA
=2,5
dB)
, selon
ISO
10821- C.6.2 ·ISO11204 GR2 a
3.
000
st
i/
min.
ESPECIFICACIONES
Modelo
DNU·1541-7
f-
Longitud
de
puntada
Veloctdad
mAx
3.
000
st
ll
mtn.
Ver
"22. TABLA
DE
VELOCIDAOE
~
DE
COSI
DO
" enIa pagma40.
,_
Longltud
de
puntada
Transports normal : 9 mm Transporte mverso: 9
mm
(mh
)
Aguja
GROZ-BECKERT
135x
17
(Nm
125a
Nm
180) (Estandar Nm
160
)
Hllo
130
a15 (US
#46
a
1138
, EUROPA.
20
/ 3 a 60 /
3)
---
Gancho
EJehonzontal 2,D-gancho
de
capacidad doble
Elevacl6n
del
Pal
anca
elevadora manual: elevadora
de
rodilla 9 mm :
16
mm
prensatelas
. -
Acelte
lubrlcante
Acettelubricante .
JUKI
New
Defrix
No
. 2
--• Nivel de
pres
i
6n
de
ruido
de
emisi6ncontinua equivalente
(~)
en
el puesto de traba1o:
Valor
ponderado A
de
83,5
dB
(incluye
K!>A
=2,5 dB);
de
acuerdo con ISO 1
0821
-C .6.
2-
ISO 11204
GR2
a 3.
000
stilmin.
Ruldo
• Nivel de poten
ci
a ac(Jstica (
LwA)
:
Valor
ponderado A
de
89
,5
dB
(incluye
KwA
=2,5 dB);
de
acuerdo
con
ISO 10821-C 6 2-
ISO
11204
GR2
a 3.
000
stilmin
CARATTERISTICHE TECNICHE
Modello
ONU
·1541-7
r---
--
Max.
3.
000
stJ/min
VelociU!
dl
cucltura
Vedere
~
par
.
"22
.
TABELLA
VELOCITA 01CUCITURA" sulla pagtna
40
.
Lunghezza
del
punto Trasporto normale : 9
mm
Trasporto1nverso : 9
mm
(max
.)
Ago
GROZ·BECKERT
135
x 17 (da
Nm
125a
Nm
180) (Standard •
Nm
160
)
Fllo
Da
#30
a15 (US
da
146
a 1138, Europa .
da
20f3
a
60f3
)
-Crochet Crochet orizzontalea capacttadoppia
-
-Alzata
pledlno
Levaalzapiedino manuale 9
mm
Alzapiedino a glnocchlo . 16
mm
premlstoffa
---
-
Olio
lubrificante
Oho
JUKI
N
ew
Defnx No.2 -
-Livellodi pressione acus
ti
ca
(
~)
dell'emtSSIOne
continua equtvalentedell'ambtente lavorativo :
Valore ponderato A di
83
,5
dB
, (Include
l<pA
=
2,5
dB). seoondo
Ia
norma
ISO
10821- C.6.2
·ISO
RumorosiU! 11204
GR2
a3.000stilmin.
-Livellodt potenza acustica
(LwA)
;
Vatoreponderato A
dt89
,5
dB
,(Include
KwA
=
2.5
dB) : secondo
Ia
norma
ISO
10821-C.6.2 -ISO
1
1204
GR2
a3.000stilmin
5

tltflf!
DNU-1541
-7
~$1JiiM
.&b~
3.000stVmin
Wi~.~!l
40
!Jr
r 22.
!iUi~ill!t
-Yl1<
J
f-
jljd.l~*lt
iE.i!
:fti
:9 mm
ffJ:i!
{fj : 9 mm
f-
I
faJ'iXAA!tt
135
x
17
( Nm125 -Nm180)
tlttt (
H~lfi.
~ml60)
-
till
I #30 -
#5
(
US:#46
-H
138
lixffll
: 2o13 -6013 >
~~
~
ll
2
fff
AcE
«l
-
JI~~i!iM
IfB!P~:fHf:
9 mm
n~TJ1mft
:
16
mm
1-
-
~~~~iiili#idl
New
Defrix
Oil
No.2
6

1.
~
:.t
:/a.>Mx
i-:ft:t
/INSTALLATION/INSTALLATION I INSTALLATION I
INSTALACIONIINSTALLAZIONEI
g~!Jj*Jl,agjt~
'
~
f:.
l.
,,__
o
~
0
I
'
1) Carry the sewing machine with two persons.
,_
______________
___
~
~
\
t
\!I)
Do
not h
ol
d t
he
han
dwh
ee
l.
J
..,_,
______________
_,
2)
Do
not
put
protrud1ng art1cles such as the screwdnver
and
the like at the location where thesewing machine
is
placed.
3)
F1x
the hinge
seats
0
and
the
support
rubbers
f)
supplied
w1th
the
machine
on
the tableusing
nails
f)
1) Porter
Ia
machinea
deux
personnes.
,.,----------------...
~
~
\
t
\W)
Ne pas ten
lr
Ia
machine
par
le
volant
J
...._
______________
..,.,
2)
Ne
pas mettre d'objets sa1llants tels que tournevis a
l'endroit
ou
Ia
machine
do1t
~tre
placee
.
3)
Fixer
les
s1eges
de
charniere
0
et
les supports en
caoutchouc
f)
foumis avec
Ia
machine
sur
Ia
table
a
I'
a1de
declous
f)
.
1) Portare Ia macchina
per
cucire con due persone.
-----------------..
~
(I}
Non
lmpugnare
II
volantlno
.
~
2)
Nonmette~
artlc'Oii
sporgenti
come
ilCacciavite"e
cose simih al posto
dove
Ia
macchina per
CtJCire
V!ene
posizionata
3)
F1ssare
i basamenti della
cemiera
0 e
le
gomme di
supporto
f)
in
dotazione
con
Ia macchina
sui
tavolo
tramite i chiodi
f)
7-
'7
)III
Ta
b
le
I Tisch I
Ta
bl
e
M
esa
ITavolo I
m~
26mm
---j---
I
0
-B
I
Alig
nI
Ausrlchten
I
Aligner
I
Alineacl6nI Alllneare/-it
1)
~
://I~=J
,:
c~":)"L•Iv
Z::<tc~
l,\o
...-.-------
----------
[
(I)
::t-v-~mr.:tJ~I<'<t.:~~~.
]
_________________
_...
2)
~
:.;:::;
~
<tJJffil;: 1'5-1'
H-WO)~~~~~~
b
'
~l,
'L'
<
t
~
c!
L\o
3>
1-:t•O)t::::;
~
m
o.
tilt$~X.:::1b.
e
~~i
J
O
1) Tragen
Sie
die
Nahmasch1ne mit zwei Personen.
.--------------------
~
~
Nl
c
ht
da
s
Handrad
ha
lt
en.
~
......_
______________
____
2)
Achten
Sie
darauf, dass sich
am
Aufstellungsort
der
Nahmaschine
keine
vorstehenden
Teile, w
ie
ein
Schraubenz1eher
oder
dergleichen, befinden.
3)
01e
m11
der
Masch1ne gelieferten Scharniersi
tze
0 und
Gummidampfer
f)
m11
Nageln 0
am
Tischbefestigen.
1) La
maquina
de
coser
debe
ser
portada
por
dos
personas.
....-----------------
~
~
No
so
ste
nga
Ia
maqul
na
por
el
vo
l
ante
. ;
._
______________
....,.
2)
No poner artlculos
salientes
como
destornillador y
semejantes en
ellugar
onde
se
va colocar
Ia
maquina
de coser.
3)
FiJe
losasienlos
de
bisagra 0 y las gomasde soporte
f)
que
se
sum1nistran con
Ia
maquina de
cose
r
en
Ia
mesa
usando
los
clavosD
------------------
.__
______________
..,.,.
2 )
.(£rJ:it~U1HJLa'~.lt!!
:
h
,
it't
~
~.tiU,i-~JJ~~~~
-
\
J
3)
IOH
f)
rellf.tfi4t't-Jft
!il
~ 0
tJL::k
.:
H;ttri
f)
DJ
IE
ilJ
tJL
t;
1
:.
4)
t-1
O);t
-1'
J!IJ
\::.; 0 ~ 6 f!iffi
iTc:T-
-::J
JI
Ai:
J16'J"L
<n;:(!t,)0
4)
F1x
011
pan0 supplied
w1th
the
mach1ne
USIIlQ
six
nails.
4)
Die
m1t
der
Masch1ne gelieferte Olwanne0
mit
sechs
Nageln befesllgen
4)
Fixer
le
carter
d'huile0 fourni avecIa machine aI'
a1de
de
six
clous
4)
Fije
Ia
bandejadel
ace1te
0
que
se suministra con
Ia
maqUJna
usando
se1s
clavos.
4) Fissare
Ia
vaschetta dell'olio 0 in dotazione
con
Ia
macch1na
tram1te
se1
ch1od1
.
7

5)
Poser
le
bouchon de vidange 0 . le joint d'etancheite
d'huile
f)
et Ia rondelle C) sur le bac d'huile. Poser
Ia
garn•ture 0
et
Ia
rondelle 0 sur Ia vis 0 . puis les
fixer
avec
l'ecrou 0 .
6) Visser ensuite le flacon
de
recuperation d'huile usee
f)
dans le bouchon devidange 0 .
5) Attaccare Ia spina di scarico 0 . Ia guarn•zione
f)
e Ia rondella C) alia vasca
dell'olio.
Attaccare
Ia
guamizione 0 e Ia rondella 0 alia vrte 0 e fissarle
con il dado 0 .
6) Dopo
averl1
lissati, awitare
il
contenitore dell'ollo
f)
nella
sptna
discarico 0 .
7) Avant
de
placer Ia
t~te
de
Ia
machine
sur
les sieges
en
caoutchouc aux quatre coins, fixer Ia chamiere 0
dans I' ouverture
du
socle de
Ia
machine, puis monter
Ia
t~te
de
Ia
machine sur Ia charniere en caoutchouc
de Ia table.
7)
lnserire Ia
cerniera
0 nell'apertura
nel
letto
della
macchina,
ed
incastrare Ia testa della macchina alia
cemiera di gamma prima di posizionare Ia testa della
macchina sui tampon, di gomma sui quattroangoli.
8
5)
:t-1'JvJt:.;t;:5mtl:~
o
,
;t1'JvY-Jv
8 , 1i
~ 0
~lUUJ1'11:t,
lt~~
l,j 0
(;:J\'.!I:f/
0 ,
J.i~
0
~1-tl:t,
:t-'.!1
1--
0
c~~G~~o
6)
~~G~Gt.:S,
~mg~
f)
~)ltl~~
O
I;:td
lj)6fv
c<t.:~l,)o
5) Attach
dra1n
plug 0 .oil seal
f)
and washer C)
to
the
oil pan.Attach packing 0 and washer 0
to
screw
0
and
f1x
them
w1th
nut
0 .
6)
After
they
are fixed, screw in waste
oil
container8
into drain plug 0 .
5)
AblaBstutzen 0 .Oldichtung
f)
und Untertegscheibe
C) an
der
Olwanne anbnngen. Zwei Dichtungen0
und
eine
Unterlegscheibe 0
an
der Schraube 0
anbringen, und
diese
mit
derMutter 0 befestigen.
6) Nachdem dieseTeile befestigt worden sind,
den
Olsammelbehalter 8 in denAblaBstutzen 0
e•nschrauben.
5) Coloque
el
tap6n 0
de
drenaje, el sello del
aceite
8
y
Ia
arandela
f)
en
el colector del aceite. Coloque
Ia
empaquetadura 0 y Ia arandela 0
en
el tornillo 0 Y
fijelos
con
Ia tuerca0 .
6) Despues
de
fijados
,
meta
a
tornillo
el tap6n 0 de
drenaje del envase
f)
.
s> reflfrmti o.
'idlf:t
e.
mJt
e
:tc~flJtti!llm.t.
Nremt*
o. m
Jt
e
:efll
~
~•
~t
o
J:.
:JF
m
•n
0
~~.
6 >
19Jii:Z.Fu,
re~iltl.fHJ
o
rri!Jti~rm~~
o
J:.
7)
t:::::.;:i o
~~'.!/
t-=OJ~t;:J...n,
:r-:1Jv(l):::l'
b.
I::
Y:i(;:1J'Ch--abtt'"C,
RQ$~1m~OJBJi8BSi:
;t
::r
~OJ...tt;:a=.>
~
G
-c
<
tc<!l
'0
7)
Fit
hinge 0
1nto
the opening in
the
machine
bed,
and
fit
the
machine head
to
table rubber hinge before
placing
the machmehead on rubberseats on thefour
comers.
7)
Das
Scharnier0
in
die
bffnung
des Maschinenbetts
einpassen, und
den
Maschinenkopf
erst
in
das
Gummilagerim Tisch einpassen, bevorer
auf
die
Gumm•dampferin
den
vier
Eckengesetztwird.7)
7)
Acomode Ia bisagra 0 en Ia abertura
de
Ia
ba~
de
Ia
m~quina,
y fije
el
cabezal de Ia
m~quina
en Ia
bisagra
de
goma
de
Ia mesa antes
de
colocar
el
asientos
de
goma
en
las
cuatro esquinas.
7>
m•~re~~
o
~~~~wm±~.~~m#~
~
JJ'1
-n-
»r
.
rem
::'k
~
.¥JJ
1m
fij
A<J
tll..5A-
j:
~ ~
wtt.

9)
Regier
l'accouplement
de
genouill~re
0 . le
bras
de
montage
de
l'axe
vertical
de
genouill~re
f)
et
le
levier
de
genouill~re
f)
dans
Ia direction de l'axe
de
levier
de
genou1llere 0
et
assembler
ces
p1eces.
1
0)
Regier !'orientation
de
Ia genouillere
avec
les vis de
fixation 0 .0
et
f)
.
9)
Regolare
II
giunto
del
paraginocchio
0 .il
braccio
di
fissaggio
dell'albero
verticale
dell'alzapiedino
a
ginocchio
f)
e Ia
leva
del paraginocch1o
f)
rispetto
alia direzione
dell'albero
della
leva
alzapiedino 8 e
montara questi componenti.
1
0)
Regolare Ia d1rezione
del
parag1nocchio con
le
vib
di
fissaggio 0 .0 e e.
a>
nQmn~:x.~
o1Cf7-:1Jvtcm1i*cG::>
t:J'D
INbM11"L<rccl-'o
8)
Securely attach
head
support
rod
0 to
the
table
unlll
11
goes
no
further
8)
D1e
Kopfs!Utze0
bis
zum
Anschlagam Tisch
befestigen.
8) Fixer solidement
Ia
tige
de
support
de
t~te
0
sur
Ia
table
en
l'enfo~t
completement
8)
Fijefirmemente
Ia
vanlla
de
soporte0
del
cabezal a
Ia
mesa
hasta
que
no
pueda avanzar
mas.
8)
Attaccare sicuramentel'asta
d1
sostegno della
testa
0
al tavolo inserendola ilpiu possibile
8)
i,HPHJL.:k3t11ttf
0
1f!$.ftk'{(~fiJtJL
tl
J:.
9)
Oc!....ti1LIH-fdl0
O)lo.Jt!-IL:-8-bttl:O"~~
L]il~
0 , 0~
J:l1i1U1lii&1'1Je
f)
,
0~
~I:
l.IJ\-
0
~lil#t-111*~0
1
O)
.Lt6'J;fdt;
0 . e, o
<:H·:~
t-=O)IcJ~~8-vtt
~~0
9)
AdJUSt
knee pad
joint
0.knee
lifter
verticalsha
ft
installing
arm
f)
and
knee p
ad
lever
D
to
the
direction
of
knee lifter lever
shaft
0 and
assemble
these
components.
10) Adjust the directJon
of
the
pad
with
setscrews 0 .0
and
f)
9)
Kmepolsterverblndung
0.
Kntelifter.Yertikalschaft-
Montagearm
f)
und
Kmepolsterhebel 0 auf
die
R1chtung
des
Kn1elifter-Hebelschafts0 ausrichten
und dieseTeilezusammenmontieren.
1
0)
D1e
Richtung des Polsters mit
den
Feststellschrauben
0 .0
und
f)
einstellen.
9}
Ajuste Ia
uni6n
0
de
Ia almohadllla
de
Ia
rodilla.
el
brazo
f)
de
instalacr6n
del
eje vertiCal
del
elevador
de
rodilla y Ia palanca
f)
de
almohadilla
de
Ia
rod
ilia en
Ia dicci6n
del
eJe
0
de
Ia
palanca
elevadora
de
rodilla
yensamble estoscomponentes.
1
0)
AJuste
Iadirecci6n
de
Ia
almohadilla
con
los
tomillos0 .
0 y
f)
.
9>
•••~•*ff•
o
~~~.
R•g~~~
o
Qii;IJ!!HHJA.f!ll:tc~atJM
f)
,
~HHf
8
10 >
JflW/Etl~~
008
~m:tNkiY:J:JirPJ.
9

2.
""Jv
t---~:1JO)~~
I ADJUSTING
THE
BELT TENSION I
EINSTELLEN DER RIEMENSPANNUNGI
REGLAGE DE
LA
TENSION
DE
COURROIEI
MODO DE AJUSTAR
LA
TENSION
DE
LA
CORREA
I
REGOLAZIONE DELLATENSIONE
DELLA
CINGHIAI
Bim~-ft)J~ifoj~
&
~
~
~
~
~
&
~~h·
Handwheel
Handrad
Volant
Volante
Volantlno
t~
.tt:_.
Cl
•
~~::I(T.>:fMOJgJijli:J:l>.A.~o.>tltl~~<:tt&b,
··~U.H>.
l:-~ll)~fifJtltiJ;:>fti:c~iiiZt..
'tf.l'5fi~:>"r<T::
~l.\
o
WARNING:
To
protectagainst possible personal
Injury
due
to
abrupt
start
of
the
machine,
be
sure
to
start
the follow-
lng
work
afterturningthe power
off
and ascertaining that the
motor
Is
at rest.
WARNUNG
: -
Um
durch plotzllches Anlaufen
der
Nahmaschlne verursachte Verletzungen zu vermelden, tuhren Sle
die
folgende Arbeit
erst
aus, nachdem Sle
den
Netzschalter ausgeschaltet
und
slch vergewlssert haben,
daB
der Motorvollkommen stlllsteht.
AVERTISSEMENT
: --
Pour ne pas rlsquer des blessures
caus~s
par
une
brusque
mise
en marche
de
Ia
machine, toujours
Ia
mettre
hors
tensionets'assurer
que
le
moteur
est
au repos
avant
d'effectuer
les
operations
sulvantes.
tAVISOI
Para
protegerse contra posibles leslones personates debldo a
un
arranque
brusco
de
Ia maqulna deco-
ser,
cercl6rese
de
comenzar el slguiente trabajo despues
de
desconectar
Ia
corrlente
y
de
estar seguro
queel motoresta completamente parado.
AVVERTIMENTO
:
Per
evltare posslblll ferimentl causatl dall'avvlolmprovvlso
della
macchlna
per
cucire,
prima
di
etfettuare
le
seguenti operazioni spegnere l'interruttoredell'alimentazlone
ed
asslcurarsl
che
11
motore
abbia com·
pletamente cessato diruotare.
H
7J7~.1t~~~i;J~.&tA.A•at.
il~~~il!
.
QU~~iU~~.It~~JiiMi!trtlf~
.
l:-177-IJ
Motor pulley
Motorrlemenschelbe
Poulie demoteur
Polea
del motor
Puleggia motore
~~.!i~U~
1"'\JI.J
Hl:hla:,
V
1"'\JI.J
1--0)clJ~l<t
9.8N
O))Jc1'JIG
t.:ll~,
1"\JI.J
1--0Jt.:b#.lltJ' 15mm
1.:1CJ:-6>J:51.:,
=t:-:90)~C!c:r:Jg
G
-c
<tee!
I.,
'0
Adjust
the
belt tension with
the
height
of
the motor
so
that
the
belt
sags
15
mm when the center
of
V belt is
applied
with a
9.8
N load.
Stellen
Sie
die Riemenspannung mit der Hohe
des
Motors
so
ein,
dass
der
Rieman amen Durchhang von 15
mm
hat.
wenn
em
Druck von 9,8 N auf
d1e
Mitte des Keilriemens
ausgeubt
w1rd
R6gler
Ia
hauteur
du
moteur
de
fa90n
que
Ia
courroie ploie
de
15
mm
lorsqu'on applique une charge de 9,8 N
en
son
centre
Ajuste
Ia
tensi6n
deIa
correa
con
Ia
altura
del
motorde
modo
que
Ia
correa haga una combade 15 mm cuando se
aphque
al
centro
de
Ia
correa
en V
una
carga de 9,8N.
Regolare
Ia
tensione
della cinghia
con
I'altezza del motore
in
modo
che
Ia
c1nghia
si incurvi di
15
mm
quando
un
carico
di
9,8
N
v1ene
apphcato
al
centro
della cinghia a
v.
10

3.
"'Jld
...
:tJH-a.>QXbi\tl:t
I ATTACHING
THE
BELT COVERI
ANBRINGEN DER RIEMENABDECKUNG I POSE DU COUVRE-COURROIEI
MODO DE
COLOCAR
LA
CUBIERTADE
LA
CORREAI
FISSAGGIO
DEL
COPRICINGHIAI
lt*?~.aaq~~
&
~
-
~
~
~
~
&
.fS:
~:_,yO)~·CT)dli:J:~A-O)al~lln<:t::~
.•
B'E00.
~-~C1)!9.1fiib'lt~:>t::i:c~D!JT:b\5fi~:>l:<t::
cl.'
WARNING:
To
protect
against
possible
personal
injury
due
to
abrupt
start
of
the
machine,
be
sure
to
start
the
follow
-
lng
work
after
turning
the
power
off
and
ascertainingthat
the
motor
Isat
rest.
WARNUNG:
Um
durch
plotzllches Anlaufen
der
Nahmaschine verursachte Verletzungen zu vermelden, fUhren
Sie
die
folgende
Arbelt
erst aus, nachdem
Sle
den
Netzschalterausgeschaltet
und
slch
vergewlsse
rt
haben,
daB
der
Motorvollkommen stlllsteht.
AVERTISSEMENT:
Pour
ne
pas
rlsquer
des
blessures causees
par
une
brusque
mise
en marche de
Ia
machine,
toujours
Ia
mettre
hors
tension
et
s'assurer
que
le
moteur
est
au
repos avantd'effectuerles operations sulvantes.
lA
VI
SOI
Para
protegerse
contra poslbles lesiones personales debldo a
un
arranque brusco
de
Ia
maquina
de
co-
ser, cercl6rese
de
comenzar
el
slguiente trabajo despues
de
desconectar Ia corrlente y
de
estar seguro
que
el
motor
esta
completamente parado.
AVVERTIMENTO :
Perevltare
possiblll
ferlmentl
causatidall'avvio improvvlsodella macchlna
per
cucire, prima
dl
effettuare
le
seguentl operazloni spegnere l'interruttoredell'allmentazlone
ed
asslcurarsl che II motore abbia com-
pletamente cessato
dl
ruotare.
·~·
~7Jh.Lt~~grJJil.&XA
••
at.
il~~lt!il.l.
Ql.A.~i!-~iJ.ltftidJ~JiifH:rfli't:.
0
10mm
1)
r\Jv
t--t.JJC-3tU
0
~7-bO)tdlJ'i\li:!NtH111
*~·
2)
r\Jv
t--
1:11
c-
<{:no
~ll:~:td
l.j e . o
rc"L,
:r-
b!.::~~G*~·
3)
r\Jvt--1JJC-(:t:j)00)fl\$0 . 0
1;:;"{J!J!---7JH-
(
1£
)0
~lct6bi6#*~.
4)
.l!:~:tdl.j
o. 0 . 0
l:r\Jv
1--tJH- <
:1f
lO
~~~
G*~·
5)
ri.Jv
t--t.JJC-ftllWJt&
G
b~I'\Jv
t--tJJC-c 2.5 mm
~t!IUI~®I:t1t!J;1,
r\Jv
1--
tJJ
C-?ililt'J1&
0
ti~fJ\
S
10
mm
0){11
!L:;;t;::tdl.i
0
cli5l)EG~~o
e)
~;:;::;~fi!J~&i¥1d:.
;;t;::tdu
0
~!I~-
r\Jv
t--tJJ\-
filWJ~~~EP0)1JicJ"'-.lt~
~
*
C:3th~tt'L1J'
SfilJ
G
'L
<
fC<!L,
'·
.,.....---------------
'
1'\Jv
1--t.JH-!Nt>t-i!:tti,
§::J-
f'1JV"JII
t--J.iH1
\
1
~
lct~CJJ•I<:mML,
l:\,\fJI.ltJq:mvc<n:<!l.\. I
I~
tiMVCl.\Qtaa.
::J-
f'O)!JifiO).S'U~C:~b
I
\
*'§"
o J
....._
______________
_
1)
Attach
beltcover
stud
f)
to the screw hole
in
the
arm.
2)
FIX
belt cover (nght)0
on
the
arm
w1th
screws8 and 0
3)
F1t
belt cover (left)
f)
to
notch 0 and
€)
of
thebelt cover
(nght)
4)
F1x
belt cover (left)
f)
w1th
screws 0 .0
and
0
5) Fix belt cover auxthary plate 9
at
the
pos1t1on
of
10
mm
from
the rear end
w1th
wood screws 0 when
there
IS
aclearance
of
2 5
mm
betweenthe belt cover
and
the
aux
thary
plate.
6)
When
tllltng the
mach1ne
head, loosen wood
screws
0
and
movethe beltcover auxiliary plate
in
the
direction
of
the
arrow
unt1l
it
stops
Then,
1111
the machine
head.
--------------------....
f Afterattaching
the
beltcover, confirm whether or l
I (i)notthe respective cordsdo
not
come incontact (
with the belt
and
the
handwheel. Disconnection
I ofthe cordswill resultwhen theycome
in
contact I
\ with one another. J
------------------
11

1) Poser le
QOU)On
de
couvre-courrore
f)
dans
le
trou
a vis
du bras.
2)
Frxer le couvre-courroie {drort) 0
sur
le bras
avec
les vis
f)
et
O
3)
Fixerle couvre-courroie (gauche) e
sur
lesencoches0
et
€)
du couvre-courroie (drort).
4) Fixerle couvre-courrore (gauche) 8 avec les vis 0 .0
et
0
5) Frxer
Ia
plaque auxiliarre
du
couvre-courroie0 a
10
mm
de
l'extremite arriere avecdes
vis
a bois0
de
maniere
qu'rl yart un jeu
de
2,5
mm
entre
le
couvre-courrore
et
Ia
plaqueauxilrarre.
6) Pourbasculer
Ia
h~te
de
Iamachine en arriere, desserrer
les vis a
bois
0 etdeplacerIaplaque auxiliaire
du
couvre-
courroie dans
le
sens
de
Iaflechejusqu'ace qu'elle Vlenne
enbutee Basculer ensuite
Ia
t~te
de
Ia machine
en
arriere.
(
-Cij-
-;P;.
::,~-;
~~,'~~r~
,
:;ri-;;;
-l
I lescordons
ne
viennent pas en contact
avec
I
Iacourrole
ou
le
volant
Un
tel
contact
pourra
it
l
__
~n~n~~~~~~o~
______
J
1) Attaccare Iacolonnettadelcopndnghia0
aJ
foro
per
vrte
nel bracero.
2) Fissare
rl
coprietnghia
(dr
destra)0
sui
bracero
con
le
viti
f)
e Q
3) lncastrareilcopricrnghia {di sinistra) 0
aJ
dentello 0 e 0
del copnctnghia
{di
destra)
4) Frssare
rl
CO_Pricinghra
{di sinistra)0
con
le viti 0 .0 e 0 .
5) Frssare
Ia
prastra ausihariaQ ad una distanza dt 1o
mmdall'estremita postenore dellapiastra ausiliaria
con
le
Vth
perlegno0 quando
c'e
un
gioco di 2,5
mm
tra il
copncmghra e
Ia
piastra ausiliaria.
6)
Oua~do
Iatesta della macchinaviene inclinata, allentare
le
vrtr
perlegno 0 e spostare Iapiastra ausiliaria
del
copncrnghia
~el
senso tndrcato dalla freccia finche
essa
sr
fermr lnchnarequrndi Iatestadella macchina.
I-(~)-
~
.";,fi;s-;to
~;ri~hia
,
~,;;,~
7h;j
l
1 rlspettivl fill
non
tocchlno
Ia
clnghiae
11
volantino
.
l Scollegamento del fill
sl
venflchera
quando
essl
sl
I
__
.!_OC~n~
_ _ _ J
-------....-
12
1) Den Rtemenabdeckungsbolzen 8 tn
die
Ge
w
tndebohrung
tm
Arm einschrauben.
2)
Ore
Rtemenabdeckung (rechts) 0
mtt
den Schrauben 8
und 0
am
Arm befesbgen.
3)
Ore
Rremenabdeckung (hnks) 0
in
die
Kerbe 0
und
8
der
Riemenabdeckung
(rechts) empassen.
4)
Ore
Rremenabdeckung (links) 0 mrt
den
Schrauben8
0
und
0 befestrgen
5)
Ore
Riemenabdeckungs-Htlfsplatte 0 mrtden
Holzschrauben0
in
ei
nem
Abstand
von
10
mm
von
derHinterkante befestrgen,
wenn
ern Abstand
von
2,5
mm
zwischen
der
Riemenabdeckung
und
der
Hilfspla
tte
besteht.
6)
Zum
Kippen
des
Maschinenkopfesdre Holzschrauben
0 IOsen, und
die
Rtemenabdeckungs-Hilfsplatte
brs
zum
Anschlag
rn
Pfeilrichtung
schieben.
Dann
den
Maschinenkopf
kippen
(-
-
-;e;;w-;;s;;
~
*h-;a;;-
d-;,
An
bring-:;,-\
I(f)
Rlemenabdeckung
, daB
die
jewelllgen Kabel nlcht 1
mit
Rlemen
und
Handrad
In
Beriihrung
kommen.
I
Gegenseltlge
Beriihrung
dleser
Teile kann
zum
I
l
Abtrennen
der
Kabel
fiihren.
_ J
..._
_____________
_
1)
Coloque
el
salrente 8
de
Ia
cubierta
de
Iacorrea
en
el
agujero
de
tomrllo
en
el brazo.
2)
Fije Ia
cubierta
de
Ia
correa
(derecha) 0 en
el
brazo
con
los
tornillos
f)
y 0 .
3) Encaje
Ia
cubierta
de
Ia correa (izquierda)0
en
las
muescas 0 y0
de
Iacubierta
de
Iacorrea (derecha)
4)
FiJe
Ia
cubierta
de
Ia
correa 0 (izquierda) con los
tomrllos
O.Oy0 .
5)
Fije Ia
placa
auxiliar0
de
Iacubierta
de
Iaco.rrea
en
Ia
posici6n
a
10
mm
desde
el
extremo
postenor
con
los tornillos
de
madera
0
de
modo
que
seproveauna
separact6n
de
2,5
mm
entre
Ia
cubierta
de
Ia
correaY
Ia
placa
auxiliar
.
6)
Cuando
levante
el
cabezal
de
Ia mAquina, afloJe
los
·1·
de
Ia
tornillos
de
madera
0 y mueva
Ia
placa auxt tar
cubierta
en
Ia d1recci6n
de
Ia
flecha
hasta
que
se
pare.
Entonces, incline
el
cabezal
de
Ia
maquina.
I-
-
D'e;;u;;
d~~""71a~ub'i;rt-;d;Ja
;;~
,
-
-\
1
CIJ
conflrme
que
los
respectlvos
cordones
no
entren I
en
contacto
con
Ia correa y
el
volante;
de
lo
1
I
contra
rio,
puede
ocurrlr
Ia
desconexi6n
de
dic:os
J
l
cordones
al
entrar
en
contacto
con
los
m~~
·-
..._
___________
_

4.
131b~3bl31fJMI;t...tl11-i~IDl$0JI700i*-
I
THE AIR DRIVE UNIT
OF
THE
SEWING
MACHINE EQUIPPED WITH
AUTOMATIC
REVERSE FEED DEVICE AND AUTO-LIFTERI
LUFTANTRIEBSEINHEIT
FOR
NAHMASCHINEN
MIT
AUTOMATISCHER
ROCKWARTSNAHVORRICHTUNG
UNO
AUTO-LIFTER I
INSTALLATION DE L'UNITE
PNEUMATIQUE
DE
LA MACHINE
AVEC
DISPOSITIF
D'ENTRAINEMENT ARRIEREAUTOMATIQUE
ET
RELEVEUR AUTOMATIQUE I
UNlOAD
IMPULSORA
NEUMATICA
DE
LA
MAQUINA
DE
COSER
EQUIPADA
CON
UN
DISPOSITIVO
DE
TRANSPORTE
INVERSO
AUTOMATICO
Y
ELEVADOR
AUTOMATICO
I
UNITA
01
COMANDO
AD
ARIA DELLAMACCHINA
PER
CUCIRE
DOTATA
01
DISPOSITIVO
01
AFFRANCATURA E ALZAPIEDINO AUTOMATICOI
m~~~~~~ffi~m*m~~~~~~
WARNING:
;.,
To
protect
againstpossible personal
Injury
due
to
abruptstart
of
the
machine,
be
sure
to
start
the
follow
·
·
lng
work afterturning
the
power
off
and ascertaining thatthe
motor
Ia
at rest.
1-------:
w
=
A
.,;:,
R
=
N
.,.,...
U
,..,.,
N
~
G
:
~.~
Urn durch plc3tzllches Anlaufen
der
Nahmaschine verursachte Verletzungen
zu
vermelden, tuhren
Sie
die
• folgende Arbelt erst
aus,
nachdem Sie
den
Netzschalterausgeschaltet
und
aich vergewissert haben,
daB
der
Motorvollkommen
stlllstehl
AVERTISSEMENT
:
;.,
Pour
ne
pas
rlsquer
des
blessures causees
par
une brusque
mise
enmarche
de
Ia machine, toujours
Ia
· mettre
hors
tension
et
s'assurer
que
le moteur
est
au repos avantd'effectuer lesop6rations suivantes.
tAVISOI
~.~
Para protegerse contra poslbles lesiones personates debldo a
un
arranque brusco
de
Ia maqu
in
a
de
co-
.
ser
, cerci6rese de comenzar el slgulente trabajo despues
de
desconectar
Ia
corrlente y
de
estar seguro
que
el
motor
est6completamente parado.
~---
A
-
V
-
V
-
ER
_
TI
_
M
-
ENTO:
~.~
Per
evitare posslbillferimentJ causatl dall'avvio lmprovvlsodella macchlna per cuclre, prima
di
effettuare
.
le
seguentloperazlonl spegnere l
'l
nterruttore
dell
'allmentazlone
ed
asslcurarsi che II
motore
abbia com-
pletamentecessato
dl
ruotare.
I
.
I
L.----
(
1)
I?$~WJ~iii0)1Ul
t)f.il:t
1)
L/~
.:tl./-5'
(II
)0
~r:t•O)*fd
Li
f)
IC:"L7-
-:J
Jv
"fiHii<:IN
IJ
Ml:t"L
<
n:c!t-
'o
2)
IrnJ!JaJI~·
(II
)
f)
~ft·O)*fdLi
0
1.:-r.
4
f!
m:r-7
111
"fimi.:INIJ
111:t-c
<rt<!t-
'0
3)
Irm-
::::z
o
let.
E31bi2?z1Jm::;u:;:>'
0
0)~-1;)
~fU'F"-o
Irm-::::z
0
1et.
Ellb~;t..tttm~u
:~5'
0
0)~
.-{
;)
~
Je=¥
f)
'"'-o
Irm-::::z
e
let.
~-1
:1~
=¥
0
'"'-~n-fnm~
G~~.
Irit\-::AC:
'¥1<:l!i-:>L"®.Q~-JIJO)tl;
~~~.tJtf~~o
~
§~i2?~t>O)~ID~a~.I:rm-~~§~~~IJ
m~
u
:;~-
o
ID~
-1
';)
~~=¥"-mtvt
t..,a;~
o
13

-
-1
'
I
I
L
---
--
(1} Installation de l'unite pneumatique
1) Poserle regulateur (ensemble)0
sur
Iaface
inf~rieure
de
Ia
table avec Ia VIS abois8 foumie comme accesso1
re
2) Poserl'un.t6
de
commande
d'Cllr
(ensemble)O
sur
la.face
mfen~re
de
Ia
table enquatrepoints avec
les
VIS a
bois
0
foum•escommaaccessoires.
3) Raccorderle flexible d'air0 auraccord raptde
du
cylindre0 d'
entraTnernent amereautomatique.
Ra(X:()(der
leflexible d'alr(!) au raccord rapideG
du
cylindre
0
du
releveur automattque.
Ra(X:()(der
le
flex1ble
d'a1r
(9
au raccord rapide O.
F81re
correspondre lesnumeros
indtqu~
surles flexibles avec
leS numeros
Ind.
tqU~
surles etiquettes
col''-~-
le
4) p 1 d
""=
sur
s raccords
our
e •sposlhf d'entraTnement amere automatique .
seulement,
r~ccorder
leflexible
d'81r
au
raccord rapide
du
_
~d
~
~
~
raTnement
arriere automattque.
l
Ne
pas
falr;to;;e;;
~hk.ek;r;;et;
;d-
-1
1
~
presseur
est
reteve avecle releveur automatlque
l
\!I)
La barre• algullle toucheralt
le
pled presseur
et
~es
I
_ _
.!_~
8
~u~l~
6~
endommagees. J
_______
_.,
14
(1)
Installing
the
air control
unit
1)
2)
3)
4)
Install regulator
(asm
.) 0
on
the
bottom
surfaceof
the
table
w•th
wood
screw8 suppliedas
accessones
Install a•rcontrol
un1t
(asm.)
f)
on
the
bottom surfaceof
the
table
1n
four
places
WJth
wood screws 0 supplied as
accessones
Connect
8lr
hose 0
to
the
quick
joint
of
cylinder 0for
automatiC reverse feed
Connect
a~r
hose (!)
to
quickjointG ofcylinder0 fora
uto
lifter.
Connect
air
hose
e
to
quickjo.nt o.
Match
the
numbers
1nd1cated
on
the
respective hosesw1
th
lhe
numbers •ndiC8ted
on
the
labels
adhered
on
the jotnts.
For
the
automatiC reverse feed
device
only, connect
the
rur
hose
to
the
quick
JOint
of
cylinder0
for
automatiC
reverse
f
eed
------------------....
I
(()
Do
not
run
the
se
wi
ng
mach
i
ne
while
the
presser l
I
1011
foot
Is
he
ld
ra
is
ed
wit
h
the
auto-lifter
. Needlebar I
com
es In
co
nta
ct
with
presser
foot.
l
As
a r
es
ult
,
th
ey
may
be
damaged
. J
....._
______________
-""
(1)
lnstallleren
der
Luftregeleinheit
1) Den
Regier
(E1nh
.) 0
m1t
der
m1tgelieferten Holzschrau
be
8
an
der
Unterse1te
der
Tischplatte
befestigen
.
2) Die Luftreglere1nhe1t (Einh.)
f)
mit
den
mitgehefert
en
Holzschrauben 0
an
vier
Stellen
an
der Unterseiteder
Tischplatte befest.gen.
3)
Den Luftschlauch 0
an
die
SchnellkupplungdesZylinders0
fur
automat
isches Ruckwartsnahen anschheBen.
Den Luftschlauch (!)
an
die
Schnellkupplung 8 d
es
Z
yl1
nders
0 fur
den
Auto-Utter anschheBen.
Den Luftschlauch
C9
an
die
Schnellkupplung 0 anschlieBen.
Darauf achten,
daB
die
Nummem
der
Schlauche
m1t
den
Nummem
auf
den
Aufklebem
an
den Anschlussen
ubere1nshmmen
4) Wenn
nur
die
automabsche RUckwartstransportvorrichtung
vorhanden ist,
den
Luftschlauch
an
die
Schnellkupplu
ng
desZyhnders0 fUr automatischen AUckwartstransport
anschlieBen.
,-
-
Bet;;j~;,;
dj;
N'fihm-;sct;i;.e~c'trt,
:ahr;;;d
der
-l
1(f)
NiihfuB
v
om
Auto-Lifte
r
hochgehalten
wlrd. I
I
Anderenfalls
kommt
die Nadelstangemit dem
NfihfuO
1
l In BerOhrung,
was
zu
elner
Beschiidlgung
derTelle J
fUhren kann. -
...._
_____________
_
(1) Modo delnstalar
Ia
unidad
de
control
neumatlca
1) lnstale
el
regulador (conjunto) 0
en
Ia
superfic:ie i
nf
eriorde
Ia
mesa
con
los IOm1llos
f)
de
madera que
se
suministran
como
accesorios
2)
lnstale
Ia
unidad
de
control
de
aire (conjunt
o)
8 en Ia
superf1cie inferior
de
Ia
mesa
en
cuatro
lugares
con
loS
tomillos
de
madera 0 que
se
suministran como accesonos
3)
Conecte
Ia
manguera
del
aire
0
en
Ia
jun
ta
del cihndro 0
para
el
transporte inversoautomatico
Conecte
Ia
manguera del aire
€)
a
Ia
junta 8 del
c:ihndro
0
para
el
elevador
automatico.
Conecte
Ia
manguera
del
aire8 a
Ia
junta 0 .
Haga
que
coinetdan
los
numerosin
dicados
en las respectl
va
s
mangueras con
los
numeros
1ndlcados en l
as
etiquetas
pegadas a
las
juntas
4)
Solamente para el dispositive
de
t
ran
spo
rt
e inver
so
automatico, conecte
Ia
ma
ngueradel aire a Ia ju
nta
del
clhndro 0 para
el
transporte inver
so
automatico.
__
,-
-
No
-;pe-;;1;;8qul,;-d~o;;,.
;ie~s-;j
- \
1
~
prensatetas
este
elevado
con
el
elevadorautomatlco. 1
\!I)
La
barra
de
aguja
toea
el
prensatelas
.
Como
J
l
resultado
,
es
pos
l
ble
que
se
dane
. _
...._
_____________
_

(1)
lnstallazlone
dell
'
unlta
dl
controllo
dell'aria
1) lnstallare
11
regolatore (asm.) 0 sulla superficie inferiore
del
tavolo
con
Ia
v1te
per
legno8 fom•ta come
accessori.
2) lnstallare
l'umtA
di
controllodell'aria (asm.)O sulla superficie
inferioredel
tavolo
in
quattro punti con le
vrtJ
per
legno
0
fom1te
oome accessori
3) Collegare
11
tubo dell'aria0 al g•unto rapido del cilindro 0 per
l'affrancatura automatics.
Collegare
11
tubo
dell'ana0 al
g•unto
rapido
f)
del cibndro 0
perl'alzapiedino
au1omat•co
.
Collegare il
IUbo
dell'aria
(9
al
QIUOIO
rapido
Cl)
.
Far cornspondere i numeriindicsti sui nspettiVi
tubi
aJ
numen
1nd1cstJ
sulleebchette attaccate
su1
g1unti.
4)
Quando
Sl
usa soltanto il
dlspos1t1vo
di
affrancatura
automatiCS,
collegare il tubo dell'ariaal giunto
rapido
del
cillndro 0 perl'affrancstura
automatiCS
.
....------------------
( Non azlonare Ia macchlna
per
cuclre mentre }
1
(I)~
II pledlno premlstoffa b tenuto sollevatocon
I'
I
alzapledlno automatlco.
I La barra
ago
toccaII pledI
no
premlstoffa. Dl I
l conseguen
za
, essl potrebbero essere dannegglatl. J
...._
______________
_
(Jj
\ I DecreaseI errlngernI
DiminutionI Dlsml
nulr
I
Dimlnuzlone
I~
;c
/I
ncreaseI EmohenI
AugmentationI AumentarI
Aumento
/:k
(2)
Modo
de
regular
Ia
presion
de
aire
La presi6n delaire
ope
ra
e1ona
l es
de
0,45 a 0,5MPa.
( 1 )
2~t2$JJ~-f(.J~~
1>
.mm
03-*tJ~t
o
re~~i01i~~~
u11.n
>
e
~~flJtJLrr
ri.
2 >
JllliHAlt'l~tt:
He.
re~~t21MW?I
<m
t·t:
l
O
:tc~fll4
~t.llfi"fiti.
3>
re~~~xn-
o
ntnu
r17;Jfftl
.iUr~
0 (I(Jiititt
1:
.
1e2''UUf0
.iii
ftJ
n
;iJ
ffiJU1Htm
til:
f'.ij 0
(!(]
n
tttt
e
.t.
te~4{,~t
C9
.it
tU
lJif
t&
ti (!) l:.
~WtfflA4~aftftB~~l:~~~~~
4 > t.ui!HHflm
H.
ift
te4x
1f
tt
flJ
n
#.1
~l!
m
arr
n0
tr1n
~
#.
J·
,..----------------
....._
______________
_
(2)
I7lf(7)DI!ID
{i,EF.II7EEI~.
0.45 ---0.5
MPa
c9
o
7-{
J!J$1
Lt=¥
.:I.l.J-570)11Uffl::>*Oi
0
em~
G
"C
<tc<!t,
'o
(2)
Adjusting
the
air
pressure
The
operating
a1r
pr
ess
ur
e
is
0.45
to
0.5
MPa
.
Adjust the
a1r
pressure using
air
pressure regulating
knob
0
of
the filterregulator.
(2)
Elnstellen
des
Luftdrucks
Oer Betnebsluftdruckbetragt 0,45bis 0,5
MPa
.
Den
Luftdruck
m1t
dem
Luftdruckregelknopt
8 am
Filterregler einstellen.
{2)
Reglage
de
Ia
pression
d'
alr
La
press
ion
d'air
de
serv•ceest de 0,45a
0,5
MPa
Regier Ia pression d'air a
!'ai
de
du
bouton
de
reglage
de
preSSion
d'air0
du
regulateur
du
f
1Jtre
Regule Ia presi6ndel a•recon Iaperilla 0 regu
lado
ra
de
presi6n
de
rure
delregulador del
f1ltro
.
(2)
Regolazlone
della
presslone
d'
aria
La
preSSIOne
di funzionamento d'ana e
da
0,45a0,5
MPa
Regolare Ia pressione d'aria tramite Iamanopoladi regolazione della
press1one
d'ana 0
del
regolatore del
f1lt
ro
.
(
2)
2~JijJ£(.Jii!J!l
4:-tJLf~fH~o-:>(tlli.:h
::J.J
0.45
-
O.SMPa
.
Uiffl~hYP3!
i'i~lf'I~U.~i'iwfll
0
*iCl
~lt
~}
J
.
15

--
~------
----
----
------
--------
----------
......
16
5.
*-ll:Zl~liOJINfilt
I INSTALLING
THE
THREAD STANDI
INSTALLIEREN
DES
GARNSTANDERS I POSE DU PORTE-BOBINESI
MODO
DE
JNSTALAR
EL
PEDESTAL
DE
HI
LOS I
INSTALLAZIONE
DEL
PORTAFILOI
!&~I'(.]
:it~
~tfl"t"~
~mChMI:t"CT
-7J!J0)7\IC:l&Of.t
l:t,
~nr~
b'fd.Jb'~~
'~l!tlc:l.t~:t
'Y
t--
1
~li~"C
<t~c!~
'0
Assemble the thread stand, set
it
up
on
the
machine
table
using
the installation holein the table
and
tighten
nut
8
gently
.
Den
Fadenstander zusammenbauen, in
das
Montageloch
im
Maschinentisch einsetzen und durch
vorsichtiges
An·
ziehen
der Mutter 0 sichem.
Assembler le porte-bobines
et
le
monter
sur
Ia
table
de
Ia
machine
en
utilisant !'orifice d'installation
sur
Ia
table
Serrer l'ecrou 0 sans
forcer.
Ensanble el pedestal dehi
los.
col6quelo
sobre
Ia
mesa
usando
el
agujero de instalacr6n en Ia
mesa
y
apriete
con
cu
i
dado
Ia tuerca 0 .
Montara
il portatilo
ed
inserire lo stesso
nell'apposrto
foro
posto
sui tavolo della macchina. Serrare
il
dado
0
senza
stringere eccessivamente.
-~~•.reu•~~~m~~Rk.*••~
•
~
~gHJG~
.

6.
~5Eb
I LUBRICATIONI SCHMIERUNG I LUBRIFICATIONI
LUBRICACIONI LUBRIFICAZIONEI
1J01W
·~:
&
~:J/O):f'aO)g81i:~QA•O)••~~<:tt&'J,
u~~~-
:c-~OJRBfif.llJt~-=>t::i:c~lll!l/Cb'5fi~..,1:<t::
~I.,\,
WARNING:
~
To
protect
against
possible
personal
injury
due
to
abruptstart
of
themachine,
be
sure
to
start
the
follow-
lng
work
after
turning
thepower
off
and
ascertaining that
the
motor
Is
at
rest.
WARNUNG:
~
Urn
durch
pl6tzllches Anlaufen
der
Nahmaschlne verursachte Verletzungen
zu
vermelden, fUhren
Sle
die
folgende Arbelt erst aus, nachdemSie den Netzschalterausgeschaltet
und
alch vergewlsserthaben,
daB
der
Motor
vollkommen stlllsteht. -
AVERTISSEMENT:
~
Pour
ne
pas rlsquer
des
blessures causees
par
une
brusque
mise
en
marche
de
Ia
machine, touJours
Ia
mettre
hors
tension
et
s'assurer que
le
moteur
est
au
repos avant d'effectuertes operations sulvantes.
~
JAVISOI
-
Para
protegerse
contra
posibles leslonespersonales debldoa
un
arranquebrusco
de
Ia
m6qulna
de
co-
ser,
cercl6rese
de comenzarel slguientetrabaJo despu6a
de
desconectar
Ia
corrlente
y de estar seguro
que
el
motor
estAcompletamenteparado.
AVVERTIMENTO :
~
Per
evltare
posslblli
ferlmentl causatl dall'avvlo lmprovvlsodella macchlna per cuclre, prima dl effettuare
le
seguentl operazlonl spegnere l'lnterruttore
dell
'allmentazlone
ed
aulcurersl
cheII motore
abbla
com-
pletamentecessato
dl
ruotare.
&
·~
=
;q7Jiil.l:.~~~~it~AA.at.
il~jf~iiJ.
-~~~-~ffl.ttti>t.llii~iiHit
1,.
Procedure
de
lubriflcation
pour
Ia
partie
de
Ia
plaquefrontale.
1) Desserrer
Ia
VIS
0 et
Ia
retirer.
2) Ouvrir
Ia
plaque frontale dans
le
sensdeIa fleche 0
3) Mettreuna quantile d'huileapproprieesur lespoints
1ndiques
par
des fleches une
fois
parjour.
4) Refermer
Ia
plaque frontale.
5) Remettre
Ia
vis 0 en placeet
Ia
serrer.
Procedlmlento
para
tubrlcar
Ia
porcl6n
de
Ia
placa
1) Afloje ysaqueel tornillo 0
2) Abra
Ia
placafrontal
en
Ia
direcci6n
de
Iaflecha 0
3) Aphque
una
cantidad adecuadade aceite una
vez
al
dla
en
los puntos marcados
con
flecha
4) CierreIa placafrontal.
5) Apriete y fijeeltornillo 0
imBU8~15~lr;:
-=>'-'
-c
1) 0
O)~u1c!:'i~""CINIJ$'i.l,~9o
2)
ifiif&~~EIJ
Q
O):fjfC.JI~!Jft~~9o
3)
~EOcm<!flrdafJil;:la:.
ma~•~~5Etl
G
r:
<
n:c~
\o
4)
im~&~Mu~"J
o
5)
0
O)~u~MIV)-c!NIJ1'111~~o
Lubricating
procedure
for
the
face plate
portion
1) Loosen and remove screw0
2) Open theface
plate
in
the
direction of arrowmark 0
3) Apply
an
adequate amount
of
oil oncea
day
to
the
points marked with
the
arrow marks.
4) Close theface plate.
5) Ttghten and attach
screw
0 .
Schmlervertahren
fur
den
Stlrnplattentell
1)
01e
Schraube 0
k>sen
unci
entfernen.
2)
01e
Shmplatte
1n
A1chtung
der
Pfeilmarkierung 0
offnen.
3)
01e
m•t Pfe1len markierten Stellen einmal
tagtich
m1t
e1ner
angemessenen Olmenge schm•eren.
4) Die Stimplatte schlleBen.
5) Die Schraube 0 anbringen undanz1ehen.
Procedure
di
lubrificazJone
per
Ia sezionedi
pi
astra
frontale
1) Allentare e nmuovere Ia
v1te
0
2)
Apnre
Ia
pastra
frontal
a
nel
scnso
indiCato
dallafreccia €)
3) Apphcare
una
adeguataquanlltA
di
oho
una
volta al
g1orno
ai punti segnati
con
le
treece.
4) Chiudere
Ia
piastra frontale.
5) Stnngere e attaccare Ia
v1te
0
~
-T
iiift!Jt(..J
1JOilb
1;~
o
tT
t~
0
1¥1
t#.
~t.
Jt
~
fHrf
A~
.
2)
filJJ'ffl::'k
G)
l'f.J1JrPJtf:Jfili.t&
.
3)
ilrfii
D
(£f.i::kfti~l'l~
ff~ffi.JmiU
~1¥J11B
.
4)
*f.fJtmf&.
5)
tT~
0
r£.
:Jt:!C~IMJ'£.
17
Other manuals for DNU-1541-7
1
Table of contents
Other JUKI Sewing Machine manuals

JUKI
JUKI LK-1900A-SS User manual

JUKI
JUKI MCS-1500 User manual

JUKI
JUKI LBH-1795AN User manual

JUKI
JUKI MO-735 User manual

JUKI
JUKI AMS-221F3020RSZ/AW-3 User manual

JUKI
JUKI SC-920 User manual

JUKI
JUKI DDL-9000 User manual

JUKI
JUKI CP-180 User manual

JUKI
JUKI HZL - 355Z Series User manual

JUKI
JUKI LBH-1790 Series User manual

JUKI
JUKI LK-1850 Series Quick start guide

JUKI
JUKI AVP-875S User manual

JUKI
JUKI LU-1510N Quick start guide

JUKI
JUKI DLN-415 User manual

JUKI
JUKI UnionSpecial 35800BLW Setup guide

JUKI
JUKI SC-922 User manual

JUKI
JUKI LBH-1795A User manual

JUKI
JUKI DDL-8300N User manual

JUKI
JUKI AC-172N-1790AN User guide

JUKI
JUKI HZL-F series User manual