JUKI DX-4000QVP User manual

Attention
Please read this instruction manual before using
the machine as it contains important operational
and safety information.
Keep this manual accessible so that you may refer
to it at anytime while operating the machine.
INSTRUCTION MANUAL
COMPUTER SEWING MACHINE
DX-4000QVP
EN

1
“IMPORTANT SAFETY INSTRUCTIONS”
When using an electrical appliance, basic safety precautions should always be followed, includ-
ing the following: Read all instructions before using this sewing machine.
“DANGER ____ To reduce the risk of electric shock:”
1. The appliance should never be left unattended when plugged in.
2. Always unplug this appliance from the electric outlet immediately after using and before
cleaning.
“WARNING ____
To reduce the risk of burns, re, electric shock, or injury to persons:”
1.
Do not allow this appliance to be used as a toy. Close attention is necessary when this appli-
ance is used by or near children. This appliance can be used by children aged from 8 years and
above and persons with reduced physical, sensory or mental capabilities or lack of experience
and knowledge if they have been given supervision or instruction concerning use of the appli-
ance in a safe way and understand the hazards involved. Children shall not play with the appli-
ance. Cleaning and user maintenance shall not be made by children without supervision.
2. Use this appliance only for its intended use as described in this manual. Use only attach-
ments recommended by the manufacturer as contained in this manual.
3.
Never operate this appliance if it has a damaged cord or plug, if it is not working properly, if it
has been dropped or damaged, or dropped into water. Return the appliance to the nearest au-
thorized dealer or service center for examination, repair, electrical or mechanical adjustment.
4. Never operate the appliance with any air openings blocked. Keep ventilation openings of the
sewing machine and foot control free from the accumulation of lint, dust, and loose cloth.
5.
Keep ngers away from all moving parts. Special care is required around the sewing machine needle.
6. Always use the proper stitch plate. The wrong plate can cause the needle to break.
7. Do not use bent needles.
8. Do not pull or push fabric while stitching. It may deect the needle causing it to break.
9. Switch the sewing machine o “O” when making any adjustments in the needle area, such as
changing needle, threading bobbin, or changing presser foot.
10. Always unplug the machine from the electrical outlet when removing covers, when lubricating
or when making any other user servicing adjustments mentioned in the instruction manual.
11. Never drop or insert any object into any opening.
12. Do not use outdoors.
13.
Do not operate where aerosol (spray) products are being used or where oxygen is being administered.
14. To disconnect, turn all controls to the o “O” position, then remove plug from outlet.
15. Do not unplug by pulling on cord. To unplug, grasp the plug, not the cord.
16. Basically, the machine should be disconnected from the electricity supply when not in use.
17. If the power cord of this appliance is damaged, it must be replaced with a special cord by
your nearest authorized dealer or service center.
18. (Except USA/Canada) This machine is provided with double insulation.
Use only identical replacement parts. See instructions for servicing Double-Insulated machine.
“SERVICING DOUBLE-INSULATED PRODUCTS”
In a double-insulated product, two systems of insulation are provided instead of grounding. No
grounding means is provided on a double-insulated product nor should a means for grounding be
added to the product. Servicing a double-insulated product requires extreme care and knowledge
of the system and should only be done by qualied service personnel. Replacement parts for a
double-insulated product must be identical to those parts in the product. A double-insulated prod-
uct is marked with the words DOUBLE INSULATION or DOUBLE INSULATED.
The symbol may also be marked on the product.
“SAVE THESE INSTRUCTIONS”
“This sewing machine is intended for household use only.”

2
Danger
warning
which is not
specied
There is a
risk of elec-
trical shock
There is a
risk of re
There is
a risk of
injury to
hands, etc.
Prohibit-
ed matter
which is not
specied
Disas-
sembly/
alteration is
prohibited
Do not
place n-
gers under
the needle
Do not
pour oil,
etc.
Generally
required
behavior
Disconnect
the power
plug
Congratulations on your purchase of a JUKI sewing machine.
Please be sure to read safety precautions in “To use the sewing machine safely” in the Instruc-
tion Manual before use to fully understand the functions and operating procedures of the sewing
machine so as to use the sewing machine for a long time.
After you have read the Instruction Manual, please be sure to keep it together with the warranty
so that you can read it whenever necessary.
The instruction manual is subject to change without prior notice for improvement.
Please visit the JUKI website for the latest version.
https://www.juki.co.jp/household_en/hsm/pdf/DX-4000QVP_EN_manual.pdf
To use the sewing machine safely
Marks and pictographs included in the Instruction Manual and shown on the sewing machine are
used so as to ensure safe operation of the sewing machine and to prevent possible risk of injury
to the user and other people.
Warning marks are used for dierent purposes as described below.
WARNING Indicates that there is a possible risk of death or serious injury if this
mark is ignored and the sewing machine is used in a wrong manner.
ATTENTION
Indicates the operation, etc. which can cause a possible risk of person-
al injury and/or physical damage if this mark is ignored and the sewing
machine is used in a wrong manner.
Pictographs mean the following:

3
● Do not wipe the sewing machine with solvent such
as thinner.
When the sewing machine
is soiled, put a small quan-
tity of neutral detergent on
a piece of soft cloth and
carefully wipe o the sew-
ing machine with it.
● Be sure to use the sewing machine
in the temperature range from 5ºC
to 40ºC.
If the temperature is excessively
low, the machine can fail to operate
normally.
WARNING
For the combination of the material and the thread and needle, in particular, refer to the explana-
tion table in “Replacement of the needle”.
If the needle or thread does not match the material used such as in the case that an extra heavy-
weight material (e.g., denim) is sewn with a thin needle (#11 or higher), the needle can break
resulting in an unexpected personal injury.
Other precautions
● Do not put the sewing machine
under the direct sunlight or in a
humid place.
Be aware that the following state can take place since the sewing machine incorporates
semi-conductor electronic parts and precise electronic circuits.
* The operating temperature of the sewing machine is between 5ºC and 40ºC. Do not use the
sewing machine under the direct sunlight, near the burning things such as a stove and candle,
or in a humid place. By so doing, the temperature in the interior portion of the sewing machine
can rise or the coating of the power cord can melt, causing re or electrical shock.
● The safety device of the sewing machine will work
to stop the sewing machine in order to prevent the
generation of abnormal heat in the case the sew-
ing machine is continuously engaged in sewing at
a low sewing speed for a long time or it is continu-
ously engaged in sewing for a long time under the
high temperature environment. In this event, Start
and Stop button will not light.
The sewing machine will
return to working condition
after about 10 minutes.
Stop!

4
Basic screen operation method
● Tap
Tap the screen with your ngertip
once.
● Pinch the screen
Pinch with two ngers.
・
Pinch in
Squeeze your ngers together.
・
Pinch out
Spread your ngers
● Swipe
Tap the screen and slide your
ngertip.
● Be sure to move the sewing machine by holding its handles.
Do not hold portion A when you lift the
sewing machine.
If the sewing machine is heavy, lift it by put-
ting your arm through the arm section.
AA

5
CAUTION
For customers in the USA
This device complies with Part 15 of the FCC Rules. Operation is subject to the following two
conditions: (1) This device may not cause harmful interference, and (2) this device must accept
any interference received, including interference that may cause undesired operation.
NOTE: This equipment has been tested and found to comply with the limits for a Class B digital
device, pursuant to Part 15 of the FCC Rules. These limits are designed to provide reasonable
protection against harmful interference in a residential installation. This equipment generates,
uses, and can radiate radio frequency energy and, if not installed and used in accordance with
the instructions, may cause harmful interference to radio communications. However, there is no
guarantee that interference will not occur in a particular installation. If this equipment does cause
harmful interference to radio or television reception, which can be determined by turning the
equipment o and on, the user is encouraged to try to correct the interference by one or more of
the following measures:
・
Reorient or relocate the receiving antenna.
・
Increase the separation between the equipment and receiver.
・
Connect the equipment into an outlet on a circuit dierent from that to which the receiver is
connected.
・
Consult the dealer or an experienced radio/TV technician for help.
This equipment complies with FCC/IC radiation exposure limits set forth for an uncontrolled en-
vironment and meets the FCC radio frequency (RF) Exposure Guidelines and RSS-102 of the
IC radio frequency (RF) Exposure rules. This equipment has very low levels of RF energy that is
deemed to comply without maximum permissive exposure evaluation (MPE). But it is desirable
that it should be installed and operated keeping the radiator at least 20 cm or more away from
person’s body.
This equipment must not be co-located or operated in conjunction with any other antenna or
transmitter.
For customers in the Europe
This radio equipment is intended to be used with the approved version(s) of software that are
indicated in the EU Declaration of Conformity.
The software loaded on this radio equipment is veried to comply with the essential requirements
of the Directive 2014/53/EU.

6
"NOTES DE SECURITE IMPORTANTES"
Lorsque vous utilisez un appareil électrique, des précautions élémentaires doivent toujours être sui-
vies, comme celles-ci. Lisez attentivement ces instructions avant d’utiliser cette machine à coudre
.
"DANGER ____ Pour réduire le risque d’électrocution:"
1. L’appareil ne doit jamais être laissé sans surveillance une fois branché.
2.
Toujours débrancher cet appareil du secteur immédiatement après utilisation et avant de le nettoyer
"ATTENTION ____
Pour les risques de brûlure, électrocutions et de blessures:"
1.
Ne pas prendre la machine domestique pour un jouet. La plus grande prudence est de mise quand la
machine est utilisée par des enfants ou quand elle se trouve à leur proximité. Cette machine à coudre
peut être utilisée par des enfants âgés de 8 ans et plus ainsi que par les personnes ayant des capa-
cités physiques, sensorielles ou mentales réduites, ou le manque d’expérience et de connaissances
seulement si elles ont été formées et ont reçues les instructions concernant l’utilisation de la machine
à coudre de manière sûre et comprendre les risques encourus. Les enfants ne doivent pas jouer avec
la machine à coudre. Le nettoyage et l’entretien ne doit pas être fait par des enfants sans surveillance.
2. N’utiliser cet appareil que dans le cadre de ses fonctions, mentionnées dans le présent ma-
nuel. N’utiliser que les piéces fournies ou recommandées par le fabricant dans ce manuel.
3.
Ne pas utiliser cet appareil si une de ses prises ou cordons est endommagée, ou s’il ne fonctionne
pas correctement. S’il est tombé, a été endommagé, tombé dans l’eau, retournez l’appareil auprès
de votre revendeur le plus proche pour une réparation, ou une vérication technique ou électrique.
4.
Ne jamais utiliser cet appareil dans un lieu dépourvu d’aération. Maintenez une ventilation susante autours de la ma-
chine et du rhéostat et éviter la poussière et les chutes de tissus aux alentours des sources d’aération de la machine.
5.
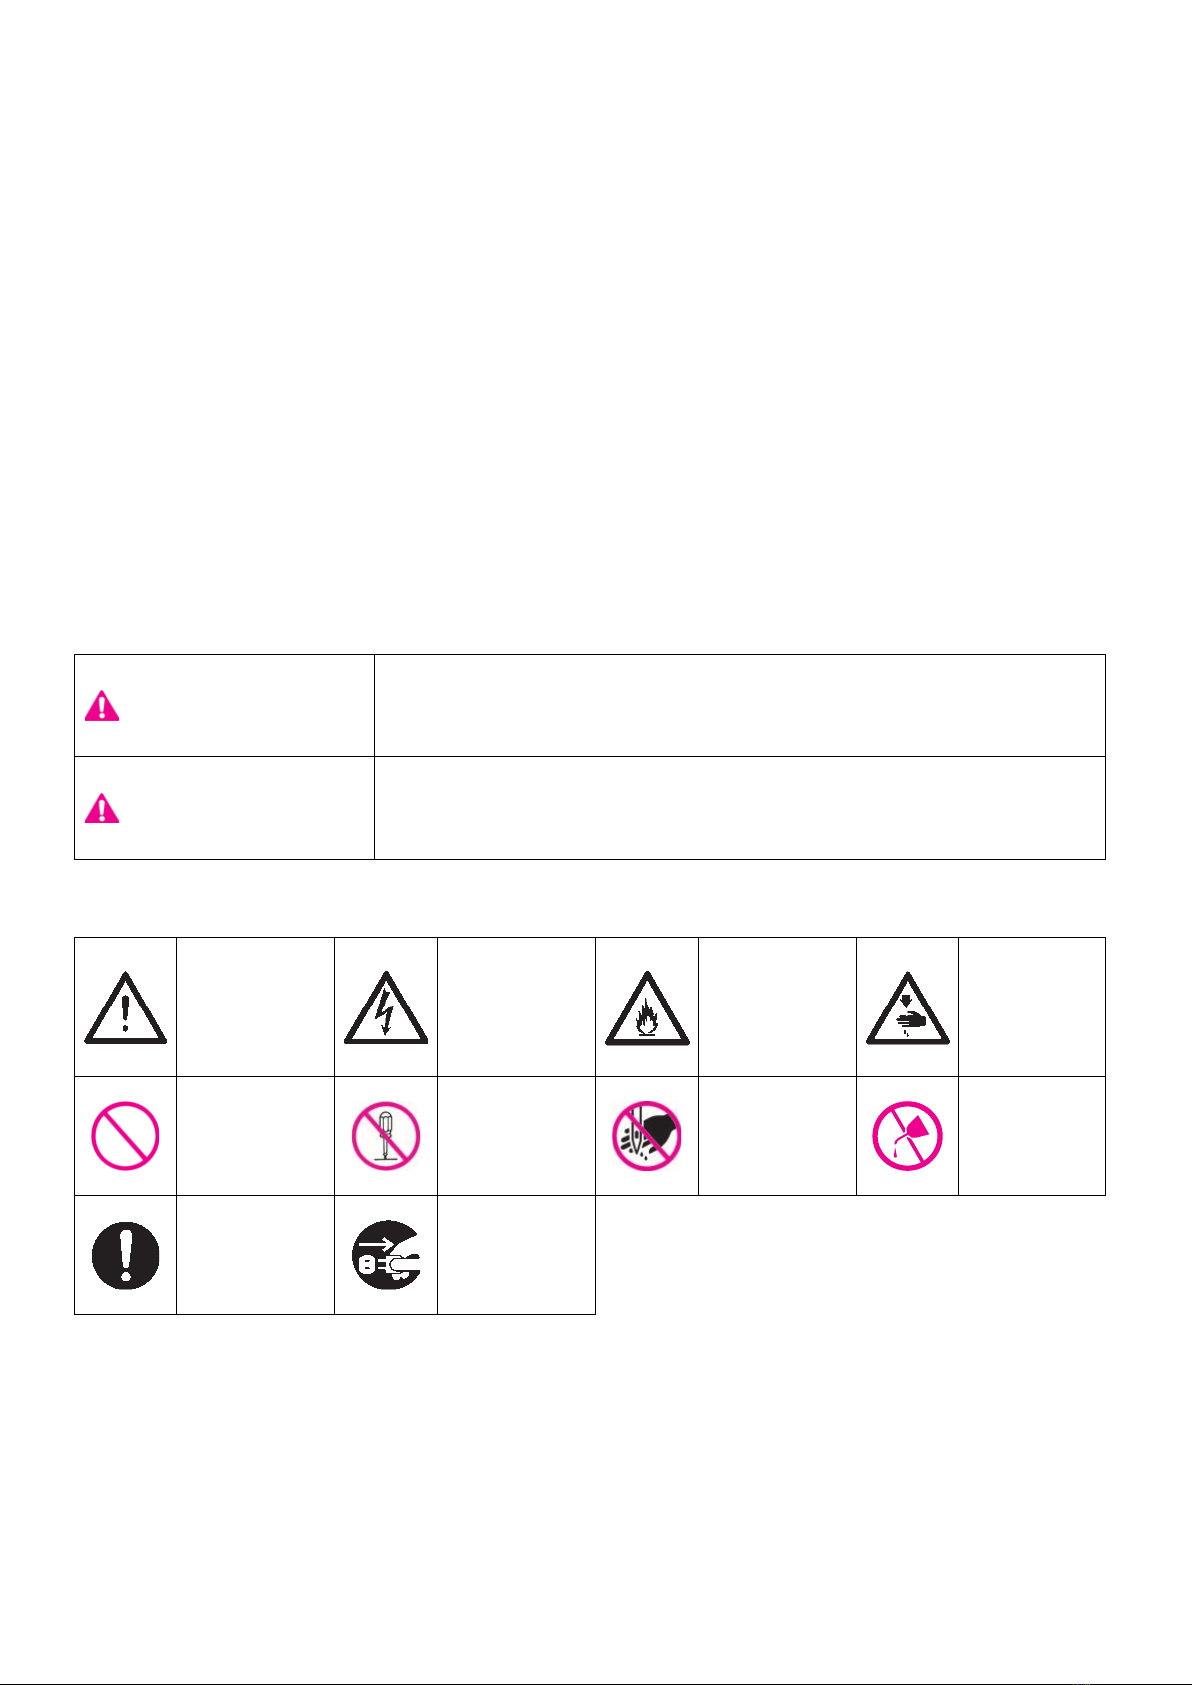
Eloigner vos doigts des pièces mobiles de la machine. Faites particulièrement attention aux mouvements de l’aiguille.
6.
Toujours utiliser la plaque aiguille appropriée. Un plaque non appropriée peut faire casser l’aiguille.
7. Ne pas utiliser d’aiguilles courbes.
8.
Ne pas tirer ou pousser le tissu lorsque vous cousez., cela pourrait abîmer, voire casser l’aiguille.
9.
Mettre la machine à coudre hors tension « O » avant de faire tout réglage dans la zone de l’aiguille,
comme enler ou remplacer l’aiguille, enler le l de la canette ou remplacer le pied presseur.
10. Débranchez toujours votre machine lorsque vous ôtez le capot, lorsque vous la nettoyez, ou
pour tout autre manipulation mentionnée dans le manuel d’instruction.
11. Ne jamais laisser d’objet entrer dans les ouvertures de la machine.
12. Ne pas utiliser à l’extérieur.
13.
Ne pas utiliser lorsqu’un aérosol a été pulvérisé, ou lorsque de l’oxygène a été administré.
14. Avant de débrancher la machine, mettre l’interrupteur en position éteint ("O").
15. Ne pas débrancher en tirant sur le cordon. Pour débrancher, tenir la prise, pas le cordon.
16. En cas de non-utilisation, l’appareil doit, en principe, être séparé du réseau en retirant la prise.
17. Si le cordon spécial de cet appareil est endommagé, il doit être remplacé par votre agent au-
torisé le plus proche ou dans un centre de service.
18.
Cette machine est équipée d’une double isolation (sauf aux USA / au CANADA). N’employer que des pièces
de rechange originales. Se reporter aux indication pour la remise en état des produits à isolation double.
"ENTRETIEN DES PRODUITS A DOUBLE ISOLATION (Ex-
cepté USA / Canada)"
Un produit à double isolation est équipé de deux isolations au lieu d’une mise à la terre. La mise à la terre n’est pas
prévue sur un produit à double isolation et ne devrait donc pas être employée. L’entretien d’un produit à double iso-
lation qui exige de grands soins et des connaissances poussées sur le système, doit donc être réalisé seulement
par du personnel qualié. N’employer que des pièces de rechange originales pour l’entretien et la réparation. Un
produit à double isolation est désigné de la manière suivante: "Isolation double" ou "A double isolement".
Le symbole peut également caractériser un tel produit.
"PRIERE DE CONSERVER SOIGNEUSEMENT LES PRES-
CRIPTIONS DE SECURITE"
"Cette machine à coudre est destinée à un usage domestique uniquement."

7
Mise en
garde
contre un
danger non
spécié
Risque de
choc élec-
trique
Risque d’in-
cendie Risque de
blessure
aux mains,
etc.
Interdiction
non spéci-
ée
Démontage/
modica-
tion interdit
Ne pas
mettre les
doigts sous
l’aiguille
Ne pas
huiler, etc
Comporte-
ment géné-
ralement
requis
Débrancher
la che
d’alimenta-
tion
Consignes de sécurité
Merci d’avoir fait l’achat d’une machine à coudre JUKI.
Avant l’utilisation, veuillez lire les consignes de sécurité sous la section « Pour utiliser la machine
à coudre en toute sécurité » du Manuel d’instructions, an de comprendre parfaitement les fonc-
tions et procédures d’utilisation de la machine à coudre, ainsi que pour prolonger sa durée de
service.
Après avoir lu le Manuel d’instructions, veillez à le conserver, avec la garantie, de façon à pou-
voir le consulter en tout temps.
Le manuel d’instructions est susceptible d’être modié sans préavis à des ns d’amélioration.
Veuillez visiter le site Web de JUKI pour obtenir la dernière version.
https://www.juki.co.jp/household_en/hsm/pdf/DX-4000QVP_EN_manual.pdf
Pour utiliser la machine à coudre en toute sécurité
Les symboles et icônes compris dans le Manuel d’instructions ou apposés sur la machine à
coudre ont pour but d’assurer l’utilisation sécuritaire de la machine à coudre et de protéger l’utili-
sateur et autres personnes contre les risques éventuels de blessure.
Les symboles de mise en garde sont utilisés aux diverses ns décrites ci-dessous.
AVERTISSEMENT Indique un risque éventuel de décès ou de blessure grave en
cas d’ignorance de ce symbole et d’une mauvaise utilisation
de la machine à coudre.
ATTENTION
Indique une utilisation qui comporte un risque éventuel de bles-
sure et/ou de dommages matériels en cas d’ignorance de ce
symbole et d’une mauvaise utilisation de la machine à coudre.
La signication des icônes est telle que décrite ci-dessous.

8
● Ne pas utiliser de détergents ou alcool pour
nettoyer la machine.
Si la machine à coudre
est sale, mettre un peu
de détergent neutre
sur un linge doux, et
le passer soigneuse-
ment sur la machine à
coudre pour enlever les
taches.
● Penser à utiliser la machine à coudre
dans une plage de température de 5 ºC
à 40 ºC. À température excessivement
basse, la machine risque de ne pas fonc-
tionner normalement.
AVERTISSEMENT
Pour combiner l’aiguille en fonction de la matière et du l, reporter vous à la section «remplace-
ment de l’aiguille» Si l’aiguille ou le l n’est bien adapté au tissu, comme dans le cas d’un tissu
très lourd (p. ex. du jean) cousu avec une aiguille mince (n° 11 ou supérieure), l’aiguille risquera
de se casser et de causer une blessure.
Autres précautions à prendre
● Ne pas exposer la machine directement
au soleil ou dans une atmosphère humide.
Il faut savoir que l’état suivant peut avoir lieu du fait que la machine intègre des semi-conduc-
teurs et des circuits électroniques.
* La température de fonctionnement de la machine à coudre est de 5 ºC à 40 ºC. Ne pas utiliser
la machine à coudre sous la lumière solaire directe, près de sources de ammes telles qu’un
poêle ou une chandelle, ni dans un emplacement humide. Cela risquerait de faire monter la
température à l’intérieur de la machine à coudre ou de faire fondre la gaine du cordon d’alimen-
tation, causant un incendie ou un choc électrique.
● Le dispositif de sécurité de la machine à
coudre se déclenchera pour arrêter la ma-
chine à coudre an de prévenir un dégage-
ment inhabituel de chaleur si la machine à
coudre coud continuellement à une faible vi-
tesse de couture ou dans un environnement
à température élevée pendant une période
prolongée.
Dans ce cas, le bouton Marche/Arrêt ne s’al-
lumera pas.
Au bout de 10 minutes
la machine sera de nou-
veau opérationnelle.
Stop!

9
Notions de base pour utiliser l’écran
● Tapotement
Tapoter une fois l’écran du bout
du doigt.
● Pincement de l’écran
Pincer avec deux doigts.
・
Rapprochement
Rapprocher les doigts.
・
Écartement
Écarter les doigts
● Balayage
Tapoter l’écran et faire glisser le
doigt.
● Veiller à déplacer la machine à coudre en la tenant par ses poignées.
Ne pas tenir la partie A lorsqu’on sou-
lève la machine à coudre.
Si la machine à coudre est lourde, la sou-
lever en passant le bras par la section du
bras.
AA

10
ATTENTION
À l’attention des clients aux États-Unis
Cet appareil est conforme à l’alinéa 15 de la réglementation FCC. Son utilisation est soumise
aux deux conditions suivantes : (1) cet appareil ne doit pas provoquer d’interférences nuisibles et
(2) cet appareil doit accepter toutes les interférences reçues, y compris les interférences suscep-
tibles de provoquer un fonctionnement indésirable.
REMARQUE: Cet équipement a été contrôlé et satisfait aux limites concernant les appareils
numériques de classe B, conformément à l’alinéa 15 de la réglementation FCC. Ces limites sont
destinées à assurer une protection raisonnable contre des interférences nuisibles dans une ins-
tallation résidentielle. Cet équipement génère, utilise et peut émettre de l’énergie radiofréquence
et, s’il n’est pas installé conformément aux instructions, peut provoquer des interférences nui-
sibles aux communications radio. Toutefois, il n’y a aucune garantie que des interférences ne se
produiront pas dans une installation particulière. Si cet équipement provoque des interférences
nuisibles à la réception radio ou TV, ce qui peut être déterminé en éteignant puis en rallumant
l’équipement, l’utilisateur est invité à essayer de corriger les interférences en prenant une ou plu-
sieurs des mesures suivantes :
・
Réorienter ou déplacer l’antenne de réception.
・
Augmenter la distance entre l’équipement et le récepteur.
・
Brancher l’équipement dans une prise sur un circuit diérent de celui auquel le récepteur est
connecté.
・
Consulter le revendeur ou un technicien radio/TV qualié pour obtenir de l’aide.
Cet équipement est conforme aux limites d’exposition aux rayonnements FCC/IC établies pour
un environnement non contrôlé et satisfait aux directives de la FCC en matière d’exposition aux
radiofréquences (RF) et à la norme RSS-102 des règles de l’IC en matière d’exposition aux
radiofréquences (RF). Cet équipement présente de très faibles niveaux d’énergie RF qui sont
considérés comme conformes sans évaluation d’exposition maximale autorisée (MPE). Mais il
est souhaitable qu’il soit installé et utilisé en maintenant le radiateur à au moins 20 cm du corps
d’une personne.
Cet équipement ne doit pas être placé à proximité d’une autre antenne ou d’un autre émetteur ni
être utilisé conjointement avec celui-ci.
À l’attention des clients en Europe
Cet équipement radio est destiné à être utilisé avec la ou les versions de logiciel approuvées
indiquées dans la Déclaration de conformité européenne.
Le logiciel chargé sur cet équipement radio est conforme aux exigences essentielles de la Direc-
tive 2014/53/UE.

11
“IMPORTANT SAFETY INSTRUCTIONS”
..1
"NOTES DE SECURITE IMPORTANTES"
..6
Contents................................................. 11
1. Conguration and functions ............13
1.1. Operating buttons .................................. 14
1.2. Operation panel ...................................... 15
2. Accessories .......................................17
3. Set-up .................................................19
3.1. How to install Wide Table....................... 19
3.2. Changing the position of
the foot switch........................................ 20
3.3. Installation of knee lifting lever............. 20
4. Basic settings and
basic operations .............................21
4.1. Connecting to the power supply .......... 21
4.2. Speed control.......................................... 23
4.3. Lifting/lowering of the presser foot ...... 24
4.4. Changing the presser foot..................... 25
4.5. Placing and releasing
“JUKI Smart Feed” ................................ 27
4.6. Changing the throat plate and the feed
dog .......................................................... 28
4.7. How to use the throat plate for straight
stitch ....................................................... 29
4.8. Attaching the needle .............................. 30
4.9. Fabric, thread and needle table............. 31
4.10. Bobbin thread preparation .................... 32
4.11. Needle thread preparation ..................... 36
4.12. How to adjust thread tension ................ 41
4.13. Setting the presser foot pressure......... 43
4.14. Setting the micro-lifter ........................... 43
4.15.
Setting the automatic back tacking, thread
trimming and presser foot lifting
........... 44
4.16. When changing the needle position..... 45
4.17. When changing the zigzag width.......... 46
4.18. When changing the stitch length.......... 47
4.19. Setting the stop position of needle....... 48
4.20. Pivot setting............................................ 48
Contents
5. Setting for the pattern sewing..........49
5.1. Single mode / Combination mode......... 49
5.1.1. Single mode..................................... 49
5.1.2. Combination mode.......................... 50
5.2. Types of patterns under the single mode,
and how to selected a pattern .............. 51
5.2.1. Practical ........................................... 51
5.2.2. Buttonhole ....................................... 53
5.2.3. Appliqué........................................... 54
5.2.4. Tapering ........................................... 54
5.2.5. Quilt line........................................... 55
6.2.6. Scallop ............................................. 55
5.2.7. One-point ......................................... 56
5.2.8. Decorative........................................ 57
5.2.9. Vintage ............................................. 58
5.2.10. Feather / Lace ................................ 58
5.2.11. Letters ............................................ 59
5.3. Combination of patterns under the com-
bination mode ........................................ 60
5.4. Types of edit functions and how to use
them ........................................................ 63
5.4.1. Pattern inversion............................. 64
5.4.2. Setting the interval between
patterns................................................. 65
5.4.3. Reset settings.................................. 65
5.4.4.
Writing / capturing the pattern data
.. 66

12
6. Sewing................................................67
6.1. Straight stitch ......................................... 67
6.2. Inserting zippers..................................... 72
6.3. Patchwork piecing.................................. 73
6.4. Overcasting stitch .................................. 74
6.5. Blind stitch.............................................. 75
6.6. Shell tuck................................................. 78
6.7. Bartacking............................................... 79
6.8. Eyelet....................................................... 81
6.9. Decorative stitches................................. 82
6.10. Lace / feather / overlapping and tiling
(blackwork) patterns.............................. 83
6.11. Scallop stitches ...................................... 84
6.12. Random pattern...................................... 85
6.13. Tapering................................................... 86
6.14. Buttonhole stitches................................ 89
6.15. Manual 2-step buttonhole...................... 96
6.16. Sewing buttons....................................... 98
6.17. Quilting (free motion)............................. 99
6.18. Hand look quilt stitches....................... 101
6.19. Quilting (quilt guide) ............................ 102
6.20. Elongation............................................. 103
6.21. Stitch in ditch quilting.......................... 104
6.22. Attaching a quilt sleeve........................ 105
7. Operation of the operation panel...107
7.1. Support.................................................. 107
7.2. Setting ................................................... 108
① Darning adjustment............................ 109
②Stop position of needle...................... 110
③Pivot..................................................... 110
④Sound volume......................................111
⑤Brightness............................................111
⑥Stitch speed ........................................ 112
⑦Presser foot lifting height .................. 112
⑧Cancel safety ...................................... 113
⑨Foot switch functions ........................ 113
⑩Two needles ........................................ 114
⑪Wireless LAN....................................... 115
⑫Factory data reset............................... 116
⑬Software version................................. 116
⑭Machine log......................................... 119
⑮Language............................................. 120
⑯Accessibility (Black-and-white inversion
of display) ........................................... 120
⑰Shutdown ............................................ 121
7.3. Sewing................................................... 122
7.4. History ................................................... 122
7.5. JUKI Sewing Net................................... 122
8. Message catalog..............................123
9. Machine Maintenance .....................128
10. Introduction of optional accessory
parts ...............................................129
11. Performance check list .................131
12. List of stitch patterns....................133
Specication list..................... back cover

13
1. Con guration and functions
Spool cap (large)
Spool pin
Operation panel
Face plate cover
Threading lever
⑧Start/stop button
Presser foot lifting lever
Needle setscrew
Needle
Presser foot
Sensor pinhole for buttonholing
Presser foot releasing button
Feed dog
Throat plate
Hook cover
Bobbin winding
shaft
Hook cover release but-
ton
Presser foot holder
①Thread trimming button
Auxiliary bed
(accessory case)
Thread cutter
⑥ Lock stitch
button
⑤Speed controller
②Needle up/down button
Knee lifting lever
hole
Light under arm
⑦ Reverse stitch
button
③ Feed dog UP/DOWN /
LOCK MODE button
Hand wheel (pulley)
Power switch
Machine-socket-inlet
Foot-controller-jack
USB insertion slot
“JUKI Smart Feed”
Presser foot holder setscrew
④Presser foot auto lift button
Wide table
Handle

14
1.1. Operating buttons
Name Function
①
Thread trim-
ming button
After sewing, press this button to trim both threads automatically.
The sewing machine stops with its needle up after thread trimming.
In the case of 2-needle setting, this button will not operate even if the
thread trimming button is pressed.
②
Needle up/down
button
When machine stops, press this button to change the needle position.
When the needle is up, the needle moves down and vise versa.
The sewing machine performs sewing at a low speed by keeping this
button held pressed for a long time.
③
Feed dog UP/
DOWN / LOCK
MODE button
When you press this button while the sewing machine is at rest, the feed
dog position is changed over.
Lamp lights up: The feed dog is at its lower position
Lamp goes out: The feed dog is at its upper position
*1 If you keep this button held pressed, all operations can be disabled (lock
mode). If you keep it held pressed again, the lock mode will be reset.
③
Presser foot
auto lift button
When this button is pressed while the sewing machine is at rest, the
presser foot position is changed.
When the presser foot is in its upper position,it comes down to its lower
position and vice versa.
④
Speed control-
ler
Sewing speed can be adjusted with the sliding lever of Speed Controller
freely. The sewing speed is increased by moving the speed controller to
the right, or decreased by moving it to the left.
When sewing with foot controller, Max. sewing speed can be set by
Speed Controller.
⑤
Lock stitch but-
ton
When this button is pressed, the sewing machine performs lock stitch.
When this button is pressed while the sewing machine is engaged in pat-
tern sewing, the sewing machine stops after it has completed the sewing
of the one-cycle/one-point of the pattern.
⑥
Reverse stitch
button
For straight stitch/zigzag stitch: The sewing machine performs reverse
stitch as long as this button is held pressed.
For other stitch types: The sewing machine performs lock stitch.
⑦
Start/stop but-
ton
When pressing this button, machine starts to sew slowly and then up to
the speed set by speed controller. Another press of this button stops the
sewing machine.
Color of button indicates machine status.
Green: Ready to start and/or while sewing
Red: Not ready to start
Orange: When the lock stitch button is pressed while the sewing
machine is engaged in pattern sewing (The sewing machine
performs lock stitch after it has completed the sewing of the
pattern by one cycle. Then, the sewing machine stops.)
* When the foot controller is plugged in, the start/stop button cannot be
used to start sewing.
Start button: Can not operate to start sewing.
Stop button: Can operate to stop sewing.
* 1 Lock Mode given in the Instruction Manual refers to the
operation to “keep the feed dog UP/DOWN / LOCK MODE button held
pressed to disable operation of the all keys”. (Refer to page 22)

15
1.2. Operation panel
Tap the screen with
your ngers.
Name Function
A
Tab Select the screen according to your purpose.
Support Main usage of the sewing machine can be checked.
(Refer to page 107)
Setting Setting of the functions (17 kinds) can be changed.
(Refer to page 108)
Sewing Selection and adjustment of the pattern can be carried out.
History Information on the patterns you have sewn remains as history.
If you want to sew the pattern using the condition you have set previously, you
may select it from the history.
JUKI Sewing Net JUKI website is displayed.
B
Adjusting Dial Function of the adjusting dial diers with the selected pattern.
Function and the numeric value are displayed on the screen.
Type: “Presser foot pressure”, “Stitch length”, “Zigzag width”, “Tapering length”,
“Elongation”
When you have
changed the set-
ting, the color of
the screen display
changes.
White: Initial value
Blue: Changed value
A
B
❶
❷
❸
❹
❻
Ⓐ
Ⓓ
❺
ⒷⒸ
❼
❽
❾

16
Name Function
ⒶPresser Foot Suitable presser foot for the stitch pattern is displayed.
ⒷNeedle Position Needle position is displayed.
Ⓒ
Type of Throat Plate The type of throat plate is displayed.
: Standard throat plate
: Throat plate for straight stitch
Ⓓ-Sewing Condition Stitch Pattern which is sewn currently or to be sewn is displayed.
❶Sewing-start back
tacking icon
Automatic back tacking at the start of sewing can be set.
: OFF : Reverse stitch : Lock stitch
❷
Thread tension icon Press the thread tension icon when you want to change the thread ten-
sion.
The thread tension set value will be returned to the initial value by select-
ing a dierent pattern.
❸Sewing-end back
tacking icon
Automatic back tacking at the end of sewing can be set.
: OFF : Reverse stitch : Lock stitch
❹Pattern selection
icon
Press this icon to select a pattern.
Pattern number of the selected pattern is displayed.
❺Pattern edit icon Stitch patterns can be edited.
❻“JUKI Smart Feed”
adjustment icon
Adjustment value of “JUKI Smart Feed” can be set.
❼Presser foot auto lift
icon
Presser foot lifting after thread trimming can be set.
: OFF : ON
❽Automatic thread
trimmer icon
Back tacking and thread trimming can be set.
: OFF : ON
❾Needle position icon Press this icon to change the needle position.
USB icon This icon is displayed on the pattern edit screen when a USB thumb drive
is inserted into the USB slot of the sewing machine.
Patterns can be “captured” from and “written” in the USB thumb drive by
pressing this icon.
Repetition sewing This icon can be used to set for sewing a combination pattern in repetition
or for sewing a single pattern by one cycle.
In the case of sewing the pattern by one cycle, “1” is displayed.
Initial setting
Single pattern: Repetition
Combination pattern: 1

17
BI
CQR
D
2. Accessories
E
COPQ
IS
DB
4
1
7
R
Auxiliary box
Accessories in the accessory box can also be
stored in the auxiliary bed.
Refer to the gure given below for the storage
procedure (storage location).
Slightly draw the auxiliary bed cover toward
❶ side, then open it toward ❷ side.
Inside of the auxiliary bed
❶❶❷❷
❶❶
❷❷

18
Sewing machine cover
● Inside the auxiliary box.
Standard presser
foot (A)
Cleaning brush
Ripper
T-shape
screwdriver
Blind stitch presser
foot (D)
Overcasting
presser foot (C)
Bobbin (3)
● Supplied with the machine
● It is contained in the packing.
Foot Controller
Bobbin (1)
Spool cap (large)
Manual buttonhole
presser foot (I)
Quick Reference
Guide
(This manual)
Knee-lifting lever
Buttonhole
presser foot (E)
Needle set
HA × 1 # 11 (1)
# 14 (1)
# 16 (1)
for knit # 11 (1)
Spool cap (Middle)
Auxiliary spool pin
Open toe presser
foot (O)
Power cord
Straight feed dog
7mm guide foot or
1/4" guide foot
Spool cap (Small)
Quilt guide
Patchwork
presser foot (P)
Straight throat plate
Straight presser
foot (S)
Quilt presser foot
(for the ruler) (Q)
Wide table
Edge Sewing
presser foot (R)
Zipper presser
foot (B)
Rolled hemming
presser foot
Adapter
shank
Quilt presser
foot (zigzag
type)
Presser
foot holder
setscrew
Needle
setscrew

19
Adjust the height of legs so that the top
surface of Wide Table is the same height
of sewing machine body.
3.1. How to install Wide Table
2Open legs of Wide Table until they stop
securely at the stopping position.
3Assemble Wide Table to sewing machine
body.
Attach it to free arm of sewing machine.
4
* Don't put any heavy materials on the Wide Table.
* Don't move sewing machine with Wide Table attached.
3. Set-up
1Draw the auxiliary bed out to the left.
Table of contents
Other JUKI Sewing Machine manuals

JUKI
JUKI LK-1910 User manual

JUKI
JUKI HZL-27Z User manual

JUKI
JUKI TL-98Q User manual

JUKI
JUKI AP-874/IP-420 User manual

JUKI
JUKI MO-134 User manual

JUKI
JUKI DDL-8300N User manual

JUKI
JUKI AMS-224EN/IP-420 User manual

JUKI
JUKI PLC-1710 User manual

JUKI
JUKI 35800 Series Quick start guide

JUKI
JUKI DDL-8300N User manual

JUKI
JUKI LK-1900S-SS User manual

JUKI
JUKI Union Special 36200L220-60 Setup guide

JUKI
JUKI DLM-5200 User manual

JUKI
JUKI DDL-5550-7 User manual

JUKI
JUKI HZL-F series User manual

JUKI
JUKI DLN-9010A User manual

JUKI
JUKI LU-2210N-7 User manual

JUKI
JUKI LH-4500C Series User manual

JUKI
JUKI LBH-772NB-1 User manual

JUKI
JUKI HZL-60 User manual