Jura E4 User manual

E4 (NAA)
Instructions for Use
Figure: Your machine may look
different than the one shown.
For your safety: read and understand manual before use.

2
Table of contents
Your E4
1 IMPORTANT SAFEGUARDS ........................................................................................4
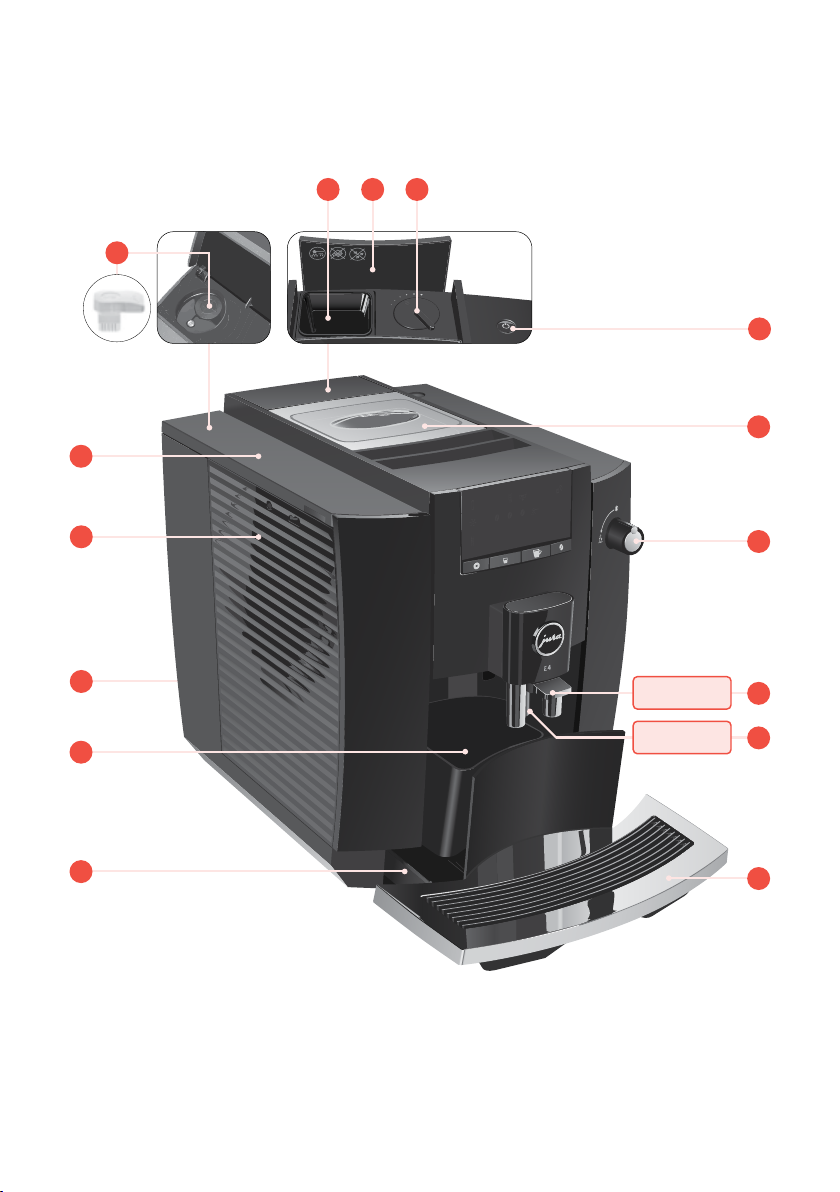
2 Control elements ....................................................................................................8
3 Preparing and using for the first time .......................................................................10
Setting up the machine ...........................................................................................10
Filling the bean container .........................................................................................10
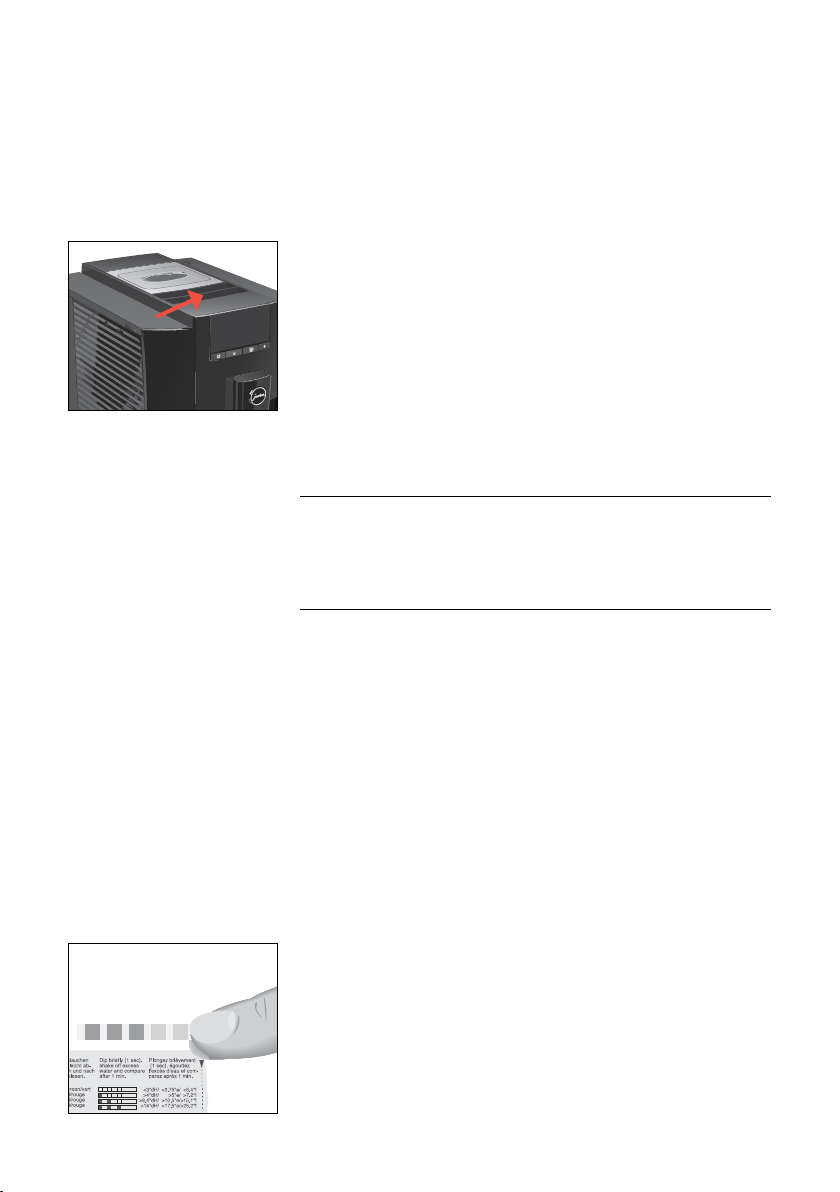
Determining the water hardness ................................................................................10
First-time use .........................................................................................................11
Connecting the machine to the WiFi network (optionally) ............................................... 12
4 Preparation .......................................................................................................... 13
Espresso and coffee ................................................................................................ 13
Two espressi and two coffees ....................................................................................14
Hot water .............................................................................................................14
Caffè Barista and lungo Barista (optionally with J.O.E.®)...................................................14
Permanently setting the amount of water for the cup size ...............................................14
Adjusting the grinder .............................................................................................. 15
Ground coffee ........................................................................................................ 15
5 Daily operation .....................................................................................................16
Switching the machine on and off .............................................................................. 16
Filling the water tank ............................................................................................... 17
Maintenance actions ............................................................................................... 17
6 Permanent settings in programming mode ...............................................................18
Automatic switch-off ...............................................................................................18
Setting the water hardness ....................................................................................... 19
7 Maintenance ........................................................................................................ 20
Inserting/changing the filter ..................................................................................... 20
Cleaning the machine ............................................................................................. 21
Descaling the machine .......................................................................................... 22
Cleaning the bean container .................................................................................... 24
Descaling the water tank ......................................................................................... 25
Switching the machine from filter mode to descaling mode ........................................... 25

3
Table of contents
8 Display messages ................................................................................................. 26
9 Troubleshooting ................................................................................................... 27
10 Transport and environmentally friendly disposal ....................................................... 28
Transport/ Emptying the system .............................................................................. 28
Disposal .............................................................................................................. 28
11 Technical data ...................................................................................................... 29
12 Index .................................................................................................................. 30
13 JURA contact details/ Legal information ................................................................... 32

1 IMPORTANT SAFEGUARDS
4
1 IMPORTANT SAFEGUARDS
Failure to observe the instructions for use may result in serious
injuries or damage to property. Safety information is therefore
indicated as follows:
JThis is the safety alert symbol. lt is used to
alert you to potential personal injury hazards.
Obey all safety messages that follow this
symbol to avoid possible injury or death.
DANGER indicates a hazardous situation which,
if not avoided, will result in death or serious
injury.
WARNING indicates a hazardous situation
which, if not avoided, could result in death or
serious injury.
JCAUTION CAUTION, used with the safety alert symbol,
indicates a hazardous situation which, if not
avoided, could result in minor or moderate
injury.
NOTICE NOTICE is used to address practices not related
to personal injury.
When using electrical appliances, basic safety precautions shall
always be followed, to reduce the risk of fire, electric shock, and/or
injury to persons, including the following:
ZRead all instructions.
ZDo not touch hot surfaces. Use handles or knobs.
ZTo protect against fire, electric shock and injury to persons, do
not immerse power cord, plugs, or body of machine in water
or other liquid.
ZClose supervision is necessary when any appliance is used by
or near children.
ZUnplug from outlet when not in use and before cleaning.
Allow to cool before putting on or taking off parts, and before
cleaning the appliance.
ZDo not operate any appliance with a damaged cord or plug or
after the appliance malfunctions, or has been damaged in any
manner. Return appliance to the nearest authorized service
facility for examination, repair or adjustment.
Comply with the
instructions for use
J DANGER
J WARNING
Follow the basic safety
precautions

1 IMPORTANT SAFEGUARDS
5
SAVE THESE INSTRUCTIONS. Pass them on to any subsequent user.
The appliance is designed and intended for household use only. It
shall only be used for coffee preparation and to heat water,
according to these instructions. Use for any other purpose will be
deemed improper. JURA Elektroapparate AG cannot accept any
responsibility for the consequences of improper use.
People, including children, who
Zdo not have the physical, sensory or mental capabilities to use
the appliance safely or
Zare inexperienced or lack knowledge in how to use the
appliance safely
must be supervised by a responsible person when using it, or must
be instructed in how to use it correctly.
ZA short power-supply cord is to be provided to reduce risks
resulting from becoming entangled in or tripping over a
longer cord.
ZThe cord shall be arranged so that it will not drape over the
counter top or table top where it can be pulled on by children
or tripped over.
ZThis appliance has a 3-pin grounded plug.
ZDo not modify the plug in any way.
Intended use
Special power cord set
instructions
ZThe use of an accessory attachment not recommended by the
appliance manufacturer may result in fire, electric shock, or
injury to persons.
ZDo not use outdoors.
ZDo not let the cord hang over the edge of a table or counter,
or touch hot surfaces.
ZDo not place on or near a hot gas or electric burner, or in a
heated oven.
ZTo disconnect, turn any control to ‘OFF’ then remove plug
from wall outlet.
ZDo not use appliance for other than intended use.
ZUse extreme caution when dispensing hot steam, hot water
or hot coffee.

1 IMPORTANT SAFEGUARDS
6
Extension cords are available an may be used if care is exercised in
their use.
If the user chooses to use an extension cord,
Zthe marked electrical rating of the extension cord should be
at least as great as the electrical rating of the appliance, and
Zif the appliance is of the grounded type, the extension cord
should be a grounding type 3-wire cord, and
Zthe longer cord should be arranged so that it will not drape
over the counter top or tabletop where it can be pulled on by
children or tripped over.
To reduce the risk of fire or electric shock, DO NOT remove any
service covers. DO NOT modify the appliance in any way that is not
described in these instructions. NO user serviceable parts included.
Repair MUST be done by authorized personnel only.
In the event of signs of damage, for example if there is a smell of
burning, unplug the machine immediately from outlet and contact
JURA customer service.
This appliance is for household use. Any servicing other than
cleaning and user maintenance shall be performed by an authorized
service representative:
ZDo not immerse base in water or try to disassemble.
ZDo not put the appliance or any individual parts in the
dishwasher.
ZCheck voltage to be sure that the voltage indicated on the
name plate complies with your voltage. The name plate is
located on the underside of the appliance.
ZNever use warm or hot water to fill the water container. Use
cold water only.
ZKeep your hands and the cord away from hot parts of the
appliance during operation.
There is a risk of scalds or burns on the spouts.
ZKeep children away.
ZDo not touch any hot parts. Use the handles or knobs
provided.
J WARNING
JCAUTION

1 IMPORTANT SAFEGUARDS
7
ZNever clean with scouring powders or hard implements.
ZEnsure that the ventilation slots are not covered.
ZNever pull out the drip tray during the brewing process. Only
pull the drip tray when the display instructs you or when the
appliance is ready for use.
ZNever fill instant coffee, chocolate mix etc. into the bean
container or ground coffee funnel (filler funnel for ground
coffee). It will damage the functioning of the brewing
chamber.
ZNever fill sugar coated coffee beans into the bean container.
In case of doubt, call your dealer.
ZNever fill anything other than coffee beans into the bean
container (no chocolate, no rice, no nuts, no spices, nothing
other than roasted coffee beans).
ZNever fill frozen beans into the bean container. If you store
beans in the freezer, let them thaw 3 to 4 hours before filling
them into the bean container.
ZNever fill anything but fresh, cold and clean water into the
water tank, except when decalcifying.
ZNever use mineral or carbonated water. You can use tap water,
bottled water, spring water and reverse osmosis water.
ZNever do anything with the machine which is not described in
these instructions. In case of doubt, call your dealer.
NOTICE
NEVER DO
(or you will void your
warranty protection):

2 Control elements
8
2 Control elements
4
1
2
14
13 15
12
5
3
6
7
8
9
10
11
J HOT
J HOT

2 Control elements
9
[]
qOn/Off button Q
wBean container with aroma preservation cover
eSwitch for hot water preparation
rHeight-adjustable coffee spout
tHeight-adjustable hot-water spout
zCup platform
uDrip tray
iCoffee grounds container
oPower cord (permanently connected or plug-in)
pWater tank
aWater tank cover
sService socket for optional JURA WiFi Connect
dFiller funnel for ground coffee
fFiller funnel cover
gGrinder adjustment switch
hMeasuring spoon for ground coffee
Symbol display and buttons
fProgramming mode button
[‘Small cup’ button
]‘Large cup’ button
sCoffee strength button
& Descaling symbol
L Cleaning symbol
! Filter symbol
u Water Tank symbol
üDrip tray symbol
4 WiFi symbol
s Coffee Strength symbol
£ Ground Coffee symbol
h

3 Preparing and using for the first time
10
3 Preparing and using for the first time
When setting up your E4, please note the following:
UPlace the E4 on a horizontal surface that is not sensitive to
water.
UChoose a spot for your E4 which protects the machine against
overheating. Ensure that the ventilation slots are not covered.
The bean container has an aroma preservation cover. This will ensure
that your coffee beans retain their aroma for longer.
Coffee beans which have been treated with additives (e.g. sugar),
ground coffee or freeze-dried coffee will damage the grinder.
TOnly use roasted, untreated coffee beans to fill the bean
container.
TRemove the aroma preservation cover.
TRemove any dirt or foreign objects from inside the bean
container.
TFill the bean container with coffee beans and close the aroma
preservation cover.
When you use the machine for the first time, you must set the water
hardness. If you do not know the hardness of your water, you can
find this out first. Use the Aquadur® test strips supplied with the
machine.
THold the test strip under flowing water for one second. Shake
off the water.
TWait for about 1minute.
TYou will then be able to read the degree of water hardness
from the discoloration of the Aquadur® test strip and the
description on the packaging.
Setting up the machine
Filling the bean container
NOTICE
Determining the water
hardness

3 Preparing and using for the first time
11
Level Display German
Degree (°dH)
Degrees of general
hardness (°dGH)
Parts per
million (ppm)
Indicator Strip number
of ‘reddish’fields
Not active – – – –
Very soft water <3 <3 < 53.4 None
Soft water > 4 > 4 > 71 1
Hard water > 8.4 > 8.4 > 150 2
Very hard water > 14 > 14 > 250 3
If the machine is operated with a defective power cord, there is a
danger of potentially fatal electric shock.
TNever use a machine which is damaged.
TNever use a machine which has a defective power cord.
Milk, sparkling mineral water or other liquids can damage the
water tank or the machine.
TOnly fill the water tank with fresh, cold water.
Precondition:The bean container has been filled.
TFor machines with a plug-in power cord: Connect the power
cord to the machine.
TInsert the power plug into a power socket.
TPress the On/Off button Q.
EThe number of symbols that are brightly lit up indicates the
water hardness level: 1–7°dH(s), 8–15°dH(ss),
16–23°dH(sss) and 24–30°dH (sss£).
EIf you do not know the hardness of your water, you can find
this out first (see chapter 3 ‘Preparing and using for the first
time – Determining the water hardness’).
TPress the [/ ]button to set the water hardness.
TPress the sbutton to confirm the setting.
The !and usymbols appear.
TRemove the water tank and rinse it with cold water.
TFit the filter cartridge extension supplied on top of the CLEARYL
Smart filter cartridge.
TInsert the filter cartridge with its extension into the water tank.
First-time use
J WARNING
NOTICE

3 Preparing and using for the first time
12
TTurn the filter cartridge clockwise until it audibly clicks into
place.
TFill the water tank with fresh, cold water and reinsert the tank.
EThe machine automatically detects that you have just
inserted the filter cartridge. The sss£ symbols flash
from right to left to show that you need to open the switch
for hot water preparation.
TPlace a receptacle under the hot-water spout.
TTurn the switch to thexposition.
The filter is rinsed. Water flows out of the hot-water spout.
Rinsing of the filter stops automatically. The sss£ symbols
flash from left to right.
TTurn the switch to the °position.
The üsymbol lights up.
TEmpty the drip tray and put it back into the machine.
TPlace a receptacle under the coffee spout.
The sss£ symbols flash while the E4 is heating up.
The machine is rinsed. Water flows out of the coffee spout.
The rinse stops automatically. Your E4 is ready for use.
Your E4 can be connected with your JURA app (J.O.E.®).
Precondition: J.O.E.®is installed on your mobile end device. The
optionally available JURA WiFi Connect is inserted into the service
socket of your E4.
For more information on setting up the WiFi Connect go to
jura.com/wifi or scan the QR code.
Connecting the machine to
the WiFi network
(optionally)

4 Preparation
13
4 Preparation
Hot coffee, hot steam and hot water can cause scalding. Scalding
is a serious burn.
TUse extreme care when handling hot liquid or steam.
TAllow liquid to cool down before drinking.
TIn the event of scalding, rinse affected area with cold water and
seek medical attention.
TKeep children AWAY.
Basic information about preparing drinks:
Aim What to do
Select coffee
strength
Press the sbutton before preparation:
‘mild’ (s), ‘normal’ (ss) or ‘strong’ (sss).
The E4 remembers the last option selected for
the next preparation.
Cancel
preparation
Press any button
EAll products can also be prepared using the JURA app (J.O.E.®).
EWith the JURA app (J.O.E.®) you can make two additional
specialty coffees: the caffè Barista and the lungo Barista.
Coffee tastes best served hot. A cold porcelain cup cools the
beverage – and impairs the taste. We therefore recommend
prewarming the cups. You can purchase a JURA cup warmer from
your specialized dealer.
Example:Coffee
TPlace a cup under the coffee spout.
TPress the ]button.
The preset amount of water for coffee flows into the cup.
J WARNING
Espresso and coffee

4 Preparation
14
Example:Two espressi
TPlace a cup under the coffee spout.
TPress the [button 2x.
ETwo brewing operations take place one after the other.
Change the cup before the second brewing operation.
ETo prepare two coffees, press the ]button 2x.
The preset amount of water for espresso flows into the cup.
TPlace a cup under the hot-water spout.
TTurn the switch to thexposition.
Hot water flows into the cup.
TTurn the switch to position °to stop the preparation of hot
water.
The JURA app (J.O.E.®) offers two additional products for you to
choose from: caffè Barista and lungo Barista.
Example:Lungo Barista
TPlace a cup under the hot-water spout.
TIn the JURA app (J.O.E.®), tap the product ‘Lungo Barista’.
TFollow the instructions in the app.
It is easy to make permanent settings for the amount of water for all
specialty coffees according to the cup size. Adjust the amount once
as shown in the following example. Every time you prepare a drink
in the future, this amount of water will be dispensed.
Example: Proceed as follows to permanently set the amount of
water for one coffee.
Two espressi and two
coffees
Hot water
Caffè Barista and lungo
Barista (optionally with
J.O.E.®)
Permanently setting the
amount of water for the cup
size

4 Preparation
15
TPlace a cup under the coffee spout.
TPress the ]button for about 2 seconds.
The coffee flows into the cup.
TPress any button as soon as there is sufficient coffee in the cup.
Preparation stops. The set amount of water for one coffee is
permanently stored.
EYou can alter this setting at any time by repeating the above
procedure.
You can adjust the grinder to suit the degree of roast of your coffee.
If you adjust the consistency of grind when the grinder is not
operating, the grinder adjustment switch could be damaged.
TOnly adjust the consistency of grind when the grinder is
running.
EThe consistency of grind is correct if the coffee flows
regularly from the coffee spout. In addition a fine, thick
crema forms.
Grinder adjustment switch
U1: Fine consistency of grind setting
U2: Coarse consistency of grind setting
Example: Proceed as follows to change the consistency of grind
during the preparation of an espresso.
TPlace a cup under the coffee spout.
TOpen the cover of the filler funnel for ground coffee.
TPress the [button.
TTurn the grinder adjustment switch to the desired position
while the grinder is running.
The preset amount of water flows into the cup.
TClose the filler funnel cover.
You can choose to use a second coffee variety, for example
decaffeinated coffee, with the filter funnel for ground coffee.
Basic information about ground coffee:
UNever add more than two level measuring spoons of ground
coffee.
UUse ground coffee which is not ground too finely. Very fine
coffee can block up the system so that the coffee only comes
out in drips.
Adjusting the grinder
CAUTION
wq
Ground coffee

5 Daily operation
16
UIf you did not fill the machine with enough ground coffee,
the £symbol flashes and the E4 stops the operation.
UThe desired specialty coffee must be prepared within
approximately one minute after filling with the ground coffee.
Otherwise the E4 stops the operation and is once more ready
for use.
All specialty coffees with ground coffee are always prepared
following the same model.
Example:Proceed as follows to prepare an espresso using ground
coffee.
TPlace an espresso cup under the coffee spout.
TPress the sbutton several times until the £symbol lights up
brightly.
TOpen the powder chute cover.
TPlace one level measuring spoon of ground coffee into the filler
funnel.
TClose the cover of the filler funnel.
TPress the [button.
The preset amount of water for espresso flows into the cup.
5 Daily operation
TPlace a receptacle under the coffee spout.
TPress the On/Off button Q.
EWhen the machine is switched off, the system is only rinsed
if a specialty coffee has been prepared.
The system rinses itself. Your E4 is switched on or off.
Switching the machine on
and off

5 Daily operation
17
Daily maintenance of the machine and hygiene when handling
coffee and water are key to a perfect coffee result in the cup every
time. You should therefore change the water daily.
Milk, sparkling mineral water or other liquids can damage the
water tank or the machine.
TOnly fill the water tank with fresh, cold water.
TOpen the water tank cover.
TRemove the water tank and rinse it with cold water.
TFill the water tank with fresh, cold water and reinsert the tank.
TClose the water tank cover.
Optimal coffee quality depends on many factors. One important
prerequisite is regular maintenance of your E4. Carry out the
following steps:
Maintenance action Daily If necessary Note
Empty the drip tray and coffee grounds
container and rinse with warm water
(The drip tray and coffee grounds
container are dishwasher-safe, but the
insert for the drip tray is not)
ZAlways empty the coffee
grounds container when the
machine is switched on. This
is the only way of resetting
the coffee grounds counter.
Rinse the water tank Z
Wipe the surface of the machine with a
clean, soft, damp cloth (e.g. microfiber
cloth)
Z
Clean the inside of the water tank with a
brush
Z
Clean the top and bottom of the cup
platform
Z
Filling the water tank
CAUTION
Maintenance actions

6 Permanent settings in programming mode
18
6 Permanent settings in programming mode
In programming mode you can set the switch-off time and water
hardness. Press the fbutton to enter programming mode.
By instructing your E4 to automatically switch itself off, you can cut
down your energy consumption. Your E4 switches off automatically
after the preset time following the last action on the machine.
The number of symbols that are brightly lit up indicates the set
switch-off time:
Switch-off time Symbol(s) shown in display
30minutes s
1hour ss
2hours sss
4hours sss£
TPress the fbutton.
The &symbol lights up brightly.
TPress the ]button several times until the üsymbol lights up
brightly.
TPress the sbutton to enter the program item.
TPress the [/ ]button to change the setting for the switch-off
time.
TPress the sbutton to confirm the setting.
EThe setting must be confirmed within 20 seconds.
The sss£ symbols flash 3 times in quick succession.
TPress the fbutton to exit programming mode.
EThe automatic switch-off can also be set using the JURA app
(J.O.E.®).
Automatic switch-off

6 Permanent settings in programming mode
19
The harder the water, the more frequently you need to descale the
E4 or change the filter. It is therefore important to set the water
hardness accurately.
The water hardness was set when the machine was first used. You
can change this setting at any time.
The number of symbols that are brightly lit up indicates the set
water hardness level:
Water hardness Symbol(s) shown in display
1–7°dH s
8–15°dH ss
16–23°dH sss
24–30°dH sss£
TPress the fbutton.
The &symbol lights up brightly.
TPress the ]button several times until the usymbol lights up
brightly.
TPress the sbutton to enter the program item.
TPress the [/ ]button to change the setting for the water
hardness.
TPress the sbutton to confirm the setting.
EThe setting must be confirmed within 20 seconds.
The sss£ symbols flash 3 times in quick succession.
TPress the fbutton to exit programming mode.
Setting the water hardness

7 Maintenance
20
7 Maintenance
Use of maintenance products that are harmful to health and
discharge of liquids during maintenance program. Harmful if
swallowed. Irritating to eyes and skin.
TKeep children AWAY.
TKeep children away from the machine while it is performing a
maintenance program.
TAvoid contact with skin and eyes.
TAvoid generation of dust. Do not inhale dust.
TWhen using do not eat or drink.
TKeep maintenance products away from food, drink and
animal food.
TKeep container tightly closed and dry. Keep in a cool place.
Your E4 has the following integrated maintenance programs:
UCleaning the machine (L)
UDescaling the machine (&)
EIf a maintenance program needs to be started, the
appropriate symbol lights up. If this happens, run the
appropriate maintenance program.
Once the filter cartridge stops working (depending on the water
hardness setting), the E4 will prompt you to change the filter.
EYour E4 no longer has to be descaled if you are using the
CLEARYL Smart filter cartridge.
ECLEARYL Smart filter cartridges are available from
specialized dealers.
Precondition:Your E4 is ready for use. The filter symbol !lights
up (if you are already using a filter and the filter capacity is
depleted).
TRemove and empty the water tank.
TTurn the filter cartridge anticlockwise and remove it along with
the extension from the water tank.
TFit the filter cartridge extension on top of a new CLEARYL Smart
filter cartridge.
TInsert the filter cartridge with its extension into the water tank.
J WARNING
Inserting/changing the filter
Other manuals for E4
1
Table of contents
Other Jura Coffee Maker manuals

Jura
Jura GIGA X9c Professional Configuration guide

Jura
Jura ONO User manual

Jura
Jura IMPRESSA XS95 User manual

Jura
Jura E8 User manual

Jura
Jura ENA Micro 90 User manual

Jura
Jura IMPRESSA Z5 User manual

Jura
Jura Z6 User manual

Jura
Jura IMPRESSA J9.3 One Touch TFT User manual

Jura
Jura GIGA X3C Guide

Jura
Jura J8 User manual

Jura
Jura ENA 8 User manual

Jura
Jura IMPRESSA XJ5 Professional User manual

Jura
Jura ENA 8 User manual

Jura
Jura IMPRESSA J Series User manual

Jura
Jura GIGA X8 Professional User manual

Jura
Jura IMPRESSA 401 User manual

Jura
Jura IMPRESSA F70 User manual

Jura
Jura IMPRESSA C5 User manual

Jura
Jura IMPRESSA X7-S User manual

Jura
Jura X6 User manual