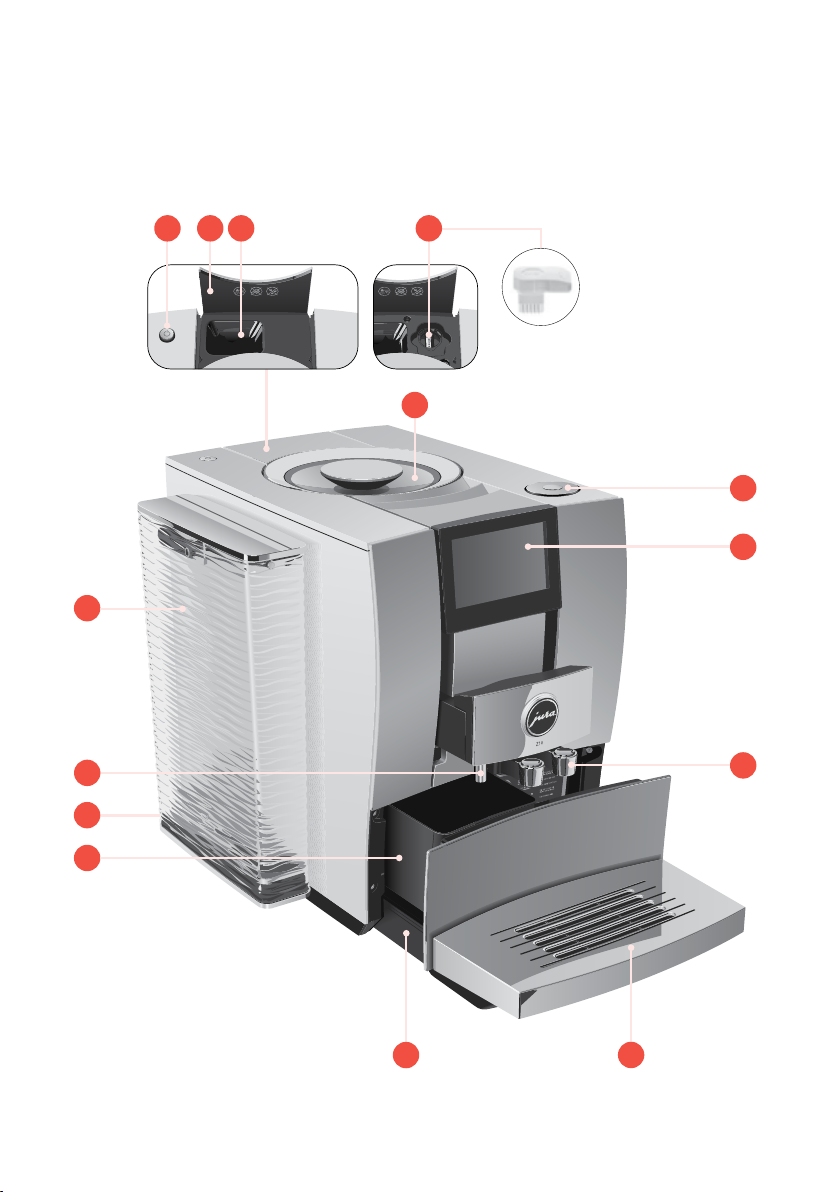
Jura Z10 759 User manual

Z10 (EA/SA/INTA)
Instructions for Use

2
Table of contents
Your Z10
1 Control elements ����������������������������������������������������������������������������������������������������4
2 For your safety �������������������������������������������������������������������������������������������������������6
Comply with the instructions for use ���������������������������������������������������������������������������6
Proper use �������������������������������������������������������������������������������������������������������������6
User limitations ������������������������������������������������������������������������������������������������������6
Use by children ������������������������������������������������������������������������������������������������������� 7
What to do in the event of damage �����������������������������������������������������������������������������7
Preventing damage ������������������������������������������������������������������������������������������������� 7
Danger of electric shock ��������������������������������������������������������������������������������������������9
Danger of burns, scalding and injury ���������������������������������������������������������������������������9
3 Preparing and using for the first time �����������������������������������������������������������������������10
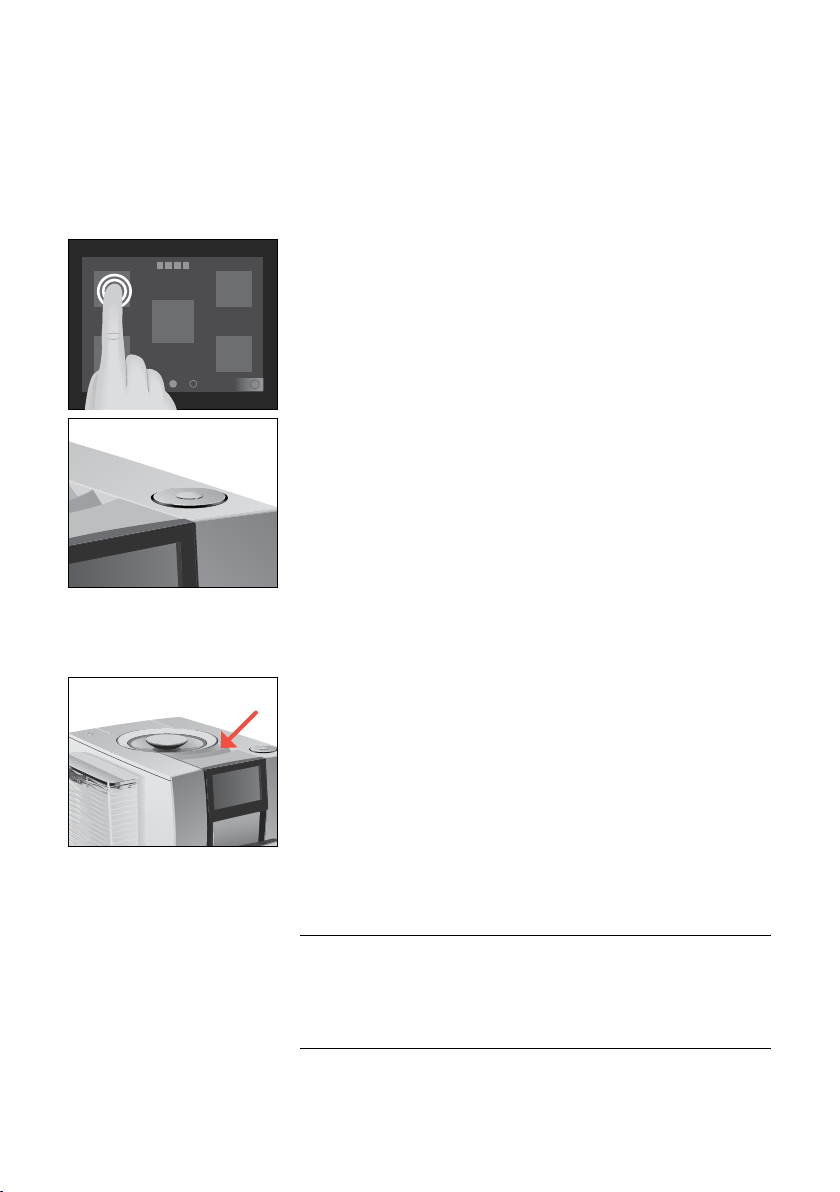
Operation with touchscreen display and Rotary Switch ���������������������������������������������������10
Setting up the machine �������������������������������������������������������������������������������������������10
Filling the bean container �����������������������������������������������������������������������������������������10
Determining the water hardness ���������������������������������������������������������������������������������11
First-time use ���������������������������������������������������������������������������������������������������������11
Managing your Z10 – the JURA Cockpit ����������������������������������������������������������������������� 13
Connecting milk ����������������������������������������������������������������������������������������������������� 13
Connecting the Cool Control milk cooler wirelessly ��������������������������������������������������������14
Establishing a WiFi connection ���������������������������������������������������������������������������������� 14
4 Preparation ���������������������������������������������������������������������������������������������������������� 15
Aroma Selection �����������������������������������������������������������������������������������������������������16
Preparation with preselection (Speciality Selection) ��������������������������������������������������������16
Cold Brew ������������������������������������������������������������������������������������������������������������� 17
Espresso and coffee ������������������������������������������������������������������������������������������������ 17
Latte macchiato, cappuccino and other speciality coffees with milk ����������������������������������� 17
Milk and milk foam �������������������������������������������������������������������������������������������������18
Espresso doppio �����������������������������������������������������������������������������������������������������18
Caffè Barista and lungo Barista ���������������������������������������������������������������������������������� 18
Pot of coffee ����������������������������������������������������������������������������������������������������������18
Ground coffee ��������������������������������������������������������������������������������������������������������19
Hot water ������������������������������������������������������������������������������������������������������������ 20
Adjusting the product settings ��������������������������������������������������������������������������������� 20
5 Daily operation �����������������������������������������������������������������������������������������������������21
Switching the machine on and off ������������������������������������������������������������������������������ 21
Filling the water tank ����������������������������������������������������������������������������������������������� 21
Maintenance actions ���������������������������������������������������������������������������������������������� 22

3
Table of contents
6 Machine settings �������������������������������������������������������������������������������������������������� 23
7 Maintenance �������������������������������������������������������������������������������������������������������� 24
Rinsing the machine ���������������������������������������������������������������������������������������������� 24
Automatic milk system rinsing ��������������������������������������������������������������������������������� 24
Cleaning the milk system ���������������������������������������������������������������������������������������� 24
Dismantling and rinsing the dual spout ���������������������������������������������������������������������� 25
Inserting/changing the filter ������������������������������������������������������������������������������������� 27
Cleaning the machine �������������������������������������������������������������������������������������������� 28
Descaling the machine ������������������������������������������������������������������������������������������ 29
Descaling the water tank ������������������������������������������������������������������������������������������ 31
Cleaning the bean container ������������������������������������������������������������������������������������� 31
8 Display messages ������������������������������������������������������������������������������������������������� 32
9 Troubleshooting ��������������������������������������������������������������������������������������������������� 33
10 Transport and environmentally friendly disposal �������������������������������������������������������� 35
Transport/ Emptying the system ������������������������������������������������������������������������������ 35
Disposal �������������������������������������������������������������������������������������������������������������� 35
11 Technical data ������������������������������������������������������������������������������������������������������� 36
12 Index ������������������������������������������������������������������������������������������������������������������ 37
13 JURA contact details/ Legal information ������������������������������������������������������������������� 40

1 Control elements
4
1 Control elements
11
12
14
8
6
7
123
5
9
10
13
4

qOn/Off button Q
wCover for powder chute for ground coffee
ePowder chute for ground coffee
rService socket with JURA WiFi Connect
(under cover)
tBean container with aroma preservation
cover
zRotary Switch
uTouchscreen display
iHeight- and width-adjustable dual spout
oCup grille
pDrip tray
aCoffee grounds container
sMains cable (permanently connected
or plug-in)
dHot-water spout
fWater tank
gContainer for milk system cleaning
hMeasuring spoon for ground coffee
jFilter casing
6
hg j

2 For your safety
6
2 For your safety
Before using the machine, read these instructions
for use thoroughly and completely and comply
with the instructions they contain� Keep these
instructions for use close to the machine and pass
them on to the next user�
Failure to observe the instructions for use may
result in serious injuries or damage to property�
Safety information is therefore indicated as fol-
lows:
JWARNING Indicates circumstances that
may result in serious injuries or
death�
JCAUTION Indicates circumstances that
may result in minor injuries�
CAUTION Indicates circumstances that may
result in damage to property�
The machine is intended for private domestic use�
It should only be used for coffee preparation and to
heat milk and water� Use for any other purpose will
be deemed improper�
People, including children, who
Udo not have the physical, sensory or mental
capabilities to use the machine safely or
Uare inexperienced or lack knowledge
must be supervised by a responsible person when
using it, or must be instructed in how to use it cor-
rectly�
When using the CLARIS Smart filter cartridge or a
JURA WiFi Connect, wireless connections are estab-
Comply with the
instructions for use
Proper use
User limitations

2 For your safety
7
lished� Specific details on the frequency band used
and the maximum transmission power can be
found in the ‘Technical data’ section�
Children must be able to recognise and under-
stand the potential dangers arising from incor-
rect use:
UKeep children under the age of 8 away from
the machine, or supervise them constantly�
UChildren aged eight and over may only oper-
ate the machine without supervision if they
have been instructed in how to use it safely�
UChildren may not clean or service the machine
unless supervised by a responsible person�
UDo not allow children to play with the machine�
Never use a damaged machine or mains cable.
This could result in fatal electric shock.
UIn the event of signs of damage, disconnect the
machine from the mains� To do this, first switch
the Z10 off with the On/Off button Q� Only then
should you remove the mains plug from the
power socket�
UReplace a damaged plug-in mains cable with
an original JURA mains cable� Unsuitable mains
cables may result in consequential damage�
UOnly permit authorised JURA service centres to
carry out repairs to the machine and the
permanently connected mains cable.
Unsuitable repairs may result in consequential
damage�
To avoid damage to the machine and the mains
cable:
UDo not use the Z10 and the mains cable near
hot surfaces�
Use by children
What to do in the
event of damage
Preventing damage

2 For your safety
8
UDo not allow the mains cable to rub against
sharp edges and ensure that it does not
become trapped�
UNever allow the mains cable to loosely hang
down� The mains cable could pose a tripping
hazard or become damaged�
UProtect the Z10 from weather and direct
sunlight�
UOnly connect the Z10 to a mains voltage
corresponding to that stated on the rating
plate� The rating plate is located on the
underside�
UConnect the Z10 directly to a domestic power
socket� Using multi-socket adapters or
extension cords may cause overheating�
UDo not use alkaline or alcohol-based cleaning
agents; only use mild cleaning agents and a
soft cloth�
UDo not use any coffee beans treated with
additives or caramelised coffee beans�
UOnly fill the water tank with fresh, cold,
non-carbonated water�
USwitch the machine off with the On/Off button
Qif you are going to be absent for a longer
period of time and remove the mains plug
from the power socket�
UOnly use original JURA maintenance products�
Use of products that are not explicitly recom-
mended by JURA could damage your Z10�

2 For your safety
9
Water conducts electricity. Do not bring water
and electricity into contact with one another:
UNever touch the mains plug with wet hands�
UDo not immerse the Z10 and/or mains cable in
water�
UDo not put the Z10 or any individual parts in
the dishwasher�
UBefore cleaning, switch the Z10 off with the On/
Off button Q� Always wipe the Z10 with a damp
cloth rather than a wet one, and protect it from
prolonged exposure to water splash� The Z10
must not be cleaned with a jet of water�
UThe Z10 is not suitable for installation on a
surface where a jet of water can be used�
UDo not touch the spouts during operation� Use
the handles provided�
UOptionally, your Z10 can be remotely operated
using mobile devices� When preparing a product
or initiating a maintenance programme, make
sure that other people are not put at risk – for
example, through contact with the spouts�
UBe careful to ensure that the dual spout is
correctly installed and clean� Otherwise parts
may come loose� There is a danger of parts
being swallowed�
Danger of electric
shock
Danger of burns,
scalding and injury

3 Preparing and using for the first time
10
3 Preparing and using for the first time
You can operate your Z10 in two ways:
UYour Z10 has a touchscreen display� Tap or swipe the display to
trigger an action�
UUse the Rotary Switch, which can be turned or pressed�
When setting up your Z10, please note the following:
UChoose a spot for your Z10 which protects the machine against
overheating� Ensure that the ventilation slots are not covered�
UPlace the Z10 on a horizontal surface that is not sensitive to
water�
The bean container has an aroma preservation cover� This will ensure
that your coffee beans retain their aroma for longer�
Coffee beans which have been treated with additives (e�g� sugar),
ground coffee or freeze-dried coffee will damage the grinder�
T Only use roasted, untreated coffee beans to fill the bean
container�
T Remove the aroma preservation cover�
T Remove any dirt or foreign objects from inside the bean
container�
Operation with touchscreen
display and Rotary Switch
s
Setting up the machine
Filling the bean container
CAUTION

3 Preparing and using for the first time
11
T Fill the bean container with coffee beans and close the aroma
preservation cover�
When you use the machine for the first time, you must set the water
hardness� If you do not know the hardness of your water, you can
find this out first� Use the Aquadur® test strips supplied with the
machine�
T Hold the test strip under flowing water for one second� Shake
off the water�
T Wait for about 1minute�
T You will then be able to read the degree of water hardness from
the discolouration of the Aquadur® test strip and the descrip-
tion on the packaging�
If the machine is operated with a defective mains cable, there is a
danger of potentially fatal electric shock�
T Never use a machine which is damaged or has a defective mains
cable�
Milk, sparkling mineral water or other liquids can damage the
water tank or the machine�
T Only fill the water tank with fresh, cold water�
Precondition:The bean container has been filled�
T For machines with a plug-in mains cable: Connect the mains
cable to the machine�
T Insert the mains plug into a power socket�
T Press the On/Off button Qto switch the Z10 on�
‘Sprachauswahl’
ETo display more languages, touch 9or 0until the desired
language comes into focus (e�g� ‘English’)�
T Touch ‘Save’�
‘Saved’ appears briefly on the display�
‘Water hardness’
Determining the water
hardness
First-time use
JWARNING
CAUTION

3 Preparing and using for the first time
12
EIf you do not know the hardness of your water, you must
find this out first (see chapter 3 ‘Preparing and using for the
first time – Determining the water hardness’)�
T Touch 9or 0to change the water hardness setting�
T Touch ‘Save’�
‘Saved’ appears briefly on the display�
‘Insert filter’
T Place a receptacle under the hot-water spout and dual spout�
T Remove the water tank and rinse it with cold water�
T Open the filter casing�
T Insert the CLARIS Smart filter cartridge�
T Close the filter casing�
T Insert the filter casing into the water tank�
T Turn the filter casing clockwise until it audibly clicks into place�
T Fill the water tank with fresh, cold water and reinsert the tank�
EThe machine automatically detects that you have just
inserted the filter cartridge�
‘Saved’
‘Filter is being rinsed’
‘System is filling’
‘Empty drip tray’
T Empty the drip tray and put it back into the machine�
‘Accessory’
q
w

3 Preparing and using for the first time
13
T Touch ‘Connect’ to connect your Z10 to your network�
T If necessary, scan the QR code with your mobile device to down-
load the JURA app (J�O�E�®)�
T Touch ‘Connect’�
T Place a receptacle under the dual spout�
‘Machine is rinsing’
The start screen is displayed� Your Z10 is ready for use�
You can manage your Z10 with the JURA Cockpit. Press the Rotary
Switch to open the JURA Cockpit�
Symbol Meaning
c‘Maintenance’ section (blue)
f‘Machine setting’ section (green)
h‘Smart mode’ active
4(white) Your Z10 is connected with the network and/or
Cool Control via JURA WiFi Connect�
4(red) No connection to the WiFi network
$Filter mode
Your Z10 creates fine, creamy, feather-light milk foam with a perfect
consistency� The most important requirement for frothing milk is a
milk temperature of 4–8°C� We would therefore recommend using
a milk cooler or a milk container�
T Connect the milk pipe to the dual spout�
T Connect the other end of the milk pipe to a milk container or a
milk cooler�
Managing your Z10 – the
JURA Cockpit
c
4$
Connecting milk

3 Preparing and using for the first time
14
Your Z10 can be connected with your Cool Control milk cooler�
Precondition:The JURA WiFi Connect is inserted into the service
socket of your Z10�
T Press the Rotary Switch�
T Touch the ‘Machine setting’ fsymbol�
T Touch ‘1/2’ to go to the next page�
T Touch ‘Connect accessory’�
T Touch ‘Connect’�
‘Saved’
Your Z10 can be connected with your JURA app (J�O�E�®)�
Precondition:J�O�E�®is installed on your mobile end device and
you have logged into your home network� The JURA WiFi Connect
is inserted into the service socket of your Z10�
T Press the Rotary Switch�
T Touch the ‘Machine setting’ fsymbol�
T Touch ‘Wi-Fi connection’�
T Touch ‘Connect’�
T Add a new network in your JURA app (J�O�E�®) and follow the
instructions�
Connecting the Cool Control
milk cooler wirelessly
Establishing a WiFi
connection

4 Preparation
15
4 Preparation
Basic information about preparing drinks:
Aim What to do
Change the coffee
strength of a single
product
During the grinding operation,
move your finger across the display
or turn the Rotary Switch
Change the amount for a
single product
During preparation, move your
finger across the display or turn the
Rotary Switch
Change the consistency
of grind, coffee strength,
quantity and temperature
for any given product
Tap and hold a product for around
2 seconds and configure the
settings under ‘Product settings’
Display more products Turn the Rotary Switch to access
the product selector view or move
your finger across the display
Stop preparation Touch ‘Cancel’ or press the Rotary
Switch
Place a product on the
start screen as a favourite
Tap and hold a product for around
2 seconds and place another
product under ‘Replace product’
EIf no actions are performed on the machine for 9 minutes,
your ‘Z10’ will switch to standby mode� Touch the display or
press or turn the Rotary Switch to take it out of standby
mode�
ECoffee tastes best served hot� A cold porcelain cup cools the
beverage – and impairs the taste� We therefore recommend
prewarming the cups� You can purchase a JURA cup warmer
from your specialised dealer�

4 Preparation
16
You can use Aroma Selection on your Z10 to change the consistency
of grind and coffee strength of any product:
Example:Espresso with higher coffee strength
T Place a cup under the dual spout�
T Touch the ‘Aroma Selection’ symbol (bottom right)�
T Touch ‘Espresso’�
T Touch sto increase the coffee strength�
T Touch ‘Start’�
The preset amount of water for coffee flows into the cup�
Touch ‘ZZZ Z’to call up the Speciality Selection and activate the
desired preselection for your next product:
Speciality Selection Meaning
‘Cold Brew’ d
(espresso, coffee,
caffè Barista, lungo
Barista)
The product is prepared as a cold
beverage�
‘Extra Shot’ s(all
speciality coffees)
The product is prepared with two
brewing operations, each with half the
amount of water – for a speciality coffee
with a particularly intense taste�
Double product eThe product is prepared 2x in succession
(2 strokes)�
‘Ground coffee’ £The product is prepared with ground
coffee�
EThe Speciality Selection closes after 10 seconds�
EIf you press your preselection briefly, the next product will
be prepared according to your preselection�
EIf you press and hold your preselection (for 2 seconds), the
preselection will be active until you switch off your Z10�
Aroma Selection
s
Preparation with
preselection (Speciality
Selection)

4 Preparation
17
The ‘Cold Brew’ preselection is used to prepare a cold speciality cof-
fee�
Example:Coffee with ‘Cold Brew’ preselection
T Fill the water tank with cold water�
EYou can influence the brewing result: The colder the water in
the water tank, the colder the brewed beverage will be�
T Place a cup under the dual spout�
T Add ice cubes to the cup according to your own preferences�
T Touch ‘ZZZ Z’to call up the Speciality Selection�
EThe Speciality Selection closes after 10 seconds�
T Touch dto activate the ‘Cold Brew’ preselection�
T Touch ‘Coffee’�
The preset amount of water for coffee flows into the cup�
Example:Coffee
T Place a cup under the dual spout�
T Touch ‘Coffee’�
The preset amount of water for coffee flows into the cup�
Your Z10 prepares the following speciality coffees with milk at the
touch of a button:
UCortado
ULatte macchiato
UMacchiato
UFlat white
UCappuccino
UCafé au lait
Example:Latte macchiato
Precondition:Milk is connected to the dual spout�
Cold Brew
Espresso and coffee
Latte macchiato, cappuccino
and other speciality coffees
with milk

4 Preparation
18
T Place a glass under the dual spout�
T Touch ‘Latte macchiato’�
The preset amounts of milk and milk foam flow into the glass�
EThere is a short interval while the hot milk separates from
the milk foam� This allows the typical layers of a latte
macchiato to form�
The preset amount of water for espresso flows into the glass�
E8 minutes after preparation, the milk system is automati-
cally rinsed� Therefore always place a receptacle under the
dual spout after preparing milk�
To ensure that the milk system in the dual spout always works prop-
erly, you must clean it daily (see chapter 7 ‘Maintenance – Cleaning
the milk system’)�
Your Z10 prepares hot milk and milk foam�
E8 minutes after milk preparation, the milk system is
automatically rinsed� Therefore always place a receptacle
under the dual spout after preparing milk�
‘Doppio’ is Italian for ‘double’� When you select Espresso doppio,
two espressi are prepared one after the other� The result is an extra
full-bodied and aromatic speciality coffee�
For the ‘caffè Barista’ and ‘lungo Barista’, the Z10 blends the coffee
with hot water using a special preparation method� This results in a
full-bodied speciality coffee which is particularly easy to digest� You
can change the amount of this additional water (see chapter 4
‘Preparation – Adjusting the product settings’)�
Relive the good old days – a ‘pot of coffee’, traditionally made from
porcelain, is perfect when you want to slow things down and catch
up with friends or family� The ‘pot of coffee’ function provides a large
portion of black coffee which is generally served at breakfast or to
accompany a piece of cake� Fill the pot with 1–5 strokes of black cof-
fee�
Milk and milk foam
Espresso doppio
Caffè Barista and lungo
Barista
Pot of coffee

4 Preparation
19
You can choose to use a second coffee variety, for example decaf-
feinated coffee, with the filter funnel for ground coffee�
UNever add more than two level measuring spoons of ground
coffee�
UUse ground coffee which is not ground too finely� Very fine
coffee can block up the system so that the coffee only comes
out in drips�
UIf you did not fill the machine with a sufficient amount of
ground coffee, ‘Not enough ground coffee’ is displayed and the
Z10 stops the operation�
UThe desired speciality coffee must be prepared within approxi-
mately one minute after filling with the ground coffee�
Otherwise the Z10 stops the operation and is once more ready
for use�
All speciality coffees with ground coffee are always prepared follow-
ing the same model�
Example:Proceed as follows to prepare one espresso using ground
coffee�
T Place an espresso cup under the dual spout�
T Touch ‘ZZZ Z’to call up the Speciality Selection�
T Touch £�
T Touch ‘Espresso’�
‘Please add ground coffee’
T Open the powder chute cover�
T Place one level measuring spoon of ground coffee into the filler
funnel�
T Close the cover of the powder chute�
T Touch ‘Next’�
T Touch ‘Espresso’�
The preset amount of water for espresso flows into the cup�
Ground coffee

4 Preparation
20
The Z10 allows you to prepare different variants of hot water:
U‘Hot water’
U‘Hot water for green tea’
There is a danger of scalding from hot water splashes�
T Avoid direct contact with the skin�
Example:Hot water
T Place a cup under the dual spout�
T Touch ‘Hot water’�
The preset amount of water flows into the cup�
Touch a product for approximately 2 seconds to access the settings:
U‘Product settings’: Specify individual settings such as coffee
strength, amount of water, etc�
U‘Initials’: Change the name of the product�
U‘Permanent preselection’: Specify a permanent preselection
(Speciality Selection)�
U‘Replace product’: Replace the products on the start screen
with your favourites�
The settings always follow the same model�
Example:Proceed as follows to change the coffee strength for one
coffee�
T Touch ‘Coffee’ for approximately 2 seconds.
T Touch ‘Product settings’�
EDepending on the selected product, there will be different
settings available which are represented by symbols on your
display�
T Touch the _symbol�
The _symbol appears in white�
T Turn the Rotary Switch to change the setting�
T Touch ‘Save’�
T Touch ‘Back’ to return to the start screen�
Hot water
JCAUTION
Adjusting the product
settings
Table of contents
Other Jura Coffee Maker manuals

Jura
Jura Impressa J6 User manual

Jura
Jura IMPRESSA F505 User manual

Jura
Jura IMPRESSA A5 One Touch User manual

Jura
Jura WE8 Configuration guide

Jura
Jura E6 User manual

Jura
Jura E8 User manual

Jura
Jura GIGA X8 Professional User manual

Jura
Jura 15171 User manual

Jura
Jura IMPRESSA E85 User manual

Jura
Jura IMPRESSA X5 User manual