2 printed on 100 % recycled paper Biostar 1500
Please read these instructions prior to assembly and keep them for further reference.
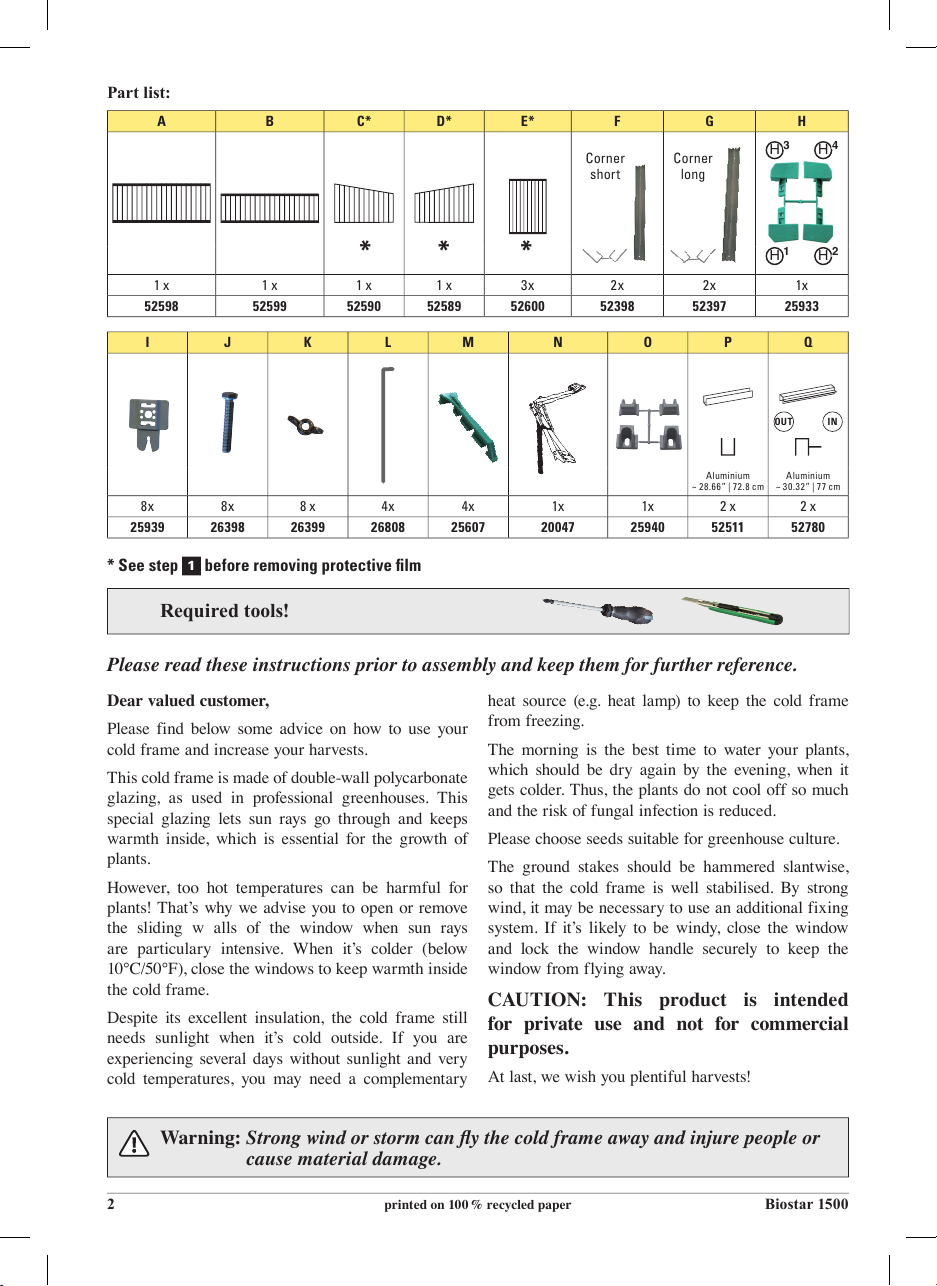
Part list:
Required tools!
Warning: Strong wind or storm can y the cold frame away and injure people or
cause material damage.
Dear valued customer,
Please find below some advice on how to use your
cold frame and increase your harvests.
This cold frame is made of double-wall polycarbonate
glazing, as used in professional greenhouses. This
special glazing lets sun rays go through and keeps
warmth inside, which is essential for the growth of
plants.
However, too hot temperatures can be harmful for
plants! That’s why we advise you to open or remove
the sliding w alls of the window when sun rays
are particulary intensive. When it’s colder (below
10°C/50°F), close the windows to keep warmth inside
the cold frame.
Despite its excellent insulation, the cold frame still
needs sunlight when it’s cold outside. If you are
experiencing several days without sunlight and very
cold temperatures, you may need a complementary
heat source (e.g. heat lamp) to keep the cold frame
from freezing.
The morning is the best time to water your plants,
which should be dry again by the evening, when it
gets colder. Thus, the plants do not cool off so much
and the risk of fungal infection is reduced.
Please choose seeds suitable for greenhouse culture.
The ground stakes should be hammered slantwise,
so that the cold frame is well stabilised. By strong
wind, it may be necessary to use an additional fixing
system. If it’s likely to be windy, close the window
and lock the window handle securely to keep the
window from flying away.
CAUTION: This product is intended
for private use and not for commercial
purposes.
At last, we wish you plentiful harvests!
A B C* D* E* F G H
Corner
short
Corner
long
H3
H1
H4
H2
1 x 1 x 1 x 1 x 3x 2x 2x 1x
52598 52599 52590 52589 52600 52398 52397 25933
I J K L M N O P Q
INOUT
Aluminium
~ 28.66” | 72.8 cm
Aluminium
~ 30.32” | 77 cm
8x 8x 8 x 4x 4x 1x 1x 2 x 2 x
25939 26398 26399 26808 25607 20047 25940 52511 52780
* See step 1before removing protective film
* * *
Biostar 1500 printed on 100 % recycled paper 3
GENERAL POINTS
Symbol legend
The following symbols and signal words are used in these
directions for use, on the cold frame or on the packaging.
WARNING! This signal word draws attention to the
risk of a medium-degree danger which if not avoided
can lead to a fatal or serious injury.
CAUTION! This signal word draws attention to the
risk of low-degree danger which if not avoided can lead
to a minor or moderate injury.
NOTE! This signal word warns against the possibility
of damage to property or provides useful additional
information on assembly or on operation.
Check the cold frame and the content
NOTE! Risk of damage!
The cold frame can be easily damaged if the packaging
is opened carelessly with a sharp knife or other pointed
object. Be very careful when opening it therefore.
1. Check if the content is complete.
2. Take the cold frame out of the packaging and check if the
cold frame or the individual parts are damaged. If they are,
do not use the cold frame. Contact the manufacturer at the
given service address.
Read and keep the directions
These directions form a constituent part of the content
of the cold frame. They contain important information
on assembly and handling. Read the directions care-
fully, in particular the safety instructions, before using the cold
frame. Non-compliance with these instructions can lead to
injuries or damage to the cold frame.
The directions are based on the standards and rules which ap-
ply in the European Union. In other countries, please observe
the country-specic directives and laws.
Keep the instructions for further use. If you pass on the cold
frame to a third party, it is essential to give these instructions
with it.
SAFETY
Use for the intended purpose
The cold frame has been designed exclusively for the purpose
of growing plants. It is exclusively intended for private use and
is not suitable for the commercial sector.
Use the cold frame only in the manner described in these
directions. Any other use is not considered to be in accordance
with the intended purpose and can lead to damage to property
or even to personal injury. The manufacturer or dealer will not
accept any liability for damage caused by incorrect use or use
that is not in accordance with the intended purpose.
Safety instructions
WARNING!
Danger of suffocation! Children playing with the
packaging lm can get caught in it and suffocate.
• Do not let your children play with the packaging foil.
WARNING!
Risk of injury! If there is a strong wind, the lid can fall
on your ngers or the cold frame can be torn away and
this can cause damage to property or personal injury.
• Set up the cold frame in a place where it will be
sheltered from the wind.
• Close the lid when there is a strong wind or storm.
Hook the vent opener into the front wall, so that the lid cannot
be opened again.
• The lid may only be opened and xed in place when there is
no wind.
• Additional security may be required in wind prone areas.
ASSEMBLY
CAUTION!
Risk of damage! The walls and the lid of the cold frame
are breakable and can be damaged or destroyed if you
do not assemble the cold frame with the necessary care.
• Assemble the cold frame carefully and on
a suitable base.
• 1-2 people should assemble the item. We recommend you to
wear protective gloves during assembly.
USE
NOTE!
Risk of damage! Handling the cold frame or your plants
incorrectly can cause the plants to die or mould spores
to form in it.
• Open and x the lid in position during strong sunlight. Close
the lid again when it becomes cooler (drop in temperature to
less than 10 °C).
• Use a source of heat, e.g. a heat lamp, when outside tempera-
tures are low or when there are several days with only little
sunlight.
• Water the plants in the morning.
• Take care that the seeds you wish to plant are suitable for
greenhouses and cold frames. The highly heat-insulating
hollow-chamber plates absorb the incident solar radiation and
convert it into heat. The heat helps your plants grow better.
• In the summer when temperatures don’t drop below 15 °C
even at night time, you can take the lid off completely or sim-
ply disassemble the cold frame and put it away in a protected
place until it is next used.
• When inserting the ground anchors that are included in the
content into the ground, insert them as diagonally as possible
so that the cold frame will be anchored securely. Close the
lid if there is a strong wind or storm. Hook in the vent opener
on the front wall so that the lid cannot be opened again.
CLEANING
CAUTION!
Risk of damage! Handling the cold frame incorrectly
can cause damage.
• Do not use any aggressive detergents, brushes with metal or
nylon bristles or sharp, rough or metallic cleaning objects
such as knives, hard scrapers or suchlike. These can damage
the surfaces.
• Use a garden hose or a watering can to wash down the cold
frame.
• Use a soft cloth to remove dirt.
STORAGE
• Make sure that all cold-frame components are completely dry.
• Keep the cold frame in a dry place that is sheltered from the
wind.
• Store the cold frame out of reach of children, closed securely
and at a storage temperature between + 5° C and + 20° C
(room temperature).
TECHNICAL DATA
Weight: 24.67 lb |11,28 kg
Dimensions: ~ 4.9 x 2.6 x H 1.6/1.3 ft
Article number: 20150
WASTE DISPOSAL
Disposal of packaging / cold frame
Dispose of the cold frame / packaging in accordance
with the rules and regulations that apply in your country.