JVC XV-M555BK User manual

XV-M555BK [B, E, EV] EN
LVT0391-003A
LVT0391-003A
[B, E, EV]
INSTRUCTIONS
XV-M555BK
DVD PLAYER
For Customer Use:
EnterbelowtheModelNo.andSerialNo.
which are located on the rear, bottom or
side of the cabinet. Retain this informa-
tion for future reference.
Model No.
Serial No.
DISC 2DISC 1
SLOW (–)
PREVIOUS SELECT NEXT
SLOW (+)
DISC 3
PLAY MODE SUBTITLE
AUDIO ANGLE
DIGEST STROBE ZOOM CANCEL
3D PHONIC
THEATER
POSITION
RM-SXVM555E REMOTE CONTROL
TV ch TV VOL.
++
––
1234
5678
9100
+
10
SHIFT
TV/VIDEO
TV
DVD
ENTER
MENU
TITLE
RETURN
CHOICE
DISPLAY
TIME
XV-M555 DVD PLAYER
STANDBY
STANDBY/ON
SHUTTLE
DVD / VIDEO CD / CD
DVD
3
DVD
2
DVD
1
DISC TITLE CHAP RESUME
DVD
DIMMER
THEATER
POSITION
3D PHONIC
DIGEST
STROBE
ZOOM
3
2
1
STOP PAUSE
PLAY
SKIP
DOLBY
D
I
G
I
T
A
L
EACH
PLAY & EXCHANGE
/
Introduction 1
Preliminary knowledge 4
Getting started 12
Basic operations 17
Advanced operations 20
Initial settings 35
Additional information 41
TM

XV-M555BK [B, E, EV] EN
LVT0391-003A
Warnings, Cautions and Others
1. CLASS 1 LASER PRODUCT
2. DANGER:Visiblelaserradiation whenopenand interlockfailedor
defeated. Avoid direct exposure to beam.
3. CAUTION: Do not open the top cover. There are no user service-
able parts inside the Unit; leave all servicing to qualified service
personnel.
IMPORTANT for the U.K.
DO NOT cut off the mains plug from this equipment. If the
plug fitted is not suitable for the power points in your home
or the cable is too short to reach a power point, then obtain
an appropriate safety approved extension lead or consult
your dealer.
BE SURE to replace the fuse only with an identical
approved type, as originally fitted.
If nonetheless the mains plug is cut off ensure to remove
the fuse and dispose of the plug immediately, to avoid a
possible shock hazard by inadvertent connection to the
mains supply.
If this product is not supplied fitted with a mains plug then
follow the instructions given below:
IMPORTANT.
DO NOT make any connection to the terminal which is
marked with the letter E or by the safety earth symbol or
coloured green or green-and-yellow.
The wires in the mains lead on this product are coloured in
accordance with the following code:
Blue : Neutral
Brown : Live
As these colours may not correspond with the coloured
markings identifying the terminals in your plug proceed as
follows:
The wire which is coloured blue must be connected to the
terminal which is marked with the letter N or coloured black.
The wire which is coloured brown must be connected to the
terminal which is marked with the letter L or coloured red.
IF IN DOUBT - CONSULT A COMPETENT ELECTRICIAN.
Caution –– button!
Disconnect the mains plug to shut the power off
completely. The button in any position do not
disconnect the mains line.The power can be remote
controlled.
CLASS 1
LASER PRODUCT
1CLASSIFICATION LABEL, PLACED ON REAR NECLOSURE 2WARNING LABEL, PLACED INSIDE THE UNIT
CAUTION -
-
LASER RADIATION WHEN OPEN.
DO NOT STARE INTO BEAM.
ATTENTION RAYONNEMENT LASER EN CAS D’OUVERTURE.
NE PAS REGARDER DANS LE FAISCEAU.
-VORSICHT LASERSTRAHLUNG, WENN ABDECKUNG GEÖFFENET.
NICHT IN DEN STRAHL BLICKEN.
-ADVARSEL LASERSTRÅLING VED ÅBNING.
SE IKKE IND I STRÅLEN.
-ADVARSEL LASERSTRÅLING NÅR DEKSEL ÅPNES.
STIRR IKKE INN I STRÅLEN.
-
VARNING LASERSTRÅLNING NÄR DENNA DEL ÄR ÖPPNAD.
STRRA EJ IN I STRÅLEN.
VARO! AVATTAESSA OLET ALTTIINA LASERSÄTEILYLLE.
ÄLÄ TUIJOTA SÄTEESEEN.
-
-
˚
Caution: Proper Ventilation
Toavoide risk of electric shock and fire and toprotect from
damage.
Locate the apparatus as follows:
Front: No obstructions open spacing.
Sides: No obstructions in 3 cm from the sides.
Top: No obstructions in 5 cm from the top.
Back: No obstructions in 15 cm from the back
Bottom: No obstructions, place on the level surface.
CAUTION
To reduce the risk of electrical shocks, fire, etc.:
1. Do not remove screws, covers or cabinet.
2. Do not expose this appliance to rain or moisture.
IMPORTANT FOR LASER PRODUCTS
REPRODUCTION OF LABELS

Introduction
XV-M555BK [B, E, EV] EN
LVT0391-003A
English
Français
Table of contents
Features .................................................................... 1
Supplied accessories ............................................... 1
About this instruction manual ............................... 2
Notes on handling ................................................... 3
Names of parts and controls
Front panel ................................................................... 4
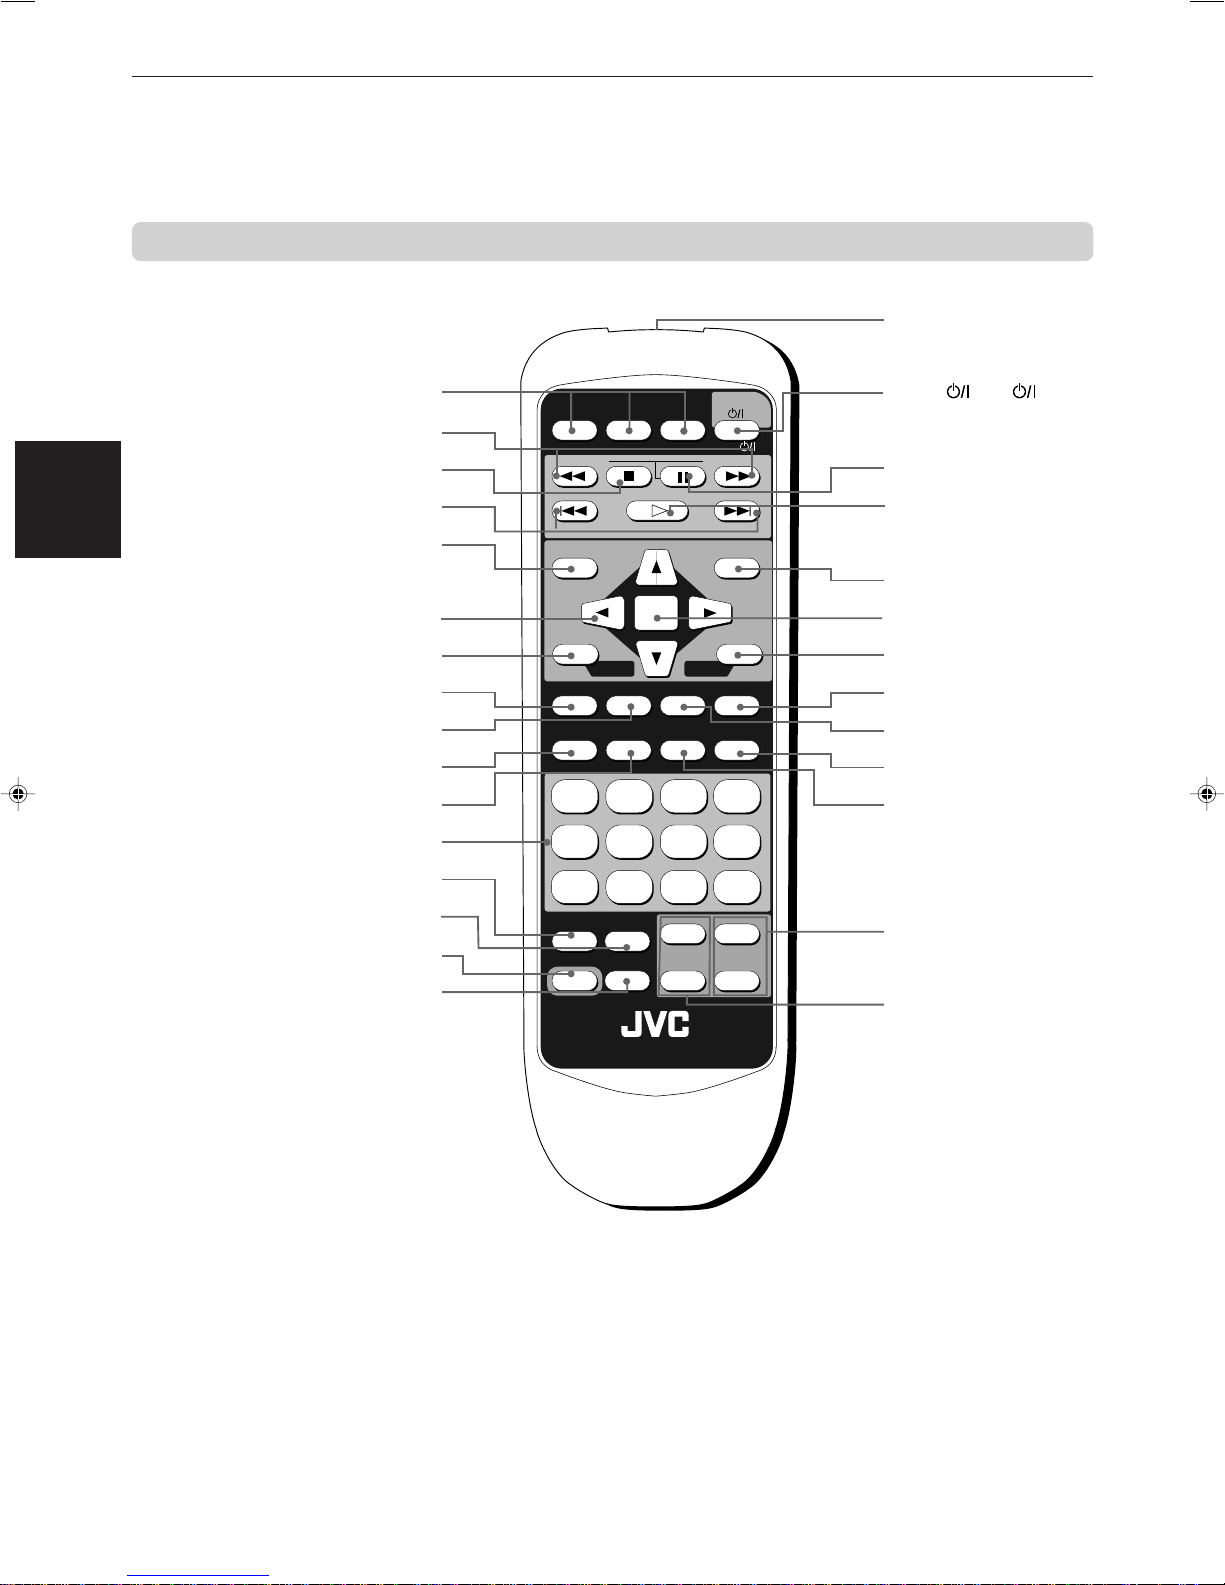
Remote control unit .................................................... 5
Display window ........................................................... 7
Rear panel .................................................................... 7
Operational Principles
On-screen displays ...................................................... 8
To prevent the monitor from burning out
[SCREEN SAVER] ...................................................... 9
On-screen guide icons .............................................. 10
How to use numeric buttons.................................... 10
About discs
Playable disc types .................................................... 11
Disc structure ............................................................. 11
Connections
Before making any connections .............................. 12
To connect to a TV ..................................................... 12
To connect to a TV with the SCART connector ................
13
To connect to an audio amplifier or receiver ......... 13
To connect to audio equipment with a digital input ......
14
To connect the power cord ........................................ 14
Using the remote control unit
To install batteries in the remote control unit ........ 15
To use the remote control unit for TV operation ... 16
Turning on/off the unit .......................................... 17
Inserting and removing discs ............................... 17
Basic playback
To start playback ....................................................... 18
To stop playback completely ................................... 18
To stop playback temporarily .................................. 18
To advance or reverse play rapidly while
monitoring ............................................................... 19
To locate the beginning of a scene or song ........... 19
To resume playback .................................................. 19
Playing from a specific position on a disc
To locate a desired scene from the DVD menu ...... 20
To locate a desired scene from the menu
of the Video CD with PBC ....................................... 20
To locate a desired title or track directly ................. 21
To locate a desired chapter or track using
¢or 4................................................................ 21
To locate a desired scene by specifying the
chapter number [CHAP. SEARCH] ......................... 22
To locate a desired position in the current title
or track [TIME SEARCH] ......................................... 22
Introduction Page 1
Preliminary Knowledge Page 4
Getting started Page 12
Basic operations Page 17
Advanced operations Page 20
To locate a desired scene from the opening
scene digest display [DIGEST] ............................... 23
Special picture playback
To advance a still picture frame-by-frame .............. 24
To display still pictures [STROBE] ........................... 24
To playback in slow-motion [SLOW] ....................... 25
To zoom a scene [ZOOM] ......................................... 25
Changing the playback order
To playback titles/tracks in the desired order
[PROGRAM] ............................................................. 26
To playback titles or tracks in random order
[RANDOM] ............................................................... 27
Repeat playback
To repeat a current title, chapter or track, or all
discs [REPEAT] ........................................................ 27
To repeat a desired part [A-B REPEAT] ................... 28
Viewing from multiple angles
To select a scene angle from the normal screen
[ANGLE] ................................................................... 29
To select a scene angle from the angle list
display [ANGLE] ...................................................... 30
Changing the language and sound
To select the subtitle language [SUBTITLE] ........... 30
To change the audio language or sound
[AUDIO] .................................................................... 31
Selecting the picture character
To select the picture character [THEATER
POSITION] ................................................................ 31
Enjoying virtual surround sound
To simulate surround sound [3D PHONIC] ............. 32
Checking the status
To check the disc/time information ......................... 33
To check the DVD function status ............................ 34
Selecting preferences
How to set preferences ............................................. 35
LANGUAGE page ...................................................... 35
AUDIO page ............................................................... 36
DISPLAY page ........................................................... 37
SYSTEM page ............................................................ 38
Limiting playback by children
To set Parental Lock for the first time [PARENTAL
LOCK] ....................................................................... 39
To change the settings [PARENTAL LOCK] ............. 40
To temporarily release the Parental lock
[PARENTAL LOCK] ................................................... 40
Care and handling of discs.................................... 41
Troubleshooting ..................................................... 42
Specifications ......................................................... 43
Table of languages and their
abbreviations .............................................. Appendix A
Country code list for parental lock ......... Appendix B
Additional information Page 41
Initial settings Page 35

Introduction
Introduction
1
XV-M555BK [B, E, EV] EN
LVT0391-003A
Features
Picture functions
7Strobe function
The unit can display nine continuous still pictures on
the TV screen.
7Digest function
You can select the desired title from the opening
scenes displayed on the TV screen.
7Angle function*
You can select a desired angle from multiple camera
angles recorded on the DVD disc.
7Zoom function
You can view scenes close-up.
7Parental lock*
You can restrict the playback of DVD discs with scenes
which you do not want children to see, such as adult
or violent films.
7Theater position
You can select the picture character according to the
lighting of your room.
Audio functions
7High quality digital sound
You can enjoy high quality sound with Dolby Digital,
MPEG Audio or Linear-PCM.
7Surround function*
The unit is compatible with Dolby Digital surround,
DTS surround and MPEG multichannel.
(DTS surround and MPEG multichannel are available
for digital output only.)
73D Phonic function
You can enjoy surround sound with your 2-channel
system.
Other functions
7Triple disc trays
You can insert up to three discs in the unit and can
playback them continuously.
7Multi-language subtitles and sound*
You can select a subtitle or sound language from those
recorded on the DVD disc.
7Multi-disc playback
You can enjoy Audio CD discs and Video CD discs, as
well as DVD discs.
7Operation from the on-screen display
User-friendly on-screen displays allow you to operate
the unit easily.
Functions with (*) mark only work on a DVD disc that is
compatible with each function.
Supplied accessories
• Audio/video cable (x 1)
• S-video cable (x 1)
• Remote Control Unit (x 1)
• R6P(SUM-3)/AA(15F) batteries (x 2)
• Instruction manual(s)
(You may have more than one manual with different
languages.)
• AC power cord (x 1)
Introduction
DISC 2DISC 1
SLOW (–)
PREVIOUS SELECT NEXT
SLOW (+)
DISC 3
TV
PLAY MODE SUBTITLE
AUDIO ANGLE
DIGEST STROBE ZOOM CANCEL
SD PHONIC
STHEATER
POSITION
RM-SV511U REMOTE CONTROL
DVD
ENTER
MENU
TITLE
RETURN DISPLAY
TV ch TV VOL.
++
––
1234
5678
9100
+
10
SHIFT
TV/VIDEO
CHOICE
TIME
/
/

Introduction
Introduction
2
English
Français
XV-M555BK [B, E, EV] EN
LVT0391-003A
27
Advanced
operations
Advanced operations
3
Press ENTER.
The unit starts random playback of the selected
disc.
When all titles/tracks of the disc have been played
once, the unit starts random playback of the next
disc (if inserted). After playing all titles/tracks of
the second disc, the unit starts random playback
of the third disc (if inserted). After playing all
titles/tracks of all the discs, random playback
ends.
The same title or track will not be played back more than
once during random play.
•To stop/quit random playback in the middle
Press 7to stop playback. The unit is still in random
playback mode, so pressing #starts random
playback again.
To quit random playback, press 7again while
stopped.
Some DVD discs may not be played back correctly in
random mode.
NOTE
DISC 2DISC 1
SLOW (–)
PREVIOUS SELECT NEXT
SLOW (+)
DISC 3
PLAY MODE SUBTITLE
AUDIO ANGLE
DIGEST STROBE ZOOM CANCEL
1234
TV
DVD
ENTER
MENU
TITLE
RETURN
CHOICE
DISPLAY
TIME
To playback titles or tracks in random
order [RANDOM]
You can play titles or tracks on the discs inserted in
random order by using the Random function.
7
While stopped
1
Press PLAY MODE.
The play mode menu appears on the TV screen.
2
Use CURSOR 2/3to move to
[RANDOM].
REPEAT PROGRAM RANDOM
2, 3
1
About this instruction manual
This instruction manual basically explains operations as follows:
These symbols
indicate the types
of discs which the
operation can be
used for.
The number
indicates the
following procedural
step(s) in which the
button(s) is(are)
used.
You may also use
the corresponding
buttons on the front
panel of the unit if
available.
The names of
buttons on the
remote control unit
(or on the front
panel of the unit) are
all given in
uppercase letters.
The number
indicates the
procedural step.
Other convenient
procedures, etc.
Additional
supplemental
remarks

Introduction
Introduction
3
XV-M555BK [B, E, EV] EN
LVT0391-003A
Important cautions
Installation of the unit
• Select a place which is level, dry and neither too hot
nor too cold (between 5˚C and 35˚C, 41˚F and 95˚F).
• Leave sufficient distance between the unit and the TV.
• Do not use the player in a place subject to vibrations.
Power cord
• Do not handle the power cord with wet hands!
• A small amount of power (3.8 watts) is always
consumed while the power cord is connected to the
wall outlet.
• When unplugging the player from the wall outlet,
always pull the plug, not the power cord.
To prevent malfunction of the unit
• There are no user-serviceable parts inside. If
anything goes wrong, unplug the power cord and
consult your dealer.
• Do not insert any metallic object into the unit.
• Do not use any non-standard shape disc available on
the market, because it may damage the unit.
• Do not use a disc with tape, seals, or paste on it,
because damage to the unit may result.
Note about copyright laws
• Please check the copyright laws in your country
before recording from DVD VIDEO, Audio CD, and
Video CD discs. Recording of copyrighted material
may infringe copyright laws.
Note about the copyguard system
• The DVD VIDEO disc is protected by the copyguard
system. When you connect the unit to your VCR
directly, the copyguard system activates and the
picture may not be played back correctly.
Safety precautions
Avoid moisture, water and dust
Do not place your player in moist or dusty places.
Avoid high temperatures
Do not expose the unit to direct sunlight or place it
near a heating device.
When you’re away
When away on travel or otherwise for an extended
period of time, remove the plug from the wall outlet.
Do not insert foreign objects into the unit
Do not insert wires, hairpins, coins, etc. into the unit.
Do not block the vents
Blocking the vents may damage the unit.
Care of the cabinet
When cleaning the unit, use a soft cloth and follow the
relevant instructions on the use of chemically-coated
cloths. Do not use benzene, thinner or other organic
solvents and disinfectants. These may cause
deformation or discoloring.
If water gets inside the unit
Turn off the power switch and remove the plug from
the wall outlet, then call the store where you made
your purchase. Using the unit in this state may cause a
fire or electrical shock.
This product incorporates copyright protection technology that is protected by method claims of certain U.S.
patents and other intellectual property rights owned by Macrovision Corporation and other rights owners. Use of
this copyright protection technology must be authorized by Macrovision Corporation, and is intended for home
and other limited viewing uses only unless otherwise authorized by Macrovision Corporation. Reverse engineering
or disassembly is prohibited.
Manufactured under license from Dolby Laboratories. “Dolby” and double-D symbol are trademarks of Dolby
Laboratories.
Confidential Unpublished Works.
© 1992-1997 Dolby Laboratories, Inc. All rights reserved.
Manufactured under license from Digital Theater Systems, Inc. US Pat. No. 5,451,942 and other world-wide patents
issued and pending. “DTS”, “DTS Digital Surround”, are trademarks of Digital Theater System, Inc.
© 1996 Digital Theater Systems, Inc. All Rights Reserved.
Notes on handling

Preliminary knowledge
4
Preliminary
Knowledge
English
Français
XV-M555BK [B, E, EV] EN
LVT0391-003A
Names of parts and controls
Refer to the corresponding pages indicated in () for details.
Front panel
Preliminary knowledge
XV-M555 DVD PLAYER
STANDBY
SHUTTLE
DVD / VIDEO CD / CD
DVD
3
DVD
2
DVD
1
DISC TITLE CHAP RESUME
DVD
DIMMER
THEATER
POSITION
3D PHONIC
DIGEST
STROBE
ZOOM
3
2
1
STOP PAUSE
PLAY
SKIP
DOLBY
D
I
G
I
T
A
L
EACH
PLAY & EXCHANGE
1button
2STANDBY indicator
4STROBE button
3DIGEST button
5ZOOM button
6DVD1 to DVD3 trays
9SHUTTLE knob
!DIMMER button
@Display window
#THEATER POSITION button
$3D PHONIC button
70(OPEN/CLOSE) buttons
81 through 3 (DISC) buttons
with indicators
0#(PLAY) button
-8(PAUSE) button
~4
/
¢(SKIP) buttons
=7(STOP) button
/
/
STANDBY/ON
1button (17)
Turns the unit on or off (standby).
2STANDBY indicator
Lights when the power cord is connected and the unit is
on standby. When the unit is turned on, the STANDBY
indicator goes off.
3DIGEST button (for DVD/Video CD) (23)
Displays beginning scenes of each title, chapter, or track
on the TV screen.
4STROBE button (for DVD/Video CD) (24)
Displays nine continuous still pictures.
5ZOOM button (for DVD/Video CD) (25)
Zoom-in for a close-up view of the scene.
6DVD 1 to DVD 3 trays (17)
Used to load discs. To insert/remove discs, press the 0
(OPEN/CLOSE) button located on the right of the tray
corresponding to disc number.
70(OPEN/CLOSE) buttons (17)
Used to open and close disc trays 1 to 3 respectively. When,
after opening the DVD1 tray, another 0(OPEN/CLOSE)
button is pressed, the DVD1 tray is first closed, then the
other DVD tray selected is opened.
81 through 3 (DISC) buttons with indicators (18)
Used to start playback of the disc in the tray corresponding
with the number indicated on the button (these functions
the same as the DISC 1 through 3 buttons on the remote
control unit). While playing, the corresponding indicator
blinks.
In this manual, they are sometimes called “DISC” buttons.
9SHUTTLE knob (19, 25)
Performs rapid advance/reverse playback operations.
Also used for slow-motion playback of a picture (for DVD/
Video CD).
0#(PLAY) button (18)
Starts playback. Also, used as a SELECT button for the
PBC of Video CDs.
Functions the same as the #(SELECT) button on the
remote control unit.
-8(PAUSE) button (18)
Pauses playback
=7(STOP) button (18)
Stops playback.
~4/¢(SKIP) buttons (19)
Used to skip a chapter, title or track.
Also, used for the page selection of a menu screen (for
Video CD).
!DIMMER button
Dims the display window.
@Display window
Indicates the current status of the unit.
#THEATER POSITION button (31)
Selects a picture character from 4 settings.
$3D PHONIC button (32)
Produces a simulated surround effect.
~4/¢(SKIP) buttons

Preliminary knowledge
5
Preliminary
Knowledge
XV-M555BK [B, E, EV] EN
LVT0391-003A
Remote control unit
£TV VOL buttons
1DISC 1 through DISC 3 buttons
21/¡(SLOW(–)/SLOW(+)) buttons
37(STOP) button
44/¢(PREVIOUS/NEXT) buttons
5
TITLE button
(For DVD)
65/∞/3/2(Cursor) buttons
7RETURN - CHOICE button
8PLAY MODE button
0DIGEST button (for DVD/Video CD)
-STROBE button (for DVD/Video CD)
=Numeric buttons
~ 3D PHONIC button
!THEATER POSITION button
@SHIFT button
$
Infrared signal-emitting
window
%
DVD
- TV
button
^8(PAUSE) button
&#(SELECT) button
*MENU button (for DVD)
(ENTER button
)DISPLAY - TIME button
_ANGLE button (for DVD)
+AUDIO button
¡CANCEL button
™
ZOOM button
(for DVD/Video CD)
¢TV ch buttons
DISC 2DISC 1
SLOW (–)
PREVIOUS SELECT NEXT
SLOW (+)
DISC 3
PLAY MODE SUBTITLE
AUDIO ANGLE
DIGEST STROBE ZOOM CANCEL
3D PHONIC
THEATER
POSITION
RM-SXVM555E REMOTE CONTROL
DVD
ENTER
MENU
TITLE
TV ch TV VOL.
++
––
1234
5678
9100
+
10
SHIFT
TV/VIDEO
RETURN
DISPLAY
CHOICE TIME
TV
9SUBTITLE button (for DVD)
#TV/VIDEO button

Preliminary knowledge
6
Preliminary
Knowledge
English
Français
XV-M555BK [B, E, EV] EN
LVT0391-003A
1DISC 1 through DISC 3 buttons (18)
Used to start playback of the disc in the corresponding tray.
Function the same as the 1 through 3 buttons on the front
panel.
21/¡(SLOW(
-
)/SLOW(+)) buttons (19, 25)
Perform rapid advance/reverse playback operations. Also
used for slow-motion playback of a picture (for DVD/Video
CD).
37(STOP) button (18)
Stops playback.
Also used to erase all the programmed tracks for program
play.
44/¢(PREVIOUS/NEXT) buttons (19)
Perform skipping a chapter, title or track.
Also used for the page selection of a menu screen (for
DVD/Video CD).
5TITLE button (for DVD) (20)
Displays a DVD title menu on the TV screen or monitor.
65/∞/3/2(CURSOR) buttons
Used to select an item from a menu or on-screen display,
or to change the setting of an item in the on-screen display.
7RETURN - CHOICE button (20, 35)
Returns to the previous menu (for DVD/VIdeo CD). When
pressed while holding down the SHIFT button, the
Preference on-screen display appears on the TV screen.
8PLAY MODE button
Displays an on-screen display for controlling the advanced
playback functions.
9SUBTITLE button (for DVD) (30)
Used to display the subtitle selection display on the TV
screen, as well as used to turn the subtitle on or off.
0DIGEST button (for DVD/Video CD) (23)
Displays beginning scenes of each title, chapter, or track
on the TV screen.
-STROBE button (for DVD/Video CD) (24)
Displays nine continuous still pictures.
=Numeric buttons (10)
Mainly used to select a title/track number, or a TV channel.
Also used to enter a time for the Time search and a chapter
number for the Chapter search.
~3D PHONIC button (32)
Produces a simulated surround effect.
!THEATER POSITION button (31)
Selects a picture character from 4 settings.
@SHIFT button (16, 33, 35, 38)
Used together with other keys for activating their second
functions.
#TV/VIDEO button (16)
Switches the TV input mode.
$Infrared signal-emitting window
Point this window toward the remote sensor on the front panel
when pressing buttons.
%DVD - TV button (16, 17)
Turns the unit on or off (standby). Pressing this button while
holding down the SHIFT button turns the TV on or off.
^8(PAUSE) button (18)
Pauses playback.
&#(SELECT) button (18)
Starts playback. Also used as a SELECT button for PBC of
Video CDs.
Functions the same as the #(PLAY) button on the front
panel.
*MENU button (for DVD) (20)
Displays a DVD menu on the TV screen or monitor.
(ENTER button
Executes the selected item in a menu or on-screen display
when pressing the button.
)DISPLAY - TIME button (33)
Displays the status information (only for DVD) or the time
information (for all types of discs). When the time information
appears, pressing this button while holding down the SHIFT
button changes the time mode.
_ANGLE button (for DVD) (29)
Changes camera angles during playback of a DVD containing
multiple camera angles.
+AUDIO button (31)
Selects the audio (for DVD/Video CD).
¡CANCEL button (26)
Cancels the previous settings.
™ZOOM button (for DVD/Video CD) (25)
Zoom-in for a close-up view of the scene.
£TV VOL buttons (16)
Adjust the TV volume.
¢TV ch buttons (16)
Change the TV channels.

Preliminary knowledge
7
Preliminary
Knowledge
XV-M555BK [B, E, EV] EN
LVT0391-003A
3D-PHONIC
DISC TITLE CHAP. PROGRAM
KARAOKE
EACH
REMAIN
DVD VCD
RANDOM
RESUME REPEAT 1A-B
THEATER
TRACK
Display window
2Title/chapter/
track indicator
5Function indicator
3Time display
1Disc number
indicator
4Disc indicator
Rear panel
1Disc number indicator
Shows the disc number being selected.
2Title/chapter/track indicator
Displays title/chapter, or track number.
3Time display
Shows the cumulative or remaining time of the track or disc,
or the total disc time.
4Disc indicator
Indicates the type of the disc set in the selected tray. When
a DVD or Video CD disc is set, “DVD” or “VCD” is indicated.
When an Audio CD is set, there is no indication.
5
Function indicator
Activated function indicators light up.
1VIDEO OUT jack (12)
Outputs a composite video signal.
2S-VIDEO OUT jack (12)
Outputs an S-video signal.
3AV OUT (13)
Standard 21-pin SCART connector feeds the video and audio
signal. The video output signal is selected from composite
(COMP) and Y/C by the COMP-Y/C switch. The audio signal
is same as AUDIO OUT.
4AUDIO OUT jacks (LEFT/RIGHT) (12)
Outputs stereo analog audio signals.
5DIGITAL OUT jack (OPTICAL) (14)
Outputs digital audio signals. Only an optical connector is
provided.
6Region Code label (11)
Shows Region Code number.
7AC IN connector (14)
Connects to the wall outlet using the suppplied AC power
cord.
PCM/STREAM
OPTICAL
VIDEO S-VIDEO
2
LEFT
RIGHT
AUDIO OUT DIGITAL OUT AC IN
COMP. Y/C
AV
VIDEO OUT AV OUT
7AC IN connector
1VIDEO OUT jack
2S-VIDEO OUT jack
3AV OUT
4AUDIO OUT jacks (LEFT/RIGHT)
5DIGITAL OUT jack (OPTICAL)
6Region code label

Preliminary knowledge
8
Preliminary
Knowledge
English
Français
XV-M555BK [B, E, EV] EN
LVT0391-003A
Operational Principles
On-screen displays
PARENTAL LOCK
NOW READING
Opening display
MENU LANGUAGE
ENGLISH
ENGLISH
ENGLISH
ENGLISH
EXIT
AUDIO LANGUAGE
SUBTITLE
ON SCREEN LANGUAGE
AUDIO DISPLAY SYSTEM
LANGUAGE
PRESS KEY
DIGITAL AUDIO OUTPUT
/PCM
Lo / Ro
ON
EXIT
DOWN MIX
COMPRESSION
AUDIO DISPLAY SYSTEM
LANGUAGE
DOLBY
DIGITAL
PRESS KEY
LANGUAGE AUDIO
DISPLAY SYSTEM
Country Code
GB
8
----
EXIT
Set Level
PASS WORD
PRESS KEY ENTER
PARENTAL LOCK
MONITOR TYPE
4:3 LB
OFF
ON
EXIT
SCREEN SAVER
ON SCREEN GUIDE
AUDIO DISPLAY SYSTEM
LANGUAGE
PRESS KEY
AUTO STANDBY
OFF
OFF
EXIT
RESUME
AUDIO DISPLAY SYSTEM
LANGUAGE
AV COMPULINK MODE
PRESS KEY
The unit provides several on-screen displays.
With some displays, you can set or select preferences
or functions, while the others are display-only.
Opening displays
The Opening display appears automatically in some
conditions.
At the bottom, the following information are indicated
depending on the unit’s status.
• NOW READING: The unit is now reading the disc
information (TOC).
• REGION CODE ERROR!: The DVD disc loaded
cannot be played because the region code of the
disc does not match the unit.
• CHANGE →DISC 1: The unit is now changing the
disc tray to DISC 1.
• OPEN: The selected tray is now opening.
• CLOSE: The selected tray is now closing.
Preference displays
When the unit is stopped, pressing the RETURN-
CHOICE button while holding the SHIFT button
accesses the preference display for setting the
preferences.
There are four pages: LANGUAGE, AUDIO, DISPLAY
and SYSTEM as shown in the right.
See page 35 for detailed information.
PARENTAL LOCK displays
When no disc is inserted or a DVD disc is stopped in
the selected disc tray, pressing the ENTER button while
holding down the SHIFT button accesses the
PARENTAL LOCK display in which you can set the level
for limiting playback.
See page 39 for detailed information.

Preliminary knowledge
9
Preliminary
Knowledge
XV-M555BK [B, E, EV] EN
LVT0391-003A
Play mode displays
Pressing the PLAY MODE button accesses the play
mode display in which you can control playback
functions.
Different displays appear depending on the disc type
and the unit’s status.
REPEAT PROGRAM RANDOM
DVD CONTROL
REPEAT A-B REPEAT TIME SEARCH CHAP. SEARCH
While stopped During DVD playback
ENGLISH ENGLISH
1 / 2 1 / 2 1 / 2
3 1 25 2:25:25 3.3
DISC TITLE CHAP. TIME BITRATE Mbps
3 1 00:08
DISC TRACK TIME EACH
REMAIN
3 1 25:25 PBC
DISC TRACK TIME
DVD function status Disc/time (DVD)
Disc time (Audio CD/Video CD
without PBC)
Disc time
(Video CD with PBC)
Status displays
Pressing the DISPLAY-TIME button during playback
accesses the status display.
For a DVD disc, pressing the DISPLAY-TIME button
toggles between the DVD function status display, and
the disc/time display and off.
For a Video CD or Audio CD disc, pressing the DISPLAY-
TIME button switches the disc/time display on and off.
CD CONTROL
REPEAT A-B REPEAT TIME SEARCH
VCD CONTROL
REPEAT A-B REPEAT TIME SEARCH PBC CALL
During Audio CD playback During Video CD playback
To prevent the monitor from burning out [SCREEN SAVER]
A television monitor screen may be burned out if a
static picture is displayed for a long time. To prevent
this, the unit automatically activates the screen saver
function if a static picture, such as an on-screen display
or menu, is displayed for over 5 minutes.
• Pressing any button on the unit or the remote
control unit will release the screen saver function
and return to the previous display.
• You can select one of several screen saver modes
available (see page 38).
• The screen saver function is not activated during
Audio CD playback or after stopping Audio CD
playback.
DVD/Video CD/CD PLAYER

Preliminary knowledge
10
Preliminary
Knowledge
English
Français
XV-M555BK [B, E, EV] EN
LVT0391-003A
On-screen guide icons
During DVD playback, you may see icons displayed over the picture. These
have the following meanings.
: Displayed at the beginning of a scene recorded from multiple angles. (See
page 29.)
: Displayed at the beginning of a scene recorded with multiple audio
languages. (See page 31.)
: Displayed at the beginning of a scene recorded with multiple subtitle
languages. (See page 30.)
You can set the unit not to display on-screen icons above via the preference
settings described on page 38.
About invalid operation icon
When you press a button, if the unit does not accept its operation, appears
on your television screen. Operations are occasionally unacceptable even if
is not displayed.
Note that some operations may not be accepted. For example, some discs
may not allow rapid advance/reverse or slow-motion playback.
How to use numeric buttons
To select a track/title number
• To select a number between 1 and 10
Press the corresponding button for the number.
• To select a number higher than 10
Use the +10 button.
Examples:
To select 13 +10 →3
To select 34 +10 →+10 →+10 →4
To select 40 +10 →+10 →+10 →10
To enter a time or chapter number
The method for entering a time for Time search or chapter number for Chapter
search is different from above. See the corresponding sections in this manual
for the details.
To select a TV channel.
Press the corresponding numeric buttons (between 0 and 9) while holding
down the SHIFT button.

Preliminary knowledge
11
Preliminary
Knowledge
XV-M555BK [B, E, EV] EN
LVT0391-003A
About discs
Playable disc types
Playable and non-playable disc types are as follows:
Playable discs
Disc structure
A DVD disc is comprised of “titles,” while an Audio CD, Video CD is comprised of “tracks.” Each title may be divided
into some “chapters.” For example, if a DVD disc contains some movies, each movie may have its own title number,
and each movie may be divided into some chapters. In a DVD karaoke disc, each song usually has its own title
number and does not have chapters. In general, each title has independent content, while each chapter in the same
title has continuity.
(Example: DVD disc)
(Example: Audio CD/Video CD)
Chapter 1 Chapter 2 Chapter 3 Chapter 1 Chapter 2
Title 1 Title 2
Track 1 Track 2 Track 3 Track 4
The DVD Logo is a trademark.
TM
DVD VIDEO Video CD Audio CD
Non-playable discs
DVD-ROM, DVD-RAM, DVD Audio, DVD-R, DVD-RW, CD-R, CD-ROM, PHOTO CD, CD-RW, CD-EXTRA, CD-G,
CD-TEXT
• Playing back discs listed as “Non-playable discs” in the table above may generate noise and damage speakers.
• This unit can play back audio recorded in CD-G, CD-EXTRA and CD-TEXT discs.
• DVD players and DVD discs have their own Region Code numbers. This unit only can play back DVD discs whose
Region Code numbers include “2”.
Examples of playable DVD discs:
ALL 52
5
3
4
2
3
2
16
5
4
2
This unit accommodates discs for the PAL system.
• With some DVD and Video CD discs, you may not be able to control them according to the instructions described in this
manual, because of the contents of the disc.
NOTE

Getting started
12
Getting
started
English
Français
XV-M555BK [B, E, EV] EN
LVT0391-003A
COMP. Y/C
AV
PCM/STREAM
OPTICAL
VIDEO S-VIDEO
LEFT
RIGHT
AUDIO OUT DIGITAL OUT
VIDEO OUT AV OUT
VIDEO
AUDIO
RIGHT
LEFT
IN
S-VIDEO
Connections
*In the following description, "TV" may be substituted with "monitor" or "projector."
*Before using the unit, you have to connect the unit to a TV and/or amplifier.
Before making any connections
• Do not connect the AC power cord until all other connections have been made.
• Since different components often have different terminal names, carefully read the instructions supplied with the
component you are going to connect.
To connect to a TV
You can enjoy using the unit by simply connecting it to a TV. To improve audio sound quality, connect the audio
outputs to your separate audio equipment. (See the following pages.)
Getting started
Connect the unit to a TV equipped with stereo audio input and video input jacks using the supplied audio/video
cables.
• If your TV has a monaural audio input instead of stereo, you need to use an optional audio cable which converts
stereo audio output to monaural.
• If your TV has an S-video input, you should connect it with the S-VIDEO output of the unit using the supplied S-
video cable in addition to the (standard) video connection to get better picture quality.
• Connect VIDEO OUT of the unit directly to the video input of your TV. Connecting VIDEO OUT of the unit to a TV via a VCR may
cause a monitor problem when playing back a copy-protected disc.
• Do not connect the unit to an NTSC television. Connect it to a PAL television.
Audio/video cable
(supplied)
S-video cable
(supplied)
The unit
TV
White
Red
Yellow
Red
White
Yellow
NOTES

Getting started
13
Getting
started
XV-M555BK [B, E, EV] EN
LVT0391-003A
COMP. Y/C
AV
PCM/STREAM
OPTICAL
VIDEO S-VIDEO
LEFT
RIGHT
AUDIO OUT DIGITAL OUT
VIDEO OUT AV OUT
VIDEO
IN
IN
S-VIDEO
AUDIO
RIGHT
LEFT
AV
IN
AUDIO
RIGHT
LEFT
COMP. Y/C
AV
PCM/STREAM
OPTICAL
VIDEO S-VIDEO
LEFT
RIGHT
AUDIO OUT DIGITAL OUT
VIDEO OUT AV OUT
SCART cable
(not supplied)
TV
The unit
• Connect the unit's AUDIO OUT to any line-level inputs (such as AUX, DVD, CD, etc.) of an audio amplifier or
receiver.
To connect to an audio amplifier or receiver
You can enjoy high-quality audio by connecting the unit's audio output to your amplifier or receiver.
Audio cable
(not supplied)
The unit
Amplifier or receiver
WhiteRed White
Red
To connect to a TV with the SCART connector
You can enjoy using the unit by simply connecting it to your television set with a 21-pin SCART cable. To hear audio
sound with better quality, connect the audio output to your audio equipment. (See below.)
Connect the unit’s AV OUT connector with your TV’s SCART connector using an optional SCART cable.
• If your TV’s SCART connector is compatible only with the regular video signal, set the COMP.-Y/C switch to “COMP.”.
• If your TV’s SCART connector is compatible with the Y/C signal, set this switch to “Y/C”. You will enjoy better-
quality pictures.
NOTE
• Do not connect the unit to a NTSC television. Connect it to a PAL television.

Getting started
14
Getting
started
English
Français
XV-M555BK [B, E, EV] EN
LVT0391-003A
To connect to audio equipment with a digital input
You can enhance the sound quality by connecting the unit’s DIGITAL OUT (optical) to the digital input of an amplifier,
DAT or MD by using an optional digital cable. The digital stereo audio signal from a disc is directly transferred. If
you connect the unit to a Dolby Digital, DTS or MPEG multichannel decoder or an amplifier with a built-in decoder by
using an optional digital cable, you can enjoy high-quality surround sound.
When you make the digital connection, also make the analog connection, because, depending on the disc type, no
audio may be reproduced from the DIGITAL OUT.
• When you connect the unit's DIGITAL OUT to digital audio equipment, before using, make the “DIGITAL AUDIO OUTPUT”
setting in the “AUDIO” page of the preference display correctly according to the connected audio equipment. If the “DIGITAL
AUDIO OUTPUT” is not set correctly, loud noise may be generated from speakers, causing damage to your speakers. See
“DIGITAL AUDIO OUTPUT” on page 36.
• With the digital connection, the unit’s settings for COMPRESSION and DOWN MIX in the AUDIO page of the preference display
are invalid. Settings for these items must be made from the decoder.
• For digital connection, connect the unit’s DIGITAL OUT (optical) to the digital input of audio equipment using an
optional digital cable.
Audio cable
(not supplied)
The unit
Optical digital cable
(not supplied)
White
Red White
Red
To connect the power cord
When all the audio/video connections have been made, insert the smaller plug of the supplied AC power cord to the
unit’s AC IN connector, then insert the other end to the wall outlet. Make sure that plugs are inserted firmly. The
STANDBY indicator lights and setup is completed.
Warning
• Disconnect the power cord if you are not going to use the unit for a long time.
• Disconnect the power cord before cleaning the unit.
• Disconnect the power cord before moving the unit.
• Do not connect or disconnect the power cord with wet hands.
• Do not pull the power cord when disconnecting it, as this may damage the cord and cause fire, electric shock, or
other accidents.
Caution
• Do not damage, alter, twist, or pull the power cord, as this may cause fire, electric shock, or other accidents.
• To prevent any accidents or damages caused by an unsuitable AC power cord, only use the supplied power cord. If
the cord is damaged, contact a dealer and get the new power cord.
• Do not put anything heavy, or the unit, on the power cord, as this may cause fire, electric shock, or other accidents.
NOTES
Digital equipment
IN
OPTICAL
DIGITAL
IN
AUDIO
RIGHT
LEFT
COMP. Y/C
AV
PCM/STREAM
OPTICAL
VIDEO S-VIDEO
LEFT
RIGHT
AUDIO OUT DIGITAL OUT
VIDEO OUT AV OUT
When using the DIGITAL OUT
jack, remove the protection cap.
Do not lose the removed cap.
When the DIGITAL OUT jack is
not used, fix the protection cap
into the jack.

Getting started
15
Getting
started
XV-M555BK [B, E, EV] EN
LVT0391-003A
Using the remote control unit
Using the remote control, you can operate not only all the functions of the unit but also basic functions of your TV.
To install batteries in the remote control unit
The battery compartment is located on the back of the remote control unit.
1Press down on the point shown by the arrow at the top of the compartment cover,
and pull up the cover to open the compartment.
2Place the two accessory R6P (SUM-3)/AA(15F) batteries in the remote control
according to the polarity markings (“+” and “–”) inside the compartment and on the
batteries.
3Place the cover over the compartment, and press down lightly.
• The batteries will last about six months with normal use. If the functions of the remote control become erratic,
replace the batteries. See below for more information.
Precaution
• Remove the batteries from the remote control if it is not going to be used for a long period of time.
• Remove dead batteries and dispose of them properly.
• Never leave dead batteries lying around, take them apart, mix them with other refuse, or throw them into an incinerator.
• Never touch liquid that has leaked out of a battery.
• Do not mix new and old batteries, or batteries of different types, when replacing them.
Precautions for the safe use of batteries
Observe the following precautions for the safe use of batteries. If they are used improperly their life will be shortened,
they may burst or their contents may leak.

Getting started
16
Getting
started
English
Français
XV-M555BK [B, E, EV] EN
LVT0391-003A
To use the remote control unit for TV operation
You can operate your TV from the remote control unit.
Setting the remote control signal for operating your TV.
1Holding down TV/VIDEO, enter the manufacturer code of your TV listed below by using the numeric buttons (0 - 9).
Do not release TV/VIDEO. Keep holding it until the next step is completed.
2Press 7while holding down TV/VIDEO.
The following buttons can be used for operating the TV:
3Try to operate your TV by pressing DVD - TV while holding SHIFT.
If your TV turns on or off, you have successfully set the control signal.
Turns the TV on or off.
Changes the TV channels.
Adjusts the TV volume.
Selects the TV channels
*For some TVs, pressing "+10" while holding down SHIFT
functions as the "RETURN," and pressing "10" while holding
down SHIFT functions as the "_ / _ _" button.
Switches input mode (either TV or VIDEO).
• The remote control unit is initially set for operating a JVC TV.
• If there is more than one code listed for the manufacturer of your TV, try them one by one until you succeed.
TV ch
+
–
TV VOL.
+
–
TV/VIDEO
NOTES
Example:
To enter the manufacturer code "01":
Press "0" then "1."
SHIFT
+
DVD
TV
/
/
SHIFT
+
90 to
Manufacturer code list
No. Manufacturer
01 JVC
02 JVC
03 JVC
04 JVC
05 THOMSON
06 FERGUSON
07 PHILIPS
08 GRUNDIG
09 SONY
10 PANASONIC
11 ITT
12 MIVER
13 HITACHI
14 TOSHIBA
15 MITSUBISHI
16 FINLUX
17 NOKIA
18 SHARP
19 SAMSUNG
20 FUNAI
21 GOLDSTAR
22 NEC

Basic operations
17
Basic
operations
XV-M555BK [B, E, EV] EN
LVT0391-003A
XV-M555 DVD PLAYER
STANDBY
SHUTTLE
DVD/ VIDEO CD / CD
DVD
3
DVD
2
DVD
1
DISCTITLE CHAP RESCUE
DVD
DIMMER
THEATER
POSITION
3DPHONIC
DIGEST
STROBE
ZOOM
3
2
1
stop pause play
skip
DOLBY
D
I
G
I
T
A
L
EACH
PLAY & EXCHANGE
STANDBY/ON
/
Basic operations
In the following description, the buttons on the remote control unit are used, however, you may use the
corresponding buttons on the front panel of the unit if available.
Turning on/off the unit
Press on the front panel or press DVD - TV on the remote control unit.
• You can turn on the unit by pressing the #(PLAY) button or any one
of 1 through 3 buttons on the front panel or, the #button or any one
of DISC 1 through 3 buttons on the remote control unit. In this
operation, the unit starts playback if the disc is set in the selected
tray.
• You can also turn on the unit by pressing any one of the 0(OPEN/
CLOSE) buttons on the front panel.
• Even if you press the or DVD - TV button to turn off the unit, the unit is not disconnected from the AC power source
as long as it is connected to the wall outlet. This state is called the standby mode. In this state, the unit is designed to consume
a very small quantity of power.
Inserting and removing discs
Up to three discs can be set in the unit. You may insert a disc into any of the disc trays 1 through 3.
1Press 0(OPEN/CLOSE) located on the right of the tray corresponding to disc number.
The corresponding disc tray opens.
2Place the disc in the tray.
3Press 0(OPEN/CLOSE) to close the disc tray.
• To insert an 8-cm disc, place it
in the inner recess.
With the label side up
• The unit can playback DVD, Audio CD, and Video CD discs only. Do not load other disc types. For details about playable disc
types, see page 11.
• When loading a disc in the tray, be sure to position the disc inside the recess. Otherwise, the disc may be damaged when the
tray is closed, and the disc may not be removed from the unit.
• If you press 0(OPEN/CLOSE) for the disc being played, the unit stops and then opens the tray.
• You can change, insert or remove the disc by pressing 0(OPEN/CLOSE) for the disc tray which is not in use for playback while the
disc in the other tray is being played, without stopping play.
NOTE
NOTES
DVD - TV
XV-M555 DVD PLAYER
STANDBY
STANDBY/ON
SHUTTLE
DVD / VIDEO CD / CD
DVD
3
DVD
2
DVD
1
DISC TITLE CHAP RESUME
DVD
DIMMER
THEATER
POSITION
3D PHONIC
DIGEST
STROBE
ZOOM
3
2
1
STOP PAUSE
PLAY
SKIP
DOLBY
D
I
G
I
T
A
L
EACH
PLAY & EXCHANGE
/
DISC 2DISC 1
SLOW (–)
PREVIOUS SELECT NEXT
SLOW (+)
DISC 3
PLAY MODE SUBTITLE
AUDIO ANGLE
DIGEST STROBE ZOOM CANCEL
3D PHONIC
THEATER
POSITION
RM-SXVM555E REMOTE CONTROL
TV ch TV VOL.
++
––
1234
5678
9100
+
10
SHIFT
TV/VIDEO
TV
DVD
ENTER
MENU
TITLE
RETURN
CHOICE
DISPLAY
TIME
Other manuals for XV-M555BK
1
Table of contents
Other JVC DVD Player manuals

JVC
JVC XV-S65GDJ User manual

JVC
JVC KD-MRD900 User manual

JVC
JVC XV-N40BK User manual

JVC
JVC XV-N350BEU User manual

JVC
JVC D-ILA LD-HD2KE User manual

JVC
JVC HR-XVC1U User manual

JVC
JVC HR-XVC18BUS User manual

JVC
JVC XV-F80BK - Progressive-Scan DVD Player User manual

JVC
JVC XV-NK58SL User manual

JVC
JVC XV-M5GSL User manual

JVC
JVC XV-M50BK User manual

JVC
JVC XV-N512N User manual

JVC
JVC XV-MK5GSL User manual

JVC
JVC XV-S60BK User manual

JVC
JVC XV-S40BK User manual

JVC
JVC XV-N340B User manual

JVC
JVC DLA-HD2KU - D-ila Projector Head Administrator guide

JVC
JVC HR-XVS20AA Administrator Guide

JVC
JVC XV-N330BUC User manual

JVC
JVC LET0239-001A User manual