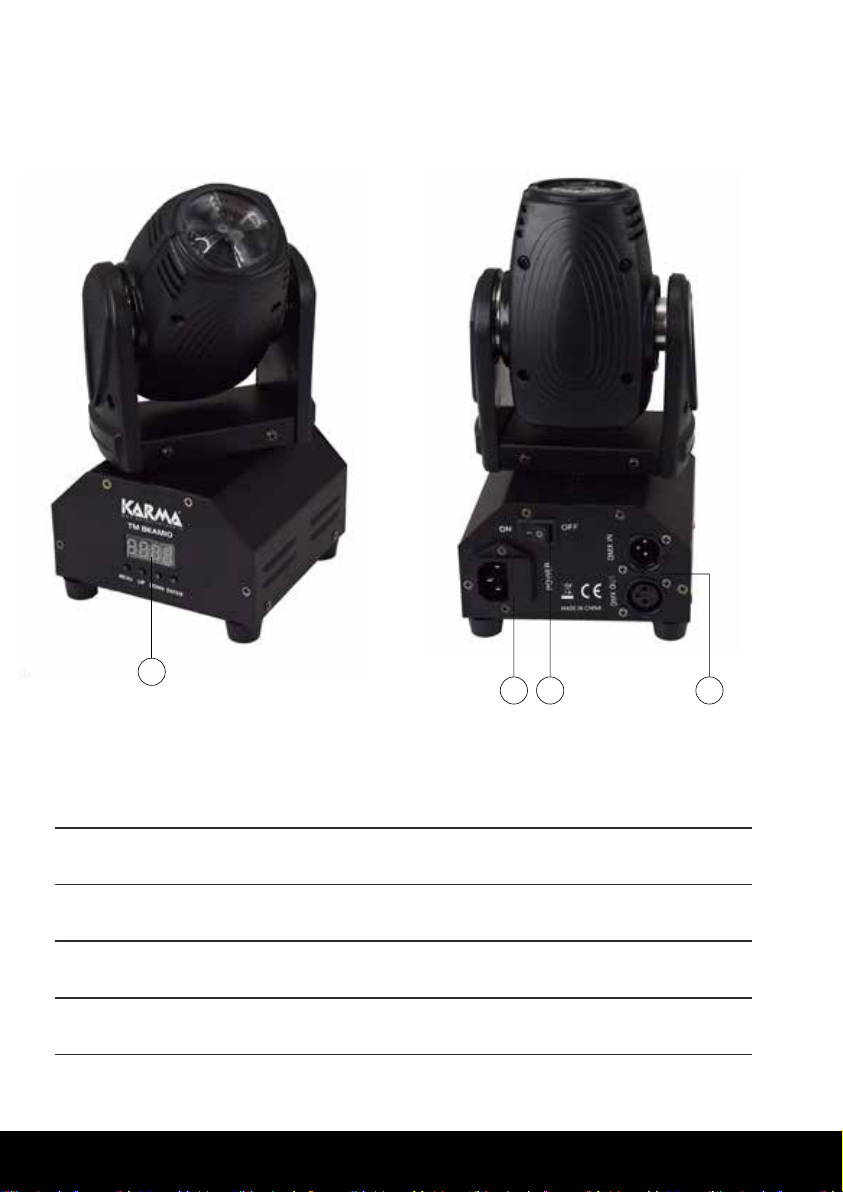
Karma TM BEAM10 User manual

Manuale di istruzioni • Instruction manual
www.karmaitaliana.it
TM BEAM10
Mini testa mobile Beam
Beam Mini moving head

32
Grazie per aver scelto il
marchio KARMA.
Il prodotto KARMA da Lei acquistato è frutto di
un’accurata progettazione da parte di ingegneri
specializzati. Per la sua realizzazione sono stati
impiegati materiali di ottima qualità per garantirne
il funzionamento nel tempo. Il prodotto è stato
realizzato in conformità alle severe normative di
sicurezza imposte dalla Comunità Europea, garanzia
di adabilità e sicurezza. Vi consigliamo di leggere
attentamente questo manuale prima di cominciare ad
utilizzare l’apparecchio al ne di sfruttarne appieno le
potenzialità. Vi ringraziamo nuovamente per la ducia
riposta nel nostro marchio.
Thank you for choosing
KARMA brand
The KARMA product you have purchased is the
result of careful planning by specialized engineers.
High quality materials were used for its construction,
to ensure its functioning over time. The product is
manufactured in compliance with strict regulations
imposed by the European Union, a guarantee of
reliability and safety. Please read this manual
carefully before starting to use the xture in order to
exploit its full potential. We thank you again for your
trust in our brand.
Precauzioni ed
avvertenze
• Il prodotto a cui questo manuale fa riferimento è
conforme alle Direttive della Comunità Europea
recando la sigla CE
• Il dispositivo funziona con pericolosa tensione
di rete 230V. Non aprire o cercare di intervenire
al suo interno senza seguire attentamente
il manuale, esiste il pericolo di una scarica
elettrica
• E’ obbligatorio eettuare il collegamento ad un
impianto di alimentazione dotato di messa a
terra. Vi consigliamo inoltre di proteggere le linee
di alimentazione delle unità dai contatti indiretti
e/o cortocircuiti tramite l’uso di interruttori
dierenziali
• Le operazioni di collegamento alla rete di
distribuzione devono essere eettuate da
un istallatore elettrico qualicato. Vericate
sempre che frequenza e tensione della rete
corrispondono a quelle per cui il prodotto è
predisposto.
• Prodotto destinato ad uso professionale e non
domestico.
Cautions and
warnings
• The product described in this manual is
compliant with the European Community
Directives and is CE marked.
• This device works with dangerous 230V
mains power . Do not use it without following
this manual’s instructions. In case of wrong
use an electric shock may occur.
• It is compulsory to connect the product to a
power system with ground . We also advise
you to protect the power lines of the units from
indirect contacts and / or short circuits through
the use of dierential switches.
• The operations of connection to the power
system must be carried out by a qualied
electrical installer. Always check that the
frequency and voltage of the power source
correspond to those set on the item.
• This product is intended for professional and
non-domestic use

32
• Evitate di utilizzare l’unità:
- in luoghi con temperatura superiore ai 45°C
- in luoghi soggetti a vibrazione e/o possibili urti
- in luoghi con troppa umidità
• Evitate che nel prodotto entri liquido
inammabile, acqua o altri oggetti metallici
• Non smontate e/o apportate modiche al
prodotto
• Tutti gli interventi di riparazione devono sempre
essere eettuati da personale utorizzato
• Se si desidera eliminare il dispositivo
denitivamente, consegnatelo ad un’istituzione
locale per il riciclaggio e lo smaltimento
• Questo prodotto è solo per uso interno
• Disconnettere l’unità dalla rete elettrica quando
non è in uso o el caso si renda necessario
un’ispezione del fusibile
• Lasciate rareddare il prodotto prima di
eettuare pulizia o manutenzione
• Non accendere e spegnere il prodotto a
brevi intervalli, potrebbe ridurre la durata del
dispositivo
• Controllare periodicamente lo stato del cavo di
alimentazione
• Avoid using the unit:
- in places with temperatures above 45 ° C
- in places subject to vibrations and / or
possible impacts
- in places with too much humidity
• Do not allow ammable liquid, water or metal
objects to enter the product
• Do not disassemble and / or make changes to
the product
• All repairs must always be carried out by
authorized persons
• If you want to dispose of the device, hand it
over to a local recycling and disposal facility
• This product is for indoor use only
• Disconnect the unit from the mains when it is
not used or fuse inspection is necessary
• Wait for the product to cool before cleaning or
maintenance
• Do not turn the product on and o at short
intervals, it may reduce the life of the device
• Periodically check the condition of the power
cord
Spedizioni
e Reclami
• I prodotti ed il materiale viaggiano sempre
a rischio e pericolo del distributore/cliente.
Eventuali danni dovranno essere contestati al
vettore. Ogni reclamo per imballi manomessi
dovrà essere inoltrato entro 8 giorni dal
ricevimento della merce.
Shipments
and complaints
• The products always travel at the risk of the
consignee. Any damage must be immediately
indicated on the carrier’s delivery bill. All
claims for damaged packagings must
be notied within 8 days from the goods’
reception.

54
Certificato di Garanzia
Si prega, dopo l’acquisto di procedere
alla registrazione del prodotto sul nostro sito internet
accedendo alla sezione assistenza(occorre registrarsi).
Registrare un prodotto permette di tenere traccia della
validità garanzia, ricevere aggiornamenti automatici
su rmware, software, manuali o altro.Per qualsiasi
chiarimento o dicoltà nella registrazione, potrete
contattare i nostri uci. Il prodotto è coperto da
garanzia in base alle vigenti normative nazionali ed
Europee. Vi suggeriamo di consultare sul sito internet:
www.karmaitaliana.it le “Condizioni Generali di
Garanzia” riportate nella sezione “FAQ”. Di seguito un
breve estratto:
• La garanzia copre i difetti di fabbrica ed i guasti
vericatisi nei primi 2 anni dalla data di acquisto.
Nel caso di acquisto con fattura, la garanzia è
limitata ad 1 anno.
• La garanzia copre il costo dell’intervento di
riparazione e di eventuali pezzi di ricambio
necessari
• Sono esclusi i guasti causati da imperizia a da
uso non appropriato dell’apparecchio
• La garanzia non ha più alcun eetto qualora
l’apparecchio risulti manomesso.
• La garanzia non prevede la sostituzione del
prodotto.
• Sono escluse dalla garanzia le parti esterne, le
batterie, le manopole, gli interruttori, e le parti
asportabili o consumabili.
• Le spese di trasporto e i rischi conseguenti sono
a carico del proprietario dell’apparecchio
• A tutti gli eetti la validità della garanzia è
avallata unicamente dalla presentazione della
fattura o scontrino d’acquisto. Vi raccomandiamo
quindi di conservare la documentazione
d’acquisto
Se avete registrato il prodotto potete entrare nella
vostra area riservata sul sito www.karmaitaliana.it
ed aprire una pratica di assistenza.Dopo poche ore
riceverete una risposta da parte del personale tecnico
che vi indicherà come procedere.Tutte le fasi della
riparazione potranno essere seguite passo passo sul
sito. E’ tracciato il tipo di intervento, la persona che se
ne è occupata e l’esatta tempistica di tutte le fasi.
Warranty Certifications
Please, after the purchase proceed to register the
product on our website by accessing the support
section (you must register). Registering a product
allows you to keep track of the warranty validity, receive
automatic updates on rmware, software, manuals or
other. For any clarication or diculty in registration,
you can contact our oces. The product is covered by
warranty according to current national and European
regulations. We suggest you to consult the “General
Conditions of Guarantee” on the website: www.
karmaitaliana.it in the “FAQ” section. Below is a brief
excerpt:
• The warranty covers factory defects and faults
occurring in the rst 2 years from the date of
purchase. In case of purchase with invoice, the
warranty is limited to 1 year.
• The warranty covers the cost of repair work and
any necessary spare parts
• Failures due to inexperience or improper use of
the device are excluded
• The warranty is no longer valid if the appliance
has been tampered with.
• The warranty doesn’t necessarily involve
replacement of the product.
• External parts, batteries,knobs switches and all
removable components subject to tear and wear
are excluded from warranty.
• Transport costs and the consequent risks are
borne by the owner of the appliance
• For all intents and purposes, the validity of the
guarantee is only validated by the presentation
of the invoice or purchase receipt. We therefore
recommend you to keep the purchase
documentation
If you have registered the product you can enter your
private area on the website www.karmaitaliana.it and
open a support request.
In a few hours you will receive an answer from our
technical sta that will explain you how to proceed.
All stages of the repairing process can be followed step
by step on our website.

54
Fronte Retro
Front Side Rear Side
1
2 3 4
Note - Notes

76
1. DISPLAY
Vi permetterà di visualizzare le funzioni scelte.
2. PRESA DI ALIMENTAZIONE
Collegate il cavo di alimentazione alla
presa per poter alimentare il dispositivo.
3. TASTO DI ACCENSIONE
Utilizzatelo per accendere il prodotto, il
prodotto eettuerà un reset.
4. PRESE XLR
Utilizzatele per collegamenti ad impianti
DMX 512.
1. DISPLAY
It will allow you to view the selected functions.
2. POWER SOCKET
Connect the power cable to the socket
to power the device.
3. ON / OFF BUTTON
Use it to switch on the product
4. XLR SOCKETS
Use them to connect line xtures with XLR
cable.
Funzioni Functions
Note - Notes

76
Display Display
MENU UP DOWN ENTER
1 2 3 4
MENU UP DOWN ENTER
1 2 3 4
1. TASTO MENU
Premete il tasto per scegliere la modalità
desiderata (Auto, DMX etc)
2. TASTO UP
Utilizzatelo per scorrere tra le voci del menu,
o per aumentare i settaggi scelti
3. TASTO DOWN
Utilizzatelo per scorrere tra le voci del menu,
o per diminuirei settaggi scelti
4. TASTO ENTER
Utilizzatelo per confermare la scelta eettuata
1. MODE BUTTON
Press this button to choose the desired mode
(Auto, DMX etc).
2. UP BUTTON
se it to scroll through the menu items, or to
increase the chosen settings
3. DOWNBUTTON
Use it to scroll through the menu items, or to
decrease selected settings
4. ENTER BUTTON
Use it to conrm the choice made

98
DISPLAY
A001 A001-A512 Indirizzo DMX / Adress Set
Chnd 11CH Selezione Canali
Channel Selection
13CH
Au01-02 Au01 Automatico Veloce
Fast runniing mode
Au02 Automatico Lento
Slow running mode
SnOn SnOn Sound Control On
SnOFF Sound Control O
RPOF RPOF Pan Avanti (X)
Pan Motor forward (X)
RPON Pan Indietro (X)
Pan Motor Reverse (X)
RTOF RTOF Tilt Avanti (Y)
Tilt Motor forward (Y)
RTON Tilt Indietro (Y)
Tilt Motor Reverse (Y)
RDOF RDOF Avanti Veloce
Forward direction show
RDON Indietro lento
Inversion direction show
DFOF DFOF Initialize setting
DFON
REST YES System Reset

98
OUT
Esempio di collegamento a cascata.
ININ OUTOUT IN
DMXDMX DMX
CENTRALINA
DMX
OUT
Example:
ININ OUTOUT IN
DMXDMX DMX
DMX
CONTROLLER
In una connessione DMX 512 ci sono 512 canali
a disposizione. Ogni apparecchio DMX impiega 1
o più canali per gestire le varie funzioni. L’utente
deve assegnare un indirizzo di partenza ad ogni
apparecchio DMX connesso all’impianto, tale
indirizzo indicherà il primo canale occupato nella
centralina. Bisogna pianicare la scelta dell’indirizzo
di partenza in modo da non far mai sovrapporre i
canali, onde evitare un funzionamento non corretto
dell’apparecchio.
Esempio: Ammettiamo di collegare 3 apparecchi
DMX ognuno dotato di 10 canali, il primo apparecchio
dovrà essere settato sull’indirizzo 1, il secondo
apparecchio sull’indirizzo 11 ed il terzo sull’indirizzo
21. Tuttavia si può usare lo stesso indirizzo di
partenza su più apparecchi se si desidera ottenere
un loro movimento all’unisono. Gli apparecchi DMX
sono concepiti per ricevere dati tramite collegamento
seriale Daisy Chain. Questo tipo di collegamento si
ha quando l’uscita dati di un apparecchio è connessa
all’ingresso dati del successivo. L’ordine in cui gli
apparecchi sono collegati non ha importanza e non
incide su come la centralina comunica con ciascuno
di essi. Utilizzare l’ordine in cui il cablaggio è più
semplice e diretto. La lunghezza del cavo di segnale
non dovrebbe superare i 100 metri per evitare
l’interferenze tra segnali e altri apparecchi elettrici.
Spesso alla ne di un impianto DMX è richiesto un
terminatore. Rivolgetevi ad un installatore o al vostro
negoziante di ducia per ulteriori informazioni.
E’ necessario inserire una resistenza di chiusura
120Ohm 1/4 W tra piedino 2 e 3
Nell’eettuare i collegamenti assicuratevi che gli
apparecchi e i cavi utilizzino le polarità riportate dalla
tabella sottostante.
In a DMX 512 linking there are 512 channels
available.Each DMX xture uses one or more
channels to manage its functions. The user must
assign a starting address to each DMX xture. This
address will indicate the rst channel used on the
controller. You have to plan the starting address
choice in order to avoid channels’ overlapping.
Otherwise the xture wouldn’t work correctly.
Example: If you need to connect 3 DMX xtures, each
with 10 channels, the rst unit is to be set on address
1, the second unit on address 11 and the third one on
address 21. Anyway you can set the same starting
address on more devices if you wish them to operate
in synchrony. DMX devices are conceived to receive
datas through a serial Daisy Chain connection. With
this kind of linking the datas output of a xture is
connected to the data input of the following one.
The order of linking of the devices is not important
and it doesn’t aect on how the controller manages
each of them. We suggest to put them in the easiest
and most direct sequence for cable connection.
The cable length should not be more than 100mts
to avoid interferences with other signals or electric
devices. A terminator is often requires at the end of
a DMX system. Please address to a technician or to
your reseller for further information.
it is necessary to add a 120 Ohm 1/4W resistor as
DMX terminator between pins 2 and 3
When you arrange the connections make sure
that the xtures and the cables use the polarities
indicated in the chart below.
MODALITA’ DMX DMX MODE

1110
MODALITA’ 13 CANALI
1 X 0-255
2X ne tune 0-255
3 Y 0-255
4Y ne tune 0-255
5 Speed 0-255
6 Dimming 0-255
7Strobe 0-255
8 Red dimming 0-255
9Green dimming 0-255
10 Blu dimming 0-255
11 Whire dimming 0-255
12 Auto running 0-255
13 Reset 150-200
MODALITA’ 11 CANALI
1 X 0-255
2X ne tune 0-255
3 Y 0-255
4Y ne tune 0-255
5 Speed 0-255
6 Dimming 0-255
7Strobe 0-255
8 Red dimming 0-255
9Green dimming 0-255
10 Blu dimming 0-255
11 Whire dimming 0-255

1110
Note - Notes

1312
Risoluzione dei problemi
Di seguito elenchiamo i problemi più frequenti nel tentativo di darvi un aiuto per tentare di risolverli. Nel caso il
problema persista anche dopo aver tentato di risolverlo attraverso i seguenti step, spegnere l’unità, scollegarla e
rivolgersi al personale autorizzato
Anomalie Possibili cause Controlli e rimedi
L’unità non è
alimentata
• Mancanza di alimentazione di rete
• Cavo di alimentazione danneggiato
• Alimentazione interna difettosa
• Fusibile bruciato
• Vericare la presenza di alimentazione
• Controllare il cavo di alimentazione
• Rivolgersi all’assistenza tecnica
• Sostituire il fusibile
L’unità non
funziona in DMX
• Indirizzo DMX errato
• cavo dmx da sostituire
• Manca la resistenza di chiusura
• Vericare l’indirizzo DMX impostato
• Sostituire il cavo
• Inserire una resistenza 120 Ohm 1/4W
• contattare l’assistenza
L’unità funziona ad
intermittenza
• L’unità è troppo calda • Lasciare rareddare l’apparecchio speg-
nendolo e vericare che la ventola non sia
ostruita. L’apparecchio deve sempre essere
posizionato in posizione areata.
TROUBLESHOOTING
Below we list the most common problems, trying to help you to solve them. If the problem persists even after
following the below steps, turn the unit o, disconnect it and contact our authorized technicians.
Troubles Possible causes Tests and solutions
The unit is not
powered
• Lack of power supply
• Damaged power cord
• Defective internal power supply
• Blown fuse
• Check power supply
• Check the power cord
• Contact technical service
• Replace the fuse
The unit doesn’t
work in DMX mode
• Wrong DMX address
• DMX cable needs replacing
• DMX terminator resistor is missing
• Check the DMX address
• Replace the cable
• Add a 120 Ohm 1/4W resistor
• Contact technical service
Unit runs
intermittently
• Unit is too hot • Wait for the xture to cool down and make
sure the fan is not obstructed. The xture must
always be positioned in an ventilated place.

1312
Note - Notes

1514
Questo simbolo vi avverte della presenza di istruzioni d’uso e manutenzione importanti, nel
manuale o nella documentazione che accompagna il prodotto
This symbol alerts you of the presence of important operating and maintenance instructions, in
the manual or in the documentation accompanying the product
Il marchio CE indica che questo prodotto è conforme alle norme della Comunità Europea: EMC
(Compatibilità Elettromagnetica) e LVD (Direttive sulla Bassa Tensione). La documentazione di
conformità in forma completa è reperibile presso la società Karma Italiana Srl.
The CE mark indicates that this product complies with the European Community standards EMC
( Electromagnetic Compatibility) and LVD ( Low Voltage Directive ). Compliance documentation
in complete form can be asked to the company Karma Italiana Srl.
Ai sensi del Decreto Legislativo N°49 del 14 Marzo 2014 - “ Attuazione delle Direttive 2012/19/
UE sui riuti di apparecchiature elettriche ed elettroniche (RAEE)”.
Il simbolo del cassonetto barrato riportato sull’apparecchiatura indica che il prodotto alla ne della
propria vita utile deve essere raccolto separatamente dagli altri riuti. L’utente dovrà, pertanto,
conferire l’apparecchiatura integra dei componenti essenziali giunta a ne vita agli idonei
centri di raccolta dierenziata dei riuti elettronici ed elettrotecnici, oppure riconsegnandola al
rivenditore al momento dell’acquisto di nuova apparecchiatura di tipo equivalente, in ragione di
uno a uno. L’adeguata raccolta dierenziata per l’avvio successivo dell’apparecchiatura dimessa
al reciclaggio, al trattamento e allo smaltimento ambientale compatibile contribuisce ad evitare
possibili eetti negativi sull’ambiente e sulla salute e favorisce il riciclo dei materiali di cui è
composta l’apparecchiatura. Lo smaltimento abusivo del prodotto da parte dell’utente comporta
l’applicazione delle sanzioni amministrative di cui al D.Lgs n. Decreto Legislativo N° 49 del 14
Marzo 2014.
The symbol of the crossed-out dustbin indicates that the product at the end of its life must be
collected separately from other waste . The user must , therefore , take the remote control
integrates the essential components come to an authorized disposal center for collection of
waste electronic and electrical , or returning it to the dealer when buying new equipment of
equivalent type , at a rate of one to one. Appropriate separate collection for the decommissioned
equipment to recycling , treatment and environmentally compatible disposal helps to prevent
negative impact on the environment and human health and promotes recycling of the materials
making up the product. Illegal dumping of the product by the user entails the application of
administrative sanctions pursuant to Legislative Decree n. 49 (14/03/2014)

1514
TM BEAM10
Sorgente Luminosa 1 led x 30W (Bianco)
Assorbimento 30W
Durata Led 80.000 ore
Pan/Tilt 540°/180°
Controlli DMX 9/11
Modalità Operativa Auto / Manuale / DMX
Connettori XLR 3 pin
Display Si
Staa da sotto, inclusa
Alimentazione 110 - 230V
Colore Nero
Dimensioni 290 x 230 x 320 mm
Peso 3,5 Kg
TM BEAM10
Led 1 led x 30W (White)
Assorbimento 30W
Durata Led 80.000 h
Pan/Tilt 540°/180°
Controlli DMX 9/11
Modalità Operativa Auto / Manuale / DMX
Connettori XLR 3 pin
Display Yes
Staa Included
Alimentazione 110 - 230V
Colore Black
Dimensioni 290 x 230 x 320 mm
Peso 3,5 Kg

PRODOTTO DA:
KARMA ITALIANA Srl
www.karmaitaliana.it
Ver. 18.1
PRODUCED BY:
KARMA ITALIANA Srl
www.karmaitaliana.it Made in China
Table of contents
Other Karma Lighting Equipment manuals

Karma
Karma TM WB4010 User manual

Karma
Karma PAR COB240 User manual

Karma
Karma DJ 359 User manual

Karma
Karma LED PAR126 IP User manual

Karma
Karma SMART FL60IP User manual

Karma
Karma STROBE 37LED User manual

Karma
Karma LED PAR27 User manual

Karma
Karma STROBE 1000 User manual

Karma
Karma PAR117 User manual

Karma
Karma LED PAR108 User manual
Popular Lighting Equipment manuals by other brands

ORTOLED
ORTOLED QB-150W instruction manual

Clevertronics
Clevertronics CLP Argonaut ARGOSQ-LP Series ASSEMBLY, INSTALLATION & MAINTENANCE INSTRUCTIONS

ETC
ETC Source 4WRD Installation and user manual

Welch Allyn
Welch Allyn LS100 owner's manual

Lepro
Lepro 3200LM quick start guide

Phantom
Phantom 60 Series user manual