Thank
you
for
purchasing
a
KAWAI
Digital
Piano!
The
Kawai
digital
piano
is
a
revolutionary
new
keyboard
instrument
that
combines
the
latest
in
electronic
advances
with
traditional
craftsmanship
inherited
from
Kawai’s
many
years
of
experience
in
building
fine
pianos.
Its
keyboard
provides
the
touch
responce
and
full
dynamic
range
required
for
a
superb
performance
on
the
piano,
harpsichord,
organ,
and
other
instrument
presets.
Moreover,
the
reverb
effect
gives
you
even
deeper
resonance.
Industry-Standard
MIDI
(Musical
Instrument
Digital
Interface)
jacks
are
included
which
allow
you
to
play
other
electronic
instruments
at
the
same
time-opening
a
whole
new
world
of
musical
possibilities.
This
Owner's
Manual
contains
valuable
information
that
will
help
you
make
full
use
of
this
instrument's
many
capabilities.
Read
it
carefully
and
keep
it
handy
for
further
reference.
Table
of
Contents
ME
Basic
ContrOlSiscscecciadsccssscsisivictccsstossnetindceccioneteassnicasbesntacsivieas
1
Te
FrONt:
PAN
Gl
oos-
cies
ssicscecceecksscecceeds
Waseadeisvecassacsscadeduecceseteansteceveeasunsdetsssvsacsest
1
2:
ROAM
PANO
5.
cic
ecccsadacscccticsacdecescccccceusecekccdccsduivslccalaceeatscenantssevseseacdetvendeeeie
3
WL
GUS
PUY
esi
sin
bicesiccesss
osauiiants
sinitciaaaseieasnadevesnatstianastenssziauieeltece
4
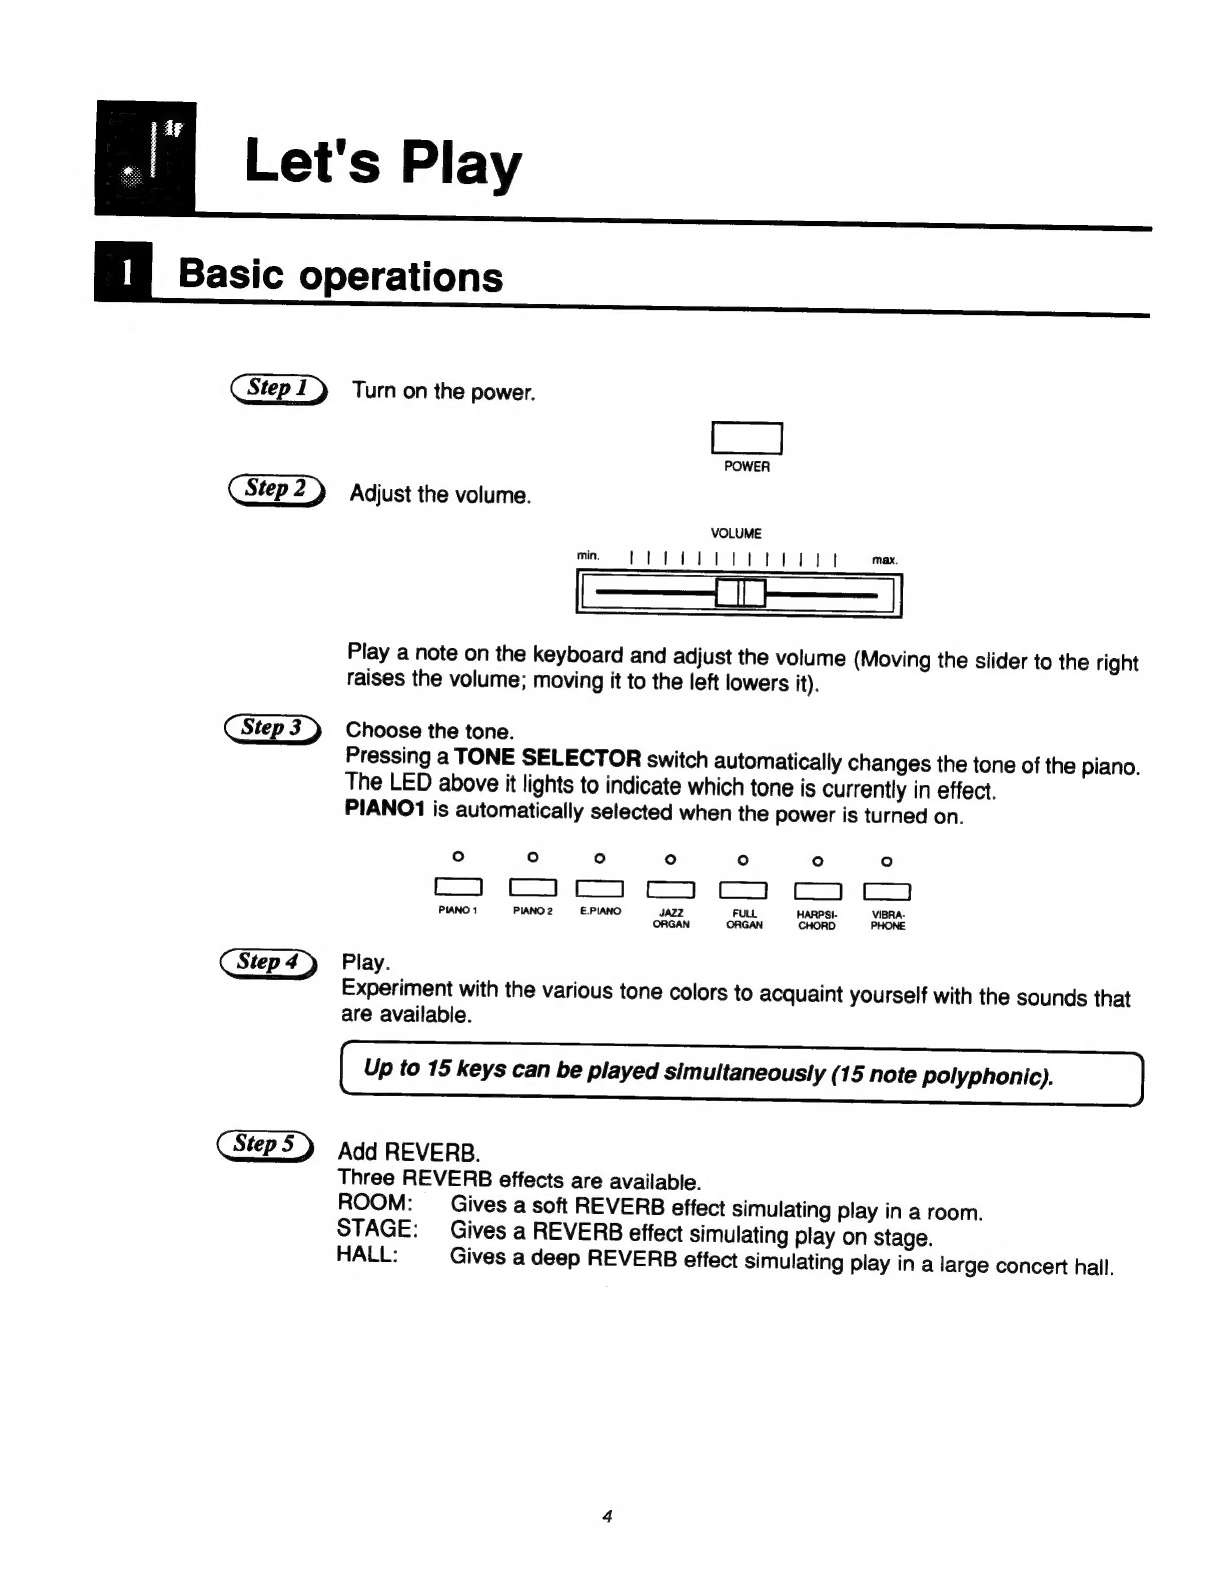
1.
Basic:
Operatlons
.ssccisciesss
siessetisscsntidentatecseeansctevencetecssseceuseezs
sasssduveasiebeescts
4
2s
WAN
SDOSO
sisessiccteccecceisscscccevastcssscasseceasscessasncvesececaveseneuasteessseesvasecsseedsreasses
5
3.
Selecting
the
TOUCH
Curve
.........ccccsssssscrssersseesssensecessssevsserseeersonerseases
6
4.
Playing
the
DeMo
SONGS
.............sssscessccssesseeestsseensesnseenscceeaseeessesensoeesnes
7
BS
MORONOMG
sisceccsecccescccetaseuiscecesusderescessedeassiveceaectacsiacssséceucdsvvecesedesasessabetses
8
BESS
RO
CONS
iaisiscecscccdunsssatesinsyeesesenancessdnessantarvclinatercecdvniordine
10
1.
Simple
reCOrding
...........sceccssennsssesssessensresscrsseeseecenersesssassneosaesssesseeeseres
10
2.
EAaSy
Play
DACK
wicsccieswisecscoseseasendsesorccveccvaersgavensssnecensseatoasedacssdvasvavecesunecsse
11
3.
Recording
Over
the
previoUS
SONG
..........:cssccsssscesseseseseseerssoseesseeess
12
4.
Playing
Dack
the
SONG
2.0.0.0...
ecescssssesssssecceeeceeeesesssesscererseacseneesoeen
13
5.
Recording
the
left
and
right
hand
parts
separately
................scssssees
14
6.
Playing
back
the
left
and
right
hand
parts
separately
.................:06
16
7.
Deleting
UMNECESSALY
SONGS.
.........:ccssssesessecsseesesessecesereestseescoeseeeenersnse
17
MB
Advanced
Features................ccccessscsssesssessssseeseesseessssneeseeeeess
18
1.
Programming
MOde...........ccccsscsssssssscssccssessssscsssssssssssssssssecssesensestenees
18
Ds
TRAINING
saies
reson
uaa
oat
cetvac
colauk
ss
Bese
cbeas
ia
Saaicd
nbs
wa
betavlen
ansavio
tetas
tice
20
Bi
TEMPCTAMEOMS
.csc2ccsceccciziececenctoucchecdesesctersacacsciectocescccdedecdeniaed
vseventesv
savers
21
4.
Setting
the
Metronome
VOIUME............cccccesssssseesscsecssssessssssenssseneeaces
23
BB
MIDE
Miter
6
oii
oa
cates
Fes
necaaccsascaeeaieceesestiwienacecdestetanersenses
24
De
What!S
MIDI?
iscisiccccdissctiscvsteseccdauresccsedcateses
svasicebevedssunocscevesuscasbbiccesvsatseice
24
2:
CONMOCHIONS
ooo.
in:
od
sccencecsceccusseceesuveucecesnsissanessdcecdacsevecedeasecusetatssandesoadeecets
25
3.
MIDI
Implementation
..............cccssecsccesssessseesssessrsescenensceesnesssessnssseeeetsas
27
4.
MIDI
SOttinGS
siccccccscececeecssscesssaacseassencececccntecdareseatsssenssiesseerseas
sdeussncecsus
28
(A)
Setting
the
Channel]
...................ssssssssscsssseccssssesessseeessscevsssecssesserenees
28
(B)
Sending
program
number
(timbre
code)
and
MIDI
exclusive
data.....29
(C)
Turning
MULTI
TIMBRE
on
and
Off
................:scsscerssscsoesesrseesssenense
32
(D)
Turning
on
and
off
individual
sounds
when
using
MULTI
TIMBRE
2
mode.....33
(E)
Local!
COmtiol
nc.
iess
cescccsccceesidecticatecacalccsecsvatectuciteacecssssdatSesceasswsdsaane
35
(F)
One
Touch
Local
Control
OFF
................:ccssssccsssssnsssserssssssvonsesenes
35
Mi
MIDI
Exclusive
Data
Format.............ccsssssssssrscsssesssssessessseees
36
ME
SPECICATION
ini
hiiectidiseiovsdiccctnsdtstecssoadses
oe
aseapeoness
37
HI
MIDI
Implementation
Chart
................ccssccssssseseeeeseeeseeeeeeees
38