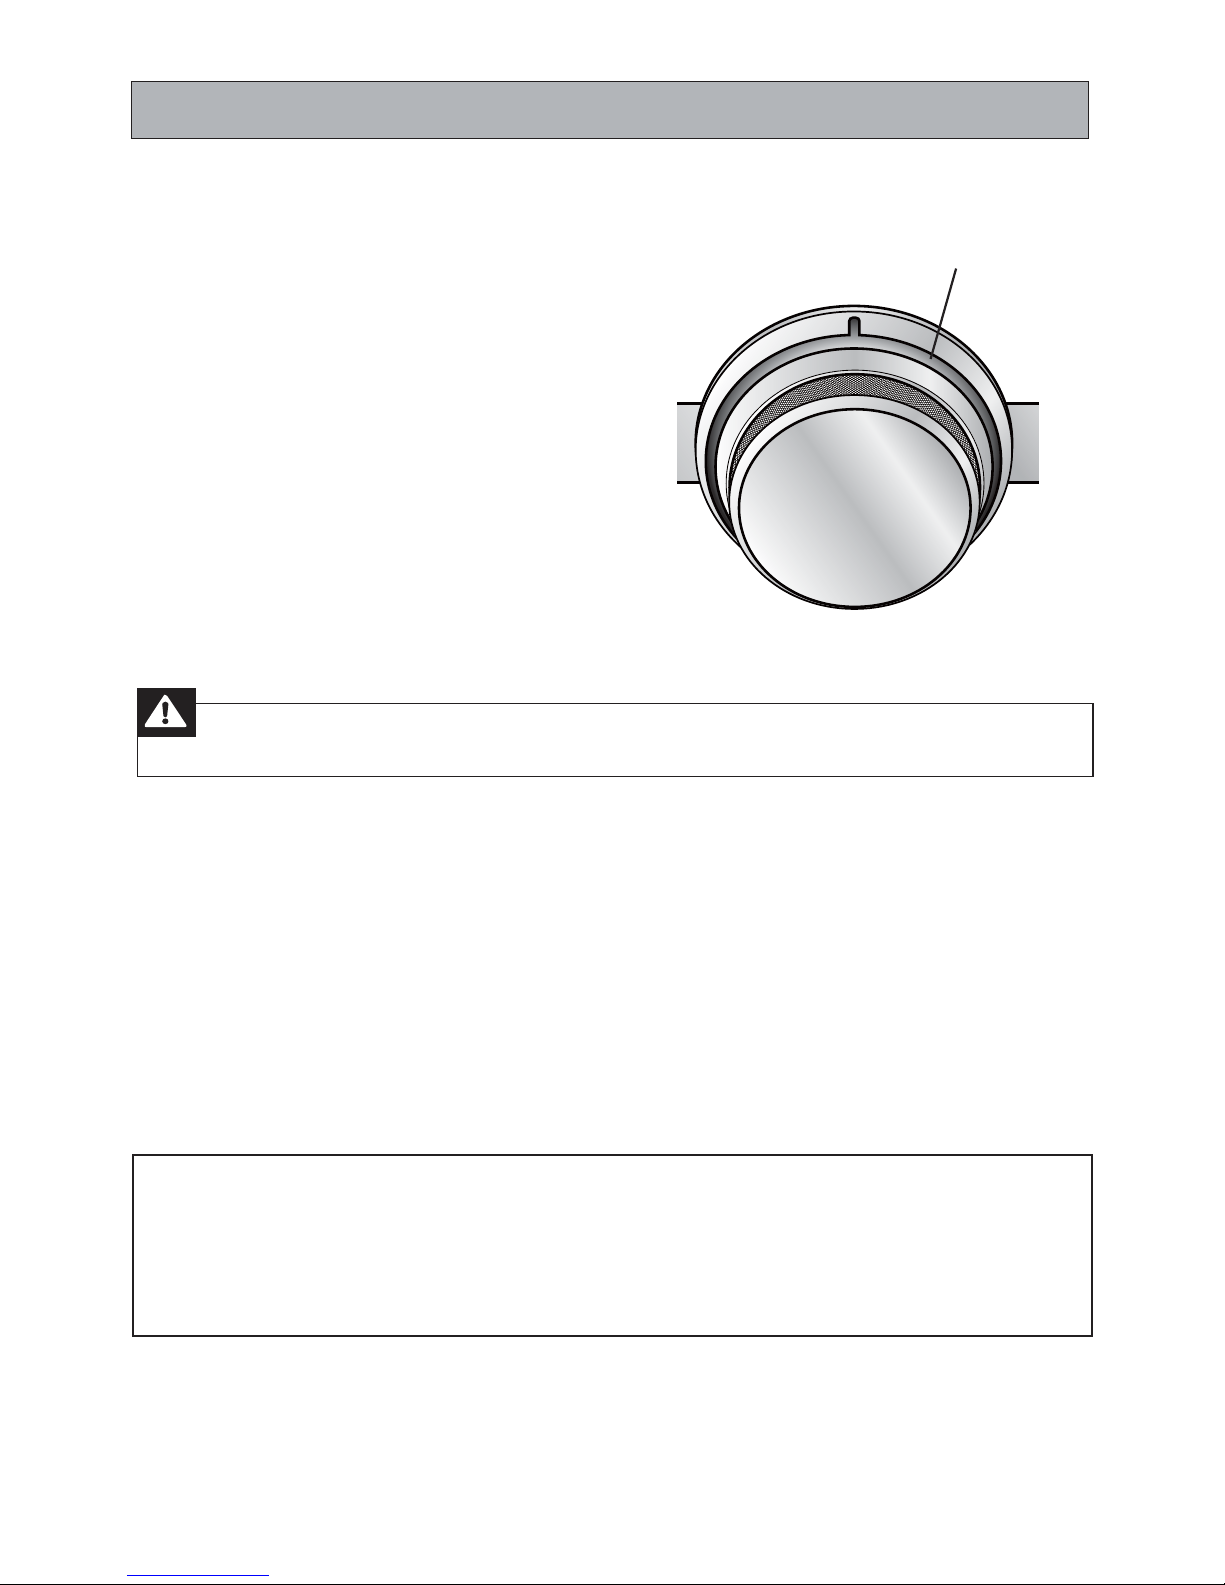
Kenmore 100.8910890A User manual

Use & Care Guide
Manual de Uso y Cuidado
English/Español
Kenmore Elite®
Stand Mixer
Tilt Head 3 & 5 Qt.
Ladeodelacabeza3y5Qt.
Models/Modelos:
100.8900890A-Black/Negro
100.8910890A-White/Blanco
100.8920890A-Red/Rojo
100.89218110-Purple/Púrpura
Customer Assistance/Asistencia al Cliente
1-855-438-7899
P/N 13477900B(0807)
Sears Brands Management Corporation
Hoçmana Estates, IL 60179 U.S.A.
www.kenmore.com
www.sears.com
www.kmart.com
Mezclador de soporte

IMPORTANT SAFEGUARDS
When using electrical appliances, basic safety precautions should always be
followed, Including the following:
1. READ all instructions. KEEP these instructions for future use.
5PQSPUFDUBHBJOTUĐSFFMFDUSJDTIPDLBOEJOKVSZUPQFSTPOT%0/05immerse cord,
plug, or the Stand Mixer in water or other liquids.
3. Close supervision is necessary when any appliance is used by or near children.
6/1-6(4UBOE.JYFSGSPNPVUMFUXIFOOPUJOVTFCFGPSFQVUUJOHPOPSUBLJOHPĒ
parts and before cleaning.
5. Avoid contacting moving parts. Keep hands, hair, clothing, as well as spatulas and
PUIFSVUFOTJMTBXBZGSPNCFBUFSEVSJOHPQFSBUJPOUPSFEVDFUIFSJTLPGJOKVSZUP
persons and/or damage to the Mixer.
%0/05PQFSBUFBOZBQQMJBODFXJUIBEBNBHFEDPSEPSQMVHPSBGUFSUIFBQQMJBODF
malGVODUJPOTPSIBTCFFOESPQQFEPSEBNBHFEJOBOZNBOOFS5BLFUIFBQQMJBODFUP
BRVBMJĐFETFSWJDFEFBMFSGPSSFQBJS
7. The use of accessory attachments not recommended by the appliance manufacturer
NBZSFTVMUJOĐSFFMFDUSJDTIPDLPSJOKVSZUPQFSTPOT
%0/05VTFPVUEPPST
/&7&3MFUUIFDPSEIBOHPWFSUIFFEHFPGUBCMFPSDPVOUFSPSUPVDIIPUTVSGBDFT
3FNPWFNJYJOHCPXMBOEđBUCFBUFSXJSFXIJQPSEPVHIIPPLGSPN4UBOE.JYFS
before washing them.
%0/05VTFUIJTBQQMJBODFGPSBOZUIJOHPUIFSUIBOJUTJOUFOEFEVTF
2
5PQSPUFDUBHBJOTUFMFDUSJDBMTIPDLUIJTBQQMJBODFJTFRVJQQFEXJUIBDPSEIBWJOH
3-prong grounding-type plug for insertion into a proper grounding-type receptacle.
%0/05BMUFSUIFQMVHGPSVTFJOBQSPOHSFDFQUBDMF*GUIFQMVHXJMMOPUĐUJOUPB
SFDFQUBDMFIBWFUIFQSPQFSSFDFQUBDMFJOTUBMMFECZBRVBMJĐFEFMFDUSJDJBO
13. This product is designed for household use only.
14. A short power supply cord (or detachable power supply cord) is to be provided to
SFEVDFSJTLTSFTVMUJOHGSPNCFDPNJOHFOUBOHMFEJOPSUSJQQJOHPWFSBMPOHFSDPSE5IJT
unit is equipped with a proper cord.

15. This appliance is not intended for use by persons (including children) with reduced
physical sensory or capabilities ,or lack of experience and knowledge, unless they
have been given supervision or instruction concerning use of the appliance by a
person responsible for their safety.
16. SAVE THESE INSTRUCTIONS!
IMPORTANT SAFEGUARDS
3

4
PARTS AND FEATURES
Fig. 1
Silica Rubber Feet
(not shown)
Coated Dough Hook
For Accessories, Attachments and services
www.sears.com
Coated Flat Beater Wire Whip
Tilting
Motor Head
Speed Control Knob
Attachment Hub
Attachment Pin
3 Quart
Stainless
Steel Bowl
5 Quart
Stainless
Steel Bowl
Bowl
Clamping Plate
Work Light
Tilt Head
Locking
Lever

PREPARING TO USE YOUR STAND MIXER
BEFORE FIRST USE:
1. Before using your Stand Mixer, remove all packing material, plastic, labels,
stickers or tags that may be attached to the Mixer, Bowls or Attachments.
2. Before the Đrst use of the Stand Mixer, wash the Flat Beater, Dough Hook, and
Stainless Steel Bowls in warm, sudsy water or in the dishwasher. The
Wire Whip should be washed by hand only. Rinse and Dry all thoroughly.
3. The exterior of the Stand Mixer should only be cleaned with a soft damp cloth,
then dried with a soft,clean cloth.
4. Place Stand Mixer on a dry, level, stable, surface such as a countertop or
table. Keep Mixer away from countertop edge. Be sure to leave plenty of room
around Air Vents at the rear of Mixer.
5
OPERATING YOUR STAND MIXER
NOTE: Do not use abrasive cleansers or scouring pads when cleaning
your Stand Mixer. NEVER immerse the body of the Stand Mixer
in water or any liquid.
TILT HEAD
WARNING: To avoid serious injury, never turn on Mixer with Beater or other
WARNING: To avoid serious injury, keep ĐOHers and hands away from
beater attachment hole and hinge area when raising or lowering Tilt Head.
To insert and remove attachments and bowls, it is necessary to raise the Tilting Motor
Head.
To raise Head, locate the Locking lever on the left hand side. Pull lever forward to the
Unlock icon . Raise head and release lever. Lever will return to Lock icon . Push
head all the way back until it stops. Head is now locked in place.
To lower Head, pull lever forward to Unlock icon. Release lever and guide Head
down until it locks into Mix position.
attachments connected unless the Bowl is in place.

6
OPERATING YOUR STAND MIXER
TO ATTACH BOWLS TO MIXER
(see Fig. 2)
1. Turn speed control to OFF.
2. Unplug Stand mixer.
3. Tilt the Head back.
4. Place bowl in Bowl Clamping Plate.
5. Turn bowl clockwise until snug.
For Accessories, Attachments and services
www.sears.com
TO REMOVE BOWLS FROM MIXER
(see Fig. 3)
1. Turn speed control to OFF.
2. Unplug Stand mixer.
3. Tilt the Head back.
4. Turn bowl counterclockwise until loosened
and pull up and out of Bowl Clamping Plate.
TO CONNECT FLAT BEATER,
WIRE WHIP OR DOUGH HOOK ATTACHMENTS
1. Turn speed control to OFF.
2. Unplug Stand mixer.
3. Tilt the Head back.
4. Align slot at the top of Attachment
with pin on Tilt Head shaft. Push
Attachment up onto shaft and turn
counterclockwise until pin moves all the
way into the slot (see Fig. 4).
TO REMOVE FLAT BEATER,
WIRE WHIP OR DOUGH HOOK
1. Turn speed control to OFF.
2. Unplug Stand mixer.
3. Tilt the Head back.
4. Turn Attachment clockwise on shaft until pin on shaft lines up with slot
on attachment. Pull oĒ.
For Accessories, Attachments and services
www.sears.com
Fig. 2
Fig. 3
Fig. 4
Pin

7
OPERATING YOUR STAND MIXER
SPEED CONTROL KNOB
The Speed Control Knob is located on
the right side of the Mixer (with the
front facing you), and has increments
from 1 to 10 and OFF (see Fig. 5).
To start Mixer, turn Knob clockwise
from OFF. Always start the Mixer on
the slowest possible speed to avoid
splashing ingredients out of the bowl.
When ingredients start to mix, turn
speed up as called for in recipe.
See Page 9 for Speed Control Guide.
WORK LIGHT AND POWER INDICATOR LIGHT
When the Mixer is plugged in and a speed is selected, the blue LED light encircling
the Speed Knob (see Fig. 5) comes on. A Work Light also comes on to illuminate
the work area above the bowl.
When you turn the Speed Knob OFF, the blue LED Light around the Speed
Knob goes out. The Work Light stays on for 3 minutes, then shuts oĒ.
Fig. 5
NOTE: If you plug the Mixer in with the Speed Knob turned to any speed
setting, the mixer will not start, but the Speed Knob and Work Light LEDs will
ăBTIPOBOEPā5VSOUIF4QFFE,OPCUP0''UPTUPQUIFMJHIUTGSPNăBTIJOH
and resume normal Mixer operation.
1
OFF
6
5
7
8
9
10
4
3
2
Power
Indicator Light
CAUTION:To avoid unintentional starting and possible injury or product damage
turn Speed Knob to OFF and unplug Stand Mixer when mixing is complete.

8
OPERATING YOUR STAND MIXER
MIXING TIME
Your Stand Mixer will mix faster and more thoroughly than most other electric Mixers.
Therefore, the mixing time in most traditional and non-packaged recipes should be
adjusted to avoid overbeating. Cakes, for example, may need only half as much
beating time as with other mixers.
BEATER ADJUSTMENT
The Stand Mixer is adjusted at the factory so that the Flat Beater clears the bottom of the
Bowl. If the Flat Beater hits the bottom of the Bowl or is too far away from the sides,
adjust as follows:
1. Turn Speed Control to OFF.
2. Unplug Stand Mixer
3. Tilt Motor Head back and lock
4. Using #3 Phillips Head screwdriver, turn
screw (see Fig.6) counterclockwise (left)
to raise the Flat Beater or clockwise
(right) to lower.
5. Adjust so that the Flat Beater just clears the
surface of the Bowl. Do not over adjust. You
may not be able to lock the Motor Head
when lowered.
NOTE: If the Flat Beater or Wire Whip strikes the Bowl, the Đnish may wear oĒ.
Fig. 6
ATTACHMENTS AND THEIR USES:
DOUGH HOOK –
– For mixing and kneading yeast doughs:
FLAT BEATER – 120V/60HZ/
–For normal to heavy mixtures:
/400W
–For mixtures that need to have air added:
WIRE WHIP – 120V/60HZ
120V/60HZ/400W
/240W
tCSFBETtDPĒFFDBLFT
tSPMMTtCVOT
tDBLFTtDPPLJFTtRVJDLCSFBET
tDSFBNFEGSPTUJOHTtQJFQBTUSZtNFBUMPBG
tDBOEJFTtCJTDVJUTtNBTIFEQPUBUPFT
tFHHTtCPJMFEGSPTUJOHT
tFHHXIJUFTtTQPOHFDBLFT
tIFBWZDSFBNtBOHFMGPPEDBLFT

9
SPEED CONTROL GUIDE
NOTE:
Do not scrape the bowl while the Stand Mixer is operating. The bowl and
beater are designed to provide thorough mixing without frequent scraping. Scraping
the bowl once or twice during mixing is usually suēcient. Turn the Mixer OĒbefore
scraping.
Number on Speed Knob
1
2
4
6
8
10
Stir
Slow Mixing
Mixing, Beating
Beating, Creaming
Fast Beating, Whipping
Fast Whipping
For slow stirring, combining, mashing,
starting all mixing procedures. Use to add
đour and dry ingredients to batter, add
liquids to dry ingredients, and combine
heavy mixtures. Use with Ice Cream
Maker Attachment, sold separately.
For slow mixing, mashing, faster stirring.
Use to mix heavy batters and candies,
start mashing potatoes or other
vegetables, cut shortening into đour,
mix thin or splashy batters, and mix
and knead yeast dough. Use with Can
Opener Attachment, sold separately.
For mixing semi-heavy batter, such as
cookies. Use to combine sugar and
shortening and to add sugar to egg
whites for meringues. Use this Medium
Speed for cake mixes. Use with Food
Grinder, Rotor Slicer/Shredder, and Fruit/
Vegetable Strainer, sold separately.
For medium fast beating (creaming) or
whipping. Use toĐOJTh mixing cake,
doughnut, and other batters. High speed
for cake mixes. Use with Citrus Juicer
attachment, sold separately.
For whipping cream, egg whites, and
boiled frostings.
For whipping small amounts of cream or
egg whites. Use with Pasta Maker and
Grain Mill attachments, sold separately.
NOTE:
Mixer may not maintain fast speeds under heavy load. This is normal.
To avoid mixer slowing down, never add more than 10 cups of đour to the mixing bowl.
Do not exceed Speed 2 when preparing
yeast dough. This could damage the Mixer.

10
MIXER TIPS AND TECHNIQUES
CARE AND CLEANING
To help determine the ideal mixing time for a recipe, observe the batter or dough
and mix only until it has the desired appearance described in your recipe, such as
“smooth and creamy”.
Always add ingredients as close to the side of the bowl as possible, not directly
into the moving beater.
When adding Nuts, Raisins or Candied Fruits, follow individual recipes for guidelines
on including these ingredients. In general, solid materials should be folded in during the
last few seconds of mixing on Speed 1. The batter should be thick enough to prevent
the fruit or nuts from sinking to the bottom of the pan during baking. Sticky fruits should
be dusted withđour for better distribution in the batter.
Mixtures containing large amounts of liquid ingredients should be mixed at lower
speeds to avoid splashing. Increase mixer speed only after the mixture has thickened.
WARNING: Injury Hazard: Unplug mixer before touching beaters or other
accessories. Failure to do so can result in broken bones, cuts or bruises.
Always unplug Stand Mixer before cleaning. Do not immerse Mixer in water.
The exterior of the Mixer should only be cleaned with a soft damp cloth.
Always remove attachments from Mixer before cleaning. Wash all attachments by hand
or in dishwasher except Wire Whip, which should only be hand washed. Rinse and dry
completely.
Beaters, Attachments and Bowls should be washed as soon as possible after use to
keep food from drying on them.
NOTE: Do not use abrasive cleansers or scouring pads when cleaning your
Stand Mixer. NEVERimmerse the body of the Stand Mixer in water or any liquid.
"OZPUIFSTFSWJDJOHTIPVMECFQFSGPSNFECZBRVBMJĐFETFSWJDFEFBMFS

11
ATTACHMENTS
Your Stand Mixer comes with a built-in multipurpose Attachment Hub located in the front
of the Tilt Motor Head. A leading brandname appliance maker oĒers a diverse selection of
food preparation attachments that will connect to the Hub, and are fully functional with this
Kenmore Elite Stand Mixer.
Read and carefully follow the instructions that come with the attachment for correct and
safe use.
ATTACHMENT HUB

10
.
Quite el tazón de fuente que se mezcla y batidor, azote del alambre o gancho
plano de la pasta de mezclador del soporte antes de lavarlas.
11
.
No utilice esta aplicación para cualquier cosa con excepción de su uso previsto.
12
.
Para proteger contra descarga eléctrica, este aparato se equipa de una cuerda
que tiene un enchufe tipo de poner a tierra de tres dientes para la inserción en un
receptáculo tipo poner a tierra apropiado. NO altere el enchufe para el uso en un
receptáculo de 2 dientes. Si el enchufe no cabe en a el receptáculo, tenga el
SFDFQUÈDVMPBQSPQJBEPJOTUBMBEPQPSVOFMFDUSJDJTUBDBMJĐDBEP
13
.
Este producto se diseña para el uso de la casa solamente.
14. Una cuerda corta de alimentación (o la cuerda desmontable de alimentación) debe
ser proporcionada para reducir riesgos resultando de enredo o de tropezar sobre
una cuerda más larga. Esta unidad se equipa de una cuerda apropiada.
12
PUNTOS IMPORTANTES
Al usar aparatos eléctricos, las medidas de seguridad básicas se deben seguir
siempre, incluyendo lo siguiente:
1. LEA todas las instrucciones. GUARDE estas instrucciones para el uso futuro.
2. Para proteger contra el fuego, la descarga eléctrica y lesión a las personas, no
sumerja la cuerda, enchufe, o el Mezclador parado en agua u otros líquidos.
3. La supervisión cercana es necesaria cuando cualquier aparato se utiliza por o
cerca a niños.
4. DESENCHUFE el Mezclador Parado del enchufe cuando no se usa, antes de
poner encima o de sacar piezas y antes de limpiar.
5. Evite de entrar en contacto con piezas móviles. Guarde las manos, pelo, ropa, tan
bien como las espátulas y otros utensilios lejos del batidor durante la operación
para reducir el riesgo de lesión a las personas y/o daño al mezclador.
6. No funcione ningún aparato con una cuerda o un enchufe dañado, o después de
que el aparato funcione incorrectamente o se haya caído o se haya dañado de
cualquier manera.
7. El uso de los accesorios accesorios no recomendados por el fabricante del
aparato puede dar lugar a fuego, descarga eléctrica o lesión a las personas.
8. No utilice al aire libre.
9. NUNCA deje la cuerda colgando sobre el borde de la mesa o del contador, o
tocar las supeSĐcies calientes.
-MFWFFMBQBSBUPBVOEJTUSJCVJEPSEFTFSWJDJPTDBMJĐDBQBSBTV
reparación.

13
15.
Esta aplicación no está diseñado para los usos por las personas (incluidos los niños) con
discapacidades o sensorio físico reducido , o la falta de experiencia y conocimiento, a
menos que se les supervise o les instruya en el uso del aparato por una persona responsable
de su seguridad.
16.
GUARDE ESTAS INSTRUCCIONES!
PUNTOS IMPORTANTES

PARTES Y CARACTERÍSTICAS
Fig. 1
Pies de goma de silicona
(no demostrados)
Gancho de pasta revestido
For Accessories, Attachments and services
www.sears.com
Batidor plano revestido Alambre de batir
Cabeza de
motor de
inclinación
Perilla de control de velocidad
Cubo accesorio
Perno accesorio
Vasija
inoxidable
de 3 cuartos
de galón
Vasija
inoxidable
de 5 cuartos
de galón
Vasija
de placa con
abrazadera
Trabajo ligero
Palanca
de Đjación
principal de
inclinación
14

PREPARACIÓN UTILIZAR SU MEZCLADOR PARADO
ANTES DEL PRIMER USO:
1. Antes de usar su mezclador parado de cabeza de inclinación, quite todo el material
de embalaje, plástico, etiquetas, etiquetas engomadas o etiquetas que se puedan
pegar al mezclador, a las vacijas o a los accesorios.
2. Antes de que el primer uso del mezclador parado, lave el batidor plano blanco, el
gancho de pasta blanco, y las vasijas inoxidables en agua caliente, jabonosa o en
el lavaplatos. El alambre de batir se debe lavar solamente a mano. Enjuague y
seque todos a fondo.
3. El exterior del mezclador del soporte se debe limpiar solamente con un paño
húmedo suave, entonces seque secar con un paño suave y limpio.
4. Coloque el Mezclador parato de cabeza de inclinación en una suQFSĐcie seco,
plano, estable, tal como un contador o mesa. Guarde el mezclador lejos del borde
del contador, sea seguro dejar un espacio alrededor de salidas de aire en la parte
posterior del mezclador.
15
FUNCIONAMIENTO DE SU MEZCLADOR PARADO
NOTA: No utilice las despedregadoras abrasivas o los cojines de fregado al
limpiar su mezclador parado. NUNCA sumerja el cuerpo del mezclador
parado en agua o cualquier líquido.
CABEZA DE INCLINACIÓN
ADVERTENCIA:
ADVERTENCIA: Para evitar lesión seria, guarde los dedos y mano lejos
del agujero del accesorio del batidor y del área de la bisagra cuando levanta o
baja la cabeza de inclinación.
Para insertar y para quitar los accesorios y las vasijas, es necesario elevar la cabeza de
inclinación del motor.
1BSBMFWBOUBSMBDBCF[BMPDBMJDFMB1BMBODBEFĐKBDJØOFOFMMBEPEFMBNBOPJ[RVJFSEP+BMF
la palanca adelante al icono del abrir . Levantar la cabeza y la palanca de liberación.
Palanca volverá a icono de bloqueo . Empujar la cabeza todo el
camino hasta que se detenga. La cabeza está bloqueado en su lugar.
Para bajar la cabeza, mueve la palanca hacia adelante para desbloquear el icono. Palanca
de liberación y guiar la cabeza hacia abajo hasta que encaje en su posición de mezcla.
Para evitar lesión seria,nunca gire el mezclador con el batidor or
otros accesorios conectados a menos que la vasija esté en lugar.

16
FUNCIONAMIENTO DE SU MEZCLADOR PARADO
PARA UNIR LAS VASIJAS AL MEZCLADOR
(véase Fig.2)
1. Gire el control de velocidad a APAGADO.
2. Desenchufe el mezclador parado
3. Incline la cabeza detrás.
4. Coloque la vasija en la vasija de placa
con abrazadera.
5. Gire la vasija a la derecha hasta que
acomode.
For Accessories, Attachments and services
www.sears.com
PARA QUITAR LAS VASIJAS DEL
MEZCLADOR
(véase Fig. 3)
1. Gire el control de velocidad a APAGADO.
2. Desenchufe el mezclador parado
3. Incline la cabeza detrás.
4. Gire la vasija a la izquierda hasta que se
BđPKe y levante y fuera de la vajsija de
placa con abrazadera.
PARA CONECTAR EL BATIDOR PLANO, ALAMBRE
DE BATIR O GANCHO DE PASTA ACCESORIO
1. Gire el control de velocidad a APAGADO.
2. Desenchufe el mezclador parado
3. Incline la cabeza detrás.
4. Alinee la ranura en la tapa del accesorio
con el perno en el eje de la cabeza
de inclinación. Empuje el accesorio
para arriba sobre el eje y gire a la izquierda
hasta que el perno se mueva hasta el
ĐOBMFn la ranura (véase Fig. 4).
PARA QUITAR EL BATIDOR
PLANO, ALAMBRE DE BATIR
O GANCHO DE PASTA
1. Gire el control de velocidad a
APAGADO.
2. Desenchufe el mezclador parado.
3. Incline la cabeza detrás.
4. Gire el el accesorio a la derecha en el eje hasta que
el perno en el eje se alinea con la ranura en el accesorio. Quite.
For Accessories, Attachments and services
www.sears.com
Fig.
2
Fig. 3
Fig. 4
Perno

17
FUNCIONAMIENTO DE SU MEZCLADOR PARADO
PERILLA DE CONTROL DE VELOCIDAD
LUZ DE TRABAJO Y LUZ INDICADOR DE ENERGÍA
Cuando se enchufa el mezclador y se selecciona una velocidad, la luz azul LED
que cerca la perilla de velocidad (véase Fig. 5) se enciende. Una luz de trabajo
también se enciende para iluminar el área de trabajo sobre la vasija.
Cuando usted da vuelta el mezclador APAGADO, la luz LED azul alrededor de la
perilla de velocidad se apaga. la luz de trabajo permanece encendido por 3 minutos,
después se apaga.
Fig.
5
NOTA: Si conecta el mezclador con el control de velocidad, se dirigió a toda
Luz de indicador
de energía
PRECAUCIÓN: Para evitar involuntario comienzo y posible lesión o producto
La perilla de control de la velocidad está
situada en el derecho del mezclador (con
los revestimientos delanteros usted), y
tiene incrementos a partir de la 1 a 10 y
APAGADO (véase el higo 5).
Para comenzar el mezclador, perilla del
trun a la derecha de APAGADO.
Comience siempre el mezclador en la
velocidad posible más lenta para evitar
de salpicar los ingredientes fuera del
tazón de fuente.
Cuando los ingredientes comienzan a
mezclarse, la vuelta acelera según lo
llamado para en la receta.
Vea la página 9 para la guía del control
de la velocidad.
1
OFF
6
5
7
8
9
10
4
3
2
daño,cuando el mezclarse es completo, dé vuelta a la perilla de la velocidad a
APAGADO y desenchufe el mezclador del soporte para la seguridad.
WFMPDJEBEDPOĂHVSBDJ³OMBNFTBEFNF[DMBTOPTFJOJDJBQFSPFMDPOUSPMEF
WFMPDJEBEZMPT-&%EFMVDFTEFUSBCBKPTFFODJFOEFZTFBQBHB(JSFMB
QSJMMBEFWFMPDJEBEFO0''EFKBSMBTMVDFTJOUFSNJUFOUFTEFZSFBTVNFFM
GVODJPOBNJFOUPOPSNBMNFOUF

18
FUNCIONAMIENTO DE SU MEZCLADOR PARADO
TIEMPO DE MEZCLAR
Su mezclador parado de cabeza de inclinación se mezclará más rápidamente y más a
fondo que la mayoría de los otros mezcladores eléctricos. Por lo tanto, el tiempo de
mezclar en las recetas más tradicionales y no empaquetadas se debe ajustar para evitar
el sobre batir. Las tortas, por ejemplo, pueden necesitar solamente la mitad de tiempo
de paliza que los otros mezcladores.
AJUSTE DEL BATIDOR
El mezclador aparado se ajusta en la fábrica de modo que el batidor plano despeje el fondo
de la vasija. Si el batidor plano golpea el fondo de la vasija o es demasiado lejano de los
lados, ajustar los siguientes:
1. Gire el control de velocidad a APAGADO.
2. Desenchufe el mezclador parado
3. Incline la parte posteriora de la cabeza
del motor y bloquee
4. Usando el destornillador Phillips # 3, gire el
tornillo (véase Fig.6) a la izquierda para levantar
el batidor plano o a la derecha para bajar
5. Ajuste de modo que el batidor plano apenas
despeje la supFSĐcie de la vasija. No sobre
ajuste. Usted no puede bloquear la cabeza
del motor cuando está bajado.
NOTA: Si el batidor plano o alambre batidor pulsa la vasija, el acabado puede ser desgastado.
Fig. 6
ACCESORIOS Y SUS USOS:
tHBMMFUBs
tQBTUFMFTEFFNQBOBEa
tHBMMFUBs
tUPSUBs
tHBSBQJ×BTCBUJEPs
tDBSBNFMPs
tHBSBQJ×BTIFSWJEPs
tCJ[DPDIPTFTQPOKPTPs
tUPSUBTEFBMJNFOUPÈOHFl
ALAMBRE DE BATIR –
tIVFWPs
tDMBSBEFIVFWo
tDSFNBQFTBEa
tUPSUBTEFDBGé
tCPMMPs
GANCHO DE BATIR –
tQBOFs
tSPEJMMPs
tQBOFTSÈQJEPs
tQBOEFDBSOe
tQBUBUBTUSJUVSBEBs
–para a las mezclas normales y pesadas:
–para las mezclas que necesitan tener aireB×BEJØ:
– para mezclar y amasar las pastas de levadura:
BATIDOR PLANO – 120V/60Hz/400W
120V/60Hz/400W
120V/60Hz/240W

19
GUÍA DEL CONTROL DE VELOCIDAD
NOTA: No raspe la vasija mientras que el mezclador parado está funcionando. La
vasija y el batidor se diseñan para proporcionar mezclar cuidadoso sin raspar
frecuente. Raspar la vasija una vez o dos veces durante mezclar es generalmente
TVĐDJFOte. Gire el mezclador apagado antes de raspar.
Número en perilla de velocidad
1
2
4
6
8
10
Revolver
Mezclar lento
Mezclar, batiendo
Batir, Cremar
Batir rápido, batir
Batir rápido
NOTA: El mezclador puede no mantener velocidades rápidas bajo carga pesada.
Esto es normal. Para evitar que el mezclador se retrase, nunca agregue más de
10 tazas de harina a la vasija de mezclar.
Para el revolvimiento lento, combinando,
triturando, comenzando todos los procedimientos
de mezclar. El uso de agregar harina y los
ingredientes secos al batidor, agregar líquidos a
los ingredientes secos, y combinar mezclas
pesadas. Uso con el accesorio del fabricante de
helado, vendido por separado.
Para mezclar lento, trituración, revolver rápido.
El uso de mezclar pesado y caramelos, comen -
zar trituración patatas u otros vegelates, cortar
en corter en harinBNF[DMBSĐOPPCBUJr fangoso,
y mezclar y amasa la pasta de levadura. Uso con
el accesorio del abrelatas, vendido por separado.
Para mezclar batido semi-pesado, tal como
galletas. Uso de combinar el azúcar y el
acortamiento y de agregar el azúcar a clara de
huevo para los merengues. Utilizar este velocidad
mediana para las mezclas de torta. Uso con
amoladora de alimento, rotor de cortBSEFTĐCSBEPSB
y fruta/tamiz vegetal, vendido por separado.
Para el batir rápido medio (cremar) o abtir.
Usado para terminar de mezclar de torta,
buñuelo, y otros batidos. Alta velocidad para las
mezclas de torta. Uso con el accesorio de
exprimidor de fruta cítrica, vendido por separado.
Para batir crema, clara de huevo, y garapiñas
hervidos.
Para batir cantidades pequeñas de crema o clara
de huevo. Use con los accesorios de fabricante
de pasta y moledor de grano, vendidos por
separado.
ESPAÑOL
levadura. Esto puede dañar
No exceda la velocidad 2 al preparar la pasta de
el mezclador.

20
CONSEJOS Y TÉCNICAS DEL MEZCLADOR
CUIDADO Y LIMPIEZA
ADVERTENCIA:
Peligro de Lesión: Desenchufe el mezclador antes de
tocar batidores o de otros accesorios. La falta de hacerlo puede causar a huesos
quebrados, corte o abulladura.
Desenchufe siempre el mezclador parado antes de limpiar. No sumerja el mezclador en agua.
El exterior del mezclador se debe limpiar solamente con un paño húmedo suave.
Quite siempre los accesorios de mezclador antes de limpiar. Lave todos los accesorios a
mano o en lavaplatos excepto el alambre batidor, que debe durante ser lavado a mano.
Enjuague y seque totalmente.
Los batidores, accesorios y las vasijas deben ser cuanto antes lavado despues de uso
para guardar el alimento secarse en ellos.
$VBMRVJFSPUSPTFSWJDJPEFCFTFSSFBMJ[BEPQPSVOSFQSFTFOUBOUFEFTFSWJDJPDVBMJĐDBEP
NOTA:
No utilice las despedregadoras abrasivas o los sosportes de fregado al limpiar
su mezclador del soporte. NUNCA sumerja el cuerpo del mezclador parado en agua
o cualquier líquido.
Para ayudar a determinar el tiempo de mezclar ideal para una receta, observe el bateador
o la pasta y mezcle solamente hasta que tiene el aspecto deseado descrito en su receta,
tal como “liso y cremoso”.
Agregue siempre los ingredientes como cerca del lado de la vasija como sea posible, no
directamente en el batidor móvil.
Al agregar nueces, pasas o frutas escarchadas, siga las recetas individuales para las
pautas en incluir estos ingredientes. Los materiales sólidos se deben doblar generalmente
en los últimos segundos de mezclar en la velocidad 1. El batidos debe ser densamente
bastante para evitar que la fruta o los nueces se hundan al fondo de la cacerola durante la
hornada. Las frutas pegajosas se deben sacar con la harina para una distribución mejor
en el batidor.
Las mezclas que contienen cantidades grandes de ingredientes líquidos se deben
mezclar a velocidades más bajas para evitar de salpicar. El aumento de velocidad del
mezclador solamente después que la mezcla ha espesado.
This manual suits for next models
3
Table of contents
Languages:
Other Kenmore Mixer manuals