Kia Telluride Parts list manual


Welcome to the Kia Family!
Your new Kia vehicle has been designed, engineered and manufactured to provide you with years of
comfortable and dependable driving. Kia is committed to quality, innovation, safety and – above all – your
satisfaction.
Using this Features & Functions Guide
The information contained in this guide is a brief overview of the operation and features of your new Kia
vehicle.
This Features & Functions Guide and the specific operational and safety information it provides are not a
substitute for your Owner’s Manual. In the interest of your safety and that of the vehicle’s occupants, and to
help you avoid risks that may result in death or serious injury, Kia reminds you to carefully read the Owner’s
Manual in order to fully familiarize yourself with the important information and safety warnings it contains.
While Kia endeavors to ensure that the information contained in this guide is accurate at the time of printing,
Kia may change vehicle specifications without notice in advance of or after the fact and assumes no liability
in connection with such changes.
REMINDER: When accessing videos on your mobile device, standard cellular data rates may apply.
1. If you’re having trouble scanning codes, check the following:
§The code should be centered and focused in your mobile device’s camera screen
§Consider moving your device closer to or farther away from the code
§The code should be well lit, without significant shadow
§Avoid scanning from a significant angle
§Confirm that the device’s app supports 2D QR Code scanning
§Try another QR Code Reader app; not all apps are created equal
2. After scanning, you may experience a “connection error” message or a “connecting” message with no subsequent response. These
messages typically indicate that your device is having trouble connecting to the Internet
QUICK TIPS
Videos and QR Codes
Kia provides a number of video resources to assist you with becoming familiar
with the features and functions found in your Kia vehicle. You can access these
resources by snapping the QR Codes with your mobile device using the built-in
QR Code Reader or a downloaded QR Code Reader App.
After opening the QR Code Reader App on your mobile device, the app will
utilize your device’s camera. Center the code in the camera viewing area -
With some apps, as soon as the app recognizes the code, it will launch the
corresponding video.
With other apps, you will have to snap or “take a picture” of the code. The app
will then launch the corresponding video.
For operation specifics, refer to the instructions that come with the QR Code
Reader app.
You can also view the videos by visiting the following website: www.youtube.
com/KiaFeatureVideos.
ONE-CLICK FUEL
CAP VIDEO
To view a video on your
mobile device, snap this
QR Code or visit the listed
website. Refer to this page
for more information.
www.youtube.com/KiaFeatureVideos
QR CODE
*IF EQUIPPED

www.kia.com
Consumer Affairs - Roadside Assistance†18: 1-800-333-4KIA (800-333-4542)
Always check the Owner’s Manual for complete operating information and safety warnings.
Driving while distracted can result in a loss of vehicle control that may lead to an accident, severe personal injury and death. The driver’s
primary responsibility is in the safe and legal operation of a vehicle, and any handheld devices, other equipment or vehicle systems which
take the driver’s eyes, attention and focus away from the safe operation of a vehicle or that are not permissible by law should never be used
during operation of the vehicle.
Getting Started
As you get to know your new Kia, you can explore this booklet to better understand how
to operate its many features and systems. You can find the complete Table of Contents
on the next two pages, but first, be sure to review the following to better understand
some of your Kia’s most used features:
1Smart Key. . . . . . . . . . . . . . . . . . . . . . . . . . . . . . . . . . . . . 56
2Fuel Filler Lid Release . . . . . . . . . . . . . . . . . . . . . . . . . . . . . . . 62
3Power Adjustable Driver’s Seat* / Front Seat Headrest Adjustment . . . . . . . . 49
4Seat Warmers / Ventilated Seats* . . . . . . . . . . . . . . . . . . . . . . . . . 48
52nd & 3rd Row Seat / Folding . . . . . . . . . . . . . . . . . . . . . . . . . 52-53
6Wiper Service Mode. . . . . . . . . . . . . . . . . . . . . . . . . . . . . . . . 39
7Front & Rear Windshield Wipers & Washers . . . . . . . . . . . . . . . . . . . . 39
8Idle, Stop & Go (ISG) System . . . . . . . . . . . . . . . . . . . . . . . . . . . 29
9Smart Cruise Control (SCC) with Stop & Go . . . . . . . . . . . . . . . . . . . . 20
10 Highway Driving Assist (HDA)* . . . . . . . . . . . . . . . . . . . . . . . . . . 16
11 Rear Occupant Alert (ROA) with Ultrasonic Sensors* . . . . . . . . . . . . . . . 51
12 Smart Power Liftgate* . . . . . . . . . . . . . . . . . . . . . . . . . . . . . . 54
13 Normal Maintenance Schedule . . . . . . . . . . . . . . . . . . . . . . . . . . 64
14 User Settings – Instrument Cluster . . . . . . . . . . . . . . . . . . . . . . . . 12
15 Vehicle Settings* – Audio Head Unit Screen . . . . . . . . . . . . . . . . . . . . 13
16 Bluetooth®Wireless Technology. . . . . . . . . . . . . . . . . . . . . . . . 40-41
17 UVO link Activation / UVO Assistance . . . . . . . . . . . . . . . . . . . . . . . 45
18 UVO link* / UVO link with Navigation* . . . . . . . . . . . . . . . . . . . . . 46-47
19 Android Auto™/ Apple CarPlay®Setup . . . . . . . . . . . . . . . . . . . . . . 44

TABLE OF CONTENTS
Instrument Cluster . . . . . . . . . . . . . . . . . . . . . . . . . . . . . . . . . . 0 4-10
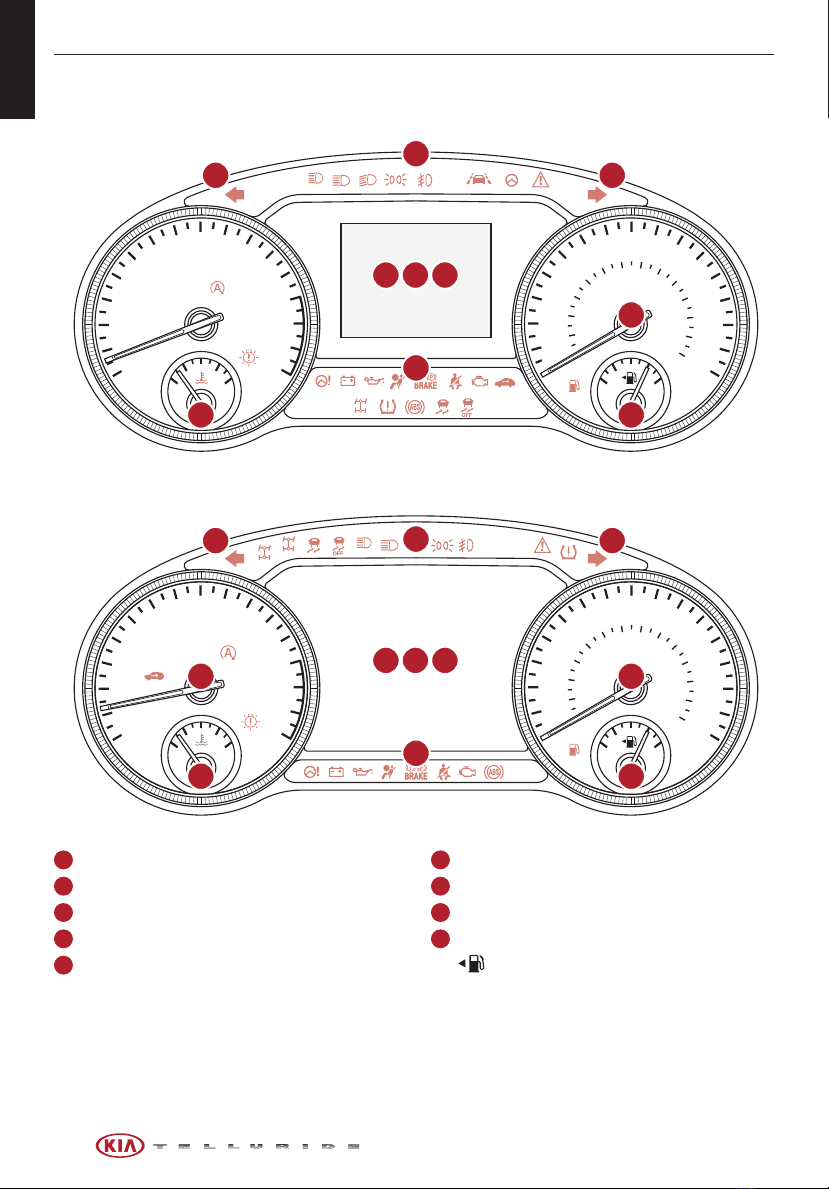
Instrument Cluster Overview . . . . . . . . . . . . . . . . . . . . . . . . . . . . . . . . . . . . . . . 04
Indicators & Warning Lights . . . . . . . . . . . . . . . . . . . . . . . . . . . . . . . . . . . . . . . 05
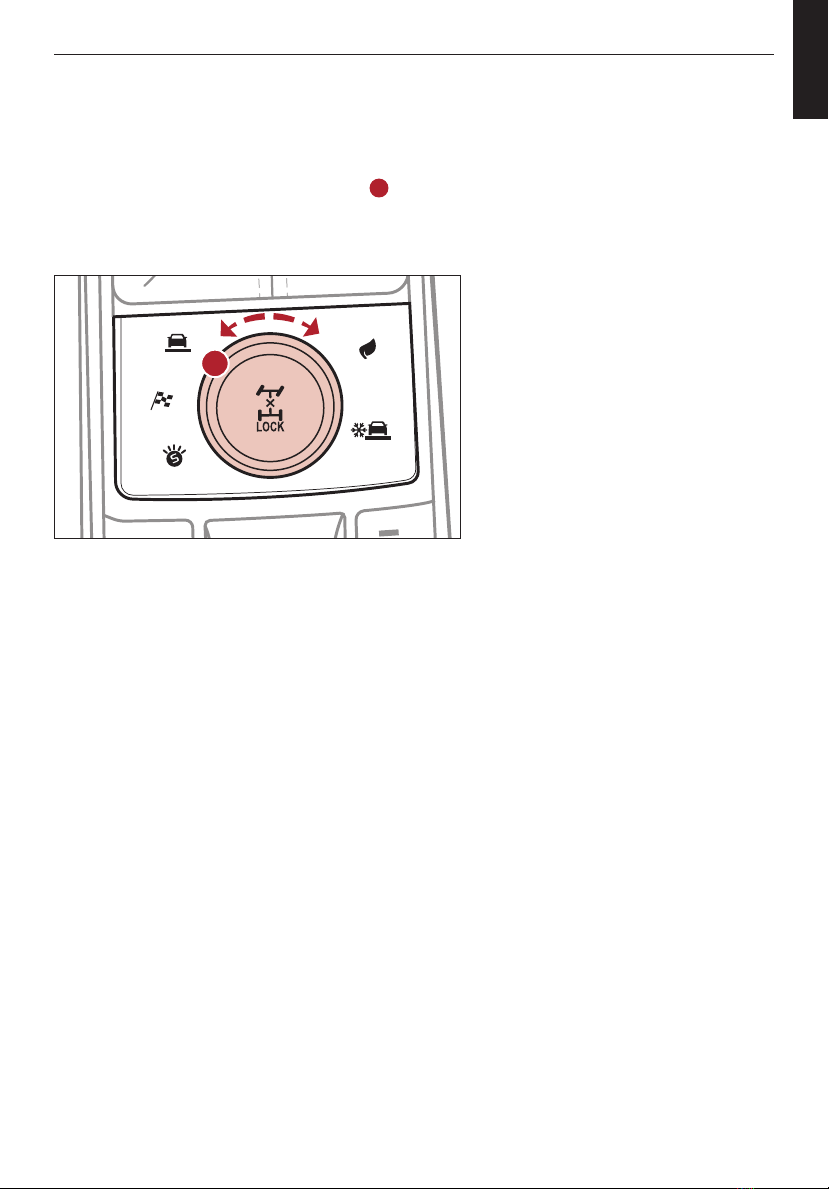
Drive Mode Integrated Control System (AWD)* . . . . . . . . . . . . . . . . . . . . . . . . . . . . . 06
All Wheel Drive (AWD) System* . . . . . . . . . . . . . . . . . . . . . . . . . . . . . . . . . . . . . 07
Fuel Economy . . . . . . . . . . . . . . . . . . . . . . . . . . . . . . . . . . . . . . . . . . . . . . 08
Tire Pressure Monitoring System (TPMS) . . . . . . . . . . . . . . . . . . . . . . . . . . . . . . . . 09
Head-Up Display (HUD)* . . . . . . . . . . . . . . . . . . . . . . . . . . . . . . . . . . . . . . . . . 10
Vehicle Settings . . . . . . . . . . . . . . . . . . . . . . . . . . . . . . . . . . . . . 11-13
LCD Instrument Cluster Modes. . . . . . . . . . . . . . . . . . . . . . . . . . . . . . . . . . . . . . 11
Trip Information / Trip Computer . . . . . . . . . . . . . . . . . . . . . . . . . . . . . . . . . . . . . 11
User Settings – Instrument Cluster. . . . . . . . . . . . . . . . . . . . . . . . . . . . . . . . . . . . 12
Service Interval Mode . . . . . . . . . . . . . . . . . . . . . . . . . . . . . . . . . . . . . . . . . . 13
Vehicle Settings* (Audio Head Unit Screen). . . . . . . . . . . . . . . . . . . . . . . . . . . . . . . . 13
Advanced Driver Assistance Systems (ADAS) . . . . . . . . . . . . . . . . . . . 14-22
Driver Attention Warning (DAW) . . . . . . . . . . . . . . . . . . . . . . . . . . . . . . . . . . . . . 14
Safe Exit Assist (SEA) . . . . . . . . . . . . . . . . . . . . . . . . . . . . . . . . . . . . . . . . . . 14
Forward Collision-Avoidance Assist (FCA) . . . . . . . . . . . . . . . . . . . . . . . . . . . . . . . . 15
Highway Driving Assist (HDA)* . . . . . . . . . . . . . . . . . . . . . . . . . . . . . . . . . . . . . . 16
Blind-Spot Collision-Avoidance Assist (BCA) . . . . . . . . . . . . . . . . . . . . . . . . . . . . . . . 17
Rear Cross-Traffic Collision-Avoidance Assist (RCCA) . . . . . . . . . . . . . . . . . . . . . . . . . . 18
Lane Keeping Assist (LKA) . . . . . . . . . . . . . . . . . . . . . . . . . . . . . . . . . . . . . . . . 19
Smart Cruise Control (SCC) with Stop & Go . . . . . . . . . . . . . . . . . . . . . . . . . . . . . . . 20
Leading Vehicle Departure Alert (LVDA)* . . . . . . . . . . . . . . . . . . . . . . . . . . . . . . . . . 21
Lane Follow Assist (LFA) . . . . . . . . . . . . . . . . . . . . . . . . . . . . . . . . . . . . . . . . . 22
Driver’s Panel . . . . . . . . . . . . . . . . . . . . . . . . . . . . . . . . . . . . . 23-27
Instrument Cluster Control (Instrument Panel Dimmer) . . . . . . . . . . . . . . . . . . . . . . . . . 23
Electronic Stability Control (ESC) / Traction Control System (TCS) . . . . . . . . . . . . . . . . . . . . 23
Hill-Start Assist Control (HAC) . . . . . . . . . . . . . . . . . . . . . . . . . . . . . . . . . . . . . . 23
Blind-Spot View Monitor (BVM) System* . . . . . . . . . . . . . . . . . . . . . . . . . . . . . . . . . 24
Reverse Parking Aid Function . . . . . . . . . . . . . . . . . . . . . . . . . . . . . . . . . . . . . . 25
Power Liftgate Open/Close Button . . . . . . . . . . . . . . . . . . . . . . . . . . . . . . . . . . . . 25
Power Windows, Window Lock & Central Door Lock / Power Folding Outside Mirrors*. . . . . . . . . . 26
Electronic Child Safety Lock System . . . . . . . . . . . . . . . . . . . . . . . . . . . . . . . . . . . 26
Heated Outside Mirrors / Auto Door Lock/Unlock . . . . . . . . . . . . . . . . . . . . . . . . . . . . 27
Engine Start/Stop Button . . . . . . . . . . . . . . . . . . . . . . . . . . . . . . . . . . . . . . . . 27
Center Panel . . . . . . . . . . . . . . . . . . . . . . . . . . . . . . . . . . . . . . 28-36
Clock / Multimedia USB Ports, Power Outlets & USB Charger Ports / AC Inverter* . . . . . . . . . . . . 28
Idle, Stop & Go (ISG) System . . . . . . . . . . . . . . . . . . . . . . . . . . . . . . . . . . . . . . . 29
Automatic Climate Control System* . . . . . . . . . . . . . . . . . . . . . . . . . . . . . . . . . . . 30
Manual Climate Control System* . . . . . . . . . . . . . . . . . . . . . . . . . . . . . . . . . . . . . 31
Automatic Transmission / Manual Mode . . . . . . . . . . . . . . . . . . . . . . . . . . . . . . . . . 32
Wireless Smartphone Charging System* . . . . . . . . . . . . . . . . . . . . . . . . . . . . . . . . . 33
2*IF EQUIPPED

TABLE OF CONTENTS
Center Panel (continued)
Parking Distance Warning-Reverse/Forward System* . . . . . . . . . . . . . . . . . . . . . . . . . . 33
Auto Hold . . . . . . . . . . . . . . . . . . . . . . . . . . . . . . . . . . . . . . . . . . . . . . . . 34
Electronic Parking Brake (EPB) . . . . . . . . . . . . . . . . . . . . . . . . . . . . . . . . . . . . . 35
Surround View Monitor (SVM)* . . . . . . . . . . . . . . . . . . . . . . . . . . . . . . . . . . . . . . 36
Steering Wheel Controls . . . . . . . . . . . . . . . . . . . . . . . . . . . . . . . 37-43
Cruise Control*. . . . . . . . . . . . . . . . . . . . . . . . . . . . . . . . . . . . . . . . . . . . . . 37
Headlights & High Beams / Turn Signals & Fog Lights*. . . . . . . . . . . . . . . . . . . . . . . . . . 38
Front & Rear Windshield Wipers & Washers / Lifting Wipers/Wiper Service Mode . . . . . . . . . . . . 39
Bluetooth®Wireless Technology . . . . . . . . . . . . . . . . . . . . . . . . . . . . . . . . . . . . . 40
Tilt/Telescoping Steering Wheel / Heated Steering Wheel*. . . . . . . . . . . . . . . . . . . . . . . . 42
Audio Controls . . . . . . . . . . . . . . . . . . . . . . . . . . . . . . . . . . . . . . . . . . . . . . 43
Audio Systems. . . . . . . . . . . . . . . . . . . . . . . . . . . . . . . . . . . . . 44-47
Android Auto™/ Apple CarPlay®Setup . . . . . . . . . . . . . . . . . . . . . . . . . . . . . . . . . . 44
UVO link Activation / UVO Assistance . . . . . . . . . . . . . . . . . . . . . . . . . . . . . . . . . . 45
UVO link* . . . . . . . . . . . . . . . . . . . . . . . . . . . . . . . . . . . . . . . . . . . . . . . . . 46
UVO link with Navigation* . . . . . . . . . . . . . . . . . . . . . . . . . . . . . . . . . . . . . . . . 47
Seating . . . . . . . . . . . . . . . . . . . . . . . . . . . . . . . . . . . . . . . . . 48-53
Seat Warmers / Ventilated Seats* . . . . . . . . . . . . . . . . . . . . . . . . . . . . . . . . . . . . 48
Power Adjustable Driver’s Seat* / Front Seat Headrest Adjustment . . . . . . . . . . . . . . . . . . . 49
Driver Position Memory System* . . . . . . . . . . . . . . . . . . . . . . . . . . . . . . . . . . . . 50
Rear Occupant Alert (ROA) with Ultrasonic Sensors*. . . . . . . . . . . . . . . . . . . . . . . . . . . 51
2nd Row Seat / One-Touch Slide and Fold . . . . . . . . . . . . . . . . . . . . . . . . . . . . . . . . 52
3rd Row Seat - Folding. . . . . . . . . . . . . . . . . . . . . . . . . . . . . . . . . . . . . . . . . . 53
Unfastening Center Seat Belt. . . . . . . . . . . . . . . . . . . . . . . . . . . . . . . . . . . . . . . 53
Other Key Features . . . . . . . . . . . . . . . . . . . . . . . . . . . . . . . . . . 54-62
Smart Power Liftgate* . . . . . . . . . . . . . . . . . . . . . . . . . . . . . . . . . . . . . . . . . . 54
Smart Key . . . . . . . . . . . . . . . . . . . . . . . . . . . . . . . . . . . . . . . . . . . . . . . . 56
Map/Room Lamps . . . . . . . . . . . . . . . . . . . . . . . . . . . . . . . . . . . . . . . . . . . . 57
Sunroof Operation*. . . . . . . . . . . . . . . . . . . . . . . . . . . . . . . . . . . . . . . . . . . . 58
Rear View Monitor System . . . . . . . . . . . . . . . . . . . . . . . . . . . . . . . . . . . . . . . . 59
HomeLink®with Auto-Dimming Rearview Mirror* . . . . . . . . . . . . . . . . . . . . . . . . . . . . 60
Sunvisor / Hood Release Lever and Latch . . . . . . . . . . . . . . . . . . . . . . . . . . . . . . . . 61
Fuel Cap/Malfunction Indicator (Check Engine Light) . . . . . . . . . . . . . . . . . . . . . . . . . . 62
Fuel Filler Lid Release . . . . . . . . . . . . . . . . . . . . . . . . . . . . . . . . . . . . . . . . . . 62
Safety Features . . . . . . . . . . . . . . . . . . . . . . . . . . . . . . . . . . . . . . 63
Seat Belts . . . . . . . . . . . . . . . . . . . . . . . . . . . . . . . . . . . . . . . . . . . . . . . . 63
Occupant Detection System (ODS) / Passenger Airbag Off Indicator . . . . . . . . . . . . . . . . . . . 63
Normal Maintenance Schedule . . . . . . . . . . . . . . . . . . . . . . . . . . . . . 64
Legal Disclaimers . . . . . . . . . . . . . . . . . . . . . . . . . . . . . . . Inside Back Cover
3
ALWAYS CHECK THE OWNER’S MANUAL FOR COMPLETE
OPERATING INFORMATION AND SAFETY WARNINGS.
*IF EQUIPPED

4
EPB
AUTO
LOCK
08
C H
1
2
345
6
7
x1000rpm
1600
0
20
40
60 200
220
240
260
80 180
100 160
120 140
E F
20
40
60 80 100
120
140
MPH
km/h
EPB
AUTO
0 8
C H
1
2
345
6
7
x1000rpm
AUTO
HOLD
1600
0
20
40
60 200
220
240
260
80 180
100 160
120 140
E F
20
40
60 80 100
120
140
MPH
km/h
(Type B instrument cluster shown)
(Type A instrument cluster shown)
Instrument Cluster Overview
See Section 4 in the Owner’s Manual for more information.
Your vehicle’s instrument cluster & indicator lights may differ from those in the images.
ATachometer
BTurn Signal Indicators
CTemperature Gauge
DSpeedometer
EIndicator & Warning Lights
FGear Shift Position Indicator
GOdometer
HTrip Computer
IFuel Gauge
Arrow direction indicates the side of the vehicle
the fuel door is located
INSTRUMENT CLUSTER
A
D
D
C
C
I
I
B
B
E
E
E
E
G
G
H
H
F
F
B
B
INSTRUMENT
CLUSTER
*IF EQUIPPED

5
Indicators & Warning Lights
Headlight ON Indicator
Parking Light ON Indicator
Cruise Indicator
Lane Keeping Assist (LKA)
Indicator*
EPB Electronic Parking Brake
Warning Light
Immobilizer Indicator
High Beam Indicator
LED Headlamp Warning Light*
Electronic Stability Control
(ESC) Warning Light
Electronic Stability Control
(ESC) OFF Light
Malfunction Indicator Light
Low Tire Pressure Indicator /
Tire Pressure Monitoring
System (TPMS) Malfunction
Light
Seat Belt Warning Light
Parking Brake & Brake Fluid
Warning Light
Door Ajar Warning Light
Airbag Warning Light
Low Windshield Washer Fluid
Turn Signal Indicators
Anti-Lock Braking System
(ABS) Warning Light
Auto Hold Indicator Light*
Charging System
Warning Light
Cruise Set Indicator
Engine Oil Pressure
Warning Light
Engine Coolant Temperature
Warning Light
Low Fuel Level Warning Light
Electric Power Steering (EPS)
Warning Indicator
Forward Collision-Avoidance
Assist (FCA) Warning (or OFF)
Indicator
Electronic Brake Force
Distribution (EBD) System
Warning Light – (Two separate
indicators on instrument
cluster lit at same time)
ECO
SPORT
SNOW
SMART
ECO / SPORT / SMART / SNOW
Mode Indicator
Master Warning Light
High Beam Assist (HBA)
Indicator*
Front Fog Light Indicator*
Idle, Stop & Go (ISG)
AWD System Warning Light*
AWD LOCK Indicator Light*
See Section 4 in the Owner’s Manual for more information.
Your vehicle’s instrument cluster & indicator lights may differ from those in the images.
INSTRUMENT CLUSTER
INSTRUMENT
CLUSTER
ALWAYS CHECK THE OWNER’S MANUAL FOR COMPLETE
OPERATING INFORMATION AND SAFETY WARNINGS.
*IF EQUIPPED

Drive Mode Integrated Control System (AWD)*
SMART, SPORT, COMFORT, ECO and SNOW drive modes may be changed
according to the driver’s preference or road conditions. To change the drive
mode, rotate the DRIVE MODE knob A.
SMART Mode – When SMART mode is activated, the system automatically
selects the drive mode best suited to the current driving style. A SMART
indicator will illuminate on the instrument cluster. The color of the SMART
indicator* (green, white, red) depends on the current driving style. To deactivate,
rotate the DRIVE MODE knob Aagain to select another setting.
SPORT Mode – A red SPORT indicator will illuminate on the instrument
cluster. To deactivate, rotate the DRIVE MODE knob Aagain to select another
setting.
COMFORT Mode – The system’s default mode is COMFORT mode and is not
displayed on the instrument cluster nor the audio system's screen.
ECO Mode – A green ECO indicator will illuminate on the instrument cluster. To
deactivate, rotate the DRIVE MODE knob Aagain to select another setting.
SNOW Mode – SNOW mode is designed to distribute the vehicle’s traction forces to help reduce or prevent
wheel slippage when driving on snowy or slippery roads. To deactivate, rotate the DRIVE MODE knob A
again to select another setting.
6
DRIVE MODE
VIDEO
To view a video on your
mobile device, snap this
QR Code or visit the listed
website. Refer to page 2
for more information.
www.youtube.com/KiaFeatureVideos
QR CODE
SHIFT
LOCK
RELEASE
P•
R•
N•
D•
+
•
-
SPORT
SMART
COMFORT
SNOW
ECO
REMINDERS:
§When ECO mode is selected, the following may occur to help
improve fuel economy:
– Acceleration may be slightly reduced even when the
accelerator is fully depressed
– Air conditioner performance may be limited
– Shift pattern of the automatic transmission may change
– Engine noise may increase
– System’s power will be limited when driving uphill
§When SPORT mode is selected, fuel economy may decrease
§Steering effort may be slightly increased in SPORT mode
(Center Console below Gear Shift)
When the Engine Start/Stop button is cycled off then on again,
the system defaults to COMFORT mode from SPORT mode. When
in other modes, it returns to its previous setting.
QUICK TIP
COMFORT
(Instrument Cluster LCD shown.
Actual images may vary)
See section 5 in the Owner’s Manual for more information.
INSTRUMENT CLUSTER
A
INSTRUMENT
CLUSTER
*IF EQUIPPED

7
INSTRUMENT CLUSTER
SHIFT
LOCK
RELEASE
P•
R•
N•
D•
+
•
-
SPORT
SMART
COMFORT
SNOW
ECO
All Wheel Drive (AWD) System*
The AWD system helps the vehicle’s performance by delivering engine power to the front and rear wheels.
AWD Auto – If the system determines AWD is needed, then it will automatically engage and distribute power
to all the wheels (AWD Lock button NOT pressed).
AWD Lock – If the AWD Lock button is pressed A, then the AWD system will operate until the AWD Lock
button is pressed again. When the AWD Lock is engaged, an equal amount of torque is transferred to the front
and rear wheels.
REMINDERS:
§
AWD Lock Mode operates when the vehicle is traveling at 25 mph or less
§
When the vehicle is traveling faster than 25 mph, the system will switch to AWD Auto mode. When the vehicle is at 20 mph or
slower, the system will switch back to AWD Lock
A
INSTRUMENT
CLUSTER
See section 5 in the Owner’s Manual for more information.
ALWAYS CHECK THE OWNER’S MANUAL FOR COMPLETE
OPERATING INFORMATION AND SAFETY WARNINGS.
*IF EQUIPPED

8
Fuel Economy
Several factors contribute to your vehicle’s fuel economy, such as maintenance
of your vehicle, driving style, environmental conditions, vehicle weight and
vehicle aerodynamics. Below are some tips on how to help improve fuel
economy:
§Keep your vehicle in good condition with regular maintenance
§Don’t let the engine idle longer than necessary
§Drive at a moderate speed, accelerating smoothly
§Keep tires inflated to the recommended pressure
§Travel lightly, without carrying unnecessary weight in your vehicle
§Avoid placing large or heavy items on roof racks
§Avoid hilly, winding or poorly maintained roads
For more information on Fuel Economy, you can snap the QR Code above to view a video or refer
to section 5 in the Owner’s Manual.
FUEL ECONOMY
VIDEO
To view a video on your
mobile device, snap this
QR Code or visit the listed
website. Refer to page 2
for more information.
www.youtube.com/KiaFeatureVideos
QR CODE
INSTRUMENT CLUSTER
INSTRUMENT
CLUSTER
*IF EQUIPPED

9
INSTRUMENT CLUSTER
Images are for illustrative purposes only and may not reflect actual feature or operation. See section 6 in the Owner’s Manual for more
information.
Tire Pressure Monitoring System (TPMS)† 26
The TPMS indicator functions as both Low Tire Pressure Light and TPMS
Malfunction Indicator A.
The TPMS indicator is designed to illuminate if it detects one or more tires
is significantly underinflated, if a spare tire has been installed that does not
have a TPMS device, or when the outside temperature drops considerably.
The LCD screen in the instrument cluster will display the Low Tire Pressure
indicator Bshowing which tire(s) is underinflated.
§Inflate tire(s) to specifications using an accurate digital tire pressure gauge.
See front driver’s door jamb for PSI specification
§When there is a problem with the TPMS, the TPMS Malfunction Indicator
will blink for approximately one minute and then illuminate. See dealer for
service
24
35
35
35
TIRE PRESSURE
MONITORING VIDEO
To view a video on your
mobile device, snap this
QR Code or visit the listed
website. Refer to page 2
for more information.
www.youtube.com/KiaFeatureVideos
QR CODE
REMINDERS:
§Check the recommended tire pressure label located on the left side of the driver’s door jamb, visible when the door is open
§Consult your dealer for service if the Low Tire Pressure Light remains illuminated after inflating your tire(s)
§Personal electronic devices (such as laptops, wireless chargers, remote start systems, etc.) may interfere with the TPMS system, which
may cause the Malfunction Warning Indicator (Check Engine Light) to illuminate
§Even with TPMS, tire pressure should be checked manually at least once a month. Only adjust tire pressure on “cold tires” that have
been sitting for 20 minutes, and tires that are not hot in temperature from direct sunlight or heat
§For proper maintenance, safety and optimal fuel economy, maintain recommended tire inflation pressure and stay within the load
limits and weight distribution recommended for your vehicle
§In winter or cold weather, the TPMS light may illuminate if the tire pressure was adjusted to the recommended tire inflation pressure
during warm weather
QUICK TIPS
EPB
AUTO
0
8
C
H
1
2
345
6
7
x1000rpm
AUTO
HOLD
1600
0
20
40
60 200
220
240
260
80 180
100 160
120 140
E F
20
40
60 80 100
120
140
MPH
km/h
A
B
INSTRUMENT
CLUSTER
ALWAYS CHECK THE OWNER’S MANUAL FOR COMPLETE
OPERATING INFORMATION AND SAFETY WARNINGS.
*IF EQUIPPED
†LEGAL DISCLAIMERS ON BACK INSIDE COVER

10 *IF EQUIPPED
†LEGAL DISCLAIMERS ON BACK INSIDE COVER
INSTRUMENT CLUSTER
See section 4 in the Owner’s Manual for more information.
The Head-Up Display is a supplemental system. Do
not solely rely on the system, always drive safely, and
pay attention to the driving conditions on the road.
Images are for illustrative purposes only and may not
reflect actual feature or operation.
REMINDERS:
§The HUD image on the windshield glass may not be visible in these cases:
§The driver has poor sitting posture
§The driver is wearing polarized sunglasses
§There is an object covering the HUD
§Driving on a wet road
§Excessive lighting inside or outside the vehicle
§Modifications made to the windshield, such as tinting or other aftermarket treatments, could affect the HUD. When replacing
the front windshield glass of vehicles equipped with the HUD, owners must replace it with windshield glass designed for HUD
operation. Otherwise, duplicated images may be displayed on the windshield glass
§If Turn By Turn (TBT) navigation information is selected as HUD content, TBT information will not be displayed on the LCD
Head-Up Display (HUD)*† 12
The Head-Up Display (HUD) is a semi-transparent display
that projects a snippet of information from the instrument
cluster and navigation system* onto the windshield glass.
To turn the HUD ON or OFF, go to User Settings in the LCD
Modes.
The HUD displays:
§Turn By Turn (TBT)
navigation information*
§Road signs*
§Speedometer
§Cruise setting speed*
§Smart Cruise Control
(SCC) information*
§Blind-Spot Collision
Warning (BCW) system
information*
§Lane Keeping Assist (LKA)
information*
§Highway Driving Assist
(HDA) system information*
§HDA system steering
control information*
§HDA system automatic
speed setting information*
§Warning lights (low fuel)
§AV mode information
MPH
0.5
mi
FM
95.7
60
60
HDA
SPEED
LIMIT
AUTO
Head-Up Display (HUD) User Settings
Drivers can adjust the HUD settings from the LCD Instrument Cluster modes in User Settings. HUD settings
include:
§Display Height: Adjust the height of the HUD image on the windshield glass
§Rotation: Adjust the degree of HUD rotation
§Brightness: Adjust the intensity of the HUD brightness
§Contents Selection: Activate or deactivate HUD content
§Speed Size: Choose the size of the HUD speedometer
§Speed Color: Choose the color of the HUD speedometer
INSTRUMENT
CLUSTER

11
ALWAYS CHECK THE OWNER’S MANUAL FOR COMPLETE
OPERATING INFORMATION AND SAFETY WARNINGS.
*IF EQUIPPED
VEHICLE SETTINGS
Trip Information / Trip Computer
The Trip Computer is a driver information system that displays information
related to driving when the Engine Start/Stop button is in the ON position.
To cycle through the LCD Instrument Cluster modes, press the Mode
button Aon the right side of the steering wheel.
When in the Trip Computer mode , press the Select/Reset (OK) button
Bto cycle through the menu. When displaying TRIP A or TRIP B screens,
press and hold the OK button Bto reset the Tripmeter to zero.
REMINDERS:
§Appearance of Trip Computer display may differ as equipped
§All stored driving information (except Odometer and Range) is reset if the battery is
disconnected
Drive Info
• Tripmeter
• Average Fuel Economy
• Timer
Accumulated Info
• Tripmeter
• Average Fuel Economy
• Timer
Consumption Info
• Average Fuel Economy
• Instant Fuel Economy
Drive Mode
Digital Speedometer
Trip Computer modes:
LCD Instrument Cluster Modes*
The LCD Instrument Cluster modes can be changed by using the mode button Aon the right side of the
steering wheel.
Trip Computer Mode: Displays the fuel
economy, drive and accumulated info,
speedometer and drive mode
Turn-by-Turn Mode*: Displays the route
guidance and destination info
Assist Mode: Displays the Lane Safety, Driver
Attention Warning, AWD and TPMS info
User Settings Mode: Change settings of the
Head-Up Display, Driver Assistance, doors,
lights, sound, convenience, service interval,
other features, language and reset
Master Warning Mode: Displays warning
messages related to the vehicle when one or
more systems is not operating normally
Your vehicle’s steering wheel buttons and
LCD modes may differ from those in the
illustrations.
Driving while distracted is dangerous and
should be avoided. Drivers should remain
attentive to driving and always exercise
caution when using the steering-wheel-
mounted controls while driving.
CRUISE
MODE CRUISE
CANCEL
RES
OK SET
CRUISE
CANCEL
RES
OK SET
MODE CRUISE
CANCEL
RES
OK SET
MODE
CANCEL
RES
OK SET
MODE
CRUISE
CANCEL
RES
OK SET
CRUISE
CANCEL
RES
OK SET
A
B
See section 4 in the Owner’s Manual for more information.
VEHICLE SETTINGS

12
VEHICLE SETTINGS
To enter the User Settings mode in the LCD
Instrument Cluster Modes, press the Mode
button Awhen the vehicle is at a standstill,
shift lever in Park, and with the Engine Start/
Stop button in the ON position and select
User Settings .
You can navigate the selections on the
display by pressing the Select/Reset (OK)
button Bup or down, and then pressing
again to enter.
User Settings Modes:
Head-Up Display (HUD)*: Enable HUD, Display Height, Rotation, Brightness, Contents
Selection, Speedometer Size, Speedometer Color
Driver Assistance: Smart Cruise Control Response, Driver Assist, Driver Attention
Warning, Warning Timing, Warning Volume, Lane Safety, Forward Safety, Blind-Spot
Safety, Parking Safety
Door/Liftgate: Automatic Lock, Automatic Unlock, Two-press Unlock*, Power Liftgate*, Power Liftgate Speed*, Smart
Power Liftgate*
Lights: One-Touch Turn Signal, Headlamp Delay
Sound: Welcome Sound*
Convenience: Seat Easy Access*, Rear Occupant Alert, Welcome Mirror/Light*, Wiper/Light Display*, Auto Rear Wiper,
Gear Position Pop-Up, Icy Road Warning
Service Interval: Enable Service Interval, Adjust Service Interval, Reset
Other: Fuel Economy Auto Reset, Speed Unit, Fuel Economy Unit, Temperature Unit, Tire Pressure Unit
Language: Select the language
Reset: Reset User Settings to factory default
User Settings - Instrument Cluster
CRUISE
MODE CRUISE
CANCEL
RES
OK SET
CRUISE
CANCEL
RES
OK SET
MODE CRUISE
CANCEL
RES
OK SET
MODE
CANCEL
RES
OK SET
MODE
CRUISE
CANCEL
RES
OK SET
CRUISE
CANCEL
RES
OK SET
(Button layout on right of steering wheel)
LCD DISPLAY
VIDEO
To view a video on your
mobile device, snap this
QR Code or visit the listed
website. Refer to page 2
for more information.
www.youtube.com/KiaFeatureVideos
QR CODE
A
B
VEHICLE SETTINGS
See section 4 in the Owner’s Manual for more information.
*IF EQUIPPED

13
VEHICLE SETTINGS
VEHICLE SETTINGS
Vehicle Settings*(Audio Head Unit Screen)
To enter the Vehicle Settings mode in the audio head unit screen, press the SETUP key. Then press
VEHICLE, which will take you to the Vehicle Settings screen. Use the touchscreen to navigate through
the menus.
Vehicle Settings modes:
Drive Mode: Drive Mode Change Alert (Detailed Alert,
Simple Alert, None)
Climate: Auto Defog System, Rear Climate Controls,
Automatic Ventilation
Lights: Ambient Light – Brightness, Color
Seat/Steering Wheel: Seat Position Change Alert, Heated/
Ventilated Features > Auto Comfort Control (Steering Wheel
Warmer, Seat Warmer/Ventilation)
Vehicle Settings
Drive Mode Drive Mode Change Alert
Detailed Alert
Climate
Lights
Seats/Steering
Menu
When Service Interval Mode is activated and set, and vehicle service is
required, the LCD will display the message Service Required and the
remaining days/miles until service is due.
Service Interval Mode ON and Interval Setting
To activate Service Interval Mode and set the interval, press the Mode button
A, scroll to User Settings and press Select/Reset (OK) button Bto enter.
Then press the OK button Bup/down to scroll to Service Mode and again
to enter. Press OK button Bup/down to select the option to set the interval.
Adjust interval and press OK button Bto save. To reset the Service Mode
system, press and hold the OK button Bfor more than 1 second.
Service Interval Mode Off
To turn Service Required OFF, go to User Settings and scroll to Service Interval
Mode, press OK button Bto enter. Select option to deactivate and press OK
button Bto save.
Service Interval Mode
LCD DISPLAY:
MAINTENANCE VIDEO
To view a video on your
mobile device, snap this
QR Code or visit the listed
website. Refer to page 2
for more information.
www.youtube.com/KiaFeatureVideos
QR CODE
See section 4 in the Owner’s Manual for more information.
For more information, refer to the Car Infotainment System Quick Reference Guide.
ALWAYS CHECK THE OWNER’S MANUAL FOR COMPLETE
OPERATING INFORMATION AND SAFETY WARNINGS.
*IF EQUIPPED

14
ADVANCED DRIVER ASSISTANCE SYSTEMS (ADAS)
Driver Attention Warning (DAW)†7
The DAW system is designed to detect inattentive driving
practices and, in certain situations, can give a warning signal to
take a break from driving.
To turn the DAW system ON, turn the ignition on and then select
User Settings in the LCD Display on the Instrument Cluster. Then
go to Driver Assistance and select Driver Attention Warning. Set
the DAW system to Normal or High Sensitivity.
Driver Attention Warning (DAW) System modes:
Normal Sensitivity: The Driver Attention Warning system
alerts the driver if it detects driver fatigue or inattentive driving
practices.
High Sensitivity: The Driver Attention Warning system alerts the
driver if it detects driver fatigue or inattentive driving practices
faster than Normal mode.
Off: The Driver Attention Warning system is deactivated A.
If the DAW system is activated, the DAW information will appear
on the LCD Display Bwhen you select the ASSIST mode .
A message, “Consider taking a break,” appears on the LCD
display and a warning sounds to suggest the driver to take a
break when the driver’s attention level is below one bar C.
REMINDERS:
§
The setup of the DAW system will be maintained, as selected, when the
ignition is cycled
§
When activated, the DAW system does not display “Consider taking a
break” message when the total trip driving time is less than 10 minutes
§
The DAW system will enter a standby mode if the camera does not detect
the lanes and/or the driving speed remains under 40 mph
Consider taking a break
Attention Level
LOW HIGH
Last Break 00:00
Attention Alert
System Off
Level Time ——:——
Driver Attention Warning is not a substitute for
safe driving and may not detect all instances
of inattentive driving practices. Failure to
pay attention to travel conditions and vehicle
operation could result in loss of vehicle control.
Always drive safely and use caution.
See section 5 in the Owner’s Manual for more
information.
A
B
C
Safe Exit Assist (SEA)†6
The Safe Exit Assist (SEA) system can help prevent
passengers from opening their door by displaying a warning
message on the Instrument Cluster and sounding an audible
warning when a vehicle is detected, approaching from
behind, and after your vehicle has stopped.
To turn on the SEA system, go to User Settings menu, select
Driver Assistance, then Blind-Spot, and select Safe Exit
Assistance.
See section 4 in the Owner’s Manual for more information.
ADAS
*IF EQUIPPED
†LEGAL DISCLAIMERS ON BACK INSIDE COVER

15
ADVANCED DRIVER ASSISTANCE SYSTEMS (ADAS)
ADAS
Forward Collision-Avoidance Assist (FCA)†6
FCA is designed to help alert the driver and, under certain conditions, apply
emergency braking when rapidly approaching a vehicle that is slowing down,
braking or stopped or if it detects a pedestrian in front of the vehicle. Initially,
FCA provides Forward Collision Warning (FCW) when it detects a potential
collision with a vehicle or pedestrian in front, emitting an audible warning and
visual alert on the instrument cluster A.
If the system detects that the collision risk has increased, the FCA
automatically applies the brakes to reduce your speed, potentially helping
to reduce the effects of a possible collision.
FCA can be enabled by going to the User Settings > Driver Assistance
> Forward Safety and selecting Active Assist, Warning Only or Off.
The Warning Time can be adjusted by going to User Settings
> Driver Assistance > Warning Time and Normal or Late.
FCA/FCW will become active when the:
§Engine Start/Stop button is ON
§Vehicle is traveling faster than 5 mph
§Electronic Stability Control (ESC) is ON
Instrument Cluster LED Warning Messages:
The Forward Collision-Avoidance Assist
(FCA) / Forward Collision Warning
(FCW) systems are not substitutes for
safe and proper driving. Always drive
safely and use Caution.
FCA and FCW may not always alert the
driver when the vehicle is approaching
another vehicle.
Images are for illustrative purposes
only and may not reflect actual feature
or operation.
See section 5 in the Owner’s Manual
for more information.
Collision Warning
Emergency
Braking
FORWARD COLLISION
AVOIDANCE ASSIST
VIDEO
To view a video on your
mobile device, snap this
QR Code or visit the listed
website. Refer to page 2
for more information.
www.youtube.com/KiaFeatureVideos
QR CODE
REMINDERS:
§FCA/FCW will be activated by default when the ignition is cycled ON, even when the
previous setting was OFF
§FCA/FCW will not operate when the vehicle is traveling faster than approximately
45/50 mph, respectively
§If FCA is operating and the ESC (Electronic Stability Control) is turned off, FCA is
automatically turned off
§When the FCA system is off, the FCA warning indicator is on in the Instrument
Cluster
The FCA Warning Volume can be adjusted in the Vehicle Settings* on the audio head unit.
QUICK TIP
A
ALWAYS CHECK THE OWNER’S MANUAL FOR COMPLETE
OPERATING INFORMATION AND SAFETY WARNINGS.
*IF EQUIPPED
†LEGAL DISCLAIMERS ON BACK INSIDE COVER

16
REMINDERS:
§Current highway speeds and controlled or limited access road
information may vary. Future navigation updates may change
this information
§If the driver changes the speed while in automatic speed setting
mode, it deactivates and enters a manual mode
§When the ignition is cycled, the system returns to its previous
state, on or off
Highway Driving Assist is not a substitute for safe driving,
may not detect all objects around the vehicle, and only
functions on certain federal highways. Always drive safely
and use caution. See the Owner’s Manual for more detailed
information, limitations and conditions.
See section 5 in the Owner’s Manual for more information.
Highway Driving Assist (HDA)*†6
The Highway Driving Assist (HDA) system is designed to adjust the speed of the vehicle when driving on
limited/controlled access highways. The system can adjust the vehicle’s speed based on available highway
speed information. The automatic speed setting mode is designed to set the speed automatically by adjusting
to the current speed limits of the highway vehicle is traveling on.
To turn the HDA system on, go to User Settings Ain the
Instrument Cluster. Go to Driver Assistance > Driving Assist
> Highway Driving Assist and press the OK button Bon the
Steering Wheel.
To activate the HDA, turn Smart Cruise Control (SCC) on by
pressing the Cruise button on the Steering Wheel controls C.
The HDA system will operate only when these conditions are met:
§The vehicle is traveling slower than 95 mph
§When driving on federal highways
§When the SCC is on and operating
§When the SCC speed is set to current federal highway speed
When the HDA system is activated and the conditions are met, the
Instrument Cluster indicator light Dwill illuminate green. If the
conditions are not met, the HDA system will be in standby mode
and the indicator light Dwill illuminate white.
When in operation, and if both lanes are recognized, a display Ewill show the lanes illuminated white and
the steering wheel indicator illuminated green.
If HDA is activated, conditions are met and the SCC speed is set by the driver (at the posted highway speed
limit or slower), the HDA system will enter the automatic speed setting mode. The set speed and AUTO will be
displayed Fin green and an audible alert will sound.
CRUISE
MODE CRUISE
CANCEL
RES
OK SET
CRUISE
CANCEL
RES
OK SET
MODE CRUISE
CANCEL
RES
OK SET
MODE
CANCEL
RES
OK SET
MODE CRUISE
CANCEL
RES
OK SET
CRUISE
CANCEL
RES
OK SET
CRUISE
CANCEL
RES
OK SET
AC
B
D
Images are for illustrative purposes only and may not
reflect actual feature or operation.
60 mph
mph
E
F
ADVANCED DRIVER ASSISTANCE SYSTEMS (ADAS)
ADAS
*IF EQUIPPED
†LEGAL DISCLAIMERS ON BACK INSIDE COVER

17
ADVANCED DRIVER ASSISTANCE SYSTEMS (ADAS)
ADAS
Blind-Spot Collision-Avoidance Assist (BCA)†6
The BCA system is designed to help alert the driver before changing lanes. The
BCA system uses a camera on the front windshield and rear radar sensors in
the rear bumper to help alert the driver and temporarily apply braking in certain
situations if it detects an approaching vehicle in the driver’s blind spot area.
To activate the BCA system, go to User Settings by pressing the Mode button on
the Steering Wheel. Select Driver Assistance > Blind Spot Safety and then press
the OK button. Select Active Assist, Warning Only or Off.
Warning Only – The Warning Only setting will activate the 1st and 2nd stage
alerts:
1st-stage: When another vehicle is detected within the BCA system warning
boundary Ba yellow indicator will illuminate on the outside rearview mirrors C.
2nd-stage: When the 1st stage alert is on and the driver activates a turn signal,
a flashing yellow indicator will illuminate on the outside rearview mirrors and the
system will sound an alert.
To set the initial warning activation time, go to the settings > Driver Assistance >
Warning Time. Then select the Normal or the Late option.
Active Assist – When Active Assist is selected in the settings, the BCA may activate the Electronic Stability
Control (ESC) and temporarily apply braking power when an approaching vehicle is detected within a certain
distance next to or behind the vehicle. A warning message may appear on the Instrument Cluster LCD.
Deactivate the BCA system by pressing the BCA off button Aon the Driver’s Panel.
REMINDERS:
§The BCA system will not issue a warning if the vehicle speed is 6
mph or more above the surrounding vehicles
§When the BCA is ON and the ignition is cycled, the BCA system
returns to its previous state
§The BCA system is a supplemental system. Do not solely rely
on these systems, and always pay attention to the road and its
conditions
The BCA system is not a substitute for safe and proper driving.
Always drive safely and use caution.
See section 5 in the Owner’s Manual for more detailed information,
limitations and conditions.
The images above are for illustrative purposes only and may not
reflect actual feature or operation.
(Blind-spot area monitoring)
(Vehicle approaching at
high speed monitoring)
(Button located on driver’s panel, left of the steering wheel)
§The BCA Warning Volume can be adjusted in the Vehicle
Settings* on the audio head unit
§The BCA system will activate when:
§The system is turned on
§Warnings: When the vehicle is traveling faster than 20 mph
§Active Assist: When the vehicle is traveling at least 40 mph
§Other vehicles are detected on the rear sides of the vehicle
QUICK TIPS
BLIND-SPOT
COLLISION-AVOIDANCE
ASSIST VIDEO
To view a video on your
mobile device, snap this
QR Code or visit the listed
website. Refer to the inside
cover for more information.
www.youtube.com/KiaFeatureVideos
QR CODE
C
A B
ALWAYS CHECK THE OWNER’S MANUAL FOR COMPLETE
OPERATING INFORMATION AND SAFETY WARNINGS.
*IF EQUIPPED
†LEGAL DISCLAIMERS ON BACK INSIDE COVER

18
ADVANCED DRIVER ASSISTANCE SYSTEMS (ADAS)
Rear Cross-Traffic Collision-Avoidance Assist (RCCA)†6
If the RCCA system sensors detect approaching vehicles from the rear left or rear right side of the vehicle
A, the system will sound an audible alert, the warning indicators on the outside rearview mirror
will illuminate and a message will appear on the Instrument Cluster screen B.
RCCA may temporarily apply braking power when an approaching vehicle is detected within a certain
distance next to or behind the vehicle.
RCCA is designed to operate under the following conditions:
§When the gear shift is in Reverse
§When the vehicle is moving slower than 6 mph
REMINDERS:
§The RCCA feature can be turned OFF/ON in User Settings, under Driver Assistance,
Parking Safety
§When vehicle power is cycled, RCCA will remain in the previous state
§When a vehicle is approaching within the sensing range, and traveling between 2.5
and 22 mph, the RCCA system will show a warning
§The RCCA system is a supplemental system. Do not solely rely on these systems and
always pay attention to the road and its conditions
Watch for traffic
Images are for illustrative purposes only
and may not reflect actual feature or
operation.
§The RCCA Warning Volume can be adjusted in the Vehicle Settings on the audio
head unit
QUICK TIP
A
B
ADAS
See section 5 in the Owner’s Manual for more information.
*IF EQUIPPED
†LEGAL DISCLAIMERS ON BACK INSIDE COVER
Other manuals for Telluride
1
Table of contents
Other Kia Automobile manuals

Kia
Kia Soul 2013 User manual

Kia
Kia Sorento 2008 Parts list manual

Kia
Kia Niro 2018 User manual

Kia
Kia Optima 2018 User manual

Kia
Kia RIO 2005 Configuration guide

Kia
Kia Rio 2012 User manual

Kia
Kia Cadenza 2012 User manual

Kia
Kia Sedona 2010 User manual

Kia
Kia Niro HEV User manual

Kia
Kia Sedona 2005 User manual

Kia
Kia Cerato User manual

Kia
Kia quoris User manual

Kia
Kia Cadenza 2018 Assembly instructions

Kia
Kia SOUL EV Parts list manual

Kia
Kia Rondo 2012 User manual

Kia
Kia K900 2019 User manual

Kia
Kia Niro Plus DE 2022 User manual

Kia
Kia sedona 2015 Parts list manual

Kia
Kia SORENTO HEV User manual

Kia
Kia Quoris 2015 User manual