Klarstein 10030512 User manual

10030512 10030513
Luftreiniger

2
Sehr geehrter Kunde,
wir gratulieren Ihnen zum Erwerb Ihres Gerätes. Lesen Sie die folgenden Hinweise sorgfältig durch und befol-
gen Sie diese, um möglichen Schäden vorzubeugen. Für Schäden, die durch Missachtung der Hinweise und
unsachgemäßen Gebrauch entstehen, übernehmen wir keine Haftung.
Inhaltsverzeichnis
Technische Daten 2
Sicherheitshinweise 2
Geräteübersicht 3
Bedienfeld und Bedienung 3
Reinigung und Pflege 5
Fehlersuche und Fehlerbehebung 7
Hinweise zur Entsorgung 7
Konformitätserklärung 7
Technische Daten
Artikelnummer 10030512, 10030513
Stromversorgung 220-240 V ~ 50-60 Hz
Leistung 40 W
Sicherheitshinweise
• Ziehen Sie den Stecker aus der Steckdose, wenn Sie das Gerät länger nicht benutzen.
• Entfernen Sie das komplette Verpackungsmaterial, bevor Sie das Gerät erstmalig benutzen.
• Benutzen Sie das Gerät nicht in Küchen.
• Stecken Sie keine Gegenstände in den Lufteinlass und den Luftauslass.
• Schauen Sie nicht direkt in die UV-Lampe.
• Stellen Sie das Gerät mindestens 1,5 Meter entfernt von anderen elektrischen Geräten auf.
• Stellen Sie das Gerät nicht unter einem Vorhang auf.
• Stellen Sie das Gerät so auf, dass Kinder es nicht erreichen.
• Benutzen Sie das Gerät nur in trockenen Innenräumen. Benutzen Sie es nicht in feuchten Räumen oder im
Freien.
• Ziehen Sie immer den Stecker aus der Steckdose, bevor Sie das Gerät reinigen oder den Filter wechseln.
• Gießen Sie kein Wasser auf das Gerät und tauchen Sie das Gerät nicht in Wasser.
• Wenn Sie das Gerät zusammen mit einer Gasheizung benutzen, sorgen sie für ausreichende Belüftung,
damit sich kein Kohlenmonoxid anstaut.
• Stellen Sie das Gerät nicht in die Nähe einer Heizung oder anderer Wärmequellen.
• Falls das Gerät beschädigt ist, muss es vom Hersteller, einem autorisierten Fachbetrieb oder einer ähnlich
qualifizierten Person repariert werden.
• Achten Sie darauf den Filter regelmäßig zu überprüfen und zu reinigen, damit das Gerät volle Leistung bringt.

3
Geräteübersicht
1 Bedienfeld
2 Luftauslassgitter
3 Basis
4 UV-Licht
5 HEPA Filter
Aktivkohlefilter
Fotokatalysator
6 Lufteinlassgitter
7 Stecker
Bedienfeld und Bedienung

4
Inbetriebnahme und Bedienung
1. Nehmen Sie das Gerät aus der Verpackung und nehmen Sie den Plastiksack ab.
2. Nehmen Sie das Lufteinlassgitter ab und entnehmen Sie die Filter. Falls sich die Filter noch in einer Plastik-
verpackung befinden, entfernen Sie die Verpackung.
3. Sobald Sie die Filter wieder eingesetzt haben, stellen Sie das Gerät auf einen ebenen Untergrund. Stecken
Sie den Stecker in die Steckdose.
4. Sobald Sie den Stecker einstecken, ertönt ein Summen.
5. Mit dem Summen geht die Betriebsanzeige an und blinkt 3 Mal, danach geht das Licht wieder aus. Sobald
Sie die Ein/Aus-Taste drücken leuchtet die Betriebsanzeige und das Gerät ist eingeschaltet. Drücken Sie
erneut auf die Ein/Aus-Taste, um das Gerät wieder auszuschalten, woraufhin alle Lichter erlöschen.
HINWEIS:
Das Gerät verfügt über einen Speicher. Immer wenn Sie es einschalten ruft es den letzten Zustand vor dem
Ausschalten auf. Um den Speicher zu löschen, drücken Sie gleichzeitig für 3 Sekunden auf die TIMER - und IO-
NISATOR-Taste. Alle Lichter bis auf die Betriebsanzeige erlöschen, nur die Betriebsanzeige blinkt und signalisiert,
dass der Speicher gelöscht wird. Das Gerät startet nun im Grundmodus.
Grundmodus
Die Betriebsanzeige ist an und das Gerät läuft mit mittlerer Geschwindigkeit. Wenn die mittlerer Geschwindigkeit
eingestellt ist, sind die Funktionen Timer, UV-Licht, Ionisator und der AUTO-Modus inaktiv.
Geschwindigkeit einstellen
• Drücken Sie im eingeschalteten Zustand mehrmals auf die SPEED-Taste, um die Geschwindigkeit in der
folgenden Reihenfolge einzustellen: mittel > hoch > AUTO > niedrig > mittel. Die Speed-Anzeige geht an.
• Falls nur eine Geschwindigkeitsanzeige an ist, bedeutet das niedrige Geschwindigkeit. Zwei Geschwindig-
keitsanzeigen bedeuten mittlere Geschwindigkeit, drei Anzeigen hohe Geschwindigkeit. Im AUTO-Modus
leuchtet die AUTO-Anzeige.
UV-Licht-Sterilisation
Drücken Sie im eingeschalteten Zustand auf die UV-Taste, um die Funktion einzuschalten. Die UV-Anzeige
leuchtet solange die Funktion an ist. Drücken Sie die Taste erneut, um die Funktion wieder auszuschalten.
Ionisator
Drücken Sie im eingeschalteten Zustand auf die ION-Taste, um die Funktion einzuschalten. Die ION-Anzeige
leuchtet solange die Funktion an ist. Drücken Sie die Taste erneut, um die Funktion wieder auszuschalten.

5
Timer
• Drücken Sie im eingeschalteten Zustand auf die TIMER-Taste, um den Timer in 1-Stunden-Schritten zu
erhöhen. Die eingestellte Zeit wird im Display angezeigt.
• Der Timer kann zwischen 1-24 Stunden eingestellt werden. Wenn in der Timer-Anzeige „0“ steht, bedeutet
es, dass kein Timer aktiv ist.
• Falls die Temperaturanzeige gerade aktiv ist, drücken Sie einmal auf die TIMER-Taste. Die Temperaturanzei-
ge erlischt, die Timer-Anzeige geht an und zeigt die verbleibende Zeit an. Drücken Sie ein weiteres Mal auf
die TIMER-Taste, um in die Timer-Einstellung zu gelangen.
• Sobald Sie den Timer gestellt haben, zeigt die Timer-Anzeige die Einstellung noch 10 Sekunden lang an.
Danach blinkt die Timer-Anzeige 5 Sekunden lang und wechselt dann zur Temperatur-Anzeige. Gleichzeitig
geht das Timer-Symbol aus und das Temperatur-Symbol an.
AUTO-Modus
• Drücken Sie solange auf die SPEED-Taste, bis Sie im AUTO-Modus sind. Die AUTO-Anzeige geht an.
• Im AUTO-Modus stellt sich das Gerät automatisch ein, entsprechend der Luftqualität.
• Sobald der AUTO-Modus aktiv ist, geht die Luftqualitäts-Anzeige an. Wenn die Luftqualität gut ist, leuchtet
die Anzeige grün. Bei mittlerer Qualität leuchtet sie gelb und bei schlechter Luftqualität rot.
• Wenn Sie den AUTO-Modus einschalten braucht das Gerät 1 Minute, um die Luftqualität zu bestimmen und
anzuzeigen.
• Wenn die Luftqualität gut ist, läuft der Lüfter mit niedriger Geschwindigkeit. Ist die Luftqualität mittel, läuft er
mit mittlerer Geschwindigkeit und bei schlechter Luftqualität mit hoher Geschwindigkeit.
Displaybeleuchtung
Wenn das Gerät eingeschaltet ist und länger als 10 Sekunden keine Einstellung vorgenommen wir, erlischt die
Displaybeleuchtung.
Pflege und Wartung
• Ziehen Sie den Stecker aus der Steckdose, bevor Sie den Filter entnehmen.
• Ersetzen Sie die Filter in regelmäßigen Abständen nach etwa 3-6 Monaten.
• Falls sich der Filter reinigen lässt, reinigen Sie ihn mit einem Staubsauger.
Nachdem Sie den Filter 2-3 Mal gereinigt und wieder verwendet haben,
ersetzen Sie ihn durch einen neuen Filter.
Filter installieren und entnehmen
Legen Sie das Gerät flach hin und drücken Sie mit dem Daumen auf die Ver-
riegelung. Ziehen Sie das Gitter vorsichtig zurück und entnehmen Sie es wie
auf dem Bild dargestellt.

6
Filterwechsel
• Falls Sie einen neuen Filter einsetzen,
entfernen Sie zuerst das Verpackungs-
material.
• Nehmen Sie den alten Filter wie abgebil-
det aus dem Gerät.
• Nehmen Sie den neuen Filter und das ak-
tuelle Datum auf die Filterplakette, damit
Sie immer wissen wann der Filter einge-
setzt wurde.
Lufteinlassgitter wieder einsetzen
• Halten Sie mit der linken Hand die Unterseite des Gitters
fest und mit dem rechten Daumen die Verriegelung oben
am Gitter.
• Setzen Sie zuerst den unteren Teil ein und drücken Sie
dann den oberen Teil ins Gerät, bis das Gitter fest sitzt.
• Verpacken Sie den gebrauchten Filter in Plastikfolie, bevor
Sie ihn entsorgen.
Reinigung
• Ziehen Sie zuerst den Stecker aus der Steckdose, bevor Sie das Gerät reinigen.
• Benutzen Sie zur Reinigung keine Scheuermittel, Lösemittel oder Alkohol. Reinigten Sie das Gehäuse mit
einem feuchten Lappen.
• Das Lufteinlassgitter kann abgenommen und mit Wasser gereinigt werden.
• Reinigen Sie den HEPA-Filter nicht mit Wasser. Saugen Sie ihn mit dem Staubsauger ab oder ersetzen Sie
ihn durch einen neuen Filter.

7
Fehlersuche und Fehlerbehebung
Problem Mögliche Ursache Lösung
Das Gerät läuft nicht. Der Stecker ist nicht eingesteckt. Stecken Sie den Stecker fest in die
Steckdose.
Rauch und Gerüche werden nicht
effektiv entfernet.
Der Filter ist zugesetzt. Reinigen oder ersetzen Sie den
Filter.
Versuchen Sie nicht das Gerät selbst zu reparieren. Reparaturen dürfen nur von geschultem Fachpersonal aus-
geführt werden. Sofern eine Reparatur erforderlich ist, wenden Sie sich an unseren Kundendienst oder einen
Fachbetrieb in Ihrer Nähe.
Hinweise zur Entsorgung
Befindet sich die linke Abbildung (durchgestrichene Mülltonne auf Rädern) auf dem Pro-
dukt, gilt die Europäische Richtlinie 2002/96/EG. Diese Produkte dürfen nicht mit dem
normalen Hausmüll entsorgt werden. Informieren Sie sich über die örtlichen Regelungen
zur getrennten Sammlung elektrischer und elektronischer Gerätschaften. Richten Sie sich
nach den örtlichen Regelungen und entsorgen Sie Altgeräte nicht über den Hausmüll.
Durch die regelkonforme Entsorgung der Altgeräte werden Umwelt und die Gesundheit
ihrer Mitmenschen vor möglichen negativen Konsequenzen geschützt. Materialrecycling
hilft, den Verbrauch von Rohstoffen zu verringern.
Konformitätserklärung
Hersteller: Chal-Tec GmbH, Wallstraße 16, 10179 Berlin, Deutschland.
Dieses Produkt entspricht den folgenden Europäischen Richtlinien:
2014/30/EU (EMV)
2014/35/EU (LVD)
2011/65/EU (RoHS)

8
Dear Customer,
Congratulations on purchasing this equipment. Please read this manual carefully and take care of the following
hints to avoid damages. Any failure caused by ignoring the mentioned items and cautions mentioned in the
instruction manual are not covered by our warranty and any liability.
Contents
Technical Data 8
Safety Instructions 8
Product Description 9
Control Panel and Operation 9
Cleaning and Care 11
Troubleshooting 13
Hints on Disposal 13
Declaration of Conformity 13
Technical Data
Item number 10030512, 10030513
Power supply 220-240 V ~ 50-60 Hz
Power consumtion 40 W
Safety Instructions
• Pull out the plug when not using the machine for a long time.
• Please take off the packing polybag of filter before using the machine.
• Do not use the air purifier in kitchen.
• Do not put sundries in airflow inlet and airflow outlet.
• Do not look directly to the UV light.
• Place the machine in above 1.5 meters distance from electrical appliance, such as television and computer.
• Do not place the machine beside curtain.
• Do not place the machine to where the children can touch.
• The machine can be only used in the indoor dry place, do not use it under the moist environment, like the
bathroom or outdoors.
• Unplug the plug when clean or change the filter.
• Do not pour water on the machine, nor soak the machine in water.
• When using the machine with gas appliance, please allow the indoor air to circulate. Because this machine
have no function of eliminating the carbon monoxide.
• Do not place the machine in a heating objects, such as stoves, heaters etc.
• If the machine is broken, it must be repaired by the manufacturer or its service provider or similarly qualified
persons.
• The machine must be regularly checked, regularly clear the grime and replace the filter elements, so that the
purifying effect won`t be affected.

9
Product Description
1 Control panel
2 Air outlet grid
3 Base
4 UV light
5 HEPA filter
Active carbon filter
Photocatalyst
6 Air inlet grid
7 Plug
Control Panel and Operation

10
Use and Operation
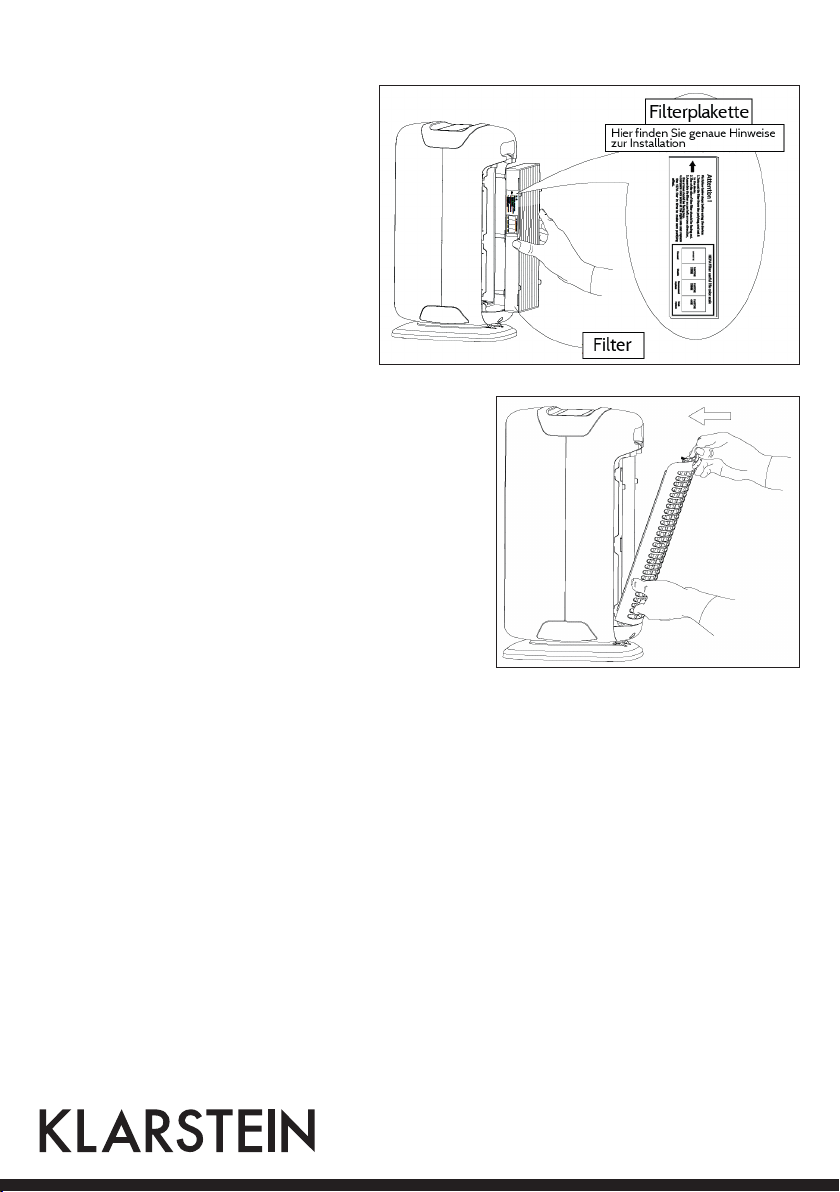
1. Get the air purifier out of the giftbox, and take away the polybag wrapped on the machine.
2. Get down the air inlet grid, and fetch the filters. If there is a polybag on the filter, you should take it off.
3. When the filters are assembled well in the machine, and the machine is put on a flat place, then plug into
the indoor electricity supply.
4. Connected with the power supply, the machine will make a buzz noise.
5. Power on, the machine will make a buzz noise, at the same time, the Power Indicator flash 3 times (after 3
times flash, the light off).
6. On/off button: After pressing this button, the power indication light will be on, and the machine will be
turned on. While the machine is on, press the on/off button again, the machine will stop working, all the
indication light will be off.
NOTE:
The machine has memory function, everytime the machine is turned on, it will work according to the last state
before turned off. To delete the memory working function: to press “timer” & “ ionizer” at the same time for 3
seconds. After 3 seconds, all lights turned off except the power indicator, and the power indicator will flashing
which means the memory working function is delete. Then the machine turn to be the default mode.
Default Mode
The power indicator on and the MED speed indicator on. At the same time, the fan working under med-range,
and other functions such as the timer, the UV light, the Ionizer and the AUTO mode stop working.
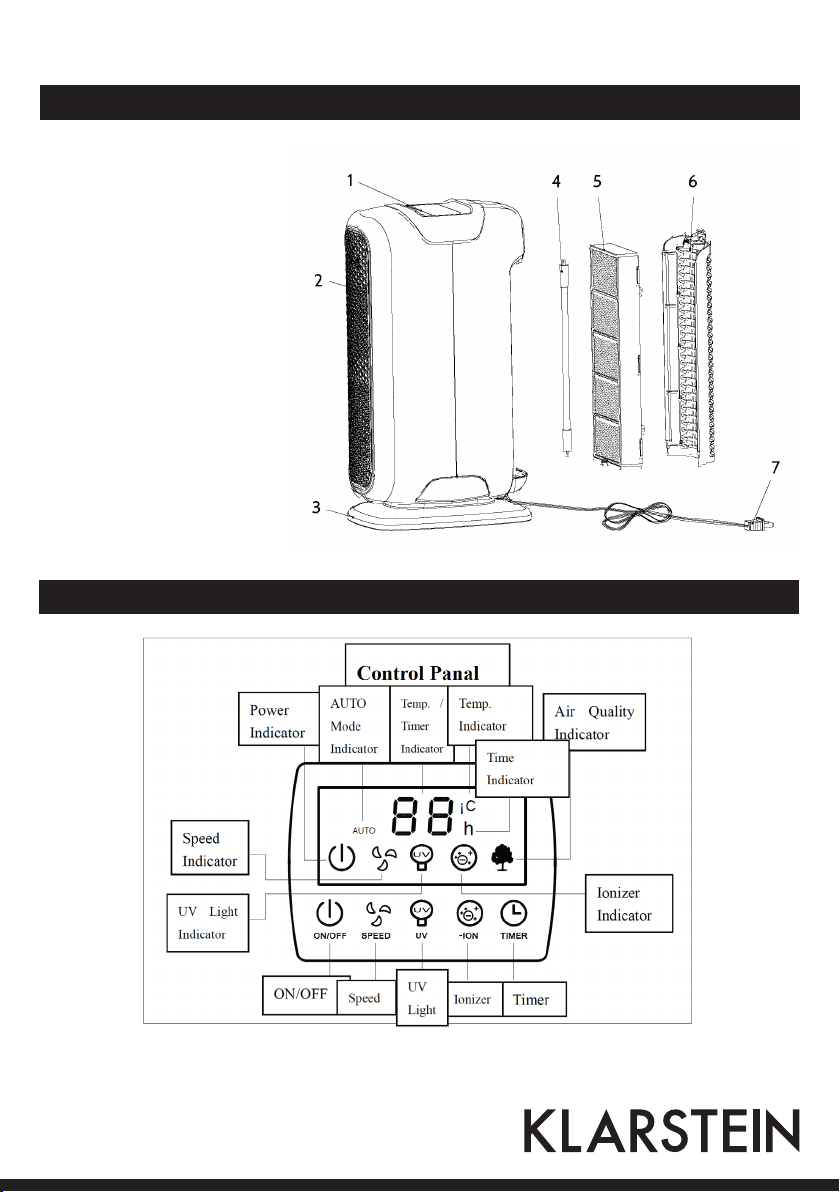
Fan Speed Choice
• When the machine is on, press the button on the panel “SPEED”, the machine will change the fan speed
from “MED”-“HIGH”-“AUTO”-“LOW”-“MED” circulated, the indication light will be on correspondently.
• If one speed indicator is lighting, it means LOW range; if two speed indicators are lighting, it means MED
range; if all the speed indicators are lighting, it means HIGH range.
UV Light Sterilization Function Choice
When the machine is on, press the UV button, the UV button can be chose alternatively, and the indication
light will be on and off accordingly.
The Ionizer Refreshing Air Choice
When the machine is on, press the Ionizer button, the Ionizer button can be chose alternatively, and the indi-
cation light will be on and off accordingly.

11
Timer Function
• When the machine is on, press the Timer button, the machine will be accumulated in units of 1 hour, and the
indication light will show the status accordingly.
• The timer can be set from 1-24 hours, 0 means without setting timer.
• If the Temperature indicator on, the Temp./Timer indicator will show the temperature currently, press the
Timer button, the temperature indicator off, at the same time, the Timer indicator on, and the Temp./Timer
indicator will show the remaining time of the timer. Press the timer button one more time, then can enter
the Timer setting mode.
• After setting the timer mode, the Temp./Timer indicator will show the setting time about 10 seconds. Then
the Temp./Timer indicator and the Timer indicator will flash 5 times, and back to the temperature display, at
the same time, the Timer indicator off, and the Temperature indicator on.
AUTO Mode Function
• Press the SPEED button choosing circularly, the machine can enter AUTO mode, and the AUTO indicator on.
• The AUTO mode is working automatically according to the air quality.
• When the AUTO mode is on, the Air Quality indicator is on, and shows the air quality good or bad; if the light
is green, it means the air quality is good; if the light is yellow, it means the air quality is not so good; if the
light is red, it means the air quality is bad.
• When the AUTO mode is on, it needs about 1 minute to detect the air quality. After 1 minute, the Air Quality
indicator can show the correct current air quality.
• When the air quality is good, the fan works under LOW-range; when the air quality is medium, the fan works
under MED-range; when the air quality is bad, the fan works under HIGH-range.
Display Light
When the machine is on, after 10 seconds without pressing any buttons, the display turns dark.
Cleaning and Care
• Cut off the power source before the following operation.
• Multi-layer filters must be replaced regularly. And it`s better to replace it
3-6 months.
• If the filter is cleanable, you can use a vacuum cleaner to clean the inlet
surface to make it clean. But after 2 and 3 times cleaning, the filter should
change a new one in case of affecting the effect.
Get Down the Air Inlet Grid
Put the machine flat, use the thumb to press the air inlet grid buckle gently,
and wave out gently. Then the air inlet grid will come out as picture shows.

12
Change Filters
• The new filter must remove the polybag
first.
• Get the filter out of the machine.
• Remove the polybag, write down the first
date on the blank place in the label which
can indicate when the filter was started to
use on the machine.
Assemble the Air Inlet Grid
• With the left hand holding the bottom of the air inlet grid,
and use the thumb of right hand holding the noose of the
air inlet grid.
• Push the bottom buckle of the air inlet into the oblique
groove. With left hand pressing the buckle and pushing the
grid into the machine, until the grid is well settled.
• The used filter should be abandoned with polybag wrap-
ped, in case of polluting the environment.
Cleaning Method
• Ensure pulling out the plug before cleaning.
• Do not clean the appliance body by corrosive chemical reagent, such as petrol, thinner and alcohol. Wring
up wet cloth and then to clean the appliance body.
• The front panel can be removed and cleaned by water.
• HEPA filter CAN NOT be washed by water. It can be cleaned by vacuum cleaner or replace a new filter.

13
Troubleshooting
Problem Possible Cause Solution
Can`t operate. Whether the plug is ready. Insert the plug again.
Inefficiency of absorb smoke and
smell.
Filters. Clean or replace the filter.
Except professional technical maintenance people, do not attempt to open or repair this machine. Please
contact retail shop or after service center when maintaining the machine.
Hints on Disposal
According to the European waste regulation 2002/96/EG this symbol on the product
or on its packaging indicates that this product may not be treated as household waste.
Instead it should be taken to the appropriate collection point for the recycling of electrical
and electronic equipment. By ensuring this product is disposed of correctly, you will help
prevent potential negative consequences for the environment and human health, which
could otherwise be caused by inappropriate waste handling of this product. For more de-
tailled information about recycling of this product, please contact your local council or your
household waste disposial service.
Declaration of Conformity
Producer: Chal-Tec GmbH, Wallstraße 16, 10179 Berlin, Germany.
This product is conform to the following European Directives:
2014/30/EU (EMC)
2014/35/EU (LVD)
2011/65/EU (RoHS)

14
Estimado cliente,
Le felicitamos por la adquisición de este producto. Lea atentamente el siguiente manual y siga cuidadosamen-
te las instrucciones de uso con el fin de evitar posibles daños. La empresa no se responsabiliza de los daños
ocasionados por un uso indebido del producto o por haber desatendido las indicaciones de seguridad.
Índice
Datos técnicos 14
Indicaciones de seguridad 14
Descripción del aparato 15
Puesta en marcha y uso 15
Limpieza y cuidado 17
Detección y resolución de problemas 19
Indicaciones para la retirada del aparato 19
Declaración de conformidad 19
Datos técnicos
Número de artículo 10030512, 10030513
Suministro eléctrico 220-240 V ~ 50-60 Hz
Potencia 40 W
Indicaciones de seguridad
• Desconecte el enchufe de la toma de corriente cuando no utilice el aparato durante un periodo prolongado.
• Retire todo el material de embalaje antes de utilizar el aparato por primera vez.
• No utilice el aparato en cocinas.
• No introduzca objetos en la entrada y salida de aire.
• No dirija la mirada directamente a la luz UV.
• Coloque el aparato como mínimo a 1,5 metros con respecto a otros aparatos eléctricos.
• No sitúe el aparato bajo una cortina.
• Coloque el aparato de tal modo que los niños no puedan tener acceso a él.
• Utilice este aparato solamente en estancias secas y cerradas. No utilice el aparato en estancias húmedas ni
al aire libre.
• Antes de limpiar el aparato y de sustituir el filtro, apáguelo y desconecte el enchufe de la toma de corriente.
• No vierta agua sobre el aparato ni lo sumerja en agua.
• Si utiliza el aparato junto con un calefactor de gas, garantice suficiente ventilación para evitar que se acumule
monóxido de carbono.
• No coloque el aparato cerca de calderas ni de otras fuentes de calor.
• Si el aparato está dañado, deberá ser sustituido por el fabricante, un servicio técnico autorizado o una per-
sona igualmente cualificada.
• Compruebe y limpie el filtro regularmente para que el aparato funcione a pleno rendimiento.

15
Descripción del aparato
1 Panel de control
2 Rejilla de salida de aire
3 Base
4 Luz UV
5 Filtro HEPA
Filtro de carbón activo
Fotocatalizador
6 Rejilla de la entrada de aire
7 Enchufe
Panel de control y utilización

16
Puesta en marcha y uso
1. Retire el aparato del embalaje y extráigalo de la bolsa de plástico.
2. Extraiga la rejilla de entrada de aire y retire el filtro. Si el filtro todavía se encuentra en su embalaje plástico,
retire dicho embalaje.
3. Cuando haya colocado el filtro, sitúe el aparato sobre una superficie estable. Conecte el enchufe a la toma
de corriente.
4. Cuando haya enchufado el aparato, este emitirá un pitido.
5. Con el pitido, el indicador de funcionamiento se enciende y parpadea 3 veces; a continuación, la luz se apaga
de nuevo. Cuando pulse el botón on/off, el indicador de funcionamiento se ilumina y el aparato estará en-
cendido. Pulse de nuevo el botón on/off para apagar el aparato y todas las luces se apagarán.
ADVERTENCIA:
El aparato cuenta con memoria interna. Siempre que lo encienda se activarán los últimos ajustes introducidos
antes del apagado. Para eliminar la memoria, pulse simultáneamente los botones TIMER e IONISATOR duran-
te 3 segundos. Todas las luces se apagan excepto el indicador de funcionamiento. Solamente permanecerá
encendida la luz de funcionamiento para indicar que la memoria se ha borrado. El aparato se iniciará en el
modo por defecto.
Modo por defecto
El indicador de funcionamiento se enciende y el aparato funciona a velocidad media. Cuando se active la velo-
cidad media, las funciones temporizador, luz UV, ionizador y modo AUTO permanecerán inactivas.
Ajustar la velocidad
• Pulse el botón SPEED con el aparato encendido para seleccionar uno de los siguientes niveles de velocidad:
medio > alto > AUTO > bajo > medio. El indicador de velocidad se enciende.
• Si solamente se encuentra encendido un indicador de funcionamiento, significará que se encuentra en el
nivel de velocidad bajo. Dos indicadores de velocidad señalizan velocidad media y tres, velocidad alta. En
moto AUTO, se ilumina el indicador AUTO.
Esterilización con luz UV
Con el aparato encendido, pulse el botón UV para activar la función. El indicador UV se ilumina cuando la
función esté activada. Pulse de nuevo el botón para desactivar la función.
Ionizador
Con el aparato encendido, pulse el botón ION para activar la función. El indicador ION se ilumina cuando la
función esté activada. Pulse de nuevo el botón para desactivar la función.

17
Temporizador
• Pulse el botón TIMER con el aparato encendido para aumentar el temporizador en intervalos de una hora.
Se mostrará el tiempo seleccionado en el display.
• El temporizador puede ajustarse en un rango de 1 a 24 horas. Cuando el indicador del temporizador muestre
«0», se encontrará desactivado.
• Si el indicador de temperatura ya está activado, pulse una vez el botón TIMER. El indicador de temperatura
se apaga, el indicador del temporizador se enciende y muestra el tiempo restante. Pulse de nuevo el botón
TIMER para acceder a los ajustes del temporizador.
• Cuando haya ajustado el temporizador, su indicador se enciende durante 10 segundos tras realizar los ajus-
tes. A continuación, el indicador parpadea durante 5 segundos y cambia al indicador de temperatura. Al
mismo tiempo, el símbolo del temporizador se apaga y el símbolo de la temperatura se enciende.
Modo AUTO
• Pulse el botón SPEED hasta acceder al modo AUTO. El indicador AUTO se enciende.
• El modo AUTO se enciende automáticamente dependiendo de la calidad del aire.
• Cuando el modo AUTO esté activado, el indicador de la calidad del aire se enciende. Si la calidad del aire
es buena, el indicador se ilumina en color verde. Con calidad media, se ilumina en color naranja y en rojo
cuando la calidad sea deficiente.
• Al encender el modo AUTO, el aparato necesita un minuto para determinar y mostrar la calidad del aire.
• Si la calidad del aire es buena, el ventilador funcionará a velocidad baja. Con calidad de aire media, el aparato
funciona a velocidad media, y cuando la calidad del aire sea mala, se activará el nivel alto de velocidad.
Iluminación de display
Si enciende el aparato y no realiza ningún ajuste durante 10 segundos, la iluminación del display se apaga.
Cuidado y mantenimiento
• Antes de retirar el filtro, apáguelo y desconecte el enchufe de la toma de
corriente.
• Sustituya el filtro regularmente cada 3-6 meses.
• Cuando necesite limpiar el filtro, utilice una aspiradora. Después de haber
utilizado el filtro 2-3 veces y de haberlo limpiado, sustitúyalo por uno nue-
vo.
Instalar y retirar el filtro
Coloque el aparato en una superficie plana y presione con los dedos el cierre.
Tire de la rejilla con cuidado y retírela como se indica en la ilustración.

18
Cambio de filtro
• Si coloca un filtro nuevo, retire primero el
material de embalaje.
• Extraiga el filtro usado del aparato como
se muestra en la imagen.
• Coja el filtro nuevo y anote la fecha de la
placa del mismo para saber cuándo debe
sustituirlo.
Colocar de nuevo la rejilla de la entrada de aire
• Sujete con la mano izquierda la parte inferior de la rejilla y
con la mano derecha tire del cierre de la rejilla hacia arriba.
• Primero coloque la parte inferior y presione la parte supe-
rior hacia el aparato para encajar la rejilla.
• Guarde el filtro usado en film transparente antes de de-
secharlo.
Limpieza
• Antes de limpiar el aparato, apáguelo y desconéctelo de la toma de corriente.
• No utilice productos abrasivos, disolventes ni alcohol para la limpieza. Limpie la carcasa con un paño húmedo.
• La rejilla de entrada de aire puede extraerse y lavarse con agua.
• No limpie el filtro HEPA con agua. Aspírelo con la aspiradora o sustitúyalo por un filtro nuevo.

19
Detección y resolución de problemas
Problema Posible causa Solución
El aparato no funciona. El enchufe no está conectado. Conecte el enchufe a la toma de
corriente.
El humo y los olores no se
eliminan.
El filtro está obstruido. Limpie o sustituya el filtro.
No intente reparar el aparato usted mismo. Las reparaciones deberán ser realizadas por personal técnico cu-
alificado. Si es necesaria una reparación, contacte con nuestro servicio de atención al cliente o con un servicio
técnico de su zona.
Indicaciones para la retirada del aparato
Si el aparato lleva adherida la ilustración de la izquierda (el contenedor de basura tachado)
entonces rige la normativa europea, directiva 2002/96/CE. Este producto no debe arro-
jarse a un contenedor de basura común. Infórmese sobre las leyes territoriales que regulan
la recogida separada de aparatos eléctricos y electrónicos. Respete las leyes territoriales
y no arroje aparatos viejos al cubo de la basura doméstica. Una retirada de aparatos con-
forme a las leyes contribuye a proteger el medio ambiente y a las personas a su alrededor
frente a posibles consecuencias perjudiciales para la salud. El reciclaje ayuda a reducir el
consumo de materias primas.
Declaración de conformidad
Fabricante: Chal-Tec GmbH, Wallstraße 16, 10179 Berlín (Alemania).
Este producto cumple con las siguientes directivas europeas:
2014/30/UE (EMC)
2014/35/UE (baja tensión)
2011/65/UE (refundición RoHS)

20
Chère cliente, cher client,
Toutes nos félicitations pour l’acquisition de ce nouvel appareil. Veuillez lire attentivement et respecter les
instructions de ce mode d’emploi afin d’éviter d’éventuels dommages. Nous ne saurions être tenus pour res-
ponsables des dommages dus au non-respect des consignes et à la mauvaise utilisation de l’appareil.
Sommaire
Fiche technique 20
Consignes de sécurité 20
Aperçu de l’appareil 21
Panneau de commande et utilisation 21
Nettoyage et entretien 23
Identification et résolution des problèmes 25
Information sur le recyclage 25
Déclaration de conformité 25
Fiche technique
Numéro d’article 10030512, 10030513
Alimentation électrique 220-240 V ~ 50-60 Hz
Puissance 40 W
Consignes de sécurité
• Débrancher l’appareil de la prise en tirant fermement sur la fiche d’alimentation et non sur le cordon.
• Enlever tous les éléments d’emballage avant d’utiliser l’appareil pour la première fois.
• Ne pas utiliser l’appareil dans une cuisine.
• Ne pas introduire d’objet dans l’entrée et la sortie d’air.
• Ne pas regarder directement dans la lampe UV.
• Tenir l’appareil à une distance minimale de 1,5 mètre des autres appareils électriques.
• Ne pas placer l’appareil sous un rideau.
• Installer l’appareil à un endroit inaccessible aux enfants.
• Utiliser l’appareil uniquement dans un intérieur sec. Ne pas l’utiliser dans des pièces humides ou en extérieur.
• Toujours débrancher l’appareil avant de le nettoyer ou d’en nettoyer les filtres.
• Ne pas verser de l’eau sur l’appareil et ne pas plonger celui-ci sous l’eau.
• Si cet appareil est utilisé en même temps qu’un radiateur au gaz, s’assurer que la pièce est bien ventilée pour
éviter l’accumulation de monoxyde de carbone.
• Ne pas placer l’appareil à proximité d’un radiateur ou de toute autre source de chaleur.
• Si l’appareil est endommagé, il doit être remplacé par le fabricant, une entreprise spécialisée habilitée ou une
personne de qualification analogue.
• Veiller à inspecter et nettoyer régulièrement le filtre de sorte à rendre l’appareil le plus performant possible.
This manual suits for next models
1
Table of contents
Languages:
Other Klarstein Air Cleaner manuals

Klarstein
Klarstein 10031909 User manual

Klarstein
Klarstein 10031190 User manual

Klarstein
Klarstein 10013269 User manual

Klarstein
Klarstein 10032000 User manual

Klarstein
Klarstein TRAMONTANA User manual

Klarstein
Klarstein 10013269 User manual

Klarstein
Klarstein 10031191 User manual

Klarstein
Klarstein 10032220 User manual

Klarstein
Klarstein 10021654 User manual

Klarstein
Klarstein VITA PURE 2G User manual