Ko Propo EX-1 ASF User manual

1

2
Title Title
Page Page
■ Table of Contents Click the page number to jump to that page.
■ Table of Contents 2
■ For Safe Operation 3
■ Getting Started 5
●Transmitter Assembly 5
●Transmitter Dismantling 5
■ Names of Parts 6
●ET Keys (1-5) and BT Button (1) 7
●Steering Wheel Adjustment 7
●Wheel Cap Remove 7
●Throttle Trigger Adjustment 7
●
Throttle Trigger Position Adjustment 7
●ICS Port 7
●Headphone Jack 7
●Colored Grip and Pad Replacement 8
●Unit Connector 8
●Charger Jack 8
●Power Switch 8
■ Preparations 9
●Battery Installation 9
●Battery Level Warning 9
●Operation Alarm 9
●Battery Pack(Under Development) 9
●Pairing 10
■ Procedures Prior to Operation 11
●Trim and Sub Trim Operation 12
■ Display and Control Method 13
●Basic Operations to Change Settings 13
●Startup Screen and Initial Screen 14
■Function Reference 15
●Main Menu 15
Model Menu(Model) 15
Model Select(MDL-Select) 16
Model Name(MDL-Name) 16
Model Copy(MDL-Copy) 17
Model Reset(MDL-Reset) 17
Steering Menu(Steering) 18
Steering Trim(ST-Trim) 18
Steering Travel(ST-Travel) 18
Steering Balance(ST-Balance) 19
Steering Sub Trim(ST-SubTrim) 19
Steering Trim Rate(TrimRate) 19
Steering Turn Speed(TurnSpeed) 20
Steering Return Speed(RetnSpeed) 20
Steering Punch(ST-Punch) 21
Steering Curve(ST-Curve) 21
Steering Reverse(ST-Reverse) 22
Travel Override(Travel Override) 22
Throttle Menu(Throttle) 23
Throttle Trim(TH-Trim) 23
Throttle High Point(TH-Point) 23
Throttle Brake(TH-Brake) 24
Throttle Sub Trim(TH-SubTrim) 24
Throttle Trim Rate(TH-TrimRate) 24
Throttle Turn Speed(TH-TurnSpeed) 25
Throttle Return Speed(TH-ReturnSpeed) 26
Throttle Punch(TH-Punch) 27
Throttle Curve(TH-Curve) 27
Throttle Reverse(TH-Reverce) 28
Throttle Drag Brake(TH-DragBrake) 28
Brake Override(Brake Override) 28
Throttle ABS(TH-ABS) 29
Throttle Acceleration(TH-Accel) 30
Throttle Auto-Start(TH-AutoStart) 31
Preset(Preset) 31
3CH/4CH Menu(3/4ch Menu) 32
Control Menu(Control Menu) 32
Control Mode(Control Mode) 32
2WAY(2WAY) 32
3WAY(3WAY) 33
5WAY(5WAY) 33
ANALOG(ANALOG) 34
Quick Setup(QuickSetup) 35
Timer Menu(Timer Menu) 36
Stopwatch(StopWatch) 36
Countdown Timer(DownTimer) 37
Lap History(LapHistory) 37
Function Menu(Function Menu) 38
Monitor(Monitor) 38
LED Color(LEDcolor) 38
LCD Backlight(BackLight) 38
LCD Contrast(Contrast) 39
Sound Volume(SoundVol) 39
Buzzer(Buzzer) 39
Key Repeat(KeyRepeat) 39
System Menu(System Menu) 40
Response(Response) 40
Setup(Setup) 41
Direct Switch(DirectBT) 41
Adjust VR (ST)(SteeringAdjustVR) 41
Adjust VR (TH)(ThrottleAdjustVR) 42
Operation Timer(OP-Timer) 42
Pairing(Pairing) 42
Power Management(POWER MANAGEMENT) 43
All Reset(AllReset) 43
ICS(ICS) 43
●Warning Display 44
Battery Level Warning 44
■ Glossary 45
■ Repair Policy 48
■ FCC statement 48
■ Specications 49
This product is to be used with ASF 2.4GHz Mini-Z and
dNano. It can not be used with other RC models.
Mini-Z, MiniZ Racer and ASF are trade marks or product
names owned by Kyosho Corporation.
Other products names are trade marks of each company
mentioned.

Due to the nature of radio controlled models, improper handling may lead to dangerous situations. Therefore please
read the following information carefully in order to ensure safe operation. Please also understand that KO Propo is
not responsible for any injuries or damage which result from no
ncompliance of these cautions and notices.
●When Installing Components
●Notes for Usage
●Make sure metal parts on the model (car chassis/ship hull) do not come into contact
with each other.
※Contact between metal parts may result in noise, which could cause the receiver to
malfunction and lead to an uncontrollable model.
●Do not cut or bundle the antenna cable.
※This may lower the receiver's sensitivity and lead to an uncontrollable model.
●Ensure correct polarity when installing transmitter and receiver batteries.
※Incorrect polarity may damage the product.
●Within Japan, this product is limited to usage with models which operate on the
ground or in the water.
※Do not use for other non-designated purposes.
●Ensure that all connectors (receiver, servo, switch, etc.) are connected securely.
※If connections become loose due to vibrations, it may lead to an uncontrollable model.
●Securely attach receiver with thick double-sided tape and ensure that it does not
make contact with other parts.
※Strong shocks or contact with other parts due to vibrations may lead to an
uncontrollable model.
●Check servo operation to ensure the pushrod is not subject to excessive loads.
※Excessive loads may damage the servo or increase battery power consumption.
●Make sure to use the rubber grommet when attaching the servo and that the servo
does not contact the R/C equipment tray.
※If vibrations affect the servo, it may lead to damage or an uncontrollable model.
●Use in conjunction with genuine official KO Propo products.
※KO Propo is not responsible for any damages or injuries which result from use of this
product in combination with other manufacturer's products.
●Do not use when there is thunder.
※It is possible for lightning to strike the antenna.
●Do not use in the rain or in areas where water has accumulated.
※If water enters the product it may lead to an uncontrollable model.
●Do not use in the following locations:
1. Near R/C circuits (within 3km)
2. Near crowds, on streets, or near actual vehicles or ships.
3. Near high-voltage power lines or communication facilities.
※If signal interference, etc. causes an uncontrollable model, a serious accident may
result.
●Do not use when your concentration levels are compromised by tiredness, alcohol,
medication, etc.
※Mistakes in judgment may result in serious accidents.
●Do not allow glow engine fuel or engine exhaust to contact the product.
※These may attack the plastic and damage the product.
●Check to ensure that the selected model memory matches the model to be controlled.
※Using an incorrect memory may lead to an uncontrollable model.
●Make sure to stop the engine (disconnect motor cables) before changing transmitter
settings.
Warning! Improper handling/
usage may lead to a high probability of material damage as well as a possibility of
serious personal injury or even death.
Notice! Improper handling/
usage may lead to personal injury or material damage.
Warning!
Enforcement matters
Warning!
Prohibited matters
Warning!
Prohibited matters
Warning!
Enforcement matters
3
■ For Safe Operation

●Notes After Usage
●
Transmitter Battery Handling and Charging (separately available option)
Caution!
Enforcement matters
Caution!
Enforcement matters
Danger!
Enforcement matters
Danger!
Enforcement matters
●Do not touch engine, motor, ESC, etc. immediately after use as they may be hot.
※Doing so may lead to burns.
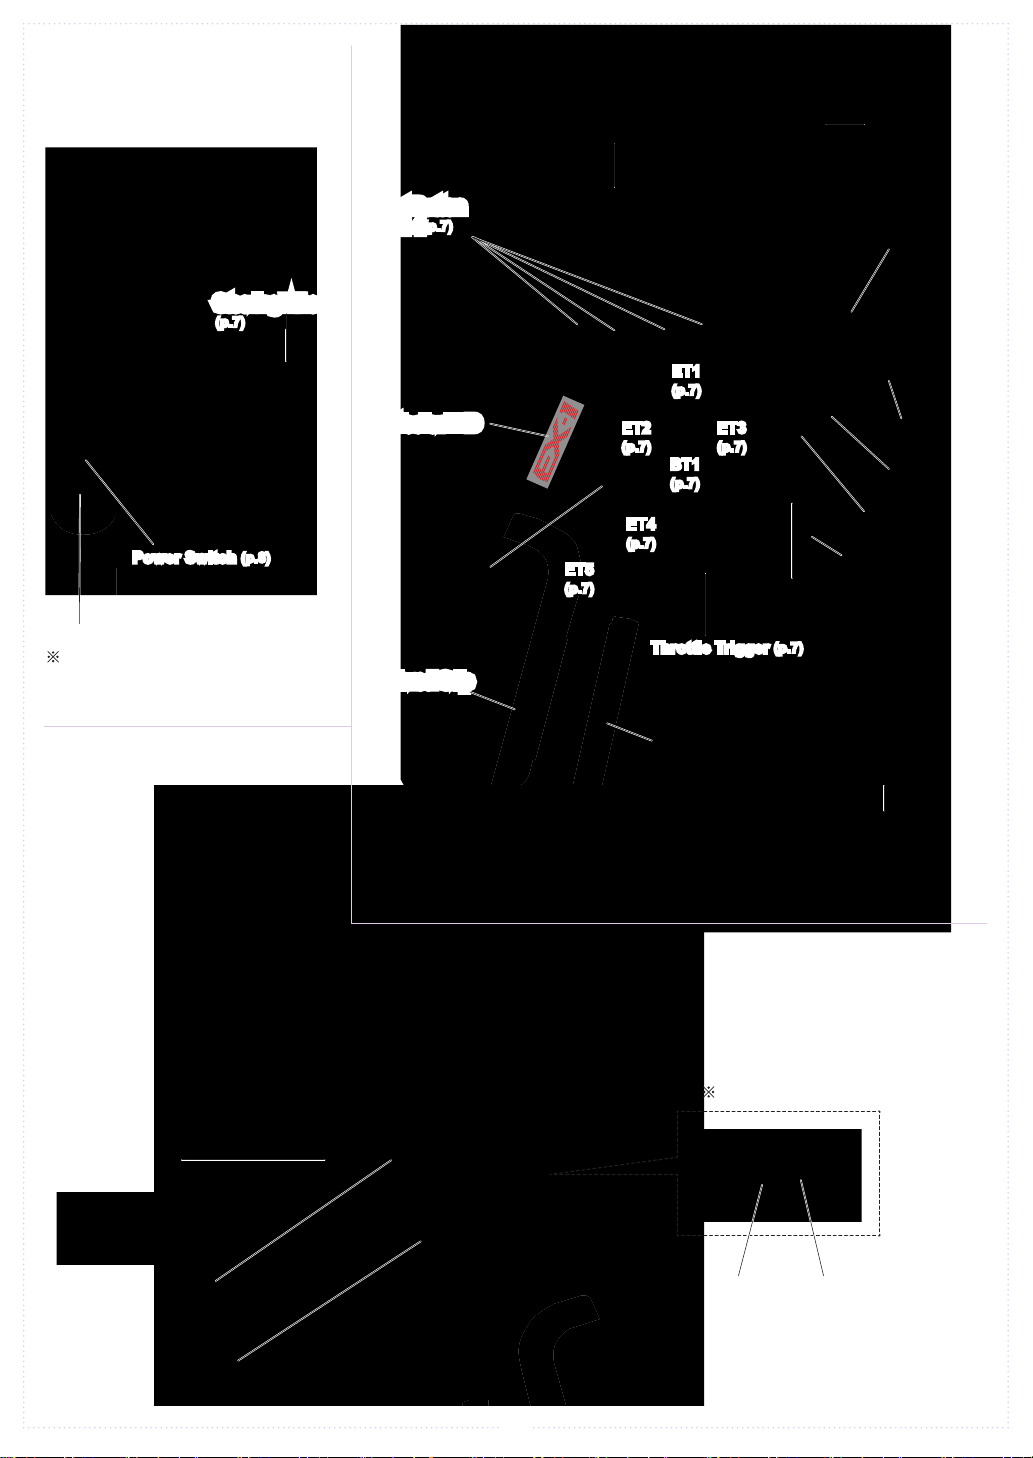
●When switching on, always turn on the transmitter first, followed by the receiver.
Follow the reverse order when switching off.
※If the wrong order is followed, it may lead to an uncontrollable model.
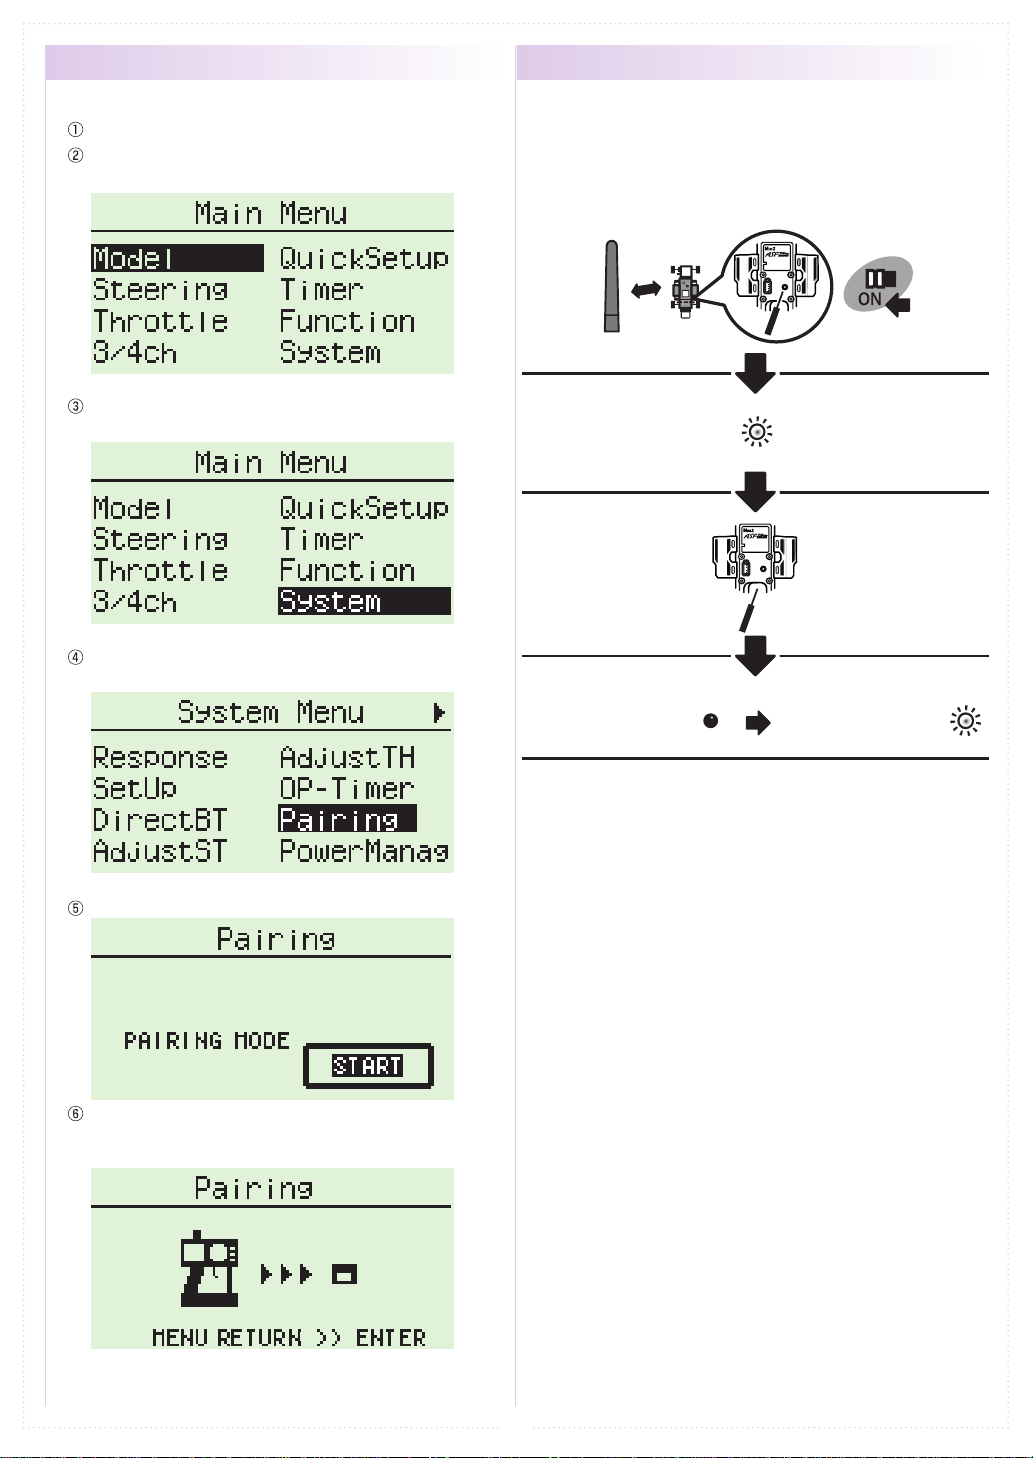
●Dismantling or modifying the RF Module (internalized in the case of the EX-1) is
prohibited and is punishable by law.
※Doing so may lead to accidents such as short circuits and KO Propo Customer
Service Department may not accept dismantled/modified products for repair.
●Do not use this product in aircraft, hospitals, or near fire alarms or medical equipment.
※This may lead to malfunctions and result in serious accidents. Also, by law you must
cease operation if the product affects other wireless or electrical devices.
●2.4GHz transmitters must be registered with the Japan Radio Control Safety
Association.
※The transmitter which you have purchases is already registered. Products which do
not have proof of registration are illegal.
●In the case of an R/C car, make sure to remove the battery pack after driving.
※If the car is switched on accidentally, it may lead to a fire or an uncontrollable model.
●Keep transmitters, batteries, and models away from small children.
※Chemical agents and the items themselves may cause personal injury.
●Remove batteries from transmitter if it will not be used for a considerable time.
※If batteries are left in the transmitter, battery leakage may result in damage.
●Do not store transmitter/receiver in the following conditions:
1. Extremely hot (over 40ºC) or cold (below 10ºC) temperatures.
2. Locations in direct sunlight.
3. Locations with high humidity.
4. Locations subject to vibrations.
5. Locations with lots of dust.
※These conditions may cause the case to deform and damage the product.
●Never short-circuit the battery connector.
※This may lead to a fire or explosion.
●Do not dispose batteries in fires.
※This is very dangerous and may lead to an explosion.
●Use KO Propo chargers to charge the battery and use the correct current (under 1A).
※Incorrect current may lead to battery damage, overheating, or leakage.
※Other manufacturer's chargers may not have a automatic cutoff function.
●Do not subject the battery to strong shocks.
※This may damage the battery and cause leakage or a short circuit.
●Do not dismantle or modify the battery.
※This may cause dangerous leakage of battery fluids.
●Keep away from water. Do not charge a wet battery.
※This may cause overheating and damage.
●Do not charge alkaline batteries.
※Alkaline and other single-use batteries cannot be recharged. Doing so may lead to fire
and damage.
●Do not use wet hands when plugging in the charger's AC Adapter.
※This may result in electrical shocks.
※If there is battery fluid leakage, avoid contact with eyes as it may result in blindness. If contact
with eyes occur, flush with large amounts of water and seek medical attention immediately.
※When disposing batteries, Ni-Cd, Ni-MH, Li-Po, and Li-Fe batteries should be recycled in order to
help protect the environment.
Warning!
Enforcement matters
Caution!
Prohibited matters
4

①①
①
①
①
①
②
②
②
②
②
②
③
③
③③
5
■ Getting Started
This manual uses the "Master Unit", "Normal Steering
Unit" and "Right Handed Grip Unit" for the examples.
If you use different optional parts, please refer to each
product's manual for installation and operation.
Detach the Steering Unit, then detach the Master Unit.
Tilt Display
(Raised Position) (Rotate to loosen)
Grip Unit
Master Unit
Master Unit
Steering Unit
Steering Unit
Antenna
●Transmitter Assembly ●Transmitter Dismantling
1.
1.
2.
2.
3. 4.
3.
Remove the connector cover before attaching.
If storing the transmitter in dismantled form, please remember to
attach the connector covers.
First detach the
antenna.
Steering Unit Release Button
Steering Unit Lock Lever
Grip Unit Lock Lever
Grip Unit Release Button
[Legend] P:Point :Notice

6
Antenna
Tilt Display
Direct Button
DBT 1-4(p.7)
Power Switch (p.8)
Charger Jack (p.8)
Multicolor LED
Steering Unit
Release Button (p.5)
Colored Grip
(p.8)
Colored Pad (p.8) Guard Bar
Trigger Guard
Steering Unit
Lock Lever (p.5)
Back Key
Enter Key
Dial Guard
Jog Dial
Headphone Jack (p.7)
Open the cover
Open the cover
ICS Port (p.7)
Throttle Trigger (p.7)
Grip Unit Lock Lever
(p.5)
Grip Unit
Release Button (p.5)
Throttle Trigger
Position Adjuster (p.7)
Steering Wheel
(p.7)
ET1
(p.7)
BT1
(p.7)
ET2
(p.7)
ET4
(p.7)
ET5
(p.7)
ET3
(p.7)
■ Names of Parts
[Front View][Side View]
[Rear View]

7
●Steering Wheel Adjustment
●Wheel Cap Remove
●Throttle Trigger Adjustment
●
Throttle Trigger Position Adjustment
●ICS Port
●Headphone Jack
●ET Keys (1-5) and BT Button (1)
Adjust the tension of the steering wheel spring.
Attach audio plugs from commercially available
headphones, etc. (sold separately) to the transmitter.
This feature helps users hear the transmitter's operation
sounds while in a noisy pit area.
Functions may be assigned to the keys/button.
This port is used for the ICS USB Adapter HS (sold
separately), which enables the transmitter to connect to a
PC. Special software, which can be downloaded from KO
Propo's website, enables the setting and modification of
the transmitter's model memory from a PC. It also enables
numerous model memory settings to be saved onto a PC.
Refer to KO Propo's website for details on how to use this
feature.
( http://www.kopropo.co.jp/sys/ )
Adjust the position and angle of the brake trigger to your
preferences.
The position of the throttle trigger may be adjusted to
match the user's hands.
Insert a 1.5mm hex wrench referring to the image below.
Rotate clockwise to increase tension and counterclock-
wise to decrease it.
[How to Adjust]
Loosen the hex screws on the throttle trigger with a
1.5mm hex wrench.
Freely adjust the brake trigger position.
Tighten the hex screws to secure.
Loosen two screws on the rear side of the transmitter.
Slide the Throttle Trigger Position Adjuster as desired.
Tighten the loosened screws to secure.
[How to Adjust]
[How to Adjust]
Excessive counterclockwise rotation will result in the wheel being
unable to return to neutral position. In this case, rotate clockwise
until the wheel returns to neutral.
Even when headphones are plugged in, sounds will still be emitted
by the transmitter itself. The headphone jack is monaural.
The possible functions which each key/button may be assigned to
are dierent.
The trigger may be loosened due to temperature, strong shocks,
or prolonged use. In this case, cementing the trigger in position is
recommended. If looseness persists, contact KO Propo Customer
Service Department.
Hex Wrench
Audio Plug
(Sold Separately)
Connect to PC
Throttle Trigger
Brake Trigger
Screws
Hex Screws
Ball Joint
Throttle Trigger
Position Adjuster
Insert Wheel Cap Remover to the wheel cap spoke.
Pull up Wheel cap remover with Wheel Cap.

8
●Charger Jack
●Unit Connector
●Power Switch
A rechargeable battery can be recharged via the charger
jack.
This product may be dismantled and therefore each unit
features their respective connectors. Dirty or damaged
connectors may result in malfunctions, so please handle
them carefully.
This product features a safety lock. The Master Unit and
Grip Unit cannot be detached when the Power Switch
is in the ON position. Turn off the transmitter before
dismantling.
Conrm that the power switch is in the OFF position. If
only using the Grip Unit, make sure that the connector
cover is in place.
Make sure the battery is securely connected. If the
connection is loose, the battery may not charge
completely.
Securely connect the charger plug to the charger jack.
Begin charging using a current of less than 1A.
[How to Recharge]
Make sure the power switch is in the OFF position when charging.
If only using the Grip Unit, make sure that the connector cover is in
place. A short circuit may occur if the connector makes contact with
metal and lead to a serious accident. Use a current of less than 1A to
charge. Do not connect/disconnect the battery during charging. Take
note of the charger plug's polarity in order to avoid damage.
Do not attempt to charge if using alkaline batteries. Doing so
may result in battery leakage or cracking which will damage the
transmitter.
[Discharging the Battery Pack]
If using a battery pack, please note that it cannot be discharged via
the charger jack. Remove the battery pack from the transmitter to
discharge it.
Do not touch the unit connectors with your ngers. If connectors
become corroded due to grime, they may become inoperable.
If storing the transmitter in dismantled form, please remember
to attach the connector covers. After prolonged use, a black
residue may build up on the connectors. Use cotton swabs dipped
in cleaning alcohol to remove. KO Propo's Customer Service
Department also handles transmitter maintenance.
●Colored Grip and Pad Replacement
Users can choose to install grips and pads of other colors
(sold separately).
Remove the two screws on each side of the grip to detach
the grip plates, then attach the colored grip and pad.
[How to Replace]
The tabs on the colored grip and pad are to be inserted into holes.
Note the direction.
Make sure the battery box or battery pack is removed before
replacing the colored grip and pad.
Note direction of the of the colored grip and pad.
Colored Grip
Colored Pad
Screws
Screws
Grip Plate
Grip Plate
AC 100V Charger
(Available Soon)
Quick Charger (Sold Separately)
Power Switch
Connector Cover

①①
①
①
②
②
②
②
9
■ Preparations
●Battery Installation ●Battery Level Warning
●Operation Alarm
●Battery Pack(Under Development)
Battery Box
1.
2.
3.
R03/AAA/UM4
Batteries (4pcs.)
Battery Box Cover
Press the tab on the bottom of the transmitter to open
battery box cover.
Remove the lock to pull out
battery box.
Install four R03/AAA/UM4
alkaline batteries while noting
their polarity, then replace
battery box.
Use batteries which have adequate remaining capacity. Weak
batteries mean lower transmitting power and may result in
malfunctions.
Do not install Ni-Cd or Ni-MH batteries in the battery box.
(These may cause the battery connectors to corrode.)
The power source used may be set in Power Management.
A warning will be displayed and an alarm will sound
when low battery voltage is detected. When you see this
warning, stop your model in a safe area and install new
transmitter batteries.
An alarm will sound after 3 minutes of transmitter idleness.
Operating the steering wheel, ET Keys, BT Button, Direct
Buttons, etc. will disable the alarm.
A rechargeable battery pack specic to the EX-1 is under
development. An announcement will be made on the KO
Propo website when it is ready for release. Thank you for
your patience.
[Warning Display on Startup]
[Warning Display During Use]
Operation of the transmitter's jog dial, buttons, or levers will
temporarily disable the low-voltage warning sound. The warning
will be displayed again after a certain amount of time has passed.
Pleae stop operation and turn o power of car.
And please change the battery.
Furthermore when voltage goes down, LOW VOLTAGE being
displayed in LCD, operation other than the steering wheel and the
throttle becomes impossible.
Make sure to fully charge the battery pack before installing it.
When turning on the power and a warning screen is dis-
played, please replace the batteries at once.
However, if you push the “Enter” key for more then 3 seconds
the battery setting will be changed to “Dry” and you can start
the system, but proceed at your own risk.
Please check the battery type and set the transmitter for the
correct battery usage.

about 1m
LED light up
LED light up
again
LED light down
release button
Pairing is complete
While pressing setup button
Turn ON Power
10
●Pairing●Pairing
Preparing the Transmitter
Switch on the transmitter.
Press the ENTER key at the startup screen. (Main
Menu display)
Use the jog dial to move the cursor to [System], then
press the ENTER key.
Move the cursor to [Pairing] on the System Menu
screen, then press the ENTER key.
Press the ENTER key.
Images of the transmitter and receiver will display
and the arrow ow can be checked. (In this state, the
transmitter is transmitting the pairing signal.)
1. After preparing the transmitter in the example to
the left, prepare the car receiver with the proce-
dure listed below.
Once pairing is complete, pressing the
ENTER key will exit the pairing screen
mode.
Turn off the power of the receiver and
turn it on again for operational use of the
vehicle.

11
■ Procedures Prior to Operation
1.Switching On
After ensuring that it is safe to do so, switch on the transmitter followed by the receiver.
2.Model Conrmation
Conrm the model which will be used.
3.Checking Movements
With the model's wheels lifted off the ground, operate transmitter to check for proper
movement. While driving, use steering and throttle trims to make ne adjustments. Drive in a
gure 8 pattern to check steering balance.
This transmitter uses the DSSS method of communication on the 2.4GHz band for 2.4GHz
ASF Mini-Z and dNano only.
You can not use this with other types of systems.
4.Switching O
After a driving session, switch off the receiver, followed by the transmitter. Remove the
battery pack from the model.
After switching o, wait at least 5 seconds before switching on again to ensure proper operation.
An alarm will sound if the controls are idle for **minutes. Operate the transmitter to stop the alarm.
See[Trim and Sub Trim Operation] on the following page.
P
Use the [Quick Setup] function to easily arrange the initial settings.
P
Stand
Figure 8 Pattern
Trim

12
The sub trim is a convenient feature but it could also complicate the setting process if used incorrectly. Use the sub trim in the
correct manner while also referring to the sub trim operation instructions on p.19 and p.24.
[Purpose of the Trim]
When a servo is to be mounted onto a model, it is usually connected to
the receiver temporarily to enable the transmitter to check its neutral
position before it is installed. However, upon running the model it is often
the case that it does not run in a straight line and the steering servo's
neutral position has to be readjusted. This adjustment function is known
as the “trim,” but trim adjustment is not only done at the beginning,
but it also must be done during model operation to account for factors
such as tire wear and chassis warp. However, using the normal trim to
make these intermediary adjustments could cause other problems. In
the case of the steering trim, it could lead to dierent turning radii for
the left and right wheels. For throttle trims on glow engine cars, the point
of maximum braking, the full open position of the carburetor, etc. would
be shifted. For this reason, the normal trims are designated as “center
trims” that only adjust the neutral position, while a new function called
sub trim is used in conjunction to enable the most optimal settings.
[Purpose of the Sub Trim]
The effect of the sub trim is illustrated in the image on the right.
Adjusting the sub trim also moves the left/right angle range. In contrast,
the center trim moves the neutral position without changing the angle
range position. However, trying to compensate the neutral position while
making large sub trim adjustments may throw o the model's left/right
balance.
[Actual Setting Sequence]
When installing R/C equipment, the servo's neutral position is set
first, then final adjustments would be made with the sub trim after
installation. However, if the sub trim setting value is high, adjust the
neutral position again.
Test run to confirm neutral position. Adjustments during this time
should also be made with the sub trim. After neutral position is xed,
adjust steering balance (p.21) so that the left and right wheels have
the same turning radius and use steering travel (p.18) to adjust overall
steering angle.
During the course of practice or racing, use the center trim to correct
slight changes to the neutral position. If the setting value becomes
high, correct in conjunction with the sub trim so that the center trim
value is zero.
Use the sub trim to adjust settings prior to driving instead of the center trim.
P
Install R/C equipment when the sub trim setting value becomes low.
P
If the neutral position becomes slightly o during driving, use center trim to correct.
P
●Trim and Sub Trim Operation
Left/Right angle range and neutral position can be
both be adjusted.
●Sub Trim
●Trim (Center Trim)
Left/Right movement range
is xed.
Adjusting neutral position only.
The sub trim is accessed via the function menu,
but the steering trim can be assigned to one of
the ET keys in SETUP.
P
Initially, steering trim and throttle trim are
assigned to ET1 and ET2 respectively.
P

13
Basic Operation 1: Selecting from a Menu This explanation uses [Steering] as an example.
Use Jog Dial to move cursor over [Steering].
Press ENTER key to change to the Steering Menu screen.
Basic Operation 2: Changing a Setting Value
This explanation uses [TURN 1] on the Steering Speed screen as an example.
Use Jog Dial to move cursor over the 100% value next to [TURN 1].
Press ENTER key to select it for modication.
Once selected, the cursor will blink. Now use the Jog Dial to change the value.
After changing the value, press ENTER key again to conrm the change.
If you wish to cancel the change, press the BACK key at this time instead of the ENTER key .
■ Display and Control Method
●Basic Operations to Change Settings
BACK Key
ENTER Key
Jog Dial
Control of setting adjustments is done via the Jog Dial, ENTER key, and BACK key.
Jog Dial:Used to move cursor between menu choices and change setting values.
Clockwise Rotation:Raising value (for L/R cases: raising toward R); Proceed to next item
Counterclockwise Rotation:Lowering value (for L/R cases: raising toward L); Return to previous item
ENTER Key:Selecting item to be modied; Conrming change
BACK Key:Returning to previous screen; Canceling change
ENTER Key

14
●Startup Screen and Initial Screen
When the transmitter is switched on, the startup screen will display, followed by the initial screen.
Pressing the ENTER key during the startup screen will allow you to proceed to the initial screen.
Model Number:Displays the currently selected model number.(p.16)
Model Name:Displays the name of the currently selected model number.(p.16)
Steering Trim Monitor:Displays the position of the steering trim.(p.18)
Throttle Trim Monitor:Displays the position of the throttle trim.(p.23)
Function Monitor:Functions that are in active will be lit up.
Power Source Type:Displays the type of battery being used.(p.43)
Voltage:Displays the current power source voltage.
Operation Time:Displays how long the transmitter has been used. (p.42)
Response Mode:Displays the Steering (S) and Throttle (T) Response (p.40)
Control Mode:Displays 3CH (3) and 4CH (4) control mode. (p.32)
Direct Button:Displays the functions assigned to each of the 4 buttons.(p.41)
Version Information:
Displays the version of the program that is installed in the Master Unit's
CPU.
Startup Screen
Initial Screen
AUT:Throttle Auto Start
ABS:Throttle ABS
SOR:Steering Travel Override
TIM:Timer Activated (including Throttle Start Ready)
ADV:Advanced High Speed HSPD:Super High Speed NORM:Normal Speed
PRE:PRESET
ACC:Throttle Acceleration
BOR:Brake Override
DBK:Drag Brake
LP:Li-Po
LF:Li-Fe DR:R03/AAA/UM4 Alkaline Batteries
NI:Ni-MH
--:OFF
2WAY: 2WAY
3WAY: 3WAY
5WAY: 5WAY
ANLG: ANALOG
Notice) If you switch battery types, make sure to also change the [Battery Management] setting.
Press the ENTER key to proceed to [Main Menu].

15
Model Menu (Model) (p.15)
Operations such as selecting or copying a model.
Steering Menu (Steering) (p.18)
Modify settings related to steering.
Throttle Menu (Throttle) (p.23)
Modify settings related to the throttle.
3CH/4CH Menu (3/4ch) (p.32)
Modify settings related to 3CH and 4CH
Quick Setup Menu (QuickSetup) (p.35)
Modify settings required for initial setup.
Timer Menu (Timer) (p.36)
Operating timer-related functions.
Function Menu (Function)(p.38)
Modify settings such as the monitor and buzzer.
System Menu (System) (p.40)
Modify system-related functions such as key
assignment and pairing.
■Function Reference
●Main Menu
Model Menu(Model)
Save various settings as model memories Up to 40 model
memories can be named and stored.
This an index which displays the 8 different function
menus. To switch between function menus, use the direct
keys or do so via the main menu. (If you wish to use the
direct keys, they must rst be assigned.)
Model Select
Switch between dierent model memories.
Model Name
Names the model memories.
Model Copy
Copies model memories.
Model Reset
Resets model memories.
[Functions]
[Legend] P
:Operating Procedure
(see p.13 for basic operation) :Point :Notice

16
Switch between dierent model memories.
Model Select(MDL-Select)
Select the model to be used.(BasicOperationp.13)
All of the various settings are registered under a model memory.
P
Switching model memory while driving may cause setting
mismatches and lead to an uncontrollable model. Please place the
car on a stand or switch if o before switching model memories.
Example
If you have multiple cars, it is convenient to have a separate
model memory for each one. Even in the case of only one
car, you could save specic settings for dierent courses
as dierent model memories as well.
This function is used to name the model memory that is
currently in use. Distinguish each model memory with
dierent names, which may also be edited. The set model
name will be displayed on the initial screen and model
select screen.
[Selectable Characters]
Model Name(MDL-Name)
To delete a character, overwrite the character to be deleted by
using the blank space at the end of each page of characters.
P
Choose one character at a time from the right side.
(Basic Operation p.13)
Setting Range MODEL:01 - 40 Setting Range Maximum 16 characters.
The settings which will be switched by Model Select are...
1)Steering Setting
2)Throttle Setting
3)3CH Setting
4)4CH Setting
5)Steering and Throttle Response
6)Setup Functions
(ET1-ET5, BT1 function assignments)
7)LED Color
8)Model Name
9)Stopwatch Settings
10)Countdown Timer Settings
P

17
Model Copy(MDL-Copy) Model Reset(MDL-Reset)
Copies the current model memory to a different model
memory. Return the current model memory to default setting values.
After reset is nished, [COMPLETE] will ash on the screen before
returning to the menu.
P
Deleted data cannot be recovered. Be careful to avoid undesired
resets.
The contents of the model memory that is being copied to will be
overwritten. Overwritten data cannot be recovered, so be careful
to avoid undesired memory overwrites.
Example
When changing settings on the same car to match driving
conditions, it is convenient to copy the original memory
before modifying it. This function also allows you to try out
new settings while keeping your original one.
Select the model memory to copy to, then hold the ENTER
key to copy.(Basic Operationp.13)
Select [YES] (hold ENTER key) to reset. Select [NO] to
cancel and return to the menu. (BasicOperationp.13)
When selecting the model memory to copy to, that model
memory's name will be displayed.
P
Setting Range MODEL:01 - 40
The settings which will be switched by Model Select are...
1)Steering Setting
2)Throttle Setting
3)3CH Setting
4)4CH Setting
5)Steering and Throttle Response
6)Setup Functions
(ET1-ET5, BT1 function assignments)
7)LED Color
8)Model Name
9)Stopwatch Settings
10)Countdown Timer Settings
P
The settings which will be switched by Model Select are...
1)Steering Setting
2)Throttle Setting
3)3CH Setting
4)4CH Setting
5)Steering and Throttle Response
6)Setup Functions
(ET1-ET5, BT1 function assignments)
7)LED Color
8)Model Name
9)Stopwatch Settings
10)Countdown Timer Settings
P

18
Steering Menu(Steering)
Adjusts the neutral/center position of the steering angle
range.
Also refer to Trim and Sub Trim Operation.(p.12)
Settings related to steering control.
Setting Range L50 - 0 - R50(
Default
:0)
Steering Trim(ST-Trim)
Setting adjustments prior to driving should be carried out with the
sub trim, not the trim.
P
The setting range cannot exceed what is set by [Steering Travel] or
[Steering Balance].
P
Trim Position Travel Position
Steering Trim
Modify the neutral position of the steering angle.
Steering Travel
Modify the overall amount of steering movement.
Steering Balance
Modify the left/right steering angles.
Steering Sub Trim
Modify the overall steering angle range.
Steering Trim Rate
Modify the amount of movement which corresponds to one
click of the Trim button.
Steering Turn Speed
Modify the speed of the steering's turn movement.
Steering Return Speed
Modify the speed of the steering's return movement.
Steering Punch
Modify how much the steering initially turns from neutral
position.
Steering Curve
Modify the movement speed ratio which corresponds to
steering angle.
Steering Reverse
Modify the steering direction.
Travel Override
Setting or switching the steering angle.
[Functions]
(N:Neutral L:Left R:Right)
Adjust the overall amount of steering servo movement
when the steering wheel is at full lock.
Setting Range 0 - 150(
Default
:100)
Steering Travel(ST-Travel)
Since the Balance setting value is a ratio of the Travel setting
value, if the latter is modified the actual movement value and
the displayed graphic will also change.(the Travel value will not
change).
P
Balance Position Travel Position
Steering will not operate if the Travel value is set to 0.

19
Adjust the left/right steering angles independently. This
enables the turning radii to match up during cornering.
Setting Range (
Default
:70%)
L:30 - 100%
R:30 - 100%
Steering Balance(ST-Balance)
The overall number of intervals does not change, so a change in
trim rate will result in a change in the range in which the trim can
be used to make corrections.
P
Although the amount of movement of one interval can be adjusted,
the lower the number the smaller the amount of movement.
P
If the trim rate is changed when the trim is already set, the trim
may be thrown off. If the trim setting is 0 then this does not
apply.)
P
Lower trim rates enable fine adjustments, but the effects may not be
apparent depending on the servo used. If there is a lot of slop in the
linkage or servo saver, fine trim adjustments could cause the user to
constantly worry about the trim settings. In that case, please reexamine
the linkages, etc.
P
If the sub trim value becomes large, adjust the servo horn position
or linkages so that the value becomes closer to 0. If the sub trim
value is too large, dead zones could result and the servo may not
operate at the extremities of its movement range.
P
The set percentage is a ratio of the value set by the Steering
Travel.
P
If the trim is set to a large value, a large left/right value discrepancy
may result. If adjusting steering balance for the rst time, follow the
procedures below.
Set trim value to 0.
Adjust sub trim so that the car drives in a straight line when
steering is in neutral position.
Use steering travel to match the overall steering angle range.
Use steering balance to match the left/right turning radii.
If the car does not drive straight at this point, use trim to correct.
P
Steering balance can be adjusted by using the steering wheel
and ET key!
If an ET key that is assigned to steering trim is pressed while the
steering is turned over halfway in either direction, the balance of
the direction of the turn can be adjusted.
However, this cannot be done while on the Function Menu or
System Menu screens.
P
Balance L Position
Sub Trim Position
Balance R Position
Steering Angle Image
Travel Position
(Dotted Line:Neutral Position)
Adjust the position of the overall steering angle range.
Use this to match the neutral position when installing the
steering servo.
Also refer to Trim and Sub Trim Operation.(p.12)
Adjusts the amount of movement associated with one click
of the trim button. This setting screen is common with the
throttle.
Setting Range L80 - 0 - R80(
Default
:0)
Setting Range
STEERING:1 - 10 intervals (
Default
:5)
THROTTLE:see Throttle Trim Rate
Steering Sub Trim(ST-SubTrim)
Steering Trim Rate(TrimRate)
Example
The servo horn position can be adjusted by the linkages, etc.
when the servo is installed onto the model, but in case this
does not set the neutral position, this function can be used
to set it from the transmitter.
(N:Neutral L:Left R:Right)

Neutral
Neutral
Return1SpeedZon
e
Return2SpeedZone
Position(POS)
Position(POS)
Turn1SpeedZone
Turn2SpeedZone
FullLock
FullLock
ElapsedTime
ElapsedTime
FullLock
FullLock
WheelOperation
WheelOperation
Neutral
Neutral
BeginTurn QuickOperations Return
ServoMovementServoMovement
ServoSpeed
SpeedPosition
Differentvalueswillaffectthegraph'sappearance
20
This function limits the maximum speed of the steering
servo by adjusting the steering turn direction [TURN]
setting. The steering angle between neutral and full
lock is split into two zones and each may be adjusted
independently (2WAY).
This function limits the maximum speed of the steering
servo by adjusting the steering return direction [RETURN]
setting. The steering angle between neutral and full
lock is split into two zones and each could be adjusted
independently (2WAY).
Setting Range
TURNPOS:1 - 100%(
Default
:100%)
This sets the point at which the two speed zones are split.
TURN 1:1 - 100%(
Default
:100%)
This sets the speed from when the steering has begun to turn.
TURN 2:1 - 100%(
Default
:---%)
This sets the speed from after the split to the second zone.
Setting Range
RETNPOS:1 - 100%(
Default
:100%)
This sets the point at which the two speed zones are split.
RETN 2:1 - 100%(
Default
:---%)
This sets the speed before the split position point.
RETN 1:1 - 100%(
Default
:100%)
This sets the speed from after the split to the second zone.
Steering Turn Speed(TurnSpeed) Steering Return Speed(RetnSpeed)
Eective speed values are dependent on the speed characteristics
of your selected servo.
P
Eective speed values are dependent on the speed characteristics
of your selected servo.
P
Take into account such factors as the servo used, car, driving
surface, etc. when adjusting all settings. Conduct test drives to nd
the best setting values.
P
Take into account such factors as the servo used, car, driving
surface, etc. when adjusting all settings. Conduct test drives to nd
the best setting values.
P
You can set the speed to be slow during initial turning, then
subsequently faster.
P
If your car ips on high-grip surfaces, lower the [TURN 1] value to
make cornering easier.
P
[Changing to 1WAY]
Changing [TURNPOS] to 100 will deactivate [TURN 2] and [TURN
1] will be used to set the speed.
P
[Changing to 1WAY]
Changing [RETNPOS] to 100 will deactivate [RETN 2] and [RETN 1]
will be used to set the speed.
P
(N:Neutral) (N:Neutral)
Table of contents
Other Ko Propo Transmitter manuals
Popular Transmitter manuals by other brands

IFM Electronic
IFM Electronic Efector 600 TD Series operating instructions

DELTA DORE
DELTA DORE TYXIA 2330 installation guide

Siemens
Siemens SITRANS P 7MF4232 operating instructions

Burkert
Burkert 8025 UNIVERSAL quick start

Williams Sound
Williams Sound IR T1 user manual

Polaris
Polaris PFT-28s quick start guide