Kohler K-176 User manual

Installation Guide
Digital Interface
Mproduct numbers are for Mexico (i.e. K-12345M)
Los números de productos seguidos de Mcorresponden a México
(Ej. K-12345M)
Français, page ″Français-1″
Español, página ″Español-1″
K-176
1093343-2-B

IMPORTANT INSTRUCTIONS
WARNING: When using electrical products, basic precautions should always be followed,
including the following:
DANGER: Risk of electric shock. Connect only to circuits protected by a Ground-Fault
Circuit-Interrupter (GFCI) or Residual Current Device (RCD). Grounding is required. The unit
should be installed and grounded by a qualified service representative.
WARNING: Risk of electric shock. A licensed electrician should route all electrical wiring.
WARNING: Risk of electric shock. Disconnect power before servicing.
WARNING: Risk of injury or property damage. Please read all instructions thoroughly before
beginning installation.
NOTICE: Follow all plumbing, electrical, and building codes.
1093343-2-B 2 Kohler Co.

Specifications
Interface
Ambient Temperature Max 125°F (52°C)
Maximum Relative Humidity 100% condensing (External surface only)
Digital Interface Cable Length (supplied
with digital interface) 30 ft (9.14 m)
Media Module
Ambient Temperature Max 104°F (40°C)
Maximum Relative Humidity 95% non-condensing
Electrical Service 100-240 V, 50/60 Hz, 2.0-0.83 A
Media Module 100-240 V, 50/60 Hz, 2.0-0.83 A
Valve Cable Length (supplied) 30 ft (9.14 m)
Line-in Cable Length 5.6 ft (1.71 m)
Ethernet Cable Length 30 ft (9.14 m)
Tools and Materials
Screwdrivers
Jigsaw/Saber
Saw
Sealant
LevelPencil
Drill
Plus:
• Shims
• Suction Cup (Provided)
Kohler Co. 3 1093343-2-B

Roughing-In
Before You Begin
Observe all local plumbing, building, and electrical codes.
Read these instructions and determine all required components along with their installation
locations before beginning this installation.
A licensed electrician should install a 15 A 120 V GFCI electrical outlet, within the stud framing, in
close proximity to the electronic valve and media module. The interface is powered through the
connection with the media module.
Install the valve and media module prior to installing the interface.
Kohler Co. reserves the right to make revisions in the design of our products without notice, as
specified in the Price Book.
7-5/8"
(19.4 cm)
30' (9.14 m)
Cutout
7-11/16"
(19.5 cm)
Cutout Detail
1/2" (1.3 cm)
Min Clamp
Arm Clearance
1/4" (6 mm) Min
Interface Lip
Clearance
Clamp Arm
3-5/8" (9.2 cm) –
4-5/8" (11.7 cm)
Wall Cavity
Depth
3/16" (5 mm)
Min –
2" (5.1 cm)
Max Depth
4-1/2"
(11.4 cm)
3-5/8"
(9.2 cm)
3-11/16"
(9.4 cm)
8-1/2" (21.6 cm)
8-Pin Interface Cable
1093343-2-B 4 Kohler Co.

Installation Overview
For best results, follow the recommended installation sequence below. Refer to content in this guide as well
as the Installation Guides packed with each component of your bathing system.
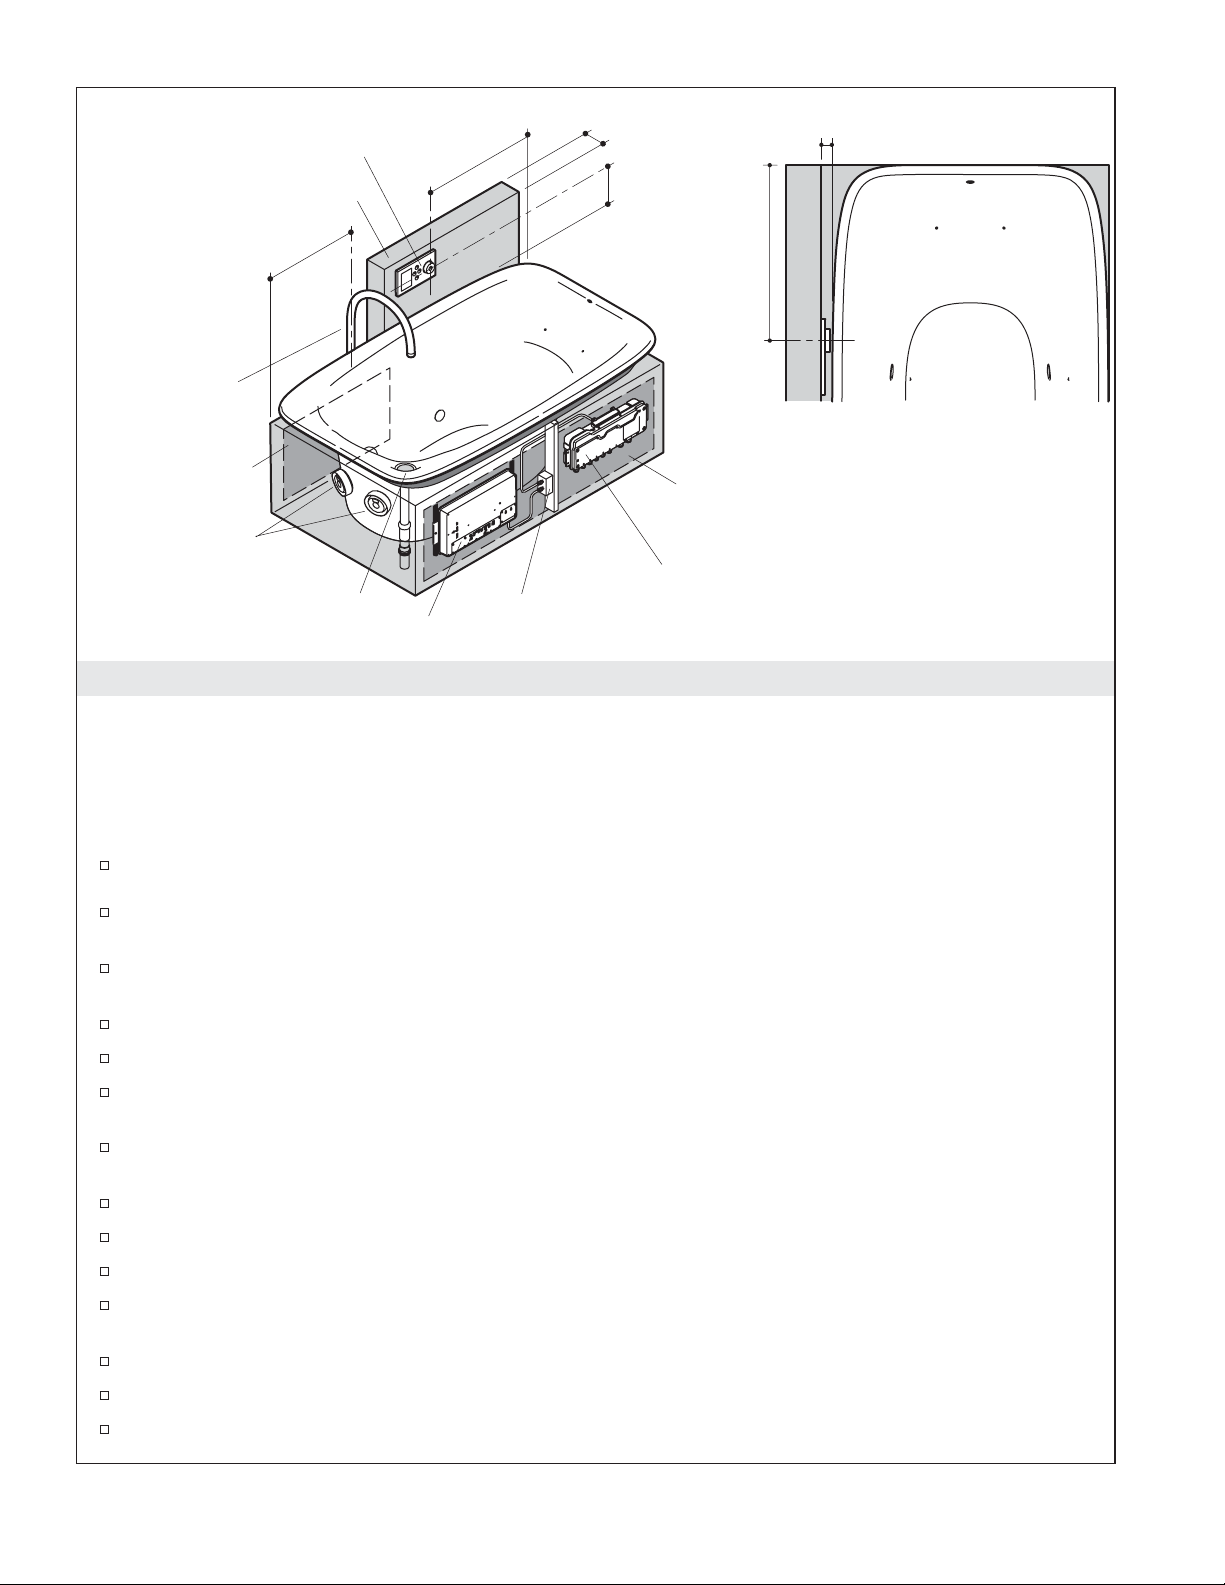
NOTE: Illustration above shows a typical installation with the preferred installation locations for the
digital interface, media module and the digital mixing valve (optional).
Recommended Installation Sequence
Determine the installation location for the media module, and digital mixing valve (if used).
Frame the island for the bath. Provide a properly dimensioned stud pocket for the media module
(required) and the digital mixing valve (optional).
Determine the location for the access panels (required) for servicing the bath transducers, media
module, and digital mixing valve (if used). Plan the island construction accordingly.
Install the island deck. Use the cut-out templates supplied with the bath when preparing the deck.
Frame the false wall for the digital interface.
Route all plumbing to include: supply lines (spout and handshower), drain line, and valve (if
applicable).
Install the electrical outlet(s) in close proximity to the media module and valve (optional)
installation location(s).
Route the Ethernet cable to a router, if applicable.
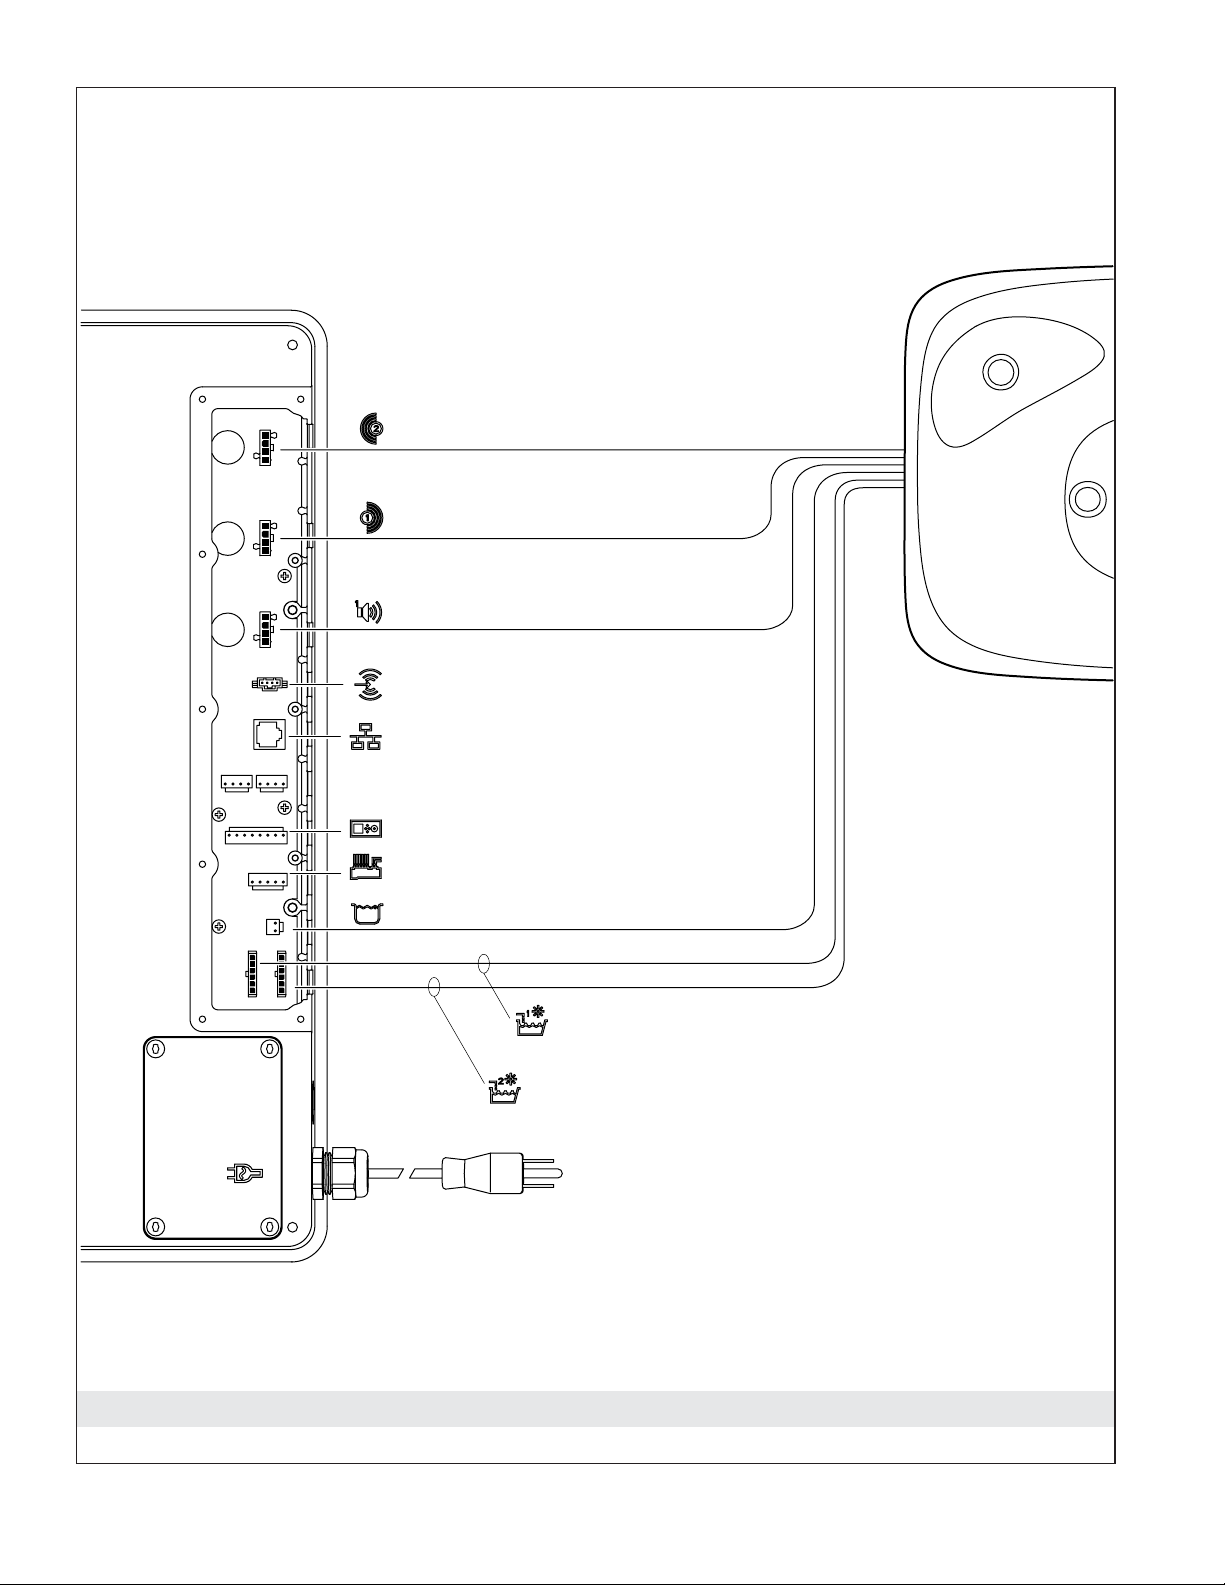
Route the digital interface cable to the media module.
Finish the false wall.
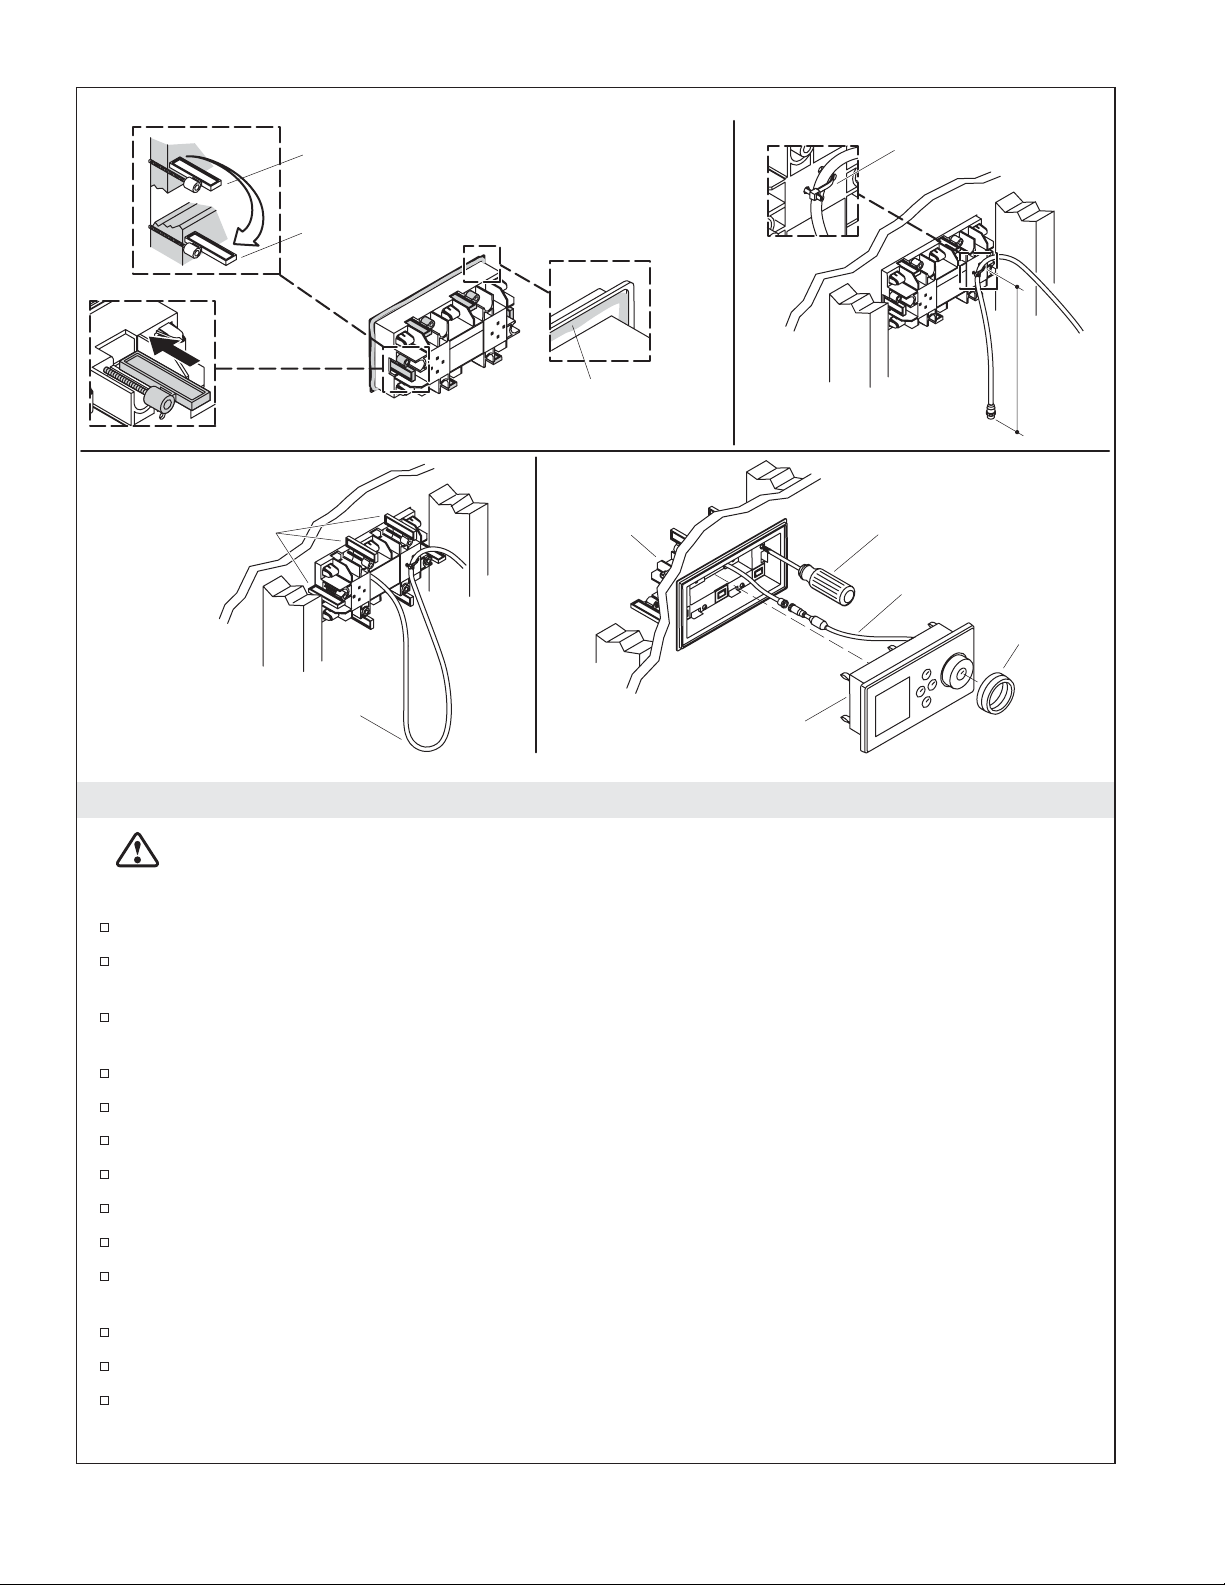
Install the digital interface and media module. Follow the installation instructions packed with each
product.
Install the bath and drain.
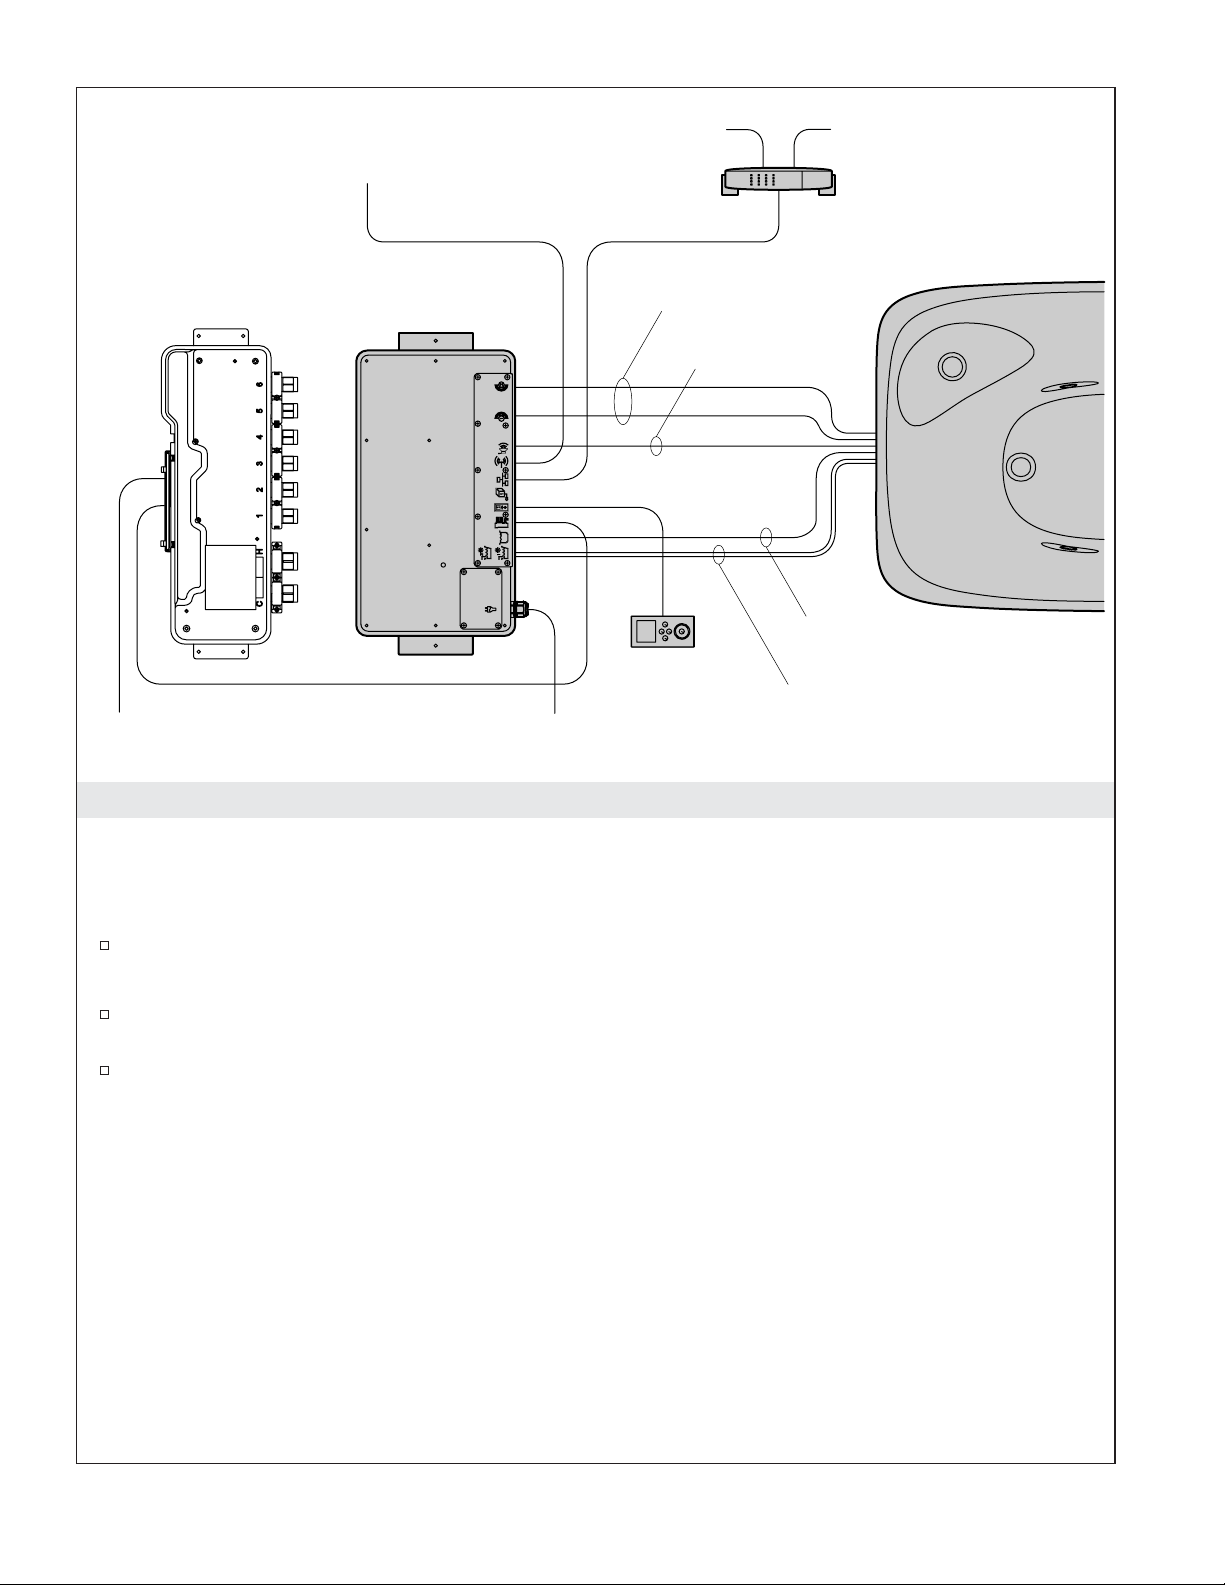
Connect all cables.
Finish the island walls and install the front and rear access panels.
Rear Access
Panel
Overflow Location (LH Shown)
Front Access Panel
24" (61 cm) Min
36" (91.4 cm) Max
3/4" (1.9 cm)
10"
(25.4 cm)
4" (10.2 cm)
Digital Interface
Media Module
34" (86.4 cm)
to Knob
34" (86.4 cm)
to Knob
Outlet
Fill Spout
Digital Mixing Valve
False Wall
Transducers
Kohler Co. 5 1093343-2-B

1. Components
The digital interface controls the digital mixing valve, transducers, ″Smart Fill″level sensor, chroma lighting,
and music through the media module.
Cables are available for connecting audio (line in) and Ethernet to the media module.
Determine all required components along with their installation locations before beginning this
installation.
Verify the components are located so the connection cables easily span the distance between the
connection points.
Refer to the installation guides packed with each product for specific installation needs.
AC Power
Media Module
Router
Computer Internet
Audio
Source
Ethernet Cable
Line In Cable
AC Power
Below Water
Transducer Cables
Above Water
Transducer Cable
Level Sensor
Cable
Chromatherapy
Lighting Cables
Bath
Digital
Interface
Digital Mixing Valve
(Optional)
1093343-2-B 6 Kohler Co.

2. Prepare the Site
NOTE: Allow for a 1/4″(6 mm) overlap for the lip of the wall sleeve and a minimum clearance of 1/2″
(1.3 cm) around the back of the opening to enable the clips to fully engage.
Refer to the rough-in information. With a pencil, mark the cut lines onto the finished wall.
Carefully cut out the opening in the finished wall following the penciled guidelines.
For thin finished wall materials of less than 3/16″(5 mm), shim around the back of the opening to
provide adequate support for mounting the interface wall sleeve.
1/4" (6 mm)
Interface Lip
Cutout
Wall Shim
Clamp Arm
7-11/16"
(19.5 cm)
3-11/16"
(9.4 cm)
1/2" (1.3 cm) Min
Clamp Arm
Clearance
3/16" (5 mm) Min –
2" (5.1 cm) Max Depth
Digital Interface
Shim thin walls if necessary.
34"
(86.4 cm)
10"
(25.4 cm)
Kohler Co. 7 1093343-2-B

3. Install the Interface
CAUTION: Risk of product damage. Do not use power screwdrivers to install the interface.
NOTE: The clamp arms can be removed and turned upside down to allow installation to thicker walls.
Measure the finished wall thickness.
If appropriate, flip the clip arms to accommodate thicker wall materials. Refer to the above
illustration.
Secure the interface cable, from the media module, with a zip tie to the back of the wall sleeve
allowing approximately 18″(45.7 cm) of cable to hang free.
Insert the free end of the interface cable into the opening of the wall sleeve.
Tuck the clamp arms into the slots of the sleeve.
Apply a bead of silicone sealant into the groove around the backside of the sleeve lip.
Insert the sleeve into the cutout.
Turn the clamp arms so that they are perpendicular to the opening.
Handtighten the screws. Do not overtighten.
Wipe away any excess sealant from around the front of the sleeve. Use care not to get sealant on the
outer surface of the sleeve.
Remove the cap from the interface cables.
Connect the interface to the interface cable.
Carefully feed the connection through the hole in the wall sleeve and into the wall cavity. A drip
loop will automatically be formed in the cable.
IMPORTANT! Flip clamp arms for thicker
wall material, 1-1/4" (3.2 cm) – 2" (5.1 cm).
Apply silicone
sealant.
Tuck clamp
arms into slots.
Insert sleeve and
untuck clamp arms.
Drip Loop
18"
(45.7 cm)
Min
Do not use power
screwdriver.
Sleeve
Cable
Interface
Control
Knob
Secure cable.
3
54
Thinner Wall, 3/16" (5 mm) – 1-1/4" (3.2 cm)
1
2
1093343-2-B 8 Kohler Co.

Install the Interface (cont.)
Verify the gasket is in place on the interface.
Slide the body of the interface into the sleeve.
Firmly press on the interface with the palms of your hands until it snaps into place.
Verify the control knob is installed.
Kohler Co. 9 1093343-2-B

Connection Key
To Ethernet
To Audio Line In
To Digital Interface
To Digital Mixing Valve
Bath
Media Module
Knee/Elbow Transducers, 1057479-B
Elbow Chroma Lights, 1083005-A
Knee Chroma Lights, 1083005-B
Water Level Sensor, 1078002
Back/Feet Transducers, 1057479-A
Above Water Speakers, 1086239
1093343-2-B 10 Kohler Co.

4. Connect the Components
CAUTION: Risk of electric shock or product damage. Make sure the power cord for the media
module is unplugged or the power supply is turned off before removing the access covers.
Remove the low voltage access cover on the media module.
Remove the grommets in the locations where the interface cable will be installed. Refer to the
″Connection Key.″
Gently press each connection until it snaps together.
Slide the cable grommet into the slot with the male end up. Verify the grommet is properly seated.
Reinstall the access cover. Do not overtighten.
Plug the media module power cord into the outlet, or for hard-wire options, turn on the power.
Verify that the indicator light turns on and pulses.
Test each component to ensure proper functionality. Refer to the Installation and Homeowner
Guides packed with each of the individual components for additional information.
5. Complete the Installation
If not already installed, install any additional components at this time according to the installation
instructions packed with the products. For connecting to the media module, refer to the ″Connect
the Components″section in the Media Module Installation Guide.
Reinstall the media module access covers. Do not overtighten.
Make sure power cord is unplugged
before opening access covers.
Grommet
Slide grommet into slot with
male end up.
High Voltage
Access Cover
Low Voltage
Access Cover
Install grommets
flush with media box.
Male End
Indicator Light
Kohler Co. 11 1093343-2-B

6. Installation Checkout
Plug the media module power supply into the outlet. Verify that the indicator light on the media
module turns on and pulses.
Turn on the water supply to the valve (if equipped).
Check all connections for leaks and make any adjustments as needed.
Turn on the main power supply. You should hear the valve power up and the power icon on the
user interface will be lit with a green pulsing light.
If not already completed, refer to the ″Digital Interface User Guide″to set up the interface.
NOTE: For more information about using the user interface and its menus, refer to the user interface
Homeowners Guide.
For installations with a digital mixing valve: Press the [Power Icon] and then press the [OK Icon]
to turn on the bath filler. Turn on the handshower by pressing the [Options Icon], then using the
interface dial, scroll to ″Handshower″and select by pressing the [OK Icon]. This will turn on all the
valve outlets and purge the air from the system.
Check for leaks and make any adjustments as needed.
Verify that the water flow is sufficient for your bathing needs.
Troubleshooting
CAUTION: Risk of personal injury. The valve (if installed) may contain hot water; be careful when
draining any residual water.
IMPORTANT! Turn off the power and water supply to all components before performing any
maintenance.
It is recommended that any valve maintenance should be performed by a Kohler Co. Authorized Service
Representative.
This troubleshooting guide is for general aid only. For service and installation issues or concerns, call
1-800-4-KOHLER.
Interface Troubleshooting Table
Symptoms Probable Cause Recommended Action
1. Digital interface is not lit. A. Media module is not plugged
into the outlet. A. Plug the media module into the
outlet.
B. Power supply connection to the
media module may be loose or
disconnected.
B. Check power supply connections to
the media module and reconnect if
needed.
C. Interface cable connections may
be loose or disconnected. C. Check all interface cable
connections, connect if needed.
D. Circuit breaker has been
tripped. D. Reset the circuit breaker.
E. The media module may require
resetting. E. Disconnect and reconnect the
power supply from the media
module.
F. If none of the recommended
actions for the above issues
correct the symptom, the media
module or interface requires
servicing.
F. Contact your Kohler Co.
Authorized Service Representative.
2. The interface power
indicator pulses but does
not turn on.
A. Interface cable connections may
be loose or disconnected. A. Check all interface cable
connections, connect if needed.
B. The media module requires
resetting. B. Disconnect and reconnect the
media module power supply.
1093343-2-B 12 Kohler Co.

Troubleshooting (cont.)
Interface Troubleshooting Table
Symptoms Probable Cause Recommended Action
C. If the above recommended
action does not correct the
symptom, the interface or media
module requires servicing.
C. Contact your Kohler Co.
Authorized Service Representative.
3. The interface functions
normally but no water
flows from the spout or
handshower.
A. Inlet/outlet fittings may be
blocked. A. Check the inlets and outlets for
blockage or debris. Clean the inlet
screens. Refer to the ″Clean the
Inlet Screens″section in the Valve
Homeowners Guide.
B. Outlets are not plumbed
correctly. B. Reroute plumbing as needed.
C. Hot and cold water supplies are
not turned on. C. Turn on the water supply to the
valve.
D. The valve or media module
memory may require resetting. D. Disconnect and reconnect the
power supply from the valve and
media module.
E. System error. E. Check the user interface for an
error code. Refer to the
″Diagnostics″section in the Digital
Interface Homeowners Guide.
F. If none of the recommended
actions for the above issues
correct the symptom, the media
module requires servicing.
F. Contact your Kohler Co.
Authorized Service Representative.
4. Display is difficult to read. A. Contrast is not optimized. A. Adjust contrast in the user interface
setting menu.
B. Brightness is not optimized. B. Adjust the brightness in the user
interface setting menu.
Valve Troubleshooting Table
Symptoms Probable Cause Recommended Action
1. Maximum blend
temperature too hot or
too cold.
A. Incorrect maximum temperature
setting. A. Refer to the ″Set the Maximum
Temperature″section in the Digital
Interface User Guide.
B. Inlet/outlet fittings may be
blocked. B. Check the inlets and outlets for
blockage or debris. Clean the inlet
screens. Refer to the ″Clean the
Inlet Screens″section in the Valve
Homeowners Guide.
C. If the above recommended
action does not correct the
symptom, the interface or valve
requires servicing.
C. Contact your Kohler Co.
Authorized Service Representative.
2. Continuous flow. A. System will not switch off. A. Turn off the water and power
supply and contact your Kohler Co.
Authorized Service Representative.
3. Handshower does not
work. A. Handshower is not enabled. A. Enable the handshower option in
the settings menu. Refer to the
Digital Interface User Guide.
4. Only cold water flows
from the outlets. A. Hot water supply is either not
turned on or not connected to
the valve inlet.
A. Check the hot water supply is
turned on and connected to the
valve inlet.
B. Hot water inlet is blocked. B. Check the hot water inlet screen for
blockage. Clean or replace the inlet
screen. Refer to the Valve
Homeowners Guide.
Kohler Co. 13 1093343-2-B

Troubleshooting (cont.)
Valve Troubleshooting Table
Symptoms Probable Cause Recommended Action
C. If none of the recommended
actions for the above issues
correct the symptom, the valve
requires servicing.
C. Contact your Kohler Co.
Authorized Service Representative.
5. Fluctuating or reduced
flow rate. Valve is
functioning properly.
A. Inlet/outlet fittings may be
blocked. A. Check the inlets and outlets for
blockage or debris. Clean the inlet
screens. Refer to the ″Clean the
Inlet Screens″section in the Valve
Homeowners Guide.
B. Water outlet pressure is low. B. Check that the flow rate is at or
above the minimum rate required.
Refer to ″Specifications″section in
the Valve Homeowners Guide.
C. Fluctuating flow. C. Verify that the dynamic inlet
pressures are within specifications.
Refer to ″Specifications″section in
the Valve Homeowners Guide.
D. If none of the recommended
actions for the above issues
correct the symptom, the valve
requires servicing.
D. Contact your Kohler Co.
Authorized Service Representative.
6. Blend temperature drift or
temperature cycling. A. Fluctuating water temperature. A. Check the inlet temperature
differentials and verify they are
sufficient. Refer to ″Specifications″
section in the Valve Homeowners
Guide.
B. Hot water supply temperature
fluctuation. B. Check and make adjustments as
needed.
C. Pressure difference greater than
5 psi (34.5 kPa) between the hot
and cold supply lines.
C. Install pressure regulators to bring
the supplies within 5 psi (34.5 kPa)
of each other.
D. If none of the recommended
actions for the above issues
correct the symptom, the valve
requires servicing.
D. Contact your Kohler Co.
Authorized Service Representative.
7. Water leaking from the
valve.
CAUTION: Risk of
personal injury or
product damage. Turn off
the main power and
water supply.
A. Connections are not secure. A. Check all connections. Make
adjustments as needed.
B. Seals are worn or damaged. B. Order a seal service pack and
replace all seals.
C. Internal leak. C. Unit requires overhaul. Contact
your Kohler Co. authorized service
representative.
8. Hot water only, the valve
shuts down. A. Hot and cold lines are reversed. A. Switch hot and cold water supply
connections. Verify the hot water
supply is connected to the inlet
marked ″H″and the cold water
supply is connected to the inlet
marked ″C.″
Music Troubleshooting Table
Symptoms Probable Cause Recommended Action
1. Bath transducers do not
produce sound. A. Transducer cables are not
connected properly. A. Make sure the cables are properly
installed into the Media Module
connections and to the bath
transducers.
1093343-2-B 14 Kohler Co.

Troubleshooting (cont.)
Music Troubleshooting Table
Symptoms Probable Cause Recommended Action
2. After playing music
loudly, the music stops
even though a song is
properly selected.
A. Thermal shut down. A. Shut down the system for 1 hour to
allow the unit to cool. Make sure
the area where the unit is installed
does not exceed 104°F (40°C).
3. Library menu is not
available. A. The Roku agreement was
declined. A. Enter the settings menu, select
″System,″select ″Music Software,″
select ″Roku Agreement″and select
″YES.″
4. Music server is not
available. A. Wireless connection out of
range. A1. Move router closer or install a
wireless access point.
A2. Connect via Ethernet cable.
B. Wireless network is not
configured properly. B. Enter the settings menu, select
″System,″select ″WiFi Security,″
select ″Network Name,″select
″WEP/WPA Key″and enter the
security key.
C. The network cable is not
connected to the correct
router/switch input.
C. Connect the Media Module to the
router’s/switch’s Ethernet ports.
D. A compatible media server is
not installed/running on your
home computer.
D. Install/open one of the supported
media servers such as Firefly
Media Server, iTunes
®
, Microsoft
®
Windows
®
Media Connect,
RhapsodyTM, Yahoo! or
Musicmatch
®
on your computer
and load your favorite music into
the server’s library.
E. The media server on your home
computer is not configured to
share files.
E. Reference the media server’s help
menu to properly configure file
sharing.
F. The incorrect Wi-Fi region was
selected. F. Enter the settings menu, select
″System,″select ″Music Software,″
select ″Region″and select the
appropriate geographical region
that matches your Wi-Fi router.
5. I have a wireless network
but my Media Module is
unable to connect to the
network.
A. Ethernet cable is plugged in. A. Unplug the Ethernet cable.
B. Media Module is not within
Wi-Fi range. B. Make sure the Media Module is
within range of your Wi-Fi
network.
C. A WEP or WPA key was not
entered for your secured
network.
C. Enter the settings menu, select
″System,″select ″WiFi Security,″
select ″Network Name,″select
″WEP/WPA Key″and enter the
security key.
D. The router is not set up for
802.11b. D. Make sure the access point/router
is configured to allow 802.11b
clients.
Kohler Co. 15 1093343-2-B

Troubleshooting (cont.)
Music Troubleshooting Table
Symptoms Probable Cause Recommended Action
6. The Media Module cannot
connect to an iTunes
server with firewall
software running.
A. The firewall is not configured
correctly to allow iTunes music
sharing.
A. Make sure your firewall software is
configured to allow iTunes music
sharing. For a Mac: Open System
Preferences. Select the Sharing icon
and click on the firewall tab. Select
the option ″iTunes Music Sharing.″
For a PC: Refer to your
documentation for changing
firewall settings. If running
Windows XP service pack 2, open
″Security Center,″select ″Windows
Firewall,″click on the ″Exceptions″
tab, and check to see that iTunes is
enabled. If not, use ″Add
Programs″to enable it. After these
changes have been made, restart
the Media Module by
disconnecting and reconnecting the
AC power.
7. The Media Module cannot
access the iTunes library. A. iTunes is not running. A. Make sure the computer containing
your iTunes library is turned on
and iTunes is running.
B. iTunes is not configured for
sharing. B. In iTunes, be sure to turn on the
″music sharing″option. Go to the
iTunes>Preferences menu or Edit>
Preferences for PC users. In the
dialog box that appears, click the
″Sharing″icon, then check the
option ″Share my music″to enable
sharing on your local network.
C. iTunes is not responding to
commands from the Media
Module.
C. Close and restart iTunes on your
computer.
8. I can see my iTunes
library in the list of
libraries, but when I try to
connect, the connection
fails.
A. iTunes is not configured for
sharing. A. In iTunes, be sure to turn on the
″music sharing″option. Go to the
iTunes>Preferences menu or Edit>
Preferences for PC users. In the
dialog box that appears, click the
″Sharing″icon, then check the
option ″Share my music″to enable
sharing on your local network.
1093343-2-B 16 Kohler Co.

Troubleshooting (cont.)
Music Troubleshooting Table
Symptoms Probable Cause Recommended Action
B. No IP address assigned to the
Media Module. B. The Media Module was not
assigned an IP address via DHCP,
but the PC was. In this situation,
the Media Module is able to see the
library via Rendezvous, but is not
able to connect to the library. Here
is how to check your Media
Module’s address: Enter the
settings menu, select ″System,″
select ″Music,″select ″Roku IP
Address.″If your IP address is of
the form 169.254.xxx.xxx, the Media
Module did not get a
DHCP-assigned address. Check the
configuration of your router to
ensure it is set up to assign DHCP
addresses. Reboot the Media
Module by disconnecting and
reconnecting the AC power.
9. The Media Module can
not access Windows
Media Connect library.
A. Windows Media Connect is not
configured for sharing. A. Make sure that your computer
containing your music library is
powered ON and Windows Media
Connect is running (icon should be
visible in the task tray). With the
Media Module powered ON and
connected to your network, make
sure that the Media Module is an
authorized device. Launch
Windows Media Connect through
your Control Panel. On the wizard
screen, scroll down the list of
devices. If the Media Module is not
listed, click the ″Add″button at the
bottom of the list. Click on Media
Module, then click ″OK.″It should
show up on the list of authorized
devices. Click ″Done.″Reboot the
Media Module by disconnecting
and reconnecting the AC power.
10. The Media Module can
not access the Musicmatch
library.
A. Musicmatch is not running. A. Make sure the computer containing
your music library is powered ON.
B. Musicmatch is not configured
for sharing. B. Make sure music sharing is enabled
in Musicmatch. From the main
Musicmatch menu, click on
Options/Settings. Click on the tab
″CD Lookup/Connectivity.″Click
the buttons next to ″Enable music
server″as well as ″Universal Plug
and Play.″Musicmatch does not
need to be running while using the
Media Module; once enabled, the
UPnP server runs in the
background. Reboot the Media
Module by disconnecting and
reconnecting the AC power.
Kohler Co. 17 1093343-2-B

Troubleshooting (cont.)
Music Troubleshooting Table
Symptoms Probable Cause Recommended Action
11. The Media Module is
connected to my network
via wired ethernet, but is
unable to play Internet
radio and may sometimes
fail to locate, connect to,
or play music from my
music servers.
A. No IP address assigned to the
Media Module. A. Determine the Media Module’s
address by entering the settings
menu, select ″System,″select
″Music,″select ″Roku IP Address.″
If your IP address is of the form
169.254.xxx.xxx, the Media Module
did not get a DHCP-assigned
address. Check the configuration of
your router to ensure it is set up to
assign DHCP addresses. Reboot the
Media Module by disconnecting
and reconnecting the AC power.
B. Ethernet cable is damaged. B. Replace the Ethernet cable.
12. No sound plays through
the bath transducers. A. The song is paused. A. Make sure a song is playing. If the
song is paused, press the OK
button to continue playback.
B. The volume is too low. B. Make sure the volume is turned up
high enough for proper enjoyment.
13. Some of my music files
do not display while
browsing.
A. Missing ID3 tag info. A. ID3 data tags may be missing.
Information about your music,
including Song Name, Artist,
Composer, Album, and Genre is
usually created automatically by
the software you used to save your
audio CD files on your computer’s
hard drive. This process creates
data called ″ID3 tags″to describe
each track. If this data is missing
from your music files, they will not
appear when you browse by that
data category. You can edit this
information in music jukebox
software such as iTunes.
14. A music file will not play. A. Unsupported file format. A. Make sure your file is a supported
format: iTunes Music Server: MP3,
AAC, ALAC, AIFF and WAV
Windows Media Player 11 /
Windows Media Connect: MP3,
WMA (including DRM WMA) and
WAV.
15. Songs purchased through
the iTunes music store
will not play.
A. Song is not supported because
of DRM. A. This is normal. DRM AAC files
(i.e., files purchased on Apple’s
music store) are not supported.
Those files will be detected but will
be skipped during playback.
16. I cannot find playlists that
I saved on my computer. A. Some playlists may not be
supported. A. iTunes users: Make sure your
playlist was created in iTunes and
is visible in your iTunes
application. Windows Media
Connect users: Make sure your
playlists are saved in the My
Documents\My Music\My
Playlists or other shared folder.
Musicmatch users: Musicmatch
exports playlists in a manner that is
not supported. Slimserver users:
Make sure your playlist is a
Slimserver-supported playlist
format.
1093343-2-B 18 Kohler Co.

Troubleshooting (cont.)
Music Troubleshooting Table
Symptoms Probable Cause Recommended Action
17. I am experiencing
undesirable noise or
resonance.
A. Apron is vibrating against the
deck. A. Verify rubber isolator mounts are
contacting the deck and insulating
the apron from the deck.
B. Transducers resonate with deck. B. Make sure bath is centered in deck
cutout. Transducers should not
contact the framing or deck.
Lights Troubleshooting Table
Symptoms Probable Cause Recommended Action
1. The bath lights do not
turn on. A. Cable connections are loose or
disconnected. A. Make sure the cables are properly
connected to the media module.
B. Light cables connected to wrong
media module connectors. B. Verify cables and connections,
reconnect as needed.
C. Chroma light string damaged. C. Replace chroma light string.
D. Media module is
malfunctioning. D. Media module may need to be
replaced. Contact your Kohler Co.
Authorized Service Representative.
Media Module Troubleshooting Table
Symptoms Probable Cause Recommended Action
1. System stops working and
the status LED is a solid
red.
A. System failure. A. Reboot the Media Module by
disconnecting the AC power from
the wall outlet. If the status LED
remains a solid red after reboot,
replace the Media Module.
2. System stops working and
the Status LED is a OFF. A. Power supply failure. A. Reboot the Media Module by
disconnecting the AC power from
the wall outlet. If there is no
change after reboot, replace the
Media Module.
B. Incorrect wiring of the AC
power supply. B. Verify that the Media Module was
installed per the installation
manual. Make sure AC power is
present at the outlet the Media
Module is plugged into.
3. Music stops playing and I
get a music error. A. Thermal shutdown. A. Shut down the system for 1 hour to
allow the unit to cool. Make sure
the area where the unit is installed
does not exceed 104°F (40°C).
B. Incorrect speaker load. B. Verify the speaker load is 4 to 8
ohms.
4. Water level sensor does
not detect water. A. Level sensor cable is damaged. A. Replace the level sensor cable.
B. Level sensor cable is loose or
disconnected. B. Make sure the cable is properly
connected to the media module.
C. Water is too pure. C. Add bath salts to your bathing
water.
5. No display on the user
interface. A. The interface cable is damaged. A. Replace the interface cable.
B. The interface cable is not
plugged in. B. Verify the interface cable is
properly plugged into the interface
at all locations.
C. The interface or Media Module
requires servicing. C. Contact your Kohler Co.
Authorized Service Representative.
Kohler Co. 19 1093343-2-B

Troubleshooting (cont.)
Media Module Troubleshooting Table
Symptoms Probable Cause Recommended Action
6. Experiences are not
functioning. A. SD card is dislodged. A. Contact your Kohler Co.
Authorized Service Representative.
Remote Control Troubleshooting Table
Symptoms Probable Cause Recommended Action
1. Intermittent or erratic
operation. A. Frequency/channel interference. A. Set RFID, PANID, and channel by
following screen prompts on the
digital interface for the remote.
Then re-sync the remote as
instructed in the Bath Homeowners
Guide.
2. LED on remote does not
blink or constantly blinks. A. Batteries are low. A. Replace batteries (2 AA).
3. One or more buttons on
remote do not function
and LED does not light
up.
A. Batteries are low. A. Replace batteries (2 AA).
B. Remote program lost. B. Re-sync the remote to the interface.
C. Remote is damaged. C. Replace remote.
4. One or more buttons on
remote do not function
but LED lights up.
A. Digital interface is
malfunctioning. A. Digital interface may need to be
replaced. Contact your Kohler Co.
Authorized Representative.
1093343-2-B 20 Kohler Co.
Table of contents
Languages:
Other Kohler Recording Equipment manuals

Kohler
Kohler K-527 Assembly instructions

Kohler
Kohler K-527 Assembly instructions

Kohler
Kohler K-657 User manual

Kohler
Kohler K-527 User manual

Kohler
Kohler K-657 User manual

Kohler
Kohler K-527 User manual

Kohler
Kohler K-657 Assembly instructions

Kohler
Kohler K-99693 Assembly instructions

Kohler
Kohler DTV+ User manual

Kohler
Kohler K-527 User manual