Kohler K-527 Assembly instructions

Homeowners Guide
Digital Interface
K-527, K-527-E, K-558,
K-558-E
Mproduct numbers are for Mexico (i.e. K-12345M)
Los números de productos seguidos de Mcorresponden a México (Ej.
K-12345M)
Français, page ″Français-1″
Español, página ″Español-1″
1214635-5-A

IMPORTANT INSTRUCTIONS
READ AND SAVE FOR THE
CONSUMER
This device complies with Part 15 of the FCC Rules.
Operation is subject to the following two conditions:
This device may not cause harmful interference.
This device must accept any interference received, including
interference that may cause undesired operation.
NOTE: This equipment has been tested and found to comply with the
limits for a Class B digital device, pursuant to Part 15 of the FCC
Rules. These limits are designed to provide reasonable protection
against harmful interference in a residential installation. This
equipment generates, uses and can radiate radio frequency energy and,
if not installed and used in accordance with the instructions, may
cause harmful interference to radio communications. However, there is
no guarantee that interference will not occur in a particular installation.
If this equipment does cause harmful interference to radio or television
reception, which can be determined by turning the equipment off and
on, the user is encouraged to try to correct the interference by one or
more of the following measures:
•Reorient or relocate the receiving antenna.
•Increase the separation between the equipment and the receiver.
•Connect the equipment into an outlet on a circuit different from
that to which the receiver is connected.
•Consult the dealer or an experienced radio/television technician
for help.
1214635-5-A 2 Kohler Co.

IMPORTANT INSTRUCTIONS (cont.)
Modifications: Any modifications made to this device that are not
approved by Kohler Co. may void the authority granted to the user by
the FCC to operate this equipment.
Table of Contents
IMPORTANT INSTRUCTIONS ............................ 2
Specifications ........................................ 3
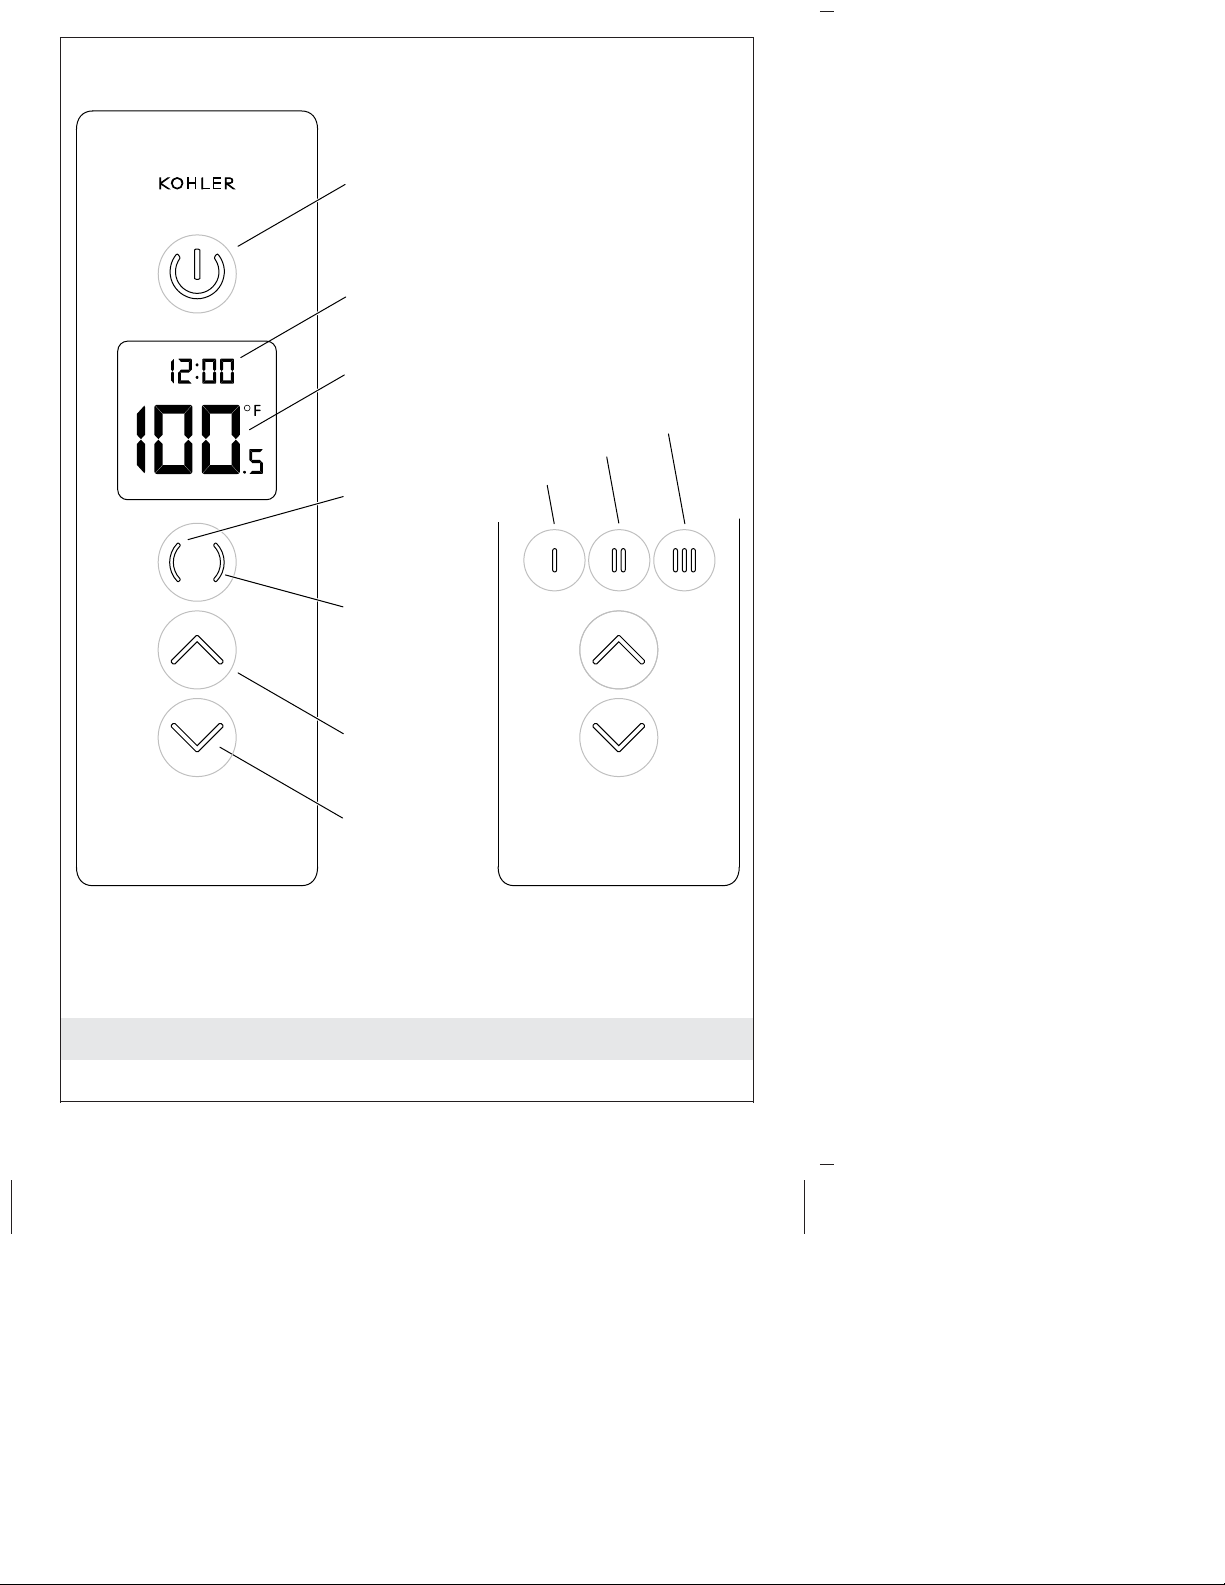
Interface Anatomy ..................................... 4
Using Your Shower .................................... 5
Settings Menu ........................................ 7
Clock – 12 or 24 Hour Time .............................. 9
Clock – Set the Time .................................. 10
Timer – Shower/Bath Fill ............................... 11
Timer – Set the Duration ............................... 12
Temperature – Set the Unit of Measure ..................... 13
Temperature – Set the Default ........................... 14
Temperature – Set the Maximum ......................... 15
Water Outlets – Set Active Outlets ........................ 16
Water Outlets – Set the Default (K-527, K-527-E) ............. 17
Water Outlets – Set the Default (K-558, K-558-E) ............. 18
Temperature – Warm-up Mode ........................... 19
Sound – ON/OFF ..................................... 20
Troubleshooting ...................................... 20
Clean the Inlet Screens ................................ 29
Remove/Reinstall the Interface ........................... 30
Care and Cleaning .................................... 30
Warranty ........................................... 31
Specifications
Interface
Ambient Temperature Max 125°F (51.5°C)
Maximum Relative Humidity 100% condensing (External surface only)
User Interface Cable Length 20’ (6.1 m)
Valve
Ambient Temperature Greater than 34°F (1°C), Max 104°F
(40°C)
Maximum Relative Humidity 95% non-condensing
Electrical Service 120 V, 15 A, 60 Hz
Kohler Co. 3 1214635-5-A

Interface Anatomy
[Power]
ON / OFF / Pause
[Down]
Menu/
Temperature
[Up]
Menu/
Temperature
Current Temperature or
Settings Option/Menu
Clock or Countdown Timer
(If Enabled)
K-527, K-527-E
Outlet 1
Outlet 3
Outlet 2
K-558, K-558-E
Outlet 2
Outlet 1
1214635-5-A 4 Kohler Co.

Using Your Shower
Systems with a Bath Filler
NOTICE: Risk of property damage. To prevent overflow, do not
leave the bath filler running unattended.
IMPORTANT! For systems with both a bath filler and shower:
When setting the temperature, set the default for comfortable
showering; refer to the ″Temperature – Set the Default″section.
Adjust the bathing temperature manually as needed.
Turn ON/OFF the Shower/Bath Filler
Press the [Power] icon to turn the system ON. Your temperature
will be set according to the default. If your system was used
within the last 2 minutes, the temperature will be the same as the
last use.
NOTE: The displayed temperature is the set temperature. The
temperature displayed will blink until the actual temperature
reaches the set temperature.
Press the [Power] icon and hold for 2 seconds to turn the system
OFF.
Decrease the Temperature
Press the [Down] icon to decrease the temperature in 1°F (0.5ºC)
increments.
Kohler Co. 5 1214635-5-A

Using Your Shower (cont.)
Press and hold the [Down] icon to decrease the temperature 1°F
(0.5ºC) every 0.5 seconds.
Increase the Temperature
Press the [Up] icon to increase the temperature in 1°F (0.5ºC)
increments up to 106°F (41°C).
NOTE: For temperatures of 106°F (41°C) and above, the system will
only allow icon presses that are 2 seconds or more apart.
Press and hold the [Up] icon to increase the temperature 1°F
(0.5ºC) every 0.5 seconds up to 106°F (41°C); and every 1 second
for temperatures above 106°F (41°C).
Pausing Your Shower/Bath Filler
Press the [Power] icon for less than 2 seconds to pause the
system. To resume showering, press the [Power] icon again.
The shower will keep the current temperature settings if resumed
within 2 minutes. If the shower is not resumed within 2 minutes,
the system will automatically turn OFF.
Change Active Water Outlets
K-527: Your system may be set for single or dual-outlet operation.
Press the [Outlet] icon to toggle between the two outlets or allow
both to flow at the same time. Refer to the ″Water Outlets – Set
Active Outlets″section.
K-558: Your system may be set for single or multiple-outlet
operation. Press the [Outlet] icon to toggle between the three
outlets or allow all to flow at the same time. Refer to the ″Water
Outlets – Set Active Outlets″section.
K-527-E: Press the [Outlet] icon to toggle between the two outlets.
K-558-E: Press the [Outlet] icon to toggle between the three
outlets.
1214635-5-A 6 Kohler Co.

Settings Menu
Enter the Settings Menu
Press and hold the [Power] and [Up] icons. If your shower is on,
the water will be shut off.
Select a Setting
Use the [Up] or [Down] icon to select a setting to change:
•Prog 1 = Clock – 12 or 24 Hour Time
•Prog 2 = Clock – Set the Time
•Prog3=Timer – Shower/Bath Fill
•Prog4=Timer – Set the Duration
•Prog5=Temperature – Set Unit of Measure
•Prog6=Temperature – Set the Default
•Prog7=Temperature – Set the Maximum
•Prog8=Water Outlets – Single or Dual Operation
•Prog9=Water Outlets – Set the Default
•Prog 10 = Temperature – Warm-up Mode
•Prog 11 = Sound – ON/OFF
Press and hold both
icons for 2 seconds.
+
Kohler Co. 7 1214635-5-A

Settings Menu (cont.)
•Prog 12 = for factory use only
•Prog En = Settings – Exit Menu
Exit the Settings Menu
Press the [Power] icon to enter a ″Prog #″screen.
Use the [Up] or [Down] icon to step to the ″Prog En″screen.
Press the [Power] icon to exit the settings menu.
1214635-5-A 8 Kohler Co.

Clock – 12 or 24 Hour Time
Program 1: Choose 12 or 24 hour clock display.
The factory default is 12 hour display.
Choose ″Prog 1″from the settings menu.
Use the [Up] or [Down] icon to step to ″12″or ″24.″
Press the [Power] icon to set your selection.
Press the [Power] icon again to return to the settings menu.
Refer to the ″Settings Menu″section to access other settings or
exit the menu.
Kohler Co. 9 1214635-5-A

Clock – Set the Time
Program 2: Set the time in hours and minutes.
Choose ″Prog 2″from the settings menu.
Use the [Up] or [Down] icon to adjust the hour. Press the [Power]
icon to set.
Use the [Up] or [Down] icon to adjust the minutes. Press the
[Power] icon to set.
Press the [Power] icon again to return to the settings menu.
Refer to the ″Settings Menu″section to access other settings or
exit the menu.
Set the hour then minutes.
1214635-5-A 10 Kohler Co.

Timer – Shower/Bath Fill
Program 3: Enable or disable timed showering/bath fill.
When enabled, a countdown timer will begin at system start-up and
the system will automatically turn off after the set duration.
If sound is enabled, the countdown timer will chime at 2 minutes
remaining. At 1 minute remaining, the system will chime and the timer
will blink for the remaining 59 seconds.
The factory default is disabled (n).
NOTE: The shower/bath fill can be paused and resumed at any
time during the countdown.
Set the time duration within the ″Prog 4″screens.
Choose ″Prog 3″from the settings menu.
Use the [Up] or [Down] icon to choose ″n″to disable or ″y″to
enable the countdown timer. Press the [Power] icon to set.
Press the [Power] icon again to return to the settings menu.
Refer to the ″Settings Menu″section to access other settings or
exit the menu.
Choose to disable (n)
or enable (y).
Kohler Co. 11 1214635-5-A

Timer – Set the Duration
Program 4: Set the time duration for showering/bath fill.
The time duration defaults to 8 minutes. Duration can be set to
whole-minute increments between 4 and 12 minutes.
When enabled, a countdown timer will begin at system start-up and
the system will automatically turn off after the set duration. Time will
be displayed in minutes:seconds.
Timed showering/bath fill must be enabled within the ″Prog 3″
screens.
IMPORTANT! Before setting duration for bath fill, time how long it
takes to fill the bath to the desired depth; take into consideration the
water that will be displaced by your body. Start timing at system
start-up then adjust the temperature as desired.
Choose ″Prog 4″from the settings menu.
Use the [Up] or [Down] icon to set the time duration as desired.
Press the [Power] icon to set.
Press the [Power] icon again to return to the settings menu.
Refer to the ″Settings Menu″section to access other settings or
exit the menu.
Set the minutes for
the countdown timer.
1214635-5-A 12 Kohler Co.

Temperature – Set the Unit of Measure
Program 5: Choose the temperature display in degrees Fahrenheit or
degrees Celsius.
The factory default is degrees Fahrenheit (°F).
Choose ″Prog 5″from the settings menu.
Use the [Up] or [Down] icon to select °F or °C. Press the [Power]
icon to set.
Press the [Power] icon again to return to the settings menu.
Refer to the ″Settings Menu″section to access other settings or
exit the menu.
Choose Fahrenheit or Celcius.
Kohler Co. 13 1214635-5-A

Temperature – Set the Default
IMPORTANT! For systems with both a bath filler and shower:
When setting the temperature, set the default for comfortable
showering; adjust the bathing temperature manually as needed.
Program 6: Set the start-up temperature of the shower.
The factory default is 100°F (38°C). The minimum temperature setting
is 86°F (30°C).
NOTE: The maximum default temperature setting is the limit
specified in program 7, up to 120°F (49°C).
Choose ″Prog 6″from the settings menu.
Use the [Up] or [Down] icon to set the default temperature. Press
the [Power] icon to set.
Press the [Power] icon again to return to the settings menu.
Refer to the ″Settings Menu″section to access other settings or
exit the menu.
Set your preferred
default temperature.
1214635-5-A 14 Kohler Co.

Temperature – Set the Maximum
Program 7: Limit the maximum water temperature for showering.
The factory default is 113°F (45°C).
NOTE: The maximum temperature setting is 120°F (49°C).
Choose ″Prog 7″from the settings menu.
Use the [Up] or [Down] icon to set the maximum temperature.
Press the [Power] icon to set.
Press the [Power] icon again to return to the settings menu.
Refer to the ″Settings Menu″section to access other settings or
exit the menu.
Set the maximum
temperature limit.
Kohler Co. 15 1214635-5-A

Water Outlets – Set Active Outlets
Single-outlet operation (n): Allows only one outlet to be on at a time.
The user must toggle between the outlets.
Multi-outlet operation (y): Allows single-, dual-, and triple-outlet
operation. The user can have multiple outlets on at the same time or
toggle between the outlets.
The factory default is dual-outlet operation (y).
Choose ″Prog 8″from the settings menu.
Use the [Up] or [Down] icon to choose ″n″for single outlet
operation, or ″y″to allow all outlets to be on at once. Press the
[Power] icon to set.
Press the [Power] icon again to return to the settings menu.
Refer to the ″Settings Menu″section to access other settings or
exit the menu.
Choose single-outlet operation (n)
or enable multiple-outlet operation (y).
1214635-5-A 16 Kohler Co.

Water Outlets – Set the Default (K-527, K-527-E)
Program 9: Determine the default outlet(s) that will turn on at shower
start-up.
The factory default is outlet 1.
NOTE: Both outlets (b) is only an option for K-527. Both outlets
must be enabled (Prog 8) for ″b″to appear as an option. See the
″Water Outlets – Set Active Outlets″section.
Choose ″Prog 9″from the settings menu.
Use the [Up] or [Down] icon to choose the outlet(s) that will turn
on at shower start-up; ″1″for outlet 1, ″2″for outlet 2, or ″b″for
both outlets (K-527 only). Press the [Power] icon to set.
Press the [Power] icon again to return to the settings menu.
Refer to the ″Settings Menu″section to access other settings or
exit the menu.
Choose default outlets: outlet 1 (1),
outlet 2 (2), or both (b).
Kohler Co. 17 1214635-5-A

Water Outlets – Set the Default (K-558, K-558-E)
Program 9: Determine the default outlet(s) that will turn on at shower
start-up.
The factory default is outlet 1.
NOTE: Multiple outlets is only an option for K-558. All outlets
must be enabled (Prog 8) for multiple outlet options to appear. See
the ″Water Outlets – Set Active Outlets″section.
Choose ″Prog 9″from the settings menu.
Use the [Up] or [Down] icon to choose the outlet(s) that will turn
on at shower start-up; ″1″for outlet 1, ″2″for outlet 2, ″3″for
outlet 3, or any combination of multiple outlets (K-558 only).
Press the [Power] icon to set.
Press the [Power] icon again to return to the settings menu.
Refer to the ″Settings Menu″section to access other settings or
exit the menu.
Choose default outlets: outlet 1 (1),
outlet 2 (2), outlet 3 (3) or any combination.
1214635-5-A 18 Kohler Co.

Temperature – Warm-up Mode
Program 10: When enabled, the shower will turn on and water will
flow until the set temperature (default) is reached.
The factory default is warm-up mode disabled (n).
NOTE: The displayed temperature is the set temperature. The
displayed temperature will blink until the actual temperature
reaches the set temperature.
Once the set temperature is reached the shower will automatically
pause until the user presses the [Power] icon to resume showering. If
the shower is not resumed within 2 minutes, the system will
automatically turn off.
Choose ″Prog 10″from the settings menu.
Use the [Up] or [Down] icon to choose ″y″to enable warm-up
mode for the default outlet, ″b″for both outlets, or ″n″to disable.
Press the [Power] icon to set.
Press the [Power] icon again to return to the settings menu.
Refer to the ″Settings Menu″section to access other settings or
exit the menu.
Enable default outlet (y),
both outlets (b), or disable (n).
Kohler Co. 19 1214635-5-A

Sound – ON/OFF
Program 11: Turns the chime ON or OFF. The chime is associated with
icon presses and the countdown for timed showering/bath fill,
The factory default is chime ON (y).
Choose ″Prog 11″from the settings menu.
Use the [Up] or [Down] icon to choose ″n″to disable chime, or
″y″to enable. Press the [Power] icon to set.
Press the [Power] icon again to return to the settings menu.
Refer to the ″Settings Menu″section to access other settings or
exit the menu.
Troubleshooting
WARNING: Risk of electric shock. Disconnect power before
performing any maintenance. When disconnected, the
product will no longer be electrically live, which will
eliminate the risk of electric shock.
CAUTION: Risk of personal injury. The valve may contain
hot water; be careful when draining any residual water.
NOTICE: Turn OFF the power and water supply to the valve before
performing any maintenance to the valve.
It is recommended that any valve maintenance should be performed
Enable (y) or
disable (n) chime.
1214635-5-A 20 Kohler Co.
Other manuals for K-527
4
This manual suits for next models
3
Table of contents
Languages:
Other Kohler Recording Equipment manuals

Kohler
Kohler K-527 User manual

Kohler
Kohler K-657 User manual

Kohler
Kohler K-657 Assembly instructions

Kohler
Kohler DTV+ User manual

Kohler
Kohler K-527 Assembly instructions

Kohler
Kohler K-527 User manual

Kohler
Kohler K-99693 Assembly instructions

Kohler
Kohler K-527 User manual

Kohler
Kohler K-657 User manual

Kohler
Kohler K-176 User manual