manuals.online logo
Brands
  1. Home
  2. •
  3. Brands
  4. •
  5. Konica Minolta
  6. •
  7. Measuring Instrument
  8. •
  9. Konica Minolta CM-3700D User manual

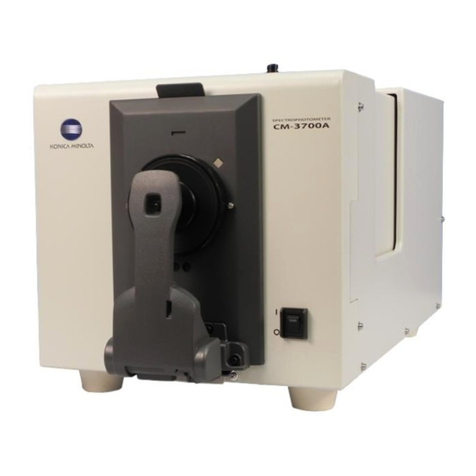
Konica Minolta CM-3700D User manual

CM-3700d
SpectraMagicTM NX (Optional)
A High-Accuracy Benchtop Spectrophotometer
With Konica Minolta's Optical Technology
for High Performance
and Computer Control for Easy Operation
High-speed,
high-accuracy measurements
Measurements at wavelengths from 360 to
740nm at 10nm pitch are taken in approximately
0.6 seconds. Konica Minolta's optical technology
ensures high absolute- value accuracy and
repeatability, and extremely strict quality control
provides higher inter-instrument agreement and
reliability.
qIllumination/viewing geometry meets ISO and
DIN standards for di:8°, de:8°(diffuse illumination/8°
viewing angle) geometry and also conforms to CIE
and ASTM standards for d:0°(diffuse illumination/0°
viewing angle) geometry.
wPulsed xenon lamp light source provides high
stability, long life, and excellent repeatability on
dark and high-chroma colors.
e6-inch integrating sphere has a powdered
barium sulfate (BaSO4) coating with superior
optical characteristics.
rDouble-beam feedback system monitors the
light emitted by the xenon lamp and automatically
compensates for changes in brightness or spectral
characteristics.
tFlat holographic grating efficiently separates
the light by wavelength to provide higher
repeatability for dark colors.
ySilicon photodiode array sensor quickly
converts the light separated by the grating to
electrical currents.
CM-3720d (Whiteness Model)/CM-3730d (Paper Industry Model)
UV cutoff filter switching (CM-3720d, CM-3730d)
Cuts off UV components having wavelengths of 420nm or less emitted by the light source. Useful for eliminating the effects
of fluorescence when measuring fluorescent materials having excitation wavelengths below 420nm.
Enables easy switching to normal measurement using illumination including ultraviolet radiation.
Low-illumination setting (CM-3720d, CM-3730d)
Reduces illumination level to one-fifth. Reduction of light quantity can eliminate triplet influences, which may occur
occasionally when measuring fluorescent materials at the normal illumination level.
Opacity jig (CM-3730d)
Enables easy switching of the background between white and black and ensures paper position does not shift during
opacity measurements.
Various measuring functions
u
Switchable between SCI and
SCE measurements
SCI (specular component included ) measurements
minimize the influence of surface conditions on
measured values, making it suitable for CCM
applications. SCE (specular component excluded)
measurements correspond closely to professional
visual evaluation.
iChangeable measurement areas
Select measurement areas of 3×5mm,ø8mm, or
ø25.4mm according to the application.
oVariable UV
The amount of UV included in the illumination can
be controlled in 1000 steps for measurements of
fluorescent materials.
!0Transmittance measurements
The spectral transmittance of liquids or of specimens
in sheet or plate form can be measured using
di:0°, de:0°(diffuse illumination/0°viewing angle)
geometry.
Demands for higher accuracy and more analysis capabilities have been increasing,
particularly from R&D professionals. In response, Konica Minolta has utilized its long experience in optics and color measurement
to create the Spectrophotometer CM-3700d, a high-accuracy benchtop spectrophotometer suitable for not only research
and development, but also for quality control or CCM applications.
System Diagram
Personal computer
Accessory Case CM-A66
(standard accessory)
Spectrophotometer CM-3700d
Standard
accessories
Optional
accessories
Target Mask
CM-A91
(3x5mm)
Target Mask
CM-A93
( 25.4mm)
AC Adapter
RS-232C Cable CM-A52
(9-pin, 2m)
White Calibration Plate CM-A90
(with floppy disk containing calibration data)
Target Mask
CM-A92
( 8mm)
Cell
CM-A99
(20mm)
Cell
CM-A98
(10mm)
Cell
CM-A97
(2mm)
Plastic Cell
CM-A132
(20mm: set for 100)
Plastic Cell
CM-A131
(10mm: set for 100)
Plastic Cell
CM-A130
(2mm: set for 100)
Transmittance
Zero Calibration Plate
CM-A100
Transmittance Specimen Holder
CM-A96
Zero Calibration Box
CM-A94 Color Tiles
RS-232C Cables CM-A55
(9-pin, 5m)
u
o !0
o
eu
SCE
SCI
8°
8°
o
r
t
!0
w
q
y
Windows®is a trademark of Microsoft Corporation in the USA and other countries.
SpectraMagicTMNX
Supports Windows®2000/XP/Vista
(optional)
SpectraMagicTM NX enables you to perform comprehensive color
inspection and analysis of incoming raw materials, in process production,
and outbound color critical goods and materials in virtually any industry.
With SpectraMagicTM NX you can insert digital images with measured data.
Measure samples in any of 8 universally accepted color spaces. Select
from 15 illuminants, and up to 40 indices to determine specific color and
appearance properties, such as strength, brightness, haze, yellowness,
opacity and strength. You can even configure up to 3 customized color
equations. Reports range from simple Pass/Fail to trend charts, histograms,
color plots, and spectral graphs. SpectraMagicTMNX comes with predefined
templates using skin technology, or you can create your own templates.
For illustrations and explanations to understanding color and color
measurement technology, there is a link to Konica Minolta's well known and
respected “Precise Color Communication”. Step by step navigation help.
SpectraMagicTM NX
CM-S100w
A High-Accuracy Benchtop Spectrophotometer
With Konica Minolta's Optical Technology
for High Performance
and Computer Control for Easy Operation
High-speed,
high-accuracy measurements
Measurements at wavelengths from 360 to
740nm at 10nm pitch are taken in approximately
0.6 seconds. Konica Minolta's optical technology
ensures high absolute- value accuracy and
repeatability, and extremely strict quality control
provides higher inter-instrument agreement and
reliability.
qIllumination/viewing geometry meets ISO and
DIN standards for di:8, de:8(diffuse illumination/8
viewing angle) geometry and also conforms to CIE
and ASTM standards for d:0(diffuse illumination/0
viewing angle) geometry.
wPulsed xenon lamp light source provides high
stability, long life, and excellent repeatability on
dark and high-chroma colors.
e6-inch integrating sphere has a powdered
barium sulfate (BaSO4) coating with superior
optical characteristics.
rDouble-beam feedback system monitors the
light emitted by the xenon lamp and automatically
compensates for changes in brightness or spectral
characteristics.
tFlat holographic grating efficiently separates
the light by wavelength to provide higher
repeatability for dark colors.
ySilicon photodiode array sensor quickly
converts the light separated by the grating to
electrical currents.
Various measuring functions
u
Switchable between SCI and
SCE measurements
SCI (specular component included ) measurements
minimize the influence of surface conditions on
measured values, making it suitable for CCM
applications. SCE (specular component excluded)
measurements correspond closely to professional
visual evaluation.
iChangeable measurement areas
Select measurement areas of 3×5mm,ø8mm, or
ø25.4mm according to the application.
oVariable UV
The amount of UV included in the illumination can
be controlled in 1000 steps for measurements of
fluorescent materials.
!0Transmittance measurements
The spectral transmittance of liquids or of specimens
in sheet or plate form can be measured using
di:0, de:0(diffuse illumination/0viewing angle)
geometry.
Demands for higher accuracy and more analysis capabilities have been increasing,
particularly from R&D professionals. In response, Konica Minolta has utilized its long experience in optics and color measurement
to create the Spectrophotometer CM-3700d, a high-accuracy benchtop spectrophotometer suitable for not only research
and development, but also for quality control or CCM applications.
System Diagram
Personal computer
Accessory Case CM-A66
(standard accessory)
Spectrophotometer CM-3700d
Standard
accessories
Optional
accessories
Target Mask
CM-A91
(3x5mm)
Target Mask
CM-A93
( 25.4mm)
AC Adapter
RS-232C Cable CM-A52
(9-pin, 2m)
White Calibration Plate CM-A90
(with floppy disk containing calibration data)
Target Mask
CM-A92
( 8mm)
Cell
CM-A99
(20mm)
Cell
CM-A98
(10mm)
Cell
CM-A97
(2mm)
Plastic Cell
CM-A132
(20mm: set for 100)
Plastic Cell
CM-A131
(10mm: set for 100)
Plastic Cell
CM-A130
(2mm: set for 100)
Transmittance
Zero Calibration Plate
CM-A100
Transmittance Specimen Holder
CM-A96
Zero Calibration Box
CM-A94 Color Tiles
RS-232C Cables CM-A55
(9-pin, 5m)
u
o !0
o
eu
SCE
SCI
8
8
o
r
t
!0
w
q
y
Windows®is a trademark of Microsoft Corporation in the USA and
other countries.
SpectraMagicTMNX
Supports Windows®2000/XP/Vista
(optional)
SpectraMagicTM NX enables you to perform
comprehensive color inspection and analysis of
incoming raw materials, in process production, and
outbound color critical goods and materials in virtually
any industry. With SpectraMagicTM NX you can insert
digital images with measured data. Measure samples
in any of 8 universally accepted color spaces. Select
from 15 illuminants, and up to 40 indices to determine
specific color and appearance properties, such as
strength, brightness, haze, yellowness, opacity and
strength. You can even configure up to 3 customized
color equations. Reports range from simple Pass/Fail
to trend charts, histograms, color plots, and spectral
graphs. SpectraMagicTM NX comes with predefined
templates using skin technology, or you can create
your own templates. For illustrations and explanations
to understanding color and color measurement
technology, there is a link to Konica Minolta's well
known and respected “Precise Color Communication”.
Step by step navigation help.
SpectraMagicTM NX
CM-S100w
A
I
L
L
P
K
Printed in Japan9242-4851-31
©2003 KONICA MINOLTA SENSING, INC.
18
Certificate No : JQA-E-80027
Registration Date : March 12, 1997
Certificate No : YKA 0937154
Registration Date : March 3, 1995
Measuring geometry
Detector
Wavelength range
Wavelength pitch
Half bandwidth
Photometric range
Light source
Measurement time
Illumination/
measurement areas
Repeatability
Inter-instrument
agreement
Temperature drift
UV adjustment
Specimen conditions
for transmittance
measurements
Interface
Power
Operation temperature/
humidity range
(*1)
Storage temperature/
humidity range
Dimensions (W
×
H
×
D)
Weight
Standard accessories
Optional accessories
*1 Operating temperature/humidity range of products for North America : 13 to 33C, relative
humidity 80% or less (at 31C) with no condensation
•Specifications are subject to change without notice.
55
12
7
271
500
128.5
143
259
247
482
41.8
Dimensions
(Units:mm)
Reflectance: di:8, de:8(diffuse illumination/8viewing angle);
SCI (specular component included )/SCE(specular component
excluded) switchable; meets CIE, ISO, ASTM, and DIN standards.
Transmittance: di:0, de:0(diffuse illumination/0viewing angle)
Silicon photodiode array with flat holographic grating
360 to 740nm
10nm
Approx. 14nm average
0 to 200%; Resolution: 0.001%
Pulsed xenon arc lamp
0.6 to 0.8 sec. (to start of data output)
Reflectance: Changeable between LAV, MAV, and SAV
LAV: ø28mm illumination/ø25.4mm measurement
MAV: ø11mm illumination/ø8mm measurement
SAV: 5×7mm illumination/3×5mm measurement
Transmittance: Approx. ø20mm
When white calibration plate is measured 30 times at 10-sec.
intervals after white calibration has been performed:
Spectral reflectance: Standard deviation within 0.05%
Chromaticity: Standard deviation within
Δ
E*ab0.005
When black tile(BCRA Series II ; reflectance: 1%)is measured 30 times
at 10-second intervals after white calibration has been performed:
Spectral reflectance: 380 to 740nm: Standard deviation within 0.02%
360 and 370nm: Standard deviation within 0.04%
Chromaticity: Standard deviation within ΔE*ab0.05
mean ΔE*ab0.08 (typical) Average for 12 BCRA Series
II
color tiles.
Max ΔE*ab0.3(corresponds to approx. ΔE*CMC 0.2) for any of 12 BCRA
Series II color tiles compared to values measured with master body ; LAV.
Spectral reflectance: Within ±0.10%/C,
Color difference: Within ±ΔE*ab0.05/C
Computer controlled: continuously variable
Sheet, plate, or liquid form up to a maximum thickness of
approximately 50mm
RS-232C standard; baud rates: 1200,2400,4800,or 9600
AC 100V/120V/230V 50/60Hz (using included AC adapter)
13 to 33C, relative humidity 80% or less with no condensation
0 to 40C, relative humidity 80% or less with no condensation
271 ×259 ×500mm(10-11/16 ×10-3/16 ×19-11/16 in.)
18kg(39.7 lb.)
White Calibration Plate; Target Mask(3×5mm);
Target Mask(ø8mm); Target Mask(ø25.4mm);
Zero Calibration Box; AC Adapter;
RS-232C Cable(9-pin, 2m);
Accessory Case CM-A66
Transmittance Specimen Holder; Glass Cells(2mm, 10mm, 20mm);
Plastic Cells(2mm, 10mm, 20mm);
Transmittance Zero Calibration Plate; Color Tiles;
RS-232C Cable(9-pin, 5m)
Optional Accessories
Transmittance Specimen
Holder CM-A96
Holds specimens in place for trans-
mittance measurements. Maximum
specimen thickness: 22.5mm
Glass Cell
CM-A97/CM-A98/CM-A99
Hold liquid specimens for transmit-
tance measurements. Optical path
lengths: 2mm (CM-A97), 10mm
(CM-A98), and 20mm (CM-A99)
Plastic Cells CM-A130(2mm),
CM-A131(10mm),CM-A132(20mm)
are also available.
Transmittance Zero
Calibration Plate CM-A100
For performing zero calibration for
transmittance measurements.
Color Tiles
14 color tiles are available: White, Pale grey,
Middle grey, Difference grey, Deep grey, Deep
pink, Red, Orange, Bright yellow, Green,
Difference green, Cyan, Deep blue, Black. Original
materials of these tiles are supplied by BCRA.
Specifications (CM-3700d)
SAFETY PRECAUTIONS
For correct use and for your safety, be sure to read the instruction
manual before using the instrument.
Always connect the instrument to the specified power supply
voltage. Improper connection may cause a fire or electric shock.

Other Konica Minolta Measuring Instrument manuals

Konica Minolta JM-103 User manual

Konica Minolta

Konica Minolta JM-103 User manual

Konica Minolta FD-5 User manual

Konica Minolta

Konica Minolta FD-5 User manual

Konica Minolta MULTI GLOSS 268Plus User manual

Konica Minolta

Konica Minolta MULTI GLOSS 268Plus User manual

Konica Minolta RANGE7 User manual

Konica Minolta

Konica Minolta RANGE7 User manual

Konica Minolta CR-400 User manual

Konica Minolta

Konica Minolta CR-400 User manual

Konica Minolta CA-100PLUS User manual

Konica Minolta

Konica Minolta CA-100PLUS User manual

Konica Minolta REGIUS 110 User manual

Konica Minolta

Konica Minolta REGIUS 110 User manual

Konica Minolta AeroDR SKR 4000 User manual

Konica Minolta

Konica Minolta AeroDR SKR 4000 User manual

Konica Minolta CM-700d User manual

Konica Minolta

Konica Minolta CM-700d User manual

Konica Minolta Vivid 910 User manual

Konica Minolta

Konica Minolta Vivid 910 User manual

Konica Minolta CS-150 User manual

Konica Minolta

Konica Minolta CS-150 User manual

Konica Minolta CS-3000HDR User manual

Konica Minolta

Konica Minolta CS-3000HDR User manual

Konica Minolta CM-3630 User manual

Konica Minolta

Konica Minolta CM-3630 User manual

Konica Minolta CA-310 User manual

Konica Minolta

Konica Minolta CA-310 User manual

Konica Minolta CM-25cG User manual

Konica Minolta

Konica Minolta CM-25cG User manual

Konica Minolta CM3610D User manual

Konica Minolta

Konica Minolta CM3610D User manual

Konica Minolta CR-400 User manual

Konica Minolta

Konica Minolta CR-400 User manual

Konica Minolta CL-200A User manual

Konica Minolta

Konica Minolta CL-200A User manual

Konica Minolta CM-36dGV User manual

Konica Minolta

Konica Minolta CM-36dGV User manual

Konica Minolta REGIUS 210 User manual

Konica Minolta

Konica Minolta REGIUS 210 User manual

Konica Minolta CM-26dG User manual

Konica Minolta

Konica Minolta CM-26dG User manual

Konica Minolta CHROMA METER CS-200 User manual

Konica Minolta

Konica Minolta CHROMA METER CS-200 User manual

Konica Minolta REGIUS 110 HQ User manual

Konica Minolta

Konica Minolta REGIUS 110 HQ User manual

Konica Minolta CS-2000A - AUTRE User manual

Konica Minolta

Konica Minolta CS-2000A - AUTRE User manual

Popular Measuring Instrument manuals by other brands

Kübler CODIX 54P operating instructions

Kübler

Kübler CODIX 54P operating instructions

CS-iTEC S 505 Quick user guide

CS-iTEC

CS-iTEC S 505 Quick user guide

Trotec TP10 instructions

Trotec

Trotec TP10 instructions

Apogee MQ-500 owner's manual

Apogee

Apogee MQ-500 owner's manual

iET 1316 User and service manual

iET

iET 1316 User and service manual

Agilent Technologies 8752C Service guide

Agilent Technologies

Agilent Technologies 8752C Service guide

REED R5800 instruction manual

REED

REED R5800 instruction manual

Eastron SDM530-Modbus user manual

Eastron

Eastron SDM530-Modbus user manual

LIMIT 6200 operating manual

LIMIT

LIMIT 6200 operating manual

LumaSense IGA 15 plus Operation manual

LumaSense

LumaSense IGA 15 plus Operation manual

SPX RADIODETECTION 6100 Series Important safety instructions

SPX

SPX RADIODETECTION 6100 Series Important safety instructions

Mitutoyo ID-N user manual

Mitutoyo

Mitutoyo ID-N user manual

Magnescale LH72 Initial setup manual

Magnescale

Magnescale LH72 Initial setup manual

Blue Line Innovations PowerCost Monitor installation guide

Blue Line Innovations

Blue Line Innovations PowerCost Monitor installation guide

Lighthouse Worldwide Solutions REMOTE 1100 operating manual

Lighthouse Worldwide Solutions

Lighthouse Worldwide Solutions REMOTE 1100 operating manual

Sony DK110NLR5 instruction manual

Sony

Sony DK110NLR5 instruction manual

Ultraflux Uf 841 user manual

Ultraflux

Ultraflux Uf 841 user manual

Siemens SITRANS LR260 operating instructions

Siemens

Siemens SITRANS LR260 operating instructions

manuals.online logo
manuals.online logoBrands
  • About & Mission
  • Contact us
  • Privacy Policy
  • Terms and Conditions

Copyright 2025 Manuals.Online. All Rights Reserved.