KRAFTWERK 38122 User manual

www.KRAFTWERKtools.com
EN
Art. 38122
Instruction Manual
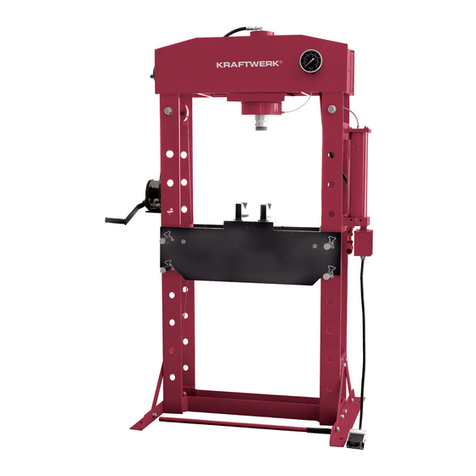
Hydropneumatic shop press
30 T

2
SAFETY INSTRUCTIONS
PLEASE READ THESE INSTRUCTIONS CAREFULLY. NOTE THE SAFETY INSTRUCTIONS AND WARNINGS. USE
THE PRODUCT CORRECTLY AND WITH CARE FOR THE PURPOSE OF WHICH IT IS INTENDED. FAILURE TO DO
SO MAY CAUSE DAMAGE TO PROPERTY AND/OR SERIOUS PERSONAL INJURY.
PLEASE KEEP THIS INSTRUCTION MANUAL SAFE FOR FUTURE USE.
We've done all we can to assure this press offers the outmost in safety, but you have to do your part. No
amount of warning can take the place of your good judgment, so make sure it's the first thing you bring to
any job. Beyond that here are some obvious tips:
• Steel and others materials can shatter, so always use protective eye-wear that complies with the
appropriate ANSI code.
• If you detect anything that may indicate imminent structural failure, stop using the press immediately
and inspect it thoroughly.
• Bolt the press to the floor if it is to be used on bulky or unstable items.
• Do not use press to compress springs or any other item that could disengage and cause a potential
hazard.
• Use a qualified person to maintain the press in good condition. Keep it clean for best and safest
performance.
• Do not exceed the rated capacity. Never apply excessive force to a workpiece and always use the
pressure gauge to accurately determine the applied load.
• Use this press for the purpose for which it is intended. DO NOT use it for any other purpose it is not
designed to perform.
• Keep children and unauthorized persons away from the work area.
• Remove ill fitting clothing. Remove ties, watches, rings and other loose jewelry and contain long hair.
• Wear ANSI approved impact safety goggles, full-face impact safety shield and heavy-duty work gloves
when operating the press.
• Keep proper balance and footing, do not over-reach and wear nonskid footwear.
• Only use this press on a surface that is stable, level, dry and not slippery, and capable of sustaining the
load. Keep the surface clean, tidy and free form unrelated materials and ensure that there is adequate
lighting.
• Inspect the press before each use. DO NOT use if bent, broken, cracked, leaking or otherwise damaged.
• Check to ensure that all applicable bolts and nuts are firmly tightened.
• Ensure that workpiece is center-loaded and secure.
• Keep hands and feet away from bed area at all times.
• Never stand directly in front of loaded press and never leave loaded press unattended.
• DO NOT operate the press when you are tired or under the influence of alcohol, drugs or any
intoxicating medication.
• DO NOT allow untrained persons to operate the press.
• DO NOT make any modifications to the press.
• DO NOT use brake fluid or any other improper fluid and avoid mixing different types of oil when adding
hydraulic oil. Only good quality hydraulic oil can be used.
• DO NOT expose the press to rain or any other kind of bad weather.
• If the press needs repairing and/or there are any parts that need to be replaced, have it repaired by
authorized technicians and only use the replacement parts supplied by the manufacturer.
WARNING! The warnings, cautions and instructions discussed in this manual cannot cover all conditions
and situations that may occur. It must be understood by the operator that common sense and caution are
factors which cannot be built into this product, but must be supplied by the operator.
BEFORE FIRST USE
a) Before first use of this product, purge away air from the hydraulic system: open the release valve by
turning it counterclockwise. Pump several full strokes to eliminate any air in the system.
b) Check all parts and conditions, if there is any part broken, stop using it and contact your supplier
immediately.
c) If under plate (29) is not in the centre, loose the screw (23) slightly, then slide the under plate to the
position you need and tighten the screw.
OPERATIONG INSTRUCTIONS
WARNING! ENSURE THAT YOU READ, UNDERSTAND AND APPLY THE SAFETY INSTRUCTIONS AND WARNINGS
BEFORE USE.
• Place the heel block on bed frame, then insert workpiece onto the heel block.
• Connect the air inlet fitting into the shop air supply hose lock fitting, turn on the air valve (pistol) to let
the pump work until the ram nears to the workpiece, then turn off the air valve (pistol) When air source
is unavaliable, use the handle to pump.
• Align workpiece and ram to ensure center-loading.
• Turn on air valve (pistol) (or pump the handle) to apply load onto workpiece.
• When work is done, turn off the air valve (pistol) (or stop pumping handle), slowly and carefully remove
loadfrom workpiece by turning the release valve conterclockwise in small increments.
• Once ram has fully retracted, remove workpiece from bed frame.
• Disconnect the air inlet fitting from the air source.
MAINTENANCE
• Clean the outside of the press with dry, clean and soft cloth and periodically lubricate the joints and all
moving parts with a light oil as needed.
• When not in use, store the press in a dry location with ram and piston fully retracted.
• When press efficiency drops, purge always air from hydraulic system as described before.
• Check the hydraulic oil; remove the oil filler nut on the top of the reservoir, if the oil is not adequate, fill
with high quality hydraulic jack oil as necessary, then replace the oil filler nut, purge away air from the
hydraulic system.
3

PART LIST
SHOP PRESS CYLINDER PARTS
4
No. Description QTY
22 Retaining ring 1
21 Y-ring 1
20 Back-up ring 1
19 Nylon-washer 1
18 Piston ring 1
17 O-ring 2
16 Piston ring 1
15 Ram 1
14 Bolt M8x10 1
13 Retainer nut 1
12 Seal ring 1
11 Nut bolt M8x10 1
10 Protecting cup 2
9 Bolt M8 x 50 2
8 Spring 1
7 Nut M8 1
6 Cylinder 1
5 Bolt 1
4 Connector nut 1
3 Plug 1
2 O-Ring 1
1 Dust cup 1

5
PART LIST
Use the exploded drawing as your guide to assemble. Lay all parts and assemblies out in front of you
before beginning.
No. Description QTY
1
2
1
14
14
14
4
10
3
1
Connecting base
Base support
Support beam A
Washer
Spring washer
Nut M12
Screw bolt M12x25
Screw bolt M12x30
Support beam B
Handle
01
02
03
04
05
06
07
08
09
10
No. Description QTY
1
1
5
1
1
1
1
1
2
4
Hydraulic pressure pump
Connector
O-ring
Hose fitting
Nut M20
Hose fitting
Connector
Hose fitting
Roller shaft
Bearing
11
12
13
14
15
16
17
18
19
20
No. Description QTY
4
4
1
1
1
1
1
4
1
1
Washer
Spring
Screw bolt M8x10
Press cylinder
Connector
Nylon seal
Press gauge
Screw bolt M5x8
Under plate
Round lifting ring
21
22
23
24
25
26
27
28
29
30
No. Description QTY
1
2
1
4
8
4
4
1
Press Pin Adapter Kit*
Press block set
Bed frame
Bed frame pin
Retaining ring
Screw bolt M10x25
Spring washer
Air blow gun
31
32
33
34
35
36
37
38
*Press Pin Adapter Kit (31) incl. connection material (5, 6, 8) is available separately

6
ASSEMBLY INSTRUCTIONS
Use the exploded drawing as your guide to assemble. Lay all parts and assemblies out in front of you
before beginning. The following procedure is recommended:
• Attach one base support (02) to left post and lower connecting base (01) using spring washers (05),
nuts (06), screw bolts (07) washers (04), then attach another to right post and the lower connecting base.
• Fix one end of support beam B (09) to the base support (02) and another end to the connecting base
(01) using spring washers (05), nuts (06), screw bolts (07) and washers (04).
• Put another upper crossbeam into position and insert the under plate (29) to the two upper cross
beams at the same time, then secure this cross beam to the posts using spring (22) and screw bolts (23).
• Screw the upper round nut onto the press cylinder (24), insert the press cylinder into the hole in the
under plate (29), then screw the under round nut onto the press cylinder and attach the serrated saddle
to the press cylinder.
• Insert bed frame pin (34) into the holes in the posts, then insert the joined press bed frame (33) into
press frame and onto bed frame pin.
• Attach the hydraulic pressure pump (11) to the right post using screw bolts (36), spring washers (37).
then insert the handle to the handle bracket.
• Connect the hose fitting (14) to the press cylinder (24) and assemble the press gauge (27) to the
pressure gauge connection nut which is on the top of hose fitting (14).
• Tighten all bolts and screws.
PRODUCT DESCRIPTION
- Lateral movable cylinder with bearing (moving range: 200 mm)
- Pressure gauge with integrated housing
- Including par of V-blocks
Capacity: 30 t
Stroke: 150 mm
Work range: 1100 mm
Work width: 550 mm
Stamp-Ø: 53 mm
Product size: 1840 x 885 x 700 mm
N.W.: 165 kg
53 mm
550 mm

7
www.KRAFTWERKtools.com
EN 1494: 2000+A1/2008
EN ISO 12100: 2010
EN ISO 13857: 2008
EN 349: 1993+A1/2008
DECLARATIONOF CONFORMITY
Model: 38122
Hydropneumatic shop press 30 T
KRAFTWERK Sàrl,
25 rue due Stade, F-67870 Bischoffsheim
Declares under sole responsibility that the product to which this declaration relates is in conformity with the following
standard(s) or other normative document(s):
Following the provisions of Directive(s)
Machinery Directive:
Bischoffsheim, 01/07/2016
2006/42/EC
Patrick Wyss
President

www.KRAFTWERKtools.com
KRAFTWERK Europe AG
Mettlenbachstrasse 23
CH-8617 Mönchaltorf
Tel. +41-44 949 40 50
KRAFTWERK Sàrl.
25, rue du Stade
F – 67870 Bischoffsheim
Tel. +33-388 48 64 50
Switzerland France
Table of contents
Other KRAFTWERK Power Tools manuals

KRAFTWERK
KRAFTWERK 3058 User manual

KRAFTWERK
KRAFTWERK 38125 User manual

KRAFTWERK
KRAFTWERK 30215 User manual

KRAFTWERK
KRAFTWERK 31003 User manual

KRAFTWERK
KRAFTWERK 38123 User manual

KRAFTWERK
KRAFTWERK 32106 User manual

KRAFTWERK
KRAFTWERK 31004 User manual

KRAFTWERK
KRAFTWERK 2045 User manual

KRAFTWERK
KRAFTWERK CORDLESS IMPACT User manual

KRAFTWERK
KRAFTWERK 32102 Manual