Kramer VA-4X User manual

Kramer Electronics Ltd.
VA-4X –Contents
i
Contents
Introduction 1
Getting Started 1
Overview 2
Typical Applications 2
Defining VA-4X HDMI Extender / Toolbox 3
Mounting VA-4X 4
Connecting VA-4X 5
Operating and Controlling VA-4X 6
Configuring Settings –OSD Menu 6
Configuring EDID via EDID Manager 10
Upgrading Firmware 18
Technical Specifications 19
Default EDID 20

Kramer Electronics Ltd.
VA-4X –Introduction
1
Introduction
Welcome to Kramer Electronics! Since 1981, Kramer Electronics has been providing a world
of unique, creative, and affordable solutions to the vast range of problems that confront the
video, audio, presentation, and broadcasting professional on a daily basis. In recent years, we
have redesigned and upgraded most of our line, making the best even better!
Getting Started
We recommend that you:
•Unpack the equipment carefully and save the original box and packaging materials for
possible future shipment.
•Review the contents of this user manual.
Go to www.kramerav.com/downloads/VA-4X to check for up-to-date user manuals,
application programs, and to check if firmware upgrades are available (where appropriate).
Achieving Best Performance
•Use only good quality connection cables (we recommend Kramer high-performance,
high-resolution cables) to avoid interference, deterioration in signal quality due to poor
matching, and elevated noise levels (often associated with low quality cables).
•Do not secure the cables in tight bundles or roll the slack into tight coils.
•Avoid interference from neighboring electrical appliances that may adversely influence
signal quality.
•Position your Kramer VA-4X away from moisture, excessive sunlight and dust.
Safety Instructions
Caution:
•This equipment is to be used only inside a building. It may only be connected to other
equipment that is installed inside a building.
•For products with relay terminals and GPI\O ports, please refer to the permitted rating
for an external connection, located next to the terminal or in the User Manual.
•There are no operator serviceable parts inside the unit.
Warning:
•Use only the power cord that is supplied with the unit.
•To ensure continuous risk protection, replace fuses only according to the rating
specified on the product label which located on the bottom of the unit.
Recycling Kramer Products
The Waste Electrical and Electronic Equipment (WEEE) Directive 2002/96/EC aims to reduce
the amount of WEEE sent for disposal to landfill or incineration by requiring it to be collected

Kramer Electronics Ltd.
VA-4X –Introduction
2
and recycled. To comply with the WEEE Directive, Kramer Electronics has made
arrangements with the European Advanced Recycling Network (EARN) and will cover any
costs of treatment, recycling and recovery of waste Kramer Electronics branded equipment on
arrival at the EARN facility. For details of Kramer’s recycling arrangements in your particular
country go to our recycling pages at www.kramerav.com/support/recycling.
Overview
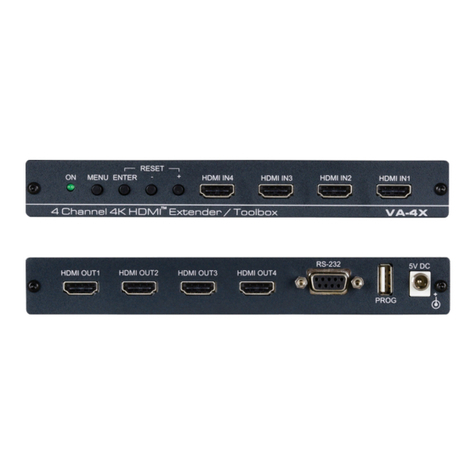
Congratulations on purchasing your Kramer VA-4X HDMI Extender / Toolbox. VA-4X is a
versatile 4K@60Hz (4:4:4) HDMI™multi-channel extender that equalizes and reclocks TMDS
data before re-transmitting the signal, thus increasing the HDMI cable range for all 4 outputs.
It is a true 4-channel HDMI "Toolbox", with functionality including 4 independent test-pattern
generators, chroma sub-sampling down-conversion and EDID management options, and, of
course, video extension.
•Extension without Loss of Quality –Kramer Equalization & re-Klocking™ Technology
rebuilds the digital signal integrity to travel longer distances. VA-4X typically extends
4K@60Hz (4:4:4) signals 20m from point to point (10m on the input and 10m on the
output).
•Zero-latency compression –Enables reducing 4K@60Hz resolution from 4:4:4 to 4:2:2
or 4:2:0 chroma sampling on up to four inputs/outputs HDMI signals.
•Easy EDID Management –Via a user-friendly software application upload, download,
create or modify EDID. Via the software application or OSD menu –select the EDID
source from the following options: default (internal), external (sink) or user defined.
•Content Protection Compatibility –Interoperability between HDCP 2.2 and HDCP 1.4
systems for up to 4 HDMI sources simultaneously.
•Comprehensive Signal Testing –Independent pattern generator on each output with a
variety of patterns and resolutions to choose from.
•Local Control and Configuration –Use the OSD menu via front panel buttons for EDID
source selection, chroma reduction, pattern generating, firmware upgrade and factory
reset. An RS-232 serial port is provided for EDID application control and a convenient
USB port enables new firmware upload via a memory stick.
•Easy Installation –Compact MegaTOOLS®fan-less enclosure for surface mounting or
side-by-side mounting of 2 units in a 1U rack space with the recommended rack adapter.
Typical Applications
•VA-4X is ideal for the following typical applications:
•HDMI extension for up to 4 lines
•Testing and installation verification using 4 independent pattern generators
•EDID management of 4 HDMI channels
•Enabling compatibility with lower bandwidth 4K systems (e.g. HDBaseT) via 4K 4:4:4 to
4:2:0 chroma-downsampling

Kramer Electronics Ltd.
VA-4X –Defining VA-4X HDMI Extender / Toolbox
3
Defining VA-4X HDMI Extender /
Toolbox
This section defines VA-4X.
Figure 1: VA-4X HDMI Extender / Toolbox Front Panel
#
Feature
Function
ON LED
Lights green when the unit is powered on.
MENU Button
Press to enter/exit the on-screen display (OSD) menu.
ENTER Button
In the OSD, press to choose the highlighted menu item.
When not in the OSD, press to view information (enabled when a channel
input and output are connected and the channel Display Information is set to
On).
Press ENTER and + simultaneously to reset the device to its default
parameters.
- Button
In the OSD, press to move back through the list or to decrease the
parameter value.
+ Button
In the OSD, press to move forward through the list or to increase the
parameter value.
Press ENTER and + simultaneously to reset the device to its default
parameters.
HDMI IN Connectors
(1 to 4)
Connect to HDMI sources.
HDMI OUT Connectors
(1 to 4)
Connect to HDMI acceptors.
IN 1 to OUT 1 comprises Channel 1, IN 2 to OUT 2 comprises Channel 2 and so on.
RS-232 9-pin D-sub
Connector
Connect to a PC to control VA-4X via the EDID Manager software.
PROG USB Port
Connect to a USB memory stick for firmware upgrade.
5V DC
Connect to included power adapter.
1
2
3
4
5
6
7
8
9
10

Kramer Electronics Ltd.
VA-4X –Mounting VA-4X
4
Mounting VA-4X
This section provides instructions for mounting VA-4X. Before installing, verify that the
environment is within the recommended range:
•Operation temperature –0to 40C (32 to 104F).
•Storage temperature –-40to +70C (-40 to +158F).
•Humidity –10% to 90%, RHL non-condensing.
Caution:
•Mount VA-4X before connecting any cables or power.
Warning:
•Ensure that the environment (e.g., maximum ambient temperature & air flow) is
compatible for the device.
•Avoid uneven mechanical loading.
•Appropriate consideration of equipment nameplate ratings should be used for avoiding
overloading of the circuits.
•Reliable earthing of rack-mounted equipment should be maintained.
•Maximum mounting height for the device is 2 meters.
To mount the VA-4X in a rack:
Mount the unit in a rack using the recommended rack adapter
(see www.kramerav.com/product/VA-4X)
To mount the VA-4X on a table or shelf:
•Attach the rubber feet and place the unit on a flat surface.
•Fasten a bracket (included) on each side of the unit and attach it to
a flat surface.
For more information go to www.kramerav.com/downloads/VA-4X

Kramer Electronics Ltd.
VA-4X –Connecting VA-4X
5
Connecting VA-4X
Always switch off the power to each device before connecting it to your VA-4X. After
connecting your VA-4X, connect its power and then switch on the power to each device.
Figure 2: Connecting to the VA-4X Rear Panel
To connect the VA-4X as illustrated in the example in Figure 2:
1. Connect up to 4 HDMI sources (for example, 4K gaming sources, laptop) to the HDMI IN
Connectors (1 to 4) on the front panel.
2. Connect up to four HDMI acceptors (for example, display, projector) to HDMI OUT
Connectors (1 to 4) .
3. Connect the power adapter to the VA-4X and to the mains electricity (not shown in
Figure 2).
4K Gaming
Source
Display ProjectorLaptop
HDMI HDMI
HDMI HDMI
Back PanelFront Panel
6
7

Kramer Electronics Ltd.
VA-4X –Operating and Controlling VA-4X
6
Operating and Controlling VA-4X
Configure and control your VA-4X using the following methods:
•OSD menu via front panel buttons (see Configuring Settings –OSD Menu on page 6).
•EDID designer software (see Configuring EDID via EDID Manager on page 10).
Configuring Settings –OSD Menu
The OSD enables you to configure VA-4X. When using the menu, it appears as an overlay on
top of any image that appears on the display. The menu is operated using the front panel
buttons.
VA-4X OSD enables performing the following:
•Navigating OSD on page 6.
•Defining EDID Source on page 8.
•Configuring Resolution Downsampling on page 8.
•Defining 5V Shutoff on page 8.
•Configuring Test Patterns on page 9.
•Configuring Information OSD on page 9.
•Configuring OSD Menu on page 9.
•Verifying Channel Information on page 10.
•Upgrading Firmware on page 18.
•Performing Factory Reset on page 10.
Navigating OSD
Navigate the OSD using the navigation buttons on the front panel, as follows:
•MENU Button –Open the OSD on your screen or exit a menu option.
•+ Button or - Button –Move up or down in the menu / sub-menu or scroll through
parameter options.
•ENTER Button –Expand a menu / sub-menu item, activate a menu / sub-menu item
to edit it or select the required value.
When a menu item is selected, it turns green.
When a menu / sub-menu item is activated and editable, the item turns blue.
For example, to define where the OSD is displayed:
1. Press the Menu button.
2
5
4
3

Kramer Electronics Ltd.
VA-4X –Operating and Controlling VA-4X
7
The Main Menu appears with Channel 1 selected.
Figure 3: Main Menu with Channel 1 Selected
2. Press the –button four times.
Main OSD is selected.
Figure 4: Main Menu with Main OSD Selected
3. Press the ENTER button.
The Main OSD menu appears with Display Select selected.
Figure 5: Main OSD Menu with Display Select Selected
4. Press the ENTER button.
Display Select is activated and editable.
Figure 6: Main OSD Menu with Editable Display Select
5. Use the +or –button to select the desired option.
6. Press the ENTER button.
The selected option is set.

Kramer Electronics Ltd.
VA-4X –Operating and Controlling VA-4X
8
Defining EDID Source
VA-4X enables you to define, for each of the 4 inputs, the source from which the EDID is
taken.
To define the EDID source for one of the 4 inputs:
1. In the OSD, go to Channel X (X= 1, 2, 3, or 4) > Input EDID.
2. Select one of the following EDID sources:
▪Sink –Display.
▪User –User defined (see Upload EDID and Store on VA-4X on page 12).
▪Internal –Default EDID (see Default EDID on page 20).
The EDID source is defined.
Configuring Resolution Downsampling
VA-4X enables you to configure, for each of the 4 inputs, how the system handles
downsampling of certain high resolutions.

To configure resolution downsampling for one of the 4 inputs:
1. In the OSD, go to Channel X (X= 1, 2, 3, or 4).
2. Go to the resolution for which you are configuring the downsampling; choose from the
following:
▪4K2K 50/60 RGB
▪4K2K 50/60 YUV4:4:4
▪4K2K 50/60 YUV4:2:2
3. Select the downsampling method from the following:

▪4:2:0 Downsampling
▪4:2:2 Downsampling
▪Passthrough
The resolution downsampling is configured.
Defining 5V Shutoff
VA-4X enables you to define, for each of the 4 channels, the behavior of the feature that
shuts off the 5V signal on an output after the device no longer detects an active video source.
To define 5V shutoff when no active source is found on one of the 4 inputs:
1. In the OSD, go to Channel X (X= 1, 2, 3, or 4).
2. Go to Auto Sync Off and select one of the following:
▪Disable –5V remains ON.
▪Fast –after 15 seconds 5V signal turns OFF.

Kramer Electronics Ltd.
VA-4X –Operating and Controlling VA-4X
9
▪Slow - after 2 minutes 5V signal turns OFF.
5V shutoff on the output is defined for the selected channel.
Configuring Test Patterns
VA-4X enables you to display a test pattern for each of the 4 outputs and define a unique
resolution and test pattern type for each one.
The default pattern resolution is 1280x720@60 and the default pattern type is white.
To configure a test pattern on one of the 4 outputs:
1. In the OSD, go to Channel X (X= 1, 2, 3, or 4).
2. Go to Output Pattern > Mode and select ON.
The test pattern is displayed on the selected output.
3. Go to Timing and select the required resolution.
The output display updates with the selected resolution.
4. Go to Pattern and select the required pattern type.
The selected pattern is displayed on the output.
Configuring Information OSD
VA-4X enables you to configure an information OSD for each of the channels that shows the
input/output numbers and resolution of the channel. The OSD appears on the connected
display upon connection or powerup of the video source for this channel.
To configure the information OSD for one of the 4 channels:
1. In the OSD, go to Channel X (X= 1, 2, 3, or 4).
2. Go to OSD> Display Information and select Yes.
3. Go to Display Timeout and select the amount of time for the information display to
remain on the screen.
The information OSD for the selected channel is configured.
Configuring OSD Menu
VA-4X enables you to configure on which output the OSD appears and how long the OSD
menu remains on the screen after the last button press.
To configure the OSD menu:
1. In the OSD, go to Main OSD > Display Select.
2. Select the output on which you want the OSD to appear or select All Channels to
display the OSD menu on all four outputs.
3. Go to Display Timeout and select the amount of time for the OSD to remain on the
screen after the last button press.

Kramer Electronics Ltd.
VA-4X –Operating and Controlling VA-4X
10
The OSD menu is configured.
Verifying Channel Information
VA-4X enables you to verify the following information about each channel:
•Resolution.
•Input and output color space.
•Input and output HDCP status.
To verify channel information:
•In the OSD, go to Information > Channel X (X= 1, 2, 3, or 4).
Information appears for the selected channel.
Performing Factory Reset
VA-4X enables you to reset the device to factory default settings.
To perform a factory reset:
1. In the OSD, go to System Setting > Factory Reset.
A confirmation message appears.
Figure 7: Factory Reset Confirmation
2. Select Yes.
VA-4X reboots and resets to factory default settings.
Configuring EDID via EDID Manager
VA-4X enables you to configure EDID using EDID Manager software.
To use EDID Manager software:
1. Download the EDID Manager software to your computer at
www.kramerav.com/product/VA-4X#Tab_Resources.
2. Power on VA-4X and connect it to your computer via the RS-232 9-pin D-sub
Connector .
3. Open EDID Manager software.
8

Kramer Electronics Ltd.
VA-4X –Operating and Controlling VA-4X
11
The EDID Manager window appears:
Figure 8: EDID Manager –EDID Controller Tab
4. Click Search.

Kramer Electronics Ltd.
VA-4X –Operating and Controlling VA-4X
12
VA-4X is connected. FC-17 appears under Link and the current EDID source (Internal,
External or User) appears under Mode.
The VA-4X firmware and EDID are identical to those of FC-17.
Figure 9: EDID Manager –VA-4X Connected
Use EDID Manager to:
▪Upload EDID and Store on VA-4X, see page 12.
▪Download EDID from VA-4X, see page 14.
▪Viewing EDID Details, see page 15.
▪Create or Modify EDID, see page 16.
Upload EDID and Store on VA-4X
To upload an EDID from your computer and store it on VA-4X:
1. Select EDID Controller.
The EDID Controller tab appears (Figure 8).
2. In the Upload area, click Open.

Kramer Electronics Ltd.
VA-4X –Operating and Controlling VA-4X
13
A file browser appears.
Figure 10: EDID Manager –File Browser
3. Select an EDID file and click Open.
The selected file name appears in the Upload area.
Figure 11: EDID Manager –EDID File Selected
4. Click Upload.

Kramer Electronics Ltd.
VA-4X –Operating and Controlling VA-4X
14
The selected EDID file is uploaded to User.
Figure 12: EDID Manager –Uploading EDID
Download EDID from VA-4X
To download an EDID from VA-4X to your computer:
1. Select EDID Controller.
The EDID Controller tab appears (Figure 8).
2. Click an EDID source: Internal, External or User.

Kramer Electronics Ltd.
VA-4X –Operating and Controlling VA-4X
15
The Save As window opens:
Figure 13: EDID Manager –Saving an EDID
3. Navigate to the folder in which you want to save the EDID file and click Save.
The selected EDID is downloaded and saved to your computer.
Viewing EDID Details
To view EDID details:
1. Select EDID Analyzer.

Kramer Electronics Ltd.
VA-4X –Operating and Controlling VA-4X
16
The EDID Analyzer tab appears.
Figure 14: EDID Manager –EDID Analyzer Tab
2. View EDID details.
Create or Modify EDID
To create or modify EDID:
1. Select EDID Creator.

Kramer Electronics Ltd.
VA-4X –Operating and Controlling VA-4X
17
The EDID Creator tab appears.
Figure 15: EDID Manager –EDID Creator Tab
2. Do one of the following:
▪Select Brand New.
▪Select Bin Modify and select an EDID file to modify.
3. Select each of the following subtabs and enter or change data, as required:
▪Descriptor –General information about the EDID source.
▪PC Timing –EDID supported resolution and refresh rates.
▪SD/HD/UHD –EDID supported resolution and refresh rates.
▪Audio1,Audio2 –EDID supported audio formats, audio frequencies, channels, and
speaker locations.
▪Color Space –EDID supported color formats and bit depths.
▪Other data –CEC Address.
4. Click Save.
5. Click Upload to upload the Bin file to USER.

Kramer Electronics Ltd.
VA-4X –Operating and Controlling VA-4X
18
Upgrading Firmware
VA-4X enables you to upgrade the device firmware.
To see the current installed firmware version, in the OSD, go to Information.
To upgrade the VA-4X firmware:
1. Insert a USB memory stick with the new firmware file into the PROG USB Port on
VA-4X.
2. Do one of the following:
▪In the OSD, go to System Setting > Firmware Update and select Yes on the
confirmation message.
Figure 16: Firmware Update Confirmation
-OR-
▪Press the front panel MENU Button - Button simultaneously for several
seconds until the firmware progress message appears.
Caution: Do not power cycle or operate the device during firmware upgrade.
3. After the upgrade is complete, remove the USB memory stick and power cycle VA-4X.
The firmware is upgraded.
9
2
4
Other manuals for VA-4X
1
Table of contents
Other Kramer Extender manuals

Kramer
Kramer EXT3-21-XR-TR User manual

Kramer
Kramer VP-14 User manual

Kramer
Kramer MINICOM EXT-RS232 User manual

Kramer
Kramer VM-4DT User manual

Kramer
Kramer FC-50 User manual

Kramer
Kramer PT-3H2 User manual

Kramer
Kramer VM-3HDT User manual

Kramer
Kramer TP-600TR User manual

Kramer
Kramer DS Vision 3000 User manual

Kramer
Kramer VA-4X User manual

Kramer
Kramer VP-43 User manual

Kramer
Kramer TP-600TRxr User manual

Kramer
Kramer TP-400FW User manual

Kramer
Kramer PL-18 User manual

Kramer
Kramer EXT3-XR-TR User manual

Kramer
Kramer VM-2HDT User manual

Kramer
Kramer FC-46H2 User manual

Kramer
Kramer FC-50 User manual

Kramer
Kramer KW-14R User manual

Kramer
Kramer TP-330FW User manual