Kramer KDS-10 User manual

KramerElectronicsLtd.
KDS-10–Contents
i
Contents
Introduction 1
Getting Started 1
Overview 2
Typical Applications 3
Defining KDS-10 4K Video Encoder/Decoder 4
Mounting KDS-10 5
Connecting KDS-10 6
Connecting the Output to a Balanced/Unbalanced Stereo Audio Acceptor 7
Connecting a Balanced/Unbalanced Stereo Audio Source to the Balanced Input 7
Setting and Operating KDS-10 8
Configuring Network Switch to Multicast Mode 8
Setting the KDS-10 System 8
Using Embedded Web Pages 10
Viewing Encoder General Settings 11
Defining Encoding Preferences 12
Defining Encoder Streaming Settings 14
Viewing Decoder General Settings 15
Defining Decoding Preferences 16
Defining Decoder Streaming Settings 17
Defining Device General Settings 18
Setting Device Date and Time 19
Setting Device Security 21
Defining Network Settings 22
Viewing About Page 23
Technical Specifications 24
Default Communication Parameters 25
Default EDID 25
Protocol 3000 26
Understanding Protocol 3000 26
Protocol 3000 Commands 27
Result and Error Codes 30

KramerElectronicsLtd.
KDS-10–Introduction
1
Introduction
Welcometo KramerElectronics! Since1981, KramerElectronics has been providing a world
of unique, creative,and affordablesolutions to the vast range of problems that confrontthe
video, audio, presentation, and broadcasting professional on a daily basis. In recent years, we
have redesigned and upgraded most of our line, makingthe best even better!
Getting Started
We recommendthat you:
•Unpack the equipment carefully and save the original box and packaging materials for
possible future shipment.
•Review the contents of this user manual.
Go to www.kramerav.com/downloads/KDS-10tocheck forup-to-date user manuals,
application programs, and to check if firmwareupgrades are available (where appropriate).
Achieving Best Performance
•Use only good quality connection cables (we recommendKramerhigh-performance,
high-resolution cables) to avoid interference, deterioration in signal quality due to poor
matching, and elevated noise levels (oftenassociated with low quality cables).
•Do not secure the cables in tight bundles or roll the slack into tight coils.
•Avoid interferencefrom neighboring electrical appliances that may adversely influence
signal quality.
•Position your Kramer KDS-10 away from moisture,excessive sunlight and dust.
Safety Instructions
Caution:
•This equipment is to be used only inside a building. It may only be connected to other
equipment that is installed inside a building.
•For products with relay terminals and GPI/O ports, please referto the permitted rating
foran external connection, located next to the terminal or in the User Manual.
•There are no operator serviceable parts inside the unit.
Warning:
•Use only the power cordthat is supplied with the unit.
•To ensure continuous risk protection, replace fuses only according to the rating
specified on the product label which is located on the bottom of the unit.

KramerElectronicsLtd.
KDS-10–Introduction
2
Recycling Kramer Products
The Waste Electrical and Electronic Equipment (WEEE)Directive2002/96/EC aims to reduce
the amount of WEEEsent fordisposal to landfill or incineration by requiring it to be collected
and recycled.To comply withthe WEEEDirective,KramerElectronics has made
arrangements with the European AdvancedRecyclingNetwork (EARN) and will coverany
costs of treatment, recyclingand recovery of waste Kramer Electronicsbranded equipment on
arrival at the EARN facility. For details of Kramer’s recycling arrangements in your particular
country go to our recyclingpages at www.kramerav.com/support/recycling/.
Overview
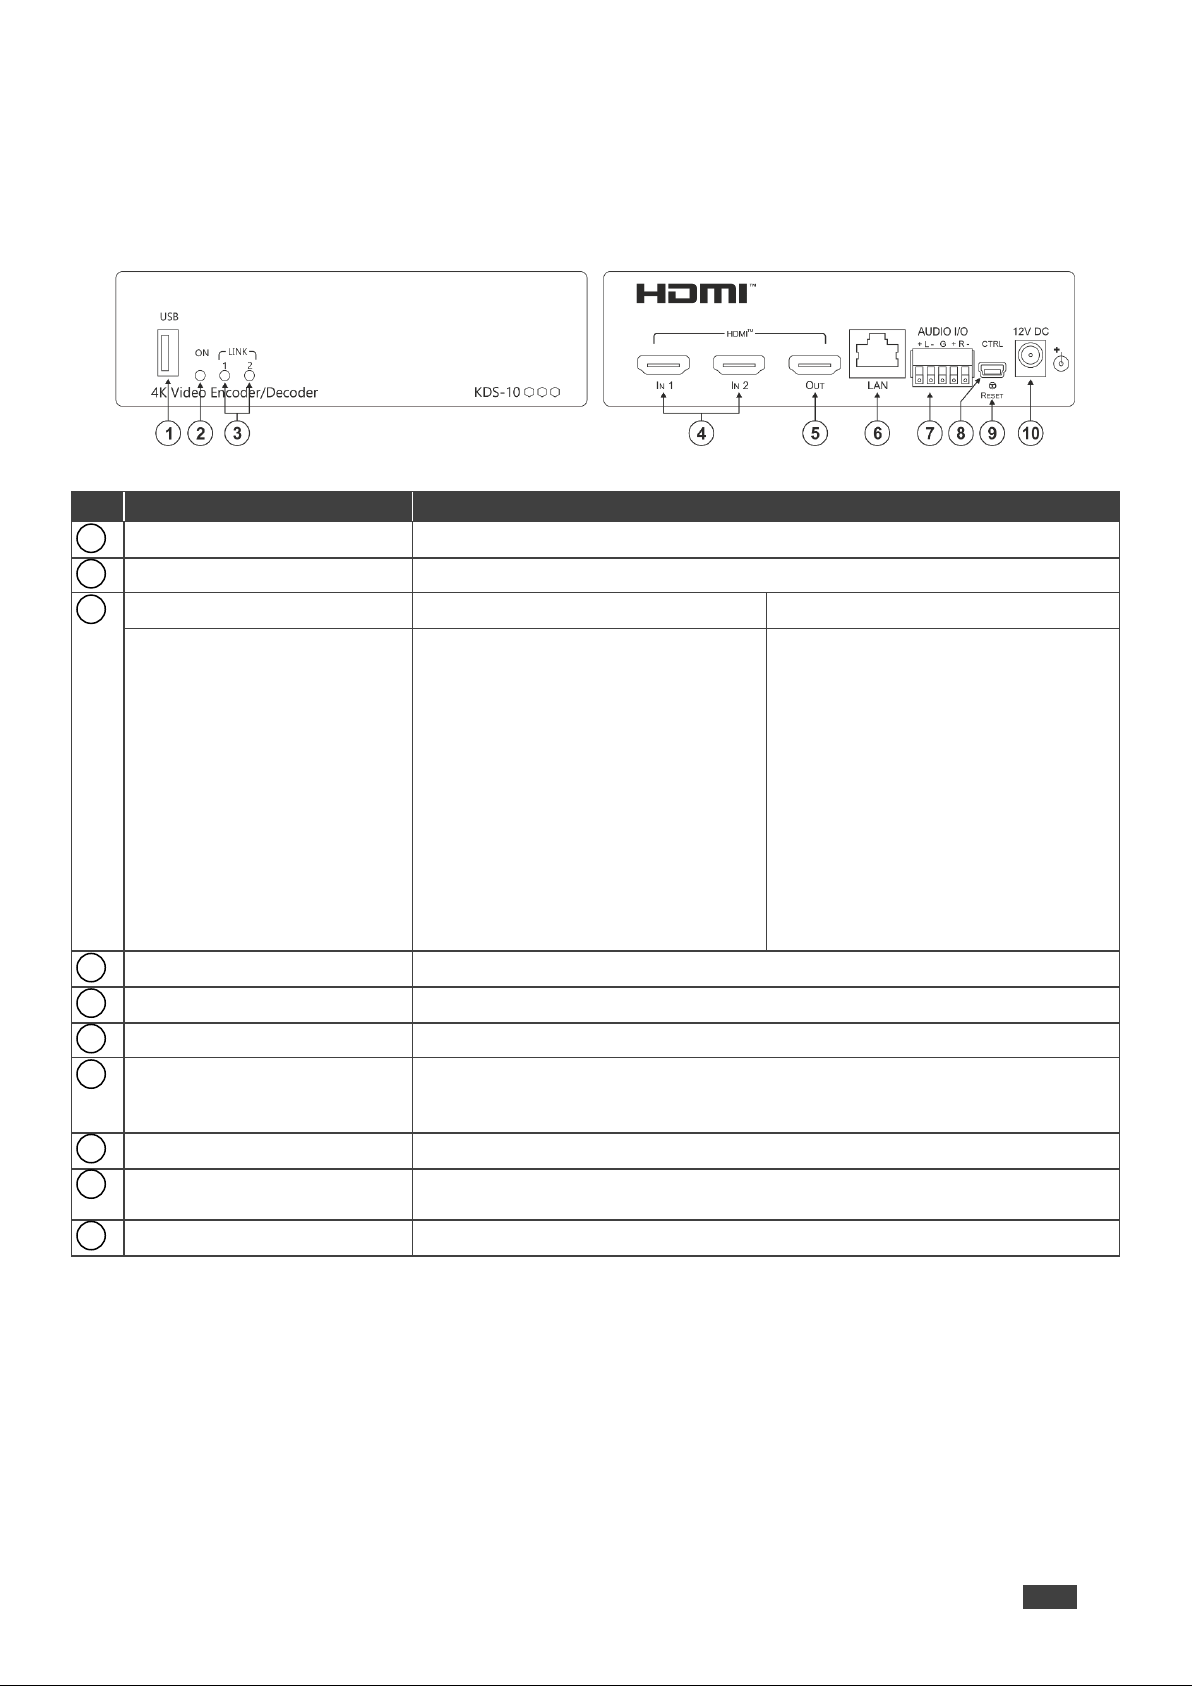
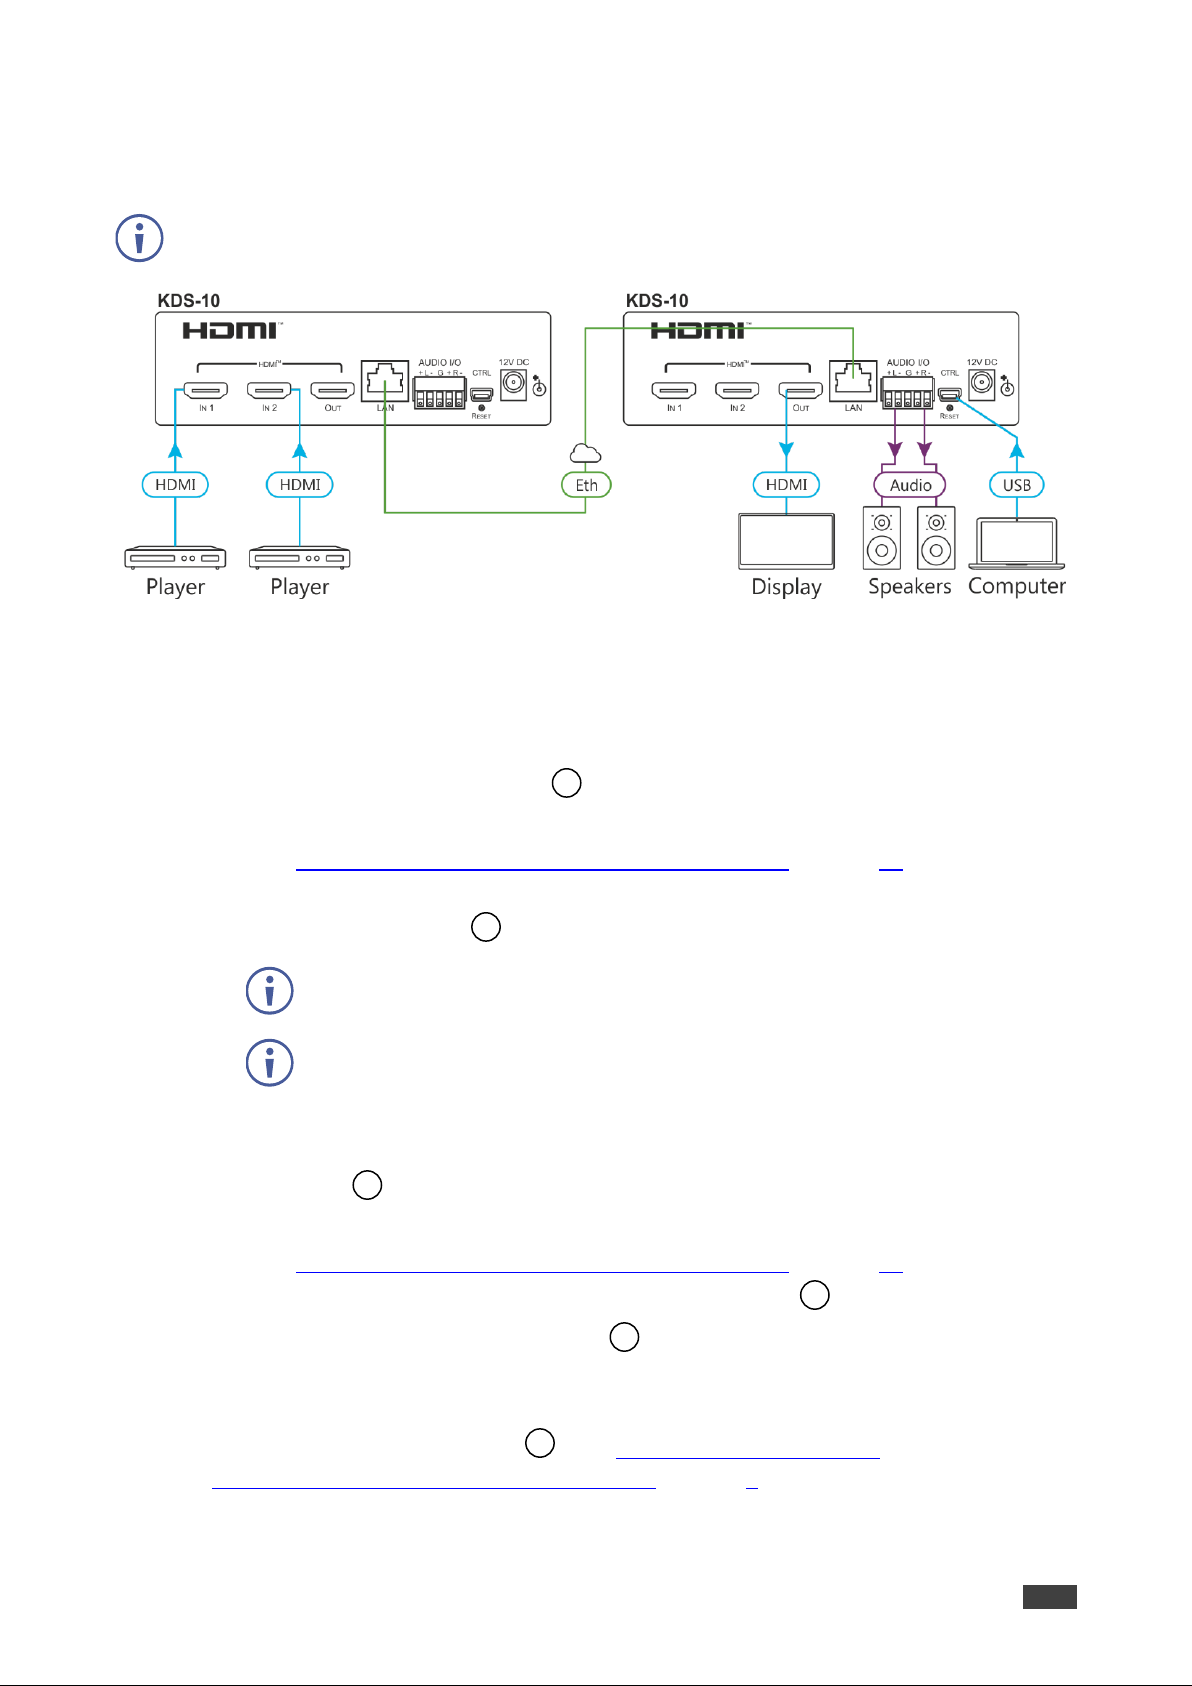
Congratulations on purchasing your KramerKDS-10 4K Video Encoder/Decoder.KDS-10 is
an advanced, multi-standard, dual-stream transceiver forstreaming 4K@60Hz (4:4:4) video
signals via Ethernet over copper cable. KDS-10 can be set as either an encoder or decoder.
As an encoder, it encodes and streams one or two HDMI™inputs overan IP network. As a
decoder, it receivesthe encoded signal, decodes it and outputs it to an HDMIoutput.
KDS-10 features:
•AdvancedVideo Streaming Transceiver –Streams up to 4K@60Hz (4:4:4) resolution
signals overa 1G network interface,when streaming one source and 4K@30Hz (4:2:0)
when streaming two sources.
•Multi-Standard Video Coding –Configure the transceiversaccording to your needs to
stream using either H.264 or H.265.
•Flexible Input and Output Options –Includes two HDMIinputs that can be streamed
alternately or together.
•Streaming Support –Unicast and multicast over RTP(Real-Time Protocol).
•Flexible Analog Audio Embedding and De-embedding –When in encoding mode, you
can select the balanced analog audio input to embed into the streaming HDMIoutput
signal. When in decoding mode, you canextractthe HDMIaudio signal and output it as
balanced analog audio.
•Convenient and Comprehensive Control –Control the unit using intuitive embedded web
pages or Protocol 3000 API commandsviaEthernet.
•Simple System Management –Remotesystem management support to enable quick
and efficientremotesystem and device life-cyclemanagement.

KramerElectronicsLtd.
KDS-10–Introduction
3
Typical Applications
KDS-10 is ideal forthe following typical applications:
•Real-time essential installations such as Commandand Control centers and interactive
solutions with or without KVM capabilities.
•AV distribution systems with one or more sources and many displays in schools,
universities, and public venues.
•Long-distance transmission of signals using existing wires and infrastructurein corporate
officesor governmentapplications.

KramerElectronicsLtd.
KDS-10–DefiningKDS-104KVideo Encoder/Decoder
4
Defining KDS-10 4K Video
Encoder/Decoder
Figure1: KDS-104K VideoEncoder/Decoder frontand backpanel
#
Feature
Function
USB Type A Port
For future use.
POWER LED
Lights when the device is powered ON.
LINK LEDs (1 & 2)
Encoder Mode
Decoder Mode
Each LED represents an HDMI input
status:
•White Flashing –Device
booting up.
•Red –Error.
HDMI In is not connected.
Ethernet is not connected.
•Blue –The stream is
administratively stopped via web
page interface.
•Green –HDMI input signal
detected.
LED 1 represents HDMI output. LED 2
is non-functional:
•White Flashing –Device
booting up.
•Red –Error.
HDMI Out not connected.
Ethernet not connected.
•Blue –The stream is
administratively stopped via web
page interface.
•Green –HDMI output signal
detected.
IN HDMI Connectors (1 to 2)
Connect to up to 2 HDMI sources.
OUT HDMI Connector
Connect to an HDMI sink.
LAN RJ-45 Connector
Connect to the network using recommended Kramer cables.
AUDIO IN/OUT Balanced
Stereo Audio 5-pin Terminal
Block Connector
Connect to an analog audio acceptor or receiver.
CTRL Mini USB Connector
Connect to PC to send P3K commands to control device.
RESET button
Press and hold while powering on the device to reset to factory default
parameters.
12V DC Connector
Connect to the power adapter.
1
2
3
4
5
6
7
8
9
10

KramerElectronicsLtd.
KDS-10–MountingKDS-10
5
Mounting KDS-10
This section provides instructions formounting KDS-10.Beforeinstalling, verify thatthe
environment is within the recommendedrange:
•Operation temperature –0to 40C (32 to 104F).
•Storage temperature –-20to +70C (-4 to +158F).
•Humidity –10% to 90%, RHLnon-condensing.
Caution:
•Mount KDS-10 before connecting any cables or power.
Warning:
•Ensure that the environment(e.g., maximum ambienttemperature & air flow)is
compatible forthe device.
•Avoid uneven mechanicalloading.
•Appropriate consideration of equipment nameplate ratings should be used foravoiding
overloading of the circuits.
•Reliable earthing of rack-mountedequipment should be maintained.
•Maximum mountingheight forthe deviceis 2 meters.
Mount KDS-10 in a rack:
•Use the recommendedrack adapter
(see www.kramerav.com/product/KDS-10).
Mount KDS-10 on a surface using one of the following methods:
•Attach the rubber feetand place the unit on a flatsurface.

KramerElectronicsLtd.
KDS-10–ConnectingKDS-10
6
Connecting KDS-10
Always switchoff the power to each devicebefore connecting it to your KDS-10.After
connecting your KDS-10,connectits power and then switch on the power to eachdevice.
Figure2: Connectingtothe KDS-10 Rear Panel
Toconnect KDS-10 as illustrated in the above example:
1. Configure the encoder mode:
a. Connect a laptop or PC to the KDS-10 Encodervia Ethernet LANRJ-45 Connector
either directly or via IP network .
b. Following the web page directions, set the KDS-10 configuration to Encoder
(see Setting KDS-10 Configuration to Encoder/Decoderon page 19).
c. Connect the video source(s) to one or moreIN HDMIconnectors(1 to 2) if device
configured as Encoder .
One video source can stream up to 4K60 and two video sources can
stream up to 4K30.
All inputs should be non-HDCP.
2. Configure the decoder mode:
a. Connect a laptop or PC to the KDS-10 Decodervia Ethernet LANRJ-45
Connector .
b. Following the web page directions, set the KDS-10 configuration to Decoder
(see Setting KDS-10 Configuration to Encoder/Decoderon page 19).
c. Connect an HDMIacceptorto the OUTHDMIConnector .
3. Connect Ethernet LAN RJ-45Connector from the KDS-10 Encoder to the KDS-10
Decoder.
4. If analog audio is required, connectspeakers to AUDIO IN/OUTBalanced Stereo Audio
5-pin Terminal Block Connector (see Connecting the Output to a
Balanced/Unbalanced Stereo Audio Acceptor on page 7.
6
4
6
5
6
7

KramerElectronicsLtd.
KDS-10–ConnectingKDS-10
7
5. Connect the 12V DC Connector power adapter to the device and the mains
electricity in the following manner:
▪To the KDS-10 decoder first (forconfiguration purposes, see Setting the KDS-10
System on page 8).
▪To the KDS-10 encoder (once the decoder configuration is complete).
Connecting the Output to a Balanced/Unbalanced
Stereo Audio Acceptor
The following are the pinouts forconnecting the output to a balanced or unbalanced stereo
audio acceptor:
Figure 3: Connecting to a Balanced Stereo Audio
Acceptor
Figure 4: Connecting to an Unbalanced Stereo Audio
Acceptor
Connecting a Balanced/Unbalanced Stereo Audio
Source to the Balanced Input
The following are the pinouts forconnecting a balanced or unbalanced stereo audio source to
the balanced input:
Figure 5: Connecting a Balanced Stereo Audio
Source to the Balanced Input
Figure 6: Connecting an Unbalanced Stereo Audio
Source to the Balanced Input
10

KramerElectronicsLtd.
KDS-10–Setting andOperating KDS-10
8
Setting and Operating KDS-10
This section describes the KDS-10 setup encoder-decoder system. To set up the system,
perform the following actions:
•Configuring Network Switchto Multicast Modeon page 8.
•Setting the KDS-10 System on page 8.
Configuring Network Switch to Multicast Mode
Beforesetting up the KDS-10 encoder and decoder, youneed to configure a network switch
to stream in multicast mode.
It is important that youuse a 1G Managed switch with IGMP snooping layer2.
Toconfigure the switch:
1. Connect the switch to your PC.
2. Set the following:
▪JumboFrames –Off.
▪IGMP Snooping –On.
▪IGMP Querier –On.
▪IGMP Immediate/Fast Leave –Off.
Switchis configured.
Setting the KDS-10 System
This section describes the following KDS-10 setups:
•Setting a KDS-10 Encoder and DecoderSystem on page 8.
•Setting an Encoder with a Custom Decoder on page 9.
Setting a KDS-10 Encoder and Decoder System
By default, KDS-10 is configured as an encoder. When setting a KDS-10 encoder-decoder
system, youneed to set the decoder first.
Toconfigure the encoder and decoder:
1. Connect the encoder-decoder system (see Connecting KDS-10on page 6).
2. Connect a laptop to the network switch.
3. Makesure that power to the encoder is Off.
4. Turn the power on the decoder to On.

KramerElectronicsLtd.
KDS-10–Setting andOperating KDS-10
9
5. Definethe deviceas a decoder (see Setting KDS-10Configuration to Encoder/Decoder
on page 19).
6. Change the decoder IP address (see Setting DeviceIP Address and Other IP Settings
on page 23).
7. Definethe source (encoder) IP address and streaming port (see Defining Decoder
Streaming Settings on page 17).
We recommendthat forthe encoder you use the default IP address.
8. Power the encoder.
9. Makesure that the streaming channel appears on the display.
KDS-10 encoder-decoder system is configured.
Setting an Encoder with a Custom Decoder
You can use a KDS-10 encoder to stream to a custom decoder (forexample,using
MediaPlayer).
Toconfigure an encoder and custom decoder:
1. Connect the encoder to the same network as the decoder.
2. Turn the encoder power On.
3. Use the following URLtemplate to connectto a generated stream forboth unicast and
multicast streaming: “rtsp://ip_of_encoder:port_number/stream”.
For example, to generate a stream from the KDS-10 HDMI1 input, enter the following:
rtsp://192.168.1.20:554/stream.

KramerElectronicsLtd.
KDS-10–UsingEmbeddedWebPages
10
Using Embedded Web Pages
The web pages enable youto control KDS-10 via the Ethernet. The web pages include all the
OSD items and are accessed using a Web browser and an Ethernet connection.
If a web page does not update correctly, clear your Web browser’s cache.
Toaccess KDS-10 web pages:
1. Type the IP address of the device in the address bar of yourinternet browser (default =
192.168.1.39).
If security is enabled, the Login window appears.
Figure 7: EmbeddedWeb PagesLoginWindow
2. Enter the Username(default = Admin) and Password (default =Admin) and click
Sign in. The default web page appears, and General settings are presented (by-default,
KDS-10 is set as an encoder.
KDS-10 Web page enables performingthe following actions:
•Viewing Encoder General Settings on page 11.
•Defining Encoding Preferenceson page 12.
•Defining Encoder Streaming Settings on page 14.
•Viewing Decoder General Settings on page 15.
•Defining Decoding Preferenceson page 16.
•Defining DecoderStreaming Settings on page 17.
•Defining DeviceGeneral Settings on page 18.
•Setting DeviceDate and Time on page 19.
•Setting DeviceSecurity on page 21.
•Defining Network Settings on page 22.
•Viewing About Page on page 23.

KramerElectronicsLtd.
KDS-10–UsingEmbeddedWebPages
11
Viewing Encoder General Settings
Toview encoder general settings:
1. In the Navigation Pane, click StreamingSettings. The Streaming Settings page
appears.
Figure 8: KDS-EN10 DefaultWeb Page
2. View the encoder general Settings.
Encoder general settings are viewed.
Setting KDS-10 as the Decoder
To set KDS-10 as a decoder, go to Setting KDS-10Configuration to Encoder/Decoder
on page 19.
OnceKDS-10 is defined as the Decoder, you canperform the following decoder actions:
•Viewing Decoder General Settings on page 15.
•Defining Decoding Preferenceson page 16.
•Defining DecoderStreaming Settings on page 17.

KramerElectronicsLtd.
KDS-10–UsingEmbeddedWebPages
12
Defining Encoding Preferences
You can define the encoder devicepreferences.
Todefine encoding preferences:
1. In the Navigation Pane, click StreamingSettings. The Streaming Settings page
appears.
2. Click Encoding to open the Encoding tab.
Figure9: General Settings–Encoding Preferences
3. Open drop-down boxes to define encoder preferences foreach input:
▪Set Encoding method.
▪DefineAudio mode (HDMIinput, Analog input, or None).
▪Set the streaming Profile to Baseline (the most simplest profile, supported by any
decoder).Main or High (forhighest quality streaming).
By-defaultRate Control is set to Constant (CBR)mode whichgenerates a constant bitrate
that youcan predefine and is recommendedforlimited bandwidth use cases.

KramerElectronicsLtd.
KDS-10–UsingEmbeddedWebPages
13
4. Click Advanced Preferences and set the following foreach input:
▪Bitrate (kbit) –to define the numberof bits used per unit of playback time to
represent a continuous medium such as audio or video aftersource coding (data
compression.
▪GOP –to define the number of successive Group of Pictures within a coded video
stream from whichthe visible framesare generated.
▪B Frames –to define the number of bi-directional frames(a video compression
method used by the MPEG standard).
▪Slices per Frame –to define the numberof slices produced foreach frame.
Each slice contains one or more completemacroblock/CTUrow(s).Slices are
distributed overthe frameas regularly as possible.
5. Click SAVE to save the changes.
Encoding preferences are defined.

KramerElectronicsLtd.
KDS-10–UsingEmbeddedWebPages
14
Defining Encoder Streaming Settings
Todefine encoder streaming settings:
1. In the Navigation Pane, click StreamingSettings. The Streaming Settings page
appears.
2. Click Streaming to open the Encoder streaming tab.
Figure10: StreamingSettings–EncoderStreaming Tab
3. Click Disable to disable all streaming (at the top of the page).
4. Perform the following foreach Stream 1 and Stream 2:
▪Enable or disable Streaming per input.
▪Set the streaming protocol (RTSP/UDP).
▪View the Streaming IP address (forunique identification and access) to report to the
corresponding decoders.
▪Definethe RTSPPort number (default ports are 554 and 555).
▪View the folder name to report to the decoder (forIP stream access).
▪Select the Streaming Method to Unicast or Multicast.

KramerElectronicsLtd.
KDS-10–UsingEmbeddedWebPages
15
5. If streaming method is set to Multicast:
▪Enter group Address.
▪Enter time to live (TTL).
When setting TTL, note that:
•1 is restricted to the same subnet.
•32 is restricted to the same site.
•64 is restricted to the same region.
•128 is restricted to the same continent.
•255 is unrestricted.
6. Click SAVE to save changes.
Encoder streaming settings are defined.
Viewing Decoder General Settings
Toview decoder general streaming settings:
1. In the Navigation Pane, click StreamingSettings. The Streaming Settings page
appears.
Figure11: DecoderGeneralSettings Tab
2. Click Start to enable decoding or Stopto disable.
3. View the decoder status.
General settings are viewed.

KramerElectronicsLtd.
KDS-10–UsingEmbeddedWebPages
16
Defining Decoding Preferences
You can viewthe decoding method and set the audio mode and other decoder preferences.
Toset decoding preferences:
1. In the Navigation Pane, click StreamingSettings. The Streaming Settings page
appears.
2. Click Decoding to open the Decoding tab.
Figure12: General Settings –DecodingPreferences
3. View the Decoding Method.
4. Set the Audio mode via the drop-down box (HDMIoutput, Analog output, Both or None).
5. Use the slider to define Network Latency.
6. Click Advanced Preferences to set the following:
▪Definethe streaming quality.
▪View the Scale Mode.
▪Sync the clock (Sync orNot Sync).
7. Click SAVE to save the changes.
Decoding preferences are set.

KramerElectronicsLtd.
KDS-10–UsingEmbeddedWebPages
17
Defining Decoder Streaming Settings
Todefine decoder streaming settings:
1. In the Navigation Pane, click StreamingSettings. The Streaming Settings page
appears.
2. Click Streaming to open the Decoder streaming tab.
Figure 13: StreamingSettings–DecoderStreamingTab
3. Click Disable to disable all streaming (at the top of the page).
4. Perform the following foreach Stream 1 and Stream 2:
▪View the streaming protocol (RTSP/UDP).
▪Enter the encoder streaming IP address.
You need to enter the encoder IP address forthe decoder to recognize the
encoder to which it needs to connect.
▪Definethe Port number (default ports are 554 for HDMI1and 555 for HDMI2on the
encoder).
Default ports are 554 to view/display Input 1 at the Encoder, and 555 to view Input
2 at the Encoder.
▪Enter folder name (do not change forKDS-10 stream).
5. Click SAVE to save changes.
Decoder streaming settings are defined.

KramerElectronicsLtd.
KDS-10–UsingEmbeddedWebPages
18
Defining Device General Settings
The DeviceGeneral Settings page enables you to perform the following functions:
•Changing DeviceNameon page 18.
•Viewing device model and serial Number.
•Updating Firmwareon page 19.
•Setting KDS-10 Configuration to Encoder/Decoder on page 19.
•Resetting Deviceon page 19.
Changing Device Name
Tochange device name:
1. In the navigation bar, click the Device Settings tab.
The DeviceGeneral Settings page appears (see Figure 14).
Figure14: Device GeneralSettings Page
2. Type a new devicename and click SAVE.
The device name is changed.
Other manuals for KDS-10
1
Table of contents
Other Kramer Media Converter manuals

Kramer
Kramer KDS-EN6 User manual

Kramer
Kramer VP-724DS User manual

Kramer
Kramer VP-420 User manual

Kramer
Kramer VM-2DVI User manual

Kramer
Kramer VM-3A User manual

Kramer
Kramer FC-31 User manual

Kramer
Kramer FC-70R User manual

Kramer
Kramer VP-413 User manual

Kramer
Kramer TOOLS VP-100 User manual

Kramer
Kramer FC-70R User manual

Kramer
Kramer TP-580TD User manual

Kramer
Kramer KDS-17DEC User manual

Kramer
Kramer VA-256XL User manual

Kramer
Kramer 465 User manual

Kramer
Kramer VM-3UHD User manual

Kramer
Kramer FC-331 User manual

Kramer
Kramer MV-5 User manual

Kramer
Kramer VM-51 User manual

Kramer
Kramer VP-715 User manual

Kramer
Kramer FC-32 User manual