manuals.online logo
Brands
  1. Home
  2. •
  3. Brands
  4. •
  5. Kurgo
  6. •
  7. Pet Care Product
  8. •
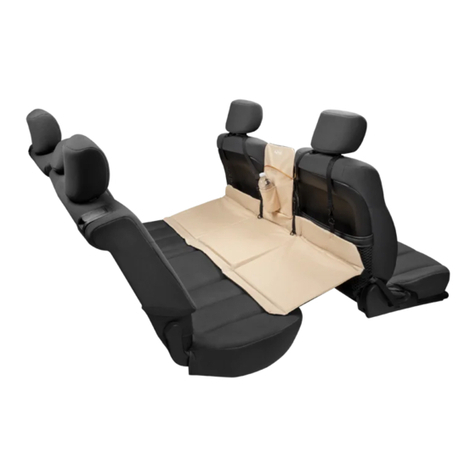
  9. Kurgo HEATHER HALF HAMMOCK User manual

Kurgo HEATHER HALF HAMMOCK User manual

AA
A A
B B
C
D
E E
F
G
H H
G
AA
BB
D
GG
E
F
E
H
C
Remarque: Le Half Hammock peut être installé
sur la banquette arrière, derrière lepassager ou
le conducteur.
Installation:
1. Étendez le hamac. Le côté en tissu doit être
sur le dessus et le côté imperméable en
dessous, face aux sièges. Le logo de Kurgo,
situé au-dessus des pochettes arrière sur le
panneau séparateur, devrait vous faire face
durant l’installation.
2. Une fois le hamac en position, connectez les
courroies comme suit. Bouclez les deux
sections des courroies latérales (A) autour
des appuie-tête correspondants.
3. Passez les courroies de coin (B) autour des
appuie-tête du côté opposé à celui ou le
hamac est installé. Serrez les courroies pour
créer une tension.
4. La courroie centrale (C) retient le panneau
séparateur (D) et peut être connectée à l’une ou
l’autre des courroies de coin (B). Déconnectez
l’une des courroies de coin, passez-la dans la
boucle de la courroie centrale et reconnectez-la.
Serrez la courroie centrale pour créer une
tension et tenez le panneau séparateur en
position verticale.
Ajustements facultatifs:
1. Des courroies élastiques de solidification sont
situées en dessous de chaque coin du hamac
(E). Elles peuvent être placées autour des coins
du dossier de votre siège pour tenir en place les
coins du hamac.
2. Un cordon élastique (F) se trouve sous le
hamac. Il peut être fixé en dessous du siège
pour un ajustement plus serré.
3. Rentrez les Bench Bean (G - situés surl’arrière
de la housse) dans l’espace où se rencontrent
la base du siège et le dossier. Un seul Bean
Bean (G) sera utilisé, cela dépend du côté de
la voiture sur laquelle vous l'avez installé.
Avis:
Veuillez communiquer toute demande
concernant un produit ou sa garantie
directement à Kurgo.
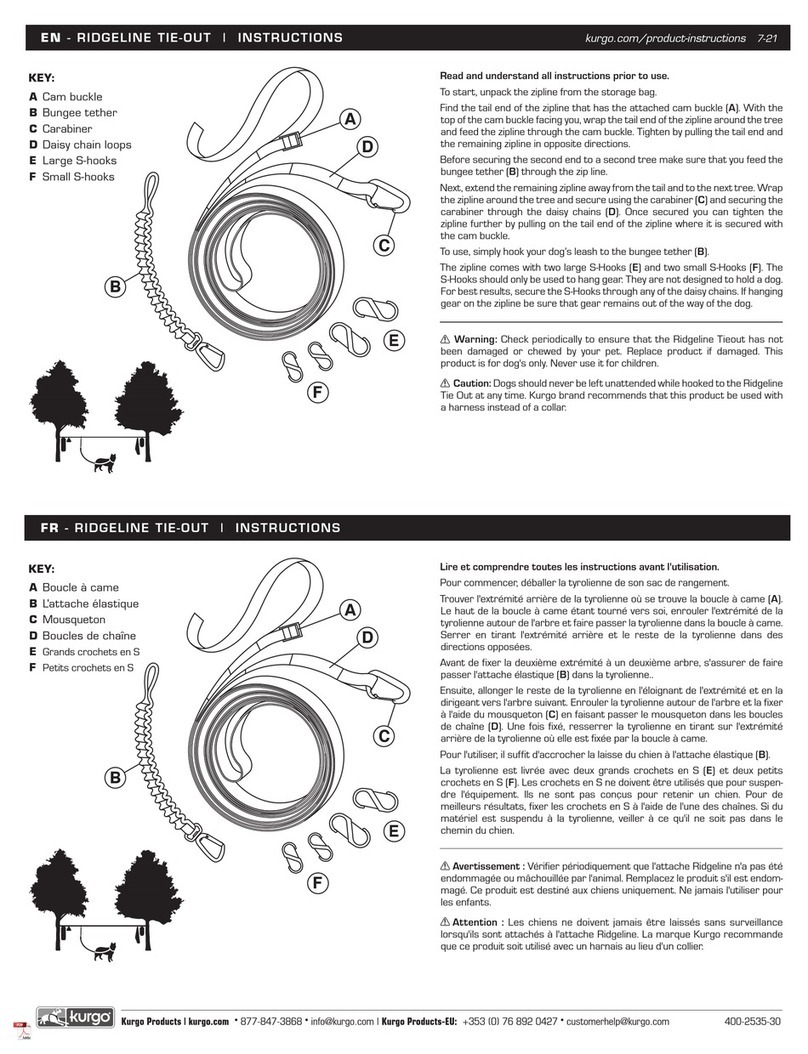
Parts List:
ASide headrest straps
BCorner headrest
straps
CCenter strap
DDividing panel
ECorner securing
straps (located on
backside)
FBungee cord
GBench Bean
HSeatbelt Opening
Liste des pièces :
ACourroies latérales
pour appuie-tête
BCourroies de coin
pour appuie-tête
CCourroie centrale
DPanneau séparateur
ECourroies de coin
de solidification
(situées à l’arrière)
FCordon élastique
GBench Bean
HOuvertures
pour ceinture
EN - HEATHER HALF HAMMOCK | INSTRUCTIONS AND CARE 5-19
FR - HEATHER HALF HAMMOCK | INSTRUCTIONS ET ENTRETIEN
kurgo.com/product-instructions
Kurgo Products: Salisbury, MA 01952 •877-847-3868 •www.kurgo.com •[email protected] | Kurgo Products-EU: +353 (0) 76 892 0427 •[email protected]
Out of box view
(product is shown folded)
AA
A A
B B
C
D
E E
F
G
H H
G
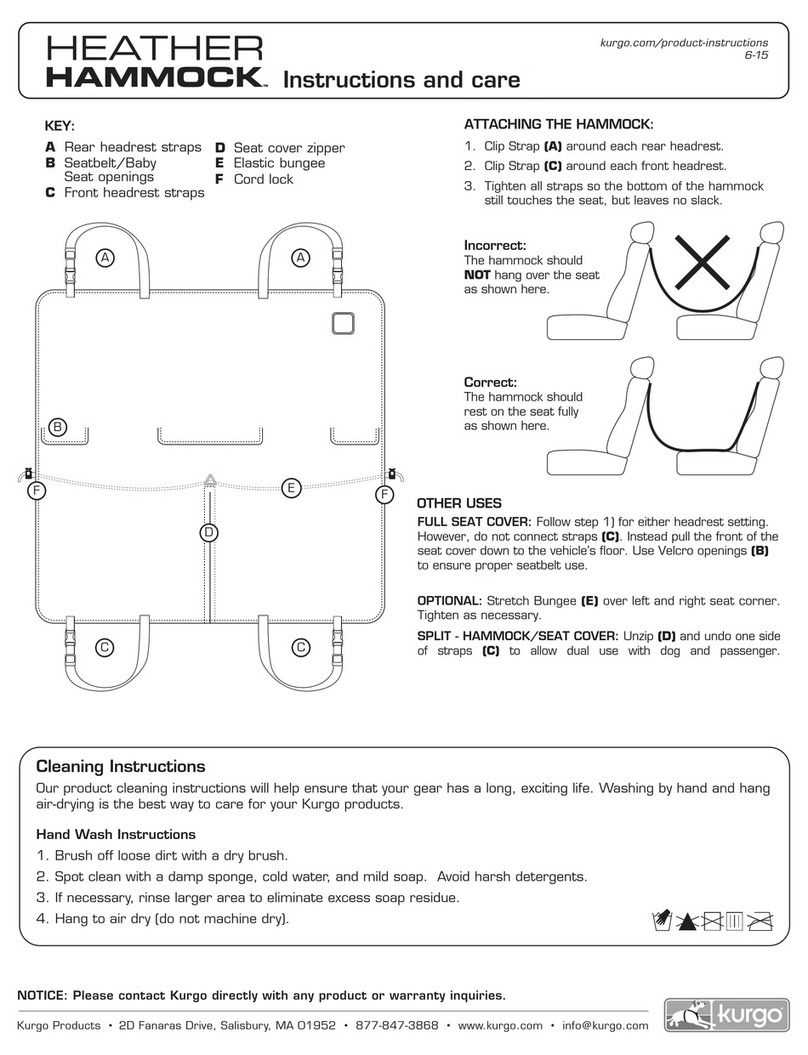
Note: The Half Hammock can be installed
on the rear seat of either the passenger
or driver side.
Installation:
1. Lay out the hammock. The cloth side should
be facing up and the waterproof side facing
down toward your seats. The Kurgo logo,
located above the back pockets on the dividing
panel (D) should be facing you as you install.
2. Once the hammock is in position start
connecting the straps as follows. Buckle the
two sections of the side straps (A) around
their corresponding headrests.
3. Loop the corner straps (B) around the
headrests on the opposite side of where
the hammock is being installed. Tighten
to create tension.
4. The center strap (C) holds up the dividing
panel (D) and can connect to either of the
corner straps (B). Disconnect one of the
corner straps, pass through the loop of the
center strap and reconnect. Tighten the center
strap to create tension and hold the dividing
panel upright.
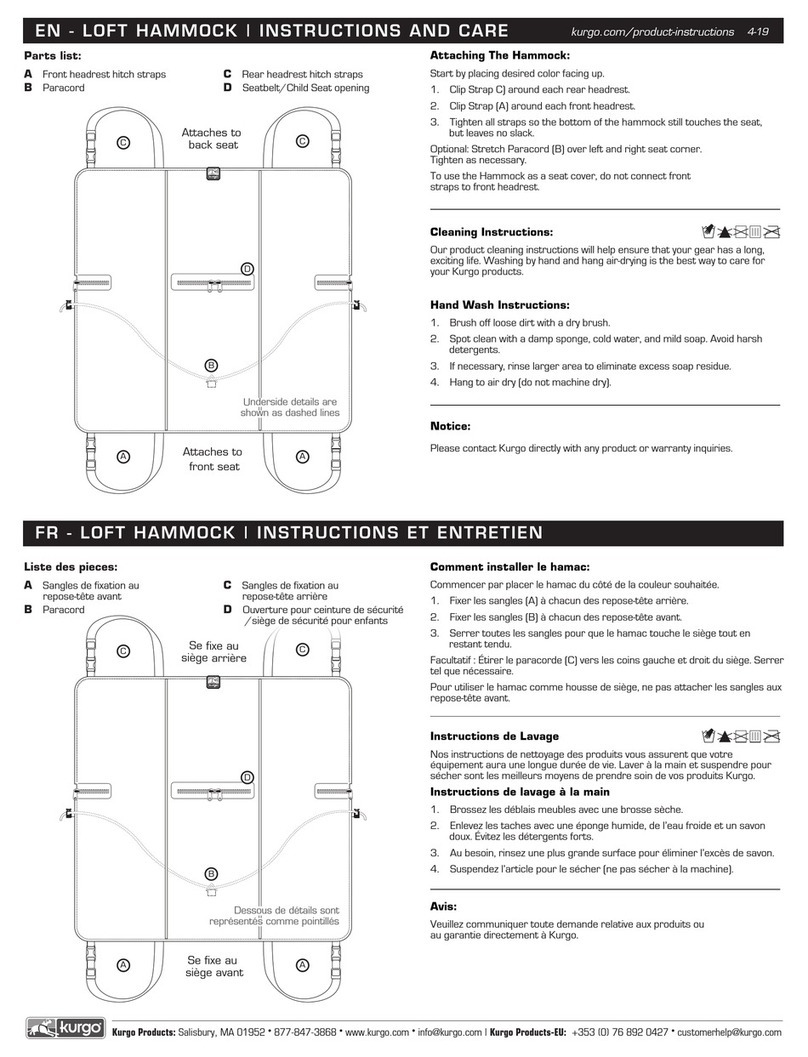
Optional adjustments:
1. There are elastic securing straps on the
underside of each corner of the hammock
(E). These can be placed around the corners
of your seat backs to hold hammock corners
in place.
2. There is a bungee cord (F) on the bottom on
the hammock. This can be attached to the
underside of the seat for a tighter fit.
3. Tuck the Bench Bean (G - located on the back
of the cover) into the crevice where the seat
base meets the seat back. Only one Bench
Bean (G) will be used, this depends on the
side of the car you install it on.
Notice:
Please contact Kurgo directly with any product or
warranty inquiries.
C
A
B
D
E
E
F
H
Steps 1 & 2
Step 3
Step 4
C
A
A
BB
Étape 1 & 2
Étape 3
Étape 4
C
A
A
BB
Vue hors boîte
(le produit est montré plié)
Top-down view
of installation
AA
BB
D
GG
E
F
E
H
C
Front
seats
Back
seats
Vue de dessus
de l'installation
Sièges
avant
Sièges
arrière
Vue arrière de l'installation
Backseat passenger
side view of final installation
C
A
B
D
E
E
F
H
AA
A A
B B
C
D
E E
F
G
H H
G
AA
BB
D
GG
E
F
E
H
C
AA
A A
B B
C
D
E E
F
G
H H
G
AA
BB
D
GG
E
F
E
H
C
Hinweis: Die Half Hammock („Halbierte Hängematte“)
kann auf dem Rücksitz, entweder auf der Beifahrer-
oder Fahrerseite angebracht werden.
Anbringung:
1. Die Hängematte bereitlegen. Die Stoffseite
sollte nach oben zeigen und die wasserfeste
Seite nach unten in Richtung Sitze. Das
Kurgo-Logo, welches sich auf den hinteren
Taschen auf der Trennplatte befindet, sollte
während der Anbringung der Hängematte in
Ihre Richtung zeigen.
2. Sobald die Hängematte in richtiger Position
ist, beginnen Sie damit, die Gurte wie folgt zu
verbinden. Zuerst die beiden Abschnitte der
seitlichen Gurte (A) um die betreffenden
Kopfstützen festschnallen.
3. Die Eckpunktgurte (B) auf der
gegenüberliegenden Seite von dort, wo die
Hängematte angebracht wird, um die
Kopfstützen schlingen. Anziehen, um
Spannung zu erreichen.
4. Der mittlere Gurt (C) hält die Trennplatte (D)
hoch und kann auf jeder beliebigen Seite der
Eckpunktgurte (B) angebracht werden. Einen
der Eckpunktgurte lösen, durch die Schlinge
des mittleren Gurtes führen und wieder
anbringen. Den mittleren Gurt anziehen, um
Spannung zu erreichen und die Trennplatte
aufrecht halten.
Wahlweise Anpassungen:
1. Es befinden sich Sicherungsgurte aus Gummi
auf der Unterseite jeder Ecke der
Hängematte (E). Diese können um die Ecken
Ihrer Rücksitze gelegt werden, um die Ecken
der Hängematte an Ort und Stelle zu halten.
2. Es befindet sich eine Gummikordel (F) auf der
Unterseite der Hängematte. Diese kann auf
der Unterseite des Sitzes angebracht werden,
um einen festeren Sitz zu erzielen.
3. Stecken Sie die Bench-Beans (G, die sich auf
der Rückseite des Bezuges befinden) in die
Spalte zwischen Sitzunterteil und Sitzlehne. Es
wird nur eines verwendet, je nachdem, auf
welcher Seite des Fahrzeugs Sie es installieren.
Hinweis:
Bitte wenden Sie sich bezüglich jedweder
Produkt- oder Garantieanfragen direkt an Kurgo.
Nota: La Half Hammock se puede instalar en el
asiento trasero, tanto del lado del pasajero como
del conductor.
Instalación:
1. Extienda la hamaca sobre el asiento,
colocando el lado del paño hacia arriba y el
impermeable hacia abajo. El logotipo de
Kurgo, que se encuentra arriba de los
bolsillos traseros del panel divisor, debe
quedar mirando hacia usted mientras instala
la hamaca.
2. Una vez extendida, coloque las tiras de la
siguiente manera. Enganche las dos tiras
laterales de los reposacabezas (A) en sus
correspondientes reposacabezas.
3. Pase las tiras de las esquinas (B) alrededor
de los reposacabezas, del lado opuesto donde
está instalada la hamaca. Ajuste hasta que
quede tensa.
4. La tira central (C) sujeta el panel divisor (D), y se
enlaza a cualquiera de las tiras de las esquinas
de los reposacabezas (B). Desenganche una de
las tiras de las esquinas. Pásela por el orificio de
la tira central (C), y ahora abróchela. Apriete la
tira central hasta que quede tensa, y el panel
divisor quede sostenido en posición vertical.
Ajustes opcionales:
1. Unas tiras elásticas de sujeción en las
esquinas del reverso de la hamaca (E), se
pasan alrededor de las esquinas de los
respaldos de los asientos, para mantener las
esquinas de la hamaca en su lugar.
2. Para que la hamaca quede más ajustada, hay
una cuerda elástica (F) en la parte de abajo
de la misma, que se engancha en la parte
inferior del asiento.
3. Pase los Bench Bean (G, que se encuentran
en el reverso de la funda), por la hendidura
donde coinciden la butaca del asiento y el
respaldo del mismo. Solo se utilizará uno que
se encuentra en el lado del automóvil en el
que lo instaló.
Aviso:
Contacte a Kurgo directamente para consultar
sobre algún producto o garantía.
Stückliste:
ASeitliche Gurte
für Kopfstützen
BEckpunktgurte
für Kopfstützen
CMittlerer Gurt
DTrennplatte
ESicherungsgurte
für Eckpunkte
(Befinden sich auf
der Rückseite)
FGummikordel
GBench Bean
HSicherheitsgurt-
Liste des pièces :
ATiras laterales de los
reposacabezas
BTiras de las esquinas
de los reposacabezas
CTira central
DPanel divisor
ETiras de las esquinas
de sujeción (ubicadas
en el reverso)
FCuerda elástica
GBench Beans
HAgujeros para
el cinturón de
seguridad
DE - HEATHER HALF HAMMOCK | ANLEITUNGEN UND PFLEGE
ES - HEATHER HALF HAMMOCK | INSTRUCCIONES Y CUIDADO
5-19
Kurgo Products: Salisbury, MA 01952 •877-847-3868 •www.kurgo.com •[email protected] | Kurgo Products-EU: +353 (0) 76 892 0427 •[email protected]
Schritte 1 & 2
Schritte 3
Schritte 4
C
A
A
BB
Vista de la caja
(el producto se muestra doblado)
Paso 1 & 2
Paso 3
Paso 4
C
A
A
BB
Vordersitz
Rücksitzt
Kurgo Products: Salisbury, MA 01952 •877-847-3868 •www.kurgo.com •[email protected] | Kurgo Products-EU: +353 (0) 76 892 0427 •[email protected]
Vista superior de la instalación
desde el lado del pasajero
Asiento
delantero
Asiento
trasero
Out-of-Box-Ansicht
(Produkt ist gefaltet dargestellt)
Vista lateral de la instalación
desde el lado del pasajero
Ansicht der Anbringung auf
der Rückbank, Beifahrerseite
Draufsicht auf
die Installation
C
A
B
D
E
E
F
H
C
A
B
D
E
E
F
H
Other Kurgo Pet Care Product manuals

Kurgo Go-Tech Adventure Harness User manual

Kurgo

Kurgo Go-Tech Adventure Harness User manual

Kurgo CARGO CAPE User manual

Kurgo

Kurgo CARGO CAPE User manual

Kurgo SKYBOX REAR Booster Seat Series User manual

Kurgo

Kurgo SKYBOX REAR Booster Seat Series User manual

Kurgo Long Hauler User manual

Kurgo

Kurgo Long Hauler User manual

Kurgo SKYBOX User manual

Kurgo

Kurgo SKYBOX User manual

Kurgo back seat BARRIER User manual

Kurgo

Kurgo back seat BARRIER User manual

Kurgo Loft Hammock User manual

Kurgo

Kurgo Loft Hammock User manual

Kurgo LOFT BOOSTER SEAT User manual

Kurgo

Kurgo LOFT BOOSTER SEAT User manual

Kurgo RSG Active Utility Belt User manual

Kurgo

Kurgo RSG Active Utility Belt User manual

Kurgo Journey Air User manual

Kurgo

Kurgo Journey Air User manual

Kurgo K9 COURIER User manual

Kurgo

Kurgo K9 COURIER User manual

Kurgo Tru-Fit Smart User manual

Kurgo

Kurgo Tru-Fit Smart User manual

Kurgo EXTENDED HAMMOCK User manual

Kurgo

Kurgo EXTENDED HAMMOCK User manual

Kurgo RSG COUNTY HARNESS User manual

Kurgo

Kurgo RSG COUNTY HARNESS User manual

Kurgo Back Seat Barrier Installation manual

Kurgo

Kurgo Back Seat Barrier Installation manual

Kurgo WANDER BENCH SEAT COVER User manual

Kurgo

Kurgo WANDER BENCH SEAT COVER User manual

Kurgo BAXTER BACKPACK Installation manual

Kurgo

Kurgo BAXTER BACKPACK Installation manual

Kurgo JOURNEY BENCH SEAT COVER User manual

Kurgo

Kurgo JOURNEY BENCH SEAT COVER User manual

Kurgo ROVER BOOSTER SEAT User manual

Kurgo

Kurgo ROVER BOOSTER SEAT User manual

Kurgo RSG TOWNIE HARNESS User manual

Kurgo

Kurgo RSG TOWNIE HARNESS User manual

Kurgo BACKSEAT BRIDGE User manual

Kurgo

Kurgo BACKSEAT BRIDGE User manual

Kurgo Heather Hammock User manual

Kurgo

Kurgo Heather Hammock User manual

Kurgo Tru-Fit Smart Harness Enhanced strength v.3 User manual

Kurgo

Kurgo Tru-Fit Smart Harness Enhanced strength v.3 User manual

Kurgo Long Hauler Joring Pack Belt User manual

Kurgo

Kurgo Long Hauler Joring Pack Belt User manual

Popular Pet Care Product manuals by other brands

Great American Deluxe Paw Pal installation guide

Great American

Great American Deluxe Paw Pal installation guide

KARHIA Pro quick guide

KARHIA

KARHIA Pro quick guide

Dogtra Pathfinder owner's manual

Dogtra

Dogtra Pathfinder owner's manual

Little Cottage Cozy Cottage Kennel Assembly instructions

Little Cottage

Little Cottage Cozy Cottage Kennel Assembly instructions

Prevue Pet Products Catville 7240 quick start guide

Prevue Pet Products

Prevue Pet Products Catville 7240 quick start guide

Premier Pet RoloRat product manual

Premier Pet

Premier Pet RoloRat product manual

4pets ECO 1 quick start guide

4pets

4pets ECO 1 quick start guide

Zoombak Pet Locator user guide

Zoombak

Zoombak Pet Locator user guide

Dogtra 1900S Series owner's manual

Dogtra

Dogtra 1900S Series owner's manual

Petsafe ScatMat Get started

Petsafe

Petsafe ScatMat Get started

Frontgate Covington Pet Residence 167209A DGG L quick start guide

Frontgate

Frontgate Covington Pet Residence 167209A DGG L quick start guide

Zolia Venandi manual

Zolia

Zolia Venandi manual

Merry Products PH0030010002 Assembly instructions

Merry Products

Merry Products PH0030010002 Assembly instructions

IRIS PS-500 Assembly instructions

IRIS

IRIS PS-500 Assembly instructions

Zooplus Futterautomat Noma instruction manual

Zooplus

Zooplus Futterautomat Noma instruction manual

PetNovations CatGenie 120 Operation guide

PetNovations

PetNovations CatGenie 120 Operation guide

Dogtra 1900NCP Field Star Series owner's manual

Dogtra

Dogtra 1900NCP Field Star Series owner's manual

SportDOG NoBark 18 operating guide

SportDOG

SportDOG NoBark 18 operating guide

manuals.online logo
manuals.online logoBrands
  • About & Mission
  • Contact us
  • Privacy Policy
  • Terms and Conditions

Copyright 2025 Manuals.Online. All Rights Reserved.