Kwunphi Kwun-E11L User manual

Kwun-E11L
PV panels cleaning robot Kwun manual
Please read this manual carefully before using
the product and keep it properly.
Kwunphi

Kwunphi into possible, Kwunphi into habit.
堒出可能,堒成习惯

1.Safety instructions ........................................................................................1
2.Attention ..................................................................................................1
3.Product introduction .....................................................................................2
4.Use guide .................................................................................................4
5.APP Use guide ..........................................................................................16
6.Daily cleaning and maintenance .......................................................................22
7.Troubleshooting.........................................................................................22
8.Recommended Operating Conditions ................................................................23
9.Limited warranty Policy ................................................................................24
10.Warranty and after-sales service .....................................................................28
Directory

1. Use the product as instructed in the manual. Only use the accessories recommended or sold by the manufacturer.
2. Make sure the supply voltage meets the voltage specified on the charger.
3. Before using the product, make sure that the battery and shell have been installed in place, and the battery power is sufficient.
4. If the power cord is damaged, it must be replaced by the manufacturer, its maintenance department or a professional to avoid
danger.
5. Please turn off the power switch or pull the plug from the power socket before cleaning and maintaining the product.
6. In case of power failure, waterproof covers must be installed on connectors and sockets, and ensure that the waterproof covers are
clean and free of foreign matter.
7. Before placing the Kwun in the initial position of the photovoltaic array, ensure that the surface of the initial position is clean in
advance to prevent the product from slipping or falling due to serious pollution of the track.
8. After cleaning job, clean the anti-fall sensor with a wet towel and then wipe it with a dry towel to prevent excessive accumulation
of dust and affect the perception.
9. Before discarding the product, turn off the power switch and remove the battery. Remove and discard the battery in accordance
with local laws and regulations.
10. If the product is not used for a long time, please turn off the power switch and power off the product.
11. Wear ESD gloves when touching the Kwun.
12. It is only used in the PV array with an inclination of less than or equal to inclination 10°(dry brush) or 5°(wash) , the PV array
edge range of 50cm is free of obstacles and the lowest point is suspended above 10cm.
13. Do not use the product in an extremely hot (above 45℃) or extremely cold (below -20℃) environment.
14. Safety protection devices such as guardrail and protective shed should be built around the photovoltaic array to prevent safety
accidents.
15. When the product is operated at a height above 2m (including 2m) which is likely to fall, it shall follow the Technical Specification
for Safety of Operation at Height in Construction.
16. Do not use the product when it cannot work normally due to drop or damage. To avoid injury, the product should be repaired by
the manufacturer or its after-sale service.
17. Please use the product according to the instructions in the manual. Kwunphi company is not responsible for any loss or injury
caused by improper use.
1
1. Safety instructions
Before using this product, please carefully read all safety and operation instructions in this manual. Operation in violation of
the manual may cause danger or damage to the equipment.
2. Attention

* The actual data of battery life may be different due to different operating environment,
load bearing, long-term battery loss and other factors.
* Equipment weight and size may vary slightly depending on material supplier, etc.
Model Kwun-E11L
Operating system TianyunOS
Battery 25.2V 15Ah
Recharger out 29.4V⎓5A
Battery life ≈300min
Charging time ≈180min
Weight 11.85Kg / 14.15Kg (Included battery)
Size L 550mm * W 390mm * H 230mm
2
* Due to the needs of continuous improvement of the product, this material product is subject to the physical, our company reserves the right to update the product.
3. Introduction
3.1 Name & Model
3.2 Parts list
Name:Kwun
Model:Kwun-E11L
* According to different areas, choose different models of chargers.
* Self cleaning stuff is only used for dry brushing, please remove it by yourself when washing.
No. Name Quantity
1 Kwun body (model:Kwun-E11L) 1 pcs
2 Battery 2 pcs
3 Recharger 1 pcs
4Kit (wrench & clamp pliers & cross screwdriver &
plumber’s tape & water saving nozzle) 1 pcs
5 Self cleaning stuff 8 pcs
6 M4*12 hexagon socket triple bolt 20pcs
7 Roller brush assembly (type F) 2 pcs
8 Water Cube 1 pcs
9 Operating instruction 1 pcs
3.3 Specification
* The illustrations in this manual are for reference only.
The actual appearance shall prevail.
①
②
⑨
③ ④ ⑤
⑧
⑦
⑥

1. Prepare the replacement track and spring pliers, and prop up the kwun body to lift the track off the ground, Take out self cleaning stuff.
2. Remove the shaft retaining ring (spring) of the driving wheel and the driven wheel using spring pliers, and remove the outer retaining ring on
the driving wheel and the driven wheel.
3. Reach into the inside of the track and take it out from the inside out to complete the track disassembly.
4. Use the caterpillar to be replaced and install the caterpillar.
5. Put the track into the driving wheel, the slave wheel and the synchronous wheel in turn, and then press the track into the inner retaining ring
of the driving wheel with force, Insert self cleaning stuff.
6. Install the outer retaining ring to the driving wheel and the driven wheel, and use the spring pliers to set the spring in the spring groove of the
driven wheel and the driving wheel respectively.
7. Check to ensure that all driving wheels and external retaining rings of driven wheels are inside the spring grooves to complete installation.
3
3. Introduction
3.5 Water Cube
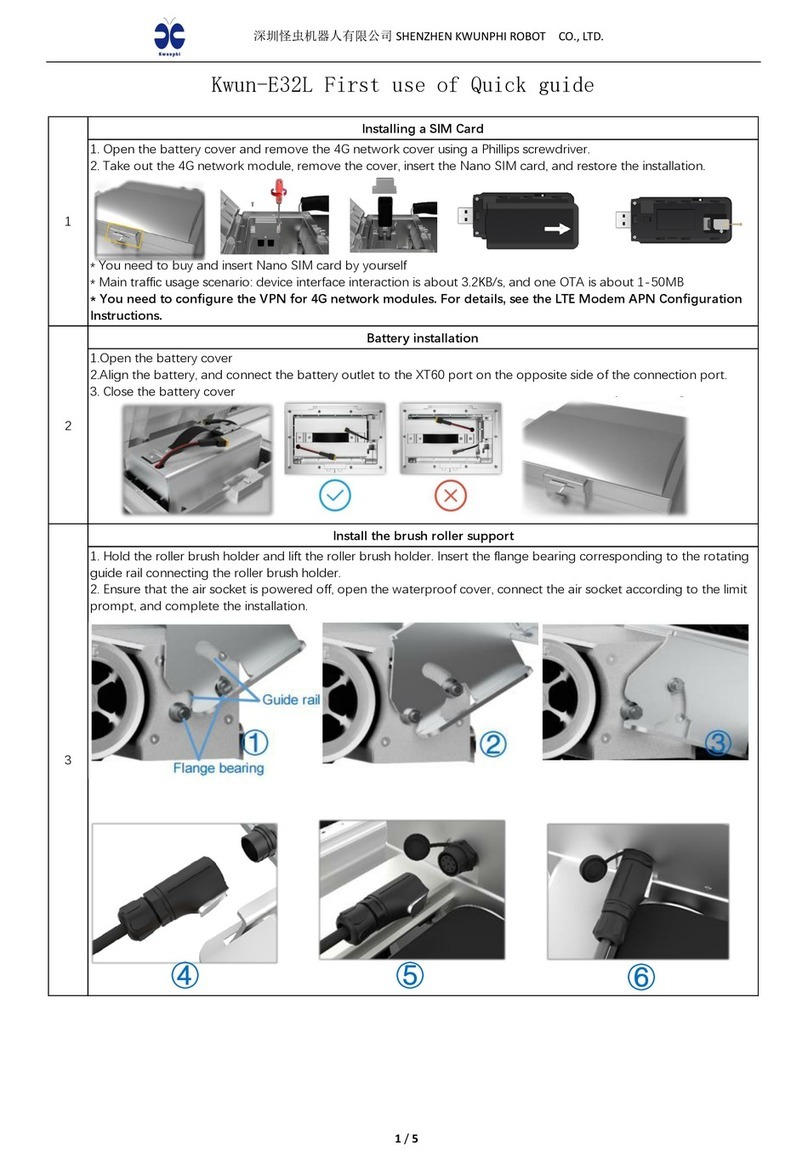
3.5.1 Water Cube connection
1. Fix the rotating table module base of the Water Cube to the mounting hole of the shell through M4 captive bolts.
2. Insert the nozzle module of the Water Cube into the through hole of the roller brush cover.
3.5.2 External device
3.4 Track installation and replacement
①water inlet
②hydraulic press
③outlet pipe ④universal rotary joint
⑤hose
⑥water cube
⑦mainfold
Need to purchase hydraulic press, universal rotary joint
and hose to use together.
Collocation demonstration:
•M14 external thread to M22 external thread rotary universal rotary joint
•M14 braided high-pressure hose with 20m length and 8.5mm rotary
joints with internal and external threads
•1800W Hydraulic press (with water inlet and outlet pipe)

No. Module
1 Kwun body
2 Battery
34G Network module
4 Indicator light & Button
5 Handle
6 Crawler belt
7 Shading brush
8 Roller
9 Ultrasonic sensor
10 Exposure box
11 Central suction cup
12 Self cleaning stuff
13 Water cube
14 Water cube-mounting
4
3. Introduction
3.6 Module specification
⑨ ⑩ ⑪ ⑫
②
③
④
⑥
⑦
①
⑤
⑬
⑧
⑭
⑫

1. PV array tilt less than 10°(dry brush) or 5°(wash). (This data ultimately depends on the characteristics of the contaminant.)
2. There are no obstacles in the PV array area, and the identification area at the bottom of the PV array edge is 5*8cm(width * depth)
barrier-free.
3. The type and direction of the PV array modules are the same, and there are white intervals between the batteries of the modules.
4. The maximum dislocation less than 4cm of the upper、lower、left and right of the adjacent PV panel.
5. The spacing of photovoltaic modules is less than 4cm, and the height difference is less than 1cm.
6. The edge of the photovoltaic array is free of obstacles within a 50cm range.(If only the top is obstructed, you can use a custom limit on
the number of rows to do not clean the top row )
7. The supported types of photovoltaic panel are as follows:
There are no obstacles within 50cm of photovoltaic array edge
5
4. Use guide
4.1 Application scenarios
* In the case of self-identification, MBB default M6/166mm size, which can be customized.
* The main grid line 0BB PV module needs to define the relative placement direction of Kwun: horizontal (H0BB) or vertical (V0BB).
* PCS automatic identification only supports 60/72. If the application scenario is fixed, you are advised to use the custom scenario mode.
< 10°
Dry brush
* Due to the needs of continuous improvement of the product, this material product is subject to the physical, our company reserves the right to update the product.
*Safety protection devices such as guardrail and protective shed should be built around the photovoltaic array to prevent safety accidents.
*When the product is operated at the height above 2m (including 2m), which is likely to fall, it should follow the Technical Specification for Safety of
Operation at High Places in Construction.
Obstacles such as walls and pipes should be within 50cm of
the top edge of photovoltaic array
Main grid line Type Size(mm) PCS
0BB Full size 125 96
2BB Full size 156 60
3BB Full size/Half size 156/158 60/72
4BB Full size/Half size 156/158 60/72
5BB Full size/Half size 156/158 60/72
6BB Full size/Half size 156/158 60/72
MBB Half size
162/166 60/72
182 60/72/54/66/78
210 60/72/45/54/66/55
One third 210 50

Ringing times One ringing Continued ringing
Content
Operation mode switching Actuator error fault alarm
The bottom layer of the communication change Operation abnormal alarm
Pilot lamp Appearance Content
Red lamp1
Normally off Drive sensors are all normal
Normally on
The battery is low, need to be charged or replaced
During the operation, the driving failure will automatically switch to standby mode, which
needs to be restarted and repaired
2.50Hz flashing There is an abnormality in the left ultrasonic anti-fall sensor
1.25Hz flashing There is an abnormal ultrasonic drop sensor on the right side
0.50Hz flashing There is an abnormality in the pressure or temperature detection module
Red lamp2
Normally off/Normally on Internal communication of the device is normal/failed
flashing
When standby, if startup conditions are not met, the device shall be completely placed on the
PV surface with an inclination less than 10°
When turning, the central sucker is lowered to complete the sucker, but the adsorption effect
is not good, unable to meet the turning conditions
Green lamp Normally on Standby
flashing Autonomous operation/remote control/remote control status
Yellow lamp Normally off/Normally on The network status is normal or the remote control takeover / network status is abnormal
6
4. Use guide
4.2 Interactive instructions
4.2.1 Light color instruction
4.2.2 Buzzer
Red lamp1 Red lamp2 Green lamp Yellow lamp

7
4.2.4 Autonomous mode
Content Option Timing Default
Type of PV module Full size/Half size/One third Standby Full size
Grid line, size, number of pieces
Automatic recognition or custom patterns standby Automatic recognition
Anchor pattern Berthing at start point/Adjacent angle Standby Berthing at start point
Cleaning tasks 1~10/999 times Online 1 time
Array row limit No limit/1~100 rows Standby No limit
Cleaning mode Array/Single bottom Quick/Normal/D
eep/Severe
Standby Array Normal
4. Use guide
4.2 Interactive instructions
4.2.3 Button
Power button
Power on or off
Start/Standby button
Start or cancel autonomous jobs
Turn off the buzzer alarm
Starting point Adjacent angle
Second row array
First row array
First row array
(In case of a obstruction,
Software can be defined not clean)
Barriers, such as walls and pipes, are within 50cm of the top edge of the photovoltaic array
Edge of the guard

8
4. Use guide
4.4 How to Use batteries
4.4.2 Battery installation
1. Unscrew the bolt on the battery cover on the right of Kwun body counterclockwise, and open the battery cover.
2. Align and insert the battery until it is inserted into the power socket at the bottom.
3. Cover the battery cover and fasten the battery cover bolts clockwise.
*For more tutorials and videos on how to use Kwun, please visit our official website
1. Ensure that the battery is not working. Take out the battery or spare battery.
2. Insert the “品” connector of the battery into the “品” connector of the charger.
3. Insert the input plug of the charger into the 220V power socket, and then turn on the power supply of the socket.
4. Wait until the red light of the charger turns on and the battery starts charging.
5. It takes about 3 hours to fully charge, when the red light of the charger is off, the green light is on, and the charging is finished.
6. Turn off the power from the socket and remove the input plug of the charger.
7. Remove the battery from the outlet of the charger and store it.
4.4.1 Charging
② ③①
4.3 Install the brush roller support
1. Hand twist combines bolt eight three
fixed roller in front Kwun body with water
segregator, roller without water segregator
Kwun body in the rear. (Do not tighten)
2. Flip Kwun body bottom up, straightening
the roller brush so that it is level, using the
M4 Allen wrench tight eight directly before
and after the three combination bolt roller.
3. Flip Kwun face on the body,
use the M4 Allen wrench verify
strengthening before and after
the original eight three
composite bolt roller.
4. Open the waterproof cover of the
front and rear roller brush air socket,
and connect the front and rear roller
brush air plugs according to the limit
prompts to complete the installation.
* Track used for a long time, its surface becomes smooth and loses friction, 1000 mesh
sandpaper can be used to grind the track surface diagonally to increase friction.

4.4 How Do I Use 4G Network Modules
9
4. Use guide
1. Lift the battery cover and remove
the battery.
①②
4.5 How to use this product
4.5.1.2. Check whether there are foreign bodies under the anti-fall sensor to prevent abnormal anti-fall perception.
4.5.1 Pre-operation inspection
4.5.1.1. Check track surface cleanliness to prevent significant loss of grip.
* You need to buy and insert Nano SIM card by yourself
* Main traffic usage scenario: device interface interaction
is about 3.2KB/s, and one OTA is about 1-50MB
③
2. and remove the 4G network cover
using a Phillips screwdriver.
3. Take out the 4G network module, remove the cover,
insert the Nano SIM card, and restore the installation.
*For more tutorials and videos on how to use Kwun, please visit our official website
(It is strictly forbidden to be squeezed by external forces)
Nano SIM card

10
4. Use guide
4.5 How to use this product
4.5.1 Pre-operation inspection
4.5.1.5. Check whether the cleanliness of the camera lens and the body of the exposure box and the shading plate completely
cover the projection plane area of the exposure box to prevent sunlight and dust from interfering with the camera.
4.5.1.4. Check the cleanliness of the suction cup surface at the bottom of the central sucker assembly to prevent a significant reduction
in grip.
4.5.1.6. Check whether the rolling brush before and after the installation is firm and deformation, to prevent the risk of falling and
affect the cleaning effect. * Do not use single rolling brush cleaning
mode to avoid falling risks.
* If the bristles are deformed under
pressure for a long time, it will cause the
bristles to become irreversibly deformed.
* When moving the roller brush, special
handle should be raised. It is strictly
forbidden to pull the roller brush shaft to
prevent deformation and damage of the
roller brush shaft.
*For more tutorials and videos on how to use Kwun, please visit our official website

11
4.5.2 Placing
4.5 How to use this product
1. The number of turns is equal to the number of turns in a single row multiplied by the number of array rows.
4. Use guide
3. Generally, use the side that is easy to carry and operate the device as the starting end, that is the bottom of the array.
Vertical layout(V)
Eight turns in a row
A row requires eight turns
2. Select the starting point with the least number of turns for H autonomous operation.
Horizontal layout(H)
Ten turns in two rows
A row requires four turns
Crossing requires two turns
Turn times of V autonomous operation = 18
Longest edge of array
* Ensure that the surface of the initial position is clean to prevent the product from slipping or falling due to heavy contamination of the tracks
Turn times of V autonomous operation = 14
Longest edge of array

* Ensure that the surface of the initial position is clean to prevent the product from slipping or falling due to heavy contamination of the tracks
12
4. Use guide
4.5 How to use this product
4.5.3 Start the Kwun
1. Corner placement
Select the starting point with the least number of turns for
horizonal autonomous operation.
Kwun is placed on the bottom corner of the left and right
sides of the photovoltaic array that meets the requirements.
3. Position calibration
Adjust the horizontal central axis of the device to the spacing line of the
cells in row 1 and row 2 in the lower corner, and the horizontal central
axis to the spacing line of the cells in row 1 and row 2 in the lower corner.
2. Turn on the power
Press the power button to start the device. When the first red
light is off, the device is normal and enters the initialization
state.
4. Start the job
When the green light is steady on and the red light is off (the buzzer
beeps once), and the initialization is successful (about 22s), press the
start/standby button to start the device.
The interval between components is less than 4cm
The height difference is less than 1cm
The identification area at the bottom of the PV array edge
is 5*8cm(width * depth) barrier-free.
Dry brush tilt less than 10°, wash tilt less than 5°
* Holes on the support plate of the synchronous wheel indicate the central position of Kwun,
which can assist in position calibration.
* The main grid line 0BB PV module needs to be closer to the interior due to size problem,
and should be placed according to the number of rows and columns +1 indicated above.

13
4. Use guide
4.6 Function application
4.6.1 Unmanned cleaning / 4.6.1.1 Array
After the start and identification is completed, the Kwun climbs up to the top of the photovoltaic array and tries the direction. After
the direction is determined, the operation begins. The Kwun turns around to span until the array is covered, and chooses the
termination according to the berthing mode.
Berthing at
Starting point
First row array
Second row array
First row array
Second row array
Third row array
Berthing at
Adjacent angle
Starting point
terminus

14
4. Use guide
4.6 Function application
4.6.2 Low voltage return
In the process of autonomous operation, when the battery power is low, the Kwun will automatically enter the low-voltage return
mode and return to the starting position.
Low voltage alarm
4.6.1 Unmanned cleaning / 4.6.1.2 Single bottom
After the start and identification is completed, the Kwun independently operates forward to the edge of the photovoltaic array to
complete the single bottom edge operation. (Recommended for cleaning array ash zone)
terminus
Starting point
*If the bottom edges are stubborn stains, it is recommended to use single bottom/severe cleaning mode for cleaning.

15
4. Use guide
4.6 Function application
4.7.4 APP monitoring
Kwun status display and mode customization Settings and other operations
Basic interaction
Joystick and button modes manually control Kwun movement
Remote control
Software application in the air download upgrade
OTA
*For more APP tutorials, see Chapter 5 APP Usage Guide
* Remote control mode is a header mode with Kwun itself as the reference coordinate system.
* Instead of headless mode with geographic or operator reference frames. Forward
Back

16
5. APP Use guide
5.1 Software download
5.2 Device connection
5.2.1 Account registration
Fill in relevant information
Click the register button
The Kwun’s ID code is located on
the underside of the battery cover
It is recommended to scan the QR
code and fill in quickly
* Need to insert Nano SIM card
* Main traffic usage scenario: device interface interaction is about 3.2KB/s, and one OTA is about 1-50MB
* For specific operations, please refer to section 4 "How to Use 4G Network Module" in Chapter 4 "User Guide".
5.1.1 Android link
https://file.kwunphi.com/app/aikwun/android/aikwun.apk
5.1.2 iOS link
https://apps.apple.com/us/app/id1616848453, or search for “AI-Kwun" in the App Store.
Android version APP
Scan QR code by browser
iOS version APP

17
Enter the device list interface
Click the login button
Enter your account number and password
5. APP Use guide
5.2 Device connection
5.2.3 Device list5.2.2 Login
*For more tutorials on the APP, please visit the official website
*You can switch between English and Chinese on the login screen or set
language options on the screen to enter the language setting screen
More Settings
Click on the Settings icon
Enter device details
Click the corresponding device
to view the details button
Custom Remarks
Hold down the device
Table of contents
Other Kwunphi Cleaning Equipment manuals

Kwunphi
Kwunphi Kwun User manual

Kwunphi
Kwunphi Kwun-C10L User manual

Kwunphi
Kwunphi Kwun-B20L2 User manual

Kwunphi
Kwunphi Kwun-E32H User manual

Kwunphi
Kwunphi Kwun-E22L User manual

Kwunphi
Kwunphi Kwun-B10L2 User manual

Kwunphi
Kwunphi Kwun-E32L User manual

Kwunphi
Kwunphi Kwun-B10L2 User manual

Kwunphi
Kwunphi Kwun-C10H User manual

Kwunphi
Kwunphi Kwun-E22H User manual