manuals.online logo
Brands
  1. Home
  2. •
  3. Brands
  4. •
  5. La Buvette
  6. •
  7. Farm Equipment
  8. •
  9. La Buvette Megastar D143 User manual

La Buvette Megastar D143 User manual

a
MEGASTAR
Renforcement
KIT D143
- Lire attentivement la notice avant de commencer le montage.
- Please, read carefully the mounting instructions before mounting.
- Bevor Sie mit der Montage beginnen, lesen Sie bitte sorgfältig die
Montageanleitung durch.
45 Kg
3 H
a = 13 (x2) , 19 (x2) 9 ; 10
- 1 -
N° 4690344 - 03/10
LA BUVETTE
Rue Maurice Perin
Parc d'activites Ardennes Emeraude - Tournes
F-08013 CHARLEVILLE-MEZIERES Cedex FRANCE
TEL : 03.24.52.37.20 - FAX : 03.24.52.37.24
Int. : +33.3.24.52.37.23 Int. : +33.3.24.52.37.24
S.A.V. : 03.24.52.37.27 - FAX : 03.24.52.37.24
Internet : www.labuvette.com
e-mail : commercial labuvette.com
sav labuvette.com
@
R
@
M8
8.25
30
70
8
1621
561
1538
831
50
8
19
20
8
x 4
x 2
x 20
x 12
x 36
- 2 -
1Démonter la barre de levage
Die Stange zum Heben demontieren
Take off the lifting bar
13
Démonter les brides et les étriers
Die Schlaufen und die Steigbügel demontieren
Take off bridles and stirrups
- 3 -
Demonter le toit de la megastar
Das Dach der Megastar demontieren
Take off the roof of Megastar
2
3
13
Démonter les tubes interieur
Die Innenrohre demontieren
Take off the internal tubes
4
- 4 -
Positionner les nouvelles brides entre les trous existants.
Die neuen Schlaufen zwischen den bestehenden Löchern positionieren
Set up the new bridles between the existing holes
5
x 2
2 trous existants
2 bestehenden Löchern
2 existing holes
M8
30
8.25
9
13
19
20
8
x 4
Monter et viser les nouvelles brides et étriers
Die neuen Schlaufen und die Steigbügel montieren
Set up the new bridles and the stirrups
6
Monter la barre de levage sur les nouvelles brides
Die Stange zum Heben auf die neuen Schlaufen montieren
Set up the lifting bar on the new bridles
7
x 1
Reprendre les étriers, écrous
et rondelles de l’ancienne version.
Die Steigbügel, die Schraubenmütter
und die Scheiben der alten Version
zurücknehmen.
Take back stirrups, nuts and slices of
the former version.
x4
Reprendre les ecrous ,
rondelles et vis ancienne
version.
Die Schraubenmütter, die
Scheiben und die Schraube
der alten Version zurücknehmen
Take back nuts, slices and lived
of the former version.
Ne pas serrer la bride et l'etrier completement
Der Zaum und der Steigbügel nicht vollständig pressen
Do not squeeze completely the bridle and the stirrup
- 5 -
!
!
561
1621
Positionner et passer le tube longitudinal dans l'étrier
Das Längsrohr im Steigbügel positionieren und anbringen
Set up and put the longitudinal tube into the stirrup
8
- 6 -
x2
M8
830
8.25
30
8.25
70
8
50
8
9 (x2)
9
13
Viser le tube longitudinal sur la megastar
Das Längsrohr an Megastar festschrauben
Screw the longitudinal tube on the Megastar
9
1
2
- 7 -
x2
Utiliser le levier du tube
afin de raprocher le tube
contre la matiére pour le viser.
Den Hebel eines Rohres nutzen,
um das Rohr gegen das Material
heranzurücken, um es a
nzuschrauben.
Use the control lever of the tube to
make it closer from the material
to screw it.
Appuyer
Drücken
Press
13
Positionner et viser le deuxiéme tube longitudinal
Das zweite Längsrohr an die richtige Stelle bringen und anschrauben
Position and screw the second longitudinal tube
10
Reprendre les étapes 8 et 9
Die Schritte 8 und 9 wiederholen
Go back to steps 8 and 9
- 8 -
11
Serrer les brides et etriers
Die Zäume und die Steigbügel pressen
Squeeze the bridles and the stirrups
12
x 2
!
831
1538
Positionner les tubes transversaux 1 et 2
Die Querrohren Nr. 1 und 2 an die richtige Stelle bringen
Position a transverse tube number 1 and 2
12
- 9 -
x4
1
23
4
1-2 3-4
M8
M8
M8
30
8.25
30
8.25
8.25
30
70
8
50
8
50
8
9 (x3)
9 (x2)
13
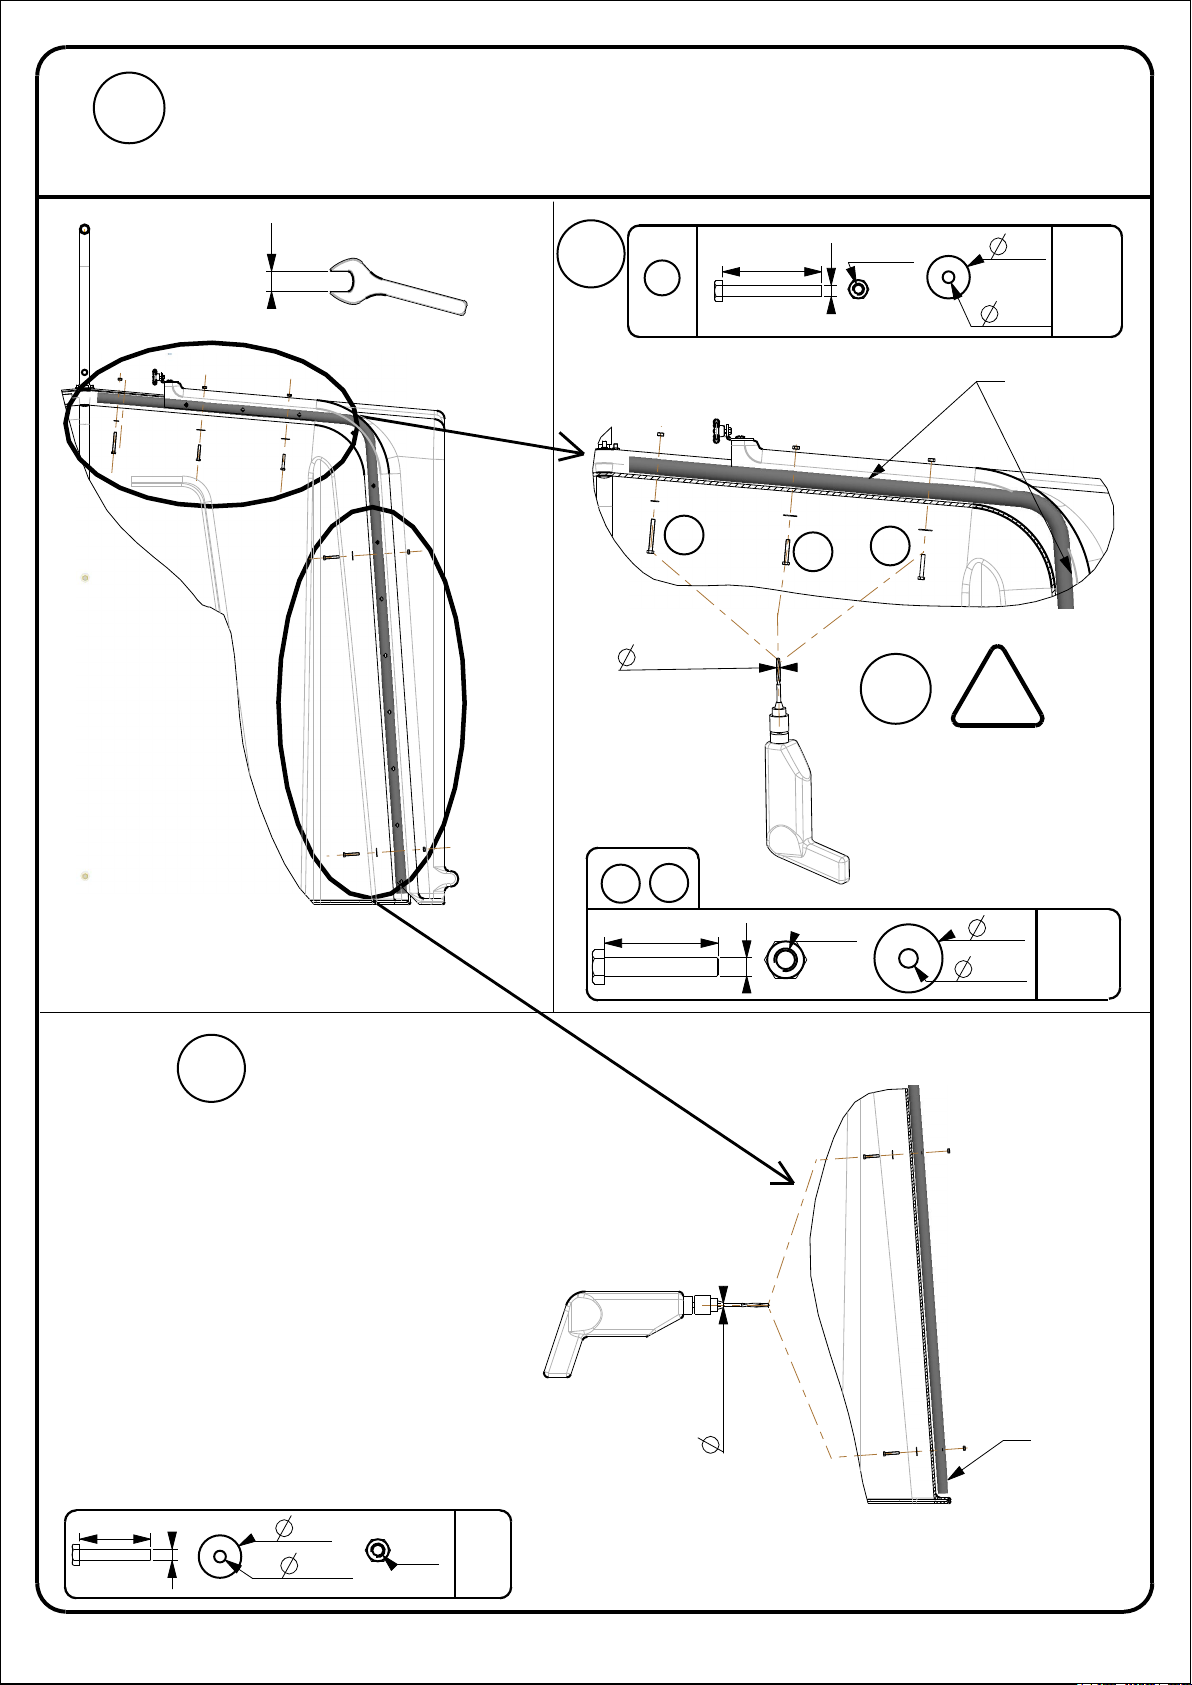
Viser les tubes transversaux 1 et 2
Das Querrohr anschrauben
Screw the transverse tube
13
2
x1
Utiliser la vis 1 pour rapprocher
la matiére, ensuite percer les trous
afin de positionner les vis2 et 3.
Die Schraube A benutzen, um den Stoff
zusammenzurücken, dann, die Löcher
zu durchbohren, um die Schrauben
zu positionieren 2 und 3
Use screw A to make material closer,
and then drill holes to position
the screws 2 and 3
- 10 -
Utiliser le levier du tube
afin de raprocher le tube
contre la matiére pour le viser.
Den Hebel eines Rohres nutzen,
um das Rohr gegen das Material
heranzurücken, um es anzuschrauben.
Use the control lever of the tube
to make it closer from the
material to screw it.
1
x2
123
Appuyer
x 2
1
23
Appuyer
1
!
3
4
14
Positionner les tubes transversaux 3 et 4
Die Querrohren Nr. 3 und 4 an die richtige Stelle bringen
Position a transverse tube number 3 and 4
Reprendre l'etape 13
Der Schritt 13 wiederholen
Go back to step 13
- 11 -
!
13
Demonter les tubes de renforts horizontaux
Die Rohre zur horizontalen Verstärkung demontieren
Take off the horizontal reinforcement tubes
15
- 12 -
1
2
1-2
8
30
8.25
70
8
10 (x3)
13
16 Monter et viser les tubes cintrés horizontaux
Die horizontalen gebogenen Rohre anschrauben
Set up and screw the horizontal arched tubes
Mettre une première vis et faire levier grace au tube pour viser la seconde
Erste Schraube einstecken und Rohrhebel nutzen, um die zweite Schraube anzuschrauben
Set up the first screw and make control lever thanks to the tube to screw the second
Lors de la fixation du tube cintré inverser les pattes pour une ouverture du toit plus grande
Bei der Befestigung des gebogenen Rohres, die Richtung des Eckwinkels für eine größere
Öffnung des Daches umkehren
During the fixation of the arched tube, reverse legs for a bigger roof opening
- 13 -
Reprendre les vis, ecrous et pattes ancienne version
Die Schrauben, die Schraubenmütter und die Pfoten
der alten Version zurücknehmen
Take back screws, nuts and legs of the former version
x 6
!
Remonter le toit
Das Dach wieder aufsetzen
Reset the roof
17
- 14 -

Other La Buvette Farm Equipment manuals

La Buvette MEGASTAR User manual

La Buvette

La Buvette MEGASTAR User manual

La Buvette BALPOR User manual

La Buvette

La Buvette BALPOR User manual

Popular Farm Equipment manuals by other brands

HighLine NT Series Operator's manual

HighLine

HighLine NT Series Operator's manual

Tatu Marchesan DCA2 2500 MC instruction manual

Tatu Marchesan

Tatu Marchesan DCA2 2500 MC instruction manual

Yetter 5000 SERIES Owner's Manual, Part Identification

Yetter

Yetter 5000 SERIES Owner's Manual, Part Identification

Sola ARES-2713 Starting manual

Sola

Sola ARES-2713 Starting manual

LEMKEN RUBIN 10 operating instructions

LEMKEN

LEMKEN RUBIN 10 operating instructions

KUHN EL 92 Assembly & operators manual

KUHN

KUHN EL 92 Assembly & operators manual

IBEA IBT 500 Series User and maintenance manual

IBEA

IBEA IBT 500 Series User and maintenance manual

SIP STAR 360/10 Instruction for work

SIP

SIP STAR 360/10 Instruction for work

horsch Partner 2000 FT operating instructions

horsch

horsch Partner 2000 FT operating instructions

Vivo BEE-V002C instruction manual

Vivo

Vivo BEE-V002C instruction manual

Princess auto 8825903 manual

Princess auto

Princess auto 8825903 manual

SAC MAXI-MIXER 4600 TRAILER Operator's manual

SAC

SAC MAXI-MIXER 4600 TRAILER Operator's manual

POMI WRAP 5 user guide

POMI

POMI WRAP 5 user guide

BVL MIXDRIVE Maximus Plus 1S Cleaning instructions

BVL

BVL MIXDRIVE Maximus Plus 1S Cleaning instructions

Amazone Cayros M Original operating manual

Amazone

Amazone Cayros M Original operating manual

Cub Cadet FastAttach 19A30037100 Operator's manual

Cub Cadet

Cub Cadet FastAttach 19A30037100 Operator's manual

Vicon Extra 532 operating manual

Vicon

Vicon Extra 532 operating manual

Unverferth NutriMax EQUALIZER manual

Unverferth

Unverferth NutriMax EQUALIZER manual

manuals.online logo
manuals.online logoBrands
  • About & Mission
  • Contact us
  • Privacy Policy
  • Terms and Conditions

Copyright 2025 Manuals.Online. All Rights Reserved.