Labex Harmony EL User manual

Labex Harmony User Manual, Date: 20 April 2020, # 1
Labex™ Harmony EL
USER MANUAL

Labex Harmony User Manual, Date: 20 April 2020, # 2
OVERVIEW
1. What is Labex Harmony
Labex Harmony is a digital electrolarynx device. It is specially designed to help
laryngectomеes talk. Its main feature is the two configurable talk buttons.
Labex Harmony is a CLASS I medical device.
General principle of operation for all models electrolarynxes manufactured by
Labex Trade Ltd.:
The digital electrolarynx produces mechanical vibrations with a low sound
frequency between 60-195 Hz. Applied to the neck, these vibrations create
trembling in the oral cavity similar to the human voice.
The combination of starting and stopping sound vibrations and oral
articulation creates comprehensible human speech.
2. In the box
In the box, you will find everything you need to start using the device:
Labex Harmony electrolarynx device;
USB charging cable;
USB charger 5V 2A;
„Labex“ lanyard;
User manual;
Warranty card.

Labex Harmony User Manual, Date: 20 April 2020, # 3
3. Parts and buttons
Labex Harmony consists of several main
components:
1. Top cap –The part which you put on your
neck.
2. Indicator LED –Indicates battery charge
3. TALK button 1 –Press the button and talk. It
can be configured with its own unique
volume and pitch.
4. TALK button 2 –Press the button and talk. It
can be configured with its own unique
volume and pitch.
5. SETTINGS button –Used for changing
settings.
6. Red LED –Indicates when the battery fully
charged.
7. Green LED Indicates when the battery is
charging.
8. USB port –Used to charge the device with
the included USB cable.
9. ON/OFF switch –Used to turn the device ON
or OFF.

Labex Harmony User Manual, Date: 20 April 2020, # 4
GETTING STARTED
4. Basic use
The device is partially charged by the manufacturer. You need to fully charge
the device before starting usage.
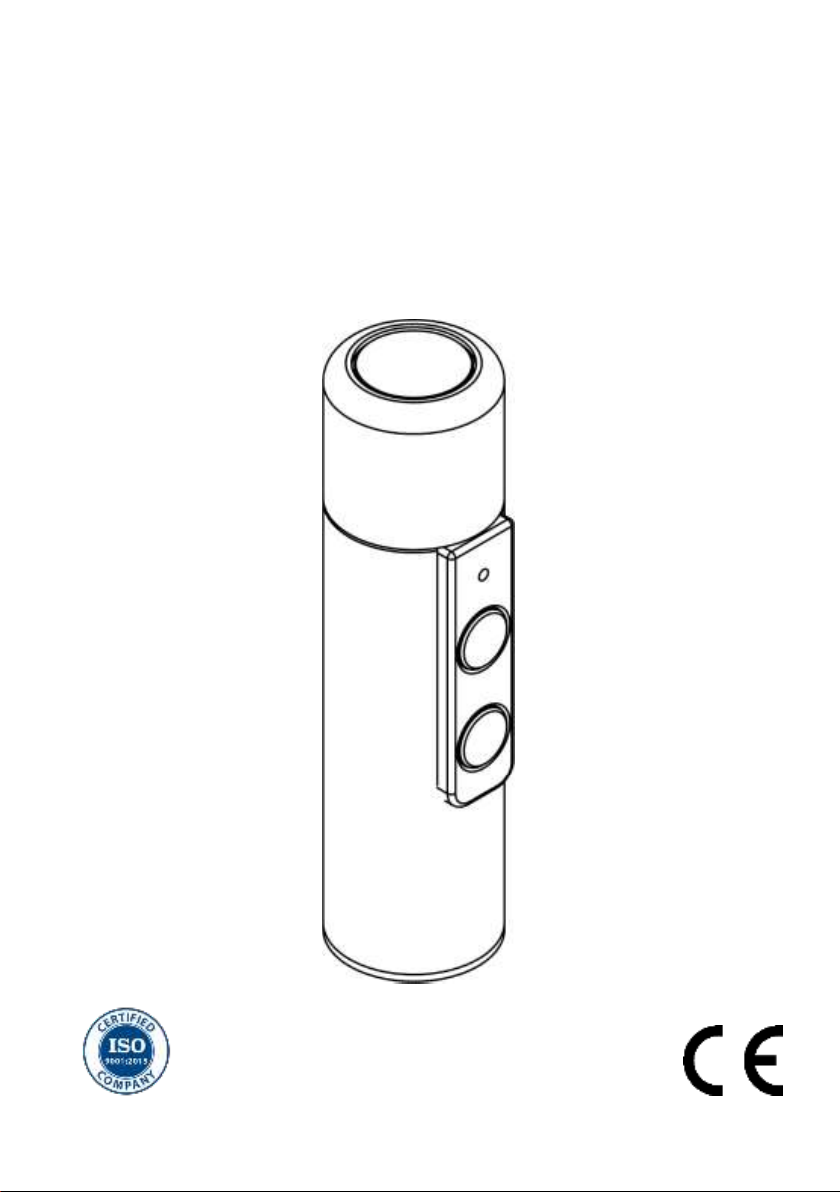
Charging the device is performed when the LED on the panel turns red when
one of the two voice buttons is pressed. Charging is carried out with the
charger included in the box. Plug the provided USB cable into the USB port of
the device, the other end of the cable connects to the charger and the
charger plugs into the socket. The green and red LEDs on the bottom of the
device will turn on. When the red light goes out, the device is fully charged.
Note: The device will not work while charging. This is a safety measure that
protects the device from damage.
5. After charging the device, it must be turned on.
To do this, use the ON / OFF slider switch on the bottom of the device. The
multicolor LED lights up green briefly. Press the Talk button 1 or Talk button 2
to start the sound.
After you get the device out of the box, you need to turn in on. Use the
ON/OFF switch at the bottom of the device to turn the device on. The LED
will light up in green for a short time. When you press TALK button 1, or TALK
button 2 while the top cap is pressed against your neck, you can start talking.
6. Finding the sweet spot
A sweet spot is a place where you feel the sound from the electrolarynx
transmits through your neck tissue and your oral cavity with the most clarity.
The easiest way to find your sweet spot is to place the electrolarynx on your
neck in different positions and actuate the sound. What you are looking for is
the place on your neck, which transmits sound the best. While looking for a
sweet spot, it is crucial that you press it firmly against your neck tissue, so the
sound transmits through your tissue and out your oral cavity. Take your time
finding your sweet spot this is the most crucial part of learning how to use an
electrolarynx. Finding just the right place will set you up for success.

Labex Harmony User Manual, Date: 20 April 2020, # 5
7. First Words
After you have pinpointed the desired spot, you can start making some basic
sounds. Focus on single vowels first. Over-articulate every sound with your
mouth until you feel comfortable with all the vowels. After that, you can start
practicing short words. Slowly work your way up to sentences and
conversation.
For a more detailed guide, please check our article:
https://labextrade.com/tips-for-using-electrolarynx/
8. Expectations
Learning to speak with an electrolarynx device is not easy. Think of it as
learning to play a musical instrument. It will take time, practice, and patience.
In some cases, talking can be achieved in a month, in other cases it can take
only 3 days.
SETTINGS
9. How to change the volume
You can adjust the volume of each button individually. To do so, follow this
procedure:
1. Press and hold the talk button you wish to adjust the volume of (TALK
button 1 or TALK button 2).
2. While holding your desired talk button, press and hold the SETTINGS
button. The LED should start glowing in red.
3. Keep both buttons pressed.
4. After a few seconds, the device will start emitting sound on its own.
Release all buttons. The device is now in “Volume setup mode.”
5. You can now hold TALK button 1 to increase the volume up, or TALK
button 2 to decrease the volume down.
NOTE: The LED will blink in red if you are at the maximum or minimum
volume. Otherwise, it will blink in green.

Labex Harmony User Manual, Date: 20 April 2020, # 6
6. After you reached your desired volume, press the SETTINGS button to
confirm, the device will automatically save your desired volume.
NOTE: You can choose different volume for each TALK button.
10.How to change the pitch
You can adjust the pitch of each button individually. To do so, follow this
procedure:
1. Press and hold the SETTINGS button.
2. While holding the SETTINGS button, press and hold the TALK button, you
wish to change the pitch of (TALK button 1 or TALK button 2).
3. Keep both buttons pressed. The LED should start glowing red.
4. After a few seconds, the device will start buzzing on its own. Release all
buttons. The device is now in “Pitch setup mode.”
5. You can now hold TALK button 1 to increase the pitch up, or TALK button 2
to decrease the pitch down.
NOTE: The LED will blink red if you are at the maximum or minimum pitch.
Otherwise, it will blink green.
6. After you reached your desired volume, press the SETTINGS button to
confirm, the device will automatically save your desired pitch.
NOTE: You can choose a different pitch for each TALK button.
11. How to reset all settings to factory defaults
If you feel you want to revert the device to its factory default volume & pitch,
follow these steps.
1. Press and hold all the buttons at the same time (TALK button 1, TALK
button 2 and SETTINGS buttons).
2. The LED will start blinking in blue. Continue to hold all the buttons until
the LED turns from blue to white.
3. When the LED turns solid white, release all the buttons and wait 3-4
seconds. All the settings have been reset to factory default.
Check our website for video tutorials.

Labex Harmony User Manual, Date: 20 April 2020, # 7
BATTERY
12. Check the battery level
While the device is turned ON, press and hold the SETTINGS button. The
Indicator LED will light up.
GREEN –Battery is charged (50% - 100%)
YELLOW –Battery is bellow half (25% - 50%)
RED –Battery is below 25%. The LED will continue to glow in red after each
button press, to remind you to charge your device.
When the battery gets critically low, the device will stop producing sound,
and the LED will blink in red after each press of the talk buttons. This will
ensure that there will be no damage to the battery and will keep the battery
healthy.
NOTE: It is recommended to charge your device when the indicator LED lights
up in RED. This will make keep the battery life and you will have plenty of
charge, and the battery stays healthy.
Note: If you find that the battery in your device can not hold a charge for more
than one hour of use, there is a possibility that the integrated battery is near the
end of its life cycle. If this happens during or outside the included warranty period,
please contact your local distributor or Labex Trade Ltd. at
https://labextrade.com/contacts or at support@labextrade.com.
13. Charging the battery
To charge the device plug the provided USB cable into the USB port at the
bottom of the device. Plug the other end of the provided USB cable into the
provided USB charger and plug the charger into an electrical socket. The
Green and Red LEDs at the bottom of the device should light up. Your device
has finished charging when the Red LED, at the bottom of the device, turns
off.
Keep in mind that the device will not work while it is charging. This is a safety
measure to prevent any damage to the device.

Labex Harmony User Manual, Date: 20 April 2020, # 8
CARING FOR YOUR DEVICE
14. Cleaning the device
Since the device is in constant contact with skin and other surfaces, it should
be cleaned at least once every 24 hours. For the best hygiene practices, the
following procedure should be followed:
1. Clean the outside surfaces of the device with a slightly wet soft microfiber
cloth.
2. After cleaning all the surfaces, you can disinfect the device by applying a
small amount of disinfectant gel or alcohol. Alternatively, alcohol wipes
can be used.
3. Wipe the device with a soft microfiber cloth again.
15.Contact information
LABEX TRADE LTD.
59 Sankt Peterburg Blvd., Floor 6, Office 604
4017 Plovdiv, Bulgaria, European Union
T: +359 32 54 9090, M: +359 878 616 711
For more information visit https://labextrade.com

Labex Harmony User Manual, Date: 20 April 2020, # 9
16. Technical specifications
General:
Adjustable tone
Yes
Adjustable
volume
Yes
Frequency range
70 - 165 Hz
Volume range
60-83 dB
Speech buttons
2
Setting button
1
Speech time
Up to 30 h.
Charging time
from 0 to 45%
60 min with
Labex charger
Charging time
from 0 to 100%
3h 15min with
Labex charger
Connector
Micro USB
USB Charging
Battery Charging
Specification 1.2
Input power:
5V 1.5A max.
Physical:
Diameter x
Length
Ø 32 x 123 mm
Weight
188 g
Body material
Premium
Polished Stainless
Steel
Top cap material
ABS
plastic
Battery:
Capacity
3400 mAh
Battery type
3.7V Li-Ion
Battery model
Custom Pack
Cell
manufacturer
LG Chemical
Battery life
More than
3 Years
Protection
Smart electronics

Labex Harmony User Manual, Date: 20 April 2020, # 10
INFORMATION
17. Warnings
Do not submerge the device underwater. Do not wash the device
under running water. This will potentially damage the device.
Do not try to disassemble the device under any circumstances. This
will permanently void your warranty.
Do not use any third-party chargers or charging cables. Use the
original ones provided in the box. Using any other charging equipment
could potentially damage the battery or the device.
Do not insert any part of the electrolarynx or any accessories into the
stoma.
Do not burn or physically damage the battery.
Do not short-circuit a cell or battery.
Do not store cells or batteries haphazardly in a pocket, purse, box or
drawer where they may short-circuit each other or be short-circuited
by conductive materials such as coins or keys.
The device contains a strong magnet that may interfere with
pacemakers or other implantable devices. Consult with your physician
before use.
Please note that due to the nature of the electrolarynxes and the principle of
their use, the device is not intended to be used by multiple people, shared
use, and second-hand use. Due to the contact of the device to the user's
neck, stoma, or other cavities - the device is for personal use only!
Once a person has used the device, it should not be used by anyone else.
Because of this fact, the included warranty provided by Labex Trade Ltd. is
non-transferable.
18. Safe storage:
Store in a dark and dry place.
Store the device and its accessories in its original box.
Store in temperatures between -20°C to +45°C.

Labex Harmony User Manual, Date: 20 April 2020, # 11
19.Warranty
All Labex devices come with a limited 2-year warranty from the date of
purchase. The warranty period of a replacement electrolarynx or part lasts as
long as the remaining warranty of the original electrolarynx.
This Limited Warranty covers any defects in material or workmanship under
normal use according to the User Manual during the Warranty Period.
Trying to open or repair the device; causing extensive shock damage
(dropping it, hitting it against other objects, etc.); or liquid damaging it
(submerging in water or other chemicals) will void your warranty.
During the Warranty Period, Labex Trade Ltd. will repair or replace, at no
charge, products or parts of a product that prove defective because of
improper material or workmanship, under normal use and maintenance. This
Limited Warranty is not transferable.
This Limited Warranty does not cover any problem that is caused by:
Conditions, malfunctions or damage not resulting from defects in
material or workmanship.
Conditions, malfunctions or damage resulting from negligence,
improper maintenance or modification.
Damaged or destroyed by natural causes including but not limited to
lightning, flood, or another natural disaster - Theft or loss of the EL.
Shipping charges as well as the risk of loss or damage to the electrolarynx
while in transit to Labex Trade Ltd are taken care of by the customer. The
back shipping is covered by the Company.
Please read the warranty card. To learn more about the Labex warranty,
please visit https://labextrade.com/warranty-policy/
If you have any problems with your device, contact your distributor or
contact us directly https://labextrade.com/contacts/

Labex Harmony User Manual, Date: 20 April 2020, # 12
20.Information on Disposal for Users of WEEE:
This symbol on the product box and/or accompanying documents means that
used electrical and electronic equipment (WEEE) should not be mixed with
general household waste. For proper treatment, recovery, and recycling,
please take this product(s) to designated collection points where it will be
accepted free of charge. Alternatively, in some countries, you may be able to
return your products to your local retailer upon the purchase of an equivalent
new product. Disposing of this product correctly will help save valuable
resources and prevent any potential negative effects on human health and
the environment, which could otherwise arise from inappropriate waste
handling. Please contact your local authority for further details of your
nearest designated collection point. Penalties may be applicable for incorrect
disposal of this waste, in accordance with your national legislation.
For professional users in the European Union, if you wish to discard electrical
and electronic equipment (EEE), please contact your dealer or supplier for
further information.
For disposal in countries outside of the European Union: This symbol is only
valid in the European Union (EU). If you wish to discard this product, please
contact your local authorities or dealer and ask for the correct method of
disposal.
Table of contents
Other Labex Medical Equipment manuals
Popular Medical Equipment manuals by other brands

Dermlite
Dermlite GL instructions

MedaCure
MedaCure GC500 quick start guide

Resonance Technology
Resonance Technology CinemaVision Installation & operation manual

mychway
mychway MS-7202F instructions

mind alive
mind alive Oasis Pro Operator's manual

Prestige medical
Prestige medical Classic Media 210047 operating instructions

inhealth
inhealth Blom-Singer Indwelling TEP Occluder Instructions for use

Arjo
Arjo Malibu Quick reference guide

Belmont Medical Technologies
Belmont Medical Technologies Hyperthermia Pump 505 manual

Breg
Breg Pin Cam Walker quick start guide

Stryker
Stryker Power-PRO TL Cot Operation manual

Lanaform
Lanaform Aqua Pillow instructions