Labex HARMONY ELECTROLARYNX User manual

Labex Harmony User Manual, Date: 15 February 2021, # 1
LABEX™HARMONY ELECTROLARYNX
USER MANUAL

Labex Harmony User Manual, Date: 15 February 2021, # 2
OVERVIEW
1. What is Labex Harmony
Labex Harmony is a digital electrolarynx device. It
is specially designed to help laryngectomees talk.
Its main feature is the two individually
configurable talk buttons.
Labex Harmony is a CLASS I medical device.
General principle of operation for all models
electrolarynges manufactured by Labex Trade
Ltd.:
The digital electrolarynx produces mechanical
vibrations with a low sound frequency between
60-195 Hz. Applied to the neck, these vibrations
create trembling in the oral cavity compensating
for the energy generated from the lungs.
The combination of starting and stopping sound
vibrations and oral articulation creates
comprehensible speech.
Labex Harmony User Manual, Date: 15 February 2021, # 3
2. In the box
In the box, you will find everything you need to
start using the device:
•Labex Harmony electrolarynx device;
•USB charging cable (USB A to micro-USB
type B);
•Intelligent USB
charger 5V 2A;
•Labex lanyard;
•User manual;
•Warranty card.
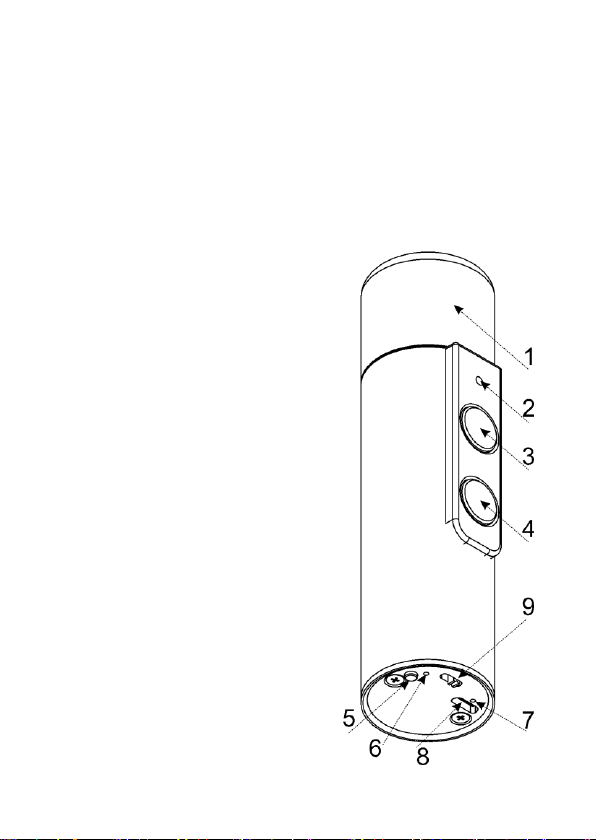
3. Parts and
buttons
Labex Harmony consists of
several main components:
1. Top Cap –The part
which you press against
your neck to receive
the sound.

Labex Harmony User Manual, Date: 15 February 2021, # 4
2. LED Indicator–Indicates battery charge and
different settings information.
3. Talk Button 1 –Press to produce sound. It
can be configured with its own unique
volume and pitch.
4. Talk Button 2 –Press to produce sound. It
can be configured with its own unique
volume and pitch.
5. Settings Button (FB) –Used for changing
settings, adjustments, and checking the
battery discharge level.
6. Red LED –Indicates when the battery is fully
charged.
7. Green LED –Indicates that the charger slot is
properly connected to the power supply.
8. USB Port –Used to charge the device with
the included USB cable.
9. ON/OFF Switch –Used to turn the device on
or off.

Labex Harmony User Manual, Date: 15 February 2021, # 5
GETTING STARTED
4. Basic use
The device is partially charged by the
manufacturer. After you take the device out of
the box, you need to fully charge it before
starting usage.
Charging is carried out by the charger included in
the box. Plug the provided USB cable into the
USB Port of the device, the other end of the
cable connects to the charger, and the charger
plugs into the socket. The Green and Red LEDs
on the bottom of the device will turn on.
The Green LED next to the micro USB slot shows
that the charger slot is properly connected to the
power supply.
While the Red LED is on, the charging is not
complete. The Red LED turns off when the
charging process is completed.
NOTE: Due to safety regulations a device usage
while charging is denied.

Labex Harmony User Manual, Date: 15 February 2021, # 6
If you turn the device on from the bottom switch
while charging and try to use it, the device will
not emit sound and the LED light above the
speech buttons will glow in Red to warn you. To
use the device, simply disconnect the charger.
5. After charging the device, it must
be turned on.
To do this, use the ON/OFF Switch on the bottom
of the device. The LED Indicator lights up in
green briefly. Press the Top Cap of the device
firmly against the neck and then hold Talk Button
1 or Talk Button 2 to speak. The device will start
to emit sound. This allows the proper function of
the product.
6. Finding the sweet spot
A sweet spot is called a place on the throat area
where you feel the sound from the electrolarynx
transmits through the neck tissue and out of the
oral cavity with the most clarity.

Labex Harmony User Manual, Date: 15 February 2021, # 7
The easiest way to find your sweet spot is by
tightly pressing the electrolarynx Top Cap in
different locations on your neck area and
articulating a single vowel while pressing one of
the Talk Buttons.
What you are looking for is the place on your
neck, which best transmits the sound. While
looking for a sweet spot, it is crucial that you
press the device tightly against your neck tissue
so the sound transmits through the tissue and
out of the oral cavity. Take your time finding your
sweet spot –this is the most important part of
learning to use an electrolarynx. Finding just the
right place will set you up for success.
7. First Words
After you have pinpointed the desired spot, you
can start making some basic sounds. It is crucial
to over-articulate every sound with your mouth
until you feel comfortable. After that, you can
start practicing short words. Slowly work your
way up to sentences and conversation.

Labex Harmony User Manual, Date: 15 February 2021, # 8
In some cases, talking can be achieved in a
month, in other cases, it can take only 3 days.
For a more detailed guide, please check our blog:
https://labextrade.com/tips-for-using-
electrolarynx/
SETTINGS
8. How to change the volume
You can adjust the volume of each button
individually. To do so, follow this procedure:
1. Press and hold the talk button which
volume you want to adjust (TALK button
1 or TALK button 2).
2. While holding the desired Talk Button, press
and hold the Settings Button. The LED
indicator will start glowing in red.
3. Keep both buttons pressed.
4. After a few seconds, the device will start
emitting sound on its own. Release all
buttons. The LED indicator will start glowing

Labex Harmony User Manual, Date: 15 February 2021, # 9
in green. The device is now in “Volume setup
mode.”
5. You can now press Talk Button 1 to increase
the volume up and Talk Button 2 to decrease
the volume.
6. When you reach your desired volume, press
the Settings Button to confirm. The device
will automatically save your choice.
NOTE: You can assign a different volume to each
Talk Button.
9. How to change the pitch
You can adjust the pitch of each Talk Button
individually. To do so, follow this procedure:
1. Press and hold the Settings Button.
2. While holding the Settings Button, press and
hold the Talk Button which pitch you want to
adjust (Talk Button 1 or Talk Button 2).
3. Keep both buttons pressed. The LED
Indicator will start glowing red.

Labex Harmony User Manual, Date: 15 February 2021, # 10
4. After a few seconds, the device will start
emitting sound on its own. Release all
buttons. The device is now in “Pitch setup
mode.”
5. You can now press Talk Button 1 to increase
the pitch and Talk Button 2 to decrease the
pitch.
NOTE: The LED Indicator will blink in red if you
are at the maximum or minimum pitch.
Otherwise, it will glow in green.
6. When you reach your desired pitch level,
press the Settings Button to confirm. The
device will automatically save your choice.
NOTE: You can assign a different pitch for each
Talk Button.
10. How to reset all settings to factory
values
If you want to revert the device to its factory
default volume & pitch, follow these steps:
This manual suits for next models
1
Table of contents
Other Labex Medical Equipment manuals


