manuals.online logo
Brands
  1. Home
  2. •
  3. Brands
  4. •
  5. Larry vs Harry
  6. •
  7. Bicycle
  8. •
  9. Larry vs Harry Shimano Steps E-Bullitt User manual

Larry vs Harry Shimano Steps E-Bullitt User manual

Contact information
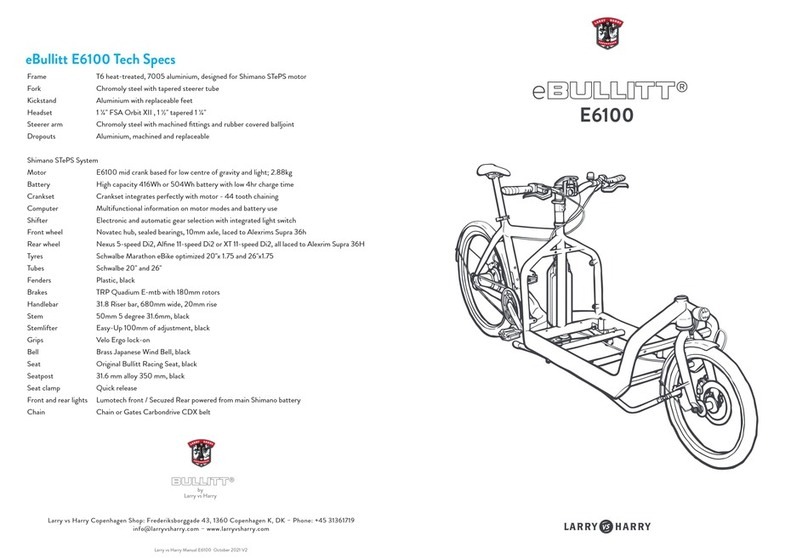
E-Bullitt tech specs
Frame T6 heat-treated, 7005 aluminium designed for Shimano STePS motor.
Fork Chromoly steel with tapered steerer tube.
Kickstand Aluminium with replaceable feet.
Headset 1 ¼"FSA Orbit XII , 1 ½"tapered 1 ¼".
Steerer arm Chromoly steel with machined fittings and rubber covered balljoint.
Dropouts Aluminium,machined and replaceable.
Shimano STePS system
Motor Bottom bracket mounted for low centre of gravity and light; 3.2kg.
Battery High capacity, 418Wh (36V, 11,6Ah) and low charging time of 4 hours.
Crankset Crankset Integrates perfectly with motor. 44 tooth chaining.
Computer Multifunctional, information on motor modes and battery use.
Shifter Electronic and automatic gear selection with integrated light switch.
Front wheel Novatec hub, sealed bearings, 10mm axle, laced to Alex DM24 rim.
Rear wheel Shimano Alfine 8-speed Di2 hub laced to Alex DM24 rim.
Tyres Schwalbe Marathon eBike optimised 20"x 1.75 and 26"x1.75.
Tubes Schwalbe 20"and 26".
Fenders Plastic, black.
Brakes Magura MT5 4-pot disc brakes , 180mm Magura discs front/rear.
Handlebar 31.6 mm alloy riser bar, black.
Stem 50mm 5 degree 31.6mm, black.
Stemlifter EasyUp 100mm of adjustment, black.
Grips Velo Ergo lock-on.
Bell Brass Japanese Wind Bell, black.
Seat Original Bullitt Racing Seat from Velo, black.
Seatpost 31.6 mm alloy , 350 mm, black.
Seat clamp Quick release.
Front and rear lights Lumotech front / Secula Rear powered from main Shimano battery.
Chain KMC rust-free.
Lock ABUS Amparo, ABUS Key Alike© integration with STePS battery.
www.larryvsharry.com
HQ – Larry vs Harry, Esromgade 15, opg. 2 (rampen), DK–2200 Copenhagen
Bullitt Store – Frederiksborggade 41, DK–1361 Copenhagen Denmark
Larry vs Harry is a company, dedicated to bringing you the finest and most most versatile bicycles.
The Larry vs Harry Bullitt is sold throughout the world. Just about anywhere you go, you'll find
Bullitts. These graceful beasts can be seen transporting goods and people, they can be seen riding
leisurely or going fast-faster-fastest.... They are a bicycle for everyone and anyone.
We are a small company with the support of dozens of dedicated and enthusiastic dealers, that will
make your ride safe and fun. Authorized Bullitt dealers are the only place where you can buy the Bullitt
product of your choice or direct from us here in Denmark. We are dedicated to the independent bicycle
dealers in your area because they are the most professional and best-qualified source to assure your
bike's mechanical integrity, guarantee proper fit, give you proper advice on where and when to ride,
consult with you about safety, properly assemble and install accessories, and to communicate
anything and everything else you need to know about the glorious pursuit of cycling!
Our employees and dealers are justifiably proud of our international reputation as an innovative and
quality driven company, where service and the enjoyment of the rider is the highest priority . We have
spent unfathomable amounts of time developing the Bullitt, learning our craft and winning multiple
awards for excellence along the way.
Our models are designed for the broadest user base, using components and parts that deliver perfor-
mance, durability and value and we focus on products that work well with the Bullitt.
The Bullitt is a bicycle designed for all to use, professionals and families alike, in all weathers and all
environments. Our contributions to cycling encompass many facets of the lifestyle, from transporta-
tion to recreation to competition. At Larry vs Harry, we believe that the Bullitt is more than just a
machine. We believe that it is an integral component of society, a trusted companion, and a way to
explore the world.
Thank you for buying a Bullitt, now go out and enjoy riding it!
Larry vs Harry
Introduction
Thankyou for buying the new Larry vs Harry eBuliitt, based on the superb Shimano Steps system. This
bike marks a new generation and evolution in ebike technology which we are truly proud to bring onto
the market, integrating all the electronic elements, including motor assistance, gear shifting and lights
into one cohesive unit.
We recommend that you read the Shimano Steps manual in it’s entirety, to fully understand all the
features and attributes of the system. However, if you are in a hurry to start using your eBullitt, here is
a little run-down to get you rolling….
Assembly guide
Assembly time should be around 20 minutes and involves mounting the fork and front wheel, rear
mudguard and rear wheel and attaching the handlebar and stem.
To mount the fork: Place the larger of the two headset bearings over the fork steerer and insert the fork
into the headtube. Next, set the remaining cartridge bearing onto the protruding fork steerer and insert
the retainer clip/preload spacer. Finally, screw the compression cap into the fork and tighten by hand
until fully inserted. Then tighten with a 5mm allen key until no further movement is sensed.
Mounting the rear mudguard and rear wheel: Required tools include 3/4mm allen keys, 10mm/15mm
spanners/wrenches. First, mount the mudguard at the top metal bracket using the long M4mm and
10mm spanner, secondly attach the metal support struts using a 3mm allen key and screw them into
the threaded holes found on the frame dropouts. When mounting the wheel, set the chain on the Alfine
sprocket and place the wheel axle into the dropouts, hand tightening the nuts to prevent the wheel falling
out. Then, pulling the wheel back towards you to ensure proper chain tension, tighten the wheel nuts
to 16Nm (or as tight as you can, basically.)
Attaching the cockpit: The stem and handlebar need to be mounted onto the steerer rod using a 4mm
allen key. Roughly align the front wheel so it is facing directly forward and slide the stem onto the steerer
rod. Then, screw in the headset top cap using a 5mm allen key. Finally, tighten the two rear facing bolts
on the stem to 5Nm ensure the front wheel is properly aligned and there is no lateral movement in the
headsets.
When setting up your bike for your personal riding style, it is important to bear in mind safety and the
ability to maintain full control of the bike under all circumstances. You may be an extremely experienced
cyclist, but the eBullitt is a very large bike and getting to grips with the extended front wheel takes some
practise, so air on the side of caution when initially adjusting seatpost and stem height. You can always
raise the saddle to get full leg extension later and when the time comes. Double check the minimum
insertion markings on the seatpost and keep the saddle level for more ecient riding.
Be sure to take your first ride in an environment free from trac and where you can get accustomed to
the steering, controls and general nuances of the bike. Do not ride on the pedestrian pavement, it is not
cool, gives cyclists a bad name and can generally get yourself in a jam. Double check local regulations
on carrying children and always ensure they are strapped in.
Important: Ensure quick release clamps (if the RQ lever does not make an imprint in your palm, it’s too
loose! ) on both the seatpost and the Easyup stem-lifter are properly tightened and that both wheels are
secure. Test the brakes at low speed and your ability to reach the brake levers. Always wear a helmet
(no discussion!).
Quick start guide
Ensure the battery is fully engaged in the battery mount and hold down the power button to initial-
ise the display on the handlebar.
Now, let’s take a look at the controls; the left hand buttons control the display and assistance
modes, high, norm and eco, along with walk assist. The more assistance the motor gives, the easier
pedalling becomes though obviously aects the longevity of the battery. Hold the top-left button
down for 3 seconds to power up the lights and use the triangular marked buttons below to select
mode. Moving over to the right-hand controls. The triangular marked buttons determine gear
shifts and the top right button selects automatic shift functions. Holding down the up/down
buttons changes the gears through the Alfine range consecutively.
The computer displays both speed and time, battery levels and chosen assistance mode. The
selected gear is shown in the bar running along the bottom of the display and in automatic mode
you can select preferred downshifts so that at trac lights the eBullitt changes gear to a lower
and easier to pedal gear upon stopping. Clever huh!
Familiarise yourself with the feeling of the Magura hydraulic brakes, they are powerful and the
modulation may get a bit of getting used to. Also, just to avoid confusion that there is no key in the
lock, the same key functions for both the Shimano Steps battery and the Abus lock.
Check the tyres are properly pumped, you can find the maximum pressure on the tyre sidewall,
but we recommend 80psi/5.5bar in the rear and 60psi/4bar in the front tyre. Always check local
trac laws to ensure your eBullitt is compliant with local trac laws and has the correctly located
reflectors and bell.
When riding in dimly lit areas or at night, make sure your lights are functioning properly. The
Shimano Steps System has rather ingeniously incorporated the lights into the main battery, so
you never need worry about replacing batteries again. Familiarise yourself however, with the
handlebar functions to correctly switch the lights on and o.
Expected longevity of your eBullitt: With care and due attention you will be riding your eBullitt
for many, many years. We have tested the frames under duress and have spent years developing
the Bullitt platform and are confident that it will hold up to sustained use, regardless of it’s
function. This said, parts are subject to wear and tear; tyres chains and brake pads need changing
on average once a year and the bikes can be easily serviced by your local dealer or local bike shop.
Only the chain should be
lubricated with oil, never put oils/lubricants on the disc brakes, it will
contaminate the pads and necessitate in replacements . Wheels should be checked sporadically for
loose spokes or the wheel is at risk of buckling. Refer to the Shimano Steps User Manual for specifics
on the motor/drivetrain/battery. Please refer to our Terms and Conditions (http://shop.larryvshar-
ry.com/terms_and_conditions) to see specifics on the frame and parts warranty.
Additionally, common sense tells us nothing lasts forever and it goes with saying that bicycles suer
from metal fatigue. This applies to aluminium bike frames too and in adverse weather, this will exacer-
bate and speed up wear and tear. Salt on roads, wet weather and the stress and strain will all take their
toll on your eBullitt, but frequent washing, care and maintenance will ensure a prolonged lifespan.
If your bicycle sustains an impact: First, check yourself for injuries, and take care of them as best you
can. Seek medical help if necessary. Next, check your bike for damage. After any crash, take your bike
to your dealer for a thorough check. Components, including frame and fork, wheels, handlebars, stems,
cranksets, brakes, etc. which have sustained an impact must not be ridden until they have been
disassembled and thoroughly inspected by a qualified mechanic. WARNING: A crash or other impact
can put extraordinary stress on bicycle components, causing them to fatigue prematurely. Components
suering from stress fatigue can fail suddenly and catastrophically, causing loss of control, serious
injury or death.
Welcome to Larry vs Harry Attention
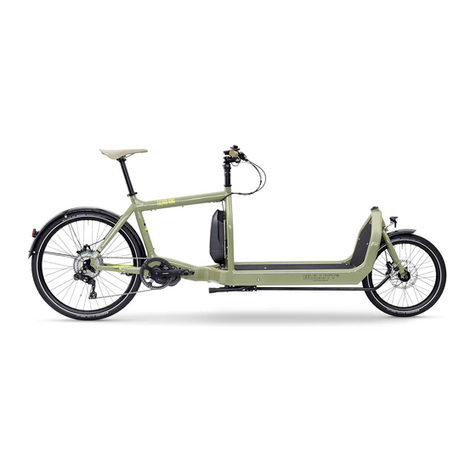
Parts overview
1Steps Computer Display
2Mode/Gear Selection Buttons
3Crankset
4Motor Unit
5Speed Sensor
6Battery
7Battery Mount
8Battery Charger
8
6
12
4
3
5
7
Introduction
Thankyou for buying the new Larry vs Harry eBuliitt, based on the superb Shimano Steps system. This
bike marks a new generation and evolution in ebike technology which we are truly proud to bring onto
the market, integrating all the electronic elements, including motor assistance, gear shifting and lights
into one cohesive unit.
We recommend that you read the Shimano Steps manual in it’s entirety, to fully understand all the
features and attributes of the system. However, if you are in a hurry to start using your eBullitt, here is
a little run-down to get you rolling….
Assembly guide
Assembly time should be around 20 minutes and involves mounting the fork and front wheel, rear
mudguard and rear wheel and attaching the handlebar and stem.
To mount the fork: Place the larger of the two headset bearings over the fork steerer and insert the fork
into the headtube. Next, set the remaining cartridge bearing onto the protruding fork steerer and insert
the retainer clip/preload spacer. Finally, screw the compression cap into the fork and tighten by hand
until fully inserted. Then tighten with a 5mm allen key until no further movement is sensed.
Mounting the rear mudguard and rear wheel: Required tools include 3/4mm allen keys, 10mm/15mm
spanners/wrenches. First, mount the mudguard at the top metal bracket using the long M4mm and
10mm spanner, secondly attach the metal support struts using a 3mm allen key and screw them into
the threaded holes found on the frame dropouts. When mounting the wheel, set the chain on the Alfine
sprocket and place the wheel axle into the dropouts, hand tightening the nuts to prevent the wheel falling
out. Then, pulling the wheel back towards you to ensure proper chain tension, tighten the wheel nuts
to 16Nm (or as tight as you can, basically.)
Attaching the cockpit: The stem and handlebar need to be mounted onto the steerer rod using a 4mm
allen key. Roughly align the front wheel so it is facing directly forward and slide the stem onto the steerer
rod. Then, screw in the headset top cap using a 5mm allen key. Finally, tighten the two rear facing bolts
on the stem to 5Nm ensure the front wheel is properly aligned and there is no lateral movement in the
headsets.
When setting up your bike for your personal riding style, it is important to bear in mind safety and the
ability to maintain full control of the bike under all circumstances. You may be an extremely experienced
cyclist, but the eBullitt is a very large bike and getting to grips with the extended front wheel takes some
practise, so air on the side of caution when initially adjusting seatpost and stem height. You can always
raise the saddle to get full leg extension later and when the time comes. Double check the minimum
insertion markings on the seatpost and keep the saddle level for more ecient riding.
Be sure to take your first ride in an environment free from trac and where you can get accustomed to
the steering, controls and general nuances of the bike. Do not ride on the pedestrian pavement, it is not
cool, gives cyclists a bad name and can generally get yourself in a jam. Double check local regulations
on carrying children and always ensure they are strapped in.
Important: Ensure quick release clamps (if the RQ lever does not make an imprint in your palm, it’s too
loose! ) on both the seatpost and the Easyup stem-lifter are properly tightened and that both wheels are
secure. Test the brakes at low speed and your ability to reach the brake levers. Always wear a helmet
(no discussion!).
Quick start guide
Ensure the battery is fully engaged in the battery mount and hold down the power button to initial-
ise the display on the handlebar.
Now, let’s take a look at the controls; the left hand buttons control the display and assistance
modes, high, norm and eco, along with walk assist. The more assistance the motor gives, the easier
pedalling becomes though obviously aects the longevity of the battery. Hold the top-left button
down for 3 seconds to power up the lights and use the triangular marked buttons below to select
mode. Moving over to the right-hand controls. The triangular marked buttons determine gear
shifts and the top right button selects automatic shift functions. Holding down the up/down
buttons changes the gears through the Alfine range consecutively.
The computer displays both speed and time, battery levels and chosen assistance mode. The
selected gear is shown in the bar running along the bottom of the display and in automatic mode
you can select preferred downshifts so that at trac lights the eBullitt changes gear to a lower
and easier to pedal gear upon stopping. Clever huh!
Familiarise yourself with the feeling of the Magura hydraulic brakes, they are powerful and the
modulation may get a bit of getting used to. Also, just to avoid confusion that there is no key in the
lock, the same key functions for both the Shimano Steps battery and the Abus lock.
Check the tyres are properly pumped, you can find the maximum pressure on the tyre sidewall,
but we recommend 80psi/5.5bar in the rear and 60psi/4bar in the front tyre. Always check local
trac laws to ensure your eBullitt is compliant with local trac laws and has the correctly located
reflectors and bell.
When riding in dimly lit areas or at night, make sure your lights are functioning properly. The
Shimano Steps System has rather ingeniously incorporated the lights into the main battery, so
you never need worry about replacing batteries again. Familiarise yourself however, with the
handlebar functions to correctly switch the lights on and o.
Expected longevity of your eBullitt: With care and due attention you will be riding your eBullitt
for many, many years. We have tested the frames under duress and have spent years developing
the Bullitt platform and are confident that it will hold up to sustained use, regardless of it’s
function. This said, parts are subject to wear and tear; tyres chains and brake pads need changing
on average once a year and the bikes can be easily serviced by your local dealer or local bike shop.
Only the chain should be
lubricated with oil, never put oils/lubricants on the disc brakes, it will
contaminate the pads and necessitate in replacements . Wheels should be checked sporadically for
loose spokes or the wheel is at risk of buckling. Refer to the Shimano Steps User Manual for specifics
on the motor/drivetrain/battery. Please refer to our Terms and Conditions (http://shop.larryvshar-
ry.com/terms_and_conditions) to see specifics on the frame and parts warranty.
Additionally, common sense tells us nothing lasts forever and it goes with saying that bicycles suer
from metal fatigue. This applies to aluminium bike frames too and in adverse weather, this will exacer-
bate and speed up wear and tear. Salt on roads, wet weather and the stress and strain will all take their
toll on your eBullitt, but frequent washing, care and maintenance will ensure a prolonged lifespan.
If your bicycle sustains an impact: First, check yourself for injuries, and take care of them as best you
can. Seek medical help if necessary. Next, check your bike for damage. After any crash, take your bike
to your dealer for a thorough check. Components, including frame and fork, wheels, handlebars, stems,
cranksets, brakes, etc. which have sustained an impact must not be ridden until they have been
disassembled and thoroughly inspected by a qualified mechanic. WARNING: A crash or other impact
can put extraordinary stress on bicycle components, causing them to fatigue prematurely. Components
suering from stress fatigue can fail suddenly and catastrophically, causing loss of control, serious
injury or death.

Other Larry vs Harry Bicycle manuals

Larry vs Harry eBullitt EP8 User manual

Larry vs Harry

Larry vs Harry eBullitt EP8 User manual

Larry vs Harry Bullitt User manual

Larry vs Harry

Larry vs Harry Bullitt User manual

Larry vs Harry Shimano Steps E-Bullitt 6100 User manual

Larry vs Harry

Larry vs Harry Shimano Steps E-Bullitt 6100 User manual

Larry vs Harry Twin Seat User manual

Larry vs Harry

Larry vs Harry Twin Seat User manual

Larry vs Harry Damper User manual

Larry vs Harry

Larry vs Harry Damper User manual

Larry vs Harry eBullitt User manual

Larry vs Harry

Larry vs Harry eBullitt User manual

Larry vs Harry eBullitt E6100 User manual

Larry vs Harry

Larry vs Harry eBullitt E6100 User manual

Popular Bicycle manuals by other brands

Canyon GRIZL quick start guide

Canyon

Canyon GRIZL quick start guide

Douze G4 instruction manual

Douze

Douze G4 instruction manual

Reid E Trail 2.0 DISPLAY MANUAL

Reid

Reid E Trail 2.0 DISPLAY MANUAL

Woosh Krieger user guide

Woosh

Woosh Krieger user guide

Giant SIMPLE 3 W datasheet

Giant

Giant SIMPLE 3 W datasheet

Giant RINCON datasheet

Giant

Giant RINCON datasheet

TrikExplor F426E user manual

TrikExplor

TrikExplor F426E user manual

Deuba 102702 Assembly instruction

Deuba

Deuba 102702 Assembly instruction

SUBITO ARGON 18 manual

SUBITO

SUBITO ARGON 18 manual

Trek Powerfly HT Sport EQ 4 Service manual

Trek

Trek Powerfly HT Sport EQ 4 Service manual

URBANGLIDE BIKE 120L user manual

URBANGLIDE

URBANGLIDE BIKE 120L user manual

DAHON PAQ MINI - 2009 manual

DAHON

DAHON PAQ MINI - 2009 manual

SWAGTRON EBS PRO PLUS quick start guide

SWAGTRON

SWAGTRON EBS PRO PLUS quick start guide

HELKAMA Bicycle instructions

HELKAMA

HELKAMA Bicycle instructions

byox QUICK user manual

byox

byox QUICK user manual

Lectric eBikes XPeak owner's manual

Lectric eBikes

Lectric eBikes XPeak owner's manual

Guerrilla Gravity Pedalhead owner's manual

Guerrilla Gravity

Guerrilla Gravity Pedalhead owner's manual

cecotec TROTON instruction manual

cecotec

cecotec TROTON instruction manual

manuals.online logo
manuals.online logoBrands
  • About & Mission
  • Contact us
  • Privacy Policy
  • Terms and Conditions

Copyright 2025 Manuals.Online. All Rights Reserved.