manuals.online logo
Brands
  1. Home
  2. •
  3. Brands
  4. •
  5. LauraStar
  6. •
  7. Ironing Center
  8. •
  9. LauraStar S PURE Operator's manual

LauraStar S PURE Operator's manual

Other LauraStar Ironing Center manuals

LauraStar STEAMUP User manual

LauraStar

LauraStar STEAMUP User manual

LauraStar Magic S4 User manual

LauraStar

LauraStar Magic S4 User manual

Popular Ironing Center manuals by other brands

Siemens TN20350 installation instructions

Siemens

Siemens TN20350 installation instructions

UFESA SMART DIGITAL instruction manual

UFESA

UFESA SMART DIGITAL instruction manual

Silvercrest SDBC 3.5 A1. instruction manual

Silvercrest

Silvercrest SDBC 3.5 A1. instruction manual

DOMENA Xecutive 1 instructions

DOMENA

DOMENA Xecutive 1 instructions

DOMENA Xellence 3 quick start guide

DOMENA

DOMENA Xellence 3 quick start guide

Bosch EasyComfort 4 Series operating instructions

Bosch

Bosch EasyComfort 4 Series operating instructions

Whirlpool ImPress LFB2611L manual

Whirlpool

Whirlpool ImPress LFB2611L manual

Euroflex monster IB 30 CLASSIC instruction manual

Euroflex

Euroflex monster IB 30 CLASSIC instruction manual

Primula Eco DOB manual

Primula

Primula Eco DOB manual

battistella EOLO Instruction and maintenance

battistella

battistella EOLO Instruction and maintenance

Bieffe l’ASSE NELLA MANICA quick start guide

Bieffe

Bieffe l’ASSE NELLA MANICA quick start guide

Iron-A-Way A-42 Specification sheet

Iron-A-Way

Iron-A-Way A-42 Specification sheet

UFESA PL1445 user manual

UFESA

UFESA PL1445 user manual

Cissell VSBMAN61 owner's manual

Cissell

Cissell VSBMAN61 owner's manual

Kärcher AB 1000 manual

Kärcher

Kärcher AB 1000 manual

Cissell SFBMAN99 owner's manual

Cissell

Cissell SFBMAN99 owner's manual

POLTI VAPORELLA NEXT VN18.10 instruction manual

POLTI

POLTI VAPORELLA NEXT VN18.10 instruction manual

Iron-A-Way UD-42 Owners & installation manual

Iron-A-Way

Iron-A-Way UD-42 Owners & installation manual

manuals.online logo
manuals.online logoBrands
  • About & Mission
  • Contact us
  • Privacy Policy
  • Terms and Conditions

Copyright 2025 Manuals.Online. All Rights Reserved.

MODE D’EMPLOI ET INSTRUCTIONS DE SÉCURITÉ
INSTRUCTION MANUAL AND SAFETY INSTRUCTIONS
BEDIENUNGSANLEITUNG UND SICHERHEITSHINWEISE
GEBRUIKSAANWIJZING EN VEILIGHEIDSVOORSCHRIFTEN
MANUALE D’USO E ISTRUZIONI DI SICUREZZA
INSTRUCCIONES DE USO E INDICACIONES DE SEGURIDAD
MANUAL DE USO E INSTRUÇÕES DE SEGURANÇA
INSTRUKCJA OBSŁUGI
BRUKSANVISNING
INSTRUKTIONSMANUAL
BRUGSANVISNING
KULLANIM VE GÜVENLIK TALIMATLARI
РУКОВОДСТВО ПО ЭКСПЛУАТАЦИИ И МЕРЫ ПРЕДОСТОРОЖНОСТИ
使用说明
说明书
사용 설명서 및 안전 사항
www.laurastar.com
LAURASTAR S PURE
لﻌﺘﺳﻻا ﻞﻴﻟد
MAX
Mise en marche rapide - Quick start guide - Kurzanleitung - Snelle ingebruikname-
Messa in funzione rapida - Puesta en marcha rápida - Iniciação rápida - Szybki start-
Pratik Kullanım Kılavuzu - Краткая инструкция для начала работы - 快速啟用指南 -
快速启用指南 - 빠른 시작 설명서 - ﻊﻳﴎ ﻞﻴﻐﺸﺗ
1
4
9
11 12
13
13
10
5 6 7 8
2 3
3 min.
2-3
x
Remarque : Le non-respect de ce mode
d’emploi / des consignes de sécurité peut
entraîner une mise en danger par l’appareil.
Le fabricant décline toute responsabilité
pour des dommages matériels ou des
blessures résultant d’un non-respect de ces
consignes de sécurité. Conserver ce mode
d’emploi pour toute personne utilisant
l’appareil.
AVERTISSEMENT : Votre produit LaurastarTM émet de la chaleur et de la vapeur ; certains
éléments peuvent être très chauds et provoquer des brûlures lors du fonctionnement.
NOTE : Cet appareil génère de la chaleur et peut causer des brûlures. Les parties qui
deviennent très chaudes sont marquées avec ce symbole.
Table des matières
Consignes de sécurité 2
Première mise en service 4
Mise en marche 5
Repasser 6
Support pour défroisser les
vêtements à la verticale 7
Rangement après utilisation 8
Rinçage de la chaudière 8
Entretien 9
Conseils et astuces 10
Problèmes et solutions 11
Informations techniques 12
Garantie 12
Félicitations ! Vous venez d’acquérir un système de repassage Laurastar de qualité alliant design et
technologie suisse. Nous vous prions de bien vouloir lire attentivement ce mode d’emploi ainsi que les
consignes de sécurité avant la première mise en marche de l’appareil et de bien vouloir conserver ce
mode d’emploi pour une utilisation future. Retrouvez toutes nos vidéos de mode d’emploi et conseils sur
www.laurastar.com
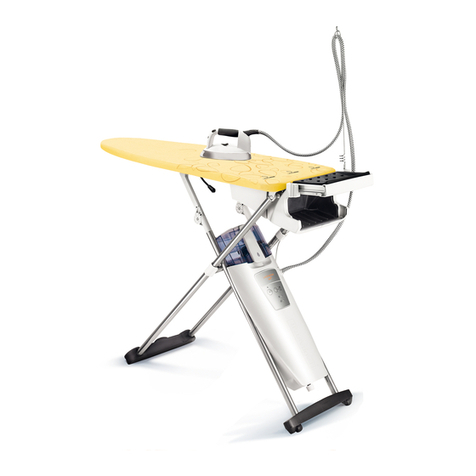
Vue d’ensemble et fonctionnalités
1. Table de repassage
2. Fer
3. Tube vapeur
4. Housse spéciale Laurastar
5. Rangement de sécurité
6. Repose fer
7. Poignée d’ajustement pour la hauteur
8. Guide-l pour le tube
9. Boutons vapeur
10. Bouton souferie
11. Réservoir d’eau
12. Grand et petit couvercle du réservoir d’eau
13. Compartiment du ltre et ltre anticalcaire
14. Bac de vidange
15. Générateur de vapeur
16. Bouton principal ON/OFF avec indicateur
lumineux
17. Bouton vitesse ventilateur
18. Témoin lumineux vapeur
19. Témoin lumineux de n d’eau
20. Bouchon du générateur de vapeur
21. Bouchon de vidange
22. Fiche secteur et câble électrique
23. Ventilateur
24. Fiche du ventilateur
25. Roulettes
26. Semelle protectrice
27. Support pour défroisser les vêtements à la
verticale (uniquement certains modèles)
28. Recharge pour ltre anticalcaire
-1-
9
10
12
3
4
23
5
6
7
8
24
14
28
15 21
25
22
25
12
13
11
26
16 17
18
19
27
20
-14-
WARNING : Failure to comply with
this Instruction Manual and the safety
instructions may result in serious in-
jury or damage to proper ty. The man-
ufacturer accepts no responsibility
for such injury or damage in the event
that these safety instructions are
not followed. Keep this instruction
manual for reference by any and all
persons who may use the appliance.
WARNING : Your LaurastarTM product generates heat and steam. Various parts of
the appliance may become very hot during operation and can cause burns.
NOTE : This appliance generates heat and can cause burns.
Those parts which get very hot are marked with this symbol.
Table of Contents
Safety instructions 15
Installation and storage 17
Start up 18
Ironing 19
Support for vertical steaming 20
Storage after use 21
Rinsing the boiler 21
Maintenance 22
Tips and tricks 23
Problems and solutions 24
Technical information 25
Guarantee 25
Congratulations ! You have just purchased a high-quality Laurastar ironing system that
combines Swiss design and technology. Please read this Instruction Manual and the safety
instructions carefully before using your appliance for the rst time, and retain this Instruction
Manual for future use.
Overview and features
1. Ironing board
2. Iron
3. Steam Hose
4. Special Laurastar cover
5. Safety storage box
6. Folding iron-rest
7. Adjustable height handles
8. Steam hose holder
9. Steam buttons
10. Vacuum/fan button
11. Water reservoir
12. Small and large water reservoir lid
13. Filter compartment and anti-scale
 l t e r
14. Drain tray
15. Steam generator
16. Main ON/OFF button with indicator
light
17. Fan speed button
18. Steam indicator light
19. Empty water indicator light
20. Steam generator cap
21. Drain cap
22. Power plug and Electric cable
23. Fan
24. Fan plug
25. Wheels
26. Protective soleplate
27. Support for vertical steaming (only
available with certain models)
28. Anti-scale for cartridge rells
EN
-15-
IMPORTANT SAFETY
INSTRUCTIONS
Note: Failure to comply with this manual or these safety instructions can lead to hazards. The
manufacturer accepts no responsibility for damage to persons or property if these safety
instructions are not observed.
Keep this instruction manual for reference by an and all persons who may use the appliance.
• In an emergency, pull the mains plug
from the socket immediately. Only connect
appliance to an earthed power supply.
• As the iron soleplate and steam jet are
very hot, do not direct steam towards parts
of your own body, or other persons/animals.
Do not iron/steam garments whilst being
worn. Danger of burning.
• This device is not to be used by people
(including children) with reduced physical,
sensory or mental capacities or those
without experience and knowledge, unless
they have received, through a person
responsible for their safety, prior observation
or instructions concerning the use of the
device. Children must be supervised to
ensure that they do not play with the device.
• Remove mains plug from electricity supply
before cleaning/servicing/rinsing and only do
it when appliance is cold for at least 2 hours
30 mins.
• Never open the boiler inlet cap during
use. For rinsing unscrew the cap carefully:
residual pressurised steam may start to
escape after several turns. Close the boiler
cap(s) again when rinsing is over. The
pressurised holes for relling, descaling,
rinsing or examination should not be opened
during use (only for steam irons equipped
with pressurised compartments).
• Danger of electric shock: Do not get mains
cable/plug wet. Do not pull the mains plug
out of the socket using the cable.
IMPORTANT: Plug in directly to
a wall socket only. STRICTLY
NO portable socket outlet,
multi-way adaptator other extension
devices are allowed.
• Do not use appliance if the mains cable/
steam hose is defective or damaged.
Ensure that a defective cable/steam hose is
replaced only by an authorised LAURASTAR
consumer services department or agent.
• The iron should not be used if it has
suffered damage from a fall, if there is
visible damage or if it leaks.
• Do not open appliance and do not attempt
to carry out any repair work yourself. Danger
of electric shock.
• Keep the iron and its cord out of reach of
children under 8 years of age when it is in
operation or cooling down.
Note:
The Water lter granules are non toxic.
Nevertheless, do nottake orally. Keep out of
reach of children.
WARNING:
Position ex and steam hose so that no one
can trip over them.
Caution when removing
SOFTPRESSING soleplate, the
iron soleplate may be hot.
Place SOFTPRESSING soleplate on
heat-resistant iron rest when hot.
Danger of burning.
-16-
The user should not leave the iron
unattended when it is connected to the
power supply.
• The plug should be removed from the
plug socket before relling the water
tank (for steam irons and irons including a
device for water vaporisation).
Note:
• ONLY use appliance indoors and
iron textiles in accordance with the
instructions in this manual.
Warning:
• Do not damage mains cable/steam hose
e.g. by trapping between sharp edges,
with excessive heat (e.g. iron) etc.
• Do not operate appliance without
water.
• Do not attempt to insert any items into
openings in the appliance. Do not open
appliance, clean when wet, immerse in
water. If any foreign matter gets into the
appliance/water, disconnect from the
mains electricity supply immediately.
Danger of electric shock. Only allow
appliance to be serviced by authorised
LAURASTAR consumer services
department/agent.
Caution:
• Clean appliance externally with a soft,
damp cloth. Do not use solvent (e.g.
petrol) or oil.
Danger: The iron should be used and
rested on a at and stable surface.
When the iron is put back on the
iron rest, ensure that the surface
supporting the iron rest is stable.
NEVER rest the iron on the ironing
board cover or clothes. To avoid risk
of re, ensure that the iron is placed
on the iron rest.
NON-DRINKING WATER.
KEEP OUT OF REACH OF CHILDREN.
Please dispose with household
refuse.
ENVIRONMENTAL
INFORMATION AND
WASTE DISPOSAL
MEASURES:
Keep the box in which your appliance
was packed in a safe place for future use
(transport, service, etc.) Do not dispose of
the appliance with the normal domestic
refuse! Please ask your local authorities
about environmentally-friendly and
appropriate disposal facilities.
EN
-17-
Initial operation
Note:
Read the safety instructions on page 15.
• Position the board and adjust the cover. The cover can be
washed at 30°C but DO NOT spin dry (A).
• Place holder in the designated opening (B).
• Rinse Boiler (See “Rinse the boiler”, page 21).
Frequency: before initial use and every month (or every 10
hours of ironing).
Your appliance is designed to operate using tap water.
Never use:
Perfumed water, rainwater, distilled water, softened
water, water from dehumidiers/tumble dryers. You can nd
more information at www.laurastar.com.
• Fill the AQUA water lter with lter granules.
NON-DRINKING WATER
KEEP OUT OF REACH OF CHILDREN.
• Remove lter and detach lter (C).
• Fill with granules (D).
• Reassemble in reverse order.
• Using the boiler when empty of water (E) will invalidate the
guarantee! Further information: “Tips and tricks”, pg. 23
MAX
A
B
C D
E
-18-
Switch on and select the temperature
• Position board height (7).
• Take out iron (5).
• Mount steam hose (8).
During operation, you will hear the sound of the
pump, you may hear a popping sound and the green
light will illuminate intermittently.
• Insert mains plug (A). Is the power supply voltage
right?
• Switch on (B).
• Switch glows wait approx. 3 mins until ready to use.
As soon as the orange indicator light switches off
and the green indicator light comes on. When in use,
intermittent illumination of the on/off of the green light
is NORMAL (B).
• Select iron temperature. The required temperature
will be reached after a few minutes (C).
• Fit SOFTPRESSING soleplate. Wait 1 minute before
ironing (D).
Remove warm SOFTPRESSING soleplate
after use.
• Evacuate condensation (E). Before ironing, activate
the steam button 2-3 times away from the garments
(see “Tips and tricks”, pg. 23).
• Automatic cut off of appliance. Automatic cut off of
appliance after 15 minutes of non-use. To switch it on
again, press the mains switch (F).
•••
Normal
Cotton, linen
Synthetic fabrics,
wool, silk
Iron these fabrics and
dark materials with the
SOFTPRESSING soleplate
••
Low
Very delicate
materials
Iron these fabrics and
dark materials with the
SOFTPRESSING soleplate
15 min.
3 min.
A
B
F
C
D
2-3 x
E
ON/OFF
Fan
Steam
Water
EN
-19-
Iron
2 ironing modes :
Manual steam : Only intermittently (G).
Fan : Change direction of fan (H).
The 3D active soleplate (only available with certain
models) (I)performs two actions with every movement of
the iron :
1. The raised part of the soleplate instantly taughtens the
fabric, eliminating any creases caused by the washing and
drying process.
2. Steam is injected evenly onto the entire surface of the
soleplate, penetrating all the bres.
The rst lightweight professional iron :
The thin soleplate and ultra-light materials increase ease of
use for unbeatable results.
Vacuum (J):
Holds garments in place on the ironing board. Perfect pleats.
Fan (K) :
Positions clothes easily on the ironing board. No unwanted
creases. No marks on seams.
• Top-up or rell water.
Fill the cold water reservoir when you hear the “beep” and
the red indicator light is ashing. The cold water reservoir
can be removed without switching the system off rst (L).
Danger:
Never open the boiler inlet cap.
H
G
‘’ BIP ’’
MAX
L
J
I
K
-20-
Support for vertical steaming (only
available with certain models)
1. Lower the clips that hold the cable to the bottom of the
ironing board legs.
2. Place part (A) on the upper part of the ironing board
legs. Bring it to the top so it ts in the hinge between the
leg and the ironing board.
3. Screw part (B) into part (A) using the offset screwdriver
provided (C).
4. Place part (D) onto part (B) and screw into place.
5. Place part (E) onto part (F).
6. Place the assembled part in the available space on part
(D), turn it to lock in place.
7. To store your appliance, fold away the support for
vertical steaming by loosening part (D).
1
2
3
4
A
BC
D
E
F
5
67
EN
-21 -
Storage after use
Note: The system must be stored in an
upright or at position and not on its side.
• Check that any condensation under the ironing board cover
has dried before storing away.
Caution: If the system is stored horizontally, the water reser-
voir must be emptied.
• Switch off and remove plug from the mains (A).
• Remove the warm SOFT PRESSING soleplate (B).
• Pull out steam cord holder and store (C).
• Store warm iron and close storage box (D).
• The ironing board is easiest to fold away when the board is
at its highest setting (E).
Rinse Boiler
Frequency: before initial use and every month (or every 10
hours of ironing).
BEFORE using the appliance, rinse the
boiler when cold, switched off and
unplugged.
Danger: Risk of burns when the boiler is under pressure.
If rinsing the boiler AFTER using the appliance, you must
switch the appliance off, remove the mains plug from the
wall socket and wait at least 2h30 before opening the boiler
inlet and drain caps. Hold at a safe distance when opening
the caps.
Warning: Splashing water - protect delicate oor coverings.
Never use decalcier or other chemical products.
• Adjust the board to its highest position and remove the cold
water reservoir.
• Unscrew the boiler inlet cap (F).
MAX
G
F
H
A
B
C
D
E