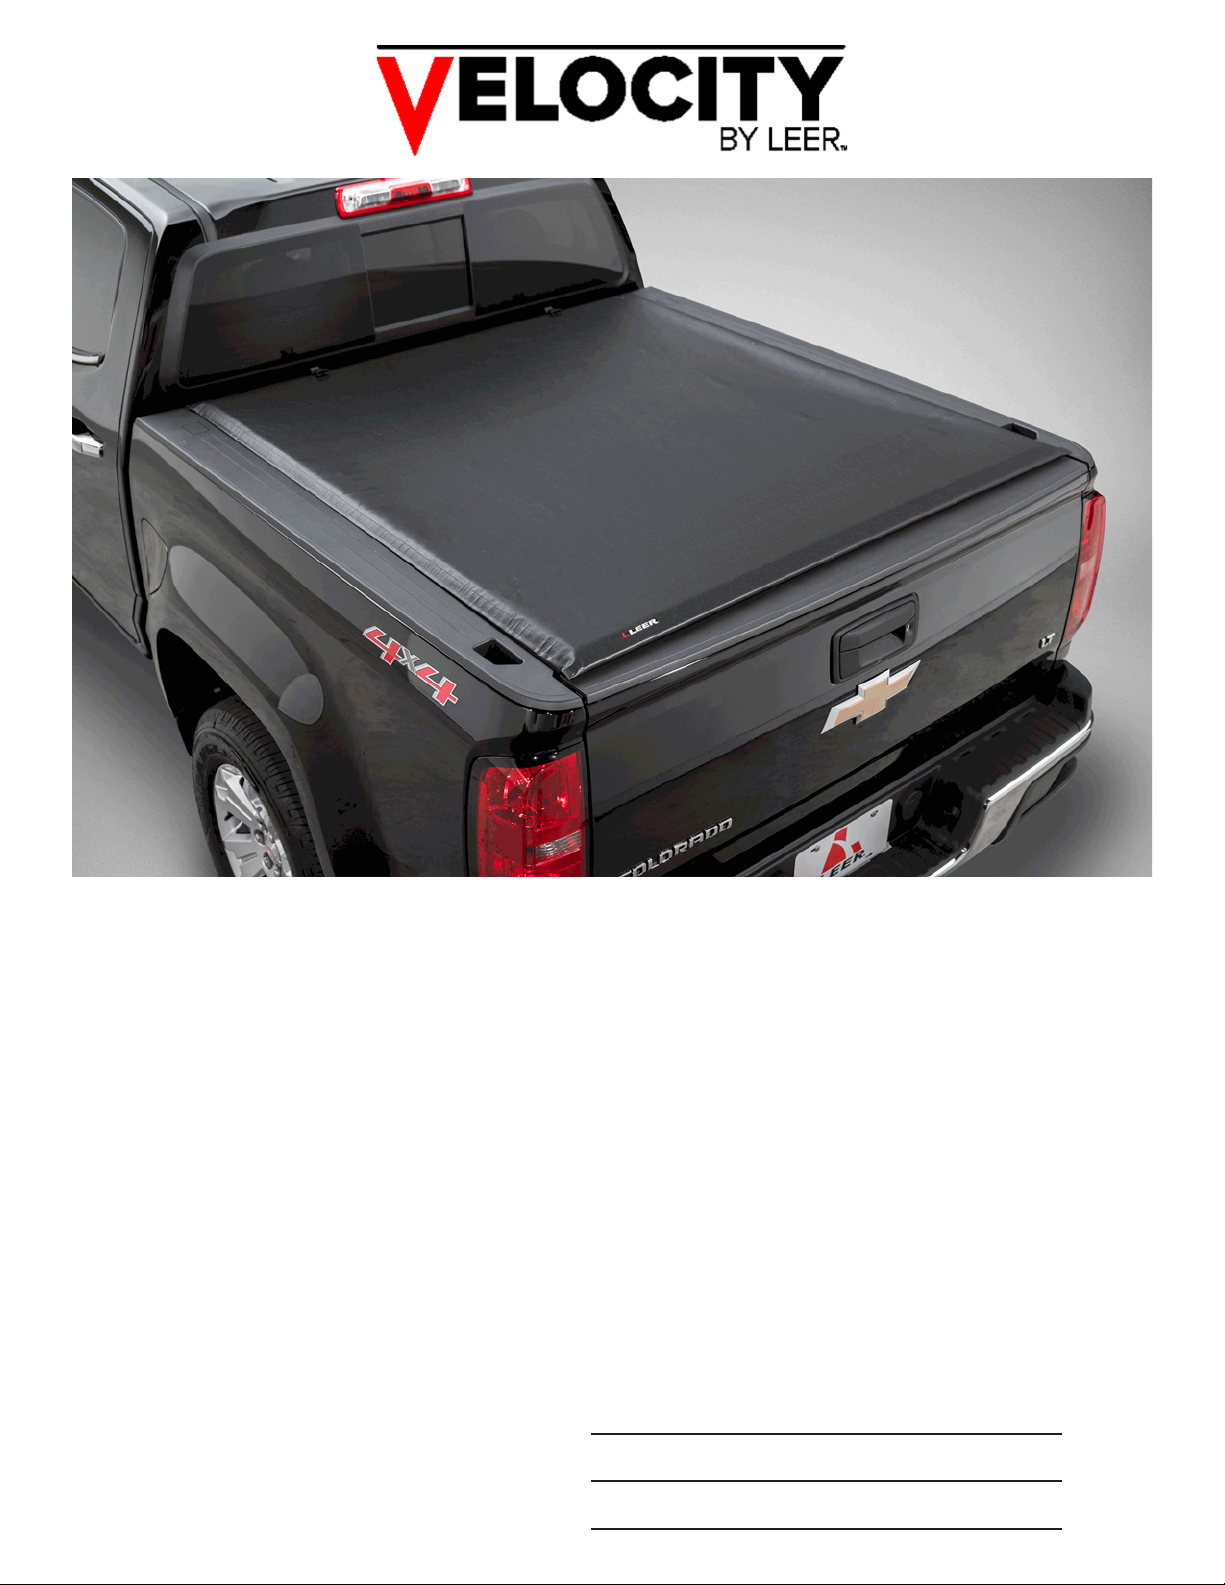
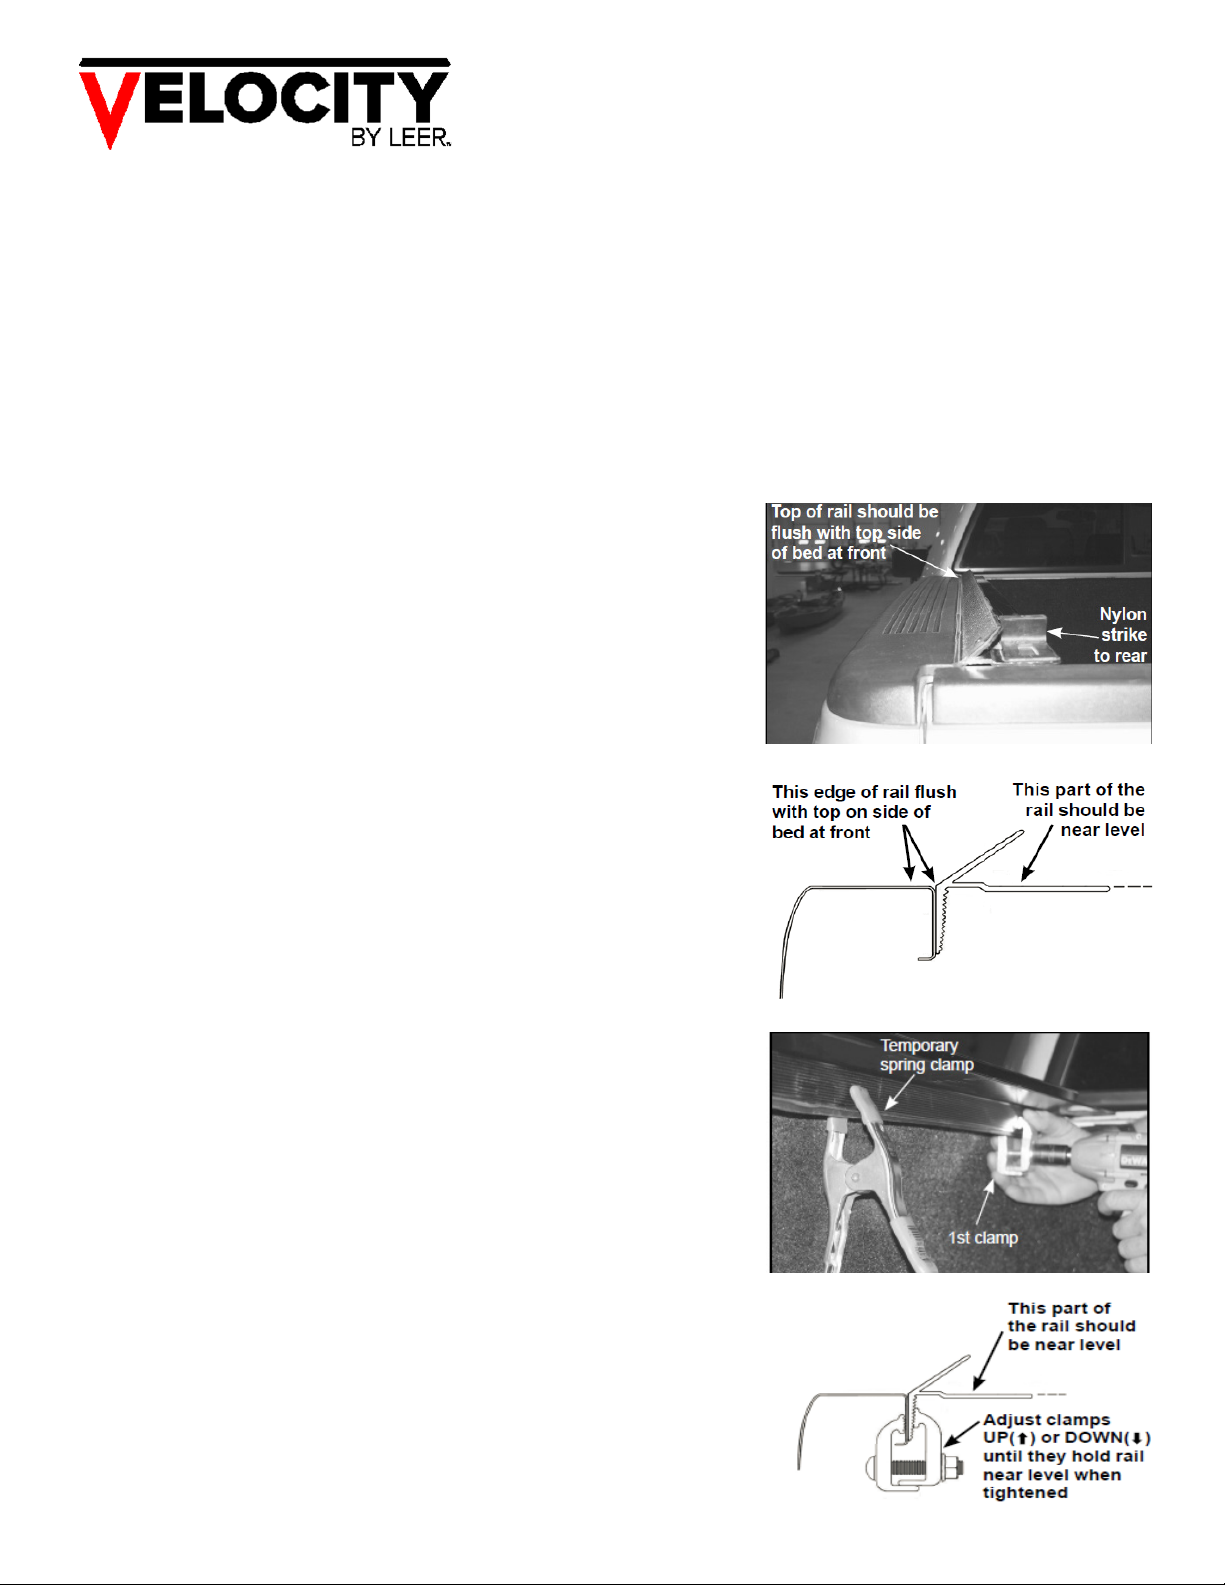
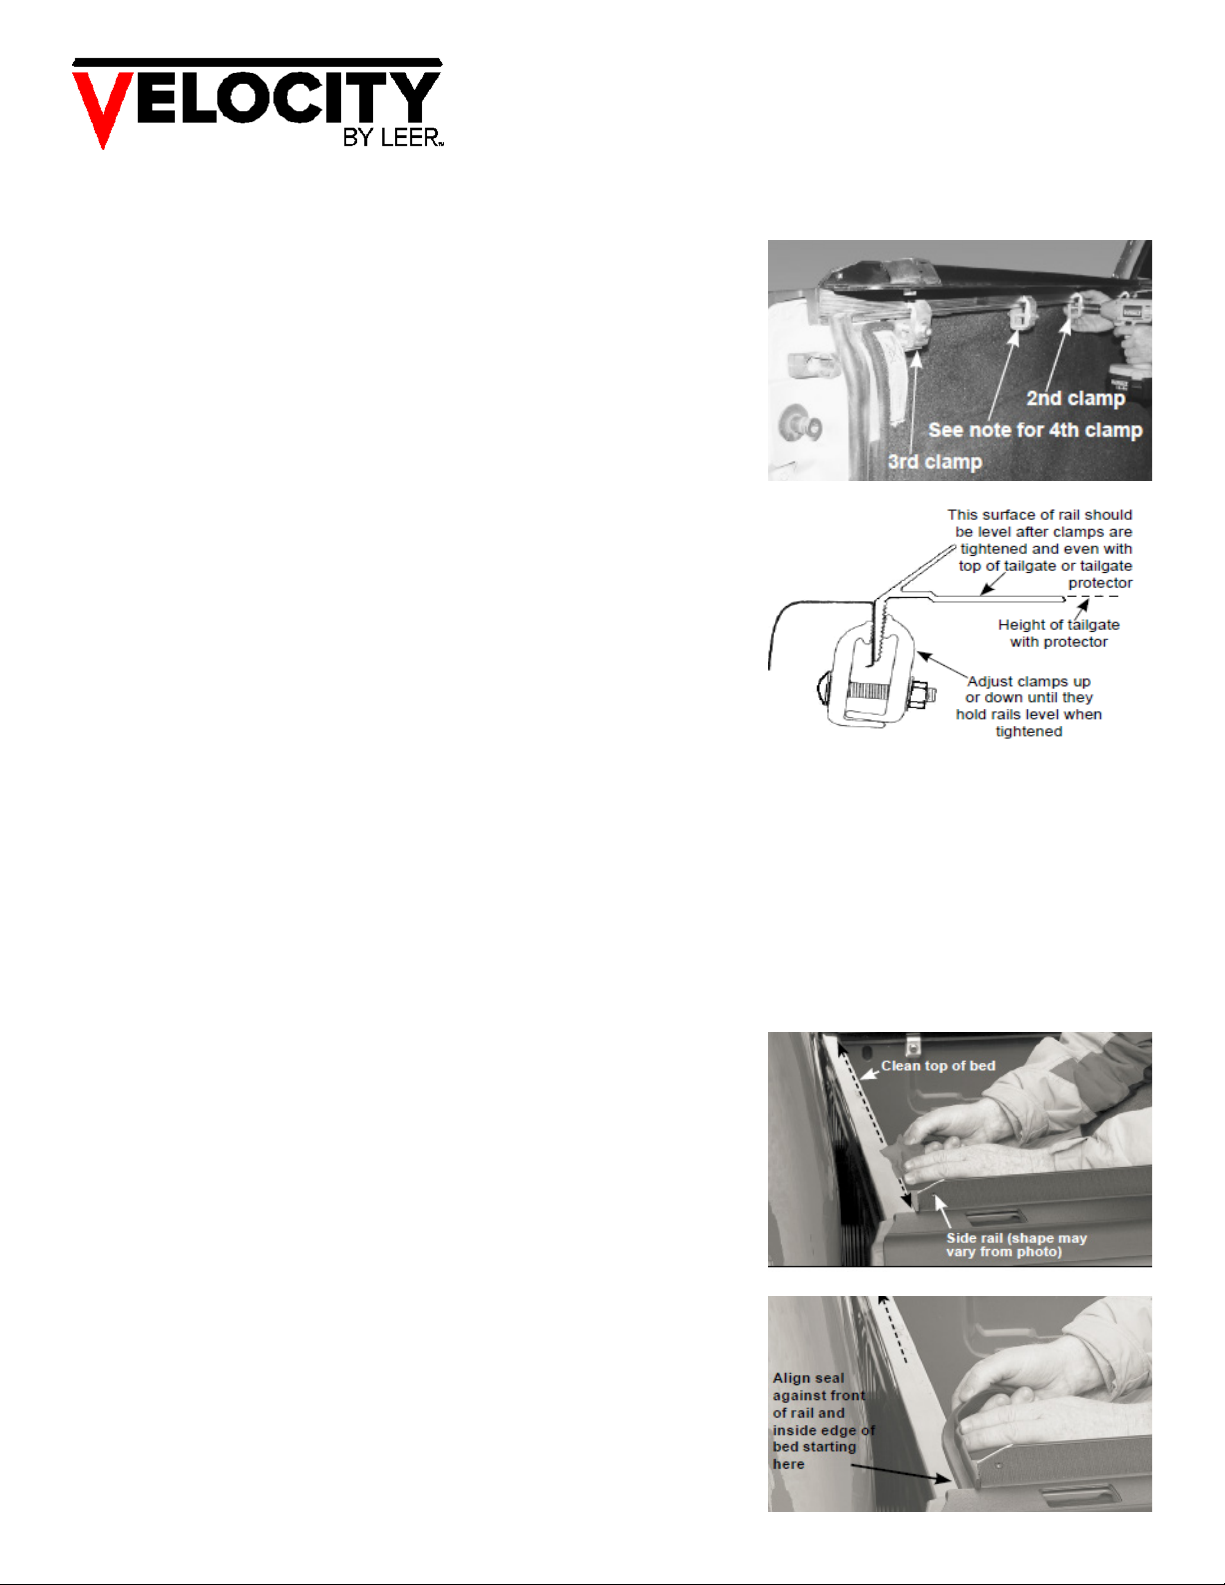
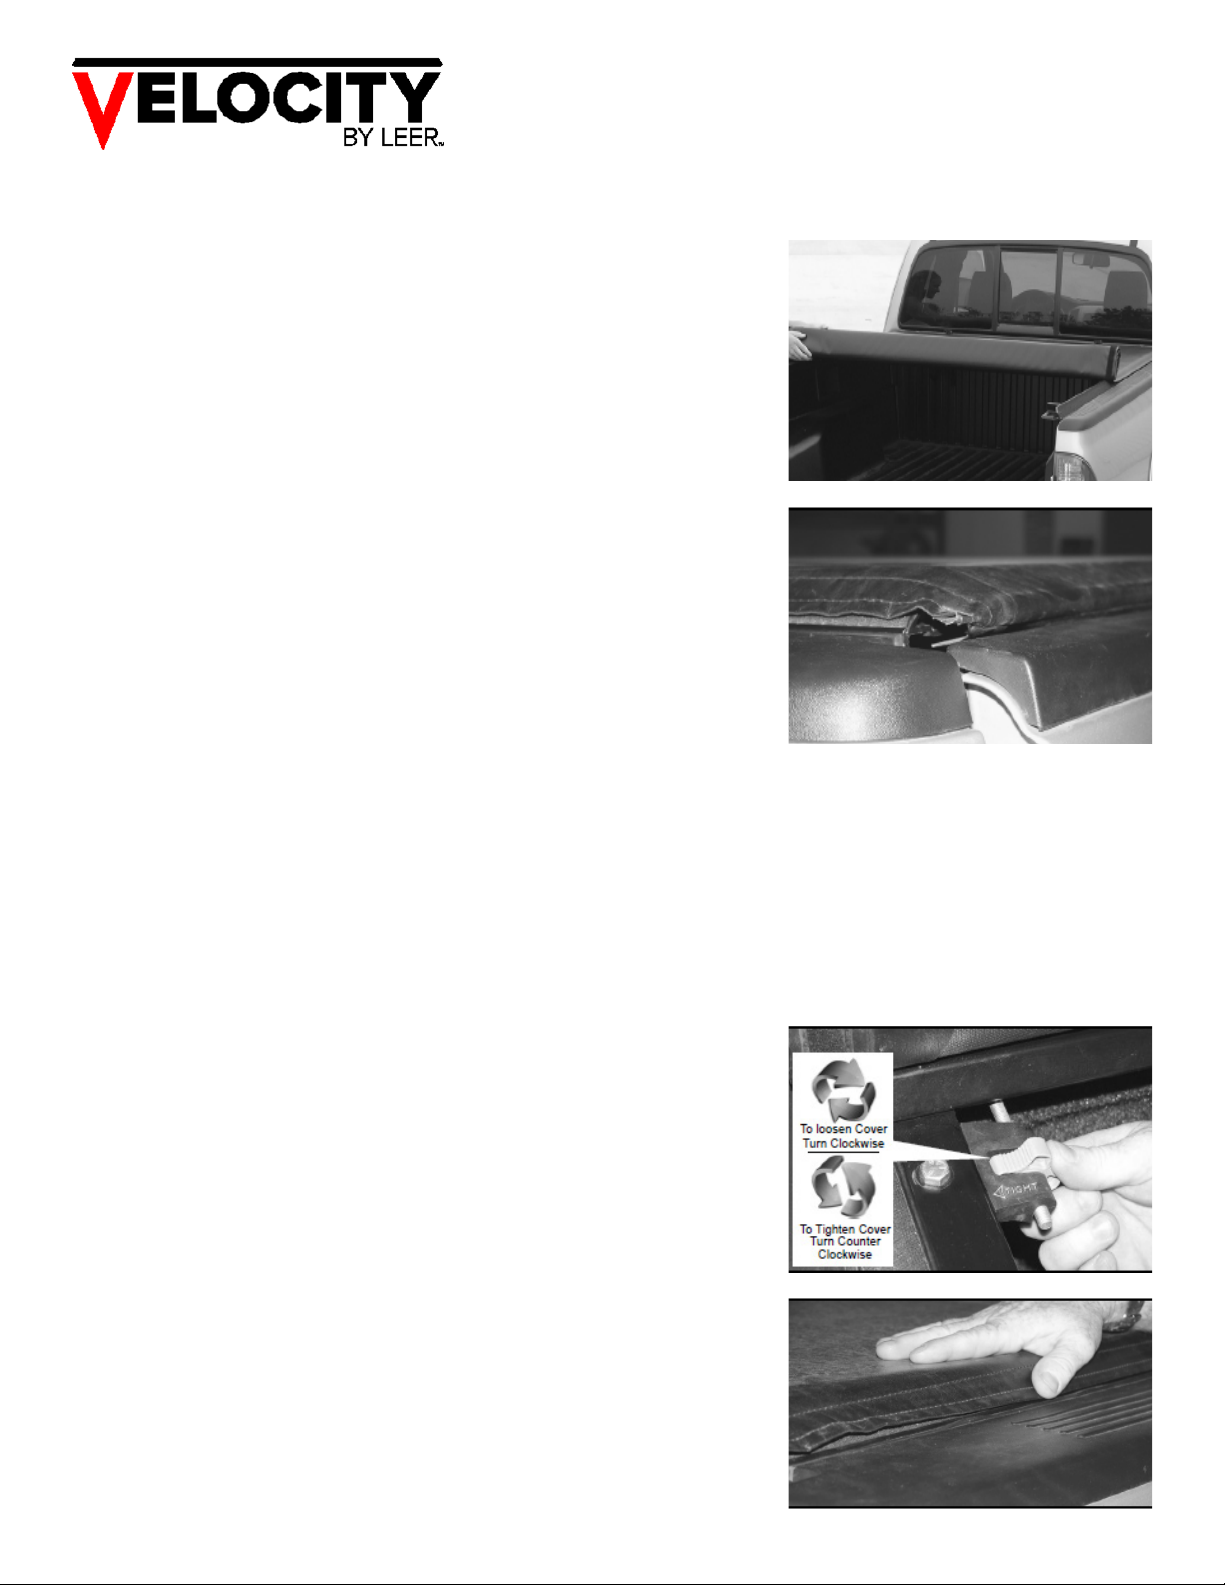
Leer Velocity User manual

INSTALLATION INSTRUCTIONS AND OWNER’S MANUAL
Thank you for purchasing the Velocity by LEER™ roll-up, soft tonneau cover. At LEER, we made sure it offered innovative
patented and patent-pending features you couldn’t find anywhere else, such as our CYNCTM pinch latching system that
locks the cover down. With CYNC pinch latch system, you can quickly pop the cover open from either side of the bed.
As a result, Velocity by LEER is simply unmatched along with its superior materials and craftsmanship. With proper care,
your tonneau cover will provide years of service and enjoyment.
It is recommended you take time to read these instructions before installing this cover even if already familiar with the
product. Often improvements are made without prior notice. Always handle the cover and components with care to
avoid damage.
Before using this product, read the operating instructions, maintenance and safety sections of this owner’s manual and
save for future reference. Your new LEER® tonneau must be registered to make the warranty valid. Registration
information can be found on the back page.
FOR YOUR RECORDS
DATE PURCHASED:
SERIAL NUMBER:
LEER DEALER:

2
1 each Driver Side Rail & Passenger Side Rail
6 each Installation Clamps (*8 each—Long Bed)
1 each Driver Side & Passenger Side Tensioner
Adjuster w/ Washer, Nuts, & Bolt
1 each Element Seal Kit; Front and Rear
1 each Pre-Rolled Cover Assembly
COMPONENTS
TOOLS NEEDED
2 each 1/2” Wrenches
1 each Tape Measure/Ruler 1 pair Scissor
1 each Spring Clamp (optional) Writing Utensil
1 each Torque Wrench Safety/Protective Eyewear
Unpack components and clean truck bed if dirty. For best seal adhesion, air and surface
temperature should be above 60°F.
NOTE ON BED LINERS: With an under-the-rail drop in bed liner, installation is possible with
minimal trim cutting of the bed liner at the front corner of the bed and back by tailgate to allow
side rail to install properly. Considerable trim cutting is required with an over-the-rail drop in
bed liner.
INSTALLATION INSTRUCTIONS
PARTS DIAGRAM

3
INSTALLATION INSTRUCTIONS
1) INSTALLING COVER SIDE RAILS
NOTE: Some installs require drilling/bolting.
Those kits will contain special side rail instruc-
tions. Follow those instructions for rail attachment
in conjunction with instructions in this owner’s
manual.
NOTE: For trucks with an electric tailgate, rails
will have to be installed slightly higher (approxi-
mately 3/16”) to eliminate interference.
A) Position side rail with attached weather strip
against the inside lip of the bed. Push rail forward
until it touches front of bed. End of rail with nylon
strike towards the rear.
B) At front, adjust top of the rail flush with top of
bed and it there with assistance of another person
or with a spring clamp.
C) Install first clamp as close to the front of the
bed as possible and use 1/2” wrench to tighten.
♦IMPORTANT: To keep rail on the truck securely;
before using the wrench on the clamp, make sure
clamp teeth engage grooves on rail, hand-tighten
the nut and then use wrench.
D) With rail flush at top of the bed and clamp teeth
engaged, tighten the clamp. Check if the rail is
level.
♦If the rail tilts up, loosen the clamp, lower it,
engage the teeth, and re-tighten it. If the rail tilts
down, loosen the clamp,
raise it, engage teeth and re-tighten it.

4
INSTALLATION INSTRUCTIONS
INSTALLING COVER SIDE RAILS - Continued
E) Install second clamp on rail at midway point
of bed. Adjust rail flush at top of bed and re-
peat clamping procedure, always making sure
teeth are engaged on rail grooves.
F) At tailgate, adjust rail height flush with top
of tailgate. Repeat clamping procedures plac-
ing third clamp as close to tailgate as possible.
Most short bed kits contain 6 total clamps.
Install 3 per side rail. For kits with 8 total
clamps, install the 4th clamp between 2nd and
3rd clamp on each side rail. Repeat STEP 1 to
install rail on opposite side. When done, make
sure all clamps are torqued to 15-20 ft/lbs on
both rails.
2) APPLY FRONT SEAL
NOTE: For best adhesion, air and surface
temperature should be above 60°F.
A) Front Bed Rail - Clean top surface with alco-
hol pad; if needed, wash first.
B) Peel paper back, align and adhere the front
Element seal at one corner across the front
rail to opposite corner and cut to length.

5
INSTALLATION INSTRUCTIONS
3) APPLY REAR SEAL
A) Clean underside of rail with included alco-
hol pad. Align the seal to the end of the rail,
make sure seal contacts edge of bed.
B) Mark the seal flap and cut a notch as shown
in the illustration.
NOTE: For additional protection against
weather elements; locate and seal miscella-
neous factory gaps, crevices, stake pockets,
etc., that may be on bed (sealant not includ-
ed).
C) Peel paper back, align an adhere to at end
of rail.
D) Refer to picture for representation of cor-
rectly applied rear seal.

6
4) ASSEMBLING TENSION ADJUSTERS TO COVER
INSTALLATION INSTRUCTIONS
NOTE: The cover comes pre-rolled in its nor-
mal open position for ease of installation.
A) Set the pre-rolled cover on the truck’s tail-
gate with front bar facing up as shown. Align
tension adjuster (marked “L”) on driver side of
cover - positioned as shown in photo.
B) Turn 1-1/4” bolt with flat washer onto nut in
bar. Leave loose for now. See photo. Repeat
for tension adjuster (“R”) on passenger side of
cover leaving that bolt loose as well.

7
5) MOUNTING COVER TO SIDE RAILS
INSTALLATION INSTRUCTIONS
A) Set the pre-rolled cover on rails at front of
bed (behind cab) with bar facing up. Roll cov-
er bar onto front of rails and fold/tuck vinyl
flap under. Now bar will face down. Let straps
hang to inside of bedrails. Push cover bar for-
ward until it sets flat on front of side rails and
overhangs them.
B) Slide left tension adjuster over until it en-
gages under side rail. (See photo in Step 5E
for tension adjuster tab under left side rail.)
Push bar back and forth to line up holes. Do
not turn dial wheel. Insert bolt from top, flat
washer and nut from bottom.
C) Hold bolt at top and tighten nut under side
rail. Repeat procedure for right hand tension
adjuster.
D) Center the front bar between the two side
rails.
NOTE: Before tightening,
make sure vinyl weather flap
is still tucked under the front bar.
E) Then tighten bolt (left loose earlier) under
front bar on each tension adjuster.

8
INSTALLATION INSTRUCTIONS
6) INITIAL OPERATIONS AND ADJUSTMENTS
A) Unroll cover and place rear bar into strikes
on side rails. Press down on bar to close (20-
30 lbs. pressure). The cover fabric may be
tight. Over time under tension it will conform
to its hardware and loosen slightly. If bar is too
hard to push down, adjust tensioners equally
as needed to close.
B) Close tailgate slowly - top of tailgate should
fit snug under cover bar. If tonneau cover
hampers normal tailgate operation raise rails
by loosening rear clamps; adjust rails up; and
tighten clamps. If there is too much space
between tailgate and cover bar, lower rails by
loosening rear clamps: adjust rails down; and
retighten clamp. Refer to page 10 for trouble-
shooting tips.
♦IMPORTANT: When done, go back and dou-
ble check each clamp and make sure it is
fully tight. Start behind cab and work towards
tailgate.
C) Check cover tension by releasing dual
pinch latching system and open and close
rear bar several times. It should snap down
when closing. Cover fabric should be tight
with no sagging between the bows. If adjust-
ment is needed, roll cover open and to loosen
turn tension adjuster Clockwise. To tighten
turn tension adjuster Counter-Clockwise. Al-
ways turn Dials in Equal amounts.
D) When done, always seal both sides of
cover with hook and loop system. For detailed
operating instructions refer to page 8.
★ TIP: Reasons to keep cover drum tight;
Lasts longer, less noise, and looks nicer.

9
OPERATING INSTRUCTIONS
TO CLOSE
TO OPEN
Release retainer straps at
the front and using both
hands unroll the cover
towards the rear of the bed.
Position roll-up bar against
strikes. Push down on bar
until cover locks in place.
Along side of bed, seal
cover edges with hook and
loop sealing system the
full length of cover on both
sides. Pull with one hand
seal with other hand.
Open tailgate, squeeze
pinch latch on either the
driver or passenger side,
lift and roll-up rear bar.
Using both hands, roll
cover toward front of bed
(not against the cab).
Securely fasten retainer
straps to store the cover.
SEE NEXT PAGE FOR
STORAGE STRAP
ADJUSTMENT

10
OPERATING INSTRUCTIONS
STRAP ADJUSTMENT
To tighten storage strap ...pull
back on top layer of strap loop
until strap is snug.
To take out slack in loop ...slide
slip bracket down.
TROUBLESHOOTING
PROBLEM SOLUTION
Cover too loose.
Cover too tight.
Gap between roll-up bar and
tailgate
Top of tailgate hits rear bar when
attempting to close
Cover too narrow.
Cover too wide.
Lopsided Cover
Pinch Latch doesn’t engage.
Turn both tension adjusters counter clockwise to move front bar
forward. Refer to INITIAL OPERATION AND ADJUSTMENTS - Step
C, see arrows next to adjuster.
Turn both tension adjusters clockwise to move front bar forward.
INITIAL OPERATION AND ADJUSTMENTS - Step C, see arrows
next to adjuster.
Rails set too high. Refer to step INITIAL OPERATION AND
ADJUSTMENTS - Step B.
Raise side rails at rear of bed until tailgate closes without pushing
rear bar up. Refer to step INITIAL OPERATION AND ADJUSTMENTS
- Step B.
Check if rail is level. If rail tilts down, loosen clamp, lower it,
engage teeth, and re-tighten clamp. Refer to step INSTALLING
COVER SIDE RAILS - Step D.
Check if rail is level. If rail tilts down, loosen clamp, raise it,
engage teeth, and re-tighten clamp. Refer to step INSTALLING
COVER SIDE RAILS - Step D.
Check front bar. It must be centered side to side. Refer to
MOUNTING COVER TO SIDE RAILS - Step D.
Check side rails for height and level. Refer to step INSTALLING
COVER SIDE RAILS - Step F. Inspect latches for jammed or broken
parts.

11
CARE AND MAINTENANCE
TIPS FOR A LONG LASTING COVER
♦ Keep cover closed when not in use and always seal cover edges the full length of bed on both sides
with hook and loop sealing system.
♦ Keep the cover tight; cover vinyl should sound drum-like when tapped on.
♦ Make sure cover is properly latched and sealed. Lock while traveling and before entering automatic
drive-through car washes.
♦ Avoid storing cover in its rolled up position for long periods of time.
♦ When cleaning, for best results use mild liquid soap and water. Never clean with petroleum or citrus
based products.
♦ Periodically treat cover with vinyl cleaner & UV protectant instead of petroleum based
products that may dry out and damage the vinyl.
♦ Avoid allowing cargo to rub against cover while transporting, whether in open or closed
position.
CARE AND MAINTENANCE
SAFETY INFORMATION
♦ Inspection and much of the maintenance can be done by the operator. It May be
necessary to review the installation and operating instructions.
♦ Periodically inspect the cover assembly and the condition of all parts. Check for loose bolts and
parts, tighten if needed. Test the operation to ensure that the parts are functioning properly and that
the cover is in top operational condition.
♦ If latch has been damaged, replace with new one.
NOTE: Inspection and/or maintenance should also be performed anytime a malfunction is observed
or suspected. If you need assistance inspecting and/or servicing your cover, or if you want to order a
replacement part, call the customer service number on the cover page. Always use original equipment
replacement parts for your cover.
♦ Do not cover cargo that is higher than the cover.
♦ Do not place object(s) on or against the cover or its framework at any time
♦ Always secure cargo so it cannot shift and damage the cover or its parts.
♦ Do not use the covers framework to tie down cargo.
♦ Never stand, sit or ride on the cover or allow others to do so.
♦ Do not leave valuables in an unattended vehicle as cover does not prevent theft of contents in truck bed.
♦ The cover does not eliminate moisture and dust from entering thet ruck bed. Special wrappings or pack-
aging of the contents may be necessary.
♦ Due to poor ventilation, if you allow a pet/animal in the bed, leave cover open. Do not allow people or
animals to occupy bed with the cover closed.
♦ When towing vehicle backwards, cover must be rolled fully open and secured with safety straps or fully
closed and secured.
♦ ALWAYS finish securing the cover by sealing sides. Use caution when operating cover in windy condi-
tions.
♦ Periodically check and/or retighten clamp and front bar tensioning bolts as needed.
♦ Periodically check dual locking system to ensure latches fully engage side rails.

5-YEAR LIMITED WARRANTY
LEER® extends the following 5-year warranty to the original retail purchaser of this Velocity by LEER™ Roll-Up
soft tonneau cover:
LEER warrants its Velocity Roll-Up Cover to be free from defects in material and workmanship, as long as the
original purchaser owns the truck on which the cover was originally installed and as long as the cover re-
mains continuously installed on said truck. This limited warranty does not cover any damage due to
accident, abuse, misuse, alteration, neglect, improper installation, or ordinary wear and tear.
LEER’s sole obligation under this limited warranty is limited to the repair or replacement, at its option, of de-
fective parts only. No labor or service allowance is given or implied. IN NO EVENT SHALL LEER BE LIABLE
FOR INCIDENTAL, CONSEQUENTIAL, OR SPECIAL DAMAGES. LEER EXPRESSLY DISCLAIMS ANY AND ALL
IMPLIED WARRANTIES OF MERCHANTABILITY, AND THERE ARE NO WARRANTIES WHICH EXTEND BE-
YOND THE LIMITED WARRANTY DESCRIPTION CONTAINED HEREIN.
All repairs shall be performed at the premises of an authorized LEER Dealer, or at TAG’s option, at a TAG
manufacturing facility. Purchasers making a claim under this warranty shall deliver the truck cap or
tonneau to an authorized LEER Dealer. Dealer may charge a nominal labor charge for removal of cap or
tonneau. TAG does not authorize any person to create, on its behalf, any obligation with respect to the
tonneau except as provided in this limited warranty.
Goods to be returned must have a pre-authorized RA # (Returned Authorization Number).
This warranty does not cover any damage due to accident, abuse, misuse, alteration, neglect, improper
installation, blow-offs, acts of nature or ordinary wear and tear.
International Customers – warranty limits may apply: For our valued customers outside of the United
States, only an authorized LEER Dealer in the country from which you purchased your LEER brand tonneau
cover is responsible for all warranty issues. Any exception is at the sole discretion of Truck Accessories
Group, LLC and must be approved prior to any repair service or warranty claim rendered.
This limited warranty gives you specific legal rights and you may have other rights, which vary, from
state to state. Your new LEER tonneau must be registered to make the warranty valid. You can register
your unit online at www.LEER.com/Leer-warranty-survey and tell us how your truck fits into your life. Input
from LEER owners helps us design products that fit your needs.
LEER.com
This product is protected by multiple patents and/or applications.
Product subject to change without notice.
LEER® A member of Truck Accessories Group, LLC © 2018ALL RIGHTS RESERVED
PN_90367.1 2018-05-10
Table of contents
Other Leer Automobile Accessories manuals

Leer
Leer CAB HIGH PREMIUM BED CAP Service manual

Leer
Leer CAB HIGH BED CAP Service manual

Leer
Leer HF650M User manual

Leer
Leer PACE EDWARDS ULTRAGROOVE ELECTRIC User manual

Leer
Leer 217988 Service manual

Leer
Leer SR 250 Service manual

Leer
Leer 1LG0300000 User manual

Leer
Leer CAB HIGH SPORT BED CAP Service manual

Leer
Leer CAB HIGH BED CAP Service manual