manuals.online logo
Brands
  1. Home
  2. •
  3. Brands
  4. •
  5. LEGRAND
  6. •
  7. Gas Detector
  8. •
  9. LEGRAND tynetec Telecare ZXT427 User manual

LEGRAND tynetec Telecare ZXT427 User manual

Doc No. FM0471 issue G Page 1
Mains Connection
Colour
Terminal
Brown
Live
Blue
Neutral
Grn/Yel
Earth
169MHz Telecare Devices
Gas & Carbon Monoxide Detector
__________________________________________________________________________________________________________
•Compatible with Reach at-home alarms, Advent xt warden call,
Altec Response and Touchsafe Pro Nursecall systems
•Gas alarm activates at 10% of Lower Explosive Limit
•CO alarm activates on Time Weighted Average;
30ppm 2hrs, 50ppm 1hr, 100ppm 10mins or 300ppm 0-3mins
•85dB @ 3m sounder
•Indicator lights: green power, yellow fault & red alarm
•Requires connection to 240V AC mains supply via a fused spur
•Transmitter low battery warning
•Complies with EN50194 (Gas) & EN50291 (CO)
•Backplate dimensions: 175 x 140mm (depth = 55mm)
•Weight: 640 grams
•Product Code: ZXT427
Where should Gas & Carbon Monoxide Detectors be fitted?
Combined Gas & Carbon Monoxide (CO) detectors should be fitted in all rooms with a fuel burning appliance such as a boiler or
gas cooker and where a lot of time is spent e.g. the kitchen or living room.
They should not be fitted in the bathroom or areas subject to steam, damp or humidity.
Choosing a Location
The combined gas & CO detector should be wall mounted in the highest part of the room, approx 300mm from the ceiling and
between 1 and 5 metres from the appliance.
The combined gas & CO detector should not be located inside a cupboard, behind a curtain, directly above the cooker or sink, next
to a door or window or near an extractor fan.
The combined gas & CO detector should be within 5 metres of a mains supply otherwise the cable provided will need extending.
Typical Tools Required
Be careful when using step ladders –always face the direction you are working.
Always make sure the correct drill bits and screwdrivers are used.
Installation
1. IMPORTANT: BS EN50244:2016 Electrical apparatus for
the detection of combustible gases in domestic premises
states that detectors should be permanently installed
and it should not be possible to switch off power to the
device, unless for maintenance. A plug and socket type
connection should not be used, due to the ease with which
the detector may be disconnected from the power supply.
2. Fix the mounting plate complete with detector to the
wall using the screws and plugs provided through the
4 fixing holes “A”.
3. The detector should be wired to the mains supply by a
qualified Electrician using the flexible cable provided to a
fused spur outlet fitted with a 3A fuse to BS1363-4 and
BS1362 respectively, or according to local regulations.
4. Apply the mains power and the GREEN ON light will FLASH
for about 2 minutes during the sensor warm-up period.
The unit is operating when the GREEN ON light is lit steady.
Tynetec and Aidcall are business units of Legrand Electric Ltd
Unit 10 Cowley Road, Blyth Riverside Business Park, Blyth
Northumberland, NE24 5TF. Tel: 01670 352 371 Fax: 01670 362 807
Email: sales@tynetec.co.uk Web: www.tynetec.co.uk
“A”
“A”
“A”
“A”
4 x FIXING
HOLES “A”
INDICATOR
LIGHTS
Doc No. FM0471 issue G Page 2
Testing & Registering the Gas & CO Detector
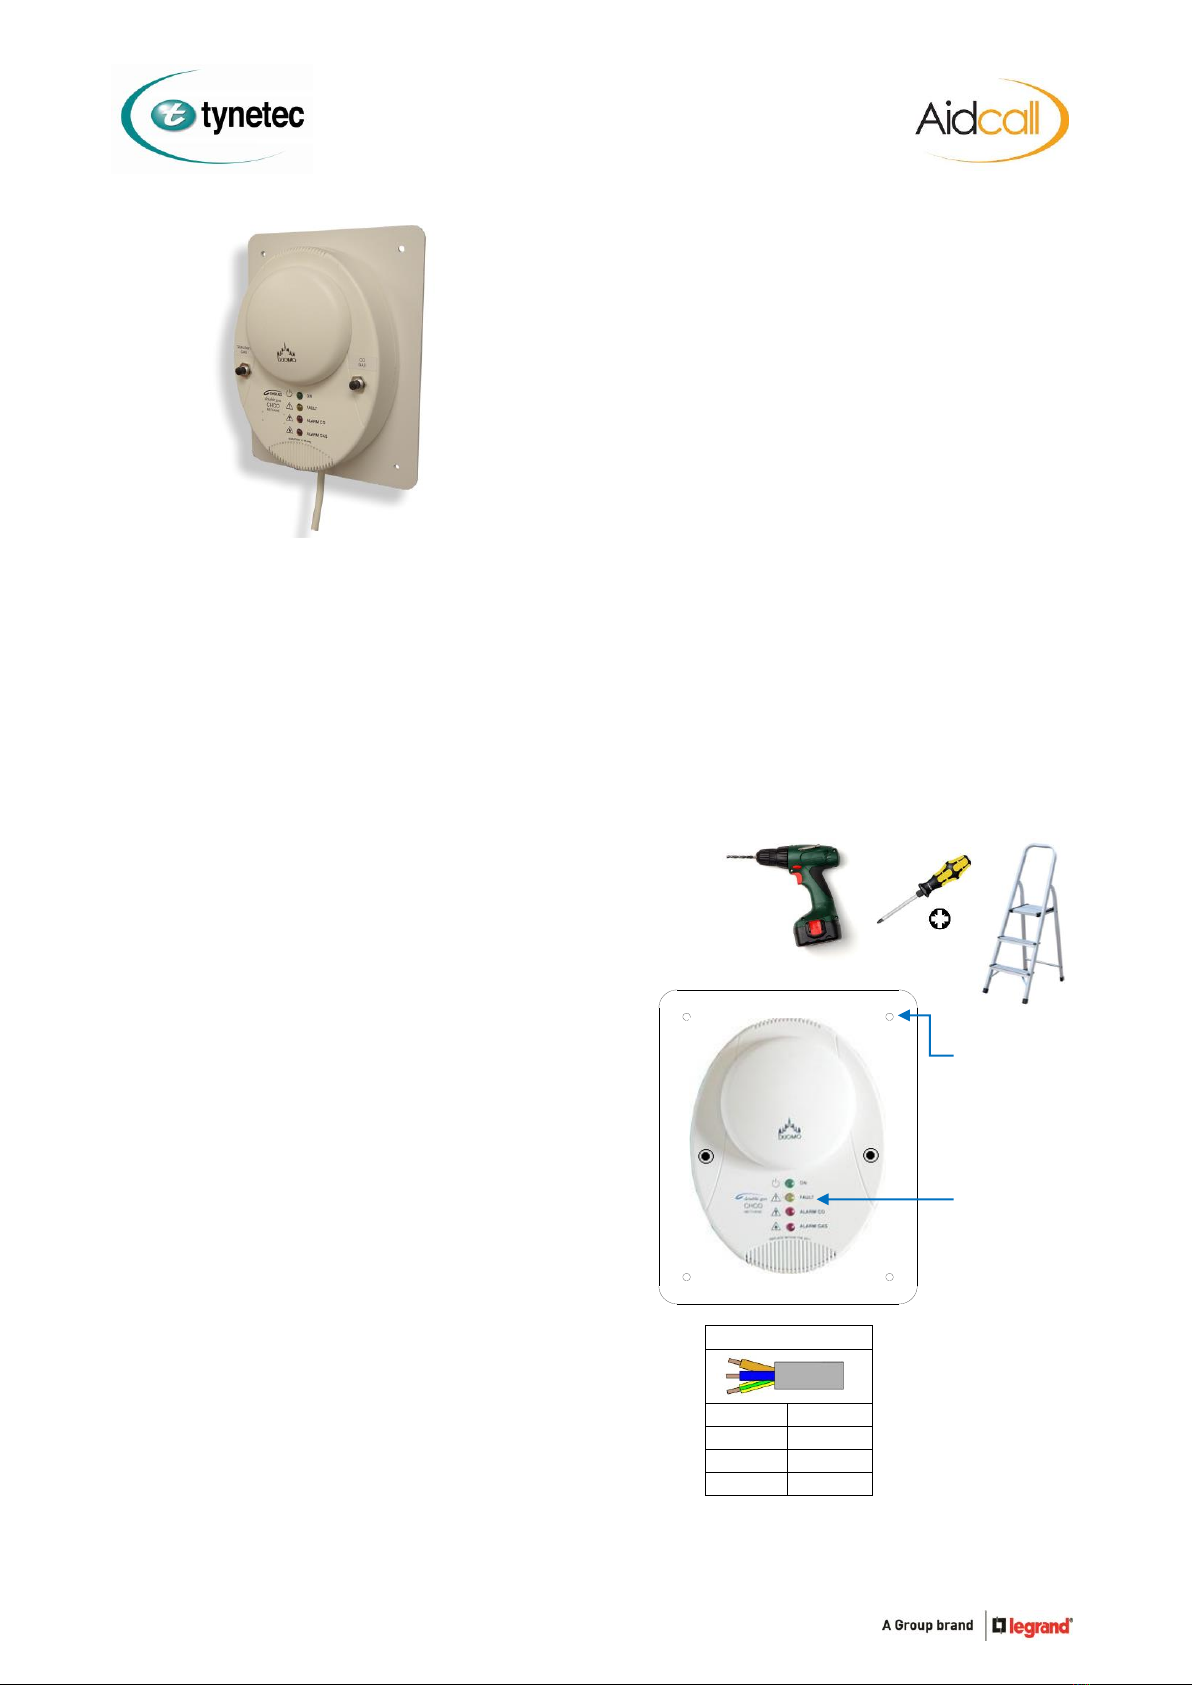
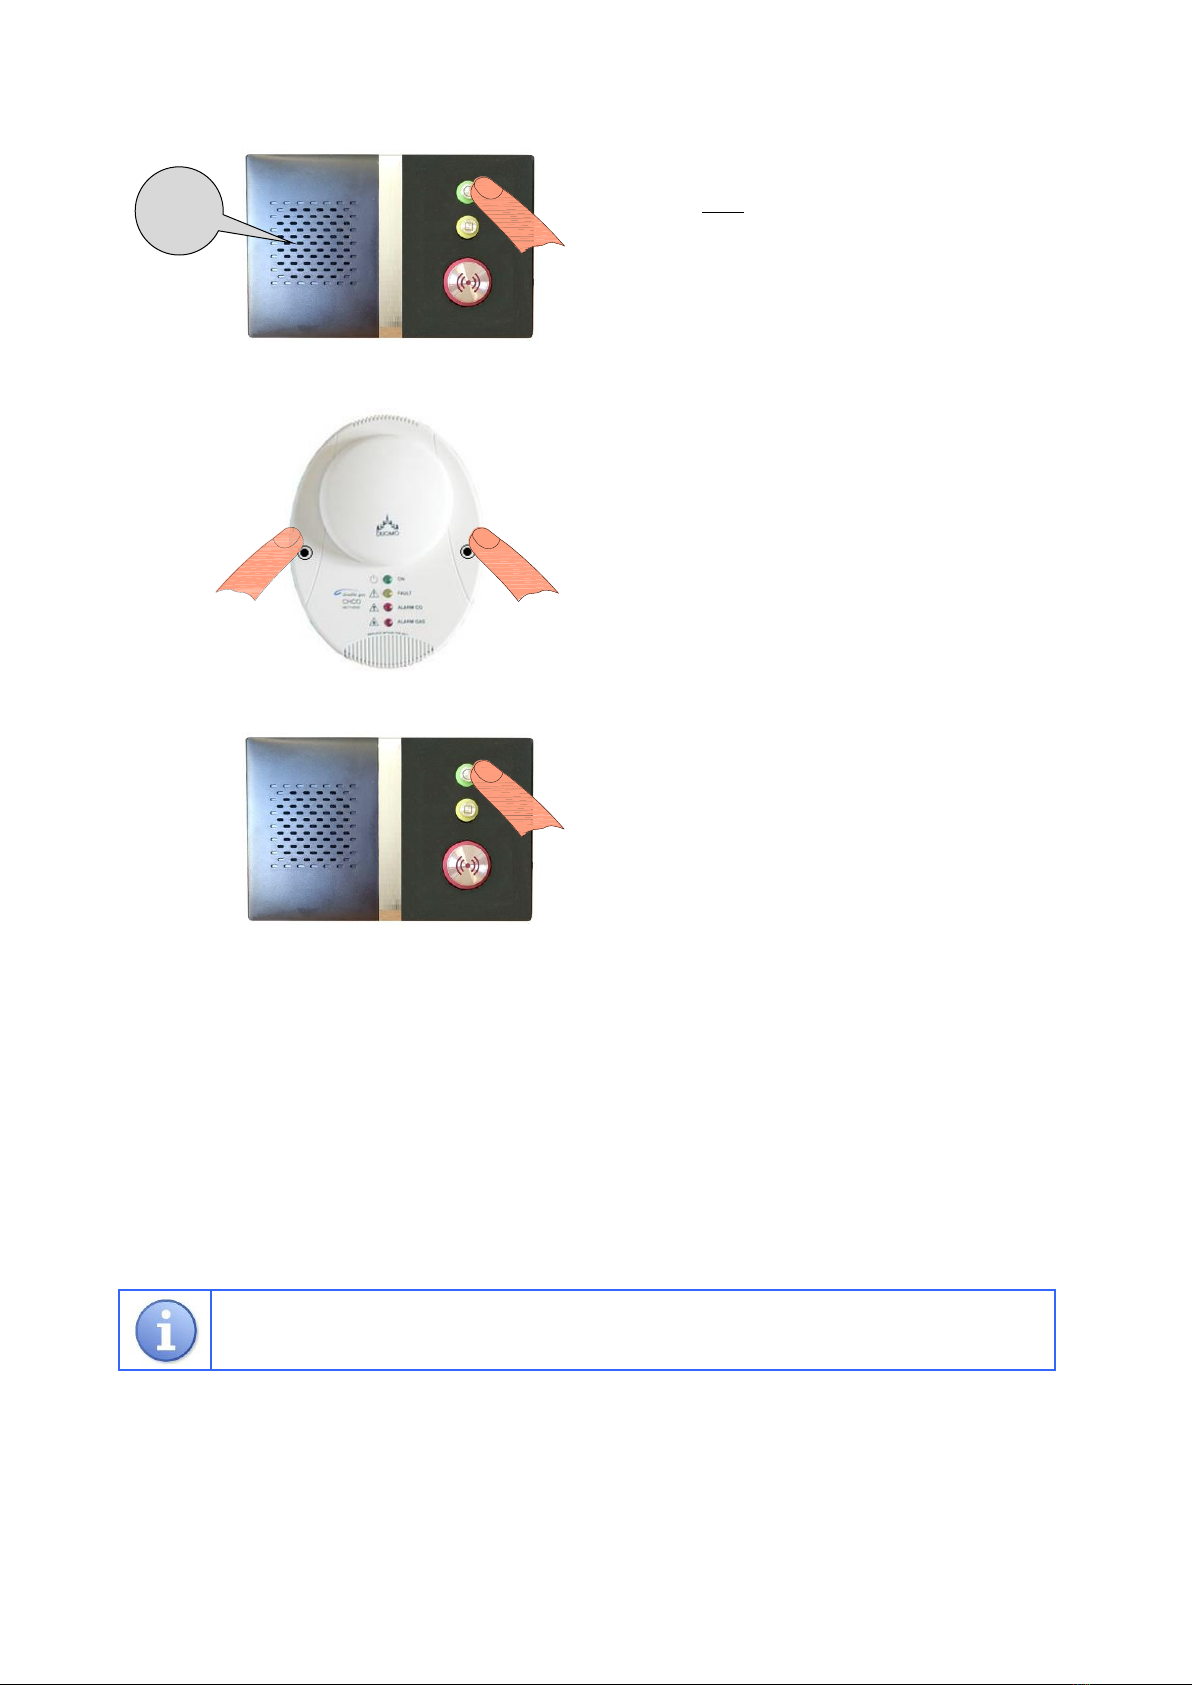
The TRANSMIT GAS and TRANSMIT CO pushbuttons on the lid
are used when registering the combined Gas & CO detector
onto the warden call system, at-home alarm or Nursecall system.
See the following pages for how to put each of these products into registration mode.
The range of all radio devices can be affected by the working environment,
always take care during installation and perform several test calls.
Important Note on Sensor Testing
The gas and CO detector should be functionally tested every 6-12 months (depending on location).
The gas sensor can only be tested with calibrated test gas, never test using neat gas as this will poison the sensor.
The CO sensor can only be tested with calibrated test CO, this will take less than 1 minute to trigger.
For test gas supplies please contact Duomo.
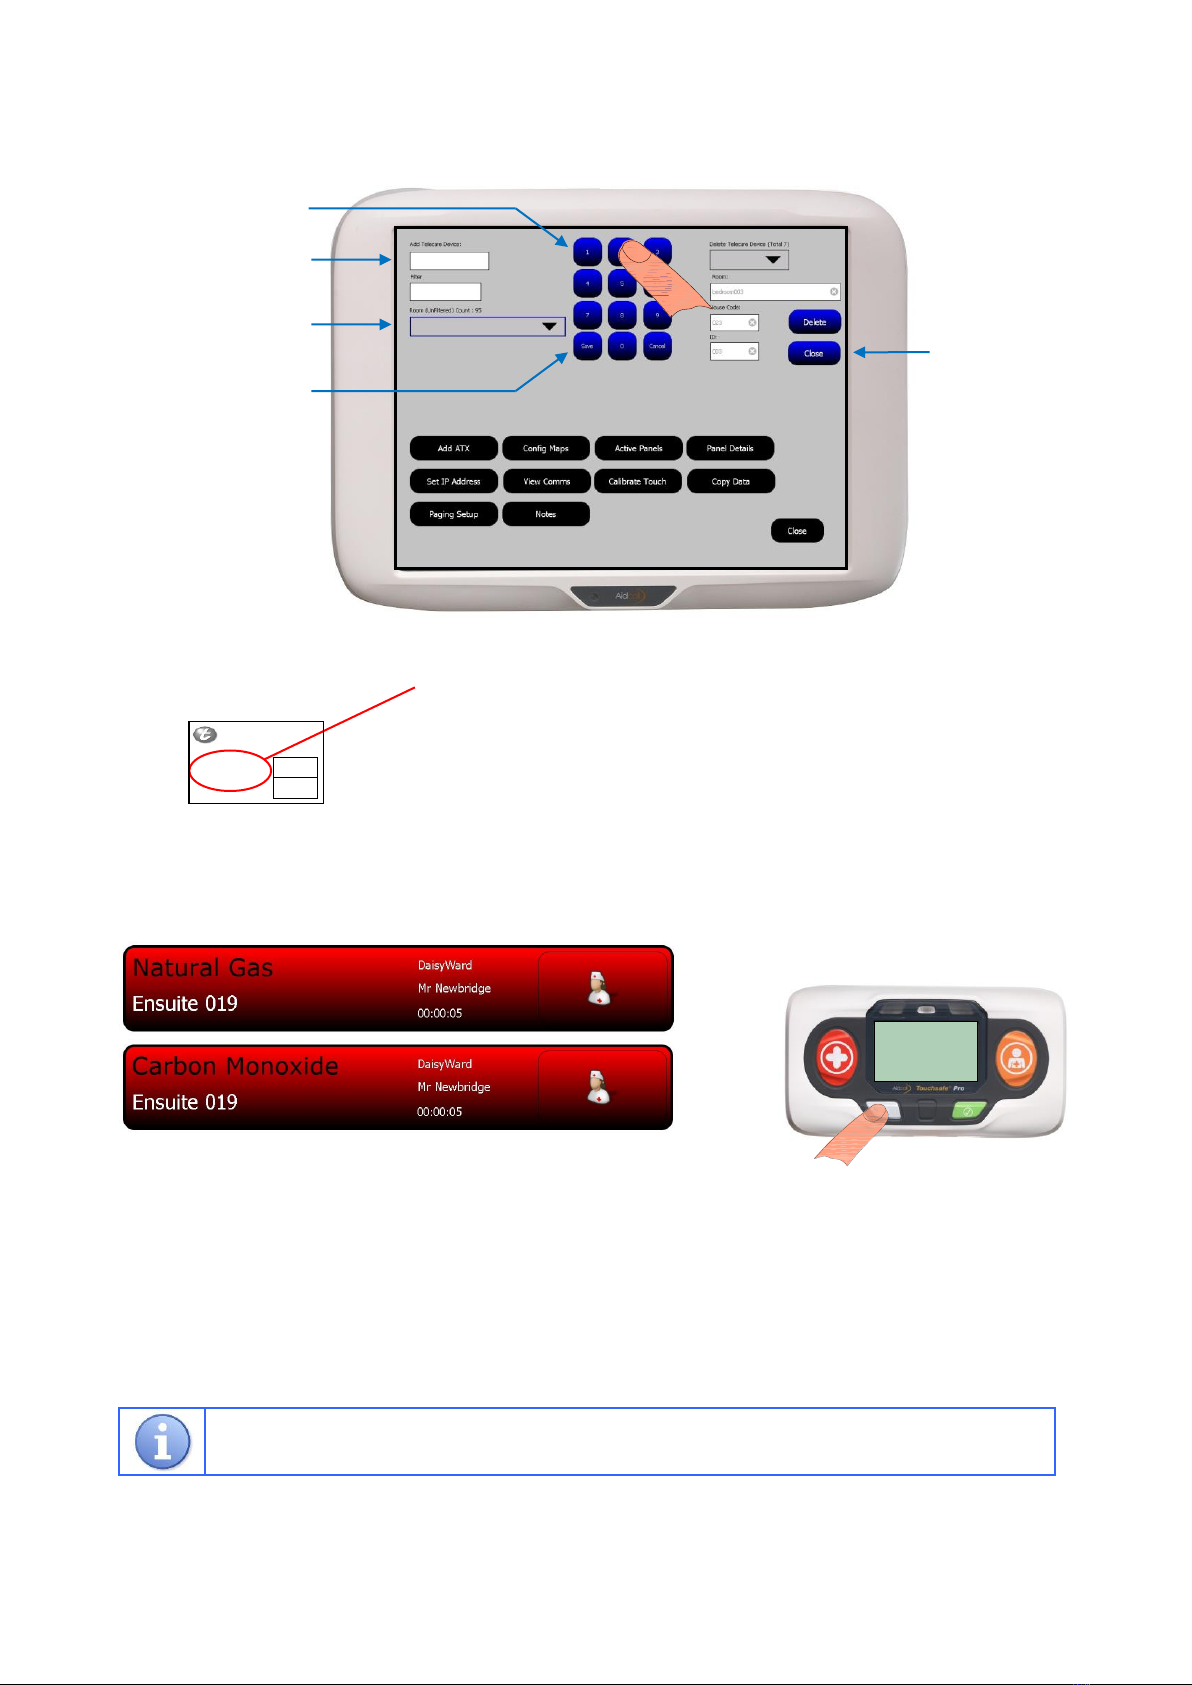
In Case of Gas Alarm
If gas is detected the RED “ALARM GAS”light will illuminate, and the audible alarm will sound.
Put out all naked flames.
Don’t smoke. Don’t use naked flames.
Don’t turn electrical switches on or off.
Turn the gas off at the supply.
Open windows and doors to ventilate the area.
The alarm will silence when the gas is cleared. If the alarm continues to sound and the leak cannot be found, vacate the premises
and inform the Gas Emergency Service immediately.
In Case of Carbon Monoxide Alarm
If carbon monoxide is detected the RED “ALARM CO”light will illuminate, and the audible alarm will sound.
Open windows and doors to ventilate the area.
If the alarm stops it is safe for a qualified person to find the cause of the alarm.
If the alarm continues turn the appliance off and do not use until it has been checked by a qualified person.
Get medical help for anyone suffering headaches or nausea, advise that carbon monoxide poisoning is suspected.
In Case of Fault
If the YELLOW “FAULT”light illuminates the self test feature has detected a fault with the sensor.
The unit is probably defective and must be replaced.
After 6 years the YELLOW light will blink continuously, and the unit will emit a beep every hour.
The sensor has exceeded its useful life and must be replaced.
False Alarms
It is possible aerosol sprays, alcohol used in cooking, cigarette, cigar or
pipe smoke, gas from a cigarette lighter, strong household cleaning
agents, polishes or solvents may cause false alarms.
Cleaning and Care
It is recommended to clean the gas & CO detector periodically using the nozzle attachment on a vacuum
cleaner to remove dust, insects and cobwebs from the cover slots.
The detector can be wiped clean with a damp cloth, never use detergents or polish etc.
Avoid spraying any aerosols near the detector.
Decorating
Never paint the gas & CO detector itself.
Unplug the mains supply and cover the detector when decorating to
avoid contamination from water or dust.
Battery Life
The transmitter battery is checked once a day, if the voltage falls and stays below a preset level for 7 consecutive days a low
battery alert is automatically transmitted. Once a low battery call is received the gas & CO detector should be replaced within 7
days. The gas & CO detector must be returned to Tynetec/Aidcall for battery replacement.
Detailed information on battery management for all Tynetec/Aidcall products is available - request Doc No. FM0630.
TRANSMIT
CO
TRANSMIT
GAS
Doc No. FM0471 issue G Page 3
TRANSMIT
GAS
TRANSMIT
CO
Registering a Gas & CO Detector onto a Reach at-home alarm unit
1. Put the Reach unit into radio device learn mode…
2. Activate the gas & CO detector…
3. Exit radio device learn mode…
4. Check with the Control Centre that it is convenient to perform a test call, first activate a gas test call and confirm they receive a
gas alarm call, then activate a CO test call and confirm they receive a carbon monoxide alarm call.
Deleting a Gas & CO Detector from a Reach at-home alarm unit
Enter 1 6 7 0 using the keypad on the rear of the Reach unit –the front light will FLASH FAST GREEN and the unit will announce
“Program Mode - Ready”.
Enter # 0 4 1 and the Reach will announce “Delete Radio Device” followed by a “Beep”.
Enter the 8 digit gas detector IDto be deleted and wait for the “Beep”
Enter the 8 digit CO detector IDto be deleted, after the “Beep” press #to exit.
Press the key to exit Program Mode; the unit will sound a “Double-Beep” and the front light will return to STEADY GREEN.

Both 8 digit ID’s can be found on a label on the back of the gas & CO detector –they will always start with 44xxxxxx and 49xxxxxx.
The instructions given above for the standard Reach product also applies to the Reach Plus, Reach Plus GSM
and Reach Ultra models. Refer to the instruction booklets provided with these products for more information
on programming and testing radio devices.
“Trigger
Radio
Device”
Press and HOLD the GREEN button on the Reach unit.
When the front light FLASHES FAST GREEN release the
button and the Reach will announce “Trigger Radio Device”.
You now have 1 minute to activate the gas & CO detector.

Press the GREEN button on the Reach unit.
The front light will return to STEADY GREEN and the Reach
is back in normal operating mode.

Press the TRANSMIT GAS button once and the Reach will
announce “Gas”.
Wait for about 10 seconds then…
Press the TRANSMIT CO button once and the Reach will
announce “Carbon Monoxide”.


Doc No. FM0471 issue G Page 4
TRANSMIT
GAS
TRANSMIT
CO
Registering a Gas & CO Detector onto an Advent xt warden call system
1. Put the Advent xt system into radio device learn mode…
2. Activate the gas & CO detector…
3. Exit the Advent xt system radio device learn mode…
4. First activate a gas test call and check a gas alarm call is reported on the warden call system, then activate a CO test call and
check a carbon monoxide alarm call is reported.
Deleting a Gas & CO Detector from an Advent xt warden call system
Press the LINE key and wait for the “Ready” prompt.
Enter 5 0 0 1 followed by the key.
Enter the flat number the gas detector is being deleted from followed by the key.
Press the TRANSMIT GAS button on the gas & CO detector to be deleted.
Wait for the “Pendant Disabled –Enter Flat” prompt.
Press the TRANSMIT CO button on the gas & CO detector to be deleted.
Wait for the “Pendant Disabled –Enter Flat” prompt.
Press the #key and wait for the “Ready” prompt, then press the LINE key to clear the connection.
Refer to the Advent xt operators manual (Doc No. FM0420) provided with the warden call system for more
information on programming and testing radio devices.
Using the Manager’s DECT telephone;
Press the LINE key and wait for the “Ready” prompt.
Enter 5 0 0 0 followed by the key.
Enter the flat number the gas & CO detector is being installed in
followed by the key.
You now have 1 minute to activate the gas & CO detector.
“Ready”
Using the Manager’s DECT telephone;
Press the #key and wait for the “Ready” prompt.
Press the LINE key to clear the connection and the warden call system is
now back in normal operating mode.
Press the TRANSMIT GAS button once.
Wait for the “Enter Location Code” prompt then press 0
(no location) followed by the key.
Wait for the “Pendant Enabled –Enter Flat” prompt.
Press the TRANSMIT CO button once.
Wait for the “Enter Location Code” prompt then press 0
(no location) followed by the key.
Wait for the “Pendant Enabled –Enter Flat” prompt.
“Ready”


Doc No. FM0471 issue G Page 5
TRANSMIT
GAS
TRANSMIT
CO
Registering a Gas & CO Detector onto anAltec Response local carer alarm unit
1. Put the Altec Response unit into radio device learn mode…
2. Activate the gas & CO detector…
3. Exit the Altec Response radio device learn mode…
4. Activate the gas detector and check a gas alarm call is displayed on the Altec Response unit.
Deleting a Gas & CO Detector from an Altec Response local carer alarm unit
Press ENTER to activate the wake-up display then ENTER again to display the main menu
Press ENTER to select Radio Devices 
Press the key to select Delete Device then press ENTER
The display will prompt you to “Trigger the Sensor”
Press the TRANSMIT GAS button on the gas & CO detector to be deleted - the display will show the device type and its 8 digit ID
If this is the device you activated press the key to select Delete then press ENTER
Press the TRANSMIT CO button on the gas & CO detector to be deleted - the display will show the device type and its 8 digit ID
If this is the device you activated press the key to select Delete then press ENTER
Note: if the ID is NOT the device you activated press the ENTER key to select Reject then try again
To exit the mode select Exit then press the ENTER key.
Refer to the Altec Response installation guide (Doc No. FM0548) provided with the portable alarm unit for
more information on programming and testing radio devices.
Press the TRANSMIT GAS button once.
The display will show Gas Alarm and the gas detector 8 digit ID number.
Check the ID is correct, press the key to select Accept then
press ENTER. Note: if another device has been picked-up press
ENTER to Reject and try again.
The display will show Flat , use the & keys to choose the
dwelling type.
Press the key to select No: 000000 then press the ENTER key.
Use the & keys to select each digit of the flat number and the
& keys to move between digits then press the ENTER key.
Press key several times to select Exit then press the ENTER key.
The display will prompt you to “Trigger the Sensor”again.
Press the TRANSMIT CO button and repeat as above.
Press ENTER to activate the wake-up display then ENTER again to display
the main menu.
Press ENTER to select Radio Devices 
Press ENTER to select Learn Device 
The display will prompt you to “Trigger the Sensor”.
You now have 20 seconds to activate the gas & CO detector.
From the Learn Device menu select Exit then press ENTER.
From the Radio Devices menu select Exit then press ENTER.
The display will return to the wake-up screen and go blank after 10 seconds.
The Altec Response is now back in normal operating mode.
tynetec
tynetec


Doc No. FM0471 issue G Page 6
Registering a Gas & CO Detector onto aTouchsafe Pro Nursecall system
1. Put the Touchsafe Pro Master Panel into Telecare registration mode; touch the screen and Logon as an Engineer or a Manager
(password required), then from the main menu page touch the Telecare button to open the screen shown below…
2. Enter the gas and CO detector ID’s…
3. Press the Close button to exit Telecare mode and the Nursecall panel is now back in normal operating mode.
4. Activate both gas and CO test calls and check they are displayed on the Nursecall panel like this…
The screen banner is red for a gas and CO alarm call (Touch the banner to display notes).
A gas or CO alarm call cannot be accepted or silenced from the screen.
You must visit the appropriate Nursecall Call Point to cancel the call.
Deleting a Gas & CO Detector from a Touchsafe Pro Nursecall system
Select the gas detector ID to be deleted from the Delete Telecare Device pull-down list box (prefixed “T44”).
Details of the gas detector selected will be displayed in the Room, House Code and ID boxes below.
If the details shown are correct press the Delete button.
Select the CO detector ID to be deleted from the Delete Telecare Device pull-down list box (prefixed “T49”) and repeat as above.
Press the Close button to exit.
Refer to the Touchsafe Pro Display Panel user guide (Doc No. FM5505) provided with the Nursecall system for
more information.
Tynetec and Aidcall operate a policy of continuous improvement and reserve the right to change product specifications without notice.
If any variation to the details contained in this document are suspected please contact Tynetec’s customer support dept on 01670 352371.
Both 8 digit ID’s are printed on a label on the rear of the gas & CO detector.
Note: the ID’s will always start with 44xxxxxx (gas) and 49xxxxxx (CO).
Touch the Add Telecare Device box then use the on-screen keypad to enter the gas ID.
Hint: enter a zone in the Filter box to narrow the search for the room (see below).
Select the users Call Point ID from the Room pull-down list box then press Save.
Note: this is the room unit that will be will be used to cancel the call.
Touch the Add Telecare Device box again and repeat as above for the CO ID.
Use keypad to enter
8 digit ID’s* here
Select the relevant
Call Point ID here
Save when done
Close to exit mode
On-screen keypad
CALLING
CANCEL
HC 345 ID 001
Press the LIGHT GREY
button to cancel the call
ZXT427 W66283
Ser: 10151313
ID: 44037640
ID: 49040302
EE0775 V1.01A
MC
*Note: both gas and CO
ID’s must be entered;
Prefix 44 = Gas
and Prefix 49 = CO

Other LEGRAND Gas Detector manuals

LEGRAND Galea Life 7756 78 User manual

LEGRAND

LEGRAND Galea Life 7756 78 User manual

LEGRAND Tynetec Aidcall ZXT486 User manual

LEGRAND

LEGRAND Tynetec Aidcall ZXT486 User manual

LEGRAND Tynetec ZXT812 User manual

LEGRAND

LEGRAND Tynetec ZXT812 User manual

LEGRAND 6827 01 User manual

LEGRAND

LEGRAND 6827 01 User manual

LEGRAND 675 28 User manual

LEGRAND

LEGRAND 675 28 User manual

LEGRAND 6827 00 User manual

LEGRAND

LEGRAND 6827 00 User manual

Popular Gas Detector manuals by other brands

Atest Gaz SmArtGas 4 user manual

Atest Gaz

Atest Gaz SmArtGas 4 user manual

S&S Northern Merlin 1000BH Installation operation & maintenance

S&S Northern

S&S Northern Merlin 1000BH Installation operation & maintenance

Emerson MRLDS-450 installation guide

Emerson

Emerson MRLDS-450 installation guide

MSA Ultima X operating manual

MSA

MSA Ultima X operating manual

New Cosmos Electric KD-12 instruction manual

New Cosmos Electric

New Cosmos Electric KD-12 instruction manual

Comelit 47RTS282EO user manual

Comelit

Comelit 47RTS282EO user manual

Heath Consultants RMLD-FR Operator's manual

Heath Consultants

Heath Consultants RMLD-FR Operator's manual

Aereco S-CO2/T Installation and maintenance  instruction

Aereco

Aereco S-CO2/T Installation and maintenance instruction

New Cosmos Electric PS-7-M Communication Specifications Guide

New Cosmos Electric

New Cosmos Electric PS-7-M Communication Specifications Guide

New Cosmos Electric PS-7-M instruction manual

New Cosmos Electric

New Cosmos Electric PS-7-M instruction manual

Duomo BX316 manual

Duomo

Duomo BX316 manual

sewerin EX-TEC SNOOPER H operating instructions

sewerin

sewerin EX-TEC SNOOPER H operating instructions

Dräger Ethylene glycol 10 Instructions for use

Dräger

Dräger Ethylene glycol 10 Instructions for use

Inficon GAS-Mate operating manual

Inficon

Inficon GAS-Mate operating manual

Riken Keiki TP-70DGII operating manual

Riken Keiki

Riken Keiki TP-70DGII operating manual

Sentry ST313A instruction manual

Sentry

Sentry ST313A instruction manual

CGS Merlin CO2 TFT Installation operation & maintenance

CGS

CGS Merlin CO2 TFT Installation operation & maintenance

Geca CTM21 user manual

Geca

Geca CTM21 user manual

manuals.online logo
manuals.online logoBrands
  • About & Mission
  • Contact us
  • Privacy Policy
  • Terms and Conditions

Copyright 2025 Manuals.Online. All Rights Reserved.