manuals.online logo
Brands
  1. Home
  2. •
  3. Brands
  4. •
  5. Lelit
  6. •
  7. Coffee Maker
  8. •
  9. Lelit PL042EMI User manual

Lelit PL042EMI User manual

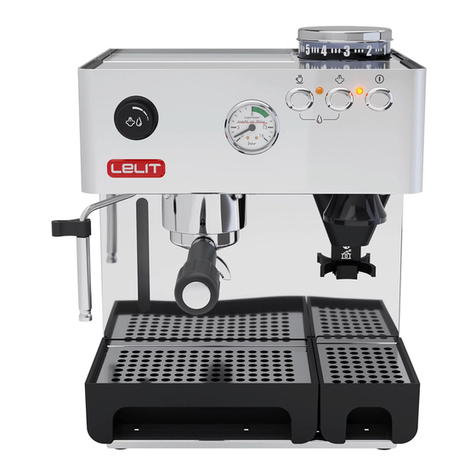
PL042EMI
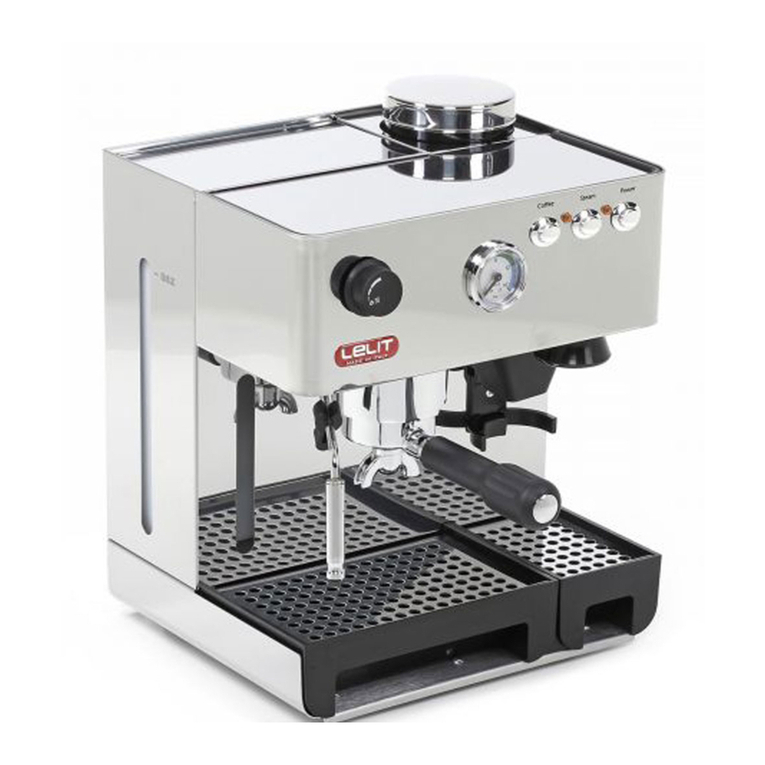
ESPRESSO MACHINE WITH BUILT-IN GRINDER
Pag. 2
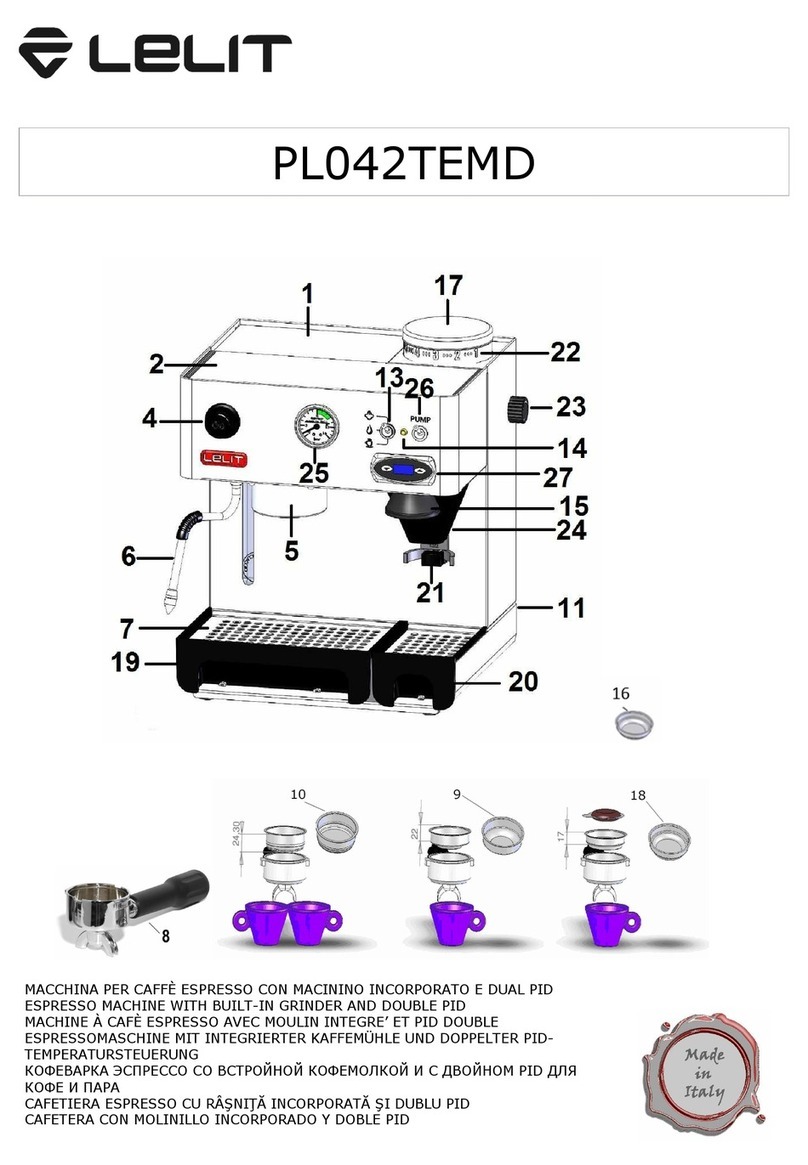
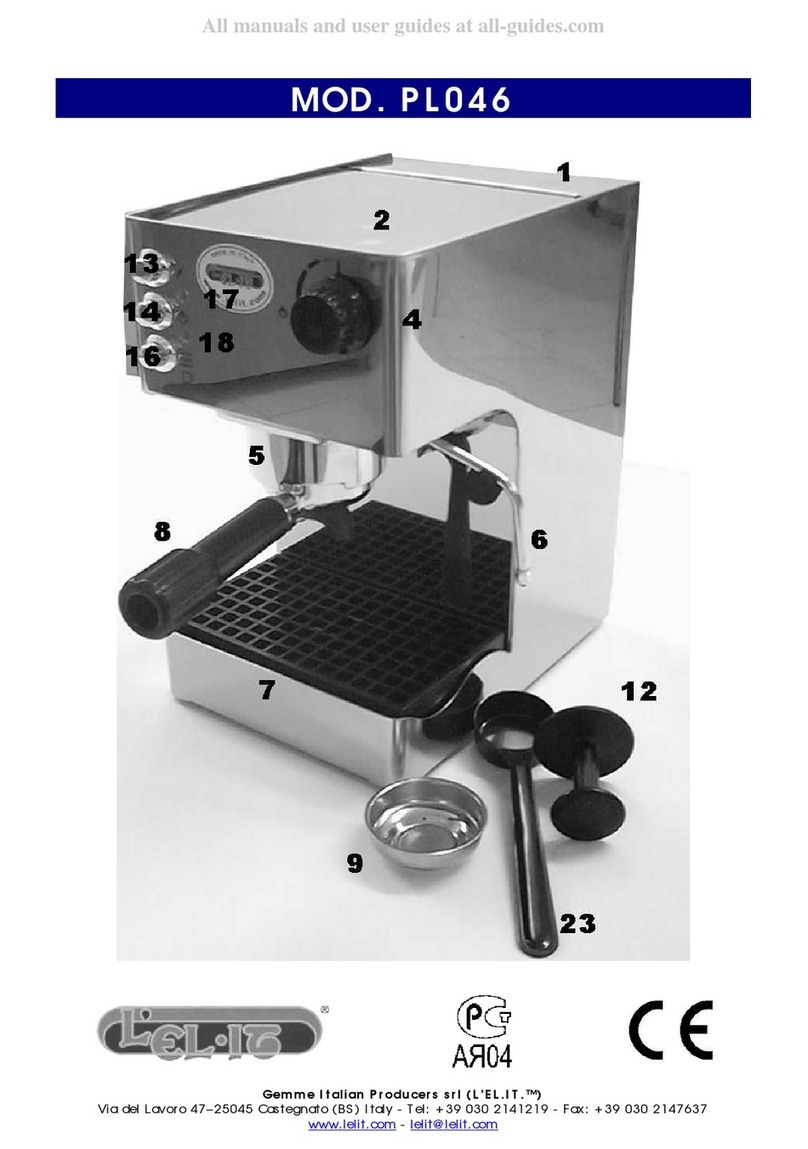
COMPONENTS :
1. Cold wat r tank
2. Cup warm r
3. St am/coff pilot light
4. St am/hot wat r knob
5. Strain r hold r r taining ring
6. St am/hot wat r tub
7. R movabl cup r st
8. Strain r hold r
9. Singl cup strain r
10. Two cup strain r
11. On/off switch
12. St am switch
13. Coff /hot wat r switch
14. Indicator light: machin on
15. Coff pr ss
17. Coff b ans contain r
18. Filt r for pods
19. R movabl wat r drainag tray
20. R movabl ground coff tray
21. Ground coff switch
22. Grinding d gr scal
23. Grinding r gulation knob
24. Ground coff distributor
25. Manom t r
USER INSTRUCTIONS
Starting the machine:
1. R mov th machin from its packing and mak sur all packing parts hav b n tak n off (including th
prot ction bags).
2. Lay th machin on a flat and st ady surfac far away from hot plac s and from th wat r taps.
3. R mov th wat r tank cov r on th back of th machin and tak out th wat r tank (1) paying att ntion not
to damag th wat r tub s insid it.
4. Fill th tank (1) with cold wat r.
5. R plac th wat r tank back in th machin and ch ck that th wat r tub s ar not b nt and that th filt r is
w ll s t on on of th m.
6. Plug in th machin in th mains. Mak sur that th wall sock t is of th right voltag .
7. Plac th filt r hold r (8) und r th br wing group (5) and turn it from th l ft to th right. L av it th r so
that it can g t warm and it g ts r ady for us .
8. Switch th machin on by pr ssing th on/off switch (11). Th built-in light (14) com s on to confirm th pow r
supply.
9. Op n th st am/hot wat r knob (4).
10. Pr ss th st am switch (12) and th coff /hot wat r switch (13).
11. Wh n wat r com s out of th st am spout (6), pr ss th coff /hot wat r switch (13) and th st am switch
(12) again and clos th st am/hot wat r knob (4).
12. Aft r compl ting all th s op rations, l av th machin on.
Grinding adjustment:
13. As a r f r nc for th grinding d gr , a grinding d gr scal (20) has b n plac d on th coff b ans
contain r (19): “7.6.5.4.3.2.1”
14. By taking as a point of r f r nc th tally mark in th machin fram and by turning grinding r gulation knob
(23), th grinding d gr scal will turn accordingly.
15. Choos high r d gr s to g t coars -ground coff , or small r d gr s to g t fin -ground coff .
16. A corr ct grinding d gr (taking into consid ration th various coff bl nds) is ss ntial to g t a good cup of
coff . W sugg st d gr 3 to g t a m dium grinding.
Preparing an espresso coffee:
17. Ch ck that th tank (1) contains wat r.
18. Pr ss th on/off switch (11). Th light (14) and th pilot light (3) will com on. Do this op ration only if th
machin is off. If it’s on pass to th following point.
19. As soon as th pilot light (3) go s off, th machin is r ady for us .
20. Plac th singl cup strain r (9) or th two cup strain r (10) in th strain r hold r (8) as d scrib d in point 4.
21. Drop th b an coff in th bowl (17)
22. Pr ss th button (21) with th strain r hold r (8) to activat th coff grind r. Wh n you hav got th d sir d
coff quantity, tak th strain r hold r (8) off.
23. Pack th coff in th strain r against th pr ss (15).
24. Ins rt th strain r hold r (8) in th r taining ring (5) and turn it hard to th right; plac th cups on th
r movabl cup r st (7).
25. Pr ss th coff /hot wat r switch (13).
26. Wh n you hav got th right quantity of coff , pr ss th switch coff /hot wat r again (13).
27. R mov th strain r hold r (8) and throw away th coff grounds.
Preparing an espresso ith the use of coffee pods:
28. Ch ck that th wat r tank (1) has b n fill d in with wat r.
29. Pr ss th on/off switch (11): th indicator light: machin on (14) and th indicator light: st am/coff r ady (3)
will com on. Do this op ration only if th machin is off. If it’s on pass to th following point.
30. As soon as th indicator light: st am/coff r ady (3) go s off, th machin is r ady for us .
31. Fit th pod filt r (18) into th filt r hold r (8) that has b n warm d up by l aving it attach d to th br wing
group as d scrib d in point 4.
32. Op n th singl pack d pod not damaging th pod.
33. Plac th pod in its filt r (18).
Pag. 3
34. Ins rt th filt r hold r (8) in th br wing group ring (5), turn it from l ft to right with forc , th n put th cup on
th r movabl wat r drainag tray (7).
35. Push th coff /hot wat r switch (13).
36. Onc you g t th coff d sir d quantity, push th coff /hot wat r switch (13) again.
37. R mov th filt r hold r (8) and throw away th us d pod.
Steam:
38. Ch ck that th wat r tank (1) has b n fill d in with wat r.
39. Pr ss th on/off switch (11): th indicator light: machin on (14) and th indicator light: st am/coff r ady (3)
will com on. Do this op ration only if th machin is off. If it’s on pass to th following point.
40. Pr ss th st am switch (12).
41. As soon as th light: st am/coff r ady (3) go s off, th machin is r ady for us .
42. Op n th st am/hot wat r knob (4). First som wat r will flow out and th n th st am.
43. Put th cup with th d sir d infusion und r th st am tub (6) and turn th knob compl t ly.
44. Wh n th drink has b n suitably froth d, clos th st am/hot wat r knob (4) and pr ss th st am switch (12)
again.
45. R op n th st am/hot wat r knob (4) and r pr ss th st am switch (12) and th coff /hot wat r switch (13)
again. Wh n th wat r flows out of th st am tub (6), clos th st am/hot wat r knob (4) again and at th
sam tim pr ss th coff /hot wat r switch (13) and th st am switch (12) again. Cl an car fully th
st am/hot wat r tub (6).
Hot ater:
46. Ch ck that th wat r tank (1) has b n fill d in with wat r.
47. Pr ss th on/off switch (11): th indicator light: machin on (14) and th indicator light: st am/coff r ady (3)
will com on. Do this op ration only if th machin is off. If it’s on pass to th following point.
48. As soon as th light: st am/coff r ady (3) go s off, th machin is r ady for us .
49. Op n th st am/hot wat r knob (4).
50. Pr ss th st am switch (12) and th hot coff /hot wat r switch (13). Hot wat r will flow out from th st am
tub (6) imm diat ly.
51. Onc you hav got th d sir d quantity of wat r, r pr ss th st am switch (12) and th coff /hot wat r switch
(13) again and clos th st am/wat r knob (4).
52. Aft r obtaining hot wat r from th tub , mak sur that th r is still wat r in th tank (1).
Useful Tips:
−Th strain rs (9 and 10) do not n d to b wash d aft r v ry singl us but w sugg st ch cking that th
hol s ar not obstruct d.
−For a b tt r r sult, w sugg st k ping th cups warm on th cup-warm r (2) which only op rat s by machin
on.
Routine maintenance and precautions:
−It is r comm nd d to cl an, aft r ach us , th st am tub and th strain r hold r car fully
−For cl aning it is r comm nd d th us of a w t damp cloth
−Do not l av th machin outdoor. And do not imm rs th machin in wat r.
−Th machin can b us d only by adults and must b k pt away from childr n
−Do not wash strain r and strain r hold r in dishwash r.
TECHNICAL DATA:
Voltag : 230 V - 50 Hz; 120 V – 60 Hz Wat r tank: 2.7 litr s
Pow r: 1200 W Dim nsions (HxLxD): 39*33*42 cm
H ating tim : ca. 3 min. W ight: 12.2 kg
Pump pr ssur : 15 bar To b op rat d with ground coff and coff pods
LEGAL WARRANTY
This product is cov r d by th warranty laws valid in th country wh r th product has b n sold; sp cific
information about th warranty t rms can b giv n by th s ll r or by th import r in th country wh r th product
has b n purchas d. Th s ll r or import r is compl t ly r sponsibl for th product.
Th import r is compl t ly r sponsibl also for th fulfillm nt of th laws in forc in th country wh r th import r
distribut s th product, including th corr ct disposal of th product at th nd of its working lif .
Insid th Europ an countri s th laws in forc ar th national laws impl m nting th EC Dir ctiv 44/99/CE.
Th ins rt d data and pictur s can b subj ct to chang s without pr vious notic for th improv m nt of th
machin ’s p rformanc s.
TROUBLESHOOTING:
D ar Custom r,
W thank you for buying on of our products, mad in accordanc with th most up-to dat t chnological innovations.
Following car fully th simpl op rations of us contain d in this manual, which comply with ss ntial saf ty
r gulations, you will g t th b st p rformanc s and notic th r markabl r liability of this product along th y ars.
You find h r b low an asy tabl d scribing som malfunctioning of th machin with its solutions:
Pag. 4
PROBLEM CAUSE SOLUTION
Coff is produc d
without froth.
1. Coff not suitabl for machin
2. Improp r grind
3. Too littl coff in filt r
4. Th filt r hold r has not b tight n d
und r th br wing group ring
1. Us diff r nt coff
2. Adjust coff grind
3. Put mor coff in th filt r
4. Tight n b tt r th filt r hold r
Coff too cold
1. Th machin had not r ach d th
prop r t mp ratur
2. Filt r-hold r not pr h at d
3. Cups not pr h at d
4. Pr ssur switch malfunction.
1. S s ction “Starting the Machine” and “Making
an Espresso Coffee”
2. Filt r-hold r must b h at d tog th r with th
wat r – s s ction “Starting the Machine”
3. Prop rly h at th cups on th cup-warm r
4. Contact th n ar st SERVICE CENTER
Coff produc d too
quickly
1. Coff too coars ly ground
2. Not nough coff in th filt r
3. Coff not pr ss d nough
4. Coff /pod old or unsuitabl
1. Us a fin r grind
2. Put mor coff in th filt r
3. Pr ss coff mor firmly
4. Us diff r nt coff /pod
Coff l aks
b tw n th coff
group and th filt r-
hold r
1. Filt r-hold r not prop rly ins rt d
2. Too much coff in th filt r
3. Edg of th filt r-hold r not cl an
4. Th douch s al is worn or damag d
1. Ins rt th filt r-hold r corr ctly
2. Put l ss coff in th filt r
3. Cl an th dg of th filt r-hold r
4. Contact th n ar st SERVICE CENTER
Coff is produc d in
drips
1. Coff too fin ly ground
2. Too much coff in th filt r
3. Coff too firmly pr ss d
1. Us a coars r grind
2. Put l ss coff in th filt r
3. Pr ss th coff mor g ntly
Th machin do s
not produc st am
1. Obstruct d outl t hol at nd of
st am pip
2. Too littl wat r in tank
1. Cl an th outl t hol with a n dl
2. S s ction “Starting the Machine”
No coff produc d
during th coff
cycl
1. Too littl wat r in tank
2. St am switch on
3. Coff too fin ly ground
4. Too much coff in th filt r
5. Coff too firmly pr ss d
6. Show r plat obstruct d
1. Fill tank
2. Turn off th st am switch
3. Us a coars r grind
4. Put l ss coff in th filt r
5. Pr ss th coff mor g ntly
6. Contact th n ar st SERVICE CENTER
Th machin do s
not work and th ON
light do s not turn
on
1. No l ctricity
2. Th main cabl is not prop rly
plugg d in
3. Th main cabl s damag d
1. R stor l ctrical pow r
2. Plug th main cabl in corr ctly
3. Contact th n ar st SERVICE CENTER for a
r plac m nt cabl
Th ON light is on
but th wat r do s
not h at
1. Th rmostat malfunction,
2. H ating l m nt malfunction
1. Contact th n ar st SERVICE CENTER
2. Contact th n ar st SERVICE CENTER
IMPORTANT INFORMATION FOR CORRECT DISPOSAL OF THE PRODUCT IN
ACCORDANCE WITH EC DIRECTIVE 2002/96/EC
At th nd of its working lif , th product must not b dispos d of as urban wast . It must b
tak n to a sp cial local authority diff r ntial wast coll ction c ntr or to a d al r providing this
s rvic . Disposing of a hous hold applianc s parat ly avoids possibl n gativ cons qu nc s
for th nvironm nt and h alth d riving from inappropriat disposal of nabl s th constitu nt
mat rials to b r cov r d to obtain significant savings in n rgy and r sourc s. As a r mind r
of th n d to dispos of hous hold applianc s s parat ly, th products is mark d with a
cross d-out wh l d dustbin.
EC DECLARATION OF CONFORMITY
G mm Italian Produc rs srl d clar s und r its own r sponsibility that th products
PL042EMI/
PL042EMIAUS,
to which this d claration r lat s, ar in accordanc with th
provisions of th sp cific dir ctiv s:
CEI EN 60335-1, CEI EN 60335-2-15
It also d clar s that th abov m ntion d products conform with th l ctromagn tic
compatibility t st EMC.
NB: Th pr s nt d claration voids should th machin b modifi d without our sp cific
authorization.
Cast gnato, 02/01/2013
Amministrator D l gato
AB 01
Gemme Italian Producers srl
Via del Lavoro 45 - I - 25045 Castegnato (BS) Italy
Tel: +3 030 21411 - Fax: +3 030 2147637
www.lelit.com - lelit@lelit.com - P.Iva 03426 20173
Other manuals for PL042EMI

1

Other Lelit Coffee Maker manuals

Lelit PL61 User manual

Lelit

Lelit PL61 User manual

Lelit Vip Line Elizabeth-PL92T User manual

Lelit

Lelit Vip Line Elizabeth-PL92T User manual

Lelit PL41LEM User manual

Lelit

Lelit PL41LEM User manual

Lelit PL41TEM User manual

Lelit

Lelit PL41TEM User manual

Lelit Victoria PL91T User manual

Lelit

Lelit Victoria PL91T User manual

Lelit PL042EMI User manual

Lelit

Lelit PL042EMI User manual

Lelit PL41TEM User manual

Lelit

Lelit PL41TEM User manual

Lelit PL41LEM User manual

Lelit

Lelit PL41LEM User manual

Lelit PL042E User manual

Lelit

Lelit PL042E User manual

Lelit PL162T-EU Service manual

Lelit

Lelit PL162T-EU Service manual

Lelit PRO Line MaraX PL62X User manual

Lelit

Lelit PRO Line MaraX PL62X User manual

Lelit Pro Line - Mara PL62 User manual

Lelit

Lelit Pro Line - Mara PL62 User manual

Lelit PL60PLUST User manual

Lelit

Lelit PL60PLUST User manual

Lelit PL042E User manual

Lelit

Lelit PL042E User manual

Lelit PL41TEM/110 User manual

Lelit

Lelit PL41TEM/110 User manual

Lelit Giulietta PL1SVH User manual

Lelit

Lelit Giulietta PL1SVH User manual

Lelit PL41PLUS User manual

Lelit

Lelit PL41PLUS User manual

Lelit PL042E User manual

Lelit

Lelit PL042E User manual

Lelit PL042TEMD User manual

Lelit

Lelit PL042TEMD User manual

Lelit Pro Line - Mara PL62 User manual

Lelit

Lelit Pro Line - Mara PL62 User manual

Lelit PL042EMZ User manual

Lelit

Lelit PL042EMZ User manual

Lelit Pro Line - Mara PL62S User manual

Lelit

Lelit Pro Line - Mara PL62S User manual

Lelit PL92T User manual

Lelit

Lelit PL92T User manual

Lelit PL60T User manual

Lelit

Lelit PL60T User manual

Popular Coffee Maker manuals by other brands

Krups KM442 manual

Krups

Krups KM442 manual

SEVERIN S2+ One Touch instruction manual

SEVERIN

SEVERIN S2+ One Touch instruction manual

AEG CaFamosa operating instructions

AEG

AEG CaFamosa operating instructions

Philips HD7825/10 Service manual

Philips

Philips HD7825/10 Service manual

WMF I800S user manual

WMF

WMF I800S user manual

ARIETE Moka Aroma Espresso 1337 manual

ARIETE

ARIETE Moka Aroma Espresso 1337 manual

Nivona CafeRomatica 720 Operating instructions and useful tips

Nivona

Nivona CafeRomatica 720 Operating instructions and useful tips

Korona 12203 instruction manual

Korona

Korona 12203 instruction manual

Salton Thermal Cafe ME8DSB Use and care guide

Salton

Salton Thermal Cafe ME8DSB Use and care guide

Teesa Aroma 800 owner's manual

Teesa

Teesa Aroma 800 owner's manual

Grindmaster American Metal Ware LCD2-3 parts list

Grindmaster

Grindmaster American Metal Ware LCD2-3 parts list

Küppersbusch cafe profi EKV 6600.0 operating instructions

Küppersbusch

Küppersbusch cafe profi EKV 6600.0 operating instructions

Magio MG-964 instruction manual

Magio

Magio MG-964 instruction manual

Miele CVA 7445 Operating and installation instructions

Miele

Miele CVA 7445 Operating and installation instructions

Philips Senseo HD7806/50 Service manual

Philips

Philips Senseo HD7806/50 Service manual

Saeco Incanto HD8918 manual

Saeco

Saeco Incanto HD8918 manual

Oster BVSTEM3199 instruction manual

Oster

Oster BVSTEM3199 instruction manual

Siemens EQ.7 Series user manual

Siemens

Siemens EQ.7 Series user manual

manuals.online logo
manuals.online logoBrands
  • About & Mission
  • Contact us
  • Privacy Policy
  • Terms and Conditions

Copyright 2025 Manuals.Online. All Rights Reserved.