Lelit PKSB500N User manual

PKSB500N
PKSB500N APERTO / OPEN
PKSB500N CHIUSO / CLOSED
ASSE DA STIRO ASPIRANTE RISCALDATA CON CALDAIA INCORPORATA 5LT. A
RICARICA AUTOMATICA E MANUALE
HEATED VACUUM IRONING BOARD WITH 5LT. INCORPORATED BOILER WITH
MANUAL AND AUTOMATIC WATER REFILL
GEHEIZTES BÜGELBRETT MIT ABSAUGFUNKTION UND 5LT. DAMPFKESSEL MIT
MANUELLER UND AUTOMATISCHER WASSERNACHFÜLLUNG
ГЛАДИЛЬНАЯ ДОСКА С ПОДОГРЕВОМ, ОТСОСОМ И ВСТРОЕННЫМ
ПАРОГЕНЕРАТОРОМ 5 Л., С РУЧНОЙ И АВТОМАТИЧЕСКОЙ ПОДАЧЕЙ ВОДЫ

Pag. 2
Iron PG036/7 Steam brush PG036/5
Steam Gun PG036/6 Ironing board pedal

Pag. 3
Italiano
COMPONENTI (immagini di riferimento a pag. 2):
1. Cavo corrente
2. Ruote
3. Pedale aspirazione
4. Manopole per fissaggio asse
5. Spina ILME per connessione asse
6. Supporto stiramaniche/Reggifilo
7. Stiramaniche/Tubo “S”
8. Asta reggifilo
9. -
10. Piano d’appoggio generatore vapore
11. Rubinetto scarico acqua
12. Tasto accensione asse
13. Piano asse
14. -
15. Parte ignifuga del telo asse
16. Tappo caldaia
17. Tasto luminoso caldaia “boiler”
18. Tasto luminoso vapore “steam”
19. Spia fine acqua “water”
20. Presa ILME connessione asse
21. Spina ILME per connessione
ferro/accessori
22. Presa ILME connessione ferro/accessori
23. Telo asse
24. Telo stiramaniche
25. Manopola regolazione temperatura ferro
26. Pulsante vapore ferro (ferro non incluso)
27. Raccordo elettrovalvola
28. Interruttore sistema automatico di carico
dell’acqua
29. Manopola regolazione flusso di vapore in
uscita
30. Pulsante vapore spazzola (PG036/5 non
inclusa)
31. Pulsante vapore pistola vapore (PG036/6
non inclusa
32. Tubi per carica acqua automatica
ASSEMBLAGGIO PRODOTTO:
1. Estrarre tutte le parti del prodotto dalle scatole da imballo ed accertarsi di avere eliminato tutti
gli elementi d’imballo.
2. Posizionare la struttura su una superficie piana e stabile, vicino ad una presa corrente
corrispondente al voltaggio necessario per il corretto funzionamento del prodotto.
3. Fissaggio piano asse: alzare il piano dell’asse (13) in posizione orizzontale sulla struttura della
caldaia, fissandolo utilizzando le manopole (4) (già presenti sulla struttura).
4. Montaggio braccetto stiramaniche/reggifilo: inserire il tubo a “S” del braccetto stiramaniche
(7) nel perno già fissato sul supporto (6) e quindi inserire il perno saldato del braccetto
stiramaniche nel foro del tubo a “S” del braccetto. Sul medesimo supporto (6) fissare anche il
reggifilo (8) composto da due pezzi.
5. Togliere il generatore di vapore dalla scatola e assicurarsi di aver rimosso tutti i componenti di
imballaggio ed i sacchetti di protezione.
6. Posizionare il generatore di vapore sul piano di supporto (10) all’interno della struttura
dell’asse, tenendo il rubinetto scarico acqua (11) e il cavo corrente (1) verso l’esterno.
7. Inserire la spina ILME (5) del piano asse (13) nell’apposita presa ILME (20) sulla macchina.
8. Inserire la spina ILME (21) del ferro o dell’accessorio che si vuole usare nell’apposita presa
ILME (22) sulla macchina. Collegare il tubo vapore del ferro direttamente al raccordo
dell’elettrovalvola (27) e stringere la fascetta (in dotazione) con una tenaglia.
9. Prima di effettuare qualsiasi operazione sulla macchina, assicurarsi che il rubinetto (11) posto
sotto sia chiuso e che il raccordo a “ L” sia avvitato con l’uscita rivolta verso il basso.
10. Posizionare il ferro da stiro direttamente sulla porzione di telo dedicata (15), visivamente
individuabile (colore più scuro rispetto al resto del telo), in materiale ignifugo, progettato per
resistere alla temperatura della piastra del ferro durante il suo funzionamento normale.
ATTENZIONE: il telo dell’asse, ad eccezione della zona sopra indicata (15), NON ha le stesse
proprietà!
11. Agganciare l'asta reggi-filo (8) con il supporto (molla) al tubo del ferro.
ISTRUZIONI D’USO:
Funzionamento generatore con carica manuale –interruttore (28) spento “O”:
12. Accertarsi che l’interruttore (28) sia su posizione “0”= spento. Svitare il tappo (16) e riempire
la caldaia con max. 3,7 litri d’acqua, fare attenzione che non trabocchi, richiudere il tappo
(16).
13. Inserire la spina di alimentazione (1) nella rete

Pag. 4
Italiano
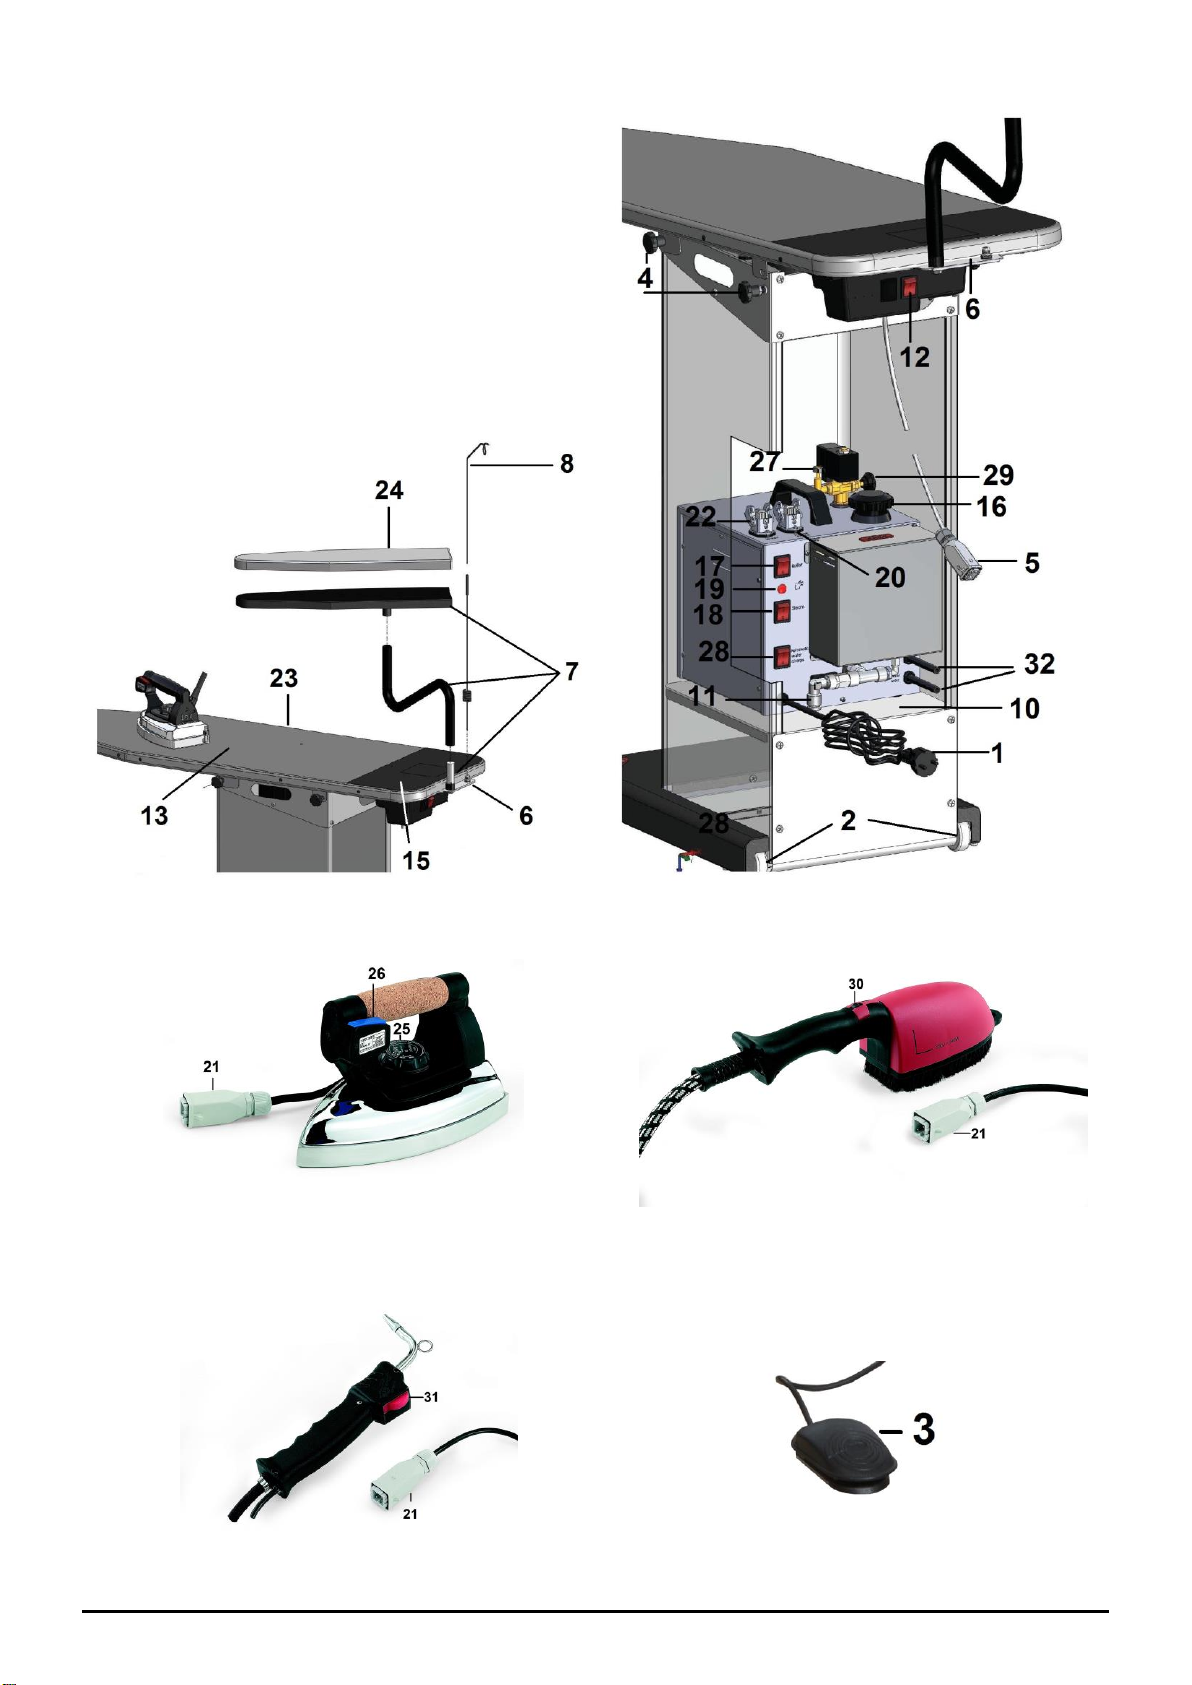
14. Premere l’interruttore luminoso caldaia (17) e l’interruttore luminoso vapore (18), che si
illumineranno a conferma dell’avvenuta accensione.
15. Posizionare la manopola di regolazione della temperatura (25) della piastra del ferro sulla
posizione “cotone” (segnato sulla manopola come “ooo”).
16. Attendere che la spia dell’interruttore caldaia (17) si spenga (tempo 15 min. circa); durante
l’esercizio è normale il riattivarsi della spia.
17. La macchina è pronta per l’uso.
18. Premere il pulsante vapore dell’accessorio (26/30/31).
19. E’ possibile regolare la quantità di vapore desiderata per mezzo dell’apposita manopola (29).
20. Se durante l’utilizzo il vapore smette di uscire e la spia dell’acqua (19) si accende, è segno che
l’acqua nella caldaia sta per finire (la caldaia non è completamente vuota); per riprendere la
stiratura spegnere l’interruttore caldaia (17). Premere il pulsante vapore per assicurarsi che
non vi sia più vapore, spegnere l’interruttore luminoso vapore (18), svitare lentamente il tappo
(16), accertarsi che non vi sia più emissione di vapore, attendere qualche minuto e riempire il
serbatoio con acqua possibilmente calda.
21. Alla prima richiesta di vapore, dopo l’accensione, potrebbe verificarsi un calo di pressione
dovuto al riempimento dei condotti interni della macchina. Per ottenere massimo vapore
attendere lo spegnimento dell’interruttore caldaia (17).
Funzionamento generatore con carica automatica –interruttore (28) acceso “I”:
22. Posizionare i due tubi (32) che escono dall’”Automatic System” in una tanica/fusto contenente
solo acqua.
23. Accertarsi che tutti gli interruttori siano spenti.
24. Per il corretto funzionamento della macchina la tanica/fusto deve sempre contenere acqua.
25. Inserire la spina di alimentazione (1) nella rete
26. Premere l’interruttore del sistema automatico (28) su “I”. Dopo 5 secondi la pompa inizia a
caricare acqua.
27. Quando il livello d’acqua nella caldaia è ottimale la pompa smette di funzionare e si possono
accendere l’interruttore luminoso vapore (18) e l’interruttore luminoso caldaia (17), che si
illumineranno a conferma dell’avvenuta accensione.
28. Durante l’utilizzo il riattivarsi della pompa è normale.
29. Posizionare la manopola di regolazione della temperatura della piastra (25) del ferro sulla
posizione “cotone” (segnato sulla manopola come “ooo”).
30. Attendere che la spia dell’interruttore caldaia (17) si spenga (tempo 15 min. circa); durante
l’esercizio è normale il riattivarsi della spia.
31. La macchina è pronta per l’uso.
32. Premere il pulsante vapore (26/30/31) dell’accessorio.
33. E’ possibile regolare la quantità di vapore desiderata per mezzo dell’apposita manopola (29).
34. Alla prima richiesta di vapore dopo l’accensione potrebbe verificarsi un calo di pressione
dovuto al riempimento dei condotti interni della macchina; per ottenere massimo vapore
attendere lo spegnimento dell’interruttore caldaia (17).
Funzionamento dell’asse:
35. Quando il tasto (12) è acceso, la funzione aspirante è comandata dal pedale (3). Si può usare
la funzione aspirante sia per agevolare la stesura dei capi sul piano dell’asse, sia quando si
vaporizza durante la stiratura per eliminare il vapore dall'abito.
36. Alla fine della stiratura è consigliabile lasciare l’asse aperta e l’interruttore resistenza asse (12)
acceso per qualche minuto per permettere al piano di lavoro (13) di asciugare l'eventuale
residuo di condensa formatasi durante la stiratura.
37. Chiusura asse: spegnere gli interruttori (12,17,18,28), disinserire la spina dalla presa di
corrente, disinserire la spine ILME (5) e (21) dalla presa (20) e (22), assicurarsi che non siano
rimasti capi di biancheria appoggiati sul piano dell'asse (13). Togliere il ferro dal piano
dell’asse e riporlo a posto. Fare attenzione a non scottarsi. Rimuovere il reggifilo (8) e lo
stiramaniche (7).
38. Tirando l’asse per la punta, spostare l’asse vicino alla posizione in cui si vuole riporla. Quando
il piano di lavoro (13) è freddo, svitare le due manopole laterali vicine alla parte ignifuga del
telo (4), estraendole dalla loro sede, portare il piano dell'asse (13) in posizione verticale con la
punta del piano di lavoro rivolta verso il basso. Fare attenzione a non perdere le manopole (4)
svitate.

Pag. 5
Italiano
ATTENZIONE:
-Non lasciare incustodito l'apparecchio quando la spina è connessa alle rete.
-La spina di alimentazione deve essere disinserita dalla presa prima di immettere acqua nella
caldaia.
-Durante l'utilizzo e per circa 15 minuti dalla fine dell'utilizzo la piastra del ferro da stiro
raggiunge e mantiene temperature pericolose - evitare qualsiasi contatto, pericolo di ustioni!
-Mantenere SEMPRE il ferro da stiro sulla porzione di telo dedicata (15). Durante il
funzionamento, NON lasciare/appoggiare MAI il ferro sulla porzione di telo prevista per la
stiratura. Pericolo di danneggiare telo/ferro!
-Non togliere mai il tappo della caldaia (16) durante l’utilizzo; verificare sempre, prima di
togliere il tappo, che non ci sia più emissione di vapore dal ferro.
-Il tappo caldaia (16) deve essere sostituito con ricambi originali.
NOTA BENE:
E' consigliabile per una maggiore durata e una migliore resa dell'apparecchio l'utilizzo di sola acqua
normale proveniente dall’acquedotto; per la pulizia della caldaia utilizzare il rubinetto scarico acqua
(11) per facilitare lo scarico dell’acqua.
Vi consigliamo di controllare periodicamente i teli dell’asse (23) e, se necessario, sostituirli con altri
originali (telo copri asse cod. PA300, telo copri braccio PA301).
DATI TECNICI:
Termostato dell’asse: taratura 70°C
Potenza della caldaia: 1500W
Potenza motore: 73 W
Potenza della resistenza dell’asse: 600 W
Potenza totale : 2200 w
Tensione di alimentazione : 230 volt 50 hz
Pressione d’esercizio: 3,5 bar
Pressione massima: 5,5 bar
Capacità nominale della caldaia in acciaio inox: 5,0 lt.
Piano di lavoro: cm 39 x 124 –Altezza (non regolabile): 87 cm
Potenza massima collegabile alla prese ILME (22): 1000 w
NB: ferro da stiro optional PG036/7, spazzola vapore PG036/5 e pistola vapore PG036/6
non inclusi nella macchina.

Pag. 6
Italiano
RISOLUZIONE DEI PROBLEMI PIÙ FREQUENTI:
PROBLEMA
SPIEGAZIONE
SOLUZIONE
Esce del
vapore (poco)
dalla caldaia
E’ possibile che, durante il
riempimento, sia fuoriuscita
dell’acqua dal tappo e sia entrata
all’interno della carrozzeria,
impregnando l’isolante
Utilizzando la macchina normalmente, l’isolante si
asciuga con il calore della macchina accesa; se il
problema non si risolve in un ora (macchina accesa),
contattare il servizio tecnico
Dal ferro da
stiro esce
vapore misto
ad acqua
E’ possibile che, durante il
riempimento, sia stata introdotta una
quantità d’acqua superiore a quella
consentita
Svuotare la macchina dell’acqua in eccesso (eseguire
attentamente le istruzioni di sfiato prima di aprire il tappo
della caldaia)
E’ possibile che la piastra del ferro
non sia calda a sufficienza, deve
scaldarsi prima del passaggio del
vapore
Verificare che la manopola della regolazione della
temperatura della piastra del ferro sia in posizione
consentita per stirare con il vapore (posizione “cotone”
°°°)
Dal ferro da
stiro non esce
vapore
E’ possibile che la manopola della
regolazione della quantità di vapore
(29) sia chiusa
Aprire la manopola della regolazione della quantità di
vapore (29) ruotandola in senso antiorario
E’ possibile che l’interruttore
luminoso del vapore (18) sia spento
Accendere l’interruttore luminoso (18) che si illuminerà a
conferma dell’avvenuta accensione; attendere almeno 4
minuti, in modo che la piastra del ferro da stiro si scaldi
E’ possibile che l’interruttore
luminoso della caldaia (17) sia spento
Accendere l’interruttore luminoso della caldaia (17) che si
illuminerà a conferma dell’avvenuta accensione;
attendere almeno 10 minuti, in modo che la caldaia
possa generare vapore
E’ possibile che sia terminata l’acqua
in caldaia (la spia mancanza acqua è
accesa)
Provvedere al riempimento seguendo attentamente le
istruzioni
L’asse da stiro
si bagna
E’ possibile che il telo posto sopra il
piano di lavoro dell’asse da stiro non
riesca a smaltire il vapore prodotto
durante la stiratura
Azionare l’aspirazione tutte le volte che si utilizza il
vapore e regolare l’uscita vapore (tramite la manopola
29) al minimo.
E’ possibile che dal ferro esca vapore
misto ad acqua (verificare spruzzando
vapore su un panno asciutto)
Vedi paragrafo “Dal ferro da stiro esce vapore misto ad
acqua”
Esce acqua
sporca dal
ferro da stiro
E’ possibile che sia entrato dello
sporco nella caldaia insieme all’acqua
Riempire la caldaia, spenta, con tre litri d’acqua, e
svuotare la caldaia diverse volte aprendo il rubinetto di
scarico (11). Ripetere l’operazione finché l’acqua che ne
fuoriesce risulta pulita. Riprendendo la stiratura,
effettuare le prime spruzzate di vapore su uno
strofinaccio, in quanto i condotti sono ancora sporchi,
finché il vapore che esce risulta pulito. E’ sconsigliato
ogni tipo di additivo da immettere nella caldaia
L’asse non
scalda
E’ possibile che la spina ILME (5) non
sia inserita bene nella presa
Inserire e fissare correttamente la spina ILME (5)
dell’asse nell’apposita presa (20).
Il ferro da
stiro non
scalda
E’ possibile che la spina ILME (21)
non sia inserita bene nella presa
Inserire e fissare correttamente la spina ILME (21) del
ferro nell’apposita presa (22).
L’elenco aggiornato dei centri assistenza autorizzati LELIT è disponibile all’indirizzo
http://www.lelit.com/web/assistenza.asp .
I dati e le immagini riportati potranno subire variazioni senza preavviso al fine del miglioramento delle
prestazioni della macchina.

Pag. 7
English
COMPONENTS (see pictures on page N°2):
1. Power cord
2. Wheels
3. Vacuum pedal
4. Knobs for fixing the board
5. ILME plug for quick connection of the
ironing board
6. Support for arm board/wand
7. Sleeve board/ “S” tube
8. Wand
9. -
10. Surface where to place the steam
generator
11. Discharge water tap
12. Ironing board switch
13. Working ironing board surface
14. -
15. Fire-proof part of the ironing board cover
16. Boiler cap
17. “Boiler” switch
18. “Steam” switch
19. Low water indicator light
20. ILME socket for quick connection of the
ironing board
21. ILME plug for quick connection of the iron
or the accessories
22. ILME socket for quick connection of the
iron or the accessories
23. Ironing board cover
24. Sleeve arm board cover
25. Plate temperature regulation knob on iron
26. Steam button on iron (iron not included)
27. Solenoid valve joint
28. Switch for automatic water charge
29. Steam regulation knob on solenoid valve
30. Steam button on the steam brush (steam
brush not included)
31. Steam button on the steam gun (steam
gun not included)
32. Hoses for water automatic loading
HOW TO ASSEMBLE THE UNIT:
1. Take the product out of its boxes making sure to remove all the packing materials.
2. Position the board on a stable and flat surface, not far away from a socket, supported with the
needed voltage for the correct functioning of the product.
3. How to fix the ironing board: Lift the ironing board (13) onto the structure on an horizontal
position and fix it screwing the 4 handles(4).
4. How to assemble the ironing board sleeve arm: insert the sleeve arm “S” tube (7) in the pin of
the support (6) and then insert the sleeve arm board on the assembled tube. Fix also the
wand (8) which is made of 2 pieces.
5. Remove the steam generator from its box making sure to get rid of all the packing materials.
6. Place the steam generator on the dedicated surface (10) inside the board, keeping the water
discharge tap (11) and the power cord (1) out, on the exterior side.
7. Insert the ironing board ILME plug (5) into the ILME socket (20) on the steam generator.
8. Insert the ILME plug (21) of the iron or of the accessory into the ILME socket (22) on the
steam generator. Connect the steam hose of the iron or of the accessory on the solenoid valve
joint (27) and tighten the steam clamp with pincers.
9. Before beginning any operation, make sure that the water tap (11) placed on the side is closed
and the “L” joint is screwed up with the outlet downwards.
10. Place the iron on the dedicated part of the ironing board cover (15). It differs in colour from
the whole ironing board colour since it’s much darker. This part ONLY is fire proof and can
resist the high temperatures of the iron plate. NOTE: the lighter part of the ironing board
cover DOES not have the same technical features!
11. Insert the iron ILME plug (21) in the ILME plug (16). Fix the iron steam hose on the wand (8)
using the given spring.
USER INSTRUCTIONS:
Manual filling operating –switch (28) off “O”:
12. Make sure that the switch (28) is off, on the “0” position. Open the cap (16) and fill the boiler
with max. 3,7 litre water, making sure you do not overspill the tank and close the cap (16)
carefully.
13. Insert the power cord (1) into an electrical outlet.
14. Switch on the boiler button (17) and the steam button (18). They will light up, confirming
that they are on

Pag. 8
English
15. Set the temperature regulation knob (25) of the iron plate on “cotton” (marked on the knob
with “ooo”).
16. Wait until the boiler button light (17) goes off, it takes about 15 minutes (while ironing the
light can come on again).
17. The machine is ready for use.
18. Press the steam button (26/30/31) of the accessory.
19. It is possible to regulate the steam quantity by turning the knob (29).
20. If during your ironing the steam stops and the low water indicator light (19) comes on, it
means that there is not enough water in the tank (the tank is not totally empty). To start
ironing again, switch the boiler switch (17) off. By pressing the steam button, make sure that
the iron does not release steam anymore, switch the steam switch (18) off, slowly unscrew
the cap (16) and let the internal steam out, wait for some minutes and fill the tank with warm
water.
21. When you first press the steam button (after having turned the boiler on) you might notice a
decrease in pressure. This is because the tank has air in it. In order to have plenty of steam
wait until the boiler switch (17) goes off.
Automatic filling operating –switch (28) on “I”:
22. Put the two hoses of the Automatic System (32) in a tank/can filled with water only.
23. Make sure that all the switches are off
24. For a correct machine operating, the tank/can must always contain water.
25. Insert the power cord (1) into an electrical outlet.
26. Switch the automatic system button (28) on the position “I”. After 5 seconds the pump begins
with the water filling
27. When the required water level in the boiler has been reached, the pump stops working and the
boiler button (17) and the steam button (18) can be switched on. They will light up,
confirming that they are on.
28. All through the use, the automatic reactivation of the pump is normal.
29. Set the temperature regulation knob (25) of the iron plate on “cotton” (marked on the knob
with “OOO”)
30. Please wait until the boiler button light (17) goes off, it takes about 15 minutes (while ironing
the light can come on again).
31. The machine is ready for use.
32. Press the iron steam button or the steam button of the accessory (26/30/31).
33. It is possible to regulate the steam quantity by turning the knob (29).
34. When you first press the steam button (after having turned the boiler on) you might notice a
decrease in pressure. This is because the tank has air in it. In order to have plenty of steam
wait until the boiler switch (17) goes off.
Ironing board functioning:
35. Once the board switch (12) is on, the vacuum function is controlled by the pedal (3). You can
use the vacuum function while ironing to get rid of the steam on the fabric or before in order
to easily place the fabric on the ironing board.
36. Once you finished ironing, we suggest you leave the ironing board open and the ironing board
heating element switch (12) on for a few minutes to ensure that the internal parts of the
board (13) are dry and free of condensation.
37. How to fold the ironing board: turn the switches (12,17,18, 28) off, remove the power plug
from the outlet, unplug the ILME plugs (5) and (21) from the ILME sockets (20) and (22) and
make sure there is no garment on the working surface (13). Remove the iron from the ironing
board surface, place it in its storage location. Pay attention not to burn yourself. Remove the
wand (8) and the sleeve arm board (7).
38. Pull the ironing board from the tip to place it near the place for storage. As soon as the
working surface (13) is cool, unscrew and take off the board knobs near the dark, fire proof
part of the cover (4), put the ironing board (13) in a vertical position with the tip downwards.
ATTENTION: do not lose the 2 unscrewed knobs (4).

Pag. 9
English
CAUTION:
-Do not leave the machine unattended while the plug is connected to the socket.
-For complete safety, before filling the boiler, please disconnect the plug.
-While using the machine and 15 minutes afterwards the iron plate reaches very dangerous
temperatures –do not touch it.
-Always keep the iron on the dedicated part of the ironing board cover (15) or on the given
pad. Never leave it on the other part of the ironing board cover. You could ruin the cover/iron!
-While using the machine, never unscrew or remove the cap (16). Before removing it, make
sure that it does not release any steam.
-The safety cap (16) must be replaced with original parts only.
PLEASE NOTE:
The use of normal tap water is recommended. In order to clean the boiler and remove limestone,
open the water discharge tap (11) to drain the water. We suggest checking the ironing board cover
(23) periodically and, if it is necessary, replacing it with an original one (ironing board cover code
PA300; ironing sleeve arm board cover code PA301).
TECHNICAL DATA:
Board thermostat set at 70°C
Boiler power : 1500W
Motor power: 73 W
Board heating element: 600 W
Total power: 2200 W
Voltage supply: Version 230V- 50Hz
Working pressure: 3,5 bar
Max. pressure: 5,5 bar
Tank nominal capacity: 5,0 litres
Board working surface: cm 39x124- Height non adjustable: 87 cm
Max. power ILME plug (22) connection: 1000 w
NB: the iron PG036/7, the steam brush PG036/5 and the steam gun PG036/6 are not
included/delivered with the ironing board

Pag. 10
English
TROUBLESHOOTING:
PROBLEM
EXPLANATION
SOLUTION
Little quantity of
team comes out
from the boiler
It may happen that, while filling the
tank, some water spilled over the
cap and flew inside the boiler wetting
the insulating material
In order to solve the problem, we suggest using the
machine as usual so to dry up the insulating material
through the heat of the machine. In case you still
have this problem after one working hour, please
contact the service centre.
Steam iron leaks
steam mixed
with water
While filling the tank you may have
poured too much water into it.
Empty the boiler of the water in excess following the
instructions before opening the security cap.
The iron plate has to be hot before
the steam passage
Please check that the temperature knob is on the
right position: “cotton °°°)”
No steam comes
out from the
iron
The steam knob (29) may be closed
Open the steam regulation knob (29) turning it
anticlockwise
The steam switch (18) may be off
Switch it (18) on and wait at least 4 minutes so that
the iron plate gets warm.
The boiler switch (17) may be off
Switch it (17) on and wait at least 10 minutes so that
the boiler produces steam.
The water inside the boiler might be
finished (the low water light indicator
is on)
Fill it to the required level following the instructions
carefully.
The ironing
board cover is
wet
The ironing board cover might not be
able to absorb the steam completely
Switch on the vacuum function each time you are
using the steam and regulate the steam knob (29) to
the minimum
The steam iron leaks steam mixed
with water (check by spraying some
steam on a dry cloth)
See “Steam iron leaks steam mixed with water”
The iron leaks
dirty water
There might be some dirt in the
tank.
Fill the empty tank with 3 litres of water, screw the
cap up, empty the tank several times opening the
water discharge tap (11). Repeat the action until the
water is cleaned. We do not recommend the use of
any additive. Before ironing again spray some steam
on a cloth until clean steam comes out.
The ironing
board does not
warm
The ILME plug (5) might not be
correctly inserted.
Plug it (5) correctly into the board plug (20)
The iron does
not warm
The ILME plug (21) might not be
correctly inserted.
Plug it (21) correctly into the iron plug (22)
The inserted data and pictures can be subject to changes without previous notice for the improvement of the
machine’s performances.

Pag. 11
Deutsch
EINRICHTUNG (siehe Bilder auf Seite 2.):
1. Stromkabel
2. Räder
3. Pedal für Absaugfunktion
4. Knobel für Fixierung des Bügelbretts
(4Stk.)
5. ILME Stecker des Bügelbretts
6. Unterstützung für Armbrett/Antenne
7. Armbrett/ „S“ Rohr
8. Antenne für Dampfschlauch
9. -
10. Fläche für das Dampferzeuger
11. Wasserabflusshahn
12. Bügelbrettschalter
13. Bügelbrettfläche
14. -
15. Feuerbeständiges Teil des Tischbezugs
16. Verschlusskappe am Kessel
17. Kesselschalter („BOILER“)
18. Dampfschalter („STEAM“)
19. „Wasser fehlt“ Anzeiger („WATER“)
20. ILME Steckdose für Bügelbrettanschluss
21. ILME Stecker des Bügeleisens oder der
Dampfzubehören
22. ILME Steckdose für Bügeleisen- od.
Zuberhörverbindung
23. Bügeltischbezug
24. Armbrettbezug
25. Temperaturregelungsknopf am Bügeleisen
26. Dampftaste am Bügeleisen (PG036/7 micht
inbegriffen)
27. Elektroventildampfverbindung
28. Schalter für automatische Nachfüllung des
Wassers
29. Dampfmengeregelungsknopf am
Dampfventil
30. Dampftaste an Bügelbürste (PG036/5 nicht
inbegriffen)
31. Dampftaste an Dampfpistole (PG036/6
nicht inbegriffen)
32. Schläuche für Wassernachfüllung
BAUANLEITUNG:
1. Packen Sie alle Teile des Produkts aus den Kartons aus und entfernen Sie alle
Verpackungsteile.
2. Legen Sie den Bügelbrett auf eine flache und stabile Ebene, in der Nähe von einer geeigneten
Steckdose.
3. Zusammenbau des Bügelbretts: legen Sie das Bügelbrett (13) auf die Kesselsstruktur, auf eine
horizontale Position. Befestigen Sie das Brett (13) mit Hilfe der 4 Knöpfe (4) (die schön auf der
Struktur anwesend sind).
4. Zusammenbau des Armbretts: stecken Sie das „S“ Rohr (7) in den schon fixierten Bolzen an der
Unterstützung (6) ein und dann stecken Sie den geschweißten Bolzen des Arms in das „S“ Rohr ein.
Fixieren Sie hier auch die Antenne für Dampfschlauch (8), die aus 2 Teilen besteht.
5. Öffnen Sie die Verpackung des Dampferzeugers und beachten Sie, dass alle Verpackungsteile und
Schutzbeutel weggenommen worden sind.
6. Legen Sie das Dampferzeuger auf die Fläche (10) innerhalb des Bügelbretts mit dem Wasserhahn
(11) und dem Stromkabel nach außen.
7. Stecken Sie den ILME Stecker (5) des Bügelbretts in die dazu bestimmte ILME Steckdose (20)
8. Stecken Sie den ILME Stecker (21) des Bügeleisen oder der gewünschten Dampfzubehöre in die
dazu bestimmten ILME Steckdose (22) ein. Schließen Sie den Dampfschlauch des Bügeleisens oder
der Zubehöre an den Anschluss (27) des Dampfventils an und ziehen Sie die ausgestattete Klemme
mit einer Zange an.
9. Bevor Sie irgendeine Handlung machen, vergewissern Sie Sich, dass der Seitenablasshahn (11)
geschlossen ist und dass der „L“ Anschluss mit der Austritt unterwärts angeschraubt ist.
10. Legen Sie das Bügeleisen direkt auf die dazu bestimmte Seite des Bezugs (15), die mechanisch
(Naht) und visuell (eine andere/dunklere Farbe im Vergleich zu dem Rest des Bezugs) gezeichnet
ist. Dieses Teil des Bezugs ist feuerbeständig und wiedersteht der Temperatur der Bügeleisenssohle
während des normalen Betriebs.
WICHTIG: der Tischbezug, o.g. Zone (15) ausgenommen, hat NICHT die gleichen Eigenschaften!
11. Haken Sie den Dampfschlauch durch die Feder an die Antenne (8).
Handbetrieb –Schalter (28) “O” aus:
12. Überprüfen Sie dass das Schalter (28) aus ist (d.h. auf Position „0“). Öffnen Sie die
Verschlusskappe (16), lassen Sie den eventuellen Rest-Druck entweichen und füllen Sie max.
3,7 Liter. Beachten Sie beim Füllung darauf, dass das Wasser nicht überläuft. Schließen Sie die
Kappe (16).
13. Stecken Sie das Stromkabel (1) in die richtige Steckdose ein.

Pag. 12
Deutsch
14. Schalten Sie den Dampfkessel mittels Schalter „Boiler“ (17) und das Bügeleisen oder die
gewünschte Zubehöre (18) mit dem jeweiligen Schalter „Steam“ an, die beide beleuchten, um
die Einschaltung anzuzeigen.
15. Stellen Sie den Temperaturregelungsknopf (25) der Sohle an Position „Cotton ooo“ ein.
16. Warten Sie darauf, dass das Licht des Kesselschalters (17) (das braucht ca. 15 Minuten)
ausmacht. Während des Betriebs kann das Licht des Schalters nochmals angehen: das ist ganz
normal.
17. Die Maschine ist betriebsbereit.
18. Drücken Sie den Dampfschalter des Zubehöres (26/30/31).
19. Es ist möglich die Dampfmenge mittels dem Knopf (29) einzustellen.
20. Sollte die rote Wasserwarnleuchte (19) während des Betriebs aufleuchten, so ist nicht mehr
genug Wasser im Kessel (der Kessel ist nicht komplett leer). Schalten Sie den Kessel mittels
des „Boiler“ Schalters (17) aus, drücken Sie die Dampftaste (26/30/31) und lassen Sie den
Rest-Dampf herauskommen. Öffnen Sie vorsichtig die Verschlusskappe (16). Lassen Sie
unbedingt den Rest –Druck entweichen, bevor Sie die Kappe ganz öffnen. Nach einer
Wartezeit von ca. 5 Minuten ist das Gerät zur erneuten Füllung mit warmem Wasser bereit.
21. Beachten Sie bitte, dass ein spontaner Druckabfall nach dem erstmaligen Betätigen völlig
normal ist. Dies hat technische Gründe und das heißt die Füllung der Innenmaschineröhre. Für
maximale Dampfleistung warten Sie bitte bis der Kesselschalter (17) ausgeht.
Automatisches Betrieb–Schalter (28) “I” auf:
22. Stecken Sie die zwei Außenröhre (32) in einen Wassertank ein.
23. Versichern Sie sich, daß alle Schalter aus sind.
24. Für ein richtiges Betrieb der Maschine muss der Wassertank immer voll mit Wasser sein.
25. Stecken Sie das Stromkabel (1) in die richtige Steckdose ein.
26. Schalten Sie den Schalter des automatischen Systems (28) an Position „I“ ein. Nach 5
Sekunden beginnt die Pumpe Wasser zu laden.
27. Wann der Wasserstand das richtige Niveau in dem Kessel erreicht hat, hört die Pumpe auf, zu
funktionieren. Sie können danach die Schalter (17 und 18) einschalten. Die beiden beleuchten,
um die Einschaltung anzuzeigen.
28. Es ist normal, wenn sich die Pumpe während der Verwendung wieder in Betrieb setzt.
29. Stellen Sie den Temperaturregelungsknopf (25) der Sohle an Position „Cotton ooo“ ein.
30. Warten Sie darauf, dass das Licht des Kesselschalters (17) (das braucht ca. 15 Minuten)
ausmacht. Während des Betriebs kann das Licht des Schalters nochmals angehen: das ist ganz
normal.
31. Die Maschine ist betriebsbereit.
32. Drücken Sie den Dampfschalter des Zubehöres (26/30/31).
33. Es ist möglich die Dampfmenge mittels dem Knopf (29) einzustellen.
34. Beachten Sie bitte, dass ein spontaner Druckabfall nach dem erstmaligen Betätigen völlig
normal ist. Dies hat technische Gründe und das heißt die Füllung der Innenmaschineröhre. Für
maximale Dampfleistung warten Sie bitte bis der Kesselschalter (17) ausgeht.
Betrieb des Bügelbretts:
35. Wenn der Bügelbrettschalter (12) eingeschaltet ist, wird die Absaugfunktion vom Pedal (3)
bedient. Man kann die Absaugfunktion verwenden, sowohl um das Kleid auf den Brett einfach
zu legen und um das feuchte Dampf aus dem Kleid herauszuziehen.
36. Am Ende des Bügelns empfehlen wir, den Bügelbrett geöffnet zu lassen, den Schalter (12)
eingeschaltet zu lassen: damit wird eine eventuelle Restfeuchte im Bügeltisch getrocknet.
37. Verschluss des Bügelbretts: Schalten Sie alle Schalter (12,17,18, 28) aus, stecken Sie den
Stromkabel (1) von der Steckdose heraus, ziehen Sie die Stecker (5) und (21) aus der Steckdose
(20) und (22) heraus, versichern Sie sich, dass kein Wäschestück auf dem Brett (13) liegt.
Nehmen Sie das Bügeleisen aus dem Brett weg und legen Sie es in seine Lagerung. Achtung: Sich
nicht zu verbrennen! Entnehmen Sie die Schlauchantenne (8) und den Armbrett (7).
38. Heben Sie die Bügelbrettspitze und, mit Hilfe der Räder, bewegen Sie den Brett in der Nähe
von seiner Lagerungsposition. Wenn die Arbeitsfläche (13) kalt ist, schrauben Sie die zwei
Knöpfe (4) ab, indem Sie diese wegnehmen, richten Sie den Bügeltisch (13) nach unten (mit
der Spitze nach unten). Verloren Sie nicht die Knöpfe (4).

Pag. 13
Deutsch
SICHERHEITSHINWEISE:
-Lassen Sie das Gerät niemals unbeaufsichtigt, wenn es im Betrieb ist.
-Ziehen Sie immer den Netzstecker heraus, bevor Sie Wasser erfüllen.
-Achtung: die Bügelplatte des Bügeleisens ist noch heiß sowohl während der Verwendung als
auch nachdem ca. 15 Minuten es ausgeschaltet wurde. Vermeiden Sie jede Kontakt, Gefahr
von Verbrennung!
-Behalten Sie das Bügeleisen IMMER auf dem dazu bestimmten Teil (15) des Bezugs. Sie
dürfen das Bügeleisen auf dem Bezug (23) NIE legen! Schadengefahr für Bezug u. Bügeleisen!
-Öffnen Sie niemals die Verschlusskappe (16) wenn das Gerät in Betrieb ist. Lassen Sie erst
den Rest-Druck entweichen, bevor Sie die Kappe (16) ganz öffnen.
-Die Verschlusskappe (16) muss unbedingt mit originellen Ersatzteilen ersetzt werden.
WARTUNG:
Für eine lange Lebensdauer des Kessels empfehlen wir eine periodische Reinigung durch den
Wasserabflusshahn (11).
Wir empfehlen nur das Benutzten vom Leitungswasser, ohne Zusatzstoffe.
Wir empfehlen die periodische Überprüfung der Bügelbrettsbezüge: wenn diese angebracht sind, ersetzen
Sie sie mit anderen Originellen (Tischbezug Art. PA300, Bezug für Armbrett Art. PA301).
TECHNISCHE DATEN:
Bügelbrettesthermostat geeicht 70°C
Leistungsaufnahme Kessel: 1500W
Motorleistung: 73W
Heizelement des Brettes: 600W
Total Leistung: 2200 W
Spannung: 230 V 50 Hz
Arbeitdruck: 3,5 Bar
Max. Kesseldruck: 5,5 Bar
Nominalkesselvolumen: 5,0 Liter
Bügelfläche: cm 39 x 124 –Höhe (nicht regelbar): 87 cm
Max. Leistung für ILME Stecker-Verbindung: 1000 w
NB: Das Extra Bügeleisen PG036/7, die Bügelbürste PG036/5 oder die Dampfpistole
PG036/6 sind nicht mit dem Bügelbrett mitgeliefert.

Pag. 14
Deutsch
STÖRUNGEN UND STÖRUNGSBEHEBUNG:
STÖRUNG
ERKLÄRUNG
STÖRUNGBEHEBUNG
Lässt der
Kessel wenig
Dampf ab?
Während der Füllung ist Wasser aus
der Kappe übergelaufen und der
Isolierstoff ist nass geworden
Benutzen Sie die Maschine wie immer, der Isolierstoff
trocknet durch die Wärme der Maschine; falls das
Problem nach einer Stunde nicht aufgelöst ist, wenden
Sie dem Kundendienst an.
Lässt das
Bügeleisen
Dampf
gemischt mit
Wasser ab?
Während der Füllung könnte man zu
viel Wasser gegossen haben.
Leeren Sie die Maschine von dem übermäßigen Wasser
(Bitte lesen Sie die Bedienungsanleitung bezüglich des
Entweichens der Kappe sorgfältig)
Die Bügeleisensohle ist nicht warm
genug. Sie sollen die Sohle vorher
des Dampfdurchgangs wärmen
lassen.
Prüfen Sir über, dass der Sohletemperatur -
regelungsknopf an die Position “cotton” °°° eingestellt
ist.
Lässt das
Bügeleisen
keinen Dampf
ab?
Der Dampfregelungsknopf (29) kann
zu sein
Drehen Sie bitte den Dampfregelungsknopf (29) gegen
Uhrzeigersinn
Das Licht des Dampfschalters (18)
ist aus
Schalten Sie den Dampfschalter (18) ein, das Licht
erleucht, um die Einschaltung zu zeigen. Warten Sie 4
Minuten auf so dass die Bügeleisensohle wärmt.
Das Licht des Kesselschalters (17)
ist aus
Schalten Sie den Kesselschalter (17) ein: das Licht
erleucht, um die Einschaltung zu zeigen; warten Sie 10
Minuten auf ein erneutes Erreichen des Betriebsdruckes
Das Wasser ist verbraucht (der
“Wasser fehlt” Anzeiger erleuchtet)
Folgen Sie die Anleitung und füllen Sie den Tank.
Ist der
Bügeltisch
nass?
Der Bezug des Bügeltisches lässt
den Dampf nicht abfließen, der
während des Bügelns produziert
wird.
Wenn Sie das Bügelbrett verwenden, betätigen Sie das
Absaugen jedes Mal Sie den Dampf benutzen und stellen
Sie den Dampf mit dem Knopf (29) zum Minumum ein.
Das Bügeleisen lässt Dampf mit
Wasser abfließen ( spritzen Sie
Dampf auf ein Tuch als
Überprüfung)
Sehen Sie Punkt 2.
Lässt das
Bügeleisen
schmutziges
Wasser ab?
Wahrscheinlich ist ein bisschen
Schmutz zusammen mit Wasser in
den Kessel hineingegangen.
Füllen Sie den abgeschalten Kessel mit drei Liter Wasser,
schließen Sie die Kappe, öffnen Sie den
Wasserabflusshahn (11) und leeren Sie den Kessel. Holen
Sie die Handlung wieder, bis es reines Wasser
herausfliesst. Bevor Sie das Bügeln wiederbeginnen,
spritzen Sie den Dampf auf einen Tuch, bis keinen
Schmutz herausgeht. Wir raten ab, keine Zusatzstoffe zu
benutzen.
Der
Bügeltisch
wärmt sich
nicht ab.
Wahrscheinlich ist der ILME Stecker
der Bügelbretts (5) nicht richtig
eingesteckt.
Bitte stecken Sie den ILME Stecker (5) in der dazu
bestimmten ILME Steckdose richtig ein. (20)
Die Sohle des
Bügeleisens
wärmt sich
nicht ab.
Wahrscheinlich ist der ILME Stecker
der Bügeleisens (21) nicht richtig
eingesteckt.
Bitte stecken Sie den ILME Stecker (21) in der dazu
bestimmten ILME Steckdose richtig ein. (22)
Die eingefügten Daten und Fotos können ohne Voranmeldung verändert werden, um die Leistungen des
Produkts zu verbessern.

Pag. 15
Русский
КОМПОНЕНТЫ (смотрите рисунок на стр. №2):
1. Шнур электропитания
2. Колеса
3. Вакуумная педаль
4. Регулятор фиксаци стола
5. Разъем ILME для быстрого подключения
гладильного стола
6. Поддержка для гладильного рукава и
стержня
7. Гладильный рукав/ “S” труба
8. Стержень
9. -
10. Отделение в гладильном столе, куда
помещен парогенератор
11. Кран слива воды
12. Выключатель гладильного стола
13. Рабочая поверхность гладильного стола
14. –
15. Несгораемая часть покрытия
гладильного стола
16. Крышка бойлера
17. Выключатель бойлера “Boiler”
18. Выключатель пара “Steam”
19. Контрольная лампочка нехватки воды
20. Гнездо ILME для быстрого подключения
гладильной доски
21. Разъем ILME для подсоединения утюга
или аксессуаров
22. Гнездо ILME для подсоединения утюга
или аксессуаров
23. Покрытие гладильной доски
24. Покрытие гладильного ракава
25. Регулятор температуры подошвы утюга
26. Кнопка подачи пара на утюге (утюг не
входит в комплект гладильного стола)
27. Соленоидный клапан
28. Выключатель для автоматической
закачки воды
29. Регулятор подачи пара на соленоидном
клапане
30. Кнопка подачи пара на паровой щетке
(щетка не включена в комплект
гладильного стола)
31. Кнопка подачи пара на паровом
пистолете (пистолет не включен в
комплект гладильного стола)
32. Шланги для автомат. закачки воды
КАК СОБРАТЬ ГЛАДИЛЬНЫЙ СТОЛ:
1. Вынуть изделие из коробки, убедитесь, что удалены все упаковочные материалы.
2. Поставьте изделие, ту часть, где гладильный стол, на устойчивую и горизонтальную
поверхность, не далеко от розетки электросети, поддерживающей необходимое
напряжение для правильного функционирования изделия.
3. Как установить гладильный стол: установите рабочую поверхность гладильного стола
(13) в горизонтальном положении на основу и зафиксируйте ее закручивая
регуляторами (4).
4. Как установить гладильный рукав: вставьте трубу рукава “S” (7) в поддержку (6) и
затем вставьте гладильный рукав в собранную трубу. Установите также стержень (8)
который состоит из 2 частей.
5. Вынуть парогенератор из упаковочной коробки, убедитесь, что удалены все
упаковочные материалы.
6. Поместите парогенератор вглубь специального отделения (10), так чтобы кран слива
воды (11) и шнур электропитания (1) были с внешней стороны.
7. Вставьте разъем гладильного стола ILME (5) в гнезде ILME (20) на парогенераторе
8. Вставьте разъем ILME утюга (21) или другого аксессуара в гнездо ILME (22) на
парогенераторе. Подсоедините паровой шланг утюга или другого аксессуара к
соленоидному клапану (27) , зажмите его у основания соединения зажимом при помощи
щипцов.
9. Прежде, чем начать какую-либо операцию, удостоверьтесь, что кран слива воды (11)
помещенный в сторону «закрыт», и кран “L” повернут выходом вниз.
10. Поместите утюг на специальную часть покрытия гладильной доски (15). Эта часть
отличается в цвете от остального цвета гладильной доски, так как она намного темнее.
Только эта часть - огнеупорная и может выдерживать высокие температуры подошвы
утюга. ВНИМАНИЕ: у более светлой части покрытия гладильной доски нет таких
технических особенностей!
11. Закрепите паровой шланг на стержне, для поддержки шланга (8).

Pag. 16
Русский
ИНСТРУКЦИИ ПО ПОЛЬЗОВАНИЮ:
Функцианирование ручным способом – переключатель (28) в положении «О»:
12. Удостоверьтесь, что выключатель (28) выключен, на “0” положение. Открыть
предохранительную пробку (16) и наполнить бойлер водой максимум 3,7 литра,
желательно не переливать, после чего закрыть предохранительную пробку (16).
13. Подключить вилку шнура питания (1) к электросети.
14. Включить кнопку бойлера (17) и паровую кнопку (18), Световое зажжение кнопок
подтверждает подключение к сети электроприбора.
15. Установить регулятор температуры подошвы утюга (25) в позицию - «cotone °°°»
(графическое изображение на регуляторе °°°).
16. Подождать когда световая кнопка бойлера (17) погаснет (время около 15 мин.).
17. Электроприбор готов к пользованию.
18. Нажать кнопку подачи пара аксессуара (26/30/31).
19. Можно регулировать количество подачи пара с помощью специального регулятора (29).
20. Если во время пользования уменьшается количество выходящего пара, и загорелась
сигнальная лампочка отсутствия воды (19), это значит, что вода в бойлере
заканчивается (бойлер еще не совсем без воды). Чтобы продолжить работу, необходимо
отключить кнопку бойлера (17). Нажать кнопку подачи пара на аксессуаре или утюге,
чтобы вывести оставшийся пар в бойлере, до полного убеждения его отсутствия.
Отключить кнопку утюга (18), отсоединить вилку шнура питания (1) от электросети.
Медленно открутить предохранительную пробку бойлера (16), контролируя в нем
отсутствие пара. После нескольких минут наполнить бойлер водой, по возможности
горячей.
21. После включения, при первом нажатии кнопки пара может произойти снижение
давления, что обусловлено необходимостью заполнения внутренних емкостей машины.
Для получения максимального пара подождать, пока погаснет кнопка бойлера (17).
Функционирование автоматическим способом - переключатель (28) включен “I”:
22. Расположить два шланга, которые выходят из Automatic System (32) в специально
отведенный бак, наполненный только водой.
23. Убедитесь, что все переключатели отключены.
24. Для хорошего функционирования машины бак должен быть всегда наполнен водой.
25. Подключить вилку шнура питания (1) к электросети.
26. Включить переключатель автоматической системы (28) в позицию “I”. Спустя 5 сек насос
начнет закачивать воду.
27. Когда уровень воды в бойлере становится оптимальным, насос перестает работать и
теперь можно включить кнопку питания бойлера (17) и паровую кнопку (18). Они
загоряться, подтверждая, что включены.
28. Во время работы является нормальным автоматическое включение насоса.
29. Установить регулятор температуры утюга (25) в позицию - «cotone» (графическое
изображение на регуляторе «°°°»).
30. Подождать когда световая кнопка бойлера (17) погаснет (время около 15 мин.).
31. Электроприбор готов к пользованию
32. Нажать кнопку подачи пара аксессуаров (26/30/31).
33. Можно регулировать количество подачи пара с помощью специального регулятора (29)
34. При первом нажатии кнопки пара после включения может произойти снижение
давления, что обусловлено необходимостью заполнения внутренних емкостей машины.
Для получения максимального пара подождать, пока погаснет кнопка бойлера (17).
Функционирование гладильной доски:
35. Когда выключатель (12) включен, вакуумной функцией управляет педаль (3). Функция
отсоса воздуха помогает избавиться от пара на изделие, которое Вы гладите. Она нужна
когда необходимо расправить изделие на поверхности рабочего стола.
36. Как только Вы закончили гладить, мы рекомендуем на несколько минут оставлять доску
открытой с включенным подогревом (12). Что позволит рабочей поверхности (13)
высохнуть и удалить возможные остатки конденсата, сформировавшегося во время
глажения.

Pag. 17
Русский
37. Складываем гладильную доску: выключите выключателя (12, 17, 18, 28), выньте вилку
электропитания из розетки, отключите разъемы ILME (5) и (21) от гнезд ILME (20) и (22)
и удостоверьтесь, что нет никакого предмета одежды на рабочей поверхности (13).
Уберите утюг с гладильного стола, сверните и поместите его в место хранения. Будьте
внимательны, чтобы не обжечься. Удалите стержень (8) и гладильный рукав (7).
38. Выньте гладильную доску из наконечника, чтобы поместить в место хранения. Как
только рабочая поверхность (13) остынет, отвинтите винты крепления
(4) , возле темного огнеупорного места гладильной доски, гладильную доску (13) нужно
ставить в вертикальное положение с наконечником вниз. ВНИМАНИЕ: не теряйте два
отвинченных крепления (4).
ВНИМАНИЕ:
-Не оставлять парогенератор включенным в электросеть без присмотра.
- Для безопасности, перед заполнением котла, отключите электрошнур от электросети.
-Во время пользования подошва утюга может достигать высоких температур, которые
поддерживаются в течение 15 минут и после отключения электроприбора.
-Всегда держите утюг на специально части покрытия гладильной доски (15) или на
прилагаемом коврике.Никогда не ставьте утюг на другой части покрытия гладильной
доски. Вы можете повредить покрытие/утюг!
-Во время работы аппарата запрещается открывать предохранительную пробку бака (16).
Всегда, перед тем как открывать предохранительную пробку бойлера, убедитесь об
отсутствии скопившегося пара в нем.
-При замене предохранительной пробки бойлера (16) – запчасти должны быть только
оригинальными.
ВНИМАНИЕ:
В целях длительного использования аппарата и эффективной отдачи его технических
характеристик, советуем использовать обычную воду из под крана. Для очистки бойлера от
накипи советуем сливать воду из бойлера через кран слива воды (11).
Мы предлагаем проверять покрытие гладильной доски (23) периодически и, если это
необходимо, заменять его оригинальным (код PA300 для покрытия гладильной доски;
покрытие для гладильного рукава - код PA301).
ТЕХНИЧЕСКИЕ ДАННЫЕ:
Набор термостата отрегулирован на: 70°C
Власть котла:1500 Вт
Моторная власть: 73 Вт
Нагревательный элемент: 600 Вт
Полная власть: 2200 Вт
Поставка напряжения: Версия 230v-50Hz
Рабочее давление: 3,5 бара
Максимальное давление: 5,5 баров
Способность номинала резервуара: 5,0 литров
Рабочая поверхность: цм 39x124-Высота, не приспосабливаемая: 87 см
Максимальная власть штепсель ILME (22): 1000 w
NB: утюг PG036/7, паровая щетка PG036/5 и паровой пистолет PG036/6 не включены
в комплект с гладильной доской

Pag. 18
Русский
РАЗРЕШЕНИЕ ВСТРЕЧАЮЩИХСЯ ПРОБЛЕМ:
ПРОБЛЕМА
ОБЪЯСНЕНИЕ
РАЗРЕШЕНИЕ
Выходит
маленькое
количество
пара из
бойлера
Возможно во время наполнения
бойлера случайное попадание
воды вне котла, намочив
изоляционное покрытие
Пользоваться электроприбором в обычном порядке,
чтобы в результате исходящего тепла высушить
изоляционное покрытие. Если в течение часа при
включенном аппарате, проблема не разрешилась,
обратиться в тех. обслуживание.
Из утюга
выходит пар
смешанный с
водой
При заполнении бака, возможно,
залили слишком много воды.
Освободить аппарат от излишка воды (выполнять
внимательно все пункты инструкции по выводу
пара, перед тем как открывать предохранительную
пробку бойлера)
Утюг должен быть хорошо разогрет
перед производством пара
Убедиться, что регулятор температуры утюга
установлен в позиции, позволяющей при глажении
подачу сухого пара (позиция “cotone” °°°)
Из утюга не
выходит пар
Возможно, регулятор подачи пара
(29) закрыт
Открыть регулятор подачи пара (29), поворачивая
против часовой стрелке
Паровой выключатель (18) может
быть выключен
Нажать на выключатель утюга (18), кнопка
зажжется и подождите примерно 4 мин. пока утюг
нагреется
Выключатель бойлера (17) может
быть не включен
Нажать выключатель бойлера (17), подождать
приблизительно 10 мин., до готовности бойлера
производить пар
Закончилась вода в бойлере
(сигнальная лампочка отсутствия
воды горит)
Наполнить бойлер водой до указанного уровня,
внимательно следуя инструкции
Покрытие
гладильной
доски влажное
Возможно, чехол рабочей
поверхности доски во время
глажения с паром не успевает
высохнуть
Включайте функцию отсоса воздуха каждый раз
когда пользуетесь паром и установите регулятор
пара (29) на минимум
Возможно, из утюга выходит пар
смешанный с водой (попробовать
направить пар на отдельную сухую
ткань)
Смотри выше «Из утюга выходит пар смешанный с
водой»
Из утюга
выходит
грязная вода
Возможно, что в бойлер с водой
попала грязь, которая потом
просочилась в утюг
Заполните пустой бак 3 литрами воды, закройте
крышкой, сливайте воду из бойлера через кран
слива воды (11). Повторить это несколько раз до
тех пор, пока вода не выйдет чистая. Мы не
рекомендуем использование никаких
дополнительных чистящих средств. Прежде, чем
приступить к глаженью своих вещей , направьте
пар на ненужную ткань, до полного выхода из
утюга чистого пара
Гладильная
доска не
нагревается
Разъем ILME (5) мог быть
неправильно вставлен.
Вставьте ILME (5) правильно в разъем (20)
Утюг не
нагревается
Разъем ILME (21) мог быть
неправильно вставлен.
Вставьте ILME (21) правильно в разъем (20)
Указанные данные и фотографии могут быть изменены без предварительного предупреждения для
улучшения работы парогенератора.

Pag. 19
(I) DICHIARAZIONE DI CONFORMITA’ CE
Gemme Italian Producers srl
dichiara sotto la propria responsabilità che il prodotto
PKSB500N, al quale è riferita questa dichiarazione, è
conforme alla seguente norma:
CEI EN 60335-1
Dichiara inoltre che il prodotto sopra indicato risulta
conforme in base alle prove di compatibilità
elettromagnetica EMC.
NB: La presente dichiarazione perde la sua validità se
la macchina viene modificata senza la nostra espressa
autorizzazione.
(GB) EC DECLARATION OF CONFORMITY
Gemme Italian Producers srl declares under its own
responsibility that the product PKSB500N, to which
this declaration relates, is in accordance with the
provisions of the specific directives:
CEI EN 60335-1 It also declares that the above
mentioned product conforms with the electromagnetic
compatibility test EMC.
NB: The present declaration voids
should the machine be modified without our specific
authorization.
(D) CE –KONFORMITÄTSERKLÄRUNG
Gemme Italian Producers srl Erklärt auf Seine einige
Verantwortung, dass die Produkte PKSB500N, auf das
sich diese Erklärung bezieht, Entsprechend der
Vorschriften der spezifischen Richtlinien:
CEI EN 60335-1
Außerdem erklärt Sie, dass die oben genannte Produkte
ist die elektromagnetische Verträglichkeit Testen
gemäß: EMC
NB: Die vorliegende Erklärung verliert Ihre Gültigkeit,
wenn die Maschine ohne unsere ausdrückliche
Genehmigung verändert wird.
(RUS) ДЕКЛАРАЦИЯ О СООТВЕТСТВИИ
ДИРЕКТИВАМ ЕЭС
Gemme Italian Producers srl
заявляет с полной ответственностью, что изделие
PKSB500N, к которому относится эта декларация
соответствует следующим нормам: CEI EN 60335-1
Заявляет также, что выше указанное изделие
отвечает требованиям, на основании результатов
тестирования по электромагнитной совместимости
ЕМС.
НОТА: Настаящая декларация является не
действительной, если в данное оборудование будут
внесены какие-либо изменения без нашего
официального разрешения.
Castegnato, 1 aprile 2011
Amministratore Delegato

Pag. 20
(I) AVVERTENZE PER IL CORRETTO
SMALTIMENTO DEL PRODOTTO AI SENSI DELLA
DIRETTIVA EUROPEA 2002/96/EC.
Alla fine della sua vita utile il prodotto non deve essere
smaltito insieme ai rifiuti urbani.
Può essere consegnato presso gli appositi centri di
raccolta differenziata predisposti dalle amministrazioni
comunali, oppure presso i rivenditori che forniscono
questo servizio.
Smaltire separatamente un elettrodomestico consente
di evitare possibile conseguenze negative per
l’ambiente e per la salute derivanti da un suo
smaltimento inadeguato e permette di recuperare i
materiali di cui è composto al fine di ottenere un
importante risparmio di energia e di risorse.
Per rimarcare l’obbligo di smaltire separatamente gli
elettrodomestici, sul prodotto è riportato il marchio del
contenitore di spazzature mobile barrato.
(D) WICHTIGER HINWEIS FÜR DIE KORREKTE
ENTSORGUNG DES PRODUKTS IN
ÜBEREINSTIMMUNG MIT DER EG-RICHTLINIE
2002/96/EG.
Am Ende seiner Nutzzeit darf das Produkt NICHT
zusammen mit dem Siedlungsabfall beseitigt werden.
Es kann zu den eigens von den städtischen Behören
eingerichteten Sammelstellen oder zu den
Fachhändlern, die einen Rücknahmeservice anbieten,
gebracht werden.
Die getrennte Entsorgung eines Haushaltsgerätes
vermeidet mögliche negative Auswirkungen auf die
Umwelt und die menschliche Gesundheit, die durch eine
nicht vorschriftsmäßige Entsorgung bedingt sind.
Zudem ermöglicht wird die Wiederverwertung der
Materialien, aus denen sich das Gerät zusammensetzt,
was wiederum eine bedeutende Einsparung an Energie
und Ressourcen mit sich bringt.
Zur Erinnerung an die Verpflichtung , die
Elektrohaushalsgeräte zu beseitigen, ist das Produkt
mit einer Mülltonne, die durchgestrichen ist,
gekennzeichnet.
(GB) IMPORTANT INFORMATION FOR CORRECT
DISPOSAL OF THE PRODUCT IN ACCORDANCE
WITH EC DIRECTIVE 2002/96/EC.
At the end of its working life, the product must not be
disposed of as urban waste.
It must be taken to a special local authority differential
waste collection centre or to a dealer providing this
service.
Disposing of a household appliance separately avoids
possible negative consequences for the environment
and health deriving from inappropriate disposal of
enables the constituent materials to be recovered to
obtain significant savings in energy and resources. As a
reminder of the need to dispose of household appliances
separately, the products is marked with a crossed-out
wheeled dustbin.
(RUS) УКАЗАНИЯ ПО КОРРЕКТНОМУ
ИЗБАВЛЕНИЮ ОТ ИЗДЕЛИЯ В СООТВЕТСТВИИ С
ЕВРОПЕЙСКОЙ ДЕРЕКТИВОЙ 2002/96/ЕС.
По окончании срока службы, электроприбор не
следует помещать в общий контейнер с мусорными
отходами.
Его можно сдать в специальные центры по сбору
дифференциальных отходов, предоставленных
административными муниципалитетами, или в
специализированные фирмы, которые занимаются
таким обслуживанием.
Раздельная переработка электроприборов позволяет
избежать возможные негативные последствия,
возникающие из-за не соответствующей переработки
отходов, для окружающей среды и здоровья
общества. Дает возможность достигнуть
значительной экономии энергии и ресурсов,
благодаря повторному использованию материалов
изготовления электроприбора.
Чтобы подчеркнуть обязательство сдачи
электроприбора на раздельную переработку, на
изделие нанесена маркировка в виде зачеркнутого
передвижного мусорного контейнера.
Other manuals for PKSB500N
1
Table of contents
Languages:
Other Lelit Iron manuals
Popular Iron manuals by other brands

VOX electronics
VOX electronics DPS-6220 operating instructions

Black & Decker
Black & Decker ProFinish X700 Series Use and care book

Philips
Philips Mistral GC2225 Service manual

Black & Decker
Black & Decker Light'N Easy IR0110W quick start guide

NIMO
NIMO IronMaid operating instructions

Philips
Philips GC7240 Servise manual