LEM Products • West Chester, OH 45011 • 1-877-536-7763 • lemproducts.com LEM Products • West Chester, OH 45011 • 1-877-536-7763 • lemproducts.com
2 3
GENERAL WARNINGS AND SAFETY INFORMATION
1. Disassemble and clean all the surfaces thoroughly.
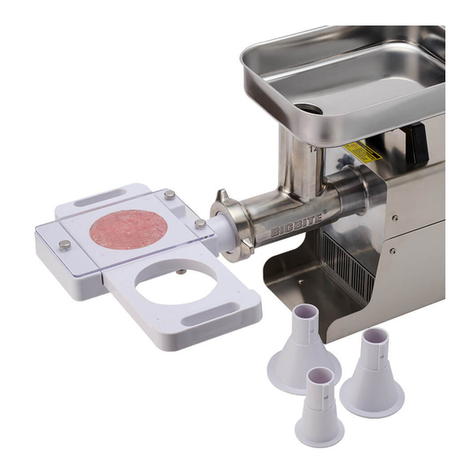
2. Unscrew the three locking knobs that secure the clear top plate to the body of the Auto Patty Maker.
3. With the components separated, clean all surfaces thoroughly with soap and hot water or in the top rack of your dishwasher.
BEFORE USING
1. With the Patty Maker attached to your grinder, position the patty-forming slide all the way to the right or left.
2. Slowly begin feeding meat into the grinding head. Watch through the clear top plate as the patty chamber begins to ll.
3. When the patty chamber is completely full, push the patty forming slider to the opposite side.
4. Be ready to catch the perfectly formed patty as it drops from the slide.
5. As the rst patty drops into your hand, the next patty will already start forming.
6. Repeat this motion while continually adding meat to the grinder.
7. Do not feed the grinder faster than you can eject and stack your patties. If the patty-forming chamber overlls, meat will
begin to push between the slide and the body of the Auto Patty Maker.
MEAT GRINDER OPERATION
1. Disassemble the Auto Patty Maker.
2. Clean all components thoroughly with hot water and mild detergent.
3. Do not scour the clear top plate.
4. The Auto Patty Maker is top rack dishwasher safe.
After cleaning, make sure the Auto Patty Maker is thoroughly dried before storing.
CLEANING
1. Place the slider on the Auto Patty Maker, making sure the top side of the slider is facing up.
2. Place the clear top plate over the slider, aligning the holes for the locking knobs.
3. Hand tighten all locking knobs to secure the clear top plate. DO NOT over tighten. DO NOT use tools to tighten locking knobs.
REASSEMBLY
1. Your Auto Patty Maker comes with a set of four adapter tubes. Using the retaining ring from your grinder, choose the
tube that ts your machine. The tube will t inside the retaining ring just like a regular stung tube.
2. With the proper tube in place, attach the retaining ring to the grinder. Be sure the slot on the tube is facing down.
On your grinder, install either the stung plate/spacer or the knife and cutting plate.
3. With the retaining ring tightened snugly, slide the mouth of the Auto Patty Maker over the tube end, aligning the groove
in the Auto Patty Maker with the slot in the tube. This will ensure that the clear plastic side is facing up.
4. Tighten the locking knob on the underside of the Auto Patty Maker rmly. DO NOT over-tighten the locking knob.
DO NOT use tools to tighten the locking knob.
ATTACHING TO GRINDER
IT IS IMPORTANT TO READ AND UNDERSTAND ALL OF THE INSTRUCTIONS AND SAFEGUARDS PRIOR TO USE
1. Always ensure that the appliance is properly assembled and safely set up before use.
2. DO NOT leave the appliance unattended if it can be switched on and operated.
3. CAUTION: This appliance is not recommended for use near or by children or persons with certain disabilities. Set up and
store the appliance out of reach of children. When not in use, store device in a secure and dry place out of reach of children.
4. Store appliance in upright position to extend life of motor.
5. WARNING:
Heavy object, to avoid muscle strain or back injury, use lifting aids and proper lifting techniques when
moving appliance.
6. The appliance must be connected to an 120V AC electric supply only.
7.
For your safety, this unit is equipped with a 3-pronged, grounding plug and must be plugged into a properly grounded
outlet. If your outlet is not of the proper type, it is your responsibility to have the outlet and wiring changed to the
correct type. Do not cut o the third (grounding) prong. Do not use an adapter.
8. Using this appliance with an extension cord may cause a decrease in electrical current, causing the motor to be over
worked and possibly catch re.
9. Do not operate with a damaged cord or plug, after the unit malfunctions, has been damaged in any way or if appliance
has been immersed in water or other liquid. Return unit to LEM Products for assessment and repair.
10. Always unplug unit when not in use, when changing parts or cleaning.
11. Never unplug by pulling on the power cord, always pull directly on the plug itself.
12. Do not let cord hang over edge of table or counter, contact sharp edges or touch hot surfaces.
13. Indoor use only. To protect against the risk of electrical shock, never immerse the device in water and do not expose the
device to rain or moisture. WARNING: In the event the device should fall into water, remove the plug from the wall
socket before attempting to remove the unit from the water. If submergence occurs, have the appliance examined by
an authorized technician before use.
14. To protect against the risk of electrical shock, DO NOT use the appliance if your hands are wet or if you are standing on
a wet oor. DO NOT use the appliance if it is wet or moist. DO NOT operate this device with wet hands or bare feet.
DO NOT operate near running water.
15. The appliance is designed for domestic use and not for commercial purposes.
16. DO NOT use the appliance on bones, deep frozen food, hard items or non-food items.
17. Use the appliance with the supplied accessories only. WARNING: The use of attachments not recommended or sold by
the manufacturer may cause injury, damage to personal property, and may void your warranty.
18. WARNING: Do not use while under the inuence of alcohol or drugs (prescription or non-prescription) as these may
impair user’s ability to properly assemble or safely operate the appliance.
19. The manufacturer declines any responsibility in the case of improper use of this product. Improper use of this product
voids the warranty.
20. Avoid contacting moving parts. Wait until all parts have come to a complete stop and disconnect from the power
source before removing any parts of the appliance.
21. DO NOT operate the appliance without the upper case installed.
22. DO NOT use ngers to push meat into appliance while the unit is running, doing so may cause serious injury.
23. Thoroughly hand-wash all parts in warm soapy water prior to use. DO NOT SOAK. NOT DISHWASHER SAFE
(discoloration may occur).
24. Tie back loose hair and clothing. Remove neckties, rings, watches, bracelets or other jewelry before operating.
25. Use on a level, stable surface to prevent tipping. Never move the appliance while in use.
26. WARNING: Knives are SHARP! To avoid injury, use extreme caution when handling.
27. When unit is turned o, cooling fan will no longer operate. DO NOT touch housing during cool down period. Housing
will take a few minutes to cool down after unit is turned o.
28.
SAVE THESE INSTRUCTIONS
