LENCO DVP-9411 User manual

Please read this User Manual carefully to ensure proper use of this product and keep this
manual for future reference.
USER MANUAL
PORTABLE DVD PLAYER
DVP-9411
www.lenco.com

Content
1
Important Safety Instructions
* Warning: To reduce the risk ofelectric shock, do not remove the cover or back.
There are no user-serviceable parts inside. Refer servicing to qualified personnel.
*Warning: To prevent fire or electric shock hazard, do not expose the unit to rain or
moisture.
* Do not expose the Adaptor and product to water
(dripping or splashing) and no
objects filled with liquids, such as vases, should be placed on the unit.
*Keep the product away from direct sunlight and heat source such asradiators or
stoves.
*Do not block the ventilation openings. Slots and openings on the unitare provided
for ventilation. The openings should never be blocked by placing your product
on
a cushion, sofa or other similar surface.
* Do not place the product on unstable cart, stand, tripod, bracket or
table.
* The unit may fall, resulting in possible damage or injury.
* Never place heavy or sharp objects on the LCD panel or frame.
* Only use the AC adapter included with product. Usingany other adapter will void
your warranty.
* Unplug the power from the outlet when the unit is not in use.
* Attention should be drawn to the environmental aspects ofbattery disposal.
* No naked flame sources, such as lighted canles, should be placed on theapparatus.
*WARNNING: The battery (battery or batteries or batterypack) shall
not be exposed to excessive heat such as sunshine, fire or the like.
*WARNNING: Excessive sound pressure from earphones or headphones can cause
hearing loss.
*WARNNING: Only use attachments/accessories specified provided by the
manufacturer, the product is supplied by
AC adapter, the AC adapter is
used as
disconnect device, the disconnect device shall remain readily operable.
Warning: TheUSB memory stick should be plugin the unit directly.
USB extension cable shouldnot be used toavoid failing of data
transferring and interferencecaused.
For the electrostaticdischarge (ESD) testof EN55020 , It was found
that manual operation (byswitch power ON/OFF switch) is need to
resume normal operation as intended after the test.
Important Safety Instructions ................................................1
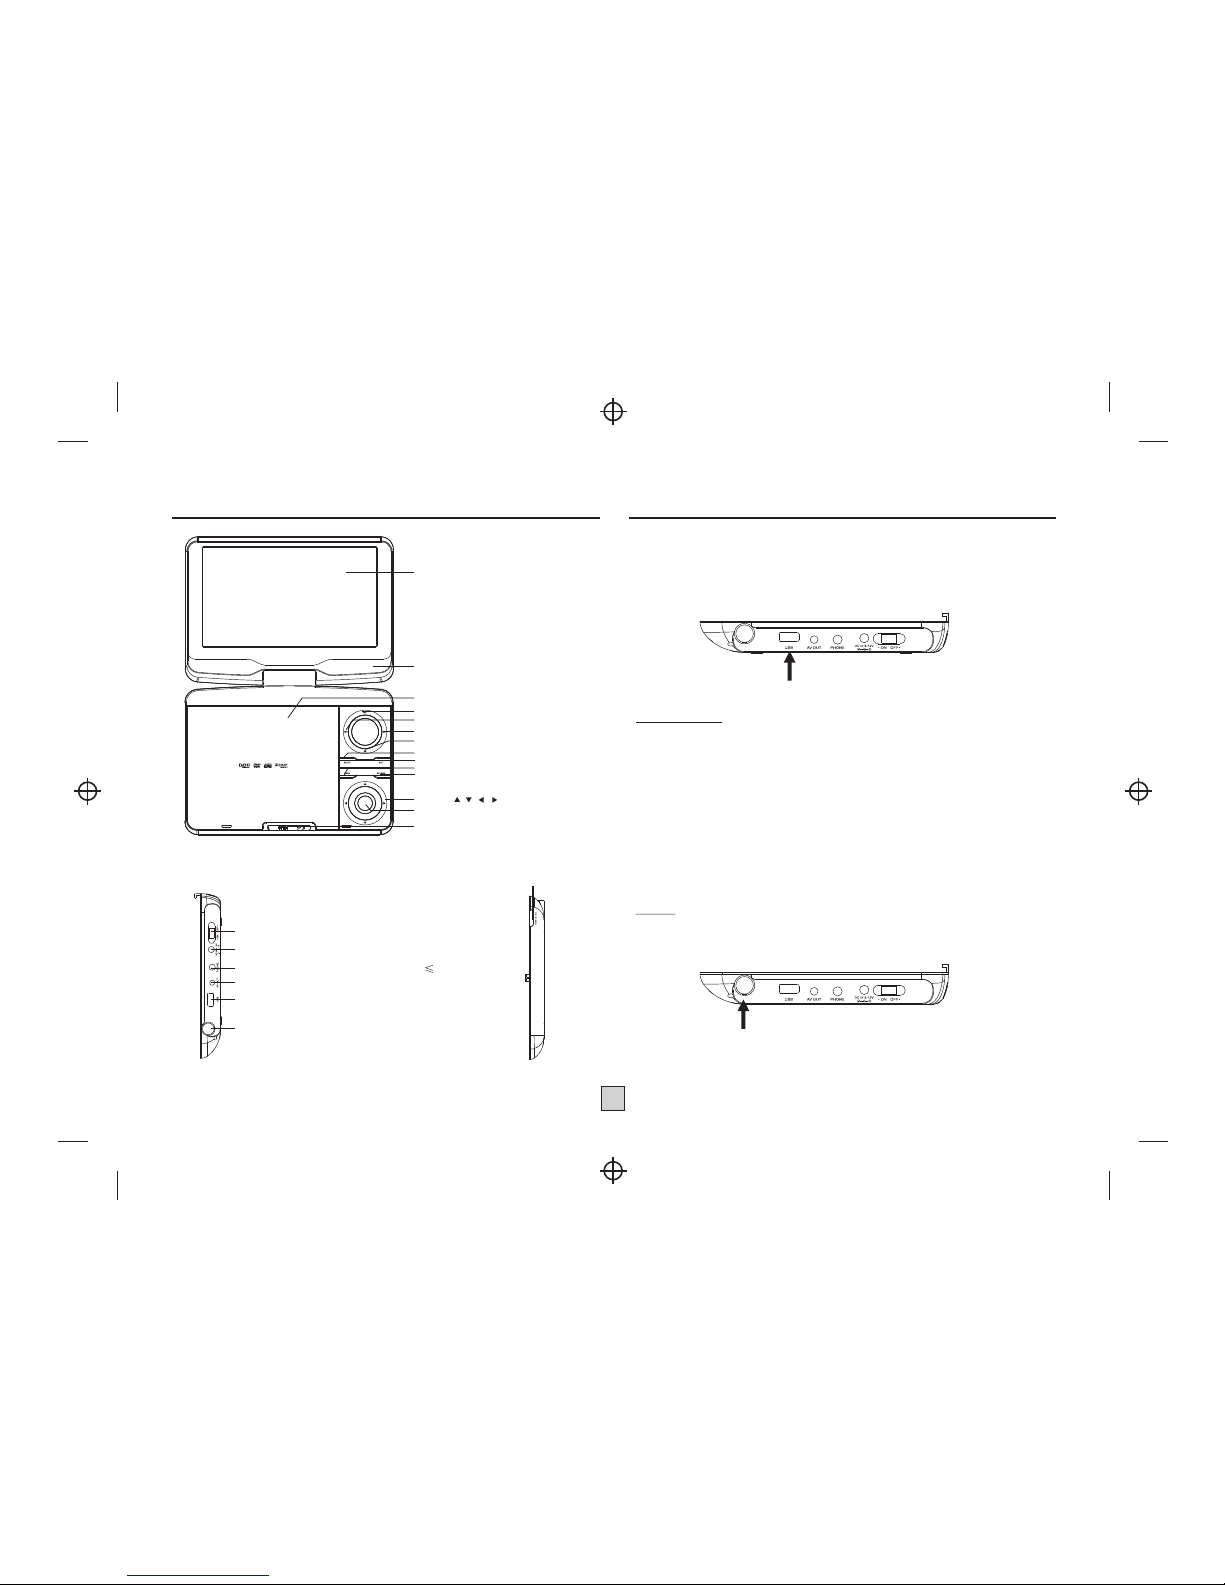
Panel Illustration........................................................................2
Connecting to the USB................................................................2
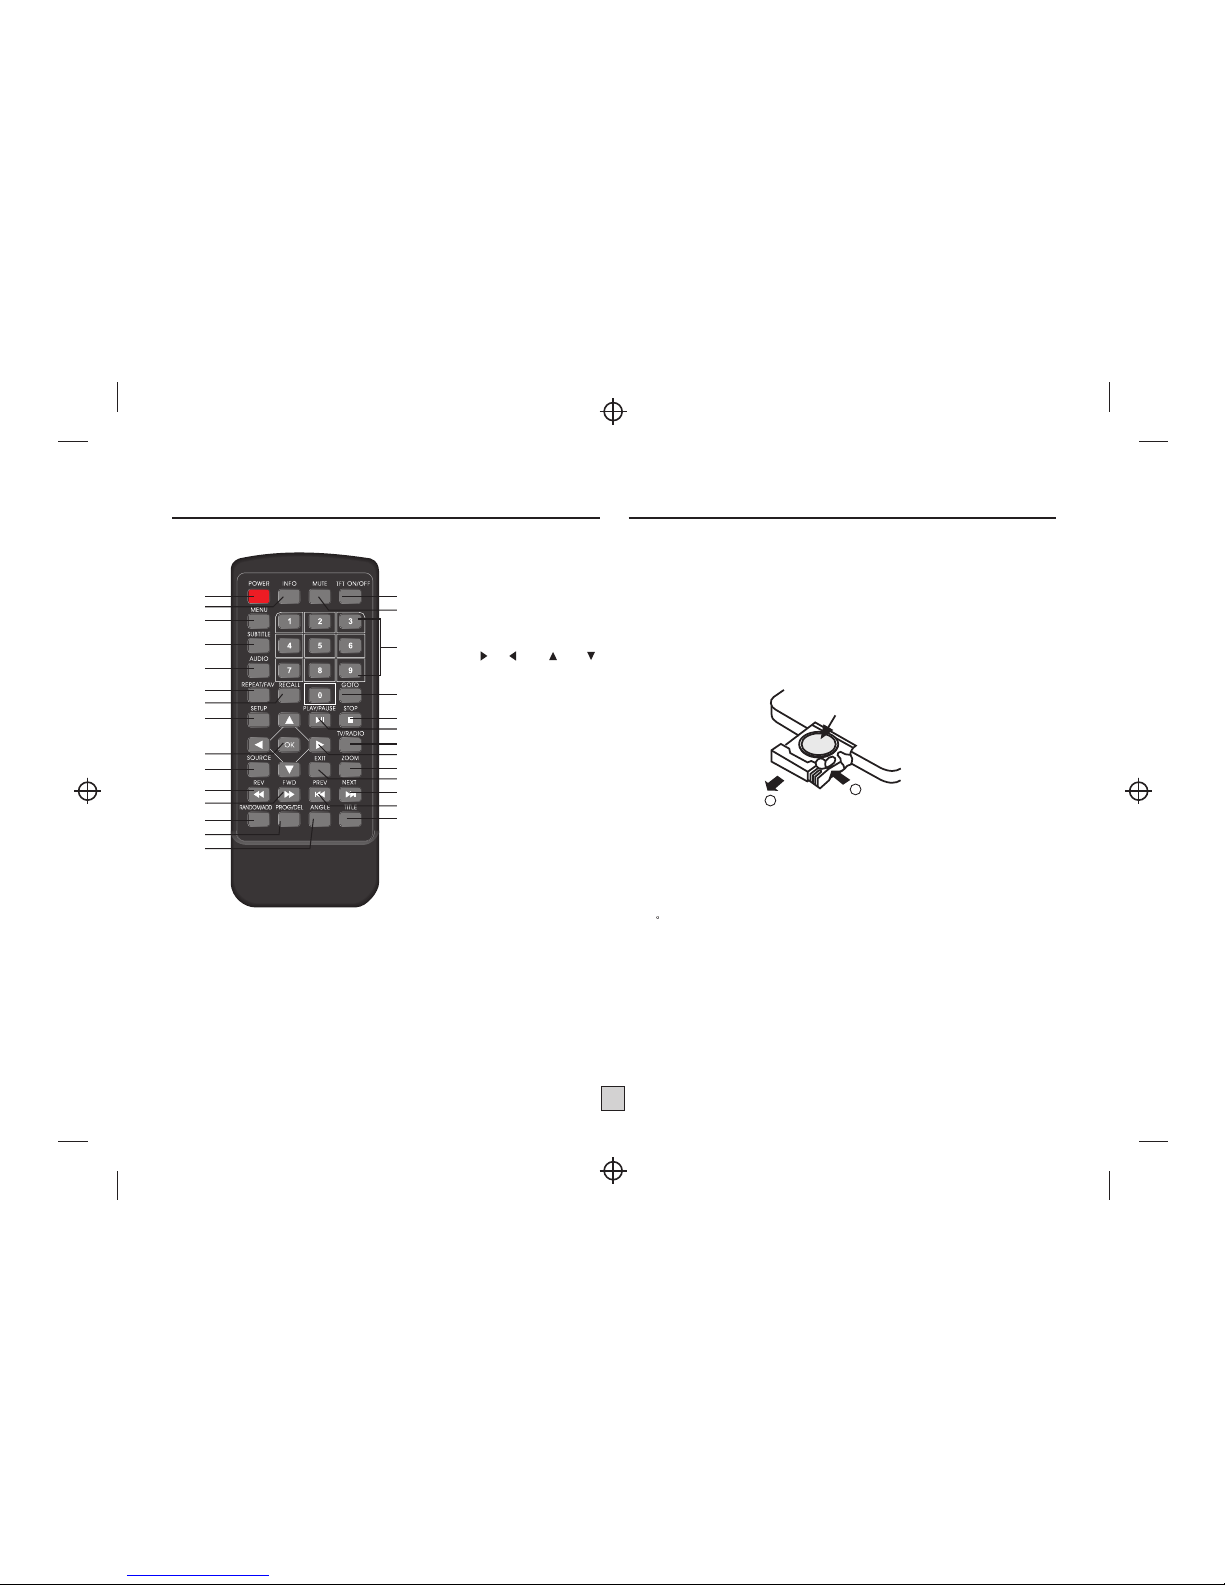
Remote Control......................................................................... 3
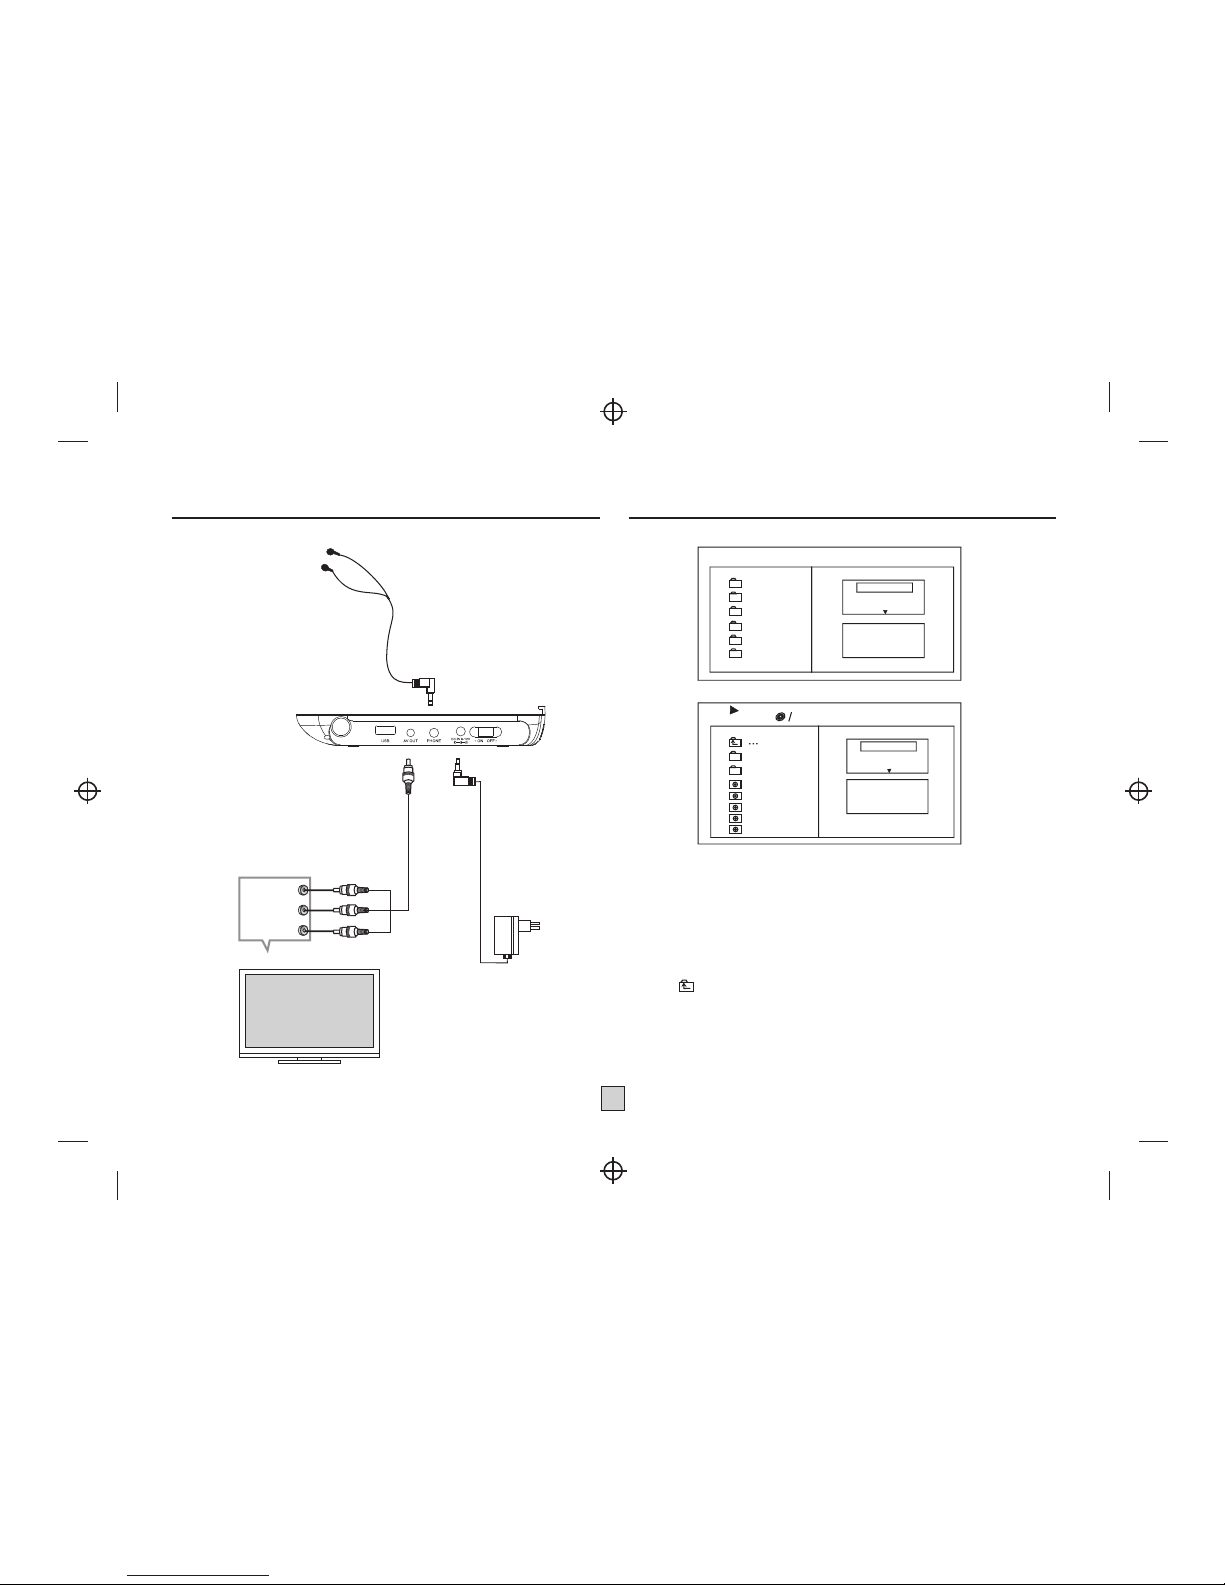
Connecting to a TV set................................................................4
MP3/WMA/MPEG4 playing.........................................................4
PICTURE CD PLAYBACK ...........................................................5
SYSTEM SETUP.......................................................................6
Trouble-shooting.......................................................................7
DVB-T PART............................................................................8
Specifications............................................................................9
Other.......................................................................................10
WARNING: Prolonged exposure to loud sounds from personal music players may
lead to temporary or permanent hearing loss.

Panel Illustration
2
Connect to the USB
POWER ( ON/OFF)
DC 12V INPUT JACK(power supply)
LCD DISPLAY
SPEAKER
DISC TOP
OPEN DISC TOP
SETUP
EXIT
SOURCE
PREV
NEXT
PLAY/PAUSE
STOP
MOVE( , , , )
PHONE JACK(Maximum output voltage 150mV)
AV OUT
USB
MENU
OK
POWER.IR.CHG
ANT IN (75 Ohm)
Press the SOURCE keyon the remote controluntil you switched into
USB work mode.
USB interface
This unit have a USBIN jack to play theMP3 music or and JPEGfiles or
other files.
Press the <SOURCE> button tochoose USB IN mode.
All the function is thesame to play a disc.
Note: the USB IN portis compatible with flash memories,it is not
warranted the compatibility with MP3players using owner software.
NOTE:
When using USB function. Pleasedo not insert in thewrong direction,
or it will be corrupted.
DVB-T
This unit have DVB-Tfunction press the <SOURCE>button tochoose
DVB-T mode.
USB
ANT IN

VOL- VOL+
1
2
CR2025
Preparation of the RemoteControl
Place the remotecontrol on an even surface andinsert the supplied
button cell into theremote control as follows.
Cell data
Battery type: 1x CR2025, 3 V
Service life: approximately 1year (for normal useand room temperature).
Using Of Remote Control
Point the remote controltowards the main unitwhen operating.
The remote control worksbest at a distanceless than 5 mand at an angleof up
to 30 to the front ofthe unit. No obstaclesmay stand in theway between
remote control and infraredsensor and do notplace the remote controlin direct
sunlight. If the remotecontrol unit fails towork even when itis operated near
the player, replacethe battery.
Notes on batteries
If the remote controlis not used fora long period oftime, please remove thebattery
from the compartment.
Do not heat batteriesor dispose of themin fires.
Do not dismantle, deformor modify batteries.
1. Push the buttontowards left.
2. Pull the batteryloader out.
3. Insert thebattery into the receptacle make surethe polarity matches
the marks inside thecomponent.
4. Insert thereceptacle into the remote control.
Remote Control
3
1. TFT on/off
2. MUTE
3. NUMBER KEYS
4. GOTO
5. STOP
6. PLAY/PAUSE
7. TV/RADIO
8. V+ , V- ,CH+ ,CH-
9. ZOOM
10. EXIT
11. NEXT
12. PREV
13. TITLE
14. POWER
15. INFO
16. MENU
17. SUBTITLE
18. AUDIO
19. REPEAT/FAV
20. RECALL
21. SETUP
22. OK
23. SOURCE
24. REV
25. FWD
26. RANDOM/ADD
27. PROG/DEL
28. ANGLE
1
2
3
4
5
6
7
8
9
10
11
12
13
14
15
16
17
18
19
20
21
22
23
24
25
26
28
27

4
MP3/WMA/MPEG4 PLAYING
AVI
Mp3
Mp4
Photo
WMA
XVID
Repeat off
Mode Normal
Filter
JPEG Preview
Audio
1/7
1
2
101
102
103
104
105
00:00:15
Repeat off
Mode Normal
Filter
Music Playing
The MP3/WMA/MPEG4 dischas such a directory structure asshown
.
Press Direction key to choose the rootdirectory and then pressOK
button to enter intothe sub directory.
Press Direction key to choose the desiredtrack and then pressOK
or PLAY to enjoy the music or movie.
If you want toreturn to the uppermenu, press Direction key to
choose the icon andpress OK button.
Filter: Allows selectingthe categories of filesdisplayed in the browserlist.
This selection isdone among the 3 categories:Audio, Photo and Video.
Repeat: To switch differentrepeat playing mode.
picture above
Mode: Select differentplaying mode.
L
R
CVBS
Red
Green
Yellow
VIDEO IN
AUDIO IN
TV
EARPHONE
ADAPTOR
Connecting to a TV set

5
Normal: Shuffle modeis cancelled.
Shuffle: Shuffle modeenabled. When playbackreaches the endof the
current chapter/track, playback jumpsto a random chapter/track.
As the end ofeach chapter/track is reached,another random chapter/
track will beplayed until all tracks/chapters have beenplayed or the
Shuffle mode is cancelled by togglingto a differentMode Option.
Music Intro: In thismode, the media willplay 10 seconds thenskip to
next media EditMode: To enable programmedplayback mode.
When you select themode, press LEFTDirection key to directory and
press OK to choose the desiredtrack and pressAdd to programto
.
Program view: Display programtrack.
Brower view: Display trackdirectory.
Add to program: Choicethe track pressAdd to programto add the track
of the program playdirectory.
Clear program: Inthe complete stop state(press the STOP button twice),
choose the track pressClear program to delete thetrack of the program
play directory.
add in programmedplaybac
PICTURE CD PLAYBACK
The PICTURE CDdisc has such a directory structurestructure as shown
in the followingpicture.
1/7
1
2
100
102
103
104
105
Repeat off
Mode Normal
Filter
JPEG Preview
Photo
Press Direction key to choose the rootdirectory and then pressOK
button to enter intothe sub directory.
Press Direction key to choose the desiredpicture and then press
OK or PLAY to enjoy thepicture.
If you want to return to theupper menu, pressDirection key to
choose the icon andpress OK button.
Image rotation
In picture play state,press Direction key to rotation the picture,press
ANGLE button to changethe picture scan mode.

OSD Language
Use this item to selectthe language of the setupmenu and screen display.
MPEG4 Subtitle
Audio
Follow the operating instructions stated in
Subtitle
This option provides the presetsubtitle language.
Follow the operating instructions statedin DVD MENU SETUPIn
combination with the desired option.
Choice different MPEG4 subtitleencoding option.
DVD MENU SETUP
ombination with the desired option.
This option provides the built-indisc dubbing language options.
In
c
6
VIDEO SETUP
Select Video in the setupmenu, and display the Video submenu:
DVD Menu
This option provides thefilm s menu languageoptions.
Follow the operatinginstructions stated in DVD MENU SETUP
In combination withthe desired option.
Language
Video
Rating
Misc
TV System
Smart Picture
Aspect Ratio
Aspect Ratio
The image display ratiois related to therecorded disc format. Somedisc
can not displayimages in the aspect ratio you choose.
If you play adisc recorded in 4:3format on a widescreenTV, blackbars
will appear onthe left and right side of the screen.
You mustadjust the screen setting depending on the type ofthe television
you have.
TV System
This product supportsoutput of various system, including NTSC, PAL.
If your TVset has onlyNTSC or PAL system, the screen will blink and
become colorless whena wrong system is selected.
Note: For more informationof output format, refer to theinstructions or
your TV set.
Smart picture
Adjust display effectfor video output: Standard:default effect.
Bright: internal setting forbright view effect.
Soft: internal setting forsoft view effect.
Dynamic: user adjust brightness,contrast, color etc.
MENU OPERATION
Press the SETUP button on the remotecontrol, the SETUPMENU(main)will be
displayed. After accessingthe setup menu, pressthe direction buttons forup
and down movement toselect an item desired,then press theOK button to
confirm. Press LEFT direction button return tothe menu of upperlevel.
To exitthe setup, press theSETUP button again. In theSETUP MENU, you may
choose any of thefollowing options as youlike.
LANGUAGE SETUP
Select Language in the setup menu,and display theLanguage submenu:
SYSTEM SETUP
Language
Video
Rating
Misc
OSD Language
Subtitle
MPEG4 Subtitle
Audio
DVD Menu

7
Language
Video
Rating
Misc
Use Default Settings
Language
Video
Rating
Misc
Parental Control
Set Password
Parental Control
Selecting a Rating allowsthe user to setthe parental control featureof
the player SelectParental Control, and pressOK to change the
different mode.
Note: Unlock the password beforesetting Parental Control.
Set Password
Use the 0-9 keysto input four digits(password),then press OK to
confirm.
Note: If you forget yourpassword, please use theuniversal password
6666 to unlock.
MISC SETUP
Select MISC in the setup menu,and display the submenu:
* Use Default SettingsReset setup data tofactory default and re-loaddisc.
RATING SETUP
Select Rating in the setupmenu, and display the Rating submenu:
Note: Not all DVD supportratings.
Carry out theproblem-solving measures described in the following
section before contacting CustomerSupport.
Turn offthe DVD player immediately as soonas you suspect a malfunction.
Unplug the powerplug and check whether the DVDplayer is unusually
warm or whether smokeis rising from it.
Trouble-shooting
Problem Possible cause Remedy
Disc cover not closed Close disc cover
No disc inserted Insert disc
Disc inserted the wrongway Insert disc with labelfacing up
Disc dirty or deformed Clean disc, or insertother disc
Regional code of the player does not
match the regional code of the DVD
Purchase DVD with corresponding
regional code
The DVD player
does not work
Moisture on lens Remove disc and turnoff
DVD player for at
least two hours
Device not properly connected
Check connexions and
connect device in the correct way
Headphones connected
(loudspeaker off) Pull out the headphones
DVD sound settings incorrect
Check sound settings and set sound
correctly
No audio
Disc dirty or deformed Clean disc, or insertother disc
TV screen is off or in the incorrect
video mode
Turn on LCD screen and/or set correct
video mode
No video
Device not properly connected
Check connexions and connect device in
the correct way
Poor video and/or
audio quality
Disc dirty or deformed Clean disc, or insertother disc
Loop mode is switchedon Exit the loop mode
Repeated
playback of a
section Disc dirty or deformed Clean disc, or insertother disc
Obstacle between remote control
and DVD player
Remove obstacle
Remote control not pointed at DVD
player
Point remote control directly at DVD player
Remote control battery inserted the
wrong way
Check the battery's polarity and, if
necessary, insert battery correctly
Remote control
does not work
Battery too low orcompletely
discharged Insert new battery

8
DVB-T PART
If you areusing the receiver for the firsttime, a First Time Installation
menu will bedisplayed to guide you through theinitial setup.
Use the remotecontroller to finish the setup.
A. At the First time installationmenu,
B.
C. Wait to completethe scanning.In case you want to stop the
scanning, press the<EXIT> button. Thechannels already found will
still be stored.
D. When finished, allactive channels found will be stored
automatically. Thelast found channelwill be played.
E. If youwant to reset stored
channel
2. DVB Modeof Main Menu
Press the <SETUP> or <MENU>button, the DVB main setup menu
appears the screen,then press the <DOWN> button tohighlight the
DVB Menu option.
You canselect your regional
settings, include yourLanguage,Country, TimeZone .
Then Select <OK> to start theautomatic channel search.
your regional settingsand clear all the
, you canselect<FTA Default Setting>and confirmto
reset it.
1. First TimeInstallation
Init Install
OSD Language : English
Area : Germany
Time Zone : GMT+1
FTA Default setting
English
Fraccais
Espanol
Deutsch
Nederlands
Polski
Installation
Auto search
Manual Search
System setup
A. Auto Search
Choose the AutomaticSearch options, Thisoperation same the First
Time Installation. Referto First time Installation.
B. Manual Search
If any channelis missing after auto search, oryou want to add newly
launched channels, you canuse Manual Search to scan thedesired
channels. To manually search thetarget channel, you mustknow its
parameters, e.g., the . Select <OK>button to
start manual searchAfter thechannel is found, it is appended to the
current channel listIf no signal is found, amessage indicating no signal
will appear.
Otherwise scanned channelwill be saved and appended tothe current
channel list.
C. System Setup
1) Language
Press the <DOWN> button tohighlight the Language options, then
Press the <RIGHT>button to intothe Language setup.
2) Area
Press the <DOWN> button tohighlight the Area options, In the Area
options, you canchoose a kinds of the Countries.As: England Germany,
Italy, France,Spain etc.
3) Time Zone
Select an appropriatetime zone to display the localtime correctly.
4)
If you wantto reset stored
channel
Frequency and Bandwidth
FTADefault Setting
your regional settingsand clear all the
, you canselect<FTA Default Setting>and confirmto reset it.

9
3.Favorite Function
In the DVBTmode, Press the<OK> , you will seethe channel
list, then select your favorite channel, then press the<RANDOM/ADD>
to add the favoritechannel. Or press the <PROG/DEL> to
remove the favoritechannel.
And then you canfind the favorite listby press the <REPEAT/FAV> .
4.Trouble Shooting
If you have anyquestions, please consult thetroubleshooting guide
below.
Unit Not Working
Turn off thepower, and thenturn it on again.
Remote Not Working
Ensure the remote batteries are working.
Point the remote control directly at theplayer's IR sensor.
Remove any obstacles between the remote andthe IR sensor.
No picture, no sound
Improper connection withAC adapter or Caradapter.
Use of unauthorized powersupply. PowerSwitch is on OFFposition.
No image
Whether antenna adjusted correctly;
Whether the correctChannel or Country selected.
May need to resetor search.
No sound
Whether the sound isturned to the end.
Whether earphone plugged in.
Whether press speakerbutton? Whether press mute button?
Diamonds in picture
Whether antenna adjusted correctly; Maybe tooweak signal at the
receiving place.
No signal
Whether the correct Countryselected; Maybe signal tooweak.
Dark picture
Adjust Brightness, Contrastcorrectly
Diamonds in picture orinferiorsound during driving.
The signal too weakat that place
button
button button
button
1)
2)
3)
4)
5)
6)
7)
8)
9)
Specifications
Play mode
Disc mode
Video S/N ratio
Resolution
Frequency response
Audio S/N ratio
Dynamic range
Distortion
D/A Converter
NTSC/PAL
DVD,VCD, CD, MP3, CD-R, CD-RW, JPEG,
DVD+ -R/W, MPEG4,
65dB.
500 lines.
fs 96KHz: 20Hz-20KHz:+/-1dBI
90dB
80dB
< 0.01%
96KHz/24bit

10
Other
Specifications are subject to change without notice.
Output characteristic
Display Device
Screen Size
Video output
Audio output
Power Voltage
Power consumption
Color TFT-LCD
9 inches
1Vp-p(75
2CH
DC IN 12V
12W
Other possible causes forproblems:
Static discharges or otherexternal interferences can causethe DVD
player to malfunction.When this happens, disconnect the powerplug
from the mainssocket and plug it back in.
If the problempersists, disconnect the device from themains again and
contact Customer Serviceor a repair shop.
VHF 177.5MHz~226.5MHz
UHF 474 MHz~858 Mhz
Input Frequency
Service and support
For information: www.lenco.com
For support: http://lencosupport.zendesk.com
Lenco helpdesk:
Germany 0900-1520530 (Local charges)
0900-23553626 (Local charges + 1ct p/min)
02-6200115 (Local charges)
The Netherlands
Belgium
France 03-81484280 (Local charges)
The helpdesk is accessible from Monday till Friday from 9 AM till 6 PM.
When contacting Lenco, you will always be asked for the model and serial number
of your product. The serial number can be found on the back of the device. Please
write down the serial number below:
Model: DVP-9411
Serial number:_________________________________
Lenco offers service and warranty in accordance to European law, which means that
in case of repairs (both during and after the warranty period) you should contact
your local dealer.
Important note: It is not possible to send products that need repairs to Lenco directly.
Important note: If this unit is opened or accessed by a non-official service center in
any way, the warranty expires.
This device is not suitable for professional use. In case of professional use, all
warranty obligations of the manufacturer will be voided.
This symbol indicates that the relevant electrical product or battery
should not be disposed of as general household waste in Europe.
To ensure the correct waste treatment of the product and battery,
please dispose them in accordance to any applicable local laws of
requirement for disposal of electrical equipment or batteries. In so
doing, you will help to conserve natural resources and improve
standards of environmental protection in treatment and disposal of
electrical waste (Waste Electrical and Electronic Equipment
Directive).
Products with the CE marking comply with the EMC Directive
(2004/108/EC) and the Low Voltage Directive (2006/95/EC) issued
by the Commission of the European Community.
®All rights reserved

ILenco II DVP-9411
9
22,86
13
9
Table of contents
Other LENCO Portable DVD Player manuals

LENCO
LENCO DVP-940 User manual

LENCO
LENCO DVP-931 User manual

LENCO
LENCO MES-216 User manual

LENCO
LENCO DVP-738X2 User manual

LENCO
LENCO MES-202 User manual

LENCO
LENCO TDV901 User manual

LENCO
LENCO DVP-735 User manual

LENCO
LENCO DVP-1063 User manual

LENCO
LENCO MES-404 User manual

LENCO
LENCO DVP-715 User manual

LENCO
LENCO DVP-928 User manual

LENCO
LENCO DVP-1040 User manual

LENCO
LENCO DVP-1039 User manual

LENCO
LENCO MES-402 User manual

LENCO
LENCO MES-212 User manual

LENCO
LENCO MES-220 DVX - User manual

LENCO
LENCO DVP-947 BK User manual

LENCO
LENCO MES-4031 User manual

LENCO
LENCO DVP-9412 User manual

LENCO
LENCO DVP-1064BK User manual