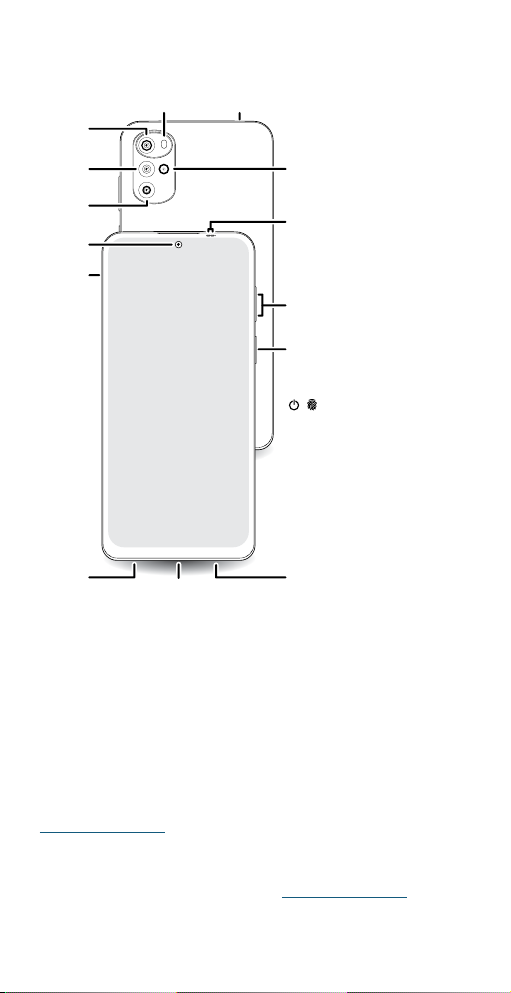
Lenovo K15 Plus User manual

User Guide
To best view this guide, download a PDF
reader app, then open the guide in the app.

Contents
Hot topics
Get Started
First look
Insert the SIM and microSD cards
Power on
Sign in
Connect to Wi-Fi
Choose one or more profiles
Check your battery charge level
Navigate your phone
Improve battery life
Care for your phone
Learn the basics
Home screen
Help & more
Search
Notifications
Volume
Do not disturb
Lock screen
Quick settings
Speak
Gestures
Picture-in-Picture
Personalize your phone
Redecorate your home screen
Add accounts to your personal or
work profile
Add another user
Digital wellbeing & parental controls
Apps
Add and update apps
Phone
Messages
Chrome™
Camera
Photos
Gmail
Duo
Calendar
More apps
Connect, share, pay & sync
Connect with Wi-Fi
Connect with Bluetooth wireless
Connect to your car
Pay with your phone
Share files with your computer
Share your data connection
Share files with Nearby Share
Print
Sync to the cloud
Cast to a TV
Use a memory card
Airplane mode
Mobile network
Protect your phone
Screen lock
Your privacy
App pinning
Backup & restore
App safety
Data usage
Troubleshoot your phone
Restart or remove an app
Restart your phone
Check for software update
Reset
Stolen phone
Find the IMEI number
Accessibility
Create a shortcut
Make your phone speak
Speak to your phone
Change your phone’s display
Change your phone’s sounds
Get more help
Where is my legal, safety &
regulatory information?
Service & repairs
Copyright & trademarks

Get Started
Hot topics
»Personalize your phone
»Quick settings
»Camera
»Protect your phone
»Speak
»Connect to Wi-Fi
»Navigate your phone
Tip: To view all of these topics on your phone, swipe up from the home
screen and tap Device Help > Learn. For FAQs and other phone
support, visit http://support.lenovo.com.
To view the SAR and/or PD values for your phone, from the
home screen, swipe up and tap Settings > , then type
Regulatory labels.
This product meets the applicable national or international RF exposure
guidance (SAR guideline) when used normally against your head or, when
worn or carried, at a distance of 5 mm from the body. To meet RF
exposure guidelines during body-worn operation, the device should be
positioned at least this distance away from the body. The SAR guideline
includes a considerable safety margin designed to assure the safety of all
persons, regardless of age and health.
To view additional information, visit www.sar-tick.com.
Caution: Before using your phone, please read the legal information.
Swipe up from the home screen and tap Settings > About phone >
Legal information.
Get Started
»First look
»Insert the SIM and microSD cards
»Power on
»Sign in
»Connect to Wi-Fi
»Choose one or more profiles
»Check your battery charge level
»Navigate your phone
»Improve battery life
»Care for your phone

Get Started
First look
Let’s get started. We’ll guide you through startup and tell you a bit about
your phone’s features.
Phone hardware buttons: top right are Volume up and down keys, middle right is Power button. Bottom middle is charging port. Top right is headset jack. On screen, top left is front
camera, top right is flash. Navigation icons are along the bottom.
Note: Certain apps and features may not be available in all countries.
Power button & fingerprint sensor
Choose from these options:
» Power on/o: Press and hold the Power button, then tap Power o.
When your phone is o, press and hold the Power button to turn it on.
» Sleep/Wake up: To conserve battery power and prevent accidental
touches, put the touchscreen to sleep by pressing the Power button.
Press it again to wake it up.
» Unlock: Unlock your phone by tapping the fingerprint sensor. See
Protect your phone to setup the fingerprint sensor.
» Restart: To restart your phone, press and hold the Power button, then
tap Restart.
Note: To add security to your phone, see Protect your phone.
Main
Camera
Ultra-wide
Camera
Flash
Front
Camera
SIM &
microSD
Card Tray
Headset Jack
Volume
Buttons
USB-C®/Charger
Speaker
Micr
ophone
Depth
Camera
Macro
Camera
Power
Button/
Fingerprint
Sensor
Proximity
Sensor
/

Get Started
Volume buttons
To turn volume up or down:
» Media volume: Press the volume buttons when your phone is not
ringing, or during a song or video, to adjust media volume.
» Call volume: Press the volume buttons during a call.
» Ring volume: Press a volume button, then tap and slide the Ring
volume bar. Press a volume button when your phone is ringing to
silence a call.
» Notification volume: Press a volume button, then tap and slide the
Notification volume bar.
» Alarm volume: Press a volume button, then tap and slide the Alarm
volume bar.
Tip: Tap > See more to see all Sound & vibration controls. Or tap
Done. For more on volume control, see Volume.
Insert the SIM and microSD cards
To activate phone service, you might need to insert a SIM card (or two), or
this may have been done for you. You can also add a microSD card, which
is optional and sold separately.
Note: Make sure you use the correct size SIM card and don’t cut the SIM
card.
1 Insert the SIM tool into the SIM tray hole to pop out the tray.
Tip: Refer to the diagram below for tray and hole location.
2 Insert the SIM card(s) with the gold contacts down, then gently push
the tray into the slot. Add a microSD card for additional storage.
Note: microSD card is optional, sold separately.
SIM card insert graphic. Make sure the SIM card is inserted correctly.
Nano SIM
SIM
SIM1
SIM2
One SIM model Two SIM model

Get Started
Power on
Press and hold the Power button, then follow the prompts to get started.
Power on graphic. Press and hold the Power button until the screen lights up.
Sign in
If you use Gmail™, you already have a Google™ account—if not, you can
create an account during setup. Signing into your Google account lets
you access, sync, and backup your stu. You can see your Google apps,
contacts, calendar, photos, and more.
To make sure your apps are up-to-date, see Add and update apps.
Tips
» To add, edit, or delete accounts, swipe up from the home screen and
tap Settings > Passwords & accounts.
» To set up email accounts, see Gmail.
» For help with your Google account, visit www.google.com/accounts.
Connect to Wi-Fi
For faster Internet access and to conserve mobile data use, swipe the
status bar down. Tap Internet, then choose a Wi-Fi network. For full
instructions, see Connect with Wi-Fi.
Note: This phone supports apps and services that may use a lot of data,
so make sure your data plan meets your needs. Contact your service
provider for details.
Choose one or more profiles
You can set up more than one profile on your phone, such as a Work and
Personal profiles, and add apps and features to each profile. For example,
you can add business related apps to your Work profile, and keep social
media and gaming apps in your Personal profile.
Note: Some apps may have slightly dierent features depending on which
profile it’s connected to.
For details on how to set up and add apps to dierent profiles, see
Personalize your phone.

Get Started
Check your battery charge level
Now is a good time to check if your phone needs to be charged. Swipe
down on the home screen to show battery charge level.
USB-C
Charge phone graphic. Plug in a charger to charge your phone fully.
Charge your phone using a compatible Lenovo charger (may be sold
separately). Use of other chargers is not recommended. Insert the
charging cable into the charging port (see First look for port location).
Plug the other end into a power receptacle.
Caution: Chargers that do not comply with applicable national standards
may be unsafe, with risk of death or injury, and may cause slow charging,
product damage, or reduced device performance. To view applicable
standards and to learn more, visit lenovomobilesupport.lenovo.com/legal.
Navigate your phone
Explore by touch
Use your fingers to find your way around:
» Tap: Choose an icon or option.
» Touch and hold: See more options.
» Drag: Move items on the home screen.
» Swipe: Scroll through lists or between screens.
» Pinch or double-tap: Zoom in and out on websites, photos, and maps.
» Twist: Twist a map with two fingers to rotate it, and slide two fingers
up to tilt it.
» Split screen: Tap , then tap the icon at the top of the screen and tap
Split screen. Not all apps will work in split screen. To close the split
screen, drag the dividing line to the bottom of the screen.
» Menus: When you see , , or , you can tap it to open options for
the current screen.
» Close Keyboard: To close a keyboard, tap .
Tip: To quickly open Settings, swipe down twice on the status bar and
tap .
System navigation
Navigate using either gestures or buttons on the screen.

Get Started
Navigation buttons
Find it: Swipe up from the home screen and tap > Settings > System
> Gestures >System navigation >3-button navigation
» Back: Tap Back to go to the previous screen.
» Home: Tap Home to return to the home screen.
» Recents: Tap Recents to see your recent apps (or browser tabs),
and tap an app to reopen it. Double-tap to quickly switch between
your recent apps. To remove an app from the recent list, swipe it up. To
scroll the list, swipe right or left.
» Google Assistant: Touch and hold Home to launch the Google
Assistant. Learn more about The Google Assistant™.
Navigation bar
Find it: Swipe up from the home screen and tap > Settings > System
> Gestures >System navigation >Gesture navigation
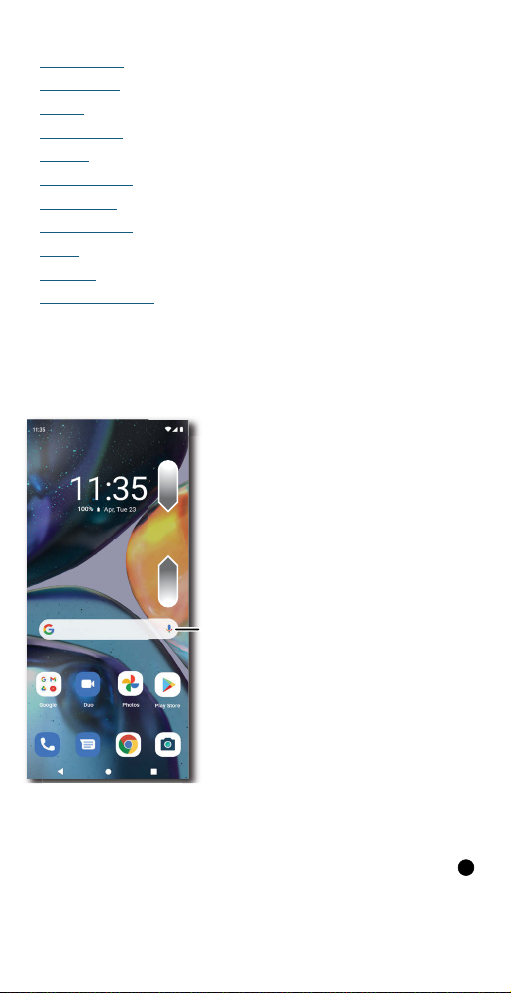
» Go to the home screen: Swipe up from the bottom of the screen.
» See recent apps: Swipe up from the bottom of the screen and hold.
Tap an app to reopen it. Tap the app icon to see app info or split the
screen.
» Go back a screen: Swipe toward the middle of the screen from the left
or right edge.
» Switch between apps: Swipe left or right on the navigation bar.
» Launch the Google Assistant: Swipe up diagonally from the bottom
corner of the screen to launch the Google Assistant. Learn more about
The Google Assistant™.
Improve battery life
Your phone processes tons of information. Depending on what apps are
in use, your phone may use a lot of power.
When your phone is not in use for a period of time, unnecessary
background processes are shut down to optimize battery life.
» To see what’s using up battery power, swipe up from the home screen
and tap Settings > Battery > Battery usage.
» To help improve battery life, swipe up from the home screen and tap
Settings > Battery > Battery Saver, and tap the switch to turn it on.
When on, your phone’s display changes to Dark theme.
» To limit battery use for apps that you don’t use often, swipe up from
the home screen and tap Settings > Battery > Adaptive Battery,
and turn it on.
Battery Tips
To save even more battery life between charges, you could reduce:
» Widgets that stream information to your home screen, like news or
weather.
» Unused accounts: Swipe up from the home screen and tap Settings
> Passwords & accounts.

Get Started
» Recording or streaming videos or music.
Care for your phone
Tips
» Restart your phone each morning to keep it running optimally.
» When you’re near water, consider using a Bluetooth speaker to listen to
music from your phone while keeping it safe. For more, see Connect
with Bluetooth wireless.
» Hold your phone firmly when using gestures to open the camera or to
turn the flashlight on/o. For more, see Gestures.
» Don’t leave your phone in a hot car on a sunny day. If you do
accidentally do this, let your phone cool o before powering up.
In case of water
Mobile devices marketed as water repellent are not waterproof. Avoid
prolonged exposure to water, and do not submerge in water. In the event
your device is exposed to water, dry your device and ports thoroughly
with a soft, clean cloth. Water damage is not covered by your warranty.
Tips to prevent damage to your phone:
» Dry your phone and ports thoroughly with a soft, clean cloth.
» Don’t try to charge your phone when it’s wet.
» Do not expose your phone to salt water or other liquids.
» Do not expose your phone to water at high pressure.
» Do not drop or puncture your device, as this could damage the water
repellent features.
Clean your phone
To disinfect your phone:
» Use wipes or cloths moistened with isopropyl alcohol with a
concentration of 70% (specific for electro-electronic products).
» It is recommended that you turn your phone o to clean it.
» Avoid moisture in the phone’s openings, including the charging port,
headset jack, microphones, and speakers.
» Do not immerse the phone in cleaning agents, and do not use cleaning
materials that contain bleach or abrasive agents.
» Do not use sprays directly on the screen.

Get Started
Learn the basics
»Home screen
»Help & more
»Search
»Notifications
»Volume
»Do not disturb
»Lock screen
»Quick settings
»Speak
»Gestures
»Picture-in-Picture
Home screen
The home screen is what you see when you turn on your phone. From
here you can explore apps and more.
Note: Software updates may change the look of your home screen.
Home screen. At the top, tap the Google bar to type search options or tap the right hand microphone icon to speak a search. Icons at the top show notifications and phone status icons.
Swipe up from center bottom to get to your apps. App icons along the bottom are commonly used apps: phone, message, Google Chrome, Gallery, and camera.
Tips
» Open app list: From the home screen, swipe up to see all your apps.
» Return home: To return to the home screen from any location, tap .
» Pages: To add a page, drag an app to the right side of the screen until
you see a new page. You can add multiple pages. To see other pages of
shortcuts and widgets (if available), swipe the home screen left.
Swipe up to see all
your apps.
Search by typing or
tap the microphone
and say a command.
Swipe down to
see notifications
and settings.

Get Started
» Settings: To quickly open common settings, swipe the status bar down.
To open more settings, swipe the status bar down again and tap .
» Customization: To personalize your home screen and other features,
see Personalize your phone.
Help & more
Learn even more about your phone and get support.
Find it: Swipe up from the home screen and tap > Device Help
Tip: Some apps have their own help that’s specific to their features. Just
tap the menu inside the app for details.
Search
On the home screen, tap or to search by voice or image.
Or, tap the Google Search box for a text search. When you type,
suggestions appear below the search field:
» To search for a suggestion, tap it.
» To search for text in the search field, tap on the keyboard.
Tip: To close the keyboard, tap .
Note: For voice search, see Speak.
Notifications
At the top of the screen, icons on the left notify you about new messages
or events. If you don’t know what an icon means, swipe the status bar
down for details.
Tip: Getting too many notifications? Swipe up from the home screen and
tap Settings > Notifications > App Settings. Tap a switch to turn
notifications on/o.
Note: Your screen may look dierent.
Notifications screen. Swipe down from the top of the home screen down to view notifications.
Tip: To quickly change common settings, swipe the status bar down. For
more, see Quick settings.
Internet
Do Not Distrub Auto-rotate
Bluetooth
Manage Clear all
Android System
Good morning!
Weather forecast
5 m
20 m
8 m
Tip: Swipe left or right to remove a
notification. Tap the arrow next to a
notification to see more.
Swipe down to see
your notifications.
Tap a notification to open it, or
choose an option, such as Reply.
Noti cations

Get Started
Bubbles
Easily see and participate in conversations using notification bubbles that
float on top of the display.
Find it: Swipe up from the home screen and tap Settings >
Notifications > Bubbles, then tap the switch to turn it on
To use, tap a bubble to open and reply to a conversation. Drag the bubble
around the screen to move it.
Note: Not all apps support this feature.
Smart reply
See suggestions based on notification content. For example, a text with
an address may show Google Maps as an option.
To turn o Smart reply, swipe up from the home screen and tap
Messages > Menu > Settings > Suggestions in chat > Smart Reply.
App notifications
You may see a notification dot on an app. This app
notification, or badge, tells you the app has an update or an
announcement, such as a new email or a missed call. Touch
and hold the app for more information, options, or app
shortcuts.
Privacy notifications
You may see a privacy notification green dot in the top right of the
screen. This privacy notification, tells you the camera or microphone
has been accessed.
Status icons
Icons at the top right of the screen tell you about phone status:
Status Icons
Network strength Alarm set
/ Wi-Fi in range/connected Data Saver on
Airplane mode Battery Saver on
Do not disturb Wi-Fi hotspot on
Battery charging Battery fully charged

Get Started
Volume
Press the side volume buttons up or down to select a ringer volume and
see other controls.
Volume screen. Press the Volume keys up or down to control the volume for Ring Notification, Media, and Alarm sounds. On screen, change the volume using slide bars.
Live Caption detects speech on your phone and shows you captions.
Tap to turn it on. When a caption shows, touch and hold the caption to
move it. Double-tap the caption to expand it.
Do not disturb
To turn o some or all sounds, swipe the status bar down, and tap Do
Not Disturb. To change Do Not Disturb settings, touch and hold Do
Not Disturb, then select an option:
» People: Allow some people to interrupt when they call, send a
message, or start a conversation.
Tip: Create an exception for repeat callers that allows a call to sound
from the same person within a 15 minute period, tap People > Calls >
Allow repeat callers.
» Apps: Choose the apps that can interrupt you when Do Not Disturb is
on.
» Alarms & other interruptions: Choose whether to hear sounds from
alarms, media, keypad, reminders, and calendar events.
» Schedules: Set a schedule to turn on Do Not Disturb at specific times
during the day or night.
Show all volume controls.
Tap to mut
e the ringer or set
phone to vibrate.
Slide to increase/decrease
volume.
Turn on Live Caption.

Get Started
Lock screen
Your touchscreen is on when you need it and o when you don’t.
Lock screen showing access to voice control on the bottom left and camera on the bottom right. Swipe this screen up to unlock it.
» Screen o and on: Press the Power button to turn the screen o and
on.
» Screen lock: To unlock the main lock screen, swipe up from the bottom
of the screen. To apply security to the lock screen (recommended), see
Screen lock.
» Notifications: Double-tap a notification to open it.
Tip: To prevent notifications from appearing in the lock screen, swipe
up from the home screen and tap Settings > Notifications >
Notifications on lock screen > Don’t show any notifications.
» Lock screen message: To add a message to your lock screen, such as
your name in case your phone gets lost, swipe up from the home
screen and tap Settings > Display >Lock screen > Add text on
lock screen.
» Screen timeout: To change your screen lock timeout, swipe up from
the home screen and tap Settings > Display > Screen timeout.
Quick settings
For quick access to handy settings, swipe the status bar or lock screen
down. Swipe down again for more settings.
Tap an icon to turn features on or o. Touch and hold an icon to see more
options. For even more settings, tap .
Add a lock screen message for
anyone who finds your phone.
Thanks for nding my phone!
Swipe up to unlock
your screen.

Get Started
Tip: Tap to rearrange your settings and add or remove settings.
Quick Settings screen that shows options, such as Wi-Fi, Bluetooth, Airplane mode, Location and more. Customizable.
Speak
Google Voice™
Use Google voice commands to tell your phone what you want.
» Use voice to make a call: Tap on the home screen. Then say “Call”
and then a contact name or number. Or, say “Send text.”
Tip: If a contact has more than one number, you can say which number
to call (for example, “Call Joe Black Mobile”).
» Search by voice: Tap on the home screen to search by voice.
Note: To wake up your phone by saying “Hey Google,” see The Google
Assistant™.
Voice to text
On a keyboard, tap , then speak your message or search text. You can
also speak punctuation.
The Google Assistant™
Note: This feature may not be available in all languages.
To start the Google Assistant:
» Tap Assistant from the home screen or from your list of apps.
» Touch and hold , then speak or type a command.
Note: You can also say “Hey Google” or “Ok Google” to start the Google
Assistant. To turn this feature on, swipe up from the home screen and tap
Settings > Google > Settings for Google apps > Search, Assistant &
Voice > Voice > Voice Match.
Tip: Start your day with a Google Assistant Routine. Hear a morning
report, including weather and calendar events. Turn this on in the Clock
app. For more tips, visit https://support.google.com/assistant.
See all phone settings.
Set screen brightness.
Tap an option to turn it
on/off. Touch and hold to
see more options.
Swipe left for more
quick settings.

Get Started
Gestures
Explore special gestures designed to save you time and make your day
easier.
Find it: Swipe up from the home screen and tap Settings > System >
Gestures
Note: Your phone may not have all features.
» Quickly open camera: Press the Power button twice to launch the
camera.
» System navigation: Navigate using either gestures or buttons at the
bottom of the screen. For more, see System navigation.
» Press and hold power button: Turn on the switch to launch the Google
Assistant by pressing and holding the Power button. Turn it o to
access the power menu by pressing and holding the Power button.
» Prevent ringing: Press the Power and Volume Up buttons at the same
time to switch incoming calls to vibrate or mute.
» Three finger screenshot: Touch and hold the screen with three fingers
to take a screenshot.
» Fast flashlight: Turn the flashlight on/o with two chopping motions.
» Quick capture: Twist your wrist twice to open the camera.

Get Started
Picture-in-Picture
If you’re watching a video, on a video call, or using navigation, and you
change screens, your video continues to play in a small window on your
screen.
» Tap , to put the video in a small window.
» Drag the video around your screen.
» Drag to the bottom of the screen to close it.
» Tap twice to make it full size again.
Note: Not all apps support this feature.
Picture-in-Picture mode. Tap the video to open it on your screen.
October
6
Nothing planned. Tap to create.
Lunch Date
11:30 AM - 1:00 PM
Indigenous Peoples’ Day
Dr. appt.
1:00 PM
School meeting
6:00 PM
Pick up dinner
4:30 PM
Meeting
8:30 AM
Picnic at the farm
12:00 PM
Meeting
8:30 AM
Dentist
10:00 AM
Wed
7
Thu
11
Mon
12
Tue
13
Wed
14
Wed
15
Fri
17
Sun
18
Mon
21
Thu
Oct 17- 23
Tap the video twice to return
to it.

Get Started
Personalize your phone
»Redecorate your home screen
»Add accounts to your personal or work profile
»Add another user
»Digital wellbeing & parental controls
Redecorate your home screen
Customize your home screen the way you want.
Home screen showing customize options. Touch and hold the home screen to add a widget. Tap an app to open it. Touch and hold it to move or remove it.
» Change your wallpaper: Touch and hold an empty spot on the home
screen, then tap Wallpapers.
» Add a home screen page: Drag an app to the right side of the home
screen until a new page appears. You can add multiple pages.
» Adjust display settings: Adjust brightness, font size, and screen saver.
Swipe up from the home screen and tap Settings > Display.
» Switch to dark theme: Change your display to use dark theme, which
saves battery and can be easier on your eyes. Swipe up from the home
screen and tap Settings > Display > Dark theme.
Tip: Tap Schedule to set when you want Dark theme to display.
» Change your style: Change your font and icon style. Touch and hold an
empty spot and tap Personalize.
» Rotate: In many apps, the touchscreen switches from portrait to
landscape when you rotate your phone. To turn this on or o, swipe up
from the home screen and tap Settings > Display > Auto-rotate
screen.
Note: To see more home screen settings, touch and hold an empty spot
Drag shortcuts on top of each
other to make a folder.
Tap a shortcut to open.
Touch and hold to move
or delete.
Touch and hold an empty
spot to change wallpaper.

Get Started
and tap Home settings.
Choose apps & widgets
» Add apps to the home screen: Swipe up, touch and hold an app, then
drag it to one of your home screen pages.
» Download new apps: Tap Play Store. For more on apps, see App
safety.
» Group apps together: Drag one app onto another. Do it again to add
more apps to the folder. To name the folder, tap it, then tap Edit Name
and enter a name below the apps.
Tip: To group apps in the app tray, swipe up > Menu > Create folder.
Type a name for the folder, then tap the apps to add to the folder.
When finished, tap Done.
» See app options: Touch and hold an app. If the app has quick options
(shortcuts), you’ll see a list.
» Add widgets: Touch and hold an empty spot on the home screen, tap
Widgets, touch and hold a widget, then drag it to your home screen.
» Resize widgets: You can resize some widgets—touch and hold a
widget until you feel a vibration, then release. Drag the white circles at
the edges to resize.
» Move or delete widgets and apps: Touch and hold a widget or app
and drag it to another spot, another page, or to Remove.
Note: Removing an app from your home screen doesn’t uninstall the
app from your phone.
Customize sounds & appearance
Customize your phone’s sounds and display settings:
» Set ringtone and notifications: Swipe up from the home screen and
tap Settings > Sound & vibration.
Tip: Set notification sounds for individual apps within the app’s
settings.
» Night Light: Set your screen to turn slightly amber colored at night.
Swipe up from the home screen and tap Settings > Display > Night
Light.
» Add vibrate for calls: To make your phone vibrate, swipe up from the
home screen and tap Settings > Sound & vibration and tap Vibrate
for calls.
» Set a ringtone for a contact: Swipe up from the home screen and tap
Contacts, tap the contact, then tap Menu > Set ringtone.
» Change language: Swipe up from the home screen and tap
Settings > System > Languages & input > Languages.
» Adjust font size: Swipe up from the home screen and tap Settings
> Display > Font size.

Get Started
Add accounts to your personal or work profile
During startup, you set up a profile, either Personal or Work. You can also
add an account to the other profile.
1 To add an account to a profile, from the home screen, swipe up >
Settings > Accounts, then tap the Personal or Work tab.
2 Tap Add account, and choose the type of account.
3 Follow the prompts to create the account.
Tip: To see which apps are connected to which profile, swipe up >
Settings > Apps & notifications, then tap the option to see all apps.
Add another user
You can share your phone with others by adding additional users.
Find it: Swipe up from the home screen and tap Settings > System >
Multiple users
Tap the switch to turn on, then add someone as a guest (if using your
phone for only a short time), or as a user. Guests and Users can customize
the home screen, accounts, apps and other settings without aecting the
options you have set. However, a Guest account is easier to remove from
your phone.
To switch between users, swipe down from the home screen with two
fingers to open Quick Settings. Tap , then tap a user name.
Note: Guests and Users will have access to Wi-Fi, Bluetooth, and most
apps. They are not able to access your files, texts, email, photos, music, or
your personal data from an app.
Table of contents
Other Lenovo Cell Phone manuals

Lenovo
Lenovo K8 Plus User manual

Lenovo
Lenovo A859 User manual

Lenovo
Lenovo NX188 User manual

Lenovo
Lenovo A7010 User manual

Lenovo
Lenovo IDEAPHONE P770 User manual

Lenovo
Lenovo Moto G5 Plus Instruction sheet

Lenovo
Lenovo A600e User manual

Lenovo
Lenovo K10 User manual

Lenovo
Lenovo A916 User manual

Lenovo
Lenovo K520 User manual

Lenovo
Lenovo VIBE C User manual

Lenovo
Lenovo A606 User manual

Lenovo
Lenovo A319 User manual

Lenovo
Lenovo VIBE P1 User manual

Lenovo
Lenovo P70 User manual

Lenovo
Lenovo PHAB2 How to use

Lenovo
Lenovo A7 L19111 User manual

Lenovo
Lenovo S60-a User manual

Lenovo
Lenovo K33b36 User manual

Lenovo
Lenovo K53b36 User manual