Leuze MLD510-R3M/A Quick start guide

MLD
Anwenderhinweise
Mehrstrahl-Sicherheits-Lichtschranken MLD
User notes
MLD multiple light beam safety devices
Instrucciones de usuario
Dispositivos de seguridad multihaz MLD
Conseils d’utilisation
Barrages immatériels multifaisceaux de sécurité MLD
Istruzioni per l'uso
Barriere fotoelettriche multiraggio di sicurezza MLD
Instruções do usuário
Barreiras de luz de segurança de múltiplos feixes MLD
사용자 지침
다중빔 안전 광전 감지기 MLD
用户提示
多光束安全光栅 MLD
Kullanıcı bilgileri
Çok ışınlı emniyet bariyerleri MLD
Leuze electronic GmbH + Co. KG
We reserve the right to make changes – 2021/10/15 – 50145184-01
www.leuze.com•

Gültigkeit
Diese Anwenderhinweise gelten für die Mehrstrahl-Sicherheits-Lichtschranken
MLD.
Sicherheit
Für Montage, Betrieb und Prüfungen müssen dieses Dokument, die Originalbe-
triebsanleitung sowie alle zutreffenden nationalen und internationalen Normen,
Vorschriften, Regeln und Richtlinien beachtet werden. Relevante und mitgelieferte
Dokumente müssen beachtet, ausgedruckt und an das betroffene Personal wei-
tergeben werden.
Lesen und beachten Sie vor der Arbeit mit dem Produkt die für Ihre Tätigkeit zu-
treffenden Dokumente vollständig.
Die Schutzfunktion ist nur dann gewährleistet, wenn der Sicherheits-Sensor für
den vorgesehenen Anwendungsbereich geeignet und fachgerecht montiert ist.
ÄLassen Sie den Sicherheits-Sensor nur von fachkundigem Personal montie-
ren.
ÄHalten Sie notwendige Sicherheitsabstände ein. Beachten Sie dabei auch
den Mindestabstand zu reflektierenden Flächen.
ÄVerhindern Sie optisches Übersprechen benachbarter Systeme.
ÄBeachten Sie, dass Hintertreten, Unterkriechen und Übersteigen der Schutz-
einrichtung sicher ausgeschlossen ist und Unter-/ Über- und Umgreifen im Si-
cherheitsabstand ggf. durch den Zuschlag CRO entsprechend ENISO13855
berücksichtigt sind.
ÄErgreifen Sie Maßnahmen die verhindern, dass der Sicherheits-Sensor dazu
verwendet werden kann, Zugang zum Gefährdungsbereich zu erlangen, z.B.
durch Betreten oder Klettern.
ÄReinigen Sie die Geräte regelmäßig.
ÄAktivieren Sie bei Zugangssicherungen die Anlauf/-Wiederanlaufsperre, da
nur das Betreten des Gefahrenbereichs erkannt wird, nicht aber ob sich eine
Person dort befindet.
ÄDie Quittiereinheit zum Entriegeln der Anlauf-/Wiederanlaufsperre darf aus
dem Gefahrenbereich heraus nicht erreichbar sein und muss Einsicht auf den
gesamten Gefahrenbereich gewährleisten.
ÄPrüfen Sie nach Montage die einwandfreie Funktion des Sicherheits-Sensors.
ÄEin automatischer Betrieb der Maschine ohne geeignete Schutzeinrichtung ist
zu unterbinden. Bei Wartungsarbeiten, z.B. Umbau, Einrichtung, Prüfung ist
die Anlage sicher stillzusetzen bzw. andere Maßnahmen zur Risikominderung
einzusetzen.
Mehrstrahl-Sicherheits-Lichtschranken der Baureihe MLD sind für einen Einsatz
bei nachfolgenden Umgebungsbedingungen nicht vorgesehen:
– in Umgebungen mit hoher Luftfeuchtigkeit, in denen Kondensation auftreten
kann.
– in Umgebungen, in denen das Produkt in unmittelbarem Kontakt zu Wasser
steht.
– in Umgebungen, in denen sich Beschlag und Eis auf der Frontscheibe des
Gerätes bilden können.
2
DE

Weitergehende Informationen für sicheres Implementieren, Prüfen und Betreiben
des Sicherheits-Sensors enthält die einschlägige Betriebsanleitung. Sie finden die
Originalbetriebsanleitung und die EU-Konformitätserklärung, indem Sie auf unse-
rer Website www.leuze.com die Artikelnummer des Sicherheits-Sensors in das
Suchfeld eingeben. Die Artikelnummer kann auf dem Typenschild des Sensors
unter dem Eintrag „Part.No.“ abgelesen werden.
Der Sicherheits-Sensor erfüllt die grundlegenden Anforderungen und die übrigen
einschlägigen Bestimmungen der Maschinenrichtlinie 2006/42/EG.
Anzeigeelemente
Betriebsanzeigen am Transmitter
1
1 LED
2 Strahlaustritt
Am Transmitter befindet sich an jeder Lichtachse eine grüne LED zur Funktions-
anzeige.
LED Beschreibung
Grün Sendestrahl aktiv
Aus Fehler (Sendestrahl nicht aktiv, Fehler oder keine Spannungsversor-
gung)
3
DE

Betriebsanzeigen am Receiver
2
1 7-Segment-Anzeige
2 LED2
3 Strahlaustritt
4 LED1
Am Receiver befinden sich unten je nach Typ eine oder zwei Leuchtdioden
(LED1, ggf. LED2).
LED1 Bedeutung
Grün Dauerlicht OSSD* ein
Rot Dauerlicht OSSD* aus
Rot langsam blinkend
(ca. 1Hz)
Anwenderfehler, externer Fehler
Rot schnell blinkend
(ca. 10Hz)
Gerätefehler, interner Fehler
Grün langsam blinkend
(ca. 1Hz)
OSSD* ein, Schwachsignal
* Ausgangsschaltelemente (Output Switching Signal Device), die ein sicherheits-
relevantes Ereignis zuverlässig signalisieren und an die Steuerung weitergeben.
LED2 (nur MLDx20/x30/x35) Bedeutung
Gelb Dauerlicht – Lichtweg ist frei
– Wieder-/Anlaufsperre ist verriegelt
– Warten auf Quittiersignal
Informationen zum Blinkverhalten bei MLD/AS-i-Geräten sind in der Betriebsanlei-
tung MLD Kapitel11.2 zu finden.
Bedeutung der 7-Segment-Anzeige (nur MLDx20/x30/x35)
Anzeige Bedeutung
1…6 Gewählte Betriebsart im Normalbetrieb
F… Gerätefehler, interner Fehler
E… Anwenderfehler, externer Fehler
U… Usage Event, Fehler im Betrieb (z.B. Mutingfehler)
8 oder . Fehler beim Hochlaufen (siehe Kapitel11)
Eine detaillierte Auflistung der Anzeigen ist in der Betriebsanleitung MLD Kapi-
tel11.3 zu finden.
4
DE

Betriebsanzeigen am Transceiver
Am Transceiver befinden sich je nach Typ eine oder zwei Leuchtdioden (LED1,
ggf. LED2) im unteren Bereich (vgl. Receiver) sowie je nach Typ eine 7-Segment-
Anzeige (vgl. Receiver) und an den Lichtachsen im oberen Bereich je eine grüne
LED (vgl. Transmitter).
Farbiger Leuchtmelder (falls vorhanden)
3
1 Leuchtmelder
Leuchtmelder Bedeutung
Grün OSSD ein
Rot OSSD aus
Gelb/rot wechselnd – Lichtweg ist frei
– Wieder-/Anlaufsperre ist verriegelt
– Warten auf Quittiersignal
– OSSDs aus
Rot langsam blinkend
(ca. 1Hz)
OSSD aus, Anwenderfehler
Rot schnell blinkend
(ca. 10Hz)
OSSD aus, Gerätefehler
Grün langsam blinkend
(ca. 1Hz)
OSSD ein, Schwachsignal
Weiß Muting (bei MLDx30 und MLDx35)
Weiß blinkend / Weiß/rot blinkend Muting-Fehler (bei MLDx30 und
MLDx35)
5
DE

Montage und Inbetriebnahme
Befestigen
4
ÄGeräte mit der gewünschten Befestigungsart befestigen (Halter separat be-
stellen), beide Typenschilder entweder oben oder unten.
Grobausrichtung und Anbringen der Laserwarn- und Laserhinweisschilder
5
ÄGeräte weitestgehend parallel und auf gleicher Höhe, Frontscheiben zueinan-
der gerichtet ausrichten. Bei Geräten mit integrierter Laserausrichthilfe Laser-
warn- und Laserhinweisschilder gut sichtbar anbringen.
Anschließen
6
1 Anschluss Maschinen-Interface
2 Lokalbuchse
ÄGerät anschließen und Spannungsversorgung einschalten.
Gerät/Betriebsart M12-Rundsteckverbinder Anschluss
Transmitter 5-poliger Stecker
Receiver/Transceiver
MLDx10/20
5-poliger Stecker oder 8-
poliger Stecker
Anschluss an das Maschi-
nen-Interface (1)
Receiver/Transceiver
MLDx30/35
– 8-poliger Stecker
– 5-polige oder 8-poli-
ge Lokalbuchse (2)
– Anschluss an das
Maschinen-Interface
(1)
– Anschluss Muting-
Sensorbox oder di-
rekter Anschluss
von Mutingsenso-
ren, Muting-Leucht-
melder und Reset-
Taster
Wahl Betriebsart der Ge-
rätevarianten
MLDx20/30/35
8-poliger Stecker Via Pinbelegung am An-
schluss an das Maschi-
nen-Interface (1)
Weitere Informationen zur Steckerbelegung und Konfiguration in der Betriebsan-
leitung MLD.
6
DE

Prüfen
7
1 Grün
2 Grün/gelb+rot/rot
ÄStatus LEDs prüfen: Dauerleuchten
Falls nicht wie angegeben: Fehlerbehebung in Betriebsanleitung MLD Kapitel 11
„Fehler beheben“.
Ausrichten
8
ÄSchrauben der Halterungen bzw. der Gerätesäulen lösen.
9
ÄWenn vorhanden, integrierte Laserausrichthilfe mit Magnet Key am Transmit-
ter aktivieren.
10
ÄGerät bzw. Gerätesäule mit Gerät durch Kippen, Neigen und Drehen ausrich-
ten.
11
Optimale Ausrichtung:
Mitte der Verdrehwinkel, bei dem die LED(s) gerade noch rot und gelb bzw. grün
leuchten.
ÄJustageschrauben wieder anziehen.
7
DE

Validity
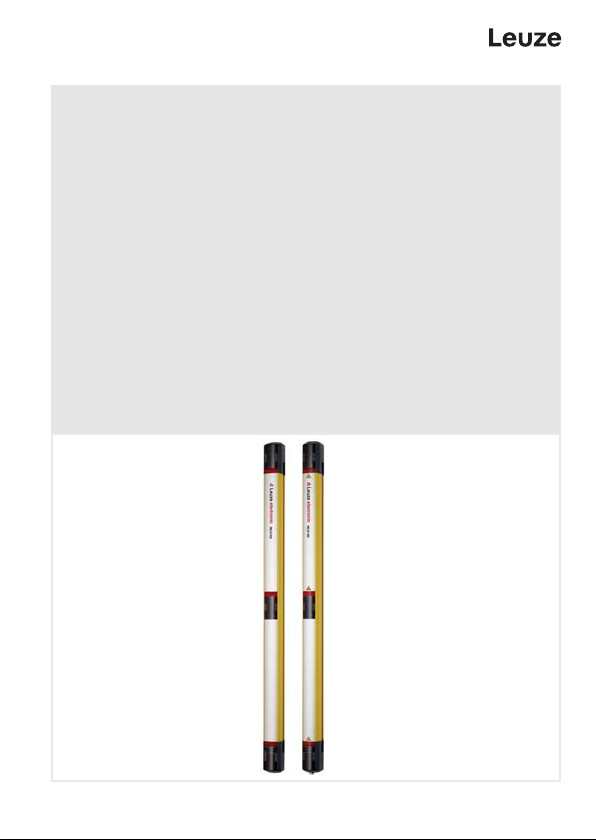
These user notes apply to the MLD multiple light beam safety devices.
Safety
For mounting, operating and testing, this document, the original operating instruc-
tions as well as all applicable national and international standards, regulations,
rules and directives must be observed. Relevant and supplied documents must be
observed, printed and handed to the affected personnel.
Before working with the product, completely read and understand the documents
applicable to your task.
The protective function is only ensured if the safety sensor is mounted appropri-
ately and properly for the intended area of application.
ÄOnly allow competent personnel to install the safety sensor.
ÄMaintain the necessary safety distances. Also observe the minimum distance
to reflective surfaces.
ÄPrevent optical crosstalk between adjacent systems.
ÄMake sure that stepping behind, crawling under or stepping over the protec-
tive device is reliably ruled out and reaching under, over or around is taken
into account in the safety distance, if applicable with additional distanceCRO
corresponding to ENISO13855.
ÄTake measures to prevent that the safety sensor can be used to gain access
to the danger zone, e.g. by stepping or climbing into it.
ÄClean the devices regularly.
ÄFor access guarding, activate the start/restart interlock as only entry into the
danger zone is detected and not whether a person is located within the dan-
ger zone.
ÄThe acknowledgment unit for unlocking the start/restart interlock must not be
reachable from the danger zone, and the entire danger zone must be clearly
visible from the location at which the acknowledgment unit is installed.
ÄAfter mounting, check the safety sensor for proper function.
ÄAutomatic operation of the machine without suitable protective device is not
permitted. Before performing maintenance work, e.g. conversion, setup or
testing, shut down the system safely and/or take other measures to mitigate
risks.
Multiple light beam safety devices of the MLD series are not intended for use in
the following environmental conditions:
– In environments with high air humidity in which condensation can occur.
– In environments in which the product is in direct contact with water.
– In environments in which fogging and ice can form on the front screen of the
device.
The relevant operating instructions contain further information on the safe imple-
mentation, testing and operation of the safety sensor. You can find the original op-
erating instructions and the EU Declaration of Conformity by entering the part
number of the safety sensor in the search field on our website www.leuze.com.
The part number can be read on the name plate of the sensor under the "Part
No." entry.
The safety sensor meets the basic requirements and the other relevant provisions
of the machinery directive 2006/42/EC.
8
EN

Display elements
Operating indicators on the transmitter
1
1 LED
2 Beam exit
There is a green LED at each light axis of the transmitter serving as a function in-
dicator.
LED Description
Green Transmitted beam active
Off Error (transmitted beam inactive, error or no voltage supply)
Operating indicators on the receiver
2
1 7‑segment display
2 LED2
3 Beam exit
4 LED1
Depending on the model, there are one or two LEDs located at the bottom of the
receiver (LED1 and, if applicable, LED2).
LED1 Meaning
Green, continuous light OSSD* on
Red, continuous light OSSD* off
Red, slowly flashing
(Approx. 1 Hz)
User error, external error
Red, quickly flashing
(Approx. 10 Hz)
Device error, internal error
Green, slowly flashing
(Approx. 1 Hz)
OSSD* on, weak signal
* Output switching signal devices that reliably signal a safety-relevant event and
pass it on to the control.
9
EN

LED2 (MLDx20/x30/x35 only) Meaning
Yellow, continuous light – The light path is free
– Start/restart interlock locked
– Waiting for acknowledgment sig-
nal
Information on the flashing behavior with MLD/AS-i devices can be found in chap-
ter 11.2 of the MLD operating instructions.
Meaning of the 7-segment display (MLDx20/x30/x35 only)
Display Meaning
1…6 Selected operating mode in normal operation
F… Device error, internal error
E… User error, external error
U… Usage event, error during operation (e.g., muting error)
8 or . Error during startup (see chapter 11)
A detailed listing of the displays can be found in chapter 11.3 of the MLD operat-
ing instructions.
Operating indicators on the transceiver
Depending on the model, there are one or two LEDs located at the bottom of the
transceiver (LED1 and, if applicable, LED2) (cf. receiver) as well as, depending on
the model, a 7-segment display (cf. receiver) and, on each of the light axes in the
upper area, a green LED (cf. transmitter).
10
EN

Colored indicator light (if present)
3
1 Indicator
Indicator Meaning
Green OSSD on
Red OSSD off
Yellow/red, alternating – The light path is free
– Start/restart interlock locked
– Waiting for acknowledgment sig-
nal
– OSSDs off
Red, flashing slowly
(approx.1Hz)
OSSD off, user error
Red, flashing fast
(approx.10Hz)
OSSD off, device error
Green, flashing slowly
(approx.1Hz)
OSSD on, weak signal
White Muting (for MLDx30 and MLDx35)
White flashing / white/red flashing Muting error (for MLDx30 and MLDx35)
Mounting and commissioning
Fastening
4
ÄSecure the devices using the desired type of fastening (holder must be or-
dered separately); both name plates either at top or bottom.
Rough alignment and attachment of the laser warning and information signs
5
ÄAlign the devices so that they are close to parallel and at the same height; po-
sition the front screens so that they are facing one another. For devices with
integrated laser alignment aid, attach laser warning and information signs at a
clearly visible location.
11
EN

Connection
6
1 Connection of machine interface
2 Local socket
ÄConnect the device and switch on the voltage supply.
Device/Operating mode M12 connector Connection
Transmitter 5-pin connector
Receiver/Transceiver
MLDx10/20
5-pin connector or 8-pin
connector
Connection to the ma-
chine interface (1)
Receiver/Transceiver
MLDx30/35
– 8-pin connector
– 5-pin or 8-pin local
socket (2)
– Connection to the
machine interface
(1)
– Connection of mut-
ing sensor box or di-
rect connection of
muting sensors,
muting indicators
and reset buttons
Selecting the operating
mode of device models
MLDx20/30/35
8-pin connector Via pin assignment at the
connection to the ma-
chine interface (1)
Additional information on the pin assignment and configuration in the MLD operat-
ing instructions.
Testing
7
1 Green
2 Green/yellow+red/red
ÄCheck status LEDs: continuously lit
If not as specified, refer to the troubleshooting measures in chapter 11 "Trou-
bleshooting" of the MLD operating instructions.
12
EN

Alignment
8
ÄLoosen the screws on the mounting brackets or device columns.
9
ÄIf present, activate the integrated laser alignment aid with magnet key on the
transmitter.
10
ÄAlign the device or device column with device by tipping, tilting and turning.
11
Optimum alignment:
Middle of the twist angle at which the LED(s) are only just lit red and yellow or
green.
ÄRetighten alignment screws.
13
EN

Validez
Estas instrucciones de usuario tienen validez para los dispositivos de seguridad
multihaz MLD.
Seguridad
Para el montaje, el funcionamiento y las comprobaciones deben observarse este
documento, las instrucciones originales de uso y todas las normas, prescripcio-
nes, reglas y directivas nacionales e internacionales pertinentes. Igualmente de-
berá tenerse en cuenta la documentación relevante incluida en el volumen de en-
trega, imprimiéndola y entregándola al personal involucrado.
Antes de trabajar con el producto, lea completamente y observe los documentos
que afecten a su actividad.
La función de protección solo está garantizada cuando el sensor de seguridad ha
sido montado apropiadamente y con profesionalidad para el ámbito de aplicación
previsto.
ÄEncargue el montaje del sensor de seguridad únicamente a personal capaci-
tado.
ÄRespete las distancias de seguridad necesarias. Observe la distancia mínima
respecto a las superficies reflectantes.
ÄEvite la interferencia óptica de sistemas contiguos.
ÄAsegúrese de que pasar por detrás, arrastrarse y trepar por el equipo de pro-
tección esté descartado de forma segura y que se tenga en cuenta la entrada
al campo de protección por debajo, por encima y por alrededor, dado el caso,
mediante el suplementoCRO conforme a ENISO13855.
ÄTome medidas que eviten que el sensor de seguridad se pueda utilizar para
acceder a la zona de peligro, p.ej., entrando o trepando.
ÄLimpie el equipo periódicamente.
ÄActive el rearme manual/automático en las protecciones de accesos, ya que
solo se detecta la entrada de personas a la zona de peligro y no si alguien se
encuentra allí.
ÄDesde la zona de peligro no se debe poder llegar a la unidad de confirmación
para desbloquear el rearme manual/automático y se debe garantizar la visibi-
lidad de toda la zona de peligro.
ÄDespués del montaje, compruebe que el sensor de seguridad funciona co-
rrectamente.
ÄSe debe evitar el funcionamiento automático de la máquina sin equipo de
protección adecuado. En los trabajos de mantenimiento, como modificacio-
nes, ajustes e inspecciones, la instalación se debe detener de forma segura
o se deben implementar otras medidas para reducir el riesgo.
Los dispositivos de seguridad multihaz de la serie MLD no han sido diseñados pa-
ra ser empleados con las siguientes condiciones ambientales:
– En entornos con alta humedad del aire, donde se puede producir condensa-
ción.
– En entornos en los que el producto está en contacto directo con el agua.
– En entornos en los que es probable que el cristal frontal del equipo se em-
pañe o hiele.
14
ES

Encontrará información acerca de la implementación, la verificación y el uso se-
guros del sensor de seguridad en las instrucciones de uso pertinentes. Encontra-
rá las instrucciones originales de uso y la declaración de conformidad UE introdu-
ciendo el código del sensor de seguridad en el campo de búsqueda en nuestro si-
tio web www.leuze.com. El código se puede encontrar en la placa de característi-
cas del sensor bajo «Part. No.».
El sensor de seguridad cumple los requisitos esenciales y las demás disposicio-
nes pertinentes de la Directiva de Máquinas 2006/42/CE.
Elementos de indicación
Indicadores de funcionamiento en el emisor
1
1 LED
2 Salida del haz
En cada eje luminoso del emisor hay un LED verde que indica el funcionamiento.
LED Descripción
Verde Haz emitido activo
Apagado Error (haz emitido inactivo, error o no hay alimentación de tensión)
15
ES

Indicadores de funcionamiento en el receptor
2
1 Display de 7 segmentos
2 LED2
3 Salida del haz
4 LED1
Según el modelo, en el receptor hay uno o dos diodos luminosos (LED1 y, dado
el caso, LED2).
LED1 Significado
Verde, luz continua OSSD* activada
Rojo, luz continua OSSD* desactivada
Rojo con parpadeo lento
(aprox. 1Hz)
Error de usuario, error externo
Rojo con parpadeo rápido
(aprox.10Hz)
Error del equipo, error interno
Verde con parpadeo lento
(aprox. 1Hz)
OSSD* activada, señal débil
* Elementos de conmutación de salida (Output Switching Signal Device), que se-
ñalizan de forma fiable cualquier evento relacionado con la seguridad y lo trans-
miten al control.
LED2 (solo MLDx20/x30/x35) Significado
Amarillo, luz continua – El recorrido de la luz está libre
– Rearme manual/automático blo-
queado
– Esperar señal de confirmación
Encontrará información sobre el comportamiento de parpadeo en los equipos
MLD/AS-i en el capítulo11.2 de las instrucciones de uso MLD.
16
ES

Significado del display de 7 segmentos (solo MLDx20/x30/x35)
Indicación Significado
1…6 Modo de trabajo elegido durante el funcionamiento normal
F… Error del equipo, error interno
E… Error de usuario, error externo
U… Usage Event, error de funcionamiento (p.ej. error de muting)
8 o . Error al arrancar (vea capítulo11)
Encontrará un listado detallado de las indicaciones en el capítulo11.3 de las ins-
trucciones de uso.
Indicadores de funcionamiento en el transceptor
Según el modelo, en el transceptor hay uno o dos diodos luminosos (LED1 y, da-
do el caso, LED2) en la parte inferior (comp. receptor) así como un display de 7
segmentos (comp. receptor) y un LED verde (comp. emisor) en cada eje óptico de
la parte superior.
Lámpara de color (si existe)
3
1 Lámpara
Lámpara Significado
Verde OSSD activada
Rojo OSSD desactivada
Amarillo/rojo alterno – El recorrido de la luz está libre
– Rearme manual/automático blo-
queado
– Esperar señal de confirmación
– OSSD desactivadas
Rojo con parpadeo lento
(aprox.1Hz)
OSSD desactivada, error del usuario
Rojo con parpadeo rápido
(aprox.10Hz)
OSSD desactivada, error del equipo
Verde con parpadeo lento
(aprox.1Hz)
OSSD activada, señal débil
Blanco Muting (con MLDx30 y MLDx35)
Blanco parpadeante / blanco/rojo par-
padeante
Error de muting (con MLDx30 y ML-
Dx35)
17
ES

Montaje y puesta en marcha
Fijación
4
ÄFijar los equipos con el tipo de fijación deseado (pedir soporte por separado),
ambas placas de características o bien arriba o bien abajo.
Alineación estimada y colocación de las placas de aviso y de advertencia de láser
5
ÄAlinee los equipos lo más paralelo posible y a la misma altura con los crista-
les frontales uno frente al otro. En los equipos con alineador láser integrado,
se deben colocar las placas de aviso y de advertencia de láser bien visibles.
Conexión
6
1 Conexión de la interfaz de máquina
2 Hembrilla local
ÄConectar el equipo y encender la alimentación de tensión.
Equipo/modo de trabajo Conector redondo M12 Conexión
Emisor Conector de 5 polos
Receptor/transceptor ML-
Dx10/20
Conector de 5 polos o co-
nector de 8 polos
Conexión a la interfaz de
máquina (1)
Receptor/transceptor ML-
Dx30/35
– Conector de 8 polos
– Hembrilla local de 5
polos u 8 polos (2)
– Conexión a la inter-
faz de máquina (1)
– Conexión de la car-
casa del sensor de
muting o conexión
directa de los senso-
res de muting, lám-
paras de muting y
pulsador de reinicio
Selección del modo de
trabajo de los modelos de
equipo MLDx20/30/35
Conector de 8 polos Vía asignación de pines
en la conexión a la inter-
faz de máquina (1)
Encontrará más información sobre la asignación de conector y la configuración en
las instrucciones de uso MLD.
18
ES

Comprobar
7
1 Verde
2 Verde/amarillo+rojo/rojo
ÄComprobar LED de estado: luces continuas
Si no es como se especifica: consultar la eliminación de errores en las instruccio-
nes de uso MLD, capítulo11 «Eliminación de errores».
Alineación
8
ÄSuelte los tornillos de los soportes o las columnas de montaje.
9
ÄEn caso que exista, active el alineador láser integrado en el emisor con la
MagnetKey.
10
ÄOrientar el equipo o la columna de montaje con el equipo inclinándolo y gi-
rándolo.
11
Alineación óptima:
Centro del ángulo de torsión en el cual los LEDs siguen luciendo en rojo y amari-
llo o verde.
ÄVolver a atornillar los tornillos de ajuste.
19
ES

Validité
Ces conseils d’utilisation s’appliquent aux barrages immatériels multifaisceaux de
sécurité MLD.
Sécurité
Pour le montage, l'exploitation et les contrôles, il convient de prendre en compte
ce document, le manuel d'utilisation d'origine ainsi que toutes les normes, pres-
criptions, règles et directives nationales et internationales qui s'appliquent. Les do-
cuments pertinents et livrés doivent être observés, imprimés et remis au person-
nel concerné.
Avant de commencer à travailler avec le produit, lisez entièrement les documents
relatifs aux activités impliquées et observez-les.
La fonction de protection n'est garantie que si le capteur de sécurité est adapté au
domaine d'application prévu et a été monté de façon conforme.
ÄLe capteur de sécurité ne doit être monté que par un personnel compétent.
ÄRespectez les distances de sécurité requises. Veuillez également respecter
la distance minimale aux surfaces réfléchissantes.
ÄEmpêchez la diaphonie optique de systèmes voisins.
ÄVeillez à ce qu'il soit impossible de passer les pieds dans le dispositif de pro-
tection ni de ramper en dessous ou de passer par dessus et à tenir compte
de l'accès des mains par le haut, par le bas et par le côté dans la distance de
sécurité, le cas échéant à l'aide du supplément CRO conformément à
ENISO13855.
ÄPrenez des mesures afin d'empêcher l'utilisation du capteur de sécurité pour
accéder à la zone dangereuse, par exemple en entrant ou en grimpant.
ÄNettoyez régulièrement les appareils.
ÄPour la sécurisation d’accès, activez le blocage démarrage/redémarrage,
puisque seule l’entrée dans la zone dangereuse est détectée, et pas si une
personne s’y trouve.
ÄL'unité d'acquittement pour déverrouiller le blocage démarrage/redémarrage
ne doit pas pouvoir être atteinte depuis la zone dangereuse. Elle doit par ail-
leurs permettre de voir l'ensemble de la zone dangereuse.
ÄAprès le montage, assurez-vous que le capteur de sécurité fonctionne correc-
tement.
ÄUn fonctionnement automatique de la machine sans dispositif de protection
adapté doit être empêché. Pendant les travaux de maintenance, par exemple
une transformation, une implémentation ou des contrôles, le système doit
être arrêté en toute sécurité ou d'autres mesures de réduction des risques
doivent être appliquées.
Les barrages immatériels multifaisceaux de sécurité de la série MLD ne sont pas
prévus pour l'emploi dans les conditions ambiantes suivantes:
– dans les environnements dans lesquels l'humidité de l'air est élevée et de la
condensation peut apparaître.
– dans les environnements dans lesquels le produit est en contact direct avec
de l’eau.
– dans les environnements dans lesquels de la buée ou de la glace peuvent
se former sur la vitre avant de l’appareil.
20
FR
This manual suits for next models
8
Table of contents
Languages:
Other Leuze Safety Equipment manuals