Lightstar LUXED P Series User manual

LUXED P Series
User Manual

Table of Contents
General Introduction 1
General Characteristics 1
LUXED-P2 – Technical Information 2
LUXED-P3 – Technical Information 3
LUXED-P4 – Technical Information 4
LUXED-P6 – Technical Information 5
LUXED-P9 – Technical Information 6
LUXED-P12 – Technical Information 7
Operational Instructions 9
DMX Control 11
Notice and Maintenance 13
Service Warranty Ordinance 14

1
General Introduction
General Characteristics
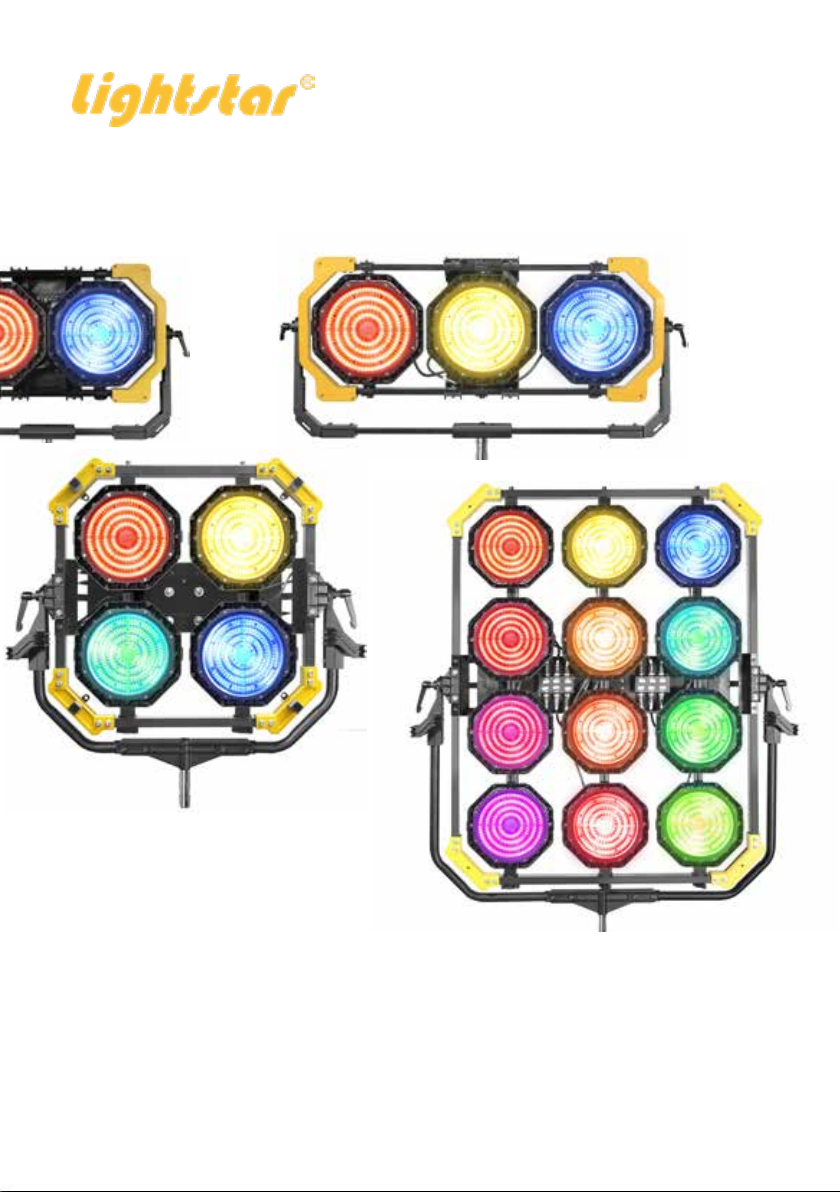
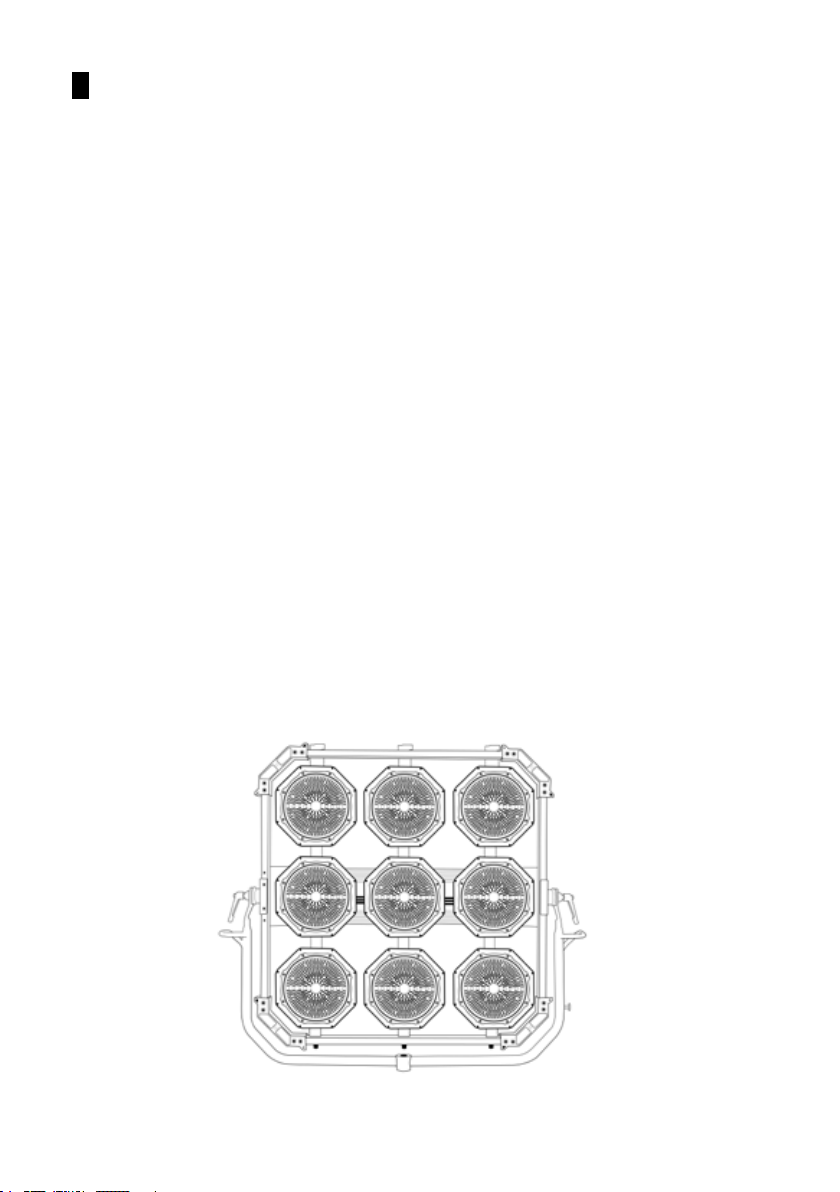
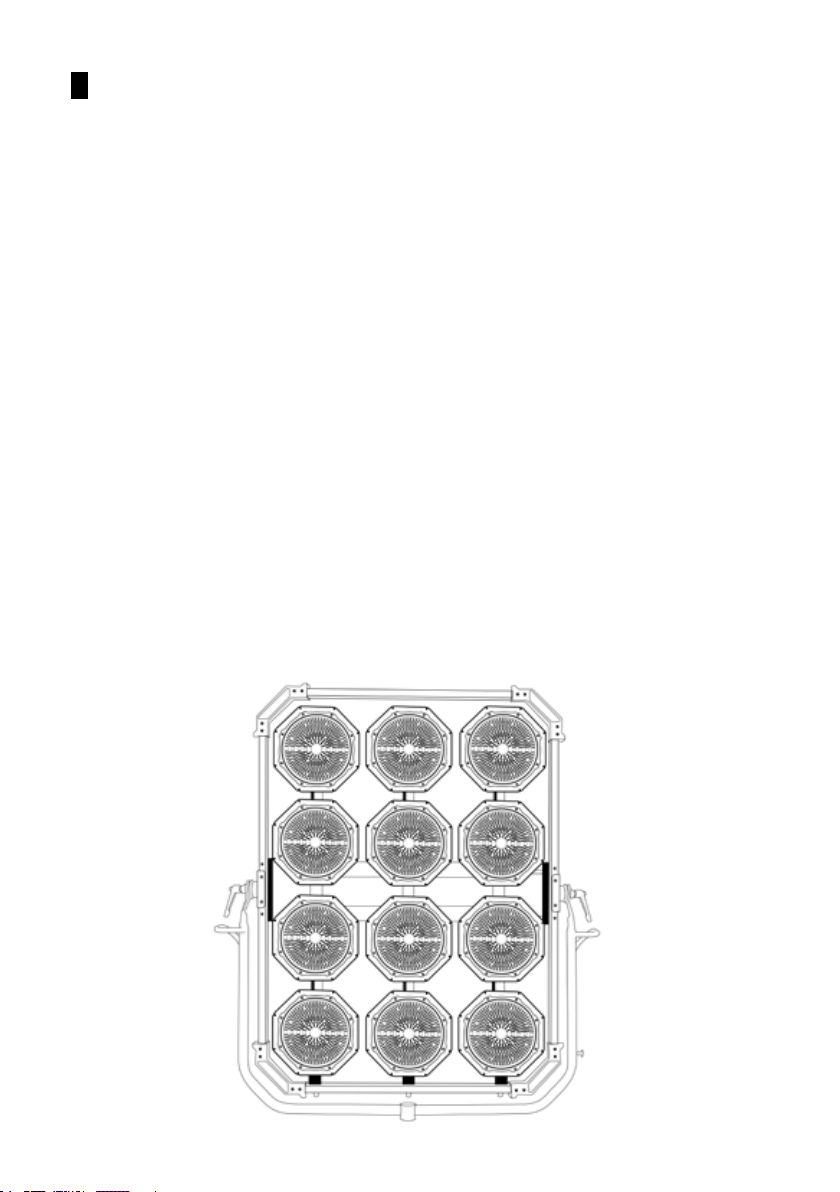
The Lightstar LUXED P Series are RGBWW LED spotlights, optimized for
heat dissipation and with an all new optical design. By using RGBWW high-
quality LED‘s the spectral light distribution is even more continuos, resul-
ting in accurate colors. The LUXED Series has a high output of power and
can be used to substitute old Dyno tungsten lights, which need a lot more
power. Also the ability to change the color and color temperature is a huge
advantage to the original Dyno lights.
The original innovater of the LUXED series has been widely recognized in
the market especially in the lm and television industry.
• modular design
• high quality bi-color light, CRI ≥ 95
• brightness adjustable from 0 - 100%
• color temperature adjustable between 2400K and 10000K
• 360° adjustable panchromatic hue
• luminous ux output stays relatively stable when temperature is adjus-
ted
• Ability to change between Spot and Flood in Menu
• supports DMX512 protocol
• LCD software control, easy to operate
• DC power input (for battery operation or via mains power supply)
• adjustable frequency from 1Hz to 50Hz
• no UV output
• lamp and power-supply are easy to maintain
• patented optical lens design

2
LUXED-P2 – Technical Information
SKU: LUXED-P2
Description: RGBWW LED Spotlight
Power: 320W
Material: Aluminium casting
Cooling: Head: passive, Ballast active
Color Temperature: 2400-10000K
Dimming: 0-100%
CRI: ≥ 95
TLCI: > 90
AC Input: 100-240V AC via PowerCon
DC Input: 48V DC SpeakOn
Control: DMX In- & Output (5-Pin XLR socket)
Wireless DMX (LumenRadio, Bluetooth
Frequency: 1-50Hz
IP Class: IP20
Dimensions: 763 x 563 x 172mm
Weight: 8.8 kg

3
LUXED-P3 – Technical Information
SKU: LUXED-P3
Description: RGBWW LED Spotlight
Power: 480W
Material: Aluminium casting
Cooling: Lamphead: passive, Ballast: active
Color Temperature: 2‘400-10‘000K
Dimming: 0-100%
CRI: ≥ 95
TLCI: > 90
AC Input: 100-240V AC via PowerCon
DC Input: 48V DC via SpeakOn
Control: DMX In- & Output (5-Pin XLR socket)
Wireless DMX (LumenRadio)
Bluetooth
Frequency: 1-50Hz
IP Class: IP20
Dimensions: 1048 x 563 x 172mm
Weight: 11.8 kg

4
LUXED-P4 – Technical Information
SKU: LUXED-P4
Description: RGBWW LED Spotlight
Power: 640W
Material: Aluminium casting
Cooling: Lamphead: passive, Ballast: active
Color Temperature: 2‘400-10‘000K
Dimming: 0-100%
CRI: ≥ 95
TLCI: > 90
AC Input: 100-240V AC via PowerCon
DC Input: 48V DC via SpeakOn
Control: DMX In- & Output (5-Pin XLR socket)
Wireless DMX (LumenRadio)
Bluetooth
Frequency: 1-50Hz
IP Class: IP20
Dimensions: 945 x 910 x 216 mm
Weight: 24 kg

5
LUXED-P6 – Technical Information
SKU: LUXED-P6
Description: RGBWW LED Spotlight
Power: 960W
Material: Aluminium casting
Cooling: Active
Color Temperature: 2‘400-10‘000K
Dimming: 0-100%
CRI: ≥ 95
TLCI: > 90
AC Input: 100-240V AC via PowerCon
Control: DMX In- & Output (5-Pin XLR socket)
Wireless DMX (LumenRadio)
Bluetooth
Frequency: 1-50Hz
IP Class: IP20
Dimensions: 1256 x 910 x 216mm
Weight: 33 kg

6
LUXED-P9 – Technical Information
SKU: LUXED-P9
Description: RGBWW LED Spotlight
Power: 1440W
Material: Aluminium casting
Cooling: Active
Color Temperature: 2‘400-10‘000K
Dimming: 0-100%
CRI: ≥ 95
TLCI: > 90
AC Input: 100-240V AC via PowerCon
Control: DMX In- & Output (5-Pin XLR socket)
Wireless DMX (LumenRadio)
Bluetooth
Frequency: 1-50Hz
IP Class: IP20
Dimensions: 1256 x 1218 x 216 mm
Weight: 37.5 kg

7
LUXED-P12 – Technical Information
SKU: LUXED-P12
Description: RGBWW LED Spotlight
Power: 1920W
Material: Aluminium casting
Cooling: Active
Color Temperature: 2‘400-10‘000K
Dimming: 0-100%
CRI: ≥ 95
TLCI: > 90
AC Input: 100-240V AC PowerCon
Control: DMX In- & Output (5-Pin XLR socket)
Wireless DMX (LumenRadio)
Bluetooth
Frequency: 1-50Hz
IP Class: IP20
Dimensions: 1256 x 1526 x 216mm
Weight: 48 kg

8

9
Operational Instructions
There are three parts on the control panel: Operating keys, LCD display
and the adjustment knob.
Operating buttons consist of four keys. Button M is for entering the menu
and return to an upper menu level. Button A is to select up button b is for
selecting down, button E is to enter.
The adjusting knob A is for adjusting the values, knob b is to select menu
and adjust parameters.
Special note: When using accessories such as a diffuser or softbox, switch
the light output beam mode to „FLOOD“ - the CCT mode will now show
„CCT FLOOD“.
MENU -> FIXTURE SETTINGS -> BEAM MODE -> FLOOD
Figure 1 - Control Panel
Knob A Knob B

10
Select button E to change from CCT to HSI mode. As before, knob A is for
adjusting the intensity and knob B for Hue parameters. To switch between
HUE and SATURATION, push button A.
When powering on the light, default interface is the CCT setting (wall
mode). By turning knob A the intensity can be adjusted. Turn knob B for
color temperature. Button A changes to Green/Magenta - adjustable with
knob B
Figure 2 - CCT / Intensity
Intensity - Color Temperature - G/M
Hue - Intensity - Saturation
Color Gels
Figure 3 - +/- Green
Figure 4 - Intensity/Hue Figure 5 - Saturation
Figure 6 - GEL Mode Figure 7 - Intesitiy/Hue Screen
Push button E to enter GEL mode. Turn knob A to adjust brightness, and
knob B to select Color Gel. Select button A to change the color temperatu-
re.

11
Select button E to enter CIE mode. Turn knob A for brightness, knob B to
adjust coordinate parameters. Select button A to switch X/Y coordinates.
Figure 8 - CIE Screen
CIE - X/Y Coordinates
Figure 9 - X/Y adjustment
Select button E to enter RGB mode. Adjust knob A to adjust brightness,
adjust knob B to adjust each color. Select color with button A/B.
Figure 10 - CCT / Intensity
RGB
Light mode
Select button M, on any interface to enter the MAIN MENU. Select light
mode by pushing button E. Optional modes are Rank mode, when using
LUXED-P4 / P6 / P9 / P12.
You can now browse through the menu and adjust the parameters here.
Figure 11 - Main Menu Figure 12 - Light Mode Figure 13 - Selection

12
But before it is necessary to select the appropriate mode you want to use.
There is also an effect and simulation library.Select button M, on any
interface to enter the MAIN MENU. Select light mode by pushing button E.
Optional modes are Rank mode, when using LUXED-P4 / P6 / P9 / P12.
You can now browse through the menu and adjust the parameters here.
But before it is necessary to select the appropriate mode you want to use.
There is also an effect and simulation library.
Figure 14 - Main Menu Figure 15 - Main Menu Figure 16 - Main Menu
Fixture Settings
Figure 17 - Fixture Settings Figure 18 - Dimming Figure 19 - Main Menu
In menu, select FIXTURE SETTINGS, select button E to enter. Up/Down
control with button A and E. There you can adjust the parameters of in
Figure 17 displayed items.

13
DMX Control
There are two kinds of DMX signal control: Wireless DMX and DMX. By
default, DMX is selected. There are 5-Pin XLR In- & Outputs on the console
for DMX via cable. For wireless DMX, there is an antenna mounted on the
side of the ballast.
DMX512 Data Pinout is as followed:
Pin 1 Data Link Common GND
Pin 2 Signal GND
Pin 3 Signal +
Pin 4 not used
Pin 5 not used
In menu screen, select DMX to adjust DMX settings.
DMX Settings
Figure 20 - Main Menu Figure 21 - Address Adjustment Figure 22 - DMX Mode
DMX WALL MODE: control all units together. Option mode, CCT, HSI,
CIE, RTG, GEL, 8-Bit and 16-Bit is optional.
In 8-Bit mode, one function occupies 1 channel
In 16-Bit mode, one function occupies 2 channels
DMX INDIVIDUAL/ control each unit (rank) individually. Option mode,
RANK MODE: CCT, HSI, CIE, RGB, GEL (all 8-Bit)
DMX CONTROLLER: select DMX controller mode. DMX data is then sent
from controller

14
Select WDMX Switch to on if using Wireless DMX. Enter by pushing button
E.
When using Wireless DMX, make sure that the WDMX button on the bal-
last is also in ON position! (Figure 25) The WDMX Reset is used to reset /
unlink the built-in LumenRadio module.
For DMX Values we put together a chart that can be downloaded from our
website. Just go to the „Support“ section and you will nd a sheet inclu-
ding all our light xtures.
1. Click the push button to show current ID settings, increase number
if necessary
2. Working Status:
LED always on : no DMX or no signal
Red LED ashing: sending
Green LED ashing: receiving
3. RF Frequency, 126 bands, selected automatically
4. ID code - ---“1-7“ group ID code, press „KEY“ to adjust. can only
communicate with same ID devices
Setting up the communication:
1. Turn on transmitter and receiver
2. Press „Key“ and set same ID for transmitter and receiver.
3. After sender receives data, it will automatically select the frequen
cy band, sending data.
4. Communication is established
Figure 23 - DMX Wall Figure 24 - DMX Individual Figure 25 - On/Off WDMX
Wireless DMX

15
Notice and Maintenance
1. LED‘s operating temperature range must be guaranteed between - 20°C
to +40°C. Overheating or undercooling can both reduce the xtures life
span.
2. The product must be placed on a solid, at and dry surface. The surface
temperature should be less than 50°C. Avoid exposure to direct sunlight
and operation in an environment with high humidity or explosive gas.
3. Do not beat, knock or shake the light violently or it may inuence the
normal use of the light.
4. Do not cover lamps with paper, cloth or similar materials that could
ignite due to high temperature.
5. Put the lamp in a cool and dry place when you do not use it for a long
time.
6. Avoid any ammable liquid, water or metal material entering the machi-
ne. Cut off the power supply as soon as this happens.
7. Do not use in dirty and dusty environments and clean them regularly.
8. The technicians must get professional trainings to install, operate or
repair LED‘s.
9. If any equipment from Lightstar doesn‘t work properly, please get in
contact with a Lightstar special repair department or professional techni-
cian. Do not disassemble or reassemble the parts by yourself.

16
Service Warranty Ordinance
Customers enjoy a one-year free warranty service as of the date of purcha-
sing our product.
1. If the expiry date of the warranty is reached, our product can still be
repaired for an according price.
2. In any of the following circumstances, the product is not repaired free of
charge, whether the warranty period expires or not.
- Damage caused by misuse or abuse, disassembly and non-original parts
replacement.
- Damage caused by natural disasters, unconventional voltage and envi-
ronmental factors
3. Lightstar will remain in the power of interpretation.
4. Software version modication without further notice.

This manual suits for next models
6
Table of contents
Other Lightstar Lighting Equipment manuals
Popular Lighting Equipment manuals by other brands

Gardenline
Gardenline SL-3129 user manual

Pelican
Pelican 9440 user manual

EFFILUX
EFFILUX EFFIFLEX2 user manual

Vision & Control
Vision & Control LDLF60x360-R633/24V Instructions for use

Eaton
Eaton CEAG GuideLed 10011 DX CG-S Mounting and operating instructions

Zumtobel
Zumtobel KXB Series operating instructions