Lindy 39416 User manual

© LINDY Group - SECOND EDITION (January 2021)
KVM over IP Access DVI-I, USB &
PS/2
Quick Installation Guide English
Schnellstartanleitung Deutsch
Guide d’Installation Rapide Français
Guida di Installazione Rapida Italiano
No. 39416
lindy.com

© LINDY Group - SECOND EDITION (January 2021)

Safety Instructions
! WARNING !
Please read the following safety information carefully and always keep this document with
the product.
Failure to follow these precautions can result in serious injuries or death from electric
shock, fire or damage to the product.
Touching the internal components or a damaged cable may cause electric shock, which
may result in death.
This device is a switching type power supply and can work with supply voltages in the range 100 - 240
VAC For worldwide usability four different AC adapters are enclosed: Euro type, UK type, US/Japan type
and Australia/New Zealand type. Use the appropriate AC adapter as shown in the picture and ensure it
is firmly secured in place and does not detach by pulling before installing into a power socket.
To reduce risk of fire, electric shocks or damage:
Do not open the product nor its power supply. There are no user serviceable parts inside.
Only qualified servicing personnel may carry out any repairs or maintenance.
Never use damaged cables.
Do not expose the product to water or places of moisture.
Do not use this product outdoors it is intended for indoor use only.
Do not place the product near direct heat sources. Always place it in a well-ventilated place.
Do not place heavy items on the product or the cables.
Please ensure any adapters are firmly secured and locked in place before inserting into a wall socket
Instructions for Use of Power Supply
Insert the required plug into the adapter pushing it until locked into place.
To unlock and remove the adapter push the button and pull it out.

QIG English
Introduction
Thank you for purchasing the KVM over IP Access DVI-I, USB & PS/2. This product has been designed
to provide trouble free, reliable operation. It benefits from both a LINDY 2-year warranty and free lifetime
technical support. To ensure correct use, please read this manual carefully and retain it for future
reference.
KVM over IP Access DVI-I, USB & PS/2 is an IP-based KVM link Extender for remote server management.
It allows virtual management of server, PCs or KVM with DVI and USB ports over the Internet. It supports
secured access with password authentication and encrypted session and can be accessed via IP.
Package Contents
KVM over IP Access
1 x DVI-D cable, 1.2m
2 x DVI-A Male to VGA Female adapter
1 x USB Type A to Type B cable, 1.2m
1 x PS/2 to dual PS/2 KM cable, 1.2m
1 x 3 pin Jack to serial D9 cable, 1m
5VDC 3A Multi-country Power Supply (UK, EU, US & AUS), Barrel Size: 5.5/2.5mm DC Jack
This Manual
Features
IP based KVM remote control solution for server or PC management
Supports DVI Single Link and VGA resolutions up to 1920x1200
USB and PS/2 ports for source connection
USB 2.0 ports for console connection
USB Wi-Fi port to support a USB Wi-Fi dongle (not included, chipset supported is Realtek RTL8192CU)
Inbuilt 2 port fast Ethernet Hub
Supports virtual media and ISO
Specification
Supports DVI 1.0, USB 2.0 specification
DVI-I port for digital or analogue video signal
Intelligent compression technology for optimised video transmission
Various security options and access for users with different levels of permission
Operating Temperature: 0°C - 40°C (32°F - 104°F)
Storage Temperature: -20°C - 60°C (-4°F - 140°F)
Humidity: 0 - 90% RH (non-condensing)
Black, metal housing
Power Requirements: AC100-240V 50/60Hz
Power Consumption: 15W

QIG English
Installation
Front
1. Video LED – Lights up when remote IP session is active
2. Power LED – Indicates Power
3. 2 x USB Device Ports – USB HID ports to plug in keyboard and mouse
4. Debug port – For service use
5. DVI-I Out – Connect to a DVI-D or VGA display
6. 2 x Ethernet Hub – Connect to a network
Rear
1. DC 5V – Connect the 5VDC 3A PSU
2. DVI-I In – Connect to a DVI or VGA PC, Server or KVM device
3. USB In – Connect to a USB port of PC, Server or KVM device
4. Power Control – For future use
5. PS/2 In – Connect to PS/2 port of PC, Server or KVM device
6. USB WiFi – Connect to a WiFi USB dongle with Realtek RTL8192CU chipset (optional)
Important! Before starting the installation, please ensure that all devices are powered off.
The following steps are for a basic installation using DVI equipment in a standard KVM installation, if you
are using VGA equipment, please substitute the DVI-A to VGA adapter (included) and a VGA cable (not
included) with DVI cables where required.
1. Connect your DVI equipped PC to a DVI-I In port using a DVI cable.
2. Connect your PC to the USB In port using a USB Type A/B cable or to the PS/2 In port using the
PS/2 to dual PS/2 cable.
3. Connect a DVI display to the DVI-I Out port using a DVI cable and USB keyboard & mouse to the
USB device ports.
4. Connect one Ethernet port to a network using a Cat.5e cable.
5. Plug the DC power supply into the DC 5V power socket and switch on.
6. Power on your Computer and display to complete the installation.

QIG English
Operation
By factory default, the KVM IP Access address is HTTPS://192.168.1.200:5908 using a web browser,
default log-in account is:
User name: superuser
Password: superu
After first log in the following page will appear:
IMPORTANT: Change the super user password immediately after you have installed your KVM IP
Access. Failing to change the password for the super user is a severe security risk and could result in
unauthorized access to the IP-KVM and to the host system. Please also make sure to store your new
password in a secure place where can always be recited when required!
To change the superuser password, add or remove other users go to Users / Local Database menu.
In the Download menu you can download viewers for Windows or for Java, please install it to manage
the PC connected to the KVM IP Access.
With Windows OS, after Setup Wizard completes the installation, click the viewer link icon to launch
the Windows viewer.
Type the hostname or the IP address of the KVM IP Access (default is 192.168.1.200:5908) then log in
typing superuser as default User ID and superu as default Password.
For configuration, the web management menu, viewer features and all detailed information please refer
to the complete user manual you can download from your local Lindy website.

Benutzerhandbuch Deutsch
! GEFAHR !
Bitte lesen Sie die folgenden Sicherheitshinweise sorgfältig durch und bewahren Sie
dieses Dokument immer zusammen mit dem Produkt auf.
Die Nichtbeachtung dieser Vorsichtsmaßnahmen kann zu schweren Verletzungen oder
zum Tod durch Stromschlag, Feuer oder Schäden am Produkt führen.
Das Berühren der internen Komponenten oder eines beschädigten Kabels kann einen
elektrischen Schlag verursachen, der zum Tod führen kann.
Dieses Schaltnetzteil arbeitet mit Anschlussspannungen im Bereich von 100…240 VAC. Für weltweiten
Einsatz sind vier verschiedene AC-Adapter für Europa, Großbritannien, USA/Japan und
Australien/Neuseeland enthalten. Verwenden Sie den geeigneten Adapter wie es die Abbildung zeigt.
Stellen Sie bitte sicher, dass der Adapter fest eingerastet ist und sich nicht abziehen lässt, bevor Sie ihn
in die Steckdose stecken.
Um die Gefahr von Bränden, Stromschlägen oder Schäden zu verringern:
Öffnen Sie weder das Produkt noch sein Netzteil. Es befinden sich keine vom Benutzer zu
wartenden Teile im Inneren.
Ausschließlich qualifiziertes Personal darf Reparaturen oder Wartungen durchführen.
Verwenden Sie niemals beschädigte Kabel.
Setzen Sie das Produkt nicht Wasser oder Feuchtigkeit aus.
Dieses Produkt ist nur für den Gebrauch in geschlossenen Räumen bestimmt.
Stellen Sie das Produkt nicht in der Nähe von direkten Wärmequellen auf. Stellen Sie es immer an
einem gut belüfteten Ort auf.
Stellen Sie keine schweren Gegenstände auf das Produkt oder die Kabel.
Bitte stellen Sie vor der Verwendung sicher, dass alle Adapter sicher und fest eingerastet sind
Anwendungshinweise für das Netzteil
Schieben Sie den gewünschten Adapter auf das Netzteil, bis er eingerastet ist. Um den Adapter zu
entfernen, drücken Sie den Knopf und ziehen den Adapter heraus.

Benutzerhandbuch Deutsch
Einführung
Wir freuen uns, dass Ihre Wahl auf ein LINDY-Produkt gefallen ist und danken Ihnen für Ihr Vertrauen.
Sie können sich jederzeit auf unsere Produkte und einen guten Service verlassen. Dieser KVM over IP
Access DVI-I, USB & PS/2 unterliegt einer 2-Jahres LINDY Herstellergarantie und lebenslangem
kostenlosen technischen Support. Bitte lesen Sie diese Anleitung sorgfältig und bewahren Sie sie auf.
Dieses Gerät ist ein IP-basierter KVM-Link Extender für das Servermanagement aus der Ferne. Er
ermöglicht die virtuelle Kontrolle von Servern, PCs oder KVM mit DVI- und USB-Anschlüssen über das
Internet. Das Gerät unterstützt den gesicherten Zugriff mit Kennwortauthentifizierung und verschlüsselter
Sitzung und kann über IP aufgerufen werden.
Lieferumfang
KVM over IP Access
1 x DVI-D Kabel, 1.2m
2 x Adapter DVI-A (Stecker) an VGA (Buchse)
1 x USB-Kabel Typ A an B, 1.2m
1 x PS/2 an Dual PS/2 KM-Kabel, 1.2m
1 x 3 Pin Stecker an serielles D9 Kabel, 1m
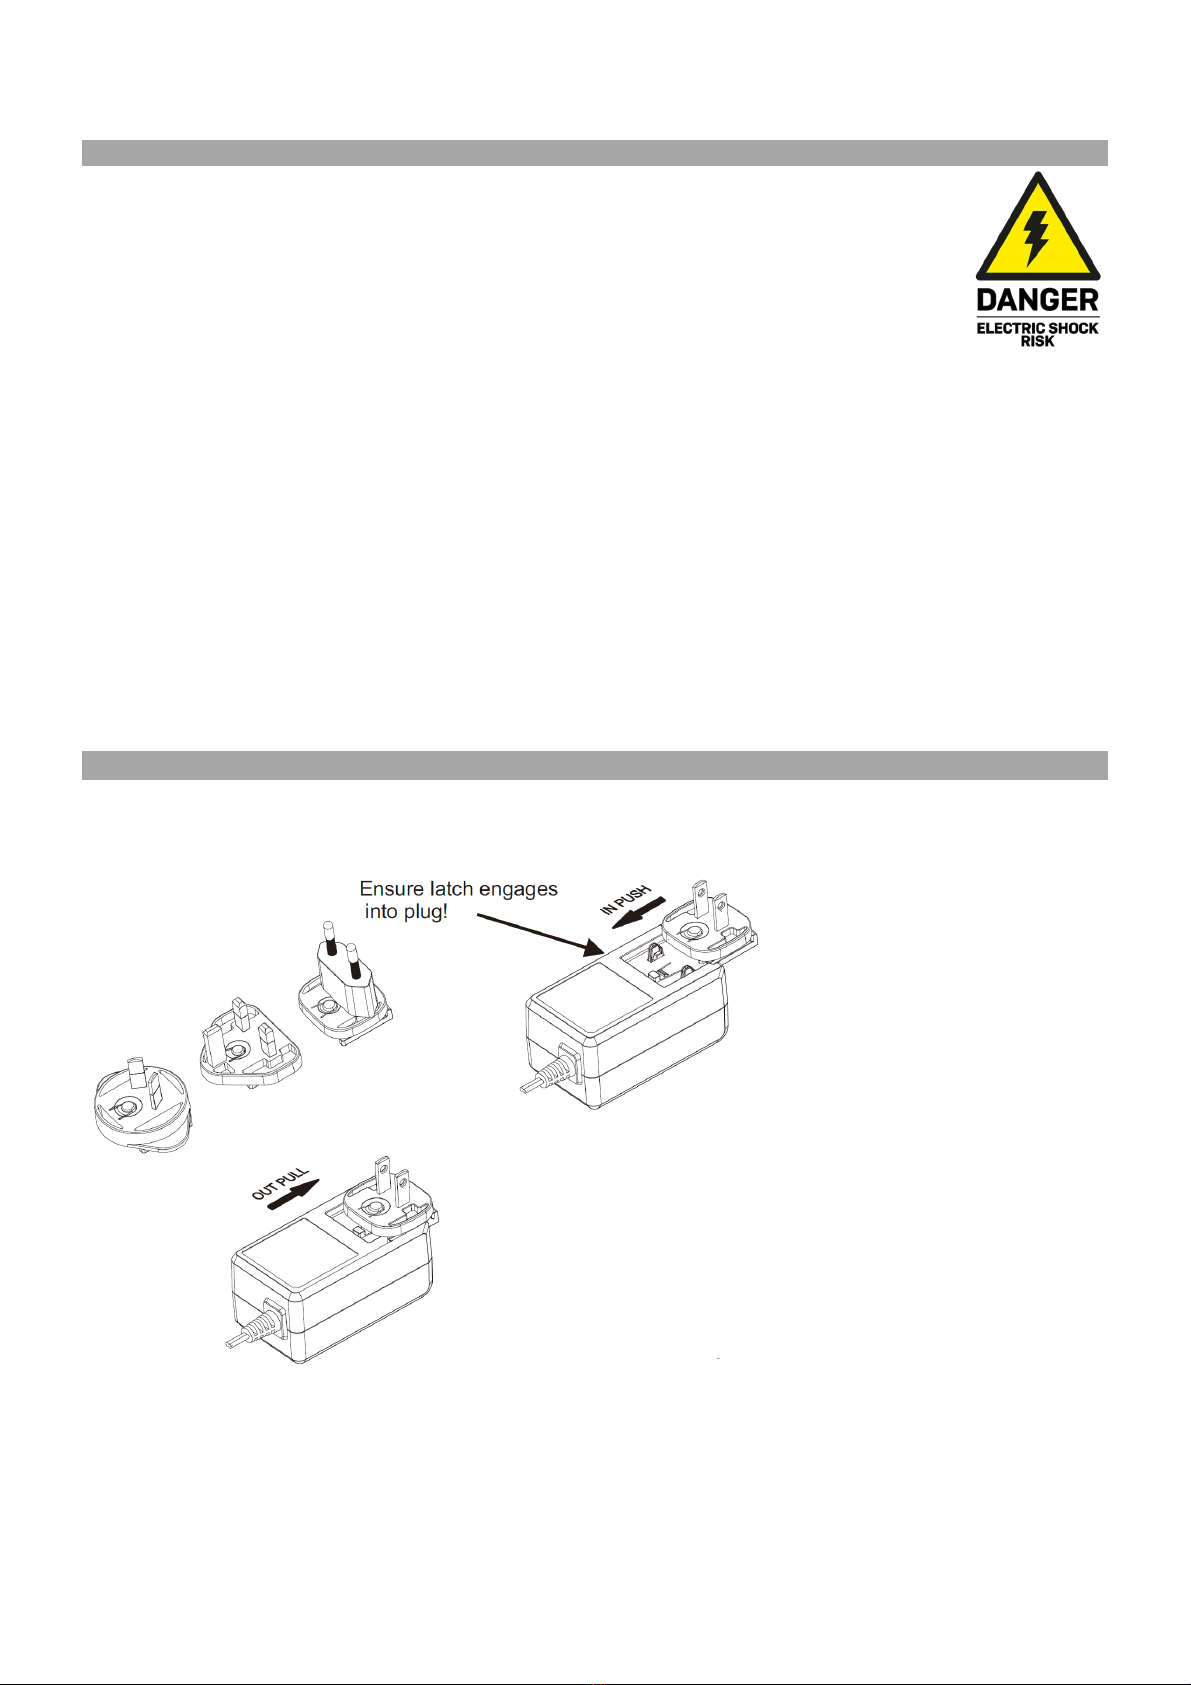
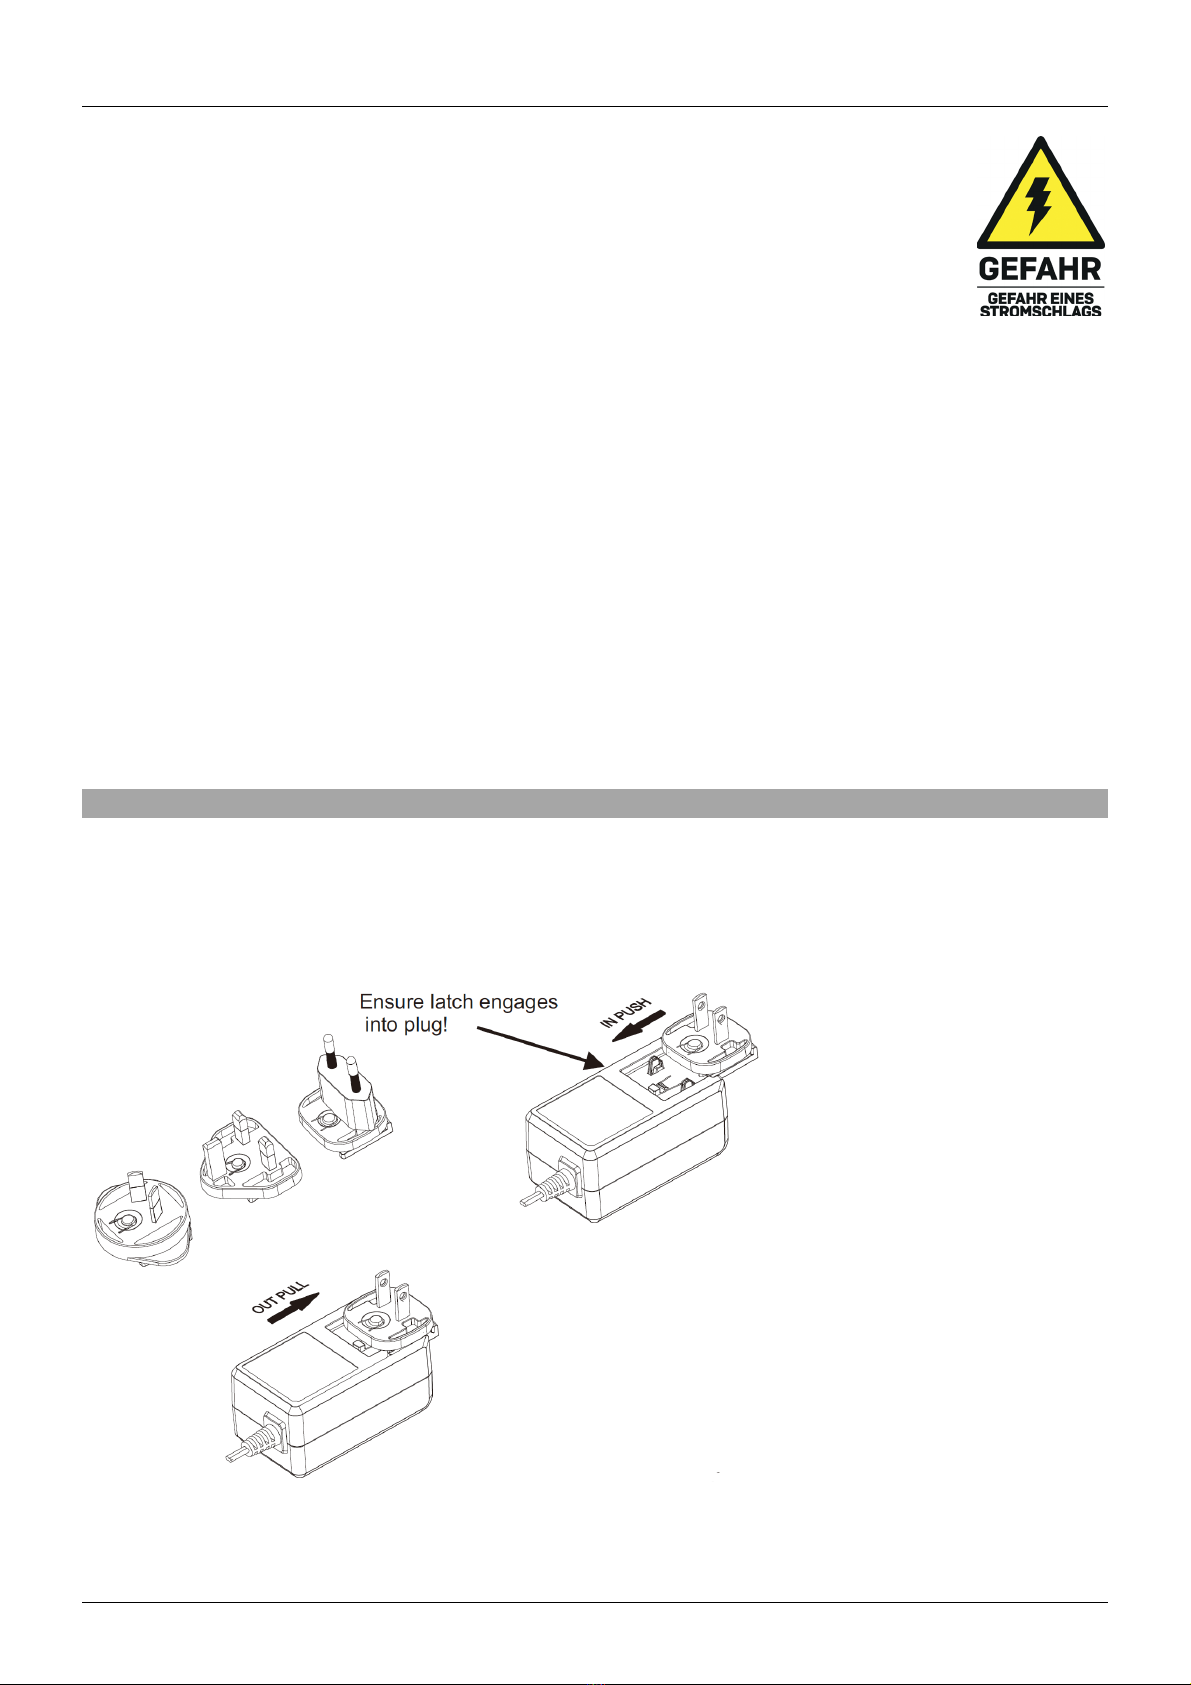
5VDC 3A Multi-Country Netzteil (UK, EU, US & AUS), DC-Hohlstecker: 5.5/2.5mm
Dieses Handbuch
Eigenschaften
IP-basierte KVM-Steuerungslösung für die Server- oder PC-Verwaltung
Unterstützt DVI Single Link und VGA Auflösungen bis 1920x1200
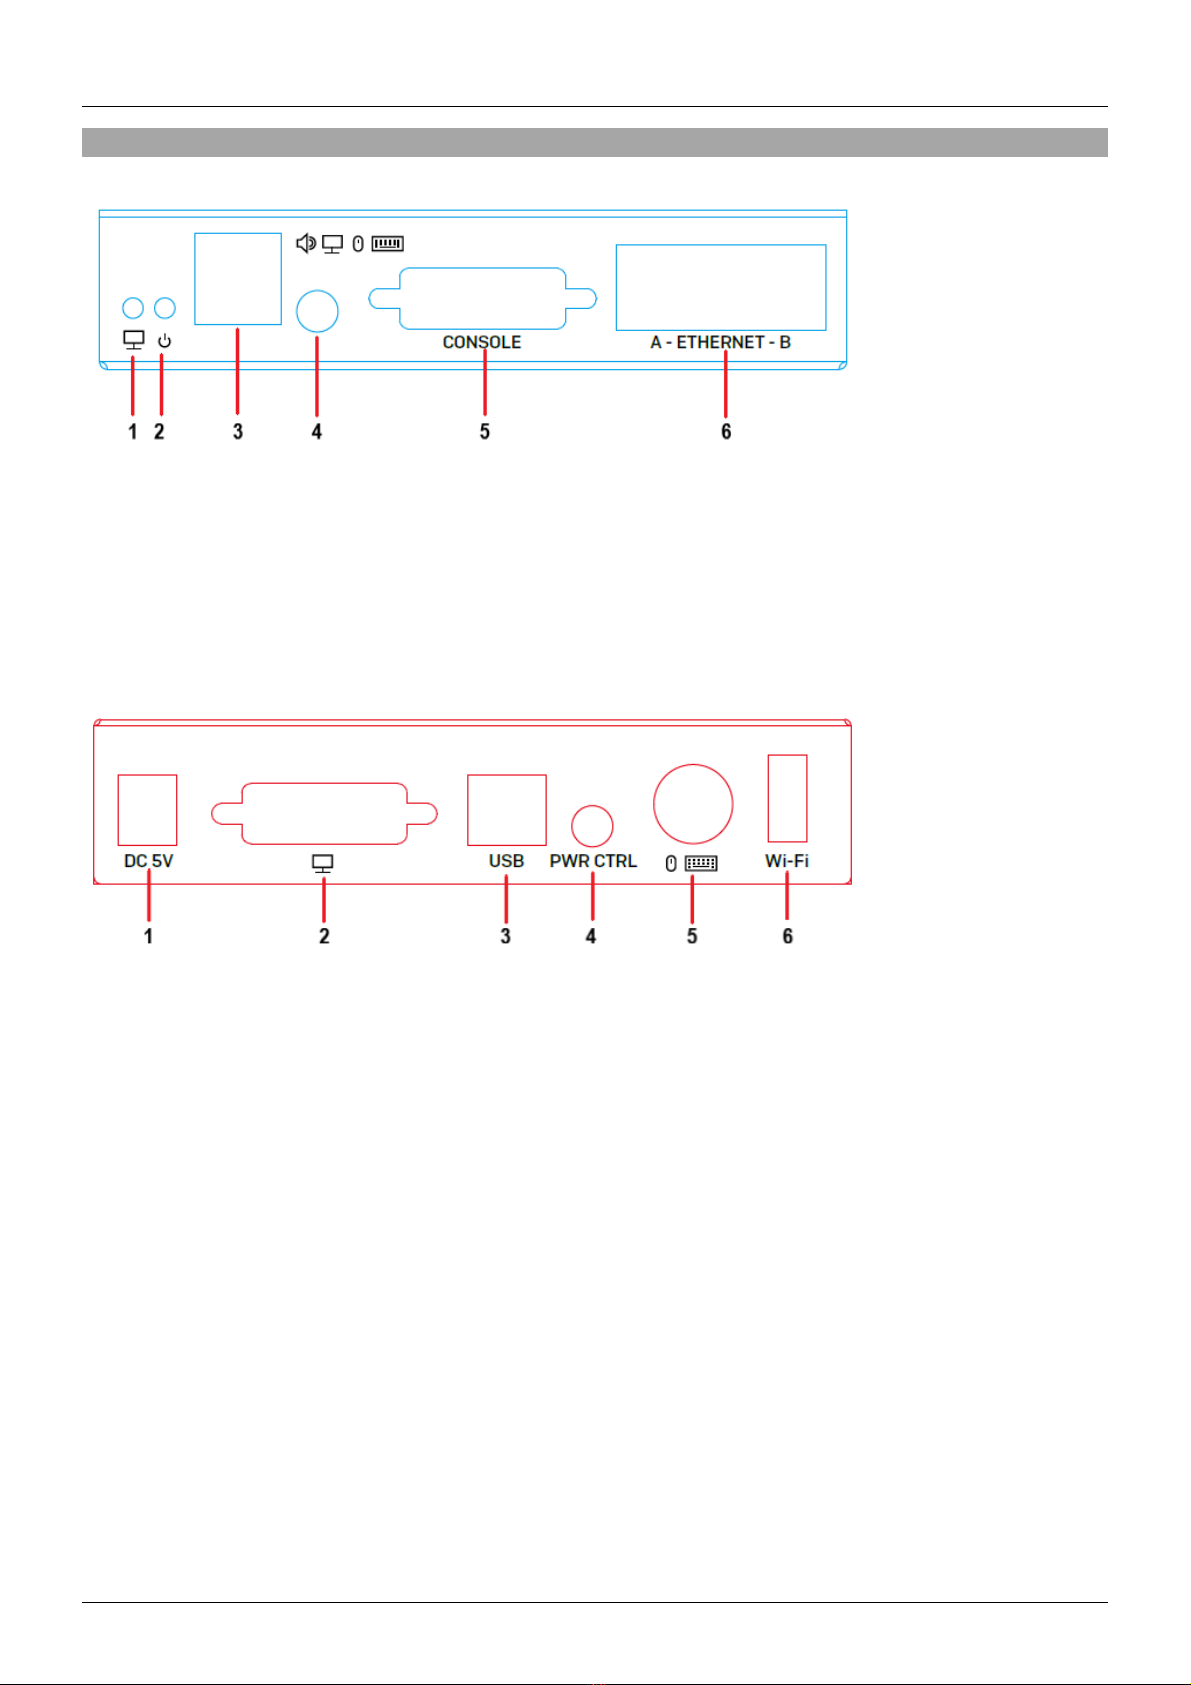
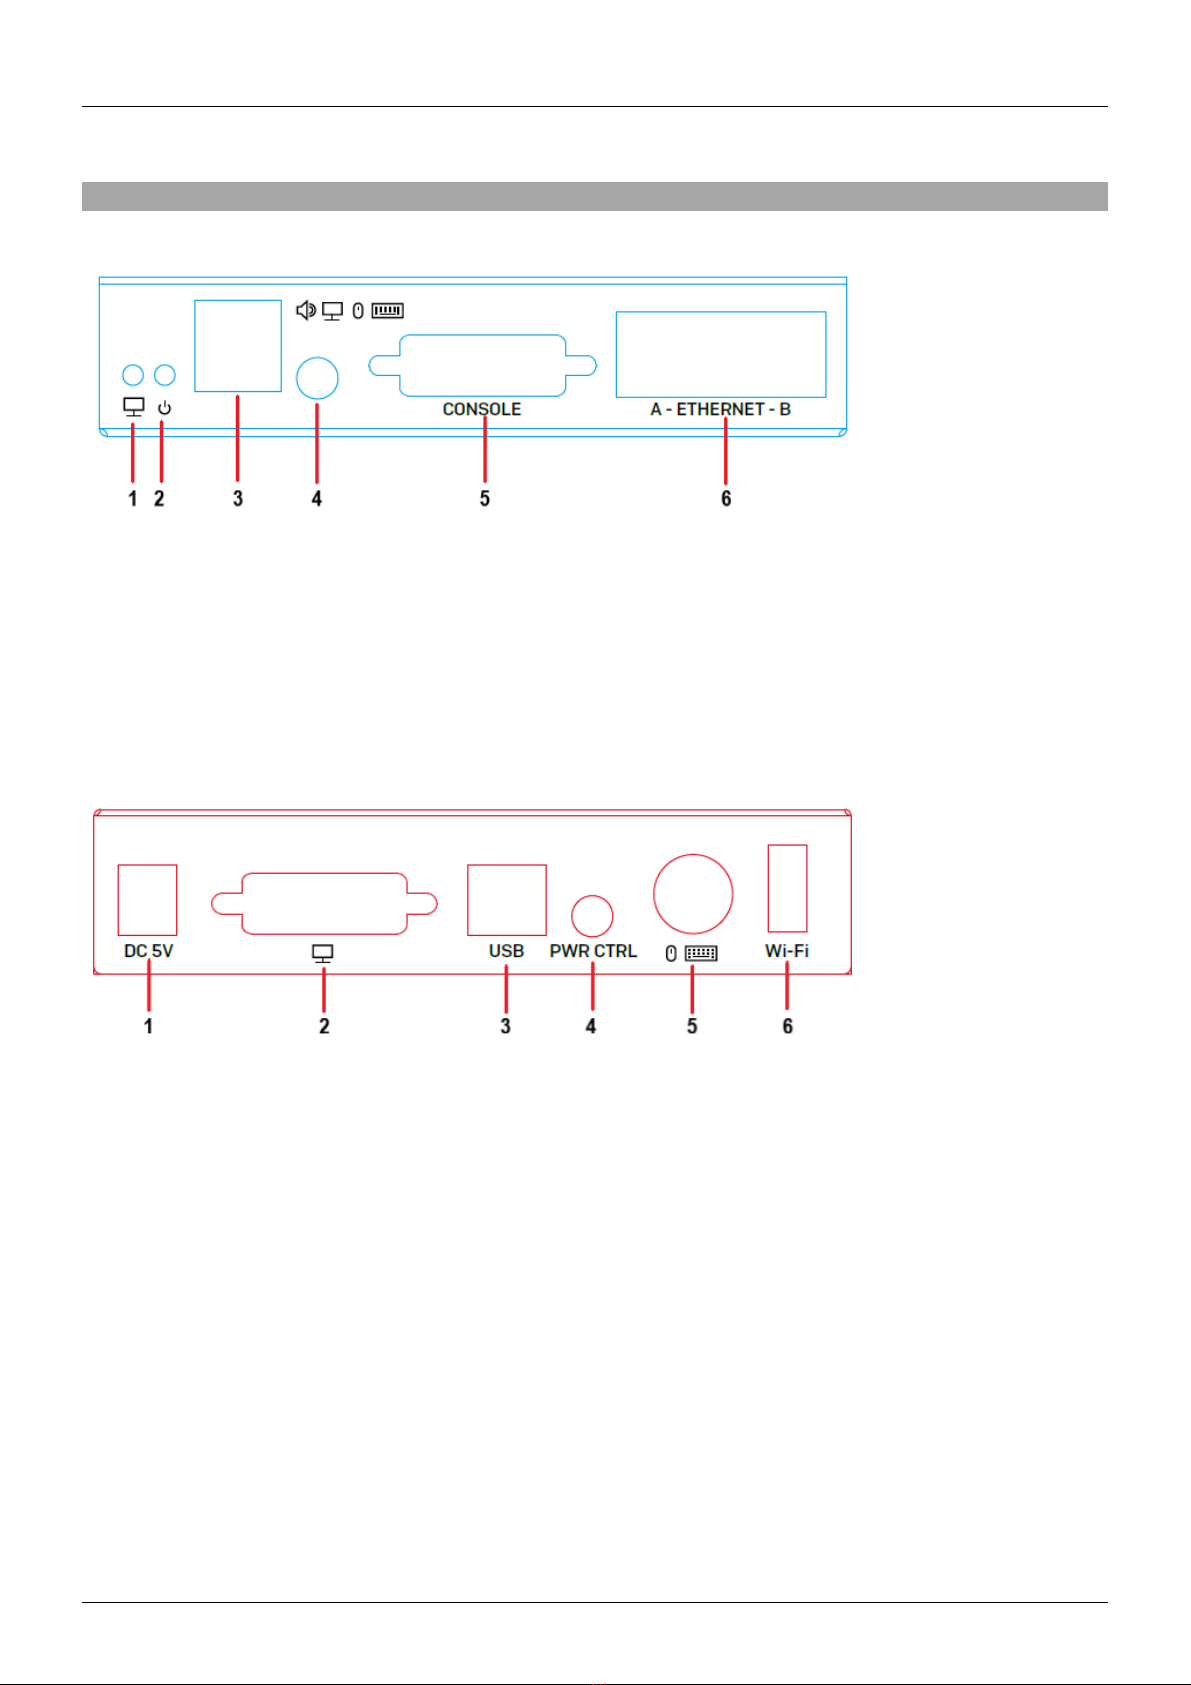
USB- und PS/2-Ports zum Anschluss von Quellgeräten
USB 2.0-Ports zum Anschluss von Konsolen
USB Wi-Fi-Port zum Anschluss eines USB Wi-Fi Dongles (nicht inklusive, unterstützter Chipsatz ist
Realtek RTL8192CU)
Integrierter 2 Port Fast Ethernet Hub
Unterstützt virtuelle Medien, ISO und Power Management
Spezifikationen
Unterstützt DVI 1.0, USB 2.0
DVI-I Anschluss für digitales oder analoges Videosignal
Intelligente Komprimierungstechnologie für optimale Videoübertragung
Verschiedene Sicherheitsoptionen und Zugänge für Nutzer mit unterschiedlichen Zugriffsrechten
Betriebstemperatur: 0°C - 40°C (32°F - 104°F)
Lagertemperatur: -20°C - 60°C (-4°F - 140°F)
Feuchtigkeit: 0 - 90% RH (nicht-kondensierend)
Schwarz, Metallgehäuse
Leistungsaufnahme: AC100-240V 50/60Hz
Stromverbrauch: 15W

Benutzerhandbuch Deutsch
Installation
Vorderseite
1. Video LED – Leuchtet auf, wenn die IP-Remote-Sitzung aktiv ist
2. Power LED – Zeigt, ob Gerät eingeschaltet ist
3. 2 x USB Geräteanschlüsse – USB HID-Ports zum Anschluss von Maus und Tastatur
4. Debug Anschluss – Für Service
5. DVI-Out – Zum Anschluss eines DVI-D oder VGA-Displays
6. 2 x Ethernet Hub – Zum Anschluss an ein Netzwerk
Rückseite
1. DC 5V Power-Steckdose – Zum Anschluss des 5VDC 3A Netzteils
2. DVI-In – Zum Anschluss eines PCs mit DVI- oder VGA-Anschluss, Servers oder KVM-Geräts
3. USB In – Zum Anschluss an einen USB-Anschluss eines PCs, Servers oder KVM-Geräts
4. Power Control – Für zukünftige Nutzung
5. PS/2 In – Zum Anschluss an einen PS/2-Port eines PCs, Servers oder KVM-Geräts
6. USB WiFi – Stellen Sie mit dem Realtek RTL8192CU-Chipsatz (optional) eine Verbindung zu einem
Wifi-USB-Dongle her
Wichtig! Stellen Sie sicher, dass alle Geräte ausgeschaltet sind, bevor Sie mit der Installation beginnen.
Die nachfolgenden Schritte beschreiben eine einfache Installation mit DVI-Geräten in einer Standard-
KVM-Installation. Wenn Sie VGA-Geräte verwenden, ersetzen Sie bitte den DVI-A an VGA Adapter
(inklusive) und ein VGA-Kabel (nicht inklusive) durch DVI-Kabel.
1. Schließen Sie Ihren PC mit DVI-Anschluss mit einem DVI-Kabel am DVI-In Port an.
2. Verwenden Sie ein USB-Kabel Typ A an B, um Ihren PC an den USB-Eingang anzuschließen oder
ein PS/2- an Dual PS/2-Kabel zum Anschluss an den PS/2-Eingang.

Benutzerhandbuch Deutsch
3. Schließen Sie ein DVI-Display mit einem DVI-Kabel am DVI-Ausgang an und verbinden Sie USB-
Tastatur und Maus mit den USB-Geräteanschlüssen.
4. Schließen Sie einen Ethernet-Port mit einem Cat.5e-Kabel am Netzwerk an.
5. Stecken Sie das DC-Netzteil in die 5V DC-Buchse.
6. Schalten Sie Ihren Computer und das Display an, um die Installation abzuschließen.
Betrieb
Im Lieferzustand ist der IP KVM Access bei Zugriff über einen Web-Browser auf die IP-Adresse
HTTPS://192.168.1.200:5908 eingestellt; nutzen Sie folgenden Login-Account:
Benutzername: superuser
Passwort: superu
Nach dem ersten Einloggen erscheint folgende Seite:
WICHTIG: Ändern sie sofort nach der Installation Ihres Gerätes das Passwort. Das Versäumnis, das
Kennwort für den Superuser zu ändern, stellt ein schwerwiegendes Sicherheitsrisiko dar und kann zu
unbefugtem Zugriff auf den IP-KVM und das Hostsystem führen. Bewahren Sie das neue Passwort an
einem sicheren Ort auf, um falls notwendig darauf zugreifen zu können.
Zum Ändern des Passworts und dem Hinzufügen oder Entfernen von Nutzern gehen Sie in das Menü
Users / Local Database.
Im Download-Menü können Sie Viewer für Windows oder Java herunterladen. Installieren Sie diese, um
den mit dem KVM IP Access verbundenen PC zu steuern.
Klicken Sie nach erfolgter Installation durch den Setup-Assistenten auf das Viewer-Link-Symbol , um
den Windows-Viewer zu starten.
Geben Sie den Hostnamen oder die IP-Adresse des KVM IP Access ein (Default-Einstellung
192.168.1.200:5908) und geben dann superuser als voreingestellte User ID und superu als Standard-
Passwort ein.
Informationen zur Konfiguration, zum Webverwaltungsmenü, zu den Viewer-Funktionen und mehr
Details finden Sie im vollständigen Benutzerhandbuch, das Sie von Ihrer lokalen Lindy-Website
herunterladen können.

QIG Français
Consignes de sécurité
! ATTENTION !
Merci de lire attentivement ces instructions de sécurité et de les conserver avec le
produit.
Le non-respect de ces précautions peut causer un choc électrique entrainant des
blessures graves, voire mortelles, un incendie ou des dommages au produit.
Toucher les composants internes ou un câble endommagé peut provoquer un choc
électrique pouvant entraîner la mort.
Cet appareil est une alimentation à découpage et peut fonctionner avec des tensions d'alimentation de
100...240 VAC Pour une utilisation dans le monde entier, quatre adaptateurs secteur différents sont
inclus : Type Euro, type UK, type US/Japon et type Australie/Nouvelle-Zélande. Utilisez l'adaptateur
secteur approprié comme indiqué sur la photo et assurez-vous qu'il est solidement fixé en place et qu'il
ne se détache pas en tirant avant de l'installer dans une prise électrique.
Pour éviter les risques d'incendie, de choc électrique ou de dommages:
N'ouvrez pas l'appareil ni son alimentation électrique. Il n'y a pas de pièces réparables par
l'utilisateur à l'intérieur.
Seul un personnel d'entretien qualifié est autorisé à effectuer toute réparation ou entretien.
Ne jamais utiliser de câble endommagé.
Ne pas mouiller le produit et ne pas l'exposer à l'humidité.
N'utilisez pas ce produit à l'extérieur, il est destiné à un usage intérieur uniquement.
Ne pas placer le produit à proximité de sources de chaleur. Toujours le placer dans un endroit
suffisamment ventilé.
Ne pas déposer de charge lourde sur le produit ou sur les câbles.
Veuillez vous assurer que l'adaptateur utilisé est fermement fixé et verrouillé en place avant de
l'insérer dans une prise murale.
Instructions d’utilisation de l’alimentation
Insérez la fiche requise dans l'adaptateur en la poussant jusqu'à ce qu'elle soit verrouillée en place.
Pour déverrouiller et retirer l'adaptateur, appuyez sur le bouton et retirez l'adaptateur.

QIG Français
Introduction
Nous sommes heureux que votre choix se soit porté sur un produit LINDY et vous remercions de votre
confiance. Vous pouvez compter à tout moment sur la qualité de nos produits et de notre service. Ce
module KVM over IP Access DVI-I, USB & PS/2 est soumis à une durée de garantie LINDY de 2 ans et
d’une assistance technique gratuite à vie. Merci de lire attentivement ces instructions et de les conserver
pour future référence.
Ce module KVM over IP Access DVI-I, USB & PS/2 est une liaison extender KVM basé sur IP pour la
gestion à distance de serveurs. Il permet la gestion de serveurs, PC ou de KVM avec port DVI et USB via
Internet. Il prend en charge l’accès sécurisé par mot de passe et l’encryptage des sessions avec un accès
via IP.
Contenu de l’emballage
Module KVM over IP Access
1 x câble DVI-D, 1.2m
2 x câble adaptateur DVI-A mâle vers VGA femelle
1 x câble USB Type A vers Type B, 1.2m
1 x câble PS/2 vers dual PS/2 KM, 1.2m
1 x câble jack 3 broches vers sérié D9, 1m
Alimentation multi-pays 5VDC 3A (UK, EU, US & AUS), Prise DC: 5.5/2.5mm
Ce manuel
Caractéristiques
Solution de contrôle KVM à distance basé sur IP pour la gestion de PC ou serveur
Prise en charge des résolutions DVI Single Link et VGA jusqu’à 1920x1200
Ports USB et PS/2 pour la connexion de la source
Ports USB 2.0 pour la connexion console
Port USB Wi-Fi pour la prise en charge d’un dongle USB Wi-Fi (non inclus, le chipset pris en charge
est le Realtek RTL8192CU)
Hub 2 ports fats Ethernet fast intégré
Prise en charge virtual media, ISO et gestion d’alimentation
Spécifications
Prise en charge DVI 1.0, USB 2.0
Port DVI-I pour signaux vidéo numérique et analogique
Technologie de compression vidéo intelligente pour l’optimisation de la transmission vidéo
Options de sécurité et d’accès pour les utilisateurs avec différents niveaux de permissions
Température de fonctionnement: 0°C - 40°C (32°F - 104°F)
Température de stockage: -20°C - 60°C (-4°F - 140°F)
Humidité: 0 - 90% RH (sans condensation)
Boitier en métal noir
Besoins énergétiques: AC100-240V 50/60Hz
Consommation électrique: 15W

Manuel Utilisateur Français
Installation
Vue avant du boitier
1. Vidéo LED – s’allume lorsque la session IP distante est active
2. Power LED – indique l’alimentation
3. 2 x ports USB Device– Ports USB HID pour la connexion clavier et souris
4. Debug port – réservé
5. DVI-I Out – Connecte un affichage DVI-D ou VGA
6. Hub 2 x ports Ethernet – Connecte le réseau Ethernet
Vue arrière du boitier
1. Prise d’alimentation DC 5V – Connecte l’alimentation 5VDC 3A
2. DVI-I In – Connecte le PC en DVI ou VGA PC, le serveur ou le KVM
3. USB In – Connecte un port USB de PC, serveur ou KVM
4. Power Control – réservé
5. PS/2 In – Connecte un port PS/2 de PC, serveur ou KVM
6. USB Wi-Fi – Connecte un dongle USB Wi-Fi avec le chipset Realtek RTL8192CU (optionnel)
Important! Avant toute installation, veuillez vous assurer que tous les appareils sont hors tension.
Les étapes suivantes concernent une installation de base utilisant un équipement DVI dans une
installation KVM standard. Si vous utilisez un équipement VGA, veuillez remplacer l'adaptateur DVI-A
vers VGA (inclus) et un câble VGA (non inclus).
1. Connectez votre PC équipé en DVI au port DVI-I In en utilisant un câble DVI.
2. Connectez votre PC au port USB In en utilisant un câble USB Type A/B ou au port PS/2 In en
utilisant un câble PS/2 vers dual PS/2.
3. Connectez un affichage DVI au port DVI-I Out en utilisant un câble DVI et un clavier & souris USB
aux ports USB device.
4. Connectez un port Ethernet au réseau en utilisant un câble Cat.5e.
5. Branchez l’alimentation DC à la prise DC 5V et mettez sous tension.
6. Démarrez votre ordinateur pour compléter l’installation.

Manuel Utilisateur Français
Utilisation
Par défaut, l’adresse IP de l’appareil est HTTPS://192.168.1.200:5908 en se connectant avec un
navigateur internet, le compte par défaut est:
Nom d’utilisateur / User name: superuser
Mot de passe / Password: superu
Après connexion la page suivante est accessible :
IMPORTANT : Changez le mot de passe du super utilisateur immédiatement après avoir installé votre
commutateur KVM IP. Le fait de ne pas changer le mot de passe du super utilisateur constitue un risque
grave pour la sécurité et pourrait entraîner un accès non autorisé au KVM IP et au système hôte. Veillez
également à stocker votre nouveau mot de passe dans un endroit sûr où il pourra toujours être consulté
en cas de besoin !
Pour modifier le mot de passe du super-utilisateur, ajouter ou supprimer d'autres utilisateurs, allez dans
le menu Users / Local Database.
Dans le menu Download, vous pouvez télécharger l’utilitaire pour Windows ou pour Java, veuillez
l'installer pour gérer le PC connecté au KVM IP Access.
Avec le système d'exploitation Windows, une fois que l'assistant d'installation a terminé l'installation,
cliquez sur l'icône du lien pour démarrer l’utilitaire Windows.
Tapez le nom d'hôte ou l'adresse IP du KVM IP Access Access (par défaut 192.168.1.200:5908) puis
connectez-vous en tapant superuser comme ID utilisateur par défaut et superu comme mot de passe
par défaut.
Pour la configuration, le menu de gestion web, les fonctionnalités du viewer et toutes les informations
détaillées, veuillez vous référer au manuel d'utilisation complet que vous pouvez télécharger sur votre
site web Lindy local.

Guida di Installazione Rapida Italiano
Istruzioni di sicurezza
! ATTENZIONE !
Per favore leggete la seguente informativa e conservate sempre questo documento con
il prodotto.
La mancata osservanza di queste precauzioni può causare seri infortuni o la morte per
folgorazione, incendi o danneggiare il prodotto.
Toccare i componenti interni o un cavo danneggiato può causare uno shock elettrico che
può condurre alla morte.
Questo dispositivo ha un alimentatore a commutazione che può funzionare con tensioni di alimentazione
all’interno del range 100…240 VAC. La fornitura comprende quattro adattatori AC per prese di tutto il
mondo: Euro, UK, US/Giappone e Australia/Nuova Zelanda. Utilizzate l’adattatore AC appropriato e
montatelo come mostrato nell’immagine, assicurandovi che sia fissato correttamente e che non si
stacchi estraendolo dalla presa.
Per ridurre il rischio di incendi, folgorazione o danni:
Non aprite il prodotto o l’alimentatore. Non esistono componenti utilizzabili all'interno.
La riparazione o manutenzione del prodotto può essere effettuata solo da personale qualificato.
Non utilizzare mai cavi danneggiati.
Non fate entrare il prodotto in contatto con acqua e non utilizzatelo in luoghi umidi.
Questo prodotto è pensato esclusivamente per l’uso in ambienti interni.
Non posizionate il prodotto nelle vicinanze di sorgenti di calore. Installatelo sempre in luoghi ben
ventilati.
Non appoggiate oggetti pesanti sul prodotto o sui cavi.
Vi preghiamo di assicurarvi che ogni adattatore sia fermamente inserito e bloccato in sede prima di
collegarlo a una presa di corrente.
Istruzioni per l’uso dell’alimentatore
Inserire l’adattatore richiesto nelle guide dell’alimentatore premendo fino a quando si aggancia.
Per sganciare e rimuovere l’adattatore premere il pulsante ed estrarlo.

Guida di Installazione Rapida Italiano
Introduzione
Vi ringraziamo per aver acquistato il KVM over IP Access DVI-I, USB & PS/2. Questo prodotto è stato
progettato per garantirvi la massima affidabilità e semplicità di utilizzo ed è coperto da 2 anni di garanzia
LINDY oltre che da un servizio di supporto tecnico a vita. Per assicurarvi di farne un uso corretto vi
invitiamo a leggere attentamente questo manuale e a conservarlo per future consultazioni.
KVM over IP Access DVI-I, USB & PS/2 è un extender KVM via IP per la gestione da remoto di server.
Consente il controllo virtuale di server, PC o KVM con interfacce DVI e USB tramite Internet. Supporta
l’accesso sicuro tramite password e sessioni criptate accessibili via IP.
Contenuto della confezione
KVM over IP Access
1 x cavo DVI-D, 1.2m
2 x adattatore DVI-A Maschio a VGA Femmina
1 x cavo USB Tipo A a Tipo B, 1.2m
1 x cavo PS/2 a dual PS/2 KM, 1.2m
1 x cavo 3 pin Jack a seriale D9, 1m
Alimentatore 5VDC 3A Multi-country (UK, EU, US & AUS), diametro connettore DC: 5.5/2.5mm
Questo manuale
Caratteristiche
Soluzione per il controllo remoto via IP si segnali KVM per la gestione di server o PC
Supporta risoluzioni DVI Single Link e VGA fino a 1920x1200
Porte USB e PS/2 per la connessione alla sorgente
Porte USB 2.0 per la connessione alla console
Porta USB Wi-Fi per la connessione a un dongle USB Wi-Fi (non incluso,il chipset supportato è il
Realtek RTL8192CU)
Hub fast Ethernet 2 porte integrato
Supporto virtual media e ISO
Specifiche
Supporta le specifiche DVI 1.0, USB 2.0
Porta DVI-I per segnali video digitali o analogici
Tecnologia di compressione intelligente per una trasmissione video ottimizzata
Diverse opzioni di sicurezza e accesso per utenti con diversi livelli di permessi
Temperatura operativa: 0°C - 40°C (32°F - 104°F)
Temperatura di stoccaggio: -20°C - 60°C (-4°F - 140°F)
Umidità: 0 - 90% RH (senza condensa)
Struttura in metallo nera
Alimentazione: AC100-240V 50/60Hz
Consumo: 15W

Guida di Installazione Rapida Italiano
Installazione
Fronte
1. LED Video – Si illumina quando la sessione IP remota è attiva
2. LED Power – Alimentazione
3. 2 x porte dispositivi USB – Porte USB HID per collegare tastiera e mouse
4. Porta Debug – Interfaccia di servizio
5. Uscita DVI-I – Collegare uno schermo DVI-D o VGA
6. 2 x Hub Ethernet – Connessione ad una rete
Retro
1. DC 5V – Collegare l’alimentatore 5VDC 3A
2. Ingresso DVI-I – Collegare un PC, Server o dispositivo KVM DVI o VGA
3. Ingresso USB – Collegare una porta USB di un PC, Server o dispositivo KVM
4. Power Control – Per uso futuro
5. Ingresso PS/2 – Collegare una porta PS/2 di un PC, Server o dispositivo KVM
6. USB WiFi – Collegare un dongle un dongle WiFi USB con chipset Realtek RTL8192CU (opzionale)
Importante! Prima di iniziare l’installazione, assicurarsi che tutti i dispositivi siano spenti.
Seguire i passaggi indicati per l’installazione con dispositivi DVI in una configurazione KVM tipica, se si
utilizzano dispositivi VGA, sostituire i cavi DVI con adattatore DVI-A a VGA (incluso) e cavo VGA (non
incluso) dove richiesto.
1. Collegare il PC all’ingresso DVI-I tramite un cavo DVI.
2. Collegare il PC all’ingresso USB tramite il cavo USB Tipo A/B o all’ingresso PS/2 tramite il cavo PS/2
a dual PS/2.
3. Collegare il display DVI all’uscita DVI-I tramite un cavo DVI e tastiera & mouse alle porte per
dispositivi USB.
4. Collegare una porta Ethernet alla rete tramite un cavo Cat.5e.
5. Collegare l’alimentatore alla presa DC 5V.
6. Accendere Computer e display per completare l’installazione.

Guida di Installazione Rapida Italiano
Utilizzo
L’indirizzo IP di default del KVM IP Access è HTTPS://192.168.1.200:5908 utilizzando un browser, i dati
di accesso per effettuare il log-in sono:
User name: superuser
Password: superu
Dopo il primo log in apparirà la seguente schermata:
IMPORTANTE: cambiare subito super user e password dopo aver effettuato il login al KVM IP Access.
Lasciando invariata la password di default del super user si corre il rischio di subire accessi indesiderati
all’IP-KVM e quindi anche al sistema connesso ad esso. Assicurarsi di cambiare la password e di
conservarla in un luogo sicuro!
Per modificare la superuser password, aggiungere o rimuovere altri utenti entrare nel menu Users /
Local Database.
Nel menu Download è possibile scaricare i viewer per Windows o Java, installate quello richiesto per
poter accedere al PC collegato al KVM IP Access.
Da Windows, una volta completata l’installazione tramite Setup Wizard, cliccare sull’icona del viewer
per avviarlo.
Digitare il nome dell’host o l’indirizzo IP del KVM IP Access (di default è 192.168.1.200:5908) quindi
accedere digitando superuser come User ID di default e superu come password di default.
Per tutte le informazioni riguardanti la configurazione, dettagli sul menu e funzioni dei viewer, consultare
il manuale completo scaricabile dal sito Lindy.

CE/FCC Statement
CE Certification
LINDY declares that this equipment complies with relevant European CE requirements.
CE Konformitätserklärung
LINDY erklärt, dass dieses Equipment den europäischen CE-Anforderungen entspricht
UKCA Certification
LINDY declares that this equipment complies with relevant UKCA requirements.
FCC Certification
This equipment has been tested and found to comply with the limits for a Class B digital device, pursuant
to part 15 of the FCC Rules. These limits are designed to provide reasonable protection against harmful
interference in a residential installation.
You are cautioned that changes or modification not expressly approved by the party responsible for
compliance could void your authority to operate the equipment.
This device complies with part 15 of the FCC Rules.
Operation is subject to the following two conditions:
1. This device may not cause harmful interference, and
2. This device must accept any interference received, including interference that may cause undesired
operation.
The enclosed power supply has passed Safety test requirements, conforming to the US American versions
of the international Standard IEC 60950-1 or 60065 or 62368-1.
LINDY Herstellergarantie – Hinweis für Kunden in Deutschland
LINDY gewährt für dieses Produkt über die gesetzliche Regelung in Deutschland hinaus eine zweijährige
Herstellergarantie ab Kaufdatum. Die detaillierten Bedingungen dieser Garantie finden Sie auf der LINDY
Website aufgelistet bei den AGBs.
Hersteller / Manufacturer (EU): Manufacturer (UK):
LINDY-Elektronik GmbH LINDY Electronics Ltd
Markircher Str. 20 Sadler Forster Way
68229 Mannheim Stockton-on-Tees, TS17 9JY
Germany England

Recycling Information
WEEE (Waste of Electrical and Electronic Equipment),
Recycling of Electronic Products
Europe, United Kingdom
In 2006 the European Union introduced regulations (WEEE) for the collection and recycling of all waste electrical
and electronic equipment. It is no longer allowable to simply throw away electrical and electronic equipment. Instead,
these products must enter the recycling process.
Each individual EU member state, as well as the UK, has implemented the WEEE regulations into national law in
slightly different ways. Please follow your national law when you want to dispose of any electrical or electronic
products. More details can be obtained from your national WEEE recycling agency.
Germany / Deutschland Rücknahme Elektroschrott und Batterie-Entsorgung
Die Europäische Union hat mit der WEEE Direktive Regelungen für die Verschrottung und das Recycling von Elektro-
und Elektronikprodukten geschaffen. Diese wurden im Elektro- und Elektronikgerätegesetz – ElektroG in deutsches
Recht umgesetzt. Das Entsorgen von Elektro- und Elektronikgeräten über die Hausmülltonne ist verboten! Diese
Geräte müssen den Sammel- und Rückgabesystemen zugeführt werden! Dort werden sie kostenlos entgegen
genommen. Die Kosten für den weiteren Recyclingprozess übernehmen die Gerätehersteller.
LINDY bietet deutschen Endverbrauchern ein kostenloses Rücknahmesystem an, beachten Sie bitte, dass Batterien
und Akkus den Produkten vor der Rückgabe an das Rücknahmesystem entnommen werden müssen und über die
Sammel- und Rückgabesysteme für Batterien separat entsorgt werden müssen. Ausführliche Informationen zu
diesen Themen finden Sie stets aktuell auf der LINDY Webseite im Fußbereich.
France
En 2006, l'union Européenne a introduit la nouvelle réglementation (DEEE) pour le recyclage de tout équipement
électrique et électronique.
Chaque Etat membre de l’Union Européenne a mis en application la nouvelle réglementation DEEE de manières
légèrement différentes. Veuillez suivre le décret d’application correspondant à l’élimination des déchets électriques
ou électroniques de votre pays.
Italy
Nel 2006 l’unione europea ha introdotto regolamentazioni (WEEE) per la raccolta e il riciclo di apparecchi elettrici ed
elettronici. Non è più consentito semplicemente gettare queste apparecchiature, devono essere riciclate. Ogni stato
membro dell’EU ha tramutato le direttive WEEE in leggi statali in varie misure. Fare riferimento alle leggi del proprio
Stato quando si dispone di un apparecchio elettrico o elettronico.
Per ulteriori dettagli fare riferimento alla direttiva WEEE sul riciclaggio del proprio Stato.
No. 39416
3rd Edition, March 2021
lindy.com
Tested to comply with
FCC
standards.
For home and office use.
Other manuals for 39416
1
Table of contents
Languages:
Other Lindy Extender manuals