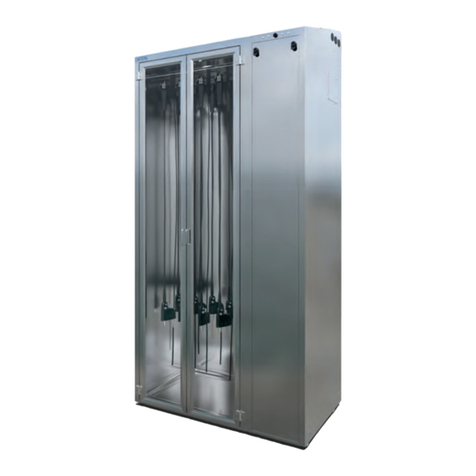
Logiquip DRI-STOR User manual

CAUTION Read and understand all of the instructions in
this document before using your product.
USER GUIDE
DRI-STOR
USER GUIDE

(800) 665-3760
2 |
USER GUIDE
ENDOSCOPE DRYING CABINETS HEPA FILTER
SUMMARY
LogiQuip’s Dri-Stor HEPA Filter Endoscope Storage Cabinets are designed to:
• Ensure a clean storage location for disinfected Endoscopes
• Provide a clean supply of HEPA Filtered air ventilating the Endoscopes
in storage
• If equipped with the Channel Purge feature, allow for the drying of the
interior channels of the Endoscopes by introducing HEPA Filtered air to
purge those channels
• Protect the Endoscopes from damage while in storage
• Allow operators to easily see what they have in storage when equipped with
the EndoTrack feature
• Provide a material, in stainless steel, that withstands frequent cleaning
• Provide a secure location for Endoscopes when equipped with BarCode
or RFID access points
WARNING
• Failure to comply with these instructions may result in accidents involving serious personal injury
• Failing to follow these instructions can result in the product being damaged or destroyed
• Safe use of the system is possible only when operating instructions are read completely and the instructions contained
are strictly observed
• Failure to comply with instructions in the NOTES section may result in serious
damage to the system or one of its components
• It is important for everyone who is to connect, install, or use the systems to
have the necessary information and access to this User Guide
• Follow the instructions for mounting
• There is risk of injury, if these instructions are not followed
• The appliance is not intended for use by young children or infirm
persons without supervision
• If there is visible damage on the product it MUST NOT be installed
• Persons who do not have the necessary experience or knowledge of the product(s) must not use the product(s)
• People with reduced physical, sensory, or mental abilities must not use the product(s), unless they are under supervision
or they have been thoroughly instructed by a person who is responsible for said people

www.logiquip.com |3
USER GUIDE
ENDOSCOPE DRYING CABINETS HEPA FILTER
ELECTRICAL SUPPLY
• North America
120 Vac, 60 Hz, 15 Amp Standard Deluxe Receptacle
• Typical Full Load Amperage
~1 Amps
• It is recommended to plug any cabinet into a dedicated circuit
• Units with EndoTrack should be plugged into an outlet connected to the emergency back-up circuit
• Disconnect power whenever servicing the cabinet, by unplugging the power cord
ENVIRONMENTAL CONDITIONS
The cabinets have been designed for use within medical facilities. They are designed to be safe within the
following conditions:
• Indoor Use ONLY
• Temperature Range: 15-35°C
• Maximum Relative Humidity: 80% up to 25°C and decreasing linearly to 50% relative humidity at 35°C
CLEANING OF CHANNEL PURGE TUBING SETS
• At the hospital’s discretion, the channel purge tubing set and connectors, can be cleaned by Steam Sterilization,
hospital approved Enzymatic detergents or High Level Disinfection
• Steam Sterilization: Tubing sets are compatible with steam sterilization at the following parameters:
270°F ( 32°C), four-minute cycle. Tubing sets should be allowed to dry for 30 minutes*prior to
connecting to an Endoscope
• The tubing sets should be washed using a hospital approved Enzymatic cleaner prior to the first use. This is done
by flushing, soaking and rinsing, following the Enzymatic manufacturer’s IFU. After the tubing sets have been
properly rinsed, they can be connected to the quick connect manifold in the cabinet to allow the interior of the
tubing to be air purged dry for 20 minutes prior to connecting to an Endoscope
• Approved High Level Disinfectants include Peracitic Acid, Hydrogen Peroxide, Gluteraldehyde, and OPA base
disinfectants. Follow the respective HLD manufacturer’s IFU for proper use. After the tubing sets have been
properly rinsed, they can be connected to the quick connect manifold in the cabinet to allow the interior of the
tubing to be air purged dry for 20 minutes prior to connecting to an Endoscope
• Tubing sets and connectors should be checked regularly for cracks and loss of tubing flexibility. If any such flaws
are found, they should be replaced immediately
*Based on independent third-party testing.

(800) 665-3760
4 |
USER GUIDE
ENDOSCOPE DRYING CABINETS HEPA FILTER
OPERATION
• For instructions for using Dri-Stor EndoTrack, the touchscreen featuring controlled user access and indicator of
scope cleanliness life-cycle, please refer to the separate dedicated Dri-Stor EndoTrack User Guide
• The system consists of an enclosed cabinet that provides a clean source of HEPA Filtered air to ensure a
maintained environment for the Endoscope storage
• For the Endoscope Channel Purge, a series of Quick Connector ports are located in the cabinet. Each part
accepts one tubing set, and when connected, allows the flow of low pressure HEPA Filtered air into the respective
channels of the attached Endoscope to facilitate drying of the channels. If there is no tubing set connected to a
port, then that port is closed and there is no flow of air through it. The connectors are specific for every make and
model of Endoscope, and cannot be used for anything other that the Endoscope they were specified for. Please
contact LogiQuip if you require more tubing and connector sets or if your Endoscope inventory changes
• Once the system is plugged in and the power switch is turned on, the cabinet will purge HEPA Filtered air within
the cabinet and any Endoscope that has a tubing set connected in the cabinet. The air quality filtered by the
HEPA is to 0.3 micron at 99.97% efficiency. The cabin air runs constantly and the Channel Purge operation is 30
minutes on and 20 minutes off
• The light remains on at all times. There is a switch on the light if you wish to turn it off. For cabinets equipped with
EndoTrack, there is a light switch on the touchscreen
1
2
3
4
5
Controller - Air Pumps for
Channel Purge are plugged
into this, which controls
pump interval time
Channel HEPA Filter
Power Strip Cabinet HEPA Filter
1
2
3
Channel Air Pump
(Supports up to 10 scopes)
4
5

www.logiquip.com |5
USER GUIDE
ENDOSCOPE DRYING CABINETS HEPA FILTER
BEST PRACTICES
• Take care in hanging and removing a scope to minimize the risk of damage
• Do not store a scope with the end touching the drip tray
• Ensure the drip tray is cleaned on a regular basis
FILTRATION
The Cabinet HEPA Filter consists of three levels of Filtration:
1. If equipped with a side mount component cabinet, an External Filter
2. HEPA Filter and Pre-Filter
3. A VOC Carbon Filter inside the cabin HEPA Filter is designed to filter odors
If the Pre-Filter is maintained on a regular schedule, it will ensure that the HEPA Filter will provide years of service
without requiring exchange.
The HEPA Filtration for the Endoscope Channel Air Purge is a separate HEPA Filter.
PREVENTATIVE MAINTENANCE SCHEDULE
Cabinet Positive Pressure Filter For HEPA-Only Cabinets Replacement Kit (40000HEPAKIT)
• Includes two (2) HEPA Pre-Filters, two (2) HEPA Post-Filters, two (2) O-Rings,
and two (2) 40000EF (External Filters)
• Replacement every six (6) months is recommended
Cabinet Main HEPA Filter (40000MFF)
• Includes one (1) main HEPA Filter replacement
• Replacement every two (2) years is recommended
Channel Air Purge HEPA Filter Replacement Kits (2 options)
• Filter Kit for 1 Pump Cabinets with 10 Scopes or less (40000CPKIT-1)
Includes two (2) HEPA Pre-Filters, two (2) HEPA Post-Filters, two (2) O-Rings,
two (2) 40000EF (External Filters), and two (2) 40000CPHF (Channel Purge Filters)
• Filter Kit for 2 Pump Cabinets with 10 Scopes or less (40000CPKIT-2)
Includes two (2) HEPA Pre-Filters, two (2) HEPA Post-Filters, two (2) O-Rings,
two (2) 40000EF (External Filters), and four (4) 40000CPHF (Channel Purge Filters)
• Replacement every six (6) months is recommended for both Kits
Tubes should be wiped clean between scope exchange, and disinfected weekly, or at the hospital’s discretion.

(800) 665-3760
6 |
USER GUIDE
CLEANING THE CABINET
Glass cleaner can be used on the glass part of the doors.
The stainless steel is easily cleaned by many different methods. While some contaminants may be easily removed,
others may require specific cleaners for effective removal. It may be necessary to identify the contaminant or
experiment with various cleaners.
Frequently, warm water with or without a gentle detergent can be used. Mild household cleaners with non-scratching
abrasive powders can be used with warm water, soft bristle brushes, sponges or clean cloths. Ordinary carbon steel
brushes or steel wool should be avoided as they may leave particles embedded in the surface, which can lead to
rusting. For more aggressive cleaning, a small amount of vinegar can be added to the cleaning powder. Handle the
stainless steel with clean gloves or cloths to guard against stains and finger prints.
Follow the facility’s schedule for the frequency of cleaning the cabinet. The drip pan can be cleaned as needed
with this schedule.
NOTES
• Avoid the use of the oily rags or greasy cloths when wiping the surface of the cabinet
• After cleaning rinse the cabinet thoroughly, where possible, with water
• When in doubt about the compatibility of a product with stainless, contact the manufacturer of the cleaner to
confirm that the product is safe for stainless steel.
• Cleaning with chloride-containing detergents MUST BE AVOIDED
FINGERPRINTS AND STAINS
Fingerprints and mild stains can be removed with a glass cleaner. Cleaning should always be followed by rinsing with
a soft cloth and clean warm water. When water contains mineral solids, which leave water spots, it is advisable to
wipe the surface completely with dry towels.
CLEAN WATER AND WIPES
Soft cloths and clean warm water should always be the first choice for mild stains, loose dirt, and soil. Rinsing with
clean water and a dry wipe(s) will eliminate the possibility of water stains.
DISINFECTANTS
If a disinfectant is used, it should be a non-chloride or non-abrasive type, such as alcohol, ammonia, or
hydrogen peroxide.
ENDOSCOPE DRYING CABINETS HEPA FILTER

www.logiquip.com |7
USER GUIDE
SOLVENT CLEANING
Organic solvents can be used to remove materials that have not had time to oxidize or decompose. Solvents should
not contain chloride, such as acetone, methyl alcohol, or mineral spirits. There are many blended organic cleaners
that are commercially available. Users are advised to contact suppliers of solvents for information regarding
application on stainless steel.
HOUSEHOLD CLEANERS
Household cleaners fall into two categories; detergent (non-abrasive) and abrasive cleaners. Both are effective for
many mild dirt, stain, and soil deposits, as well as light oils, such as fingerprints. The abrasive cleaners are more
effective, but introduce the possibility of scratching the surface. The degree of abrasiveness will vary greatly with
the product. Some brands will produce noticeable scratching on only the most highly-polished surfaces. All of these
cleaners vary widely with respect to acidity and the amount of chlorine contained. A neutral cleaner which is low in
chloride is preferred, unless the user is assured that the surface can be thoroughly rinsed after cleaning with warm
water and wiped dry with a soft cloth. It is not a guarantee that the product is non-abrasive, non-acidic, or low in
chloride even if it states that it is for use on stainless steel. The cleaning method generally employed with these
cleaners is to apply to the stainless surface and follow directions closely.
Even the finest cleaning powders can scratch or burnish a finish. On polished finishes, rubbing or wiping should be
done in the direction, NOT across, of the polish line or grain of the surface.
ENDOSCOPE DRYING CABINETS HEPA FILTER
GRAIN DIRECTION
FOR BEST PRACTICES WIPE SIDE TO SIDE

(800) 665-3760
8 |
USER GUIDE
ENDOSCOPE DRYING CABINETS HEPA FILTER
CLEANING THE CABINET FILTER
1. Shut off the cabinet Power Supply
2. If equipped with a side component cabinet, use the provided 8mm Allen wrench to remove the mechanical compartment
front panel. For cabinets with components mounted in the top, remove the access or top panel (depending on model)
3. Turn off the switch for HEPA Fan and unplug the power cord
4. Slide the HEPA housing completely out of the cabinet and remove the lid by undoing two latches and one screw
5. Twist the Filter Assembly counterclockwise to unlock the old HEPA Filter
6. If replacing the HEPA Filter along with its Pre- and Post-Filters, go to STEP 7
a. Remove the Pre-Filter Sleeve by sliding it off the HEPA Filter and replace with the new one
b. Remove the Post-Filter from the opening at the bottom of the HEPA Filter. To insert the new Filter, roll it up,
and slide it back into the HEPA Filter
c. Replace the O-Ring on the HEPA Filter
d. Place the old Filters (to be discarded) in a bag and remove to a non-biohazard area
7. Insert the new HEPA Assembly into the housing, and with downward pressure, twist the Filter Assembly clockwise to
relock the Seal and Filter into place
8. Replace the lid to the HEPA Housing and slide it into the cabinet
9. Plug in Fan and turn on the Power Switch to ON
10. If using EndoTrack, go to the Service Screen to reset the HEPA replacement timer. Refer to the EndoTrack User Guide
11. Replace the mechanical compartment front panel, top panel, or shroud. Store the Allen wrench in the hold on the top
side of the cabinet
12. Turn on cabinet Power Supply
Cabin HEPA Filter Box With Top Removed
Twist Cap (To Left) To Access HEPA Filter
VOC Carbon FilterCabin HEPA Filter

www.logiquip.com |9
USER GUIDE
CHANGING THE CHANNEL PURGE FILTER
1. Turn off the Power Supply to the cabinet
2. Using the provided 8mm Allen wrench, remove the mechanical compartment font panel, if the unit has a side component
cabinet. For cabinets with components mounted in the top, remove the access panel or top (depending on model)
3. Take the tube off the barb of the Filter and unscrew the base from the tubing
4. Replace Filter, by screwing it onto the tubing and putting the tubing on the top barb of the filter. CAUTION: Make sure the
Filter and threaded fitting are exactly aligned. DO NOT OVERTIGHTEN
5. Press the RESET button on the Filter Cabinet Control Box. If using EndoTrack, go to the Service screen to reset the HEPA
Replacement Timer. Refer to the EndoTrack User Guide
6. Replace the mechanical compartment front panel, if the side component cabinet or cover plate Filters are mounted in
the top
External Filter
(Side Mount Cabinet)
Side Cabinet RemovalFilter Reset Button - Resets Timer For
Channel Purge Filter Replacement
ENDOSCOPE DRYING CABINETS HEPA FILTER
Channel Purge
HEPA Filter
Channel Purge
Air Pump
Power Button
Cabinet Filter
Alert LED
Channel Purge Filter
Alert LED

(800) 665-3760
10 |
USER GUIDE
ENDOSCOPE DRYING CABINETS HEPA FILTER
TROUBLESHOOTING
Below is a list of common problem and troubleshooting solutions. For items you can not resolve contact your local LogiQuip
Representative or Customer Support person. Please have the serial number of the unit available. It can be found on a label
inside near the top, or on the top of the unit.
SYMPTOM
LED light does
not illuminate
the cabinet
No air flow through
purge parts
No air flowing
through grill duct
inside the cabinet
Door does
not lock
Door does
not open
PROBLEM Main cabinet LED
light is out
Channel Purge
pump failure No air flow to cabinet Door eLock failed
to engage
Door eLock failed
to open
SOLUTION
OPTION 1
LED light power cable
is unplugged. Plug
into power bar in
component cabinet
or check that the plug
into the LED light is
not loose
Pump unplugged.
Plug in pump
Power switch for
HEPA fan is OFF.
Switch ON
Scanned badge is not
set up on cabinet.
Refer to User Manual
Scanned badge is not
set up on cabinet.
Refer to User Manual
OPTION 2
Power bar component
cabinet is switched
OFF. Switch ON
Control Box/Manifold
unplugged. Plug into
power bar in the
component cabinet
Power cable for HEPA
fan is unplugged.
Plug into power bar in
component cabinet
eLock solenoid failed.
Replace eLock
eLock solenoid failed.
Replace eLock
OPTION 3 LED light failure.
Replace LED light
3A fuse in control box
is blown. Replace fuse
10A fuse is blown.
Replace fuse
8-Channel relay
board failure.
Replace relay board
8-Channel relay
board failure.
Replace relay board
OPTION 4 —Control box failure.
Replace control box
Wiring/connection
failure. Repair wiring
Wiring/connection
failure. Repair wiring
Wiring/connection
failure. Repair wiring
OPTION 5 — —
Ensure duct is
connected at
both ends
Barcode/RFID
scanner failure.
Replace scanner
Barcode/RFID
scanner failure.
Replace scanner
OPTION 6 — — HEPA fan failure.
Replace HEPA fan
Control board (GPIO)
failure. Replace
control board
Control board (GPIO)
failure. Replace
control board
OPTION 7 ———CPU failure.
Replace CPU
CPU failure.
Replace CPU
OPTION 8 — — —
Lock pin and door
catch not aligned.
Adjust eLock to line-up
with door catch
Lock pin and door
catch not aligned.
Adjust eLock to line-up
with door catch

USER GUIDE
WARRANTY INFORMATION
LogiQuip products are covered by a Limited 5-Year Warranty from date of receipt against defect in materials or workmanship under
normal use and service, excluding Electronic Components, Cart Covers, Custom Products, and LogiCell Tambour Doors. During this
period, LogiQuip will, in its sole discretion, repair defects in materials or workmanship that existed when the product was received
or replace the product. Visit LogiQuip.com/Warranty for more details.
ABOUT US
Healthcare exclusive since 1992, LogiQuip’s Inventory Management Solutions are designed for Healthcare Professionals looking for
a better way to manage supply chain tasks. With Expert Advice, Innovative Solutions, and 360 Service that doesn’t stop after the
sale, LogiQuip’s sole purpose is to ensure Healthcare Professionals have the supplies they need when they need them. Partnering
with you to design and implement the right solutions, we give you time back to focus on what’s important; Patient Care.
Other manuals for DRI-STOR
2
Table of contents
Other Logiquip Medical Equipment manuals
Popular Medical Equipment manuals by other brands

Mortara
Mortara Surveyor S2 user manual

Scaleo medical
Scaleo medical Horizon S5 user manual

Concoa
Concoa Medical IntelliSwitch 570 Series Installation and operating instructions

GE
GE TruTrak+ 3900 user manual

Interacoustics
Interacoustics VisualEyes 505 Instructions for use

NAUSICAA
NAUSICAA MAXXI UP 300 manual

Elma Instruments
Elma Instruments Elma B-Scope 500 user manual

Servox
Servox Digital First steps

Advanced Instruments
Advanced Instruments OsmoPRO Multi-Sample user guide

Baby Vida
Baby Vida Oxygen Monitor Instructions and product information

Omron
Omron Total Power + Heat PM800 instruction manual

Planmeca
Planmeca Compact i Touch quick guide