CAL. NO. BATTERY BATTERY LIFE
(Approx.)
Z029 SONY CR2032,
1 piece 5 years
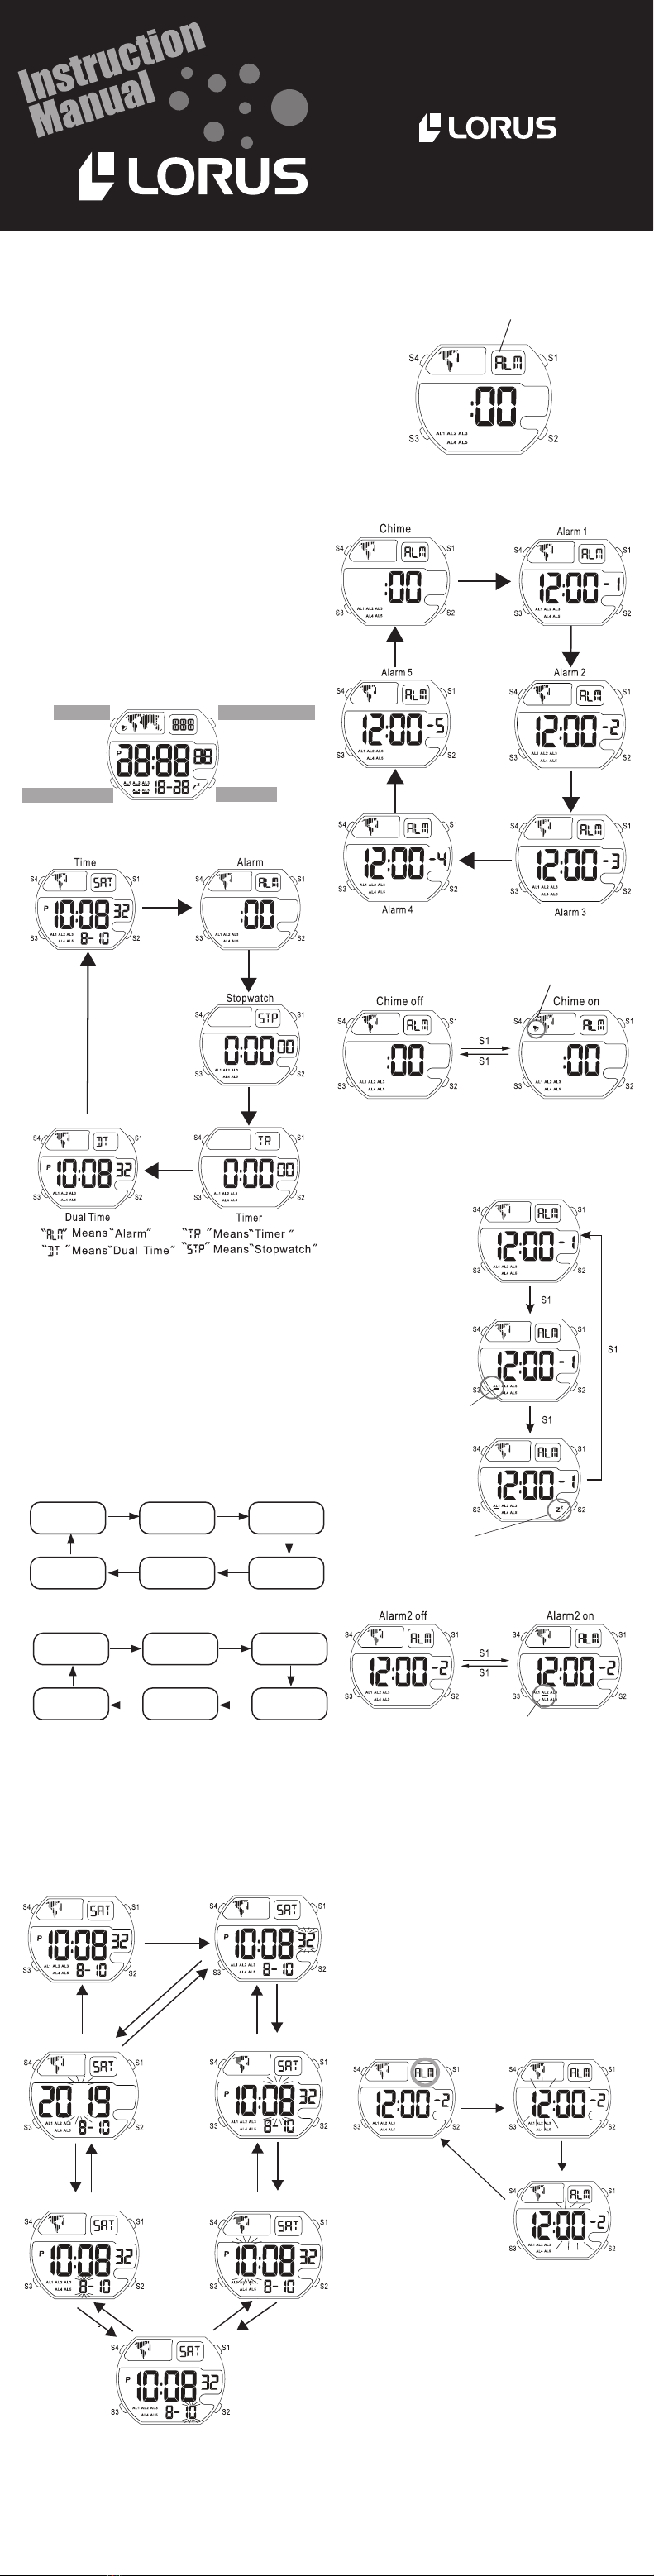
■HOW TO USE THE STOPWATCH
How to stop the TIMER alarm while sounding
The TIMER alarm sounds for 10 seconds when
time is up. To stop it manually while sounding,
press any button.
Press S3 twice to go to the STOPWATCH mode.
The STOPWATCH mode indicator appears on
the display.
HOUR SETTING BY
PRESSING S4
MINUTE SETTING BY
PRESSING S4
S2
S2
S1 or S3
• Measurement and release of lap times can
be repeated when S2 is pressed.
• Press S4 to activate EL light for 2 seconds
STOPWATCH OPERATION
Standard Measurement
Lap Time Measurement
S1 S1 S2
Start Stop Reset
S1 S2 S2 S1 S2
Lap 1 Lap 2
The miniature battery which powers your
watch should last as individually specified
below. However, because it is inserted at
the factory, the actual life of the battery
once in your possession may be less than the
specified period.
Be sure to replace the battery to prevent any
possible malfunction as soon as it runs down.
To replace the battery we recommend taking
the watch to a local watch repair shop.
Note:If the alarm is used for more than 20
seconds a day and/or the illuminating
light for more than 8 seconds a day,
the battery life may be less than the
specified period.
■BATTERY CHANGE
■ILLUMINATING LIGHT
In any mode press S4 to illuminate the display
for about 2 seconds.
Note:
1. The backlight of the watch employs an
electro-luminescent (EL) light, which tends
to lose illuminating power after very long
use.
2. The illumination provided by backlight
may be hard to see when viewed under
direct sunlight.
Printed in China
Caution:
Leather straps are not water resistant except
so indicated, even if the watch head is water
resistant.
• ALLERGIC REACTION
Because the case and band touch the
skin directly, it is important to clean them
regularly. If not, shirt sleeves may be stained
and those with delicate skin may develop a
rash. Please wear the watch with some play
to avoid any possible allergic reaction. If you
develop a rash on your wrist, stop wearing
and consult a physician.
• MAGNETISM
Your watch will be adversely affected by
strong magnetism. Keep it away from close
contact with magnetic objects.
• SHOCKS AND VIBRATIONS
Your watch may be worn for normal sports
activities, but be careful not to drop it or hit
it on hard surfaces.
• TEMPERATURE
Your watch is preadjusted so that constant
accuracy may be insured at normal tem-
perature.
• CLEANING
Use only a soft cloth and clean water for
cleaning your watch. Never use chemicals,
as the waterproof gasket will corrode.
■SERVICE
When your LORUS watch requires repair
or servicing, please see the enclosed
WARRANTY/GUARANTEE.
■CARE OF YOUR LORUS WATCH
This watch contains precise electronic
components. Never attempt to open the
case or remove the back cover.
• BATTERY
CAUTION
Do not expose the old battery to fire or
recharge it. Keep it at a place beyond
the reach of children. If a child swal-
lows it, consult a doctor immediately.
• WATER RESISTANT
Condition
of use Accidental
contact
with water,
such as
splashes
and rain
Swimming
and taking
a shower
Skin
diving
Scuba
diving
Indication
on the dial/
case back
No
Indication
* If your watch is 200 M/20 BAR, 100 M/10
BAR or 50 M/5 BAR water resistant, it is so
indicated on the dial/case back.
• Do not operate the buttons when the watch
is wet.
• If the watch is exposed to salt water, rinse it
in fresh water and then wipe it thoroughly
dry.
• Should you find any water or condensation
inside the watch, immediately have it
checked. Water can corrode electric
parts inside the case.
NO NO NO
YES YES NO NO
YES YES NO
NO NO NO
YES
WATER
RESISTANT
WATER
RESISTANT
(50M/5 BAR
)
WATER
RESISTANT
100M/10 BAR
or above
(
NO
(
YES
TIMER OPERATION
1. Press S1 in the TIMER mode to start the
timer.
2. Press S1 to stop the timer.
3. To reset the timer, press S2.
■HOW TO USE THE TIMER
Press S3 three times to go to the TIMER mode.
The TIMER mode indicator appears on the
display.
S1
S1
S2
TIMER RUN
TIMER STOP
Reload
set value
STOP
START
START
TIMER mode indicator
START/STOP
RESET
EL light
EXIT
1. Press and hold S2 to change the display to
the TIMER SETTING mode. The hour digits
start flashing.
2. Press S4 to set the hour digits. One digit
(flashing) is increased with each pressing
of S4. To move the digits quickly, keep the
button pressed.
3. Press S1 or S3 to confirm the hour setting
and move on to the minute setting. The
minute digits start flashing.
4. Press S4 to set the minute digits. One digit
(flashing) is increased with each pressing
of S4. To move the digits quickly, keep the
button pressed.
5. Press S2 to complete the timer setting.
TIMER SETTING
■
HOW TO SET THE SECOND TIME ZONE
Press S3 four times to go to the DUAL TIME
mode. The DUAL TIME mode indicator appears
on the display.
HOUR SETTING
BY PRESSING S4
MINUTE SETTING
BY PRESSING S4
S2
S2
S1 or S3
DUAL TIME mode indicator
EL light
Exit Setting mode
1. Press and hold S2 to change the display
to the DUAL TIME SETTING mode. The hour
digits start flashing.
2. Press S4 to set the hour digits. One digit
(flashing) is increased with each press of
S4. To move the digits quickly, keep the
button pressed.
3. Press S1 or S3 to confirm the hour setting
and move on to the minute setting. The
minute digits start flashing.
4. Press S4 to set the minute digits. One digit
(flashing) is increased with each pressing
of S4. To move the digit quickly, keep the
button pressed.
5. Press S2 to complete the second time zone
setting.
6. Press S3 to return to the TIME/CALENDAR
mode.
SECOND TIME ZONE SETTING
STOPWATCH mode indicator
START/STOP
SPRIT/RESET
EL light
EXIT