Stopwatch Operation
Press button “A” to show the STOPWATCH
mode.
Minutes
■HOW TO USE THE STOPWATCH
• The stopwatch can measure up to 23 hours,
59 minutes and 59 seconds in 1/100 second
increments for the first hour and in 1 second
increments thereafter.
* Even if the STOPWATCH mode is changed
to another while the measurement is in progress,
it continues counting properly. After the
stopwatch is used, however, be sure to reset
it as the battery energy is consumed enormously
to shorten the battery life.
STOPWATCH mode mark
C
B
D
A
Seconds 1/100 seconds
Accumulated elapsed time measurement
Start Stop
Restart
Stop
Reset
C C
➡➡
C C D
➡➡
* Restart and stop of the stopwatch can be repeated
by pressing button “C”.
■HOW TO SET THE REGULAR ALARM
REGULAR ALARM
mode mark
1. Press button “A” to show the REGULAR ALARM
mode.
2. Press button “A” for 2 to 3 seconds to show
the REGULAR ALARM SETTING display.
* The hour digits start flashing.
3. Press button “C” to select the digits to be
adjusted (flashing).
→
→
MinutesHour
AD
BC
Alarm
mark
MinutesHour
4. Press button “D” to set the digits.
* One digit is advanced with each press of
the button. The digits move quickly by
keeping the button pressed.
5. After all the adjustments are completed, press
button “A” to return to the REGULAR ALARM
mode.
* The alarm mark appears and the regular
alarm is automatically engaged.
■HOW TO SET THE SINGLE-TIME ALARM
Designated alarm time
C
B
D
A
Notes:
1. When the time function is displayed in the
24-hour indication, the alarm is also displayed
in the 24-hour indication.
2. When setting the hour digits in the 12-hour
indication, check that AM/PM is properly
set. Only “PM” mark is displayed and there
is no indication for the AM setting. In the
24-hour indication, “24” is displayed.
3. If the watch is left untouched in the REGULAR
ALARM SETTING display with the digits
flashing, it will automatically return to the
REGULAR ALARM mode in 1 to 2 minutes.
Engagement/disengagement of the regular
alarm and alarm test
• With each press of button “C” in the REGULAR
ALARM mode, the regular alarm is engaged
and disengaged alternately.
• At the designated time, the alarm rings for
20 seconds and stops. To stop it manually,
press any of the buttons.
• The alarm can be tested by keeping button
“C” pressed in the REGULAR ALARM mode.
* After the alarm is tested, press button “C”
again to engage or disengage the regular
alarm.
Single-time
alarm mark
Current
time
1. Press button “C” in the TIME/CALENDAR
mode to show the SINGLE-TIME ALARM
mode.
* If the watch is left untouched in the SINGLE-
TIME ALARM mode, it will automatically
return to the TIME/CALENDAR mode in
20 to 30 seconds.
2. Press button “C” or “D” to set the desired
alarm time.
* One minute is advanced or moved back
with each press of button “C” or “D”, respectively.
The digits move quickly by keeping the
respective buttons pressed.
* The single-time alarm mark “1-AL” is displayed
and the alarm is automatically engaged.
•The single-time alarm can be set to ring only
once at the designated time. As it rings, it is
automatically disengaged.
•The alarm time can be set in 1 minute increments
starting from the current time.
3. Press button “A” to return to the TIME/
CALENDAR mode.
• The alarm rings at the designated time for
20 seconds. To stop it manually, press any
of the buttons.
* The sigle-time alarm rings differently from
the regular alarm.
• To check the alarm time you have set, press
button “C” in the TIME/CALENDAR mode
to show the SINGLE-TIME ALARM mode.
• To cancel the alarm time you have set, press
buttons “C” and “D” at the same time or
press button “C” or “D” to set the alarm time
to the current time in the SINGLE-TIME
ALARM mode.
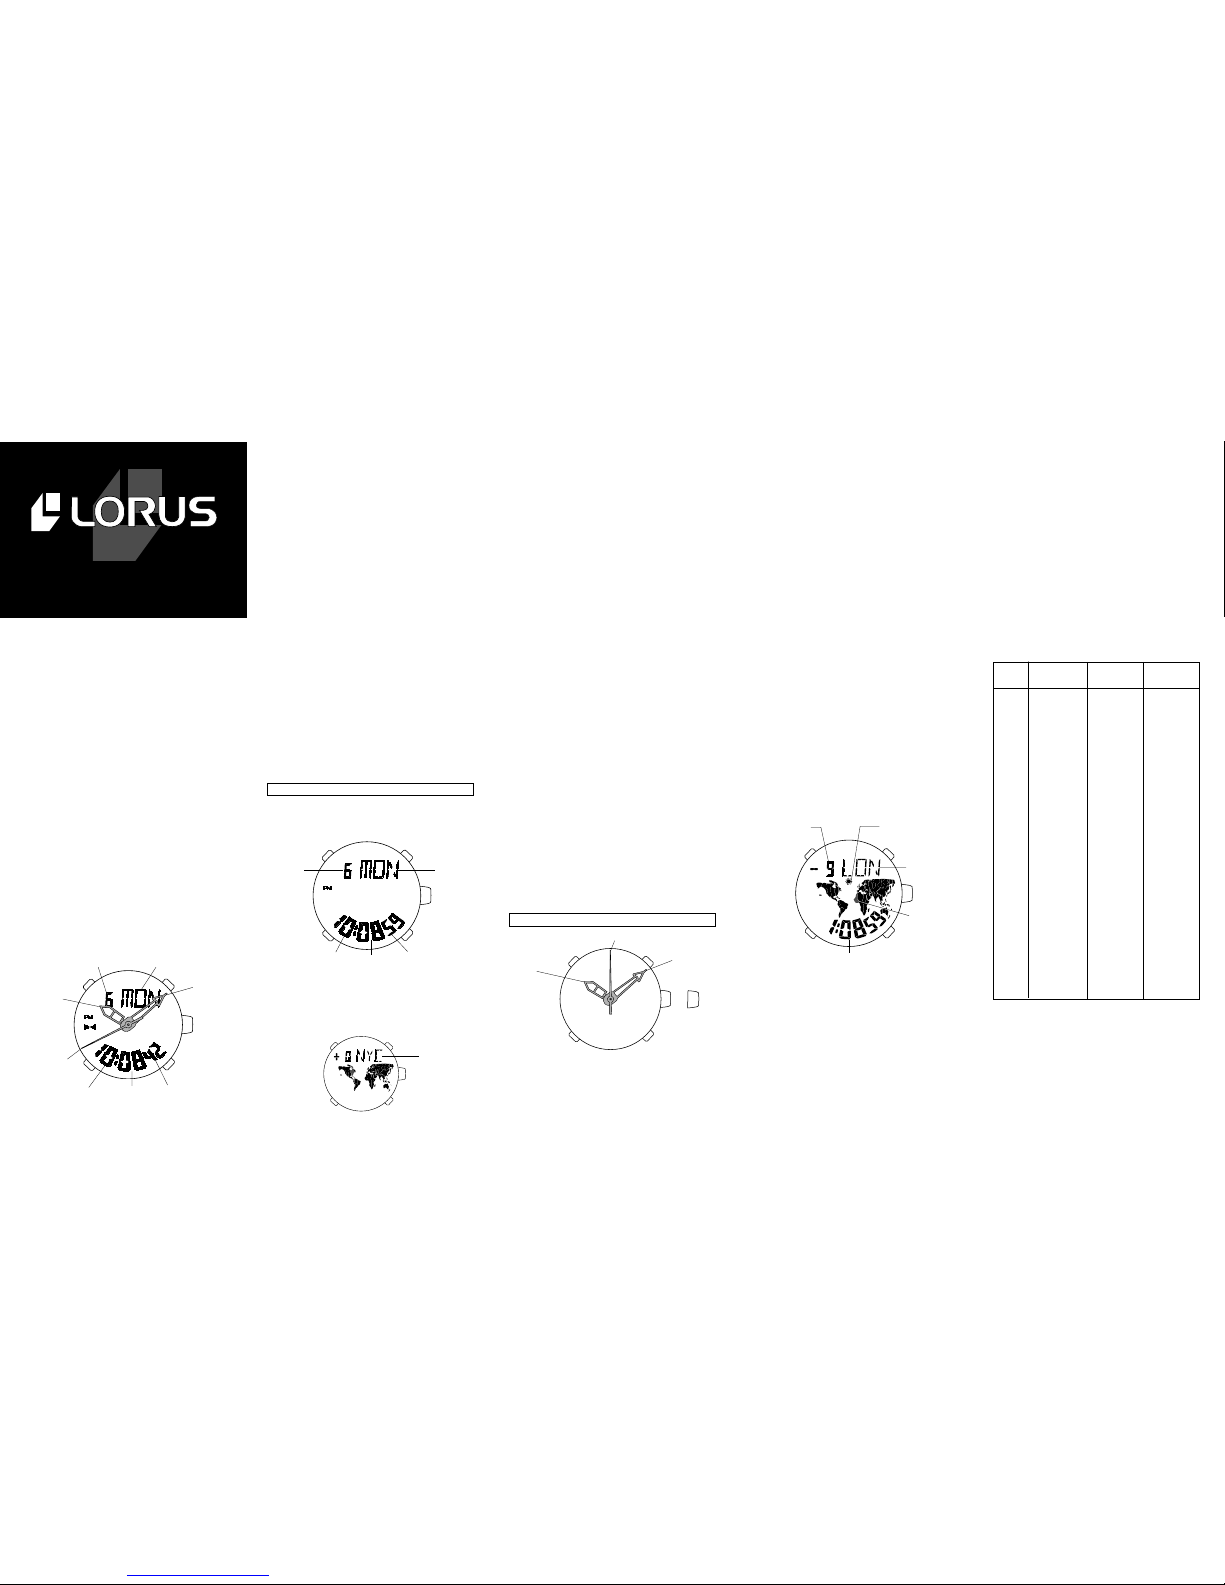
■DEMONSTRATION FUNCTION
1. Press button “D” for 2 to 3 seconds in the
TIME/CALENDAR mode to activate the demonstration
function.
2. The modes and displays are shown for 2 seconds
automatically in the following order.
→→
Time/calendar
display WORLD
TIME mode
REGULAR
ALARM
mode
→
STOPWATCH
mode
3. To deactivate the demonstration function, press
any of the buttons. The watch returns to the
TIME/CALENDAR mode.
→
Blank
display
Calendar
display
→
→
■NOTE ON UNUSUAL DISPLAY
While in the TIME/CALENDAR SETTING display
with the digits flashing, all the segments of the display
will light up if both buttons “C” and “D” are pressed
at the same time. This is not a malfunction. Press
button “A”, “C” or “D” to return to the TIME/CALENDAR
mode, and then set the time/calendar again.
■NECESSARY PROCEDURE AFTER
BATTERY CHANGE
After the battery is replaced with a new one or if an
abnormal display (broken digits, etc.) appears in
the digital display, follow the procedure below to
reset the IC.
1. Press and hold the four buttons at the same
time for 2 to 3 seconds.
* “12:00'00" a.m., Jan. 1, 2000, Sat.” will be
displayed and “UTC” is selected in the WORLD
TIME mode.
2. Before using the watch, set the time/calendar
and alarm.
■LUMIBRITE WATCH
(dial, hands, buttons, case, bezel,
strap, etc.)
✩If your watch is a LORUS LUMIBRITE watch, it
has following features.
LORUS LUMIBRITE watches absorb and store light
energy from natural and artificial light sources
and emit light in the dark. They are made of
environmentally friendly material, and therefore,
are harmless to human beings and the environment.
• With a full charge, LORUS LUMIBRITE watches
glow in the dark hours longer than conventional
luminous watches of this type. If exposed to a
light of more than 500 lux (i.e., the brightness
of a typical office) for approximately 10 minutes,
or direct sunlight for 2 minutes, they will glow
for hours.
• Since LORUS LUMIBRITE watches emit the light
they store, the brightness will decrease gradually
over time. The length of time they will glow
may also differ slightly depending on such factors
as the brightness of and distance from the light
source used to charge the watch.
■LORUS LITE
B
Notes:
1. When the light begins to lose its luminance,
this is an indication that the battery for the
digital display is depleted. We recommend
that you change the battery before the watch
itself stops.
2. If the light is used continuously for a long time,
the battery life may be less than the specified
period.
•Press button “B” in any mode. The electroluminescent
light evenly illuminates the display for 3 seconds
for easy viewing in the dark.
■ViViDiGi
ViViDiGi is a new type of liquid crystal panel that
makes possible various colors and high contrast.
• Excellent light reflection and transmission make
the display bright and clear.
• Various color options are available.
• Either the whole panel or the displayed data
only can be illuminated.
* Features vary in different models.
■BATTERY CHANGE
The miniature lithium batteries SEIKO SR626SW,
MAXELL SR626SW, SONY SR626SW, Matsushita
SR626SW or EVEREADY 377 for analogue display
and SEIKO SR41W, MAXELL SR41W, SONY SR41W
or EVEREADY 392 for digital display,which power
your watch should last approximately 2 years. However,
because they are inserted at the factory, the actual
life of the batteries once in your possession may
be less than the specified period. Be sure to replace
the batteries to prevent any possible malfunction
as soon as they run down. To replace the batteries,
we recommend taking the watch to a local watch
repair shop.
Notes:
1. If the alarm is used for more than 10 seconds a
day and/or the illuminating light more than
once (for 3 seconds) a day, the battery life may
be less than the specified period.
2. If either of the two batteries runs down, we
recommend that you replace both of the batteries.
■CARE OF YOUR LORUS WATCH
• BATTERY
CAUTION
Do not expose the old battery to fire or
recharge it. Keep it at a place beyond
the reach of children. If a child swallows
it, consult a doctor immediately.
• WATER RESISTANT
No
indication
WATER
RESISTANT
WATER
RESISTANT
(50 M/5 BAR)*
Condition
of use
Accidental
contact with
water, such
as splashes
and rain
Swimm-
ing and
taking a
shower
Skin
diving Scuba
diving
Indica-
tion on
the dial/
case back
NO NO NO NO
YES YES NO NO
YES NO NO NO
WATER
RESISTANT
100 M/
10 BAR or
above
YES YES YES NO
()
*
* If your watch is 200 M/20 BAR, 100 M/10
BAR or 50 M/5 BAR water resistant, it is so
indicated on the dial/case back.
•Do not operate the crown and buttons when the
watch is wet.
•If the watch is exposed to salt water, rinse it in
fresh water and then wipe it thoroughly dry.
Caution:
Leather straps are not water resistant except so
indicated, even if the watch head is water resistant.
• ALLERGIC REACTION
Because the case and band touch the skin directly,
it is important to clean them regularly. If not,
shirt sleeves may be stained and those with
delicate skin may develop a rash. Please wear
the watch with some play to avoid any possible
allergic reaction. If you develop a rash on your
wrist, stop wearing and consult a physician.
• MAGNETISM
Your watch will not be affected by magnetism
generated by household electric appliances.
• SHOCKS AND VIBRATIONS
Your watch may be worn for normal sports ac-
tivities, but be careful not to drop it or hit it on
hard surfaces.
• TEMPERATURE
Your watch is preadjusted so that constant accuracy
may be insured at normal temperature.
When your LORUS watch requires repair or
servicing, please see the enclosed WARRANTY/
GUARANTEE.
■SERVICE
Printed in China