Lotus cooker BMD-64EM User manual

563018601.doc
LIBR.ISTR.BMD
Istruzioni
per l'installazione e l'uso
Aufstellungs
und Bedienungsanleitung
Instructions
Pour l’installation et l’emploi
Instructions
for installation and use
Guia para la intalación e
instrucciones de uso
BAGNOMARIA ELETTRICI
ELEKTRISCH BETRIEBENES
WASSERBAD
BAIN-MARIE ELECTRIQUE
ELECTRICAL BAIN-MARIE
BAÑO MARIA ELÉCTRICOS
PARA USO PROFESIONAL
Mod.
BM
D
-
6
4EM
BMD
-
68E
T
BMD
-
82EM
BMD
-
84EM
IT
CH
FR
BE
DE
AT
CH
GB
IE
ES

2
FIG. A, BMD-64EM , BMD-68ET
562021801 M02_00
D
E
390-590-790
400-600-800
10
8
10
390
590
790
390
590
790
B
Tabella
Descrizione A
BMD-64EM 400 mm
BMD-68ET 800 mm 512 mm
D
516 mm
= D = = C=
600 A
10
181
273,3
310 mm
C
634 mm
124 101 F
G
38 mm
F
69 mm 83 mm
G
140 mm
B
Allacciamento elettrico Allacciamento acqua 1/2GF Scarico acqua 1GF
Elektroanschluß
Wasseranscluß 1/2GF Wasserabflussrohr 1GF
Raccordement electrique
Raccord eau 1/2GF Evacuation d'eau 1GF
Electrical connection
Water connection 1/2GF Water drainage 1GF
Conexión eléctrica
Enlace agua 1/2GF Descarga agua 1GF

3
FIG. A , BMD-82EM
B
190-390-590-790
400-600-800
10
8
10
190
390
590
790
190
390
590
790
562042500M01P00
D
E
10
262
189
400 400
17
100
200
282
161
200
743
800 28 20 2028
809
B
Allacciamento elettrico Allacciamento acqua 1/2GF Scarico acqua 1GF
Elektroanschluß
Wasseranscluß 1/2GF Wasserabflussrohr 1GF
Raccordement electrique
Raccord eau 1/2GF Evacuation d'eau 1GF
Electrical connection
Water connection 1/2GF Water drainage 1GF
Conexión eléctrica
Enlace agua 1/2GF Descarga agua 1GF

4
FIG. A, BMD-84EM
B
390-590-790
400-600-800
10
8
10
390
590
790
390
590
790
562036700 M01_00
D
E
800
56
68856 309
400
46 45
131 110
10
176
270
32
99
B
Allacciamento elettrico Allacciamento acqua 1/2GF Scarico acqua 1GF
Elektroanschluß
Wasseranscluß 1/2GF Wasserabflussrohr 1GF
Raccordement electrique
Raccord eau 1/2GF Evacuation d'eau 1GF
Electrical connection
Water connection 1/2GF Water drainage 1GF
Conexión eléctrica
Enlace agua 1/2GF Descarga agua 1GF

5
Pag. 6
Seite 10
Page 14
Page 18
Pàg. 22
IT
CH
FR
BE
DE
AT
CH
GB
IE
ES

6
IT CH
TABELLA DATI TECNICI.......................................................................................7
ISTRUZIONI PER L'INSTALLAZIONE................................................................7
INSTALLAZIONE......................................................................................................7
DISPOSIZIONI DI LEGGE, REGOLE TECNICHE E DIRETTIVE..................7
ALLACCIAMENTO ELETTRICO..........................................................................7
EQUIPOTENZIALE...................................................................................................8
MESSA IN FUNZIONE..............................................................................................8
ISTRUZIONI PER L'USO.........................................................................................8
ACCENSIONE ............................................................................................................8
SVUOTAMENTO DELLA VASCA..........................................................................8
PULIZIA E MANUTENZIONE................................................................................8
COMPORTAMENTO IN CASO DI PROLUNGATA INTERRUZIONE DI
FUNZIONAMENTO...................................................................................................8
MANUTENZIONE .....................................................................................................8
ACCESSIBILITÀ........................................................................................................9

7
IT CH
TABELLA DATI TECNICI
MODELLI
BMD-64EM
BMD-68ET BMD-82EM BMD-84EM
ALIMENTAZIONE 230V~50/60 Hz
400V~2N 50/60 Hz
230V~50/60 Hz 230V~50/60 Hz
ASSORBIMENTO MASSIMO 9,13 A 9,13 A 7,16 A 12,39
POTENZA MASSIMA 2,1 kW 4,2 kW 1,65 kW 2,85
CAVO ALIMENTAZIONE 3x1,5 mm² 5x1,5 mm² 3x1,5 mm² 3x1,5 mm²
TRASFORMAZIONE
MODELLI
BMD-68ET
ALIMENTAZIONE 230V~3 50/60 Hz
ASSORBIMENTO MASSIMO 12,08 A
POTENZA MASSIMA 4,2 kW
CAVO ALIMENTAZIONE 3x2,5 mm²
ISTRUZIONI PER L'INSTALLAZIONE
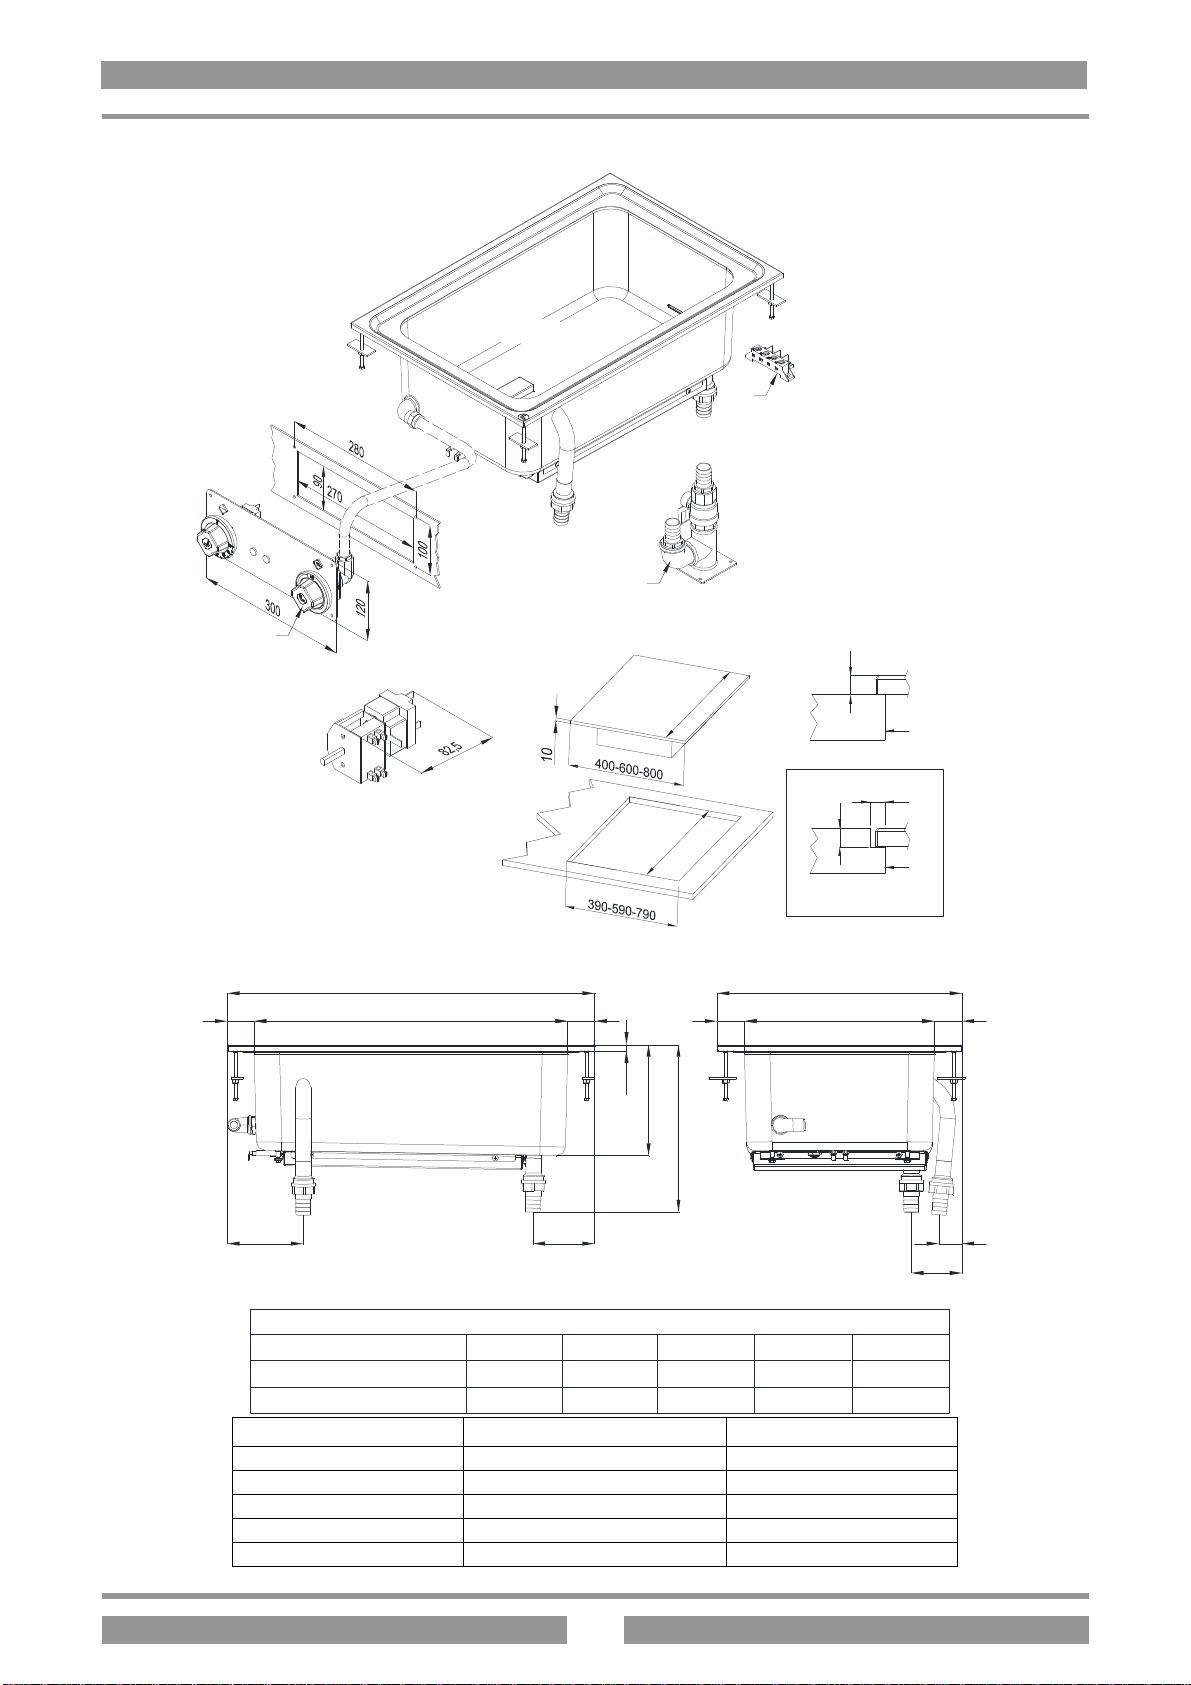
La targhetta caratteristiche tecniche si trova sulla parete anteriore (vedi disegno al punto allacciamento elettrico) e
contiene tutti i dati necessari all'allacciamento.
INSTALLAZIONE
Si consiglia di porre l'apparecchio sotto una cappa aspirante, in modo che l'evacuazione dei vapori avvenga in modo
rapido. Qualora l'apparecchio venisse posizionato vicino a pareti, pareti divisorie, mobili da cucina, rivestimenti
decorativi ecc si consiglia che questi siano di materiale non infiammabile, altrimenti provvedere a rivestire tali pareti
con del materiale non infiammabile.
Si deve anzitutto assicurare che le prescrizioni antincendio vengano rispettate.
L'installazione, messa in funzione e manutenzione dell'apparecchio devono essere eseguite da personale qualificato.
Tutti i lavori necessari all'installazione devono essere eseguiti in osservanza alle norme vigenti.
Il costruttore declina qualsiasi responsabilità in caso di cattivo funzionamento, che risulti dovuto ad una installazione
errata o non conforme.
Attenzione: come da disposizioni internazionali, durante l'allacciamento dell'apparecchio è da prevedere a monte dello
stesso un dispositivo che permetta di staccare in modo onnipolare l'apparecchio dalla rete, questo dispositivo deve avere
una apertura dei contatti di almeno 3 mm.
DISPOSIZIONI DI LEGGE, REGOLE TECNICHE E DIRETTIVE
L'installazione deve essere eseguita in osservanza delle seguenti norme:
- Prescrizione antinfortunistica vigente.
- Prescrizione di installazione, norme CEI.
ALLACCIAMENTO ELETTRICO
L'apparecchio non viene consegnato con il cavo di allacciamento elettrico. Per l’installazione del cavo si proceda nel
seguente modo:
•Togliere la tensione.
•Passare il cavo di allacciamento attraverso il pressacavo, collegare i conduttori nel corrispondente morsetto della
morsettiera e fissarli.
•Il conduttore di terra deve essere più lungo degli altri, in modo che in caso di rottura del pressacavo, questo si
stacchi dopo i cavi della tensione.
N.B. il cavo di allacciamento deve avere una sezione adeguata alla potenza dell'apparecchio (vedi tabella dati tecnici).
EQUIPOTENZIALE
L'apparecchio deve essere collegato ad un sistema equipotenziale. La vite di collegamento è posizionata sulla parte
posteriore dell'apparecchio ed è contraddistinta dal simbolo .

8
IT CH
Attenzione: il costruttore non è responsabile, e non risarcisce in garanzia danni provocati e che sono dovuti ad
installazioni inadeguate e non conformi alle istruzioni.
MESSA IN FUNZIONE
Prima di utilizzare l'apparecchio è necessario pulirlo con cura, soprattutto la vasca (vedi paragrafo "pulizia e cura").
Controllare l'allacciamento dell'apparecchio e metterlo in funzione secondo le istruzioni.
ISTRUZIONI PER L'USO
Attenzione: Usare l'apparecchio solo sotto sorveglianza!
Mai mettere in funzione l'apparecchio senz'acqua! I bagnomaria sono apparecchi che consentono il riscaldamento e il
mantenimento in temperatura di carne, pesce, verdure, legumi ecc. ad esclusione di cibi fritti.
ACCENSIONE
Controllare che il rubinetto di scarico dell'acqua, che si trova nel vano sottostante l'apparecchio (leva in posizione
orizzontale) sia chiuso. Riempire la vasca con acqua (max.60°C) fino al livello indicato dal simbolo stampigliato nella
vasca
--
. Inserire l'interruttore posto a monte dell'apparecchio. Girare la manopola da "0" fino alla posizione desiderata
fra i 30° e i 90°C, si accendono le spie bianca e verde.
La lampada spia verde indica che l'apparecchio è sotto tensione. l'accensione della lampada spia bianca segnala il
funzionamento dell'elemento riscaldante, il suo spegnimento indica il raggiungimento della temperatura. Per spegnere
l'apparecchio, girare la manopola in posizione “O” .
SVUOTAMENTO DELLA VASCA
Per eseguire questa operazione bisogna aprire il rubinetto di scarico (leva in posizione verticale) che si trova al di sotto
dell'apparecchio
PULIZIA E MANUTENZIONE
Attenzione: durante la pulizia non lavare esternamente l'apparecchio con getti d'acqua diretti o ad alta
pressione.
Ogni sera a fine lavoro pulire accuratamente l'apparecchio. La pulizia quotidiana dell'apparecchio garantisce un
funzionamento perfetto e una lunga durata dello stesso.
Prima di iniziare la pulizia togliere la tensione dall'apparecchio. Le parti in acciaio sono da lavare con acqua calda e
detersivo neutro, sono poi da sciacquare abbondantemente in modo da eliminare ogni traccia di detersivo poi asciugare
con un panno asciutto. Non usare detergenti abrasivi o corrosivi.
COMPORTAMENTO IN CASO DI PROLUNGATA INTERRUZIONE DI
FUNZIONAMENTO
Pulire ed asciugare accuratamente l'apparecchio come da istruzioni. Togliere la tensione
COMPORTAMENTO IN CASO DI GUASTO
In caso di guasto spegnere l'apparecchio, togliere la tensione mediante il dispositivo posto a monte dell'apparecchio e
avvisare il servizio assistenza.
MANUTENZIONE (SOLO PER PERSONALE QUALIFICATO)
Qualsiasi lavoro di manutenzione e da far eseguire esclusivamente a personale qualificato. Prima di iniziare una
manutenzione, togliere la spina o disinserire l'interruttore posto a monte. Vuotare la vasca quando è piena.
ACCESSIBILITA’

9
IT CH
Per accedere alla morsettiera, togliere la schiena dell'apparecchio. Gli elementi di comando si raggiungono dal cruscotto
anteriore, svitare il cappuccio nero della leva dell'uscita dell'acqua, svitare le viti che fissano il cruscotto e togliere
quest'ultimo

10
DE
AT
CH
TABELLE DER TECHNISCHE DATEN................................................................9
AUFSTELLUNGSANLEITUNGEN.......................................................................10
AUFSTELLUNG.......................................................................................................10
GESETZLICHE BESTIMMUNGEN, TECHNISCHE VORGABEN UND
VORSCHRIFTEN.....................................................................................................10
ELEKTROANSCHLUSS.........................................................................................10
ÄQUIPOTENZIAL...................................................................................................11
INBETRIEBNAHME ...............................................................................................11
BEDIENUNGSANLEITUNGEN.............................................................................11
EINSCHALTEN........................................................................................................11
ENTLEERUNG DES BECKENS............................................................................11
REINIGUNG UND WARTUNG .............................................................................11
VORGEHEN BEI LÄNGEREM BETRIEBSSTILLSTAND ..............................11
WARTUNG ...............................................................................................................12
ZUGÄNGLICHKEIT...............................................................................................12

11
DE
AT
CH
TABELLE DER TECHNISCHEN DATEN
MODELLE
BMD-64EM
BMD-68ET BMD-82EM BMD-84EM
STROMZUFUHR 230V~50/60 Hz
400V~2N 50/60 Hz
230V~50/60 Hz 230V~50/60 Hz
MAXIMALE
STROMAUFNAHME 9,13 A 9,13 A 7,16 A 12,39
HÖCHSTLEISTUNG 2,1 kW 4,2 kW 1,65 kW 2,85
VERSORGUNGSLEITUNG 3x1,5 mm² 5x1,5 mm² 3x1,5 mm² 3x1,5 mm²
ABÄNDERUNG
MODELLE
BMD-68ET
STROMZUFUHR 230V~3 50/60 Hz
MAXIMALE
STROMAUFNAHME 12,08 A
HÖCHSTLEISTUNG 4,2 kW
VERSORGUNGSLEITUNG 3x2,5 mm²
AUFSTELLUNGSANLEITUNGEN
Das technische Typenschild befindet sich auf der Vorderseite des Geräts(siehe Zeichnung unter Punkt “Elektrischer Anschluss”)
und enthält alle für den Anschluss notwendigen Daten.
AUFSTELLUNG
Es wird empfohlen, das Gerät unter einer Abzugshaube aufzustellen, damit entstehende Dämpfe rasch abgeleitet werden können.
Falls das Gerät in der Nähe von Wänden, Trennpaneelen, Küchenmöbeln, Dekorverkleidungen etc. aufgestellt wird, sollten diese
aus nicht entflammbaren Material bestehen. Im gegenteiligen Fall sind diese Wände mit feuerfesten Materialien zu verkleiden.
Darüber hinaus ist sicherzustellen, dass die geltenden Brandschutzbestimmungen eingehalten werden.
Die Aufstellung, Inbetriebsetzung und Wartung muss vonqualifiziertem Fachpersonal durchgeführt werden. Alle notwendigen
Aufstellungsarbeiten müssen unter Einhaltung der geltenden Bestimmungen erfolgen.
Der Hersteller übernimmt keinerlei Haftung für eine mangelhafte Betriebsleistung, wenn diese auf eine fehlerhafte und nicht
gesetzmäßige Installation zurückzuführen ist.
Achtung: Gemäß den internationalen Bestimmungen muss während des Anschließens des Geräts oberhalb desselben eine
automatische Vorrichtung mit einer Kontaktöffnungsweite von mindestens 3 mm installiert werden, durch welche das Gerät auf
allpolige Weise vom Stromnetz getrennt werden kann.
GESETZLICHE BESTIMMUNGEN, TECHNISCHE VORGABEN UND VORSCHRIFTEN
Die Aufstellung muss unter Einhaltungder folgenden Vorschriftendurchgeführt werden:
- Geltende unfallverhütende Bestimmungen .
- Aufstellungsanweisungen, Vorschriften der C.E.I. (Italienische Elektrizitätsgesellschaft).
ELEKTROANSCHLUSS
Das Gerät wird ohne Anschlusskabel geliefert. Zur Installation des Anschlusskabels wie folgt vorgehen:
•Die Stromzufuhr unterbrechen.
•Das Anschlusskabeldurch den Kabeldurchgang ziehen, die Leiter mit den entsprechenden Klemmender Klemmleiste
verbinden und daran befestigen.
•Die Erdungsleitung muss länger als die anderen sein, damit es sich bei einer eventuellen Beschädigung der Kabelklemme
erst nachden Spannungskabeln löst.
ZUR BEACHTUNG Das Anschlusskabel muss einender Gerätespannung entsprechenden Querschnitt aufweisen (siehe Tabelle
Technische Daten).
ÄQUIPOTENZIAL
Das Gerät muss mit einem Äquipotenzial-System verbunden werden. Die Verbindungsschraube ist auf der Rückseite
des Geräts angebracht und mit dem Symbol gekennzeichnet.

12
DE
AT
CH
Achtung!: Der Hersteller übernimmt für Schäden, die durch eine unsachgemäße, nicht den Anleitungen entsprechende
Installation verursacht wurden, keinerlei Haftung und leistet auch innerhalb der Garantie keinen Schadenersatz.
INBETRIEBNAHME
Vor der Benutzung ist es notwendig, das Gerät und insbesondere das Becken sorgfältig zu reinigen. (siehe Abschnitt
„Reinigung und Pflege“").
Den Anschluss des Geräts überprüfen und gemäß den Bedienungsanleitungen in Betrieb nehmen.
BEDIENUNGSANLEITUNGEN
Achtung: Das Gerät darf nur unter Aufsicht benutzt werden.
Das Gerät niemals ohne Wasser in Betrieb nehmen. Mit den Wasserbädern können Fleisch, Fisch, Gemüse,
Hülsenfrüchte etc. mit Ausnahme von gebackenen Speisen erhitzt und warm gehalten werden.
EINSCHALTEN
Überprüfen, ob der im Inneren der Wanne vorhandene Wasserabflusshahn geschlossen ist (Hebel in waagrechter
Stellung). Den Druckknopf gedrückt halten und das Becken bis zur Höhe der in der Wanne angebrachten Einkerbung
-
-
mit Wasser füllen (max.60°C). Den oberhalb des Geräts befindlichen Schalter betätigen. Den Drehknopf von “O” bis
auf die gewünschte Position zwischen 30° und 90°C stellen, die weiße und die grüne Kontroll-Lampe schalten sich ein.
Die grüne Kontroll-Lampe leuchtet auf, sobald das Gerät mit Strom versorgt wird. Das Aufleuchten der weißen
Kontroll-Lampe zeigt den Betrieb des Heizelements an, ihr Erlöschen bedeutet, dass die gewünschte Temperatur
erreicht wurde. Zum Ausschalten des Geräts ist der Drehknopf wieder auf die Position “O” zu drehen.
ENTLEERUNG DES BECKENS
Um diese Arbeit durchführen zu können ist es notwendig, den Abflusshahn, der nur durch die Tür des darunter
liegenden Schrankelements erreicht werden kann, aufzudrehen.
REINIGUNG UND WARTUNG
Achtung: Zur Reinigung darf das Gerät von außen auf keinem Fall mit einem direkten Wasserstrahl oder einem
Hochdruckreiniger abgespritzt werden.
Das Gerät muss jeden Abend nach Betriebsende sorgfältig gereinigt werden. Die tägliche Reinigung nach dem
Abschalten des Geräts garantiert den einwandfreien Betrieb und eine lange Lebensdauer der Anlage.
Vor dem Reinigungsbeginn ist die Stromzufuhr zum Gerät zu unterbrechen. Die Stahlteile sind mit heißem Wasser und
einem neutralen Reinigungsmittel zu säubern. Anschließend mit sauberem Wasser gründlich nachspülen, damit alle
Reinigungsmittelreste entfernt werden und mit einem weichen Tuch trockenreiben. Keine Scheuermittel oder ätzende
Reinigungsmittel verwenden.
VORGEHEN BEI LÄNGEREM BETRIEBSSTILLSTAND
Das Gerät laut den Anweisungen gründlich reinigen und trockenreiben. Die Stromzufuhr unterbrechen.
VORGANGSWEISE IM SCHADENSFALL
Im Falle eines Schadens ist das Gerät abzuschalten, die Stromzufuhr mittels der oberhalb des Geräts angebrachten
Vorrichtung zu unterbrechen und der Kundendienst zu verständigen.
WARTUNG (NUR DURCH FACHPERSONAL)

13
DE
AT
CH
Sämtliche Wartungsarbeiten sind von qualifiziertem Fachpersonal durchzuführen. Vor Beginn der Wartung ist der
Stecker herauszuziehen oder die Stromzufuhr durch den oberhalb des Geräts angebrachte Schalter zu unterbrechen.
Das Wasser im Becken ausleeren.
ZUGÄNGLICHKEIT
Um zur Klemmleiste zu gelangen, ist die Rückwand des Geräts zu entfernen. Die Betriebselemente sind durch die
vordere Bedienblende zugänglich, dazu die schwarze Abdeckkappe des Wasserauslaufhebels losschrauben, die
Schrauben der Bedienblende lösen und diese entfernen.

14
FR
BE
TABLEAU DES DONNÉES TECHNIQUES.........................................................14
INSTRUCTIONS D'INSTALLATION...................................................................14
INSTALLATION ......................................................................................................14
DISPOSITIONS LÉGALES, RÈGLES TECHNIQUES ET DIRECTIVES......14
BRANCHEMENT ÉLECTRIQUE.........................................................................14
CIRCUIT ÉQUIPOTENTIEL.................................................................................15
MISE EN SERVICE .................................................................................................15
INSTRUCTIONS D'UTILISATION.......................................................................15
ALLUMAGE..............................................................................................................15
VIDAGE DU BAC.....................................................................................................15
NETTOYAGE ET ENTRETIEN ............................................................................15
INSTRUCTIONS EN CAS DE NON-UTILISATION PROLONGEE................15
ENTRETIEN..............................................................................................................15
ACCÈS BORNIER/ÉLÉMENTS DE COMMANDE............................................16

15
FR
BE
TABLEAU DES DONNÉES TECHNIQUES
MODÈLES
BMD-64EM
BMD-68ET BMD-82EM BMD-84EM
ALIMENTATION 230V~50/60 Hz
400V~2N 50/60 Hz
230V~50/60 Hz 230V~50/60 Hz
ABSORPTION MAXIMUM 9,13 A 9,13 A 7,16 A 12,39
PUISSANCE MAXIMUM 2,1 kW 4,2 kW 1,65 kW 2,85
CÂBLE D'ALIMENTATION 3x1,5 mm² 5x1,5 mm² 3x1,5 mm² 3x1,5 mm²
TRANSFORMATION
MODÈLES
BMD-68ET
ALIMENTATION 230V~3 50/60 Hz
ABSORPTION MAXIMUM 12,08 A
PUISSANCE MAXIMUM 4,2 kW
CÂBLE D'ALIMENTATION 3x2,5 mm²
INSTRUCTIONS D'INSTALLATION
La plaque des caractéristiques techniques se trouve sur la paroi frontale (voir schéma au chapitre "Branchement
électrique") et contient toutes les données nécessaires au branchement.
INSTALLATION
Il est recommandé de placer l'appareil sous une hotte aspirante de façon à ce que l'évacuation des vapeurs puissent
s'effectuer plus rapidement. Dans le cas où l'appareil serait installé à proximité de murs, de parois, de meubles de
cuisine ou autres revêtements décoratifs, il est important de veiller à ce que ceux-ci soient constitués de matériaux non-
inflammables, différemment les revêtir d'un matériau non-inflammable.
Il est impératif de respecter les normes anti-incendie.
L'installation, la mise en service et l'entretien de l'appareil doivent être confiés à un personnel qualifié à cet effet. Toutes
les interventions nécessaires à l'installation doivent être effectuées dans le respect des normes en vigueur.
Le fabricant décline toute responsabilité en cas de mauvais fonctionnement dû à une mauvaise installation ou à une
installation non conforme.
Attention!: conformément aux dispositions internationales applicables, durant le branchement de l'appareil, il est
nécessaire de prévoir en amont de celui-ci un dispositif automatique assurant la coupure omnipolaire de l'alimentation
de secteur; ce dispositif doit prévoir une ouverture des contacts de 3 mm minimum.
DISPOSITIONS LÉGALES, RÈGLES TECHNIQUES ET DIRECTIVES
L'installation doit être effectuée dans le respect des normes suivantes:
- normes de sécurité en vigueur.
- règles d'installation, normes CEI.
BRANCHEMENT ÉLECTRIQUE
L'appareil est livré sans câble d'alimentation. Pour l'installation du câble d'alimentation procéder comme suit:
•Couper la tension.
•Faire passer le câble d'alimentation à travers le passe-fil, raccorder les conducteurs aux bornes correspondantes du
bornier et les fixer.
•La longueur du conducteur de terre doit être supérieure à celle des autres conducteurs de telle sorte qu'en cas de
rupture du presse-fil le conducteur de terre se décroche après les conducteurs de tension.
N.B.: le câble d'alimentation doit avoir une section adaptée à la puissance de l'appareil (voir tableau des données
techniques).
CIRCUIT ÉQUIPOTENTIEL
L'appareil doit être raccordé à un circuit équipotentiel. La vis de raccordement est positionnée sur la partie postérieure de
l'appareil et est marquée du symbole .

16
FR
BE
Attention!:le fabricant décline toute responsabilité en cas de dommages causés par une installation non conforme aux
instructions prévues à cet effet.
MISE EN SERVICE
Avant d'utiliser l'appareil, il est nécessaire de procéder à son nettoyage, en particulier le nettoyage du bac (voir chapitre
"nettoyage et entretien").
Contrôler le branchement de l'appareil et le mettre en marche en suivant les Instructions d'utilisation.
INSTRUCTIONS D'UTILISATION
Attention!: veiller à ce que l'appareil soit constamment contrôlé durant son utilisation.
Ne jamais mettre en marche l'appareil sans eau; les bains-marie sont desappareils qui permettent de réchauffer et de maintenir
à température viandes, poissons, légumes, etc., à l'exception des aliments frits.
ALLUMAGE
S'assurer que le robinet d'évacuation d'eau présent à l'intérieur du logement sous l'appareil est fermé (position horizontale).
Remplir d'eau (max.60°C) le bac en maintenant, jusqu'au niveau indiqué par le symbole présent à cet effet à l'intérieur du bac
(
--
). Placer l'interrupteur présent en amont de l'appareil sur la position On. Amener la commande de la position "0" à la
position voulue entre 30° et 90°C, les témoins blanc et vert doivent s'allumer.
Allumés, les témoin verts et blancs indiquent respectivement que l'appareil est sous tension et que l'élément chauffant
fonctionne. Une fois atteinte la température programmée, le témoin blanc s'éteint. Pour éteindre l'appareil, ramener la
commande sur la position "0".
VIDAGE DU BAC
Pour procéder à cette opération, il est avant tout nécessaire d'ouvrir le robinet d'évacuation (position verticale), accessible en
ouvrant la porte du logement situé sous l'appareil.
NETTOYAGE ET ENTRETIEN
Attention!: ne pas nettoyer l'appareil à l'aide de jets d'eau directsou à haute pression.
Une fois l'utilisation terminée veiller à nettoyer soigneusement l'appareil. Un nettoyage quotidien de l'appareil une fois celui-ci
éteint est gage de bon fonctionnement et de longue durée.
Avant de procéder au nettoyage, couper l'alimentation électrique. Les parties en acier doivent être nettoyées à l'aide d'eau
chaude et d'un détergent neutre; rincer ensuite abondamment afin d'éliminer toute trace de détergent puis essuyer à l'aide d'un
chiffon sec. Ne pas utiliser de détergents abrasifs ou corrosifs.
INSTRUCTIONS EN CAS DE NON-UTILISATION PROLONGEE
Nettoyer et essuyer soigneusement l'appareil comme indiqué ci-dessus et l'isoler de l'alimentation électrique.
EN CAS D'ANOMALIE OU DE PANNE
Éteindre l'appareil, l'isoler de l'alimentation électrique à l'aide du situé en amont et prendre contact avec le service d'assistance.
ENTRETIEN (A CONFIER AU SEUL PERSONNEL QUALIFIE)
Toute intervention d'entretien doit être exclusivement confiée à un personnel qualifié. Avant de procéder à toute opération
d'entretien, débrancher la prise ou placer l'interrupteur situé en amont sur la position Off. Vider le bac lorsqu'il est plein.
ACCÈS BORNIER/ÉLÉMENTS DE COMMANDE
Pour accéder au bornier de branchement, retirer le panneau postérieur de l'appareil. Les éléments de commande sont
accessibles depuis le panneau frontal: dévisser le capuchon noir de la manette d'évacuation d'eau, dévisser les vis de
fixation du panneau frontal et retirer ce dernier.

17
GB IE
TECHNICAL DATA TABLE..................................................................................18
INSTALLATION INSTRUCTIONS.......................................................................18
INSTALLATION ......................................................................................................18
LAWS, TECHNICAL RULES AND NORMS.......................................................18
ELECTRIC CONNECTION....................................................................................18
EQUIPOTENTIAL...................................................................................................19
STARTING UP..........................................................................................................19
INSTRUCTIONS FOR USE....................................................................................19
TURNING ON...........................................................................................................19
EMPTYING THE TUB ............................................................................................19
CLEANING AND MAINTENANCE......................................................................19
PROCEDURE TO FOLLOW IF THE APPLIANCE IS NOT GOING TO BE
USED FOR SOME TIME ........................................................................................19
PROCEDURE TO FOLLOW IN THE CASE OF A BREAKDOWN................19
MAINTENANCE ......................................................................................................19
ACCESSIBILITY......................................................................................................20

18
GB IE
TECHNICAL DATA TABLE
MODELS
BMD-64EM
BMD-68ET BMD-82EM BMD-84EM
POWER SUPPLY 230V~50/60 Hz
400V~2N 50/60 Hz
230V~50/60 Hz 230V~50/60 Hz
MAXIMUM ABSORPTION 9,13 A 9,13 A 7,16 A 12,39
MAXIMUM POWER 2,1 kW 4,2 kW 1,65 kW 2,85
POWER SUPPLY CABLE 3x1,5 mm² 5x1,5 mm² 3x1,5 mm² 3x1,5 mm²
TRANSFORMATION
MODELS
BMD-68ET
POWER SUPPLY 230V~3 50/60 Hz
MAXIMUM ABSORPTION 12,08 A
MAXIMUM POWER 4,2 kW
POWER SUPPLY CABLE 3x2,5 mm²
INSTRUCTIONS FOR INSTALLATION
The data plate is on the front (see diagram in electric connection item) and has all the data necessary for the connection.
INSTALLATION
When fitting, the appliance must be levelled using a spirit level; slight differences of level can be adjusted by screwing
or unscrewing the adjustable feet. The main switch or the socket must be near the appliance and easily accessibile.
It is advisable to place the appliance under an extractor hood so that steam is extracted rapidly. If the appliance is placed
near walls, dividing panels, kitchen furniture, decorative finishings, etc. , these should be in flameproof material;
otherwise it is necessary to cover them with non-flammable material.
Above all, it is necessary to ensure that the fire prevention norms are observed.
The installation, starting up and maintenance of the appliance must be carried out by qualified personnel. All operations
done when installing must be carried out observing the norms in force.
The manufacturer declines all responsibility in the event of incorrect functioning due to wrong installation or
installation which does not comply with the norms.
Attention! In accordance with international rules,when connecting the appliance,an automatic device enabling the
disconnection of all contacts from the mains, must be installed above it; this device must have a contacts opening of at
least 3 mm.
LAWS, TECHNICAL RULES AND NORMS
Installation must be carried out observing the following norms:
- Safety prescription in force
- Installation prescription, ECI norms.
ELECTRIC CONNECTION
The appliance is supplied without the connection cable. To install the power supply cable, proceed as follows:
•Disconnect the power supply.
•Push the connection cable through the cable blocker, connect the conductor wires to the corresponding terminals in
the junction box and fix them into place.
•The earth wire must be longer than the others so that if the cable blocker should break, it will disconnect after the
tension wires.
N.B. The connection cable must have an adequate section for the power of the appliance(see technical data table).
EQUIPOTENTIAL
The appliance must be connected to an equipotential system. The connection screw is positioned at the back of the
appliance and is identified by the symbol.

19
GB IE
Attention! The manufacturer will neither be held responsible for, nor will give any compensation during the guarantee
period for any damage caused, and which is due to inadequate installations not compliant with the instructions.
STARTING UP
Before using the appliance, it is necessary to clean it carefully, especially the tub (see paragraph “cleaning and care”).
Check the connection of the appliance and start it up following the instructions.
INSTRUCTIONS FOR USE
Attention! Use the appliance only under surveillance.
Never start up the appliance without water. Bain-Marie are appliances for heating and keeping warm meat, fish,
vegetables, legumes, etc. with the exclusion of fried foods.
TURNING ON
Check that the water drainage tap, which is located in the compartment under the appliance (lever in horizontal
position), is turned off. Fill the tub with water (max.60°C), keeping the button pressed down until reaching the level
indicated by the symbol
--
stamped inside the tub. Switch on the switch situated above the appliance. Turn the knob
from “0” into the desired position between 30°C and 90°C; the white and green lights come on. The green light
indicates that the power supply is on.
The white light shows that the heating element is working; when the temperature is reached, it goes out. To turn off the
appliance, turn the knob into position “O”.
EMPTYING THE TUB
To carry out this operation, it is necessary to open the outlet tap (lever in vertical position) which can only be reached
through the cabinet door situated under the appliance.
CLEANING AND MAINTENANCE
Attention! During cleaning, do not wash the external parts of the appliance with direct sprays of
water or with high pressure.
After every use, clean the appliance thoroughly. Daily cleaning after switching off the appliance ensures the perfect
functioning and long life of the appliance.
Before starting to clean the appliance, disconnect the power supply. The parts in steel must be washed with hot water
and neutral detergent, then rinsed thoroughly in order to eliminate all traces of detergent; after which, dried with a dry
cloth. Do not use abrasive or corrosive detergents.
PROCEDURE TO FOLLOW IF THE APPLIANCE IS NOT GOING TO BE USED FOR
SOME TIME
Clean and dry the appliance carefully according to the instructions. Disconnect the power supply.
PROCEDURE TO FOLLOW IN THE EVENT OF A BREAKDOWN
In the event of breakdown, turn off the appliance, disconnect the power supply by using the device situated above the
appliance and notify the after sales service.
MAINTENANCE (ONLY FOR QUALIFIED PERSONNEL)
Any kind of maintenance must only be done by qualified personnel. Before carrying out maintenance, remove the plug
or switch off the switch above the appliance. Empty the tub when it is full.
ACCESSIBILITY

20
GB IE
To get to the junction box, remove the back of the appliance. The control elements are reached from the front panel;
unscrew the black cap of the water drainage lever, unscrew the fixing screws from the panel and then remove it.
This manual suits for next models
3
Table of contents
Languages:
Other Lotus cooker Kitchen Appliance manuals

Lotus cooker
Lotus cooker BRF-64G User manual

Lotus cooker
Lotus cooker BR-6G User manual

Lotus cooker
Lotus cooker MR-12L User manual

Lotus cooker
Lotus cooker RSFT-63EM User manual

Lotus cooker
Lotus cooker SA-400 User manual

Lotus cooker
Lotus cooker BRF-74G User manual

Lotus cooker
Lotus cooker E Series Specification sheet