Lotus cooker MR-12L User manual

563021500.doc
LIBR.ISTR.MR-12L
Istruzioni
per l'installazione e l'uso
Aufstellungs
und Bedienungsanleitung
Instructions
Pour l’installation et l’emploi
Instructions
for installation and use
Guia para la intalación e
instrucciones de uso
MARINATORE RAPIDO AD
ULTRASUONI
SCHNELLE MARINIERUNG
MIT ULTRASHALL
MACHINE POUR PREPARATION
A MARINADE RAPIDE AVEC
ULTRA-SONS
RAPID MARINADE MACHINE
WITH ULTRASOUND
MARINADOR RÁPIDO
ULTRASONIDO
Mod.
MR-12L
IT CH
FR
BE
DE AT CH
GB IE
ES

2
SCHEMA ELETTRICO – SCHALTPLAN – SCHEMA ELECTRIQUE
WIRING DIAGRAM – ESQUEMA ELECTRICO
1
Alimentazione
230V~50/60Hz Stromversorgung
230V~50/60Hz Alimentation
230V~50/60Hz Power
230V~50/60Hz Alimentación
230V~50/60Hz
2
Ventilatore Fan Fan Fan Ventilador
3
Piezo ad ultrasuoni Piezo Ultraschall Ultrasons piézo Ultrasonic piezo Ultrasónicos piezo
4
Timer Timer Minuterie Timer Temporizador
5
Scheda comandi Control Board Contrôle du conseil Control board Tablero de control

3
Pag. 4
Seite 8
Page 12
Page 16
Pàg. 20
IT CH
FR
BE
DE AT CH
GB IE
ES

4
IT CH
INDICE
DICHIARAZIONE DI CONFORMITA’.......................................................................................................................5
TABELLA DATI TECNICI ELETTRICI.....................................................................................................................5
INSTALLAZIONE...........................................................................................................................................................5
DISPOSIZIONI DI LEGGE, REGOLE TECNICHE E DIRETTIVE........................................................................5
ACCENSIONE..................................................................................................................................................................5
REGOLAZIONE DEL TIMER ......................................................................................................................................6
SCARICO..........................................................................................................................................................................7
PULIZIA E MANUTENZIONE......................................................................................................................................7
COMPORTAMENTO IN CASO DI PROLUNGATA INTERRUZIONE DI FUNZIONAMENTO.......................7
COMPORTAMENTO IN CASO DI GUASTO.............................................................................................................7

5
IT CH
DICHIARAZIONE DI CONFORMITA’
Il costruttore dichiara che gli apparecchi sono conformi alle prescrizioni della direttiva 2004/108/CE per la parte
elettrica. L’installazione dovrà essere effettuata in osservanza delle norme vigenti.
N.B.: Il costruttore declina ogni responsabilità in caso di danni diretti o indiretti dovuti ad un’errata installazione,
alterazioni, cattiva manutenzione, uso non corretto, e a tutti gli altri casi previsti negli articoli riportati dalle nostre
condizioni di vendita.
La targhetta matricola si trova sulla parete laterale (vedi disegno al punto allacciamento elettrico) e contiene tutti i dati
necessari all’allacciamento.
Attenzione: come da disposizioni internazionali, durante l'allacciamento dell'apparecchio è da prevedere a monte dello
stesso un dispositivo automatico che permetta di staccare in modo omnipolare l'apparecchio dalla rete, questo
dispositivo deve avere un'apertura dei contatti di almeno 3mm.
TABELLA DATI TECNICI ELETTRICI
MODELLO DIMENS. cm ALIMENTAZ. POTENZA
TOTALE
kW
ASSORB.
MAX. A
CAVO
ALIMENTAZ.
mm²
MR-12L 34,2x28,2x38h 230V~50/60Hz 0,3 1,3 3 x 1
INSTALLAZIONE
Durante il posizionamento l'apparecchio deve essere messo a bolla, piccoli dislivelli possono essere aggiustati mediante
i piedini regolabili (avvitare o svitare). L'interruttore generale o la presa devono essere nelle vicinanze dell'apparecchio
e facilmente accessibili.
Si consiglia di porre l'apparecchio sotto una cappa aspirante, in modo che l'evacuazione dei vapori avvenga in modo
rapido. Qualora l'apparecchio venisse posizionato vicino a pareti, pareti divisorie, mobili da cucina, rivestimenti
decorativi ecc. si consiglia che questi siano di materiale non infiammabile, altrimenti provvedere a rivestire tali pareti
con del materiale non infiammabile.
Si deve anzitutto assicurare che le prescrizioni antincendio vengano rispettate.
Attenzione: come da disposizioni internazionali, durante l’allacciamento dell’apparecchio è da prevedere a monte dello
stesso un dispositivo che permetta di staccare in modo omnipolare l’apparecchio dalla rete. Questo dispositivo deve
avere un’apertura dei contatti di almeno 3 mm.
Attenzione: il costruttore non è responsabile, e non risarcisce in garanzia danni provocati e che sono da addebitare ad
installazioni inadeguate e non conformi alle istruzioni.
DISPOSIZIONI DI LEGGE, REGOLE TECNICHE E DIRETTIVE
L’installazione deve essere eseguita in osservanza delle seguenti norme:
•prescrizione antinfortunistica vigente;
•prescrizione VVF vigente.
ACCENSIONE
Accendere l’apparecchio tramite il pulsante principale ON/OFF sul lato sinistro della macchina.
L’apparecchio si carica di marinatura a base liquida (come burro liquido, olio, acqua). La macchina prevede l’uso solo
ed esclusivamente di componenti di prima scelta. La scocca e la vasca sono completamente in acciaio inossidabile.
Si prega di osservare tutte le operazioni di sicurezza e di igiene richieste e riportate nel presente manuale.
Il volume utile della vasca é di circa 12 litri. Il produttore Vi consiglia di non caricare mai più di 5 litri.
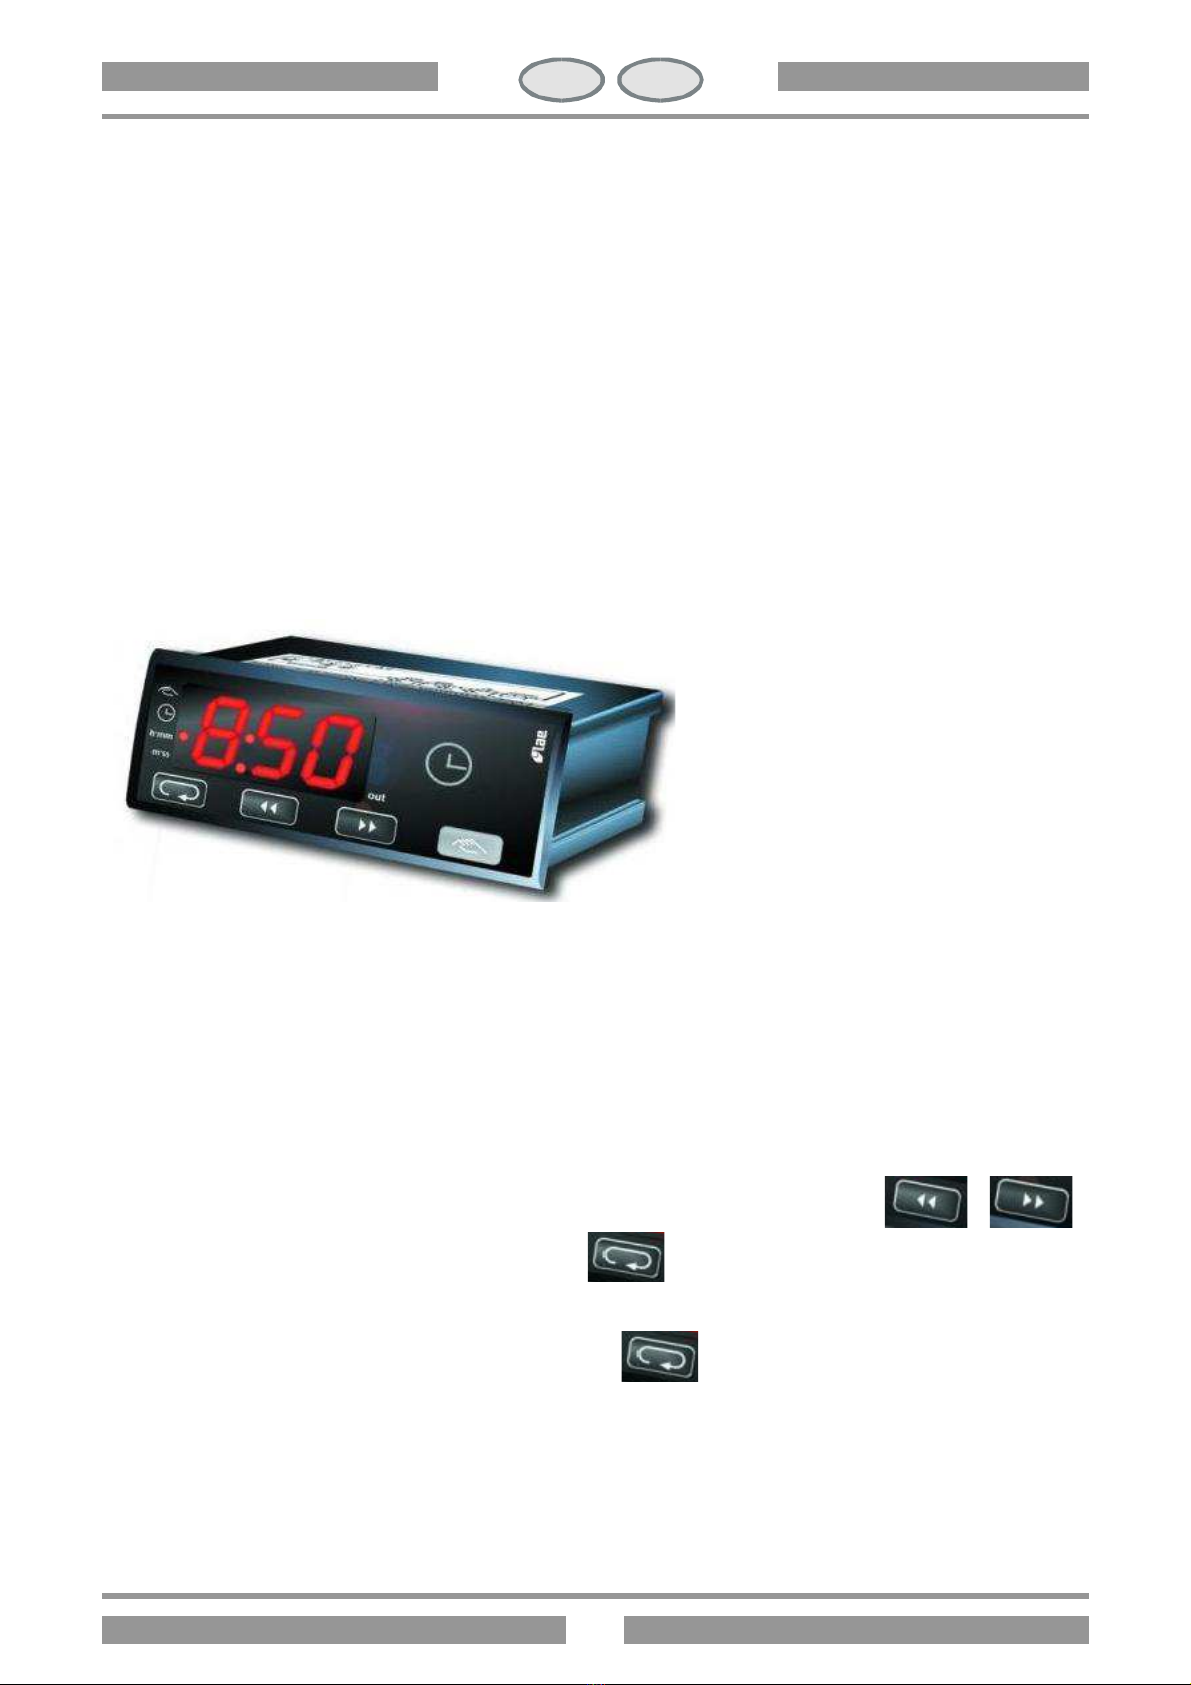
Sul cruscotto dell’apparecchio é posizionato un temporizzatore digitale. Nell’atto dell’accensione sul display appaiono
il valore del tempo attuale. Per impostare e modificare i valori si prega di seguire le istruzione riportate nel paragrafo
seguente. La macchina lavora tramite diffusori ad ultrasuoni che fanno sí che la marinatura sia estremamente rapida,
rispettando l’integrità naturale dei prodotti alimentari (come carni, pesce, verdure).
Versare nella vasca la salamoia (la sostanza liquida di marinatura) e impostare il tempo richiesto a seconda del tipo di
prodotto da marinare, che può variare tra 12-20 minuti. Mettere nella vasca gli alimenti (qualsiasi tipo di carne, verdure,
frutta, pesce). Nel caso delle carni si può ottenere un risultato migliore lavorando con carni tagliate a fette. Chiudere

6
IT CH
l’apparecchio con l’apposito coperchio in policarbonato. Attendere la scadenza del tempo impostato precedentemente
sul temporizzatore. Tolto il coperchio, estrarre il prodotto, che sarà pronto per essere cotto o arrostito, o per essere
confezionato sottovuoto e mantenuto in frigorifero fino alla sua cottura.
Attenzione!
Non azionare mai il temporizzatore a vasca vuota, ciò danneggia l’apparecchio e rovina i suoi componenti. Il ché
comporta la perdita della garanzia!
Importante!
Non usare salamoie troppo dense, non aggiungere spezie tagliate a pezzi troppo grandi, che possono ostacolare la
distribuzione del liquido al cuore del prodotto. Non mettere mai altro materiale nella vasca (come plastica, metallo,
ecc…), si può danneggiare l’apparecchio. Non versare mai nella vasca salamoia a temperatura più bassa di 10 °C, o piú
alta di 25 °C !!!
Risulta del tutto normale un minimo riscaldamento dalla salamoia che però non deve mai surriscaldarsi.
Una volta terminato il tempo impostato l’apparecchio si ferma automaticamente.
il produttore declina ogni responsabilità per problemi dovuti alla mancanza di rispetto delle precauzioni di sicurezza
REGOLAZIONE DEL TIMER
TIMER TMR15 TIMER DIGITALE
Campo di regolazione: 1 sec...9 h:59 min
Entrata: a contatto
Temperatura ambiente: -10…50 °C
Uscita: relé: 230V/16(4)A
Tensione di alimentazione: 12V=/~ 2W
Umiditá relativa ambiente: 15-80%
All’atto dell’accensione dell’apparecchio sul display appare sempre l’ultimo valore impostato prima dello spegnimento.
Nel caso in cui l’utente avesse l’intenzione di modificare questo valore bisogna agire sui tasti o .
Una volta impostato il tempo desiderato, premendo il tasto l’apparecchio parte.
Al termine del conto alla rovescia il timer emette un segnale acustico e l’apparecchio si ferma.
Scaduto il tempo impostato il timer torna a segnalare l’ultimo valore impostato.
Nel caso in cui il ciclo di lavoro venga interrotto con il tasto il display del timer torna a segnalare l’ultimo
valore impostato.
In questo caso non c’é modo di continuare il conteggio alla rovescia.
Per questo motivo si consiglia di leggere il valore attuale prima di fermare l’apparecchio, e successivamente impostare
il resto del tempo, facendo ripartire la macchina.
Mentre il timer lavora non é possibile modificare il tempo impostato.
Sul display i tempi vendono indicati in formato minuti/secondi fino a un valore di 9 minuti/59 secondi,
consecutivamente a partire dal 10 minuti i valori vengono indicati in formato ora minuti.

7
IT CH
SCARICO
Dopo l’uso spegnere l’apparecchio, e tramite il rubinetto di scarico posto sul retro dell’apparecchio scaricare
completamente la salamoia dalla vasca.
La salamoia va scaricata dopo ogni uso.
PULIZIA E MANUTENZIONE
Attenzione: durante la pulizia non lavare esternamente l'apparecchio con getti d'acqua diretti o ad alta
pressione.
Ogni sera a fine lavoro pulire accuratamente l'apparecchio. La pulizia quotidiana dell'apparecchio garantisce un
funzionamento perfetto ed una lunga durata dello stesso.
Prima di iniziare la pulizia togliere la tensione dall'apparecchio. Le parti in acciaio sono da lavare con acqua calda e
detersivo neutro, sono poi da asciugare abbondantemente in modo da eliminare ogni traccia di detersivo poi asciugare
con un panno asciutto. Non usare detergenti abrasivi e corrosivi.
Le parti smaltate sono da lavare con acqua saponata.
Forno: la pulizia del forno é facilitata togliendo la griglia di supporto.
Avviso importante: Al di fuori dell’ordinaria pulizia e manutenzione degli impianti, consigliamo di fare controllare
l'impianto almeno una volta all’anno da un installatore.
Si consiglia perciò di stipulare un contratto di assistenza.
COMPORTAMENTO IN CASO DI PROLUNGATA INTERRUZIONE DI
FUNZIONAMENTO
Pulire ed asciugare accuratamente l’apparecchio come da istruzioni. Togliere la tensione.
COMPORTAMENTO IN CASO DI GUASTO
In caso di guasto spegnere l’apparecchio, togliere la tensione mediante il dispositivo posto a monte dell’apparecchio e
avvisare il servizio assistenza.

8
DE AT CH
INHALTSVERZEICHNIS
ANGABEN ZUM GERAT UND SCHEMATISCHE DARSTELLUNG.....................................................................9
ELEKTRISCHE DATEN ................................................................................................................................................9
AUFSTELLUNG ..............................................................................................................................................................9
RECHTSVERORDNUNGEN, TECHNISCHE REGELN UND RICHTLINEN.......................................................9
EINSCHALTEN...............................................................................................................................................................9
TIMEREINSTELLUNG................................................................................................................................................10
ABLAUF..........................................................................................................................................................................10
REINIGUNG UND WARTUNG...................................................................................................................................11
VERHALTEN BEI LÄNGEREN AUSSERBETRIEBSETZUNGEN.......................................................................11
VERHALTEN IM STÖRFALL ....................................................................................................................................11

9
DE AT CH
ANGABEN ZUM GERAT UND SCHEMATISCHE DARSTELLUNG
Das Tipenschild befindet sich hinten an der RuckWard (siehe Zeichnungmim Punkt Elektroanschluss) und es beinhaltet
alle zur Installation erforderlichen Daten.
Achtung! : Gemäß den internationalen Bestimmungen muss während des Anschließens des Geräts oberhalb desselben
eine automatische Vorrichtung mit einer Kontaktöffnungsweite von mindestens 3 m installiert werden, durch welche
das Gerät auf allpolige Weise vom Stromnetz getrennt werden kann.
ELEKTRISCHE DATEN
MODELLE ABMESSUNGEN
cm STROMZUFUHR
HOCH
LEISTUNG
KW
MAXIMALE
STROMAUF
NAHME A
VERSORGUNGS
LEITUNG
MR-12L 34,2x28,2x38h 230V~50/60Hz 0,3 1,3 3 x 1
AUFSTELLUNG
Das Gerät muss bei der Aufstellung waagerecht stehen, kleinere Unebenheiten können mit den höhenverstellbaren
Füssen des Gerätes (ein- bzw. ausschrauben) ausgeglichen werden. Hauptschalter bzw. Steckdose sollten sich in der
Nähe des Gerätes befinden und leicht zugänglich sein. Es wird empfohlen das Gerät unter einer Abzugshaube
aufzustellen, damit eine schnelle Wrasenabführung sichergestellt wird. Bei Aufstellung dieses Gerätes in unmittelbarer
Nähe von Wänden, Trennwänden, Küchenmöbel, dekorativen Verkleidungen usw. Wird empfohlen, dass diese aus
nichtbrennbarem Material gefertigt sind, andernfalls missen sie mit geeignetem, nichtbrennbarem Material verkleidet
werden. Die genauste Beachtung der Vorschriften des Brandschutzes muss sichergestellt sein. Ein max. Abstand
zwischen der Gerätekante und der vorderen Kante des Untergestells muss werden.
RECHTSVERORDNUNGEN, TECHNISCHE REGELN UND RICHTLINEN
Bei der Aufstellung sind folgende geltende Vorschriften zu beachten
•einschlägige Unfallverhütungsvorschriften ;
•einschlägige VDE-Vorschriften.
EINSCHALTEN
Das Gerät mit dem Hauptschaltknopf ON/OFF auf der linken Geräteseite einschalten.
Das Gerät wird mit einer Marinade auf flüssiger Grundlage (flüssige Butter, Öl, Wasser) gefüllt. Für das Gerät sind
ausschließlich Komponenten erster Wahl vorgesehen. Korpus und Wanne sind komplett aus Edelstahl.
Alle in dieser Anleitung beschriebenen Abläufe, die der Sicherheit und Hygiene dienen, sollten unbedingt beachtet
werden.
Das Nutzvolumen der Wanne beträgt etwa 12 Liter. Der Hersteller empfiehlt nie mehr als 5 Liter einzufüllen.
Auf der Bedienblende des Gerätes ist ein digitaler Timer untergebracht. Beim Einschalten erscheint auf dem Display die
aktuelle Zeitangabe. Zum Einstellen und Ändern der Werte bitte den Anweisungen des nachfolgenden Absatzes folgen.
Das Gerät arbeitet mit Ultraschallverteilern, die dafür sorgen, dass die Marinade extrem schnell wirkt und die natürliche
Beschaffenheit der Lebensmittel (wie Fleisch, Fisch, Gemüse) erhalten bleibt.
Die Salzlake (die flüssige Substanz der Marinade) in die Wanne gießen und je nach Produkt, das mariniert werden soll,
die erforderliche Zeit einstellen, die zwischen 12-20 Minuten liegen kann. Die Lebensmittel (jede Fleischart, Gemüse,
Obst, Fisch) in die Wanne legen. Bei Fleisch erzielt man ein besseres Resultat, wenn das Fleisch in Scheiben
geschnitten ist. Das Gerät mit seinem Polykarbonatdeckel schließen. Die zuvor auf dem Timer eingestellte Zeit
abwarten. Den Deckel abnehmen, das Produkt herausnehmen, das jetzt gegart oder gebraten werden kann oder
vakuumverpackt im Kühlschrank bis zu seiner Verwendung aufbewahrt wird.
Achtung!
Den Timer nie bei leerer Wanne einschalten, das Gerät wird dadurch beschädigt und seine Bauteile werden
ruiniert. Dies hat den Verlust der Garantie zur Folge!
Wichtig!
Keine zu dickflüssigen Salzlaken verwenden und keine in zu große Stücke geschnittene Gewürzkräuter beigeben, sie
können die Flüssigkeitsverteilung im Kern des Produkts behindern. Nie anderes Material (wie Kunststoff, Metall,

10
DE AT CH
usw…) in die Wanne geben, das Gerät könnte beschädigt werden. Keine Salzlake mit einer Temperatur unter 10 °C
oder über 25 °C in die Wanne geben!!!
Eine minimale Erwärmung der Salzlake ist durchaus normal, sie darf sich allerdings nicht erhitzen.
Nach Ablauf der eingegebenen Zeit bleibt das Gerät automatisch stehen.
Der Hersteller übernimmt keine Haftung für Störungen, die auf das Nichtbeachten der Sicherheitsmaßnahmen
zurückzuführen sind.
TIMEREINSTELLUNG
TIMER TMR15 DIGITALER TIMER
Einstellbereich: 1 Sek...9 h:59 min
Eingang: mit Kontakt
Raumtemperatur: -10…50 °C
Relaisausgang: 230V/16(4)A
Versorgungsspannung: 12V=/~ 2W
Relative Raumfeuchtigkeit: 15-80%
Beim Einschalten des Gerätes erscheint auf dem Display immer der zuletzt vor dem Ausschalten eingegebene Wert.
Falls der Benutzer diesen Wert ändern will, muss er die Tasten oder benutzen. Nach Eingabe der
gewünschten Zeit, drückt man die Taste , um das Gerät zu starten.
Am Ende der Rückwärtszählung gibt der Timer ein akustisches Signal aus und das Gerät bleibt stehen.
Nach Ablauf der eingegebenen Zeit zeigt der Timer wieder den zuletzt eingegebenen Wert.
Falls der Betriebszyklus mit der Taste unterbrochen wird, zeigt das Display wieder den zuletzt eingegebenen
Wert.
In diesem Fall kann die Rückwärtszählung nicht fortgesetzt werden.
Aus diesem Grund empfiehlt es sich, vor dem Anhalten des Geräts den aktuellen Wert abzulesen und anschließend die
Restzeit einzugeben, in dem man das Gerät neu startet.
Während der Timer in Betrieb ist, kann die eingegebene Zeit nicht geändert werden.
Die Zeiten werden auf dem Display bis zu 9 Minuten und 59 Sekunden in Minuten/Sekunden angezeigt, ab 10 Minuten
werden sie in Stunden und Minuten gezeigt.
ABLAUF
Nach dem Gebrauch das Gerät ausschalten und über den Ablaufhahn auf der Geräterückseite die Salzlake vollständig
aus der Wanne entfernen.
Die Salzlake muss nach jedem Gebrauch abgelassen werden.

11
DE AT CH
REINIGUNG UND WARTUNG
Achtung: Zur Reinigung darf das Gerät von außen auf keinem Fall mit einem direkten Wasserstrahl oder einem
Hochdruckreiniger abgespritzt werden.
Das Gerät muss jeden Abend nach Betriebsende sorgfältig gereinigt werden. Die tägliche Reinigung nach dem
Abschalten des Geräts garantiert den einwandfreien Betrieb und eine lange Lebensdauer der Anlage.
Vor dem Reinigungsbeginn ist die Stromzufuhr zum Gerät zu unterbrechen. Die Stahlteile sind mit heißem Wasser und
einem neutralen Reinigungsmittel zu säubern. Anschließend mit sauberem Wasser gründlich nachspülen, damit alle
Reinigungsmittelreste entfernt werden und mit einem weichen Tuch trockenreiben. Keine Scheuermittel oder ätzende
Reinigungsmittel verwenden.
VERHALTEN BEI LÄNGEREN AUSSERBETRIEBSETZUNGEN
Das Gerät nach Anleitung gründlich reinigen und abtrocknen, Stromzufuhr schliessen bzw. ausschalten.
VERHALTEN IM STÖRFALL
Im Störall sollte das Gerät ausserbetrieb gesetzt werden. Kundendienst benachrichtigen
.

12
FR BE
INDEX
DONNÉES TECHNIQUES ET REPRÉSENTATION SCHÉMATIQUE................................................................13
DONNÉES ELECTRIQUES.........................................................................................................................................13
MISE EN OEUVRE .......................................................................................................................................................13
DISPOSITIONS DE LA LOI, RÉGLEMENTS TECHNIQUES ET DIRECTIVES...............................................13
INSTALLATION............................................................................................................................................................13
ALLUMAGE...................................................................................................................................................................13
RÉGLAGE DE LA MINUTERIE.................................................................................................................................14
VIDAGE..........................................................................................................................................................................14
NETTOYAGE ET ENTRETIEN..................................................................................................................................15
COMPORTEMENT EN CAS D’ARRÊT DE FUNCTIONNEMENT PROLONGÉ ..............................................15
COMPORTEMENT EN CAS DE PANNE..................................................................................................................15

13
FR BE
DONNÉES TECHNIQUES ET REPRÉSENTATION SCHÉMATIQUE
La plaque de matricule se trouve sur la paroi postérieure (voir la figure, a la connexion électrique) et contient toutes les
données nécessaires pour la connexion.
DONNÉES ELECTRIQUES
MODELES DIMENSIONS
cm ALIMENTATION PUISSANCE
MAXIMUM KW
ABSORPTION
MAXIMUM A CABLE
D’ALIMENTATION
MR-12L 34,2x28,2x38h 230V~50/60Hz 0,3 1,3 3 x 1
MISE EN OEUVRE
Pendant la mise en place il faut vérifier le niveau à bulle d’air de l’appareil. Les petites différences de niveau peuvent
être ajustées au moyen des pieds-de biche réglables (visser ou dévisser). L’interrupteur général et la prise de courant
doivent être placés en proximité de l’appareil et facilement accessible. On conseille de mettre l’appareil sous une hotte
d’aspiration, pour l’évacuation rapide des vapeurs. Au cas où l’appareil serait placé près de parois, cloisons, meubles de
cuisine, revêtements décoratifs, etc., ceux-ci devraient être en matériel non inflammable, dans le cas contraire revêtir
ces parties avec du matériel non inflammable. Il faut en tout premier lieu s’assurer que les prescriptions contre les
incendies soient respectées. Au cours de la mise en oeuvre il faut respecter une distance maximale entre le bord
antérieur du meuble de support et l’appareil.
DISPOSITIONS DE LA LOI, RÉGLEMENTS TECHNIQUES ET DIRECTIVES
Pour l’installation il faut se conformer aux règlements suivant :
•prescription en vigueur pour la prévention des accidents ;
•prescription VDE en vigueur
INSTALLATION
L’installation, la mis en service et l’entretien de l’appareil doivent être effectués seulement par le personnel qualifié.
Tous les travaux nécessaires pour l’installation doivent être effectués conformément aux règlements en vigueur. Le
fabricant décline toute responsabilité en cas de fonctionnement incorrect, résultant de l’installation incorrecte ou non
conforme.
Attention: Conformément aux dispositions internationales, lorsqu’on effectue le branchement électrique de l’appareil il
faut placer au-dessus de celui-ci un dispositif du réseau ; ce dispositif doit avoir une ouverture des contacts d’au moins
3 mm.
ALLUMAGE
Allumer l'appareil en appuyant sur la touche principale ON/OFF située sur le côté gauche de l'appareil.
La machine se remplit de marinade à base liquide (beurre liquide, l'huile, l'eau). L'appareil prévoit uniquement l'emploi
de composants de premier choix. La coque et le bac sont entièrement fabriqués en acier inox.
Merci de bien vouloir effectuer toutes les opérations d'hygiène et de sécurité nécessaires indiquées dans ce manuel.
Le volume utile du bac est d'environ 12 litres. Le fabricant conseille de ne jamais charger plus de 5 litres.
Une minuterie numérique est installée sur le tableau de bord de l'appareil. Au moment de l'allumage, la valeur de temps
actuelle s'affiche sur l'écran. Pour régler et modifier cette valeur, merci de bien vouloir suivre les instructions du
paragraphe suivant. La machine fonctionne grâce à l'action de diffuseurs à ultrasons permettant une marinade rapide
tout en respectant l'intégrité naturelle des produits alimentaires (tels que la viande, le poisson, les légumes).
Verser la saumure (substance liquide de la marinade) dans le bac et paramétrer le temps nécessaire en fonction du type
de produit à faire mariner, pouvant varier de 12 à 20 minutes. Mettre les aliments dans le bac (tout type de viande,
légumes, fruits, poisson). En cas d'utilisation de viande, il est possible d'obtenir un meilleur résultat en taillant la viande
en tranches. Fermer l'appareil avec son couvercle en polycarbonate. Patienter jusqu'à ce que le temps prédéfini sur la
minuterie soit écoulé. Retirer le couvercle et extraire le produit. Il est désormais prêt à être cuit ou rôti, ou encore à être
emballé sous vide et conservé au réfrigérateur jusqu'à sa cuisson.
Attention !
Ne jamais actionner la minuterie à vide ; cela endommagerait l'appareil et ses composants. Ceci impliquera la
perte de la garantie !

14
FR BE
Important !
Ne pas utiliser de saumure trop dense et ne pas ajouter d'épices en trop gros morceaux susceptibles d'obstruer la
distribution du liquide au cœur du produit. Ne jamais placer de matériaux étrangers dans le bac (plastique, métal, etc.) ;
cela pourrait endommager l'appareil. Ne jamais verser de saumure dont la température est inférieure à 10°C ou
supérieure à 25 °C !!!
Il est parfaitement normal que la saumure se réchauffe légèrement, cependant celle-ci ne doit jamais surchauffer.
Une fois le temps prédéfini écoulé, l'appareil s'arrête automatiquement.
le fabriquant décline toute responsabilité en cas de problèmes dus au non-respect des précautions de sécurité.
RÉGLAGE DE LA MINUTERIE
MINUTERIE TMR15 MINUTERIE NUMÉRIQUE
Plage de réglage : 1 sec...9 h:59 min
Entrée : à contact
Température ambiante : -10…50 °C
Sortie : relais : 230V/16(4)A
Tension d'alimentation : 12V=/~ 2W
Humidité ambiante relative : 15-80%
À l'allumage de l'appareil, la dernière valeur paramétrée avant l'extinction s'affichera sur l'écran.
Si l'utilisateur souhaite modifier cette valeur, il lui suffira d'utiliser les touches o . Une fois le
temps désiré paramétré, appuyer sur la touche pour lancer l'appareil.
Une fois le décompte terminé, la minuterie émettra un signal sonore et l'appareil s'arrêtera.
Une fois le temps prédéfini écoulé, la minuterie indiquera à nouveau la dernière valeur paramétrée.
Si le cycle de travail est interrompue avec la touche l'écran de la minuterie indiquera à nouveau la dernière
valeur paramétrée.
Dans ce cas, il ne sera plus possible de reprendre le décompte.
C'est pourquoi il est conseillé de consulter la valeur actuelle avant d'arrêter l'appareil puis de paramétrer successivement
le reste du temps en faisant repartir la machine.
Lorsque la minuterie est activée, il n'est plus possible de modifier le temps paramétré.
Sur l'écran, les temps sont indiqués sous forme de minutes et de secondes jusqu'à 9 minutes 59 secondes. À partir de 10
minutes, les valeurs sont indiquées sous la forme heures-minutes.
VIDAGE
Après l'usage, éteindre l'appareil et vider complètement le bac de saumure en ouvrant le robinet de décharge situé à
l'arrière de l'appareil.
Le bac de saumure doit être vidé après chaque usage.

15
FR BE
NETTOYAGE ET ENTRETIEN
Attention!: ne pas nettoyer la partie externes de l'appareil à l'aide de jets d'eau directs ou à haute pression.
Une fois l'utilisation terminée veiller à nettoyer soigneusement l'appareil. Un nettoyage quotidien de l'appareil une fois
celui-ci éteint est gage de bon fonctionnement et de longue durée.
Avant de procéder au nettoyage, couper l'alimentation électrique. Les parties en acier doivent être nettoyées à l'aide
d'eau chaude et d'un détergent neutre; rincer ensuite abondamment afin d'éliminer toute trace de détergent puis essuyer à
l'aide d'un chiffon sec. Ne pas utiliser de détergents abrasifs ou corrosifs.
Les parties émaillées doivent être nettoyées à l'aide d'eau savonneuse.
Four: pour faciliter le nettoyage du four, retirer la grille.
Important: outre le nettoyage et l'entretien, il est recommandé de procéder au moins une fois par an au contrôle des
appareils (contrôle à confier à un installateur qualifié); il est par conséquent recommandé d'établir un contrat
d'assistance.
COMPORTEMENT EN CAS D’ARRÊT DE FUNCTIONNEMENT PROLONGÉ
Nettoyer et essuyer soigneusement l’appareil selon les instructions, interrompre le courrant.
COMPORTEMENT EN CAS DE PANNE
En cas de panne éteindre l’appareil, interrompre le courant à l’aide du dispositif placé au-dessus de l’appareil et
prévenir le service d’assistance.

16
GB IE
INDEX
TECHNICAL DATA AND DRAWINGS.....................................................................................................................17
ELECTRICAL DATA....................................................................................................................................................17
POSITIONING...............................................................................................................................................................17
REGULATIONS, TECHNICAL STANDARDS AND SPECIFICATIONS.............................................................17
INSTALLATION............................................................................................................................................................17
TURNING ON ................................................................................................................................................................17
SETTING THE TIMER.................................................................................................................................................18
DRAINING......................................................................................................................................................................18
CLEANING AND MAINTENANCE............................................................................................................................18
PREPARATION FOR A PROLONGED OUT OF USE ............................................................................................19
INSTRUCTIONS IN THE EVENT OF FAULTS.......................................................................................................19

17
GB IE
TECHNICAL DATA AND DRAWINGS
The data plate is attached to the lateral panel (see drawing electrical connection point) and contains all the information
necessary for connection.
ELECTRICAL DATA
MODELS DIMENSIONS
cm POWER
SUPPLY MAXIMUM
POWER KW
MAXIMUM
ABSORPTION A POWER SUPPLY
CABLE
MR-12L 34,2x28,2x38h 230V~50/60Hz 0,3 1,3 3 x 1
POSITIONING
On positioning the appliance, ensure that it is perfectly levelled. Small adjustments can be made by screwing the
adjustable feet up or down. The master switch or the socket point must be in proximity to the appliance and easily
accessible. It is advisable to place the oven under an extractor hood to ensure rapid elimination of steam. If the
appliance is placed near a wall or partition, kitchen furniture or decorative coverings, etc., these must be fire-proof or
coated with fire-proofing. Local fire prevention regulations must be observed. There must be maximum clearance
between the front edge of the cabinet and the appliance.
REGULATIONS, TECHNICAL STANDARDS AND SPECIFICATIONS
Installation must be carried out in accordance with:
•current accident prevention legislation;
•current specifications.
INSTALLATION
The installation, start-up and maintenance of this appliance must be carried out only by qualified fitters. All installation
operations must be in accordance with current regulations. The manufacturer declines all responsibility for
malfunctioning due to bad or faulty installation.
Attention: international regulations require that a omni pole cut-out device with contact opening of at least 3 mm be
fitted on the wiring leading to the appliance.
TURNING ON
Turn the device on with the main ON / OFF button on the left of the machine.
The device is filled with the liquid based marinade (like liquid butter, oil, water). Only top quality components are used
for the machine. Both the frame and tank are made entirely of stainless steel.
Please observe all the safety and hygiene operations required and specified in this manual.
Useful tank volume is approximately 12 litres. The manufacturer recommends never putting in more than 5
litres.
The digital timer is on the device's control panel. The current time is displayed the instant it is turned on. To set and
change the values please follow the instructions given in the following paragraph. The machine works by means of
ultrasound diffusers that ensure an extremely fast marinade, maintaining the natural integrity of the food (e.g. meat,
fish, vegetables).
Pour the brine (the liquid marinade) into the tank and set the time required depending on the type of product marinating
which can vary from 12 to 20 minutes. Put the food (any kind of meat, vegetable, fruit, fish) in the tank. If it is meat you
are marinating you will have a much better result if it is cut into slices. Close the device with its polycarbonate lid. Wait
for the time set on the timer to end. Remove the lid and take the product out which is now ready to cook or roast or to
be vacuum packed and kept in the fridge until needed for cooking.
Caution!
Never use the timer if the tank is empty as it would damage the device and ruin its components. This would
invalidate the warranty!
Important!

18
GB IE
Do not use brine marinades that are too dense, do not add coarsely cut spices that could prevent the liquid getting
through to the middle of the product. Never put other materials in the tank (such as plastic, metal, etc…) which would
damage the device. Never pour brine marinade in the tank if its temperature is under 10°C or higher than 25°C!!!
It is quite normal for the marinade to heat slightly but it must never overheat.
The device stops automatically at the end of the time set.
the manufacturer disclaims all responsibility for problems due to disregarding the safety precautions.
SETTING THE TIMER
TIMER TMR15 DIGITAL TIMER:
Adjustment Range: 1 sec...9 h:59 min
Input: by contact
Room temperature -10…50 °C
Output: relay 230V/16(4)A
Supply voltage: 12V=/~ 2W
Relative ambient humidity: 15-80%
When turning the device on the last value set before it was turned off is displayed.
If the user intends changing this value he/she has to use the or key. Once the time wanted has been
set, press the key to start the device.
At the end of the countdown the timer beeps and the device stops working.
When the time set has elapsed the timer displays the last value set.
If the work cycle is interrupted with the key the last value set is shown on the timer’s display.
In this case it is impossible for the countdown to continue.
For this reason we suggest reading the current value before stopping the device and then resetting the remaining time,
restarting the machine.
The time set cannot be changed all the time the timer is working.
The time is displayed in minutes and seconds up to a value of 9 minutes/59 seconds, consecutively starting from 10
minutes the values are given in the hour/minute format.
DRAINING
After use, turn the device off and, via the drain cock at the back of it, drain all the brine marinade from the tank.
The marinade must be drained off after each use.
CLEANING AND MAINTENANCE
Attention! During cleaning, do not wash the external parts of the appliance with direct sprays of water or with
high pressure.

19
GB IE
After every use, clean the appliance thoroughly. Daily cleaning after switching off the appliance ensures the perfect
functioning and long life of the appliance.
Before starting to clean the appliance, disconnect the power supply. The parts in steel must be washed with hot water
and neutral detergent, then rinsed thoroughly in order to eliminate all traces of detergent; after which, dried with a dry
cloth. Do not use abrasive or corrosive detergents.
Important: As well as ordinary cleaning and maintenance, it is advisable to have the installation checked by an
installer at least once a year.
It is therefore suggested to draw up an after-sales assistance contract.
PREPARATION FOR A PROLONGED OUT OF USE
Thoroughly clean and dry the appliance as per instructions, switch off at the mains.
INSTRUCTIONS IN THE EVENT OF FAULTS
If a fault develops, turn off the appliance, switch off at the mains and call the technical assistance service.

20
ES
ÍNDICE
DECLARACIÓN DE CONFORMIDAD .....................................................................................................................21
TABLA DATOS TÉCNICOS ELÉCTRICOS.............................................................................................................21
INSTRUCCIONES PARA LA INSTALACIÓN .........................................................................................................21
INSTALACIÓN..............................................................................................................................................................21
ENCENDIDO..................................................................................................................................................................21
AJUSTE DEL TEMPORIZADOR ...............................................................................................................................22
DESCARGA....................................................................................................................................................................22
DISPOSICIONES DE LEY, REGLAS TÉCNICAS Y DIRECTIVAS......................................................................23
LIMPIEZA Y MANTENIMIENTO .............................................................................................................................23
COMO COMPORTARSE EN CASO DE AVERÍA ...................................................................................................23
PROCEDIMIENTO A EFECTUAR EN CASO DE LARGA INTERRUPCIÓN DEL FUNCIONAMIENTO....23
Table of contents
Languages:
Other Lotus cooker Kitchen Appliance manuals

Lotus cooker
Lotus cooker BRF-64G User manual

Lotus cooker
Lotus cooker BMD-64EM User manual

Lotus cooker
Lotus cooker SA-400 User manual

Lotus cooker
Lotus cooker E Series Specification sheet

Lotus cooker
Lotus cooker BRF-74G User manual

Lotus cooker
Lotus cooker BR-6G User manual

Lotus cooker
Lotus cooker RSFT-63EM User manual