Louet Erica User manual

Erica
Návod pro montáž
Úvod ........................................................................................................................1
Údržba .....................................................................................................................5
Montáž .....................................................................................................................7
Složení stavu .........................................................................................................36
Tipy a důležité informace .......................................................................................37
Řešení problémů....................................................................................................39
Příslušenství ...........................................................................................................41
Version: M-Erica-V4

1
Introduction
Einleitung
Úvod
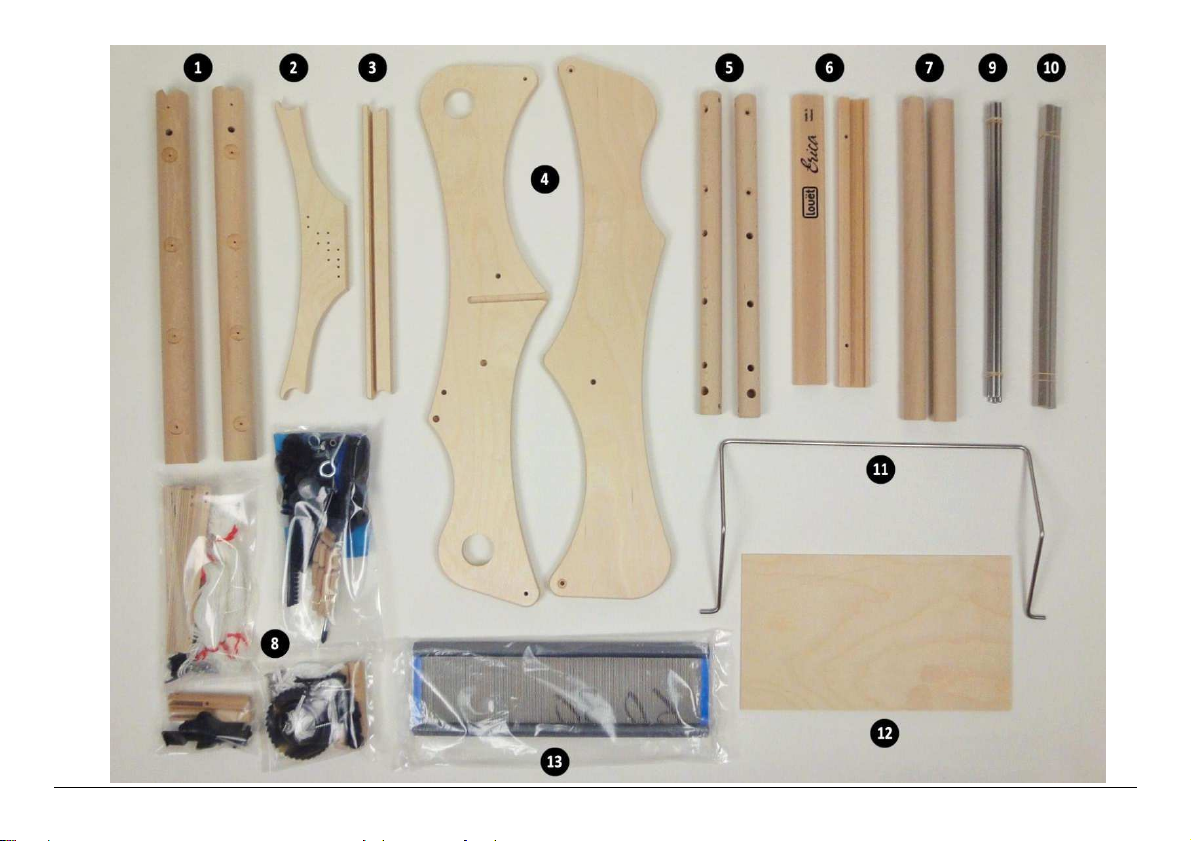
The photos shown in this manual are
of the Erica 30-2. The assembly for
the Erica 50-2 is done in the same
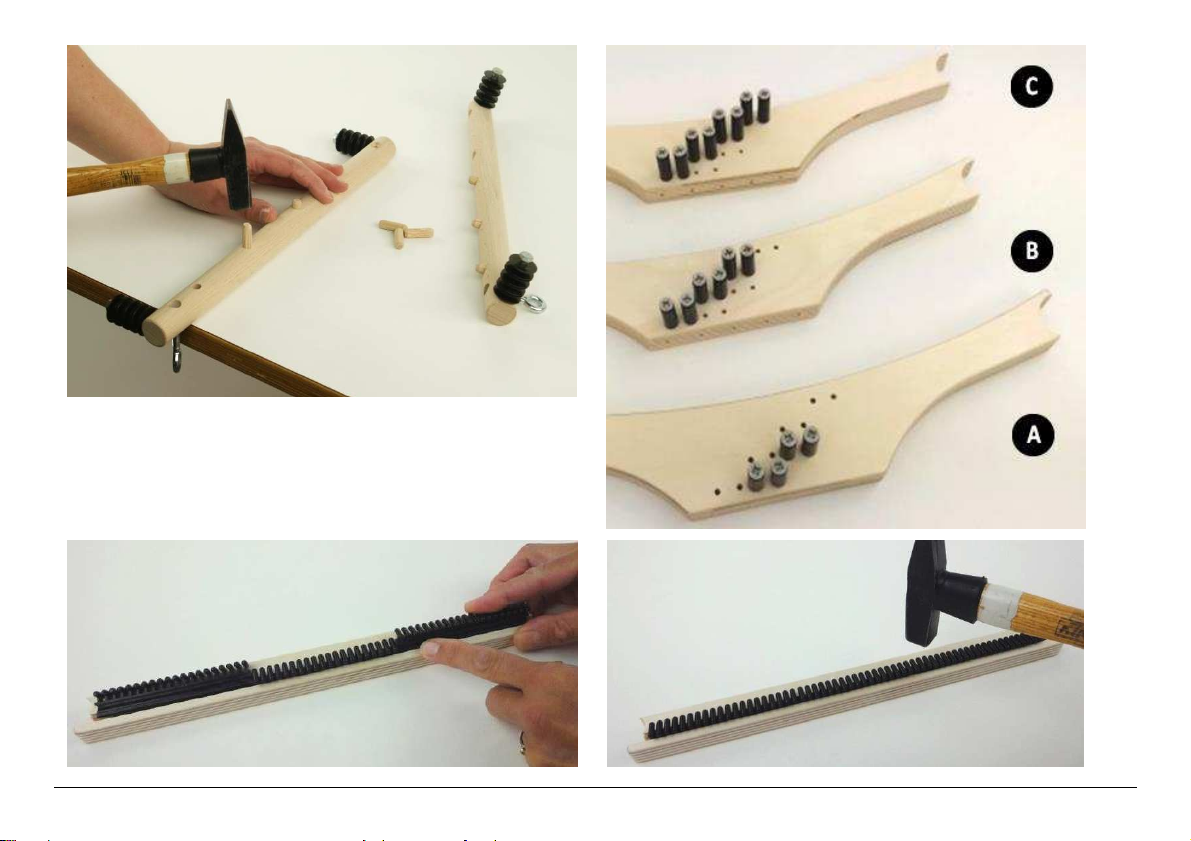
way. If you are going to assemble 3
or 4 shafts, the text will help you
where needed.
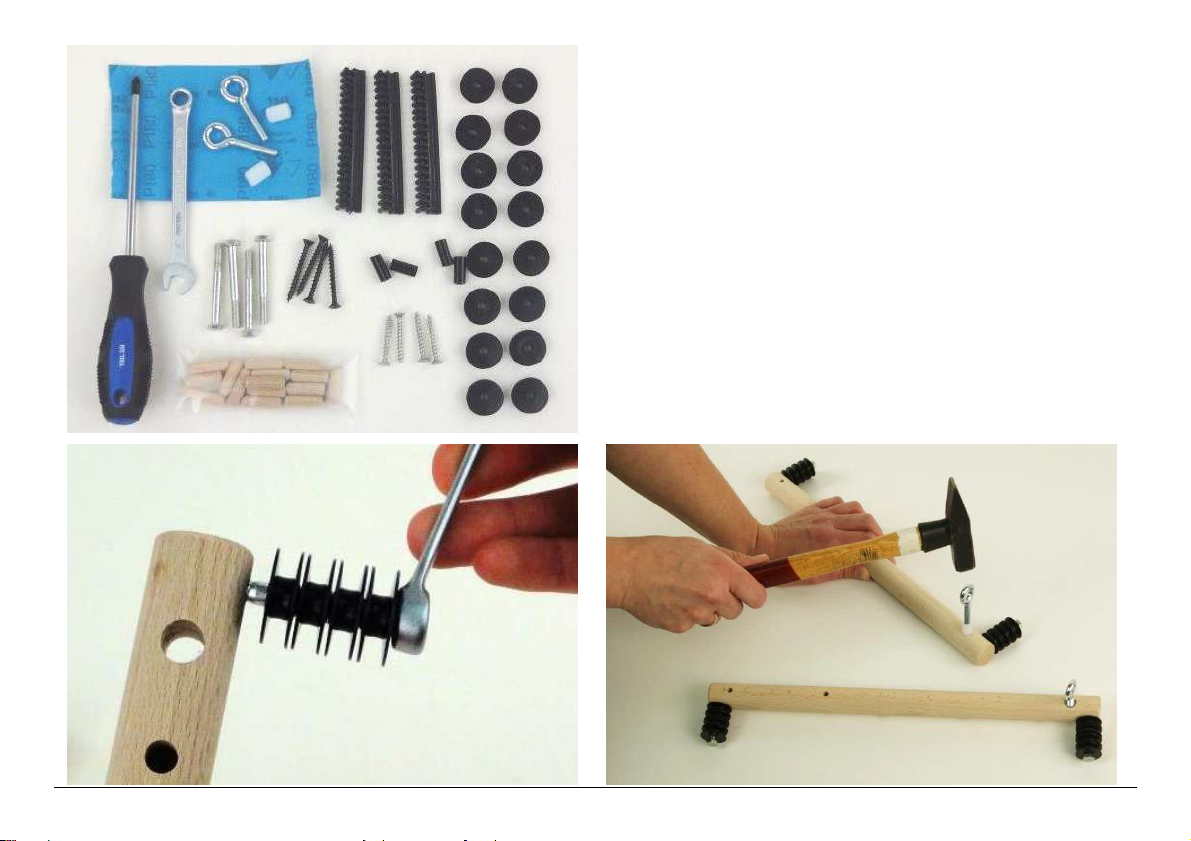
With the piece of sandpaper from the
first hardware bag, you can smooth
the edges of the wooden parts. If you
want to finish your Erica with
wateerbased lacquer or oil for wood,
you can better do that before
assembling. The assembly of Erica
will take about 2 to 3 hours of time
(excl. finishing).
Besides the tools supplied in the first
hardware bag, you will need a
hammer or mallet, a pair of scissors
and a lighter for the assembling of
Erica.
A weaving instruction manual for
Erica can be found online:
www.louet.nl. This weaving
instruction is also included in the
accessory kit for beginning weavers,
together with 2 flat shuttles, warping
posts and a reed/heddle hook.
Die Fotos in dieser Anleitung zeigen
den Erica 30-2. Der Zusammenbau
des Erica 50-2 erfolgt in gleicher
Weise. Falls Sie 3 oder 4 Schäfte
einbauen, wird im Text darauf
hingewiesen welche Schritte Sie
wiederholen müssen.
Mit dem Schleifpapier aus dem ersten
Beutel können Sie die Kanten der
Holzteile noch zusätzlich abrunden.
Falls Sie Erica lackieren oder ölen
möchten, dann empfehlen wir dies vor
dem Zusammenbau zu tun. Der
Zusammenbau von Erica nimmt rund
2 bis 3 Stunden (exklusive
Holzbehandlung) in Anspruch.
Zusätzlich zu den Werkzeugen im
ersten Kleinteilbeutel benötigen Sie
für den Zusammenbau von Erica
einen Hammer, eine Schere und ein
Feuerzeug.
Eine Webanleitung für Erica finden
Sie online: www.louet.nl. Diese
Webanleitung ist auch im
Zubehörpaket für Anfänger inkludiert.
Dieses beinhaltet weiters 2
Schiffchen, eine Schärvorrichtung und
einen Reihhaken/Blattstecher.
Na fotografiích použitých v tomto
manuálu je použit stav Erica 30-2.
Složení stavu Erica 50-2 se provádí
stejným způsobem. Pokud máte stav
se třemi nebo čtyřmi listy, text vás
povede v místech, kde to bude třeba.
Kouskem smirkového papíru ze
sáčku s nářadím můžete zjemnit
hrany dřevěných částí, kde je to
třeba. Pokud chcete upravit svůj stav
Erika lakem na vodní bázi nebo
olejem na dřevo, je lépe to udělat
před montáží. Složení stavu trvá cca
2 – 3 hodiny (čas případné povrchové
úpravy v to nepočítaje).
Kroměnářadí, které najdete v prvním
sáčku, budete potřebovat ještě
kladívko nebo paličku, nůžky a
zapalovač.
Návod na tkaní k Erica najdete on-
line na www.louet.nl. Obsahuje jej
také v tištěné podoběset s doplňky
pro začátečníky (spolu se dvěma
plochými člunky, snovacími kolíky a
osnovním zavlékacím háčkem).

2

3
Loom parts
1. Raddle
2. Beam cords
3. Reed
4. Cloth beam
5. Warp beam
6. Breast beam
7. Back beam
8. Apron and lease bars
9. Warping strips
10. Cord to hold lease bars
11. Toggle
12. Heddles
13. Shaft or harness
14. Ratchett (pall) and ratchet wheel
Teile Webstuhl
1. Reedekamm
2. Schnüre der Bäume
3. Webblatt
4. Warenbaum
5. Kettbaum
6. Brustbaum
7. Streichbaum
8. Kreuz- und Anbindestäben
9. Kettlatten
10. Schnüre für anbinden Kreuzstäbe
11. Hebeln
12. Litzen
13. Schäfte
14. Sperrad und Klinke
Části stavu
1. Bidlen
2. Lanka zbožového válce
3. Paprsek
4. Zbožový válec
5. Osnovní válec
6. Čelní válec
7. Zadní válec
8. Křížové a osnovní tyče
9. Osnovní latě
10. Lanko držící osnovní tyče
11. Přepínač
12. Nitěnky
13. List
14. Třecí brzda s ráčnovým kolem
Texsolv heddles
Texsolv heddles are made out of a
double polyester cord that is
connected on specific intervals. They
are bundled in a zigzag fashion in
bundles of 100 heddles. Never
remove the ties from the bundles
before you place the shaft bars, or
something else, through the top and
bottom large loops. If you do the
heddles will become quite tangled
and disorganized and it is a major
task to sort this out.
Texsolv Litzen
Diese Litzen sind aus doppelter
Polyesterschnur, die in bestimmten
Abständen verbunden sind. Die
Litzenkette ist im Zick-Zack in 100er
Bündel gefaltet. Entfernen Sie die
Verschlüsse an den Bündeln nicht
bevor die Schaftstäbe oder etwas
anderes durch die Bündelöffnungen
gesteckt wurden. Die Verschlüsse
sind notwendig, um die Litzen
ordentlich sortiert zu erhalten. Wenn
Sie Litzen von den Schäften
entfernen, binden Sie sie vorher
wieder zu Bündeln.
Texsolv nitěnky
Texsolv nitěnky jsou vyrobeny
z dvojitého polyesterového vlákna,
které je spojeno ve specifických
intervalech. Jsou svázány cik cak
způsobem do svazkůpo 100
nitěnkách. Nikdy vazbu nerozvolňujte,
dokud jejich horní a dolní velká oka
neumístíte na latělistů, nebo na něco
jiného. Pokud byste je rozvolnili,
nitěnky se začnou zamotávat a
propletou se a znovu je roztřídit je
velice komplikované.

4

5
Parts in box
1. Warp and cloth beam
2. Upper rail
3. Raddle bar
4. Sides of the loom
5. Round uprights of the castle
6. Reed holder (2 parts)
7. Breast and back beam
8. 4 hardware bags
9. 4 stainless steel rods Ø6 mm
(shaft bars) and 4 stainless steel
rods Ø 5 mm (apron and lease
bars)
10. 16 warping strips
11. Beater frame
12. Plywood sheet
13. Reed 40/10 (10 dpi)
Teile im Karton
1. Kett- und Warenbaum
2. Obere Schiene
3. Reedekammleiste
4. Linkes und rechtes Seitenteil
5. Senkrechte Rundstäbe für den
Mittelteil
6. Webblatthalterung (2 Teilen)
7. Brust- und Streichbaum
8. 4 Beutel Kleinteile
9. 4 oder 8 Stäbe Ø6 mm
(Shaftstäbe) und 4 Stäbe Ø5 mm
(Kreuz- und Anbindestäbe)
10. 16 Kettlatten
11. Weblade
12. Sperrholzplatte
13. Webblatt 40/10
Jednotlivé části stavu
1. Osnovní a zbožový válec
2. Horní rám
3. Lišta listu
4. Bočnice stavu
5. Kulaté lišty vrchní konstrukce
6. Držák paprsku (2 části)
7. Čelní a zadní válec
8. 4 sáčky s příslušenstvím
9. 4 nerezové ocelové tyče o
průměru 6 mm (tvoří rám
listu) a 4 nerezové ocelové
tyče o průměru 5 mm (křížové
a osnovní)
10. 16 osnovních latí
11. Rám bidlenu
12. Překližková deska
13. Paprsek 40/10 (10 dpi)
Maintenance
The Erica loom requires no special
maintenance, however we do
recommend tightening the screws of
the construction annually, particularly
in dry climates.
Wartung
Erica bedarf keiner besonderen
Wartung. Wir empfehlen aber, nach
einigen Monaten die Festigkeit der
Schrauben des Rahmens zu
kontrollieren. Dies ist besonders
wichtig, wenn der Webstuhl in einer
trockenen Umgebung aufgestellt ist.
Wiederholen Sie dies nach einem
Jahr.
Údržba
Stav Erica nepotřebuje žádnou
speciální údržbu, přesto Vám
doporučujeme jednou ročněutáhnout
vruty konstrukce, speciálněpokud je
stav umístěný v suchém prostředí.

6

7
Assembly
Assembling the castle
Open the hardware bag that contains
the screwdriver:
- Screwdriver Pz2
- Wrench 13 mm
- 4 bolts M6 x 55 mm
- 4 screws 4.5 x 45 mm
- 16 nylon rollers
- 11 wooden dowels Ø8 x 25 mm
- 4 or 8 screws 4 x 35 mm
- 4 or 8 nylon bushings
- 2 screw eyes M6 x 30
- 2 nylon knurled nuts
- 3 or 5 raddle strips
- piece of sandpaper
Zusammenbau
Zusammenbau des Mittelteils
Öffnen Sie den Beutel, der den
Schraubenzieher enthält:
- Schraubenzieher Pz2
- Schraubenschlüssel 13 mm
- 4 Bolzen M6 x 55 mm
- 4 Schrauben 4.5 x 45 mm
- 16 Nylonrollen
- 11 Holzdübel Ø8 x 25 mm
- 4 oder 8 Schrauben 4 x 35 mm
- 4 oder 8 Nylonbuchsen
- 2 Ösenschrauben M6 x 30
- 2 Nylonrändelmuttern
- 3 bzw. 5 Reedekammstreifen
- ein Stück Schleifpapier
Montáž
Složení rámové konstrukce
Otevřete sáček s příslušenstvím, který
obsahuje šroubovák:
-Šroubovák Pz2
-Klíč13 mm
-4 šrouby M6 x 55 mm
-4 vruty 4,5 x 45 mm
-16 nylonových koleček - kladek
-11 dřevěných kolíkůprůměr 8
mm x 25 mm
-4 nebo 8 vrutů4 x 35 mm
-4 nebo 8 nylonových pouzder
-2 šroubovací očka M6 x 30
-2 nylonové vroubkované matice
-3 nebo 5 bidlenových proužků
-Kousek smirkového papíru
Slip 4 rollers over each of the 4 M6 bolts
and screw them into the holes at the ends
of the uprights so far that the four rollers
still have about 4 mm (0.15”) play. With the
4 rollers on each bolt, the loom is already
equipped for four shafts.
Screw the screw eyes partly into the
knurled nuts and tap them into the larger
holes at the ends of the uprights (see
picture). Tap them so deep that the nuts no
longer protrude from the wood.
Stecken Sie jeweils 4 Nylonrollen auf die
4 M6 Bolzen und schrauben Sie diese in
die Löcher an den Enden der
senkrechten Rundstäbe. Die 4 Rollen
sollten etwa 4 mm Spiel haben. Mit 4
Rollen auf jedem Bolzen ist der Webstuhl
bereits für 4 Schäfte ausgerüstet.
Schrauben Sie die Ösenschrauben in die
Rändelmuttern und klopfen Sie diese in
die weiteren Löcher an den Enden der
senkrechten Rundstäbe (siehe Bild).
Versenken Sie diese Muttern soweit,
dass Sie nicht über das Holz
hinausragen.
Nasuňte 4 kolečka na každý ze 4 M6
šroubůa našroubujte je do otvorůna
koncích kulatých lišt horní konstrukce tak
daleko, aby kolečkům zůstala cca 4 mm
vůle. Se čtyřmi kolečky na každém
šroubu je stav připraven pro umístění 4
listů.
Zašroubujte šroubovací očka částečnědo
vroubkovaných matic a zatlučte je do
větších otvorůna koncích kulatých lišt
(viz obrázek). Zatlučte je tak hluboko, aby
matice nevyčnívaly ze dřeva.

8

9
Tap 3 dowels into the 8 mm holes of
each upright. The other dowels you
will need later on during assembling.
Now we will mount the nylon bushings
onto the upper rail. For the two shafts
there are 4 screws and 4 bushings in
the hardware bag. Fasten the screws
lightly, and unscrew them so that the
bushing can just turn freely.
If you install three or four shafts, then
also use the screws and bushings of
those shafts. The picture shows where
the bushings for 2, 3 or 4 shafts
should be located:
A. Position of the rollers with 2 shafts
B. Position of the rollers with 3 shafts
C. Position of the rollers with 4 shafts
Place the raddle strips on the groove
of the raddle bar. This groove is a bit
longer then needed. Make sure the
strips are connected and in the middle.
Push them into the groove. If needed
use the hammer to tap the strips softly
to the bottom of the groove.
Klopfen Sie die 3 Holzdübel in die 8
mm Löcher jedes senkrechten
Rundstabes. Sie benötigen die
verbleibenden Dübel später beim
Zusammenbau.
Nun montieren Sie die Nylonbuchsen
auf die obere Schiene. Für 2 Schäfte
befinden sich 4 Schrauben und 4
Buchsen im Kleinteilbeutel.
Schrauben Sie die Schrauben zuerst
ein wenig fest, dann lockern Sie
diese wieder bis sich die Buchsen frei
drehen.
Falls Sie 3 oder 4 Schäfte aufbauen,
dann benützen Sie die Schrauben
und Buchsen dieser Schäfte. Das
Bild zeigt wie die Buchsen für 2, 3,
oder 4 Schäfte angeordnet werden:
A. Anordnung bei 2 Schäften.
B. Anordnung bei 3 Schäften.
C. Anordnung bei 4 Schäften.
Legen Sie die Reedekammstreifen
auf die Rille der Reedekammleiste.
Die Rille ist etwas länger als nötig.
Kontrollieren Sie, ob die Schienen
bündig und zentriert liegen. Drücken
Sie diese in die Rille. Wenn nötig,
benützen Sie den Hammer, um die
Streifen vorsichtig ganz in die Rille zu
klopfen.
Zatlučte 3 kolíky do 8 mm otvorůna
každé liště. Další otvory využijete
později při montáži.
Nyní budeme osazovat nylonová
pouzdra do horní lišty. Na 2 listy
najdete v sáčku s příslušenstvím 4
šrouby a 4 pouzdra. Utáhněte šrouby
zlehka a potom je vyšroubujte tak,
aby se pouzdra mohla volněotáčet.
Pokud instalujete 3 nebo 4 listy,
potom použijte také šrouby a pouzdra
určená pro tyto listy. Na obrázku je
ukázáno umístění pouzder pro 2, 3
nebo 4 listy:
A. Umístění pouzder pro 2 listy.
B. Umístění pouzder pro 3 listy.
C. Umístění pouzder pro 4 listy.
Umístěte bidlenové proužky do
drážky bidlenové lišty. Tato drážka je
o něco delší, než je třeba. Ujistěte se,
že jsou proužky spojeny těsněvedle
sebe a umístěny ve středu drážky.
Zatlačte je do drážky. Pokud je třeba,
použijte kladívko a zatlučte proužky
jemněshora do drážky.

10
A

11
Use the four screws 4.5 x 45 mm to
connect the uprights to the upper rail
and raddle bar. Make sure the dowels
in the uprights are facing out.
The raddle bar should be mounted so
that the protruding part is on the back;
it shouldn’t block the movement of the
shafts along the side with the rollers.
Check the flatness of the construction
and correct it if needed, see picture A.
Schrauben Sie die senkrechten
Rundstäbe mit den 4 Schrauben 4,5
x 45 mm an die obere Schiene und
die Reedekammleiste. Achten Sie
darauf, dass die Dübel in den
Rundstäben nach außen zeigen.
Die Zähne der Reedekammleiste
müssen nach hinten zeigen, damit
diese die Schaftbewegungen auf der
Seite wo sich die Rollen befinden
nicht behindern.
Überprüfen Sie, ob die Konstruktion
flach liegt und korrigieren Sie dies
falls nötig, siehe Bild A.
Použijte čtyři vruty 4.5 x 45 mm ke
spojení kulatých lišt s horní lištou a
bidlenovou lištou. Ujistěte se, že
kolíky na kulatých lištách směřují
ven.
Bidlenová lišta by měla být osazena
tak, že vyčnívající části jsou vzadu;
neměly by blokovat pohyb listůna
stranách s kolečky.
Zkontrolujte plochost konstrukce a
upravte ji, pokud je třeba, jak je to
vidět na obrázku A.

12

13
Mounting the toggles
Open the hardware bag with the
wooden toggles:
- 11 or 13 screws 4 x 13 mm
- 3 or 5 hinges
- 2 or 4 toggles
Use the 4 x 13 mm screws to
assemble the hinges together with the
toggles onto the upper rail. Each
toggle mounts between two hinges, so
you always need one more hinge than
the number of toggles. The other 8
screws you will need later to attach the
ratchets and ratchet wheels to the
beams.
Montage der Kipphebeln
Öffnen Sie den Kleinteilbeutel mit
den hölzernen Kipphebeln:
- 11 oder 13 Schrauben 4x13 mm
- 3 oder 5 Scharniere
- 2 oder 4 Kipphebeln
Benützen Sie die 4 x 13 mm
Schrauben, um die Scharniere
gemeinsam mit den Kipphebeln an
der oberen Schiene zu befestigen.
Jeder Kipphebel gehört zwischen 2
Scharniere. Sie benötigen also immer
ein Scharnier mehr als Kipphebel.
Die restlichen 8 Schrauben benötigen
Sie später, um die Sperrvorrichtung
an den Bäumen zu befestigen.
Osazení přepínačů
Otevřete sáček s příslušenstvím pro
dřevěné přepínače:
-11 nebo 13 vrutů4 x 13 mm
-3 nebo 5 pantů
-2 nebo 4 přepínače
Použijte vruty 4 x 13 mm ke spojení
pantůspolu s přepínači k horní listě.
Každý přepínačusaďte mezi dvěma
panty – proto potřebujete vždy o
jeden pant navíc. Dalších 8 vrutů
upotřebíte později k připojení
ozubených kol k válcům.

14
Assembling the shafts
Open the hardware bag with the
heddles:
- 200 heddles (150 mm)
- 4 or 8 little screw eyes
- 4 or 8 bolts M4x10 mm
- 4 or 8 shaft sides
- 2 or 4 shaft cords
- 2 or 4 elastic cords
Screw the little screw eyes into the
small hole of each shaft side. Screw it
in so deep that only the eye protrudes
and turn it in transverse position, as
shown in the picture.
Zusammenbau der Schäfte
Öffnen Sie den Kleinteilbeutel mit
den Litzen:
- 200 Litzen (150 mm)
- 4 oder 8 kleine Ösenschrauben
- 4 oder Bolzenschrauben M4x10
mm
- 4 oder 8 Schaftseitenteile
- 2 oder Schaftschnüre
- 2 oder Gummischnüre
Schrauben Sie die kleinen
Ösenschrauben in das kleine Loch
auf jeder Schaftseite. Schrauben Sie
diese so weit hinein, dass nur die
Öse herausragt und drehen Sie sie in
eine waagrechte Stellung (siehe
Bild).
Montáž listů
Otevřete sáček s nitěnkami:
-200 nitěnek (150 mm)
-4 nebo 8 malých vrutů
s očkem
-4 nebo 8 šroubůM4 x 10 mm
-4 nebo 8 bočnic listů
-2 nebo 4 listová lanka
-2 nebo 4 elastická lanka
Zašroubujte vruty s očkem do malých
otvorůna každé bočnici listu.
Vešroubujte je tak hluboko, aby
vyčnívalo pouze očko a otočte je do
příčné pozice, jak je to ukázáno na
obrázku.

15
Thread the elastic cords through the
screw eye and second hole from the
top of two shaft sides in the way the
picture above shows. Tie the ends of
the cords together with a square knot,
allowing the ends to protrude about 1
cm (1/2”).
Fädeln Sie die Gummischnüre durch
die Ösen und durch die zweiten
Löcher der oberen Seite der zwei
Schaftseitenteile wie im Bild gezeigt.
Verknoten Sie die Enden der
Gummischnüre mit einem
Kreuzknoten und lassen Sie die
Enden dabei 1 cm überstehen.
Protáhněte elastické lanko skrz očka a
druhé dírky shora na bočnicích, jak je
to ukázáno na obrázku nahoře.
Snažte konce lanka dohromady
čtvercovým uzlem a nechte konce
vyčnívat cca 1 cm.

16
Insert 2 of the 4 thicker metal rods (Ø6
mm) into the holes of a shaft side. Slip
over a bundle of heddles onto the rods
and remove the ties.
If you install more than 2 shafts, you
can split the bundle to transfer heddles
to another shaft: count the number of
heddles you want to replace and cut
them apart. Normally when you
remove heddles from a shaft, you
should tie them first in 4 places, but
you can transfer them also to the new
shaft by inserting 2 metal rods and
take the heddles off. Make sure to
check that the rods are going through
all heddles correctly.
Stecken Sie 2 der 4 dickeren
Metallstäbe (Ø 6 mm) in die Löcher
eines Schaftseitenteils. Fädeln Sie ein
Bündel Litzen über die Stäbe und
entfernen Sie die Verschlüsse.
Falls Sie mehr als 2 Schäfte einbauen,
können Sie die Litzen wie folgt auf die
Schäfte aufteilen: Zählen Sie die Anzahl
der Litzen, die Sie transferieren wollen,
und schneiden Sie diese ab. Wenn sie
Litzen von einem Schaft abziehen,
sollten Sie diese an 4 Stellen zusam-
menbinden. Sie können auch 2 Metall-
stäbe einschieben und die Litzen so
herunterziehen. Passen Sie auf, dass
die Stäbe korrekt alle Litzen erfassen.
Vložte 2 ze 4 silnějších kovových tyčí
(o průměru 6 mm) do otvorů
v bočnicích listu. Nasuňte na ně
svazky nitěnek a uvolněte nitky, které
je drží pohromadě.
Když instalujete více než 2 listy, pak
můžete svazek rozdělit a přenést
nitěnky na další list: spočítejte si počet
nitěnek, které chcete přemístit a
oddělte je. Normálně, když snímáte
nitěnky z listu, měli byste je nejprve
upevnit na čtyřech místech, ale
můžete je také přenést na nový list
tak, že do nich vložíte další 2 kovové
tyče a nitěnky na nich sundáte.
Ujistěte se ale, že tyče procházejí
správněskrz všechny nitěnky.

17
Put the second shaft side onto the rods.
This is easier if you spread the heddles
towards the first side.
Use a sharp pair of scissors to cut the
heddles apart by cutting the little loops at
the top and bottom.
Assemble the other shaft(s) in the same
way.
Stecken Sie nun das zweite
Seitenteil auf die Stäbe. Dies geht
einfacher, wenn sie die Litzen zur
ersten Seite schieben.
Trennen Sie die einzelnen Litzen,
indem Sie mit einer scharfen
Schere die oberen und unteren
Schlaufen aufschneiden.
Bauen Sie die anderen Schäfte in
gleicher Weise zusammen.
Nasuňte druhou bočnici listu na
tyče. Jde to snadněji, když nitěnky
rozprostřete blíže k první straně.
Použijte ostré nůžky k rozdělení
nitěnek tím, že rozstřihnete malá
očka v jejich horní a dolní části.
Další listy smontujte stejným
způsobem.

18
Screw the 4 mm bolts half way into
the ends of the shaft sides.
Schrauben Sie die 4 mm
Bolzenschrauben zur Hälfte in die
Enden der Schaftseitenteile.
Zašroubujte 4 mm šrouby z poloviny
do koncůbočnic listu.

19
Find the middle of the shaft cords by
taking them double. Pinch the cord to
ease the threading of this middle
through the hole in the toggle. Take
the loop out of the other side and
place it around the end of the toggle.
Attach the cord(s) to the other
toggle(s) in the same way.
Falten Sie die Schaftseile in der Mitte.
Klemmen Sie den Seilfalz zwischen
die Finger damit Sie das Seil besser
durch das Loch im Kipphebel fädeln
können. Ziehen Sie die Schlaufe
dann hinten ein Stück aus dem Loch
heraus und führen Sie sie über den
oberen Teil des Hebels. Befestigen
Sie auch die anderen Seile genauso
an den Hebeln.
Najděte střed listových lanek tím, že
je přehnete napůl. Stiskněte lanko,
abyste si usnadnili protažení tohoto
středu skrz otvor v přepínači.
Uchopte očko na druhé straněa
umístěte jej okolo konce přepínače.
Připevněte lanko/a k dalším/u
přepínači/ům stejným způsobem.
Other manuals for Erica
3
Table of contents
Other Louet Weaving manuals

Louet
Louet Kombo 70 4+4 User manual

Louet
Louet Megado Computer Dobby 2.0 User manual

Louet
Louet David-III Assembly instructions

Louet
Louet Kombo 40 4+4 User manual

Louet
Louet Spring User manual

Louet
Louet Spring Assembly instructions

Louet
Louet Jane Assembly instructions

Louet
Louet Erica User manual

Louet
Louet Delta User manual