LUCHT LHZ TECHNOTHERM DTH User manual

Feel good through the warmth created from electricity - www.technotherm.de
Model
• Rapid Heater DTH
Manual Rapid Heater DTH
Please note and keep!
Changes reserved!
Id_Nr. 911 361 381
Edion:09/18

Feel good through the warmth created from electricity - www.technotherm.de
Manual Rapid Heater DTH
Feel good through the warmth created from electricity - www.technotherm.de
GB
Volume
3
Volume
1
Volume
2
60cm
60cm
2,25m
60cm
1
2
3 4
196mm
358mm
Ø:6mm / L:35mm
A
B
C
88mm
4m
3m
3m
1m
min
15cm
min
15cm
min
60cm
min
50cm
min
15cm

Manual Rapid Heater DTH
Feel good through the warmth created from electricity - www.technotherm.de
GB
5

Feel good through the warmth created from electricity - www.technotherm.de
Manual Rapid Heater DTH
Feel good through the warmth created from electricity - www.technotherm.de
GB
6

Manual Rapid Heater DTH
Feel good through the warmth created from electricity - www.technotherm.de
GB
7

Feel good through the warmth created from electricity - www.technotherm.de
Manual Rapid Heater DTH
Feel good through the warmth created from electricity - www.technotherm.de
GB
9
10
A
B
C D
E
F
G
H
I
J
K
L
M
11
8
10

Manual Rapid Heater DTH
Feel good through the warmth created from electricity - www.technotherm.de
GB
ENGLISH
INSTALLATION AND OPERATING MANUAL
Before operating the heater, please read these instructions thoroughly to avoid damage and hazardous situa-
tions. Any use of this heater other than that stipulated in this instruction manual may cause re, electric shock
or injury, and voids all warranties.
Warranty does not apply to any defect, deterioration, loss, injury or damage caused by, or as a result of, the misuse or
abuse of this heater. The rights dictated by State law are not prejudiced. None of the terms of this warranty are to be
taken as excluding any conditions or warranties implied by State law, which cannot be excluded or modied.
Before any operation remove the packaging and check product integrity. In case of defects or damages do not try to
repair it yourself but contact your dealer.
Do not let children play with the packaging and protect the environment by disposing of the packaging in accordance
with the national regulations for waste processing.
1. For your saFety
•This appliance is intended for normal household use and not for
use in commercial/industrial enviroment, in vehicles or on board
ships or aircrafts.
•This appliance can be used by children aged from 8 years and
above and persons with reduced physical, sensory or mental ca-
pabilities or lack of experience and knowledge if they have been
given supervision or instruction concerning use of the appliance
in a safe way and understand the hazards involved. Children shall
not play with the appliance. Cleaning and user maintenance shall
not be made by children without supervision.
•Children of less than 3 years should be kept away unless conti-
nuously supervised.
•Children aged from 3 years and less than 8 years shall only switch
on/off the appliance provided that it has been placed or installed
in its intended normal operating position and they have been gi-
ven supervision or instruction concerning use of the appliance in
a safe way and understand the hazards involved. Children aged
from 3 years and less than 8 years shall not plug in, regulate and
clean the appliance or perform user maintenance.
•CAUTION — Some parts of this product can become very hot
and cause burns. Particular attention has to be given where
children and vulnerable people are present.
• Make sure that your supply rating corresponds to what specied
on the rating plate: 230V~, 50Hz.
•This heater is water resistant to IPX4. It can therefore be used
in bathrooms or other areas subject to humidity AS LONG AS IT

Feel good through the warmth created from electricity - www.technotherm.de
Manual Rapid Heater DTH
Feel good through the warmth created from electricity - www.technotherm.de
GB
IS NOT INSTALLED WITHIN THE PERIMETER OF BATH TUBS
OR SHOWERS. This means that it cannot be installed in the are-
as marked as VOLUME 1 in picture 1.
•During function, place the heater in a safe position:
- at least 1m far from inammable objects or furnitures;
- leaving not less than 1m of free space in front of the heater;
- not located immediately below a socket-outlet.
•Do not leave animals or children touch or play with the appliance.
Pay attention! The air outlet grille gets hot during operation (more
than 90°C)
•WARNING: In order to avoid overheating, do not cover the
heater. Do not hang anything on the heater and do not cover it
while it’s working. This is clearly written on the cover of the pro-
duct or shown by the symbol
•Do not use the heater in rooms with explosive gas or while using
inammable solvents or varnish or glues.
•If the cordset is damaged and you have to change it, do not do
the job yourselves! Take the product to an after sales authorised
repair centre or to a person with similar skill and knowledge, in
order to avoid any risk of danger.
•The appliance must be positioned so that the plug is always ac-
cessible.
•Do not mount the product on walls made of synthetic material.
2. Wall mounting
• Only x the heater in vertical position with the air outlet grid downward;
• This heater is tted with a double electrical insulation circuit (class II) and therefore does not require an earth
connection.
• This heater must be correctly installed in compliance with the regulations in force in the country of installation.
• In wet spaces like bathrooms or kitchens, the connection terminal must be installed at least 25 cm above the
oor. The electrical connection to the power supply must also be tted with a two-pole switch with a minimum
gap between the contacts that allows complete disconnection according to excess voltage III category conditions.
• To choose the best installation position please consider that the sensor is able to detect movements in the areas
shown in picture 2. Place the heater in the best position to detect people inside the room and to be clear from
any object that may interfere with the sensor's beam. Detection is more efcient when people move in front of
the product instead towards it.
• Always make observe the minimum distances from walls, furniture and/or objects, as indicated in picture 3. Never
install the product so that the distance between the oor and the lower side of the product is less than 600 mm:
- Drill three 6 mm diameter holes in the wall, as shown in picture 4

Manual Rapid Heater DTH
Feel good through the warmth created from electricity - www.technotherm.de
GB
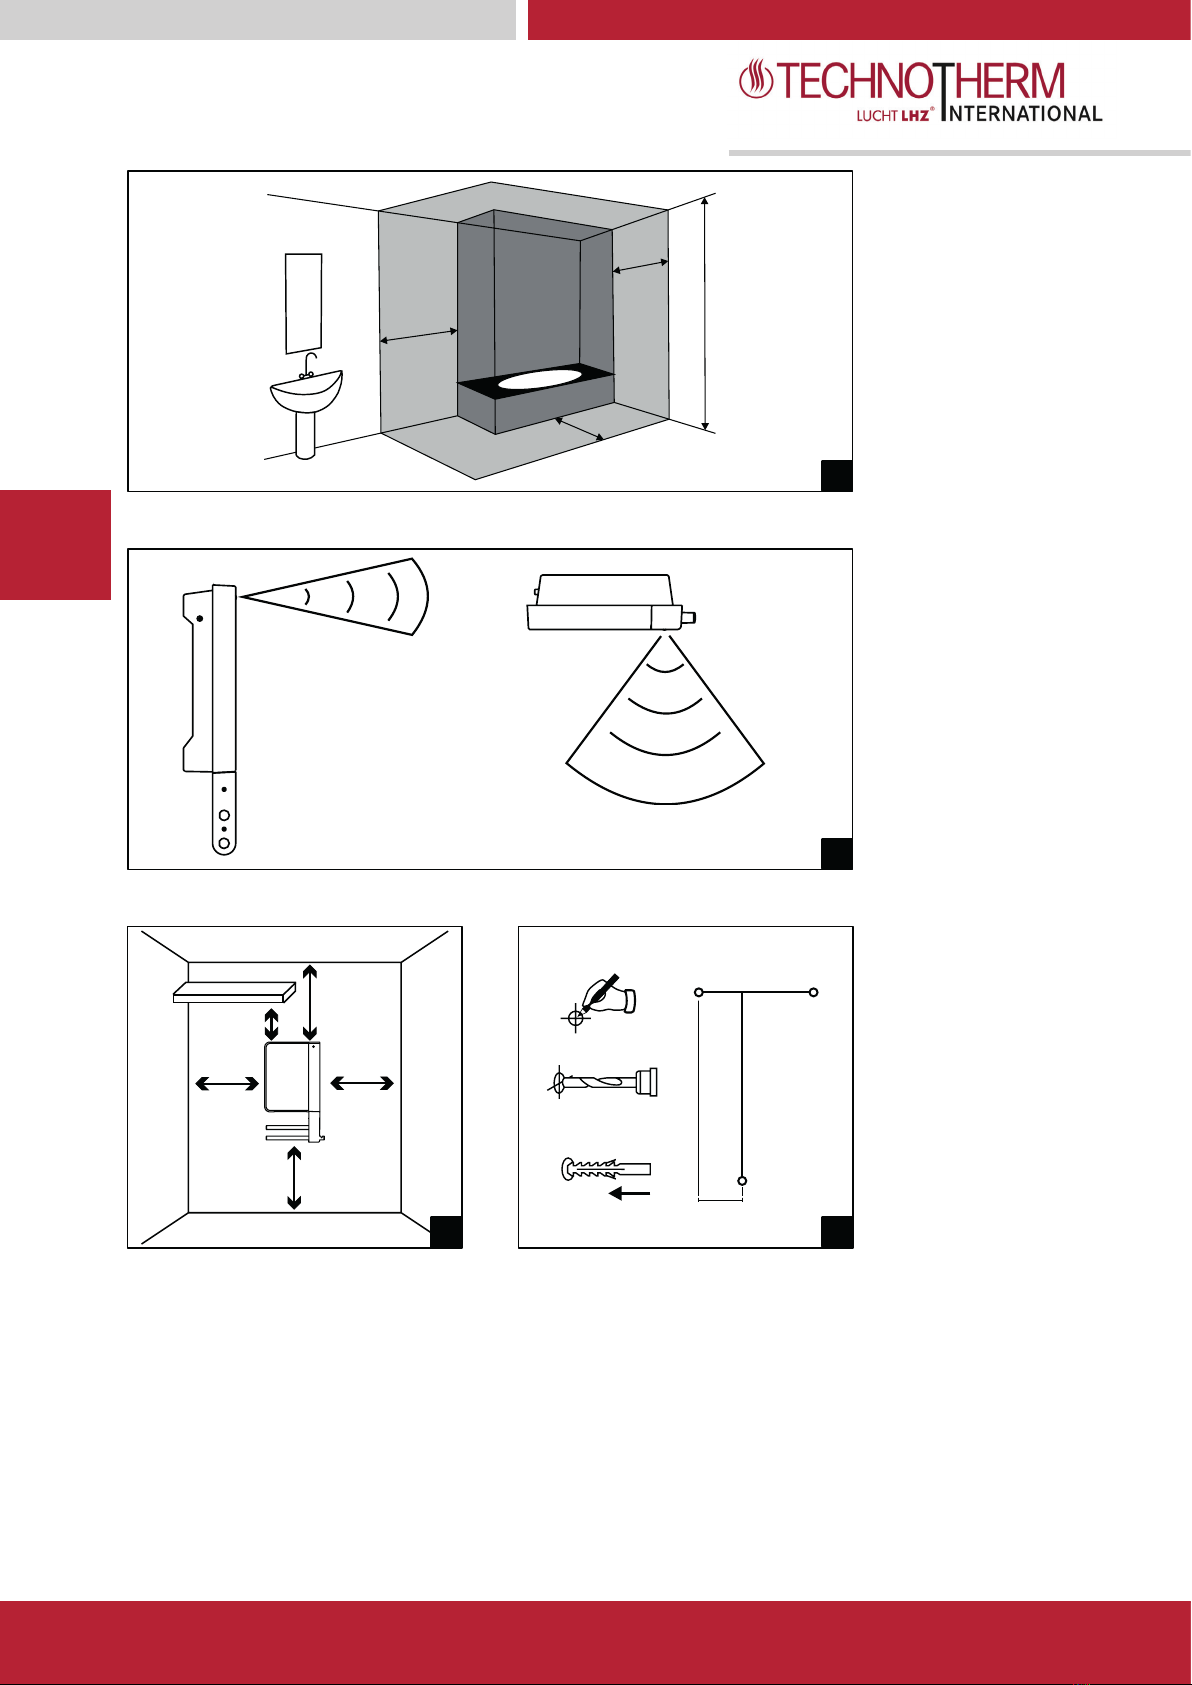
- Insert the three wall plugs supplied with the product
- Insert the 2 upper screws, contained in the same bag, taking care to leave a distance of 8 mm between the
head of the screws and the wall;
- Gripping the heater rmly, hook it onto the two screws; CAUTION! Before releasing the heater make sure
it is attached to the 2 screws.
- Then secure the product with the lower screw.
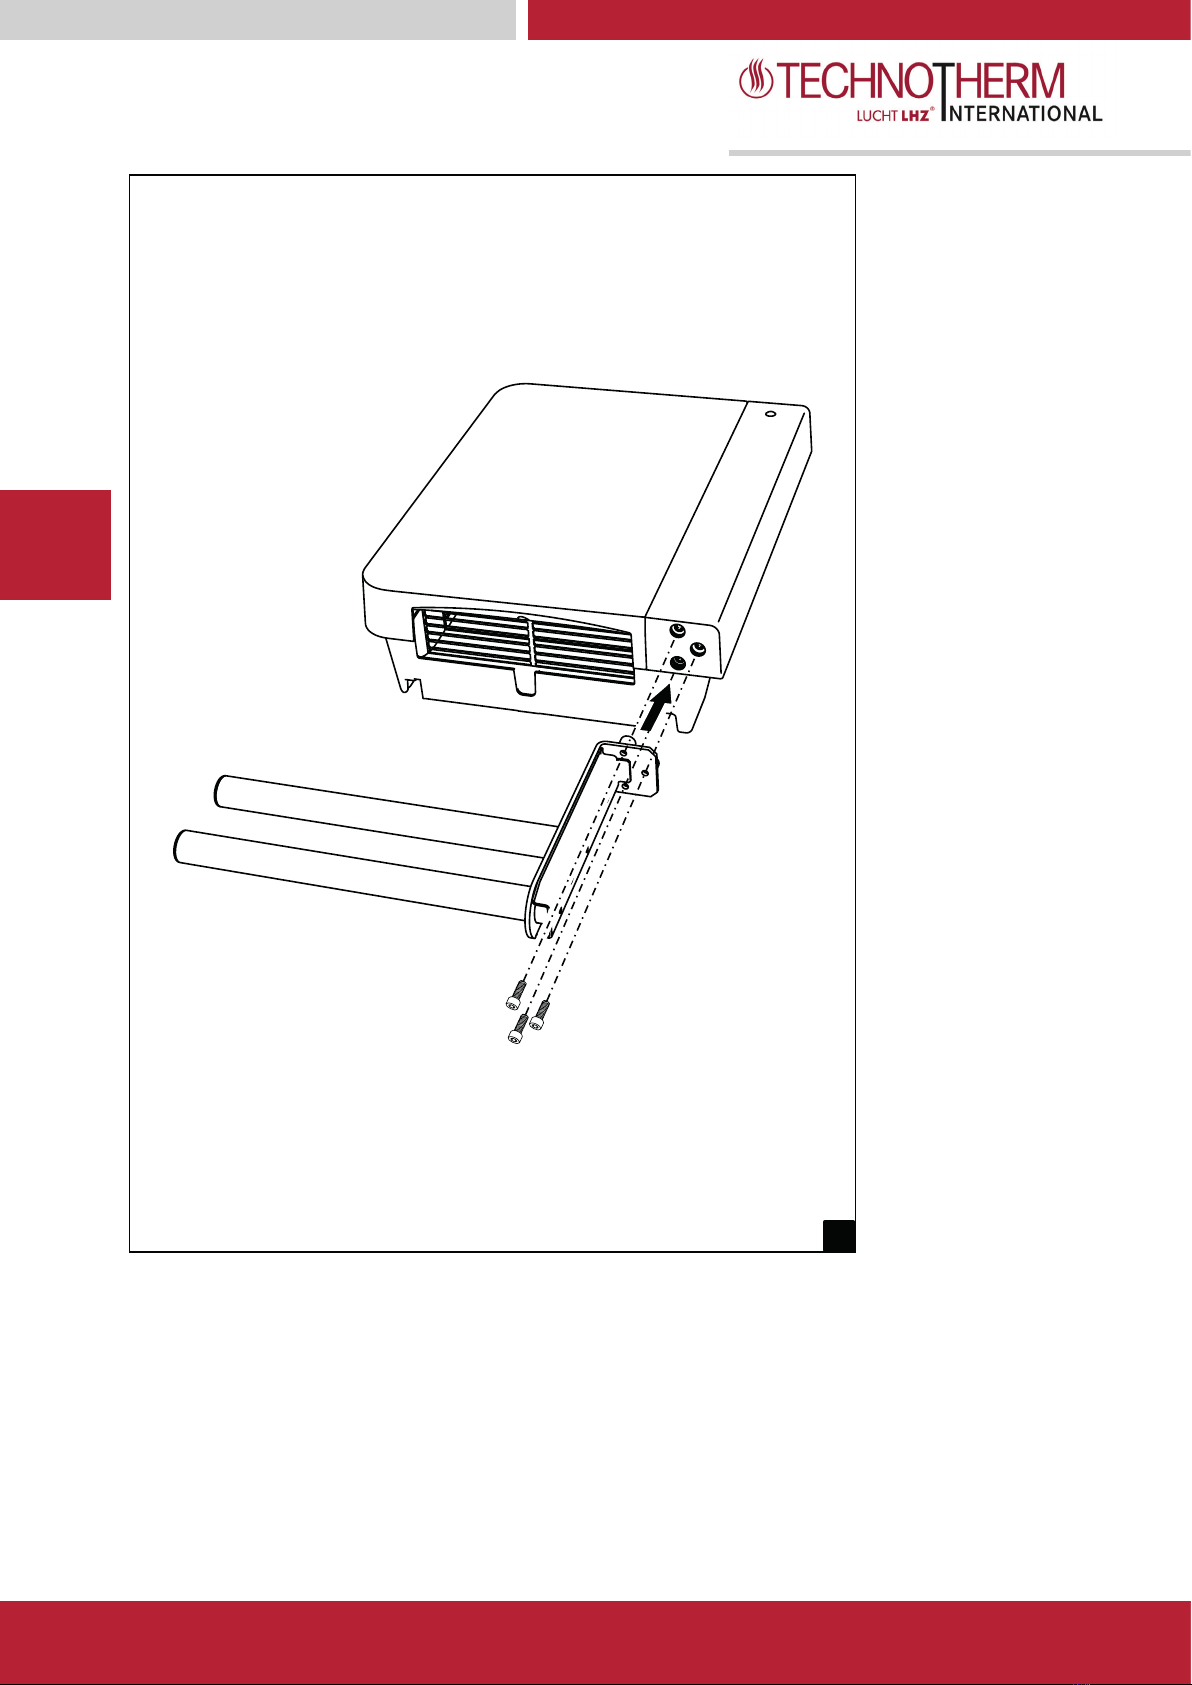
3. toWels holder (on applicable versions)
• Before installing the wall-mounted fan heater it is necessary to x the towel bar supplied separately from the
product. To this purpose:
- Remove the 2 plastic covers as shown in picture 5;
- Fasten the bar to the fan heater with the 3 screws supplied as shown in picture 6;
- Replace the 2 plastic covers as shown in picture 7;
- Fix the plastic covers using the 2 supplied screws as shown in gure 7.
• Please do not push or embed towel close to the air outlet grid (picture 9) but place them as shown in picture 8.
4. Filter
• This product is tted with a lter to protect the heating element from dust and dirt.
• The lter is removable to be easily cleaned with water (picture 10).
• To keep the heater in perfect condition, clean the lter once every six months REMEMBERING TO PUT IT BACK
AGAIN AFTERWARDS.
• Every 120 working hours, the user is notied of the need to clean the lter on the back of the product. The warning
is given in the form of a running message on the display:
" CLEAn FILtEr - PULIrE FILtro "
.
• Even when the display is showing the message above, the product goes on working in the mode active when
the notication appears.
• If any key is pushed the text is removed from the display and the built-in counter is reset.
5. command description and Functioning
• The heater is tted with a double pole electromechanical ON/OFF switch on its left side. Switching off the product
the supply voltage is disconnected from all the internal components.
• The following controls are available on the front panel (picture 11):
A - Presence Sensor
B - Anti-freeze mode LED indicator
C - Eco mode led indicator
D - Comfort mode led indicator
E - Open window detection LED indicator
F - Display
G - Boost function
H - Ok/conrm
I - Show and increase
J - Show and decrease
K - Mode
L - Menu
M - Stand-by
This fan heater features a presence sensor and an automatic power management function.
The presence sensor allows a reduced energy consumption, lowering automatically the ambient temperature when no
presence is detected in the room for at least 10 minutes. Once someone is detected, Windy comes automatically back
to the set comfort temperature. The automatic electronic power selection, instead, manages the consumption through
an accurate and comfortable regulation keeping constant the selected temperature - according to what has previously
been set on the electronic thermostat.

Feel good through the warmth created from electricity - www.technotherm.de
Manual Rapid Heater DTH
Feel good through the warmth created from electricity - www.technotherm.de
GB
The product can be used choosing between 4 different operating modes:
- ANTI-FREEZE
- PROGRAMMED
- AUTOMATIC
- BASIC
Anti-freeze mode
The thermostat is set to keep 7 ± 3 ° C. The function is activated manually or automatically when no presence in the
room is detected for at least 36 hours. In this case, as soon as a presence is detected again, the product will automa-
tically set the automatic mode.
Programmed mode
The product can be programmed by selecting, for each day of the week, which of the 5 preset proles you want to use.
During all the operating time in programmed mode, the presence sensor is deactivated so that the product can correctly
follow the temperature prole set by the user.
In Programmed mode there is also a special function - which can be activated at the user's choice - allowing the detec-
tion of the eventual opening of a window and switching to the Anti-freeze mode to minimize energy waste.
Automatic Mode
The product is set to work at a comfort temperature whenever someone is detected in the room. Should no one be
detected in the room for at least TEN minutes, the heater will automatically set the Eco mode (3,5°C less than the set
Comfort temperature). Should no one be detected in the room for more than 36 hours, the heater will automatically set
the Anti-freeze mode (7°C). In case someone should be detected again for at least 2 minutes, the product will automa-
tically increase the temperature to the comfort level.
In automatic mode is also available a special feature, which is activated at user’s choice, which allows to detect the
possible opening of a window and to switch to the Anti-freeze mode to minimize energy waste.
Basic Mode
The product works in Comfort mode. The presence detection is disabled and doesn't affect the set temperature as in
Automatic mode.
In Automatic mode is also available a special feature, which is activated at user’s choice, which allows to detect the
possible opening of a window and to switch to Anti-freeze mode to minimize energy waste.
6. using the Fan heater
MAIN ON/OFF SWITCH
(placed on the left side of the product)
The power supply of the product is controlled by an electromechanical ON/OFF switch. Switching off the fan heater will
cut off the power to the electronic board causing - after 30 minutes of power supply absence - the loss of every stored
information. We recommend to use this switch only when you are not using the product for long periods. Instead, it is
possible to use the on/stand-by key for any short-term interruption, so that no stored setting will get lost.
At rst use of the product or in case of over 30 minutes power loss, when the product turns on the display shows 00:00
and begins counting the time starting from this value.
Should no adjustment be made within 15min after power up, the product will automatically switch to Anti-
freeze mode with the lighting up of the corresponding LED light.
ON/OFF

Manual Rapid Heater DTH
Feel good through the warmth created from electricity - www.technotherm.de
GB
STAND-BY BUTTON
Use the button to switch On or set in Stand-by the product. When ON is pressed the set working temperature
LED lights up.
Example of activation in Comfort.
MENU BUTTON
The button allows access to the product settings - time, day, weekly program and open window detection
adjustment.
Time setting
Hour
Activate time display/change
by pressing the button until the word "Hour" appears.
After 3 seconds:
00
:
00
The 2 digits representing
the hour blink
Select the current hour
by using the or
key
Press the OK key
to conrm
21
:
00
The 2 digits representing
the minutes blink
Select the current minu-
tes by using the or
key
Press the OK key
to conrm
Day of the week setting
dAY
Activate day of the week display/change
by pressing the button until the word "dAY " appears.
After 3 seconds:
Mo
The 2 digits representing
the day blink
Select the current day
by using the or
key
Press the OK key
to conrm

Feel good through the warmth created from electricity - www.technotherm.de
Manual Rapid Heater DTH
Feel good through the warmth created from electricity - www.technotherm.de
GB
Weekly program setting
The programming function allows you to choose - for each day of the week - one of the following three preset operating
program:
0h 6h 12h 18h 24h
Comfort
Eco
P1
0h 6h 12h 18h
24h
Comfort
Eco
P2
0h 6h 12h 18h
24h
Comfort
Eco
P3
0h 6h 12h 18h
24h
Comfort
Eco
P4
0h 6h 12h 18h 24h
Comfort
Eco
P5
ProG
Activate programming display/change
by pressing the button untile the writing "ProG" appears.
After 3 seconds:
Mo
:
P1
The 2 digits representing
the rst day blink
Select the day by using
the and keys
Press the OK key
to conrm
Mo
:
P1
The 2 program digits
blink
Select the desired pro-
gram by using the
and keys
Press the OK key
to conrm
Mo
:
P1
The 2 digits representing
the selected day blink
again to proceed with
selecting another day
Select the day by using
the and keys
Press the OK key
to conrm
Tu
:
P2
The 2 program digits
blink
Select the desired pro-
gram by using the
and keys
Press the OK key
to conrm
Proceed like this for all the days you wish to view and/or modify.

Manual Rapid Heater DTH
Feel good through the warmth created from electricity - www.technotherm.de
GB
E
nd
At the end of the procedure, after the last day - Sun-
day - is displayed, press the button again allows
to terminate the programming. The message "End"
appears on the display.
At any time it is possible to exit by pressing the key
to save your changes.
Press the OK key
to exit the program-
ming
Open window detection
This function makes it possible to detect an open window and automatically activate the Anti-freeze operating mode.
When the function is enabled and ready a LED lights up under the corresponding icon.
The simultaneous lighting of the LED lights under the Anti-freeze and window symbols indicates that an open window
has been detected and the Anti-freeze mode has been automatically set.
The reset of the normal functioning is not automatic but is achieved by pressing one of the product buttons.
Correct operation of this function may depend on where the radiator is positioned in the room, the presence
of draughts, the outside temperature, and how long the window remains open.
OPEn
Activate open window detection function display/change by pressing the
button until the writing "OPEn Uindou" appears
OP
En
The writing scrolls on
the display
Press the OK key
to view the function
status
YES
"YES" indicates the
function is active
Activate or deactivate
the function by using the
and keys
Press the OK key
to conrm
NO
"NO" indicates the fun-
ction is deactive
Activate or deactivate
the function by using the
and keys
Press the OK key
to conrm

Feel good through the warmth created from electricity - www.technotherm.de
Manual Rapid Heater DTH
Feel good through the warmth created from electricity - www.technotherm.de
GB
MODE BUTTON
Pressing the button allows to select one of the 4 operating modes described in paragraph 5.
FroS
ANTI-FREEZE mode
The thermostat temperature is automatically set to 7 ±
3 ° C.
The LED light corresponding to the Anti-freeze mode
lights up.
In this mode the open window detection function is di-
sabled.
ProG
PROGRAMMED mode
The fan heater reaches and keeps the temperature set in
the weekly program (MENU button).
The LED light corresponding to the Comfort or Eco mode
lights up according to the settings for the current time and
day.
In this mode the open window detection function can be
enabled or disabled using the MENU button ( "OPEn Uin-
dou" setting).
Auto
AUTOMATIC mode
The fan heater reaches and keeps the Comfort tempera-
ture and automatically switches rst to the Eco and then
to the Anti-freeze mode when no presence is detected.
The LED light corresponding to the Comfort, Eco or Anti-
freeze mode lights up according to the information recei-
ved by the presence sensor.
In this mode the open window detection function can be
enabled or disabled using the MENU button ("OPEn Uin-
dou" setting).
BASE
BASIC mode
The fan heater reaches and keeps the Comfort tempera-
ture by deactivating the presence sensor.
The LED light corresponding to the Comfort mode lights
up.
In this mode the open window detection function can be
enabled or disabled using the MENU button ("OPEn Uin-
dou" setting).

Manual Rapid Heater DTH
Feel good through the warmth created from electricity - www.technotherm.de
GB
SELECTION BUTTONS
Selection buttons are used within the menus to display and/or set the several customizable parameters as shown in
the various sections of this manual.
You can check the set Comfort temperature at any time by pressing a single time the or key. A further pression
will modify the set temperature.
Note: The temperature measured by the inner sensor of the product is representative of the ambient temperature
nearby it and it may differ from the temperature measured using other instruments in other areas of the room. That
difference may depend on many factors including, for example:
- the installation position: some areas of the room may be affected by drafts or hot air sacs that modify the sensor
measurement;
- an external wall xation: it may imply a temperature measurement lower than the real room temperature;
- an excessive towels load on the support bar may obstruct the airow. As a result the sensor may measure a tempe-
rature higher than the real room temperature;
- unstable conditions: any evaluation must be done in stable working conditions. For this purpose Comfort temperature
should be changed only 60min after a previous change. In fact, it is not possible to evaluate if the room temperatu-
re is correctly maintained by the product when the Comfort temperature gets repeatedly changed in a short time.
If the difference between set temperature and room temperature is detected in stable working conditions, measure the
difference and then increase or decrease the comfort temperature on the product of the exact measured difference
value.
OK BUTTON
The OK button is used in the various menus to conrm the chosen settings.
BOOST BUTTON
The Boost button allows to activate the timed operation for 15 minutes at maximum power without the thermostat
control. During this operation the display shows alternately the word "BooS" and the remaining time. At the end of this
forced operation, the fan heater returns to the previous operating mode.
7. troubleshooting
• In the event of overheating, the safety device on the appliance automatically disabled the heating elements and
motor. In this case:
-Turn off the fan heater and allow it to cool down for about 15/20 minutes.
- Make sure the dust lter is not totally obstructed and clean if necessary. Remember to put it back again
afterwards.
- Eliminate any other possible reasons for overheating (e.g.: obstructions in front of the air inlet/outlet grilles,
build-ups of dirt).
-Turn on the fan heater again and check its correct functioning.
• If the touch control commands are blocked or don't answer properly to digital pressure, turn off the heater for at
least 30sec using the electromechanic switch on the left side of the heater. Then turn on the heater using the
same switch.
8. maintenance
• This product does not require any special maintenance.
• Clean the product with a dry cloth at least once every 6 months.
• If the product requires repairing, contact an authorised technical service centre.
• When replacing the power cable, use a 2x1,00mm2H05VV-F <HAR> type. This operation must be performed
by qualied personnel and never by the user in order - in order to avoid product damages and safety hazards.
9. legal notice
Environment and recycling
To prevent the product from being damaged during transport, it has been carefully packed. To contribute to
environmental protection, we ask you to dispose of the packaging material properly.
Recycling of obsolete appliances
Appliances with this label must not be disposed off with the general waste. They must be
collected separately and disposed off according to local regulations. Used appliances disposal must be
carried out carefully and in accordance with local waste disposal regulations.

Feel good through the warmth created from electricity - www.technotherm.de
Manual Rapid Heater DTH
Feel good through the warmth created from electricity - www.technotherm.de
GB
TECHNOTHERM Service
Fon: +49 (0) 911 93 78 32 10
TECHNOTHERM a brand of Lucht LHZ GmbH & Co. KG
Reinhard-Schmidt-Str. 1 | 09217 Burgstädt - Germany
Telefon: +49 (0) 3724 66869 0
Telefax: +49 (0) 3724 66869 20
info@technotherm.de | www.technotherm.de
Errors and technical changes reserved. Dimensions without guarantee! Edion 09/18
Information requirements for electric local space heaters
Model identier(s): DTH
Item Symbol Value Unit Item Unit
Heat output Type of heat input, for electric storage local space heaters only (select
one)
Nominal heat
output Pnom 1,8 kW manual heat charge control, with integrated thermostat no
Minimum heat
output (indicative) Pmin 1,0 kW manual heat charge control with room and/or outdoor
temperature feedback
no
Maximum
continuous heat
output
Pmax,c 1,8 kW
electronic heat charge control with room and/or outdoor
temperature feedback
no
Auxiliary electri-
city consum-
ption
fan assisted heat output no
At nominal heat
output elmax 0,000 kW Type of heat output/room temperature control (select
one)
At minimum heat
output elmin 0,000 kW single stage heat output and no room temperature control no
In standby mode elSB 0,00053 kW Two or more manual stages, no room temperature control no
with mechanic thermostat room temperature control no
with electronic room temperature control no
electronic room temperature control plus day timer no
electronic room temperature control plus week timer yes
Other control options (multiple selections possible)
room temperature control, with presence detection yes
room temperature control, with open window detection yes
with distance control option no
with adaptive start control no
with working time limitation no
with black bulb sensor no
Contact details Technotherm – Reinhard- Schmidt- Str. 1 – 09217 Burgstädt - Germany
This manual suits for next models
3
Table of contents
Other LUCHT LHZ Heater manuals

LUCHT LHZ
LUCHT LHZ Technotherm International CPH 1000 User manual

LUCHT LHZ
LUCHT LHZ TechnoTherm CHM Series User manual

LUCHT LHZ
LUCHT LHZ VPN Series User manual

LUCHT LHZ
LUCHT LHZ Technotherm TTB-E Duo+ Safety guide

LUCHT LHZ
LUCHT LHZ TECHNOTHERM VPS User manual

LUCHT LHZ
LUCHT LHZ TECHNOTHERM VPS Series User manual

LUCHT LHZ
LUCHT LHZ TechnoTherm CHM 500 E User manual

LUCHT LHZ
LUCHT LHZ Technotherm TTS 200 User manual

LUCHT LHZ
LUCHT LHZ TECHNOTHERM TTB-E Duo+ Series Safety guide