manuals.online logo
Brands
  1. Home
  2. •
  3. Brands
  4. •
  5. Luci
  6. •
  7. Lighting Equipment
  8. •
  9. Luci SHIN FLEX Indoor User manual

Luci SHIN FLEX Indoor User manual

14/09/2023
The following is the safety cautions to prevent any harms or damages to others.
If the product is used against cautions, it may cause damage, electric shock, smoke, or re.
Safety Cautions
Electrical work certicate is needed to install and inspect this product.
Please ask electrician for the installation.
Important notice for storage
Observe the storing temperature of our LED xtures: 0 °C to 55°C
Please do not store the carton or the packages of our LED xtures
in the following conditions:
- wet location- places of high humidity
- places with much litter or dust
- places exposed to sun light directly
- places with solvent such as a paint liquid is stored or volatile materials are
volatilized.
During storing period, please do not put the cartons or individual packages
vertically.
Please do not open individual package until just before installing LED xtures
to avoid any damage to the LED xtures.
Please do not place heavy object on the carton.
Please do not use our LED xtures as the working light during construction
period.
Do not place a ammable object such as a cloth or a paper or an insulating
material on top of the xture or cover it with such a material. It may cause
the LED xture not to turn on or re.
Do not put a piece of metal or a ammable in clearance of the LED xture.
Do not place or install LED xture in close contact with other electric equipment
in or out of ceiling area to prevent fall, electric shock or re caused by vibration
from electric equipment.
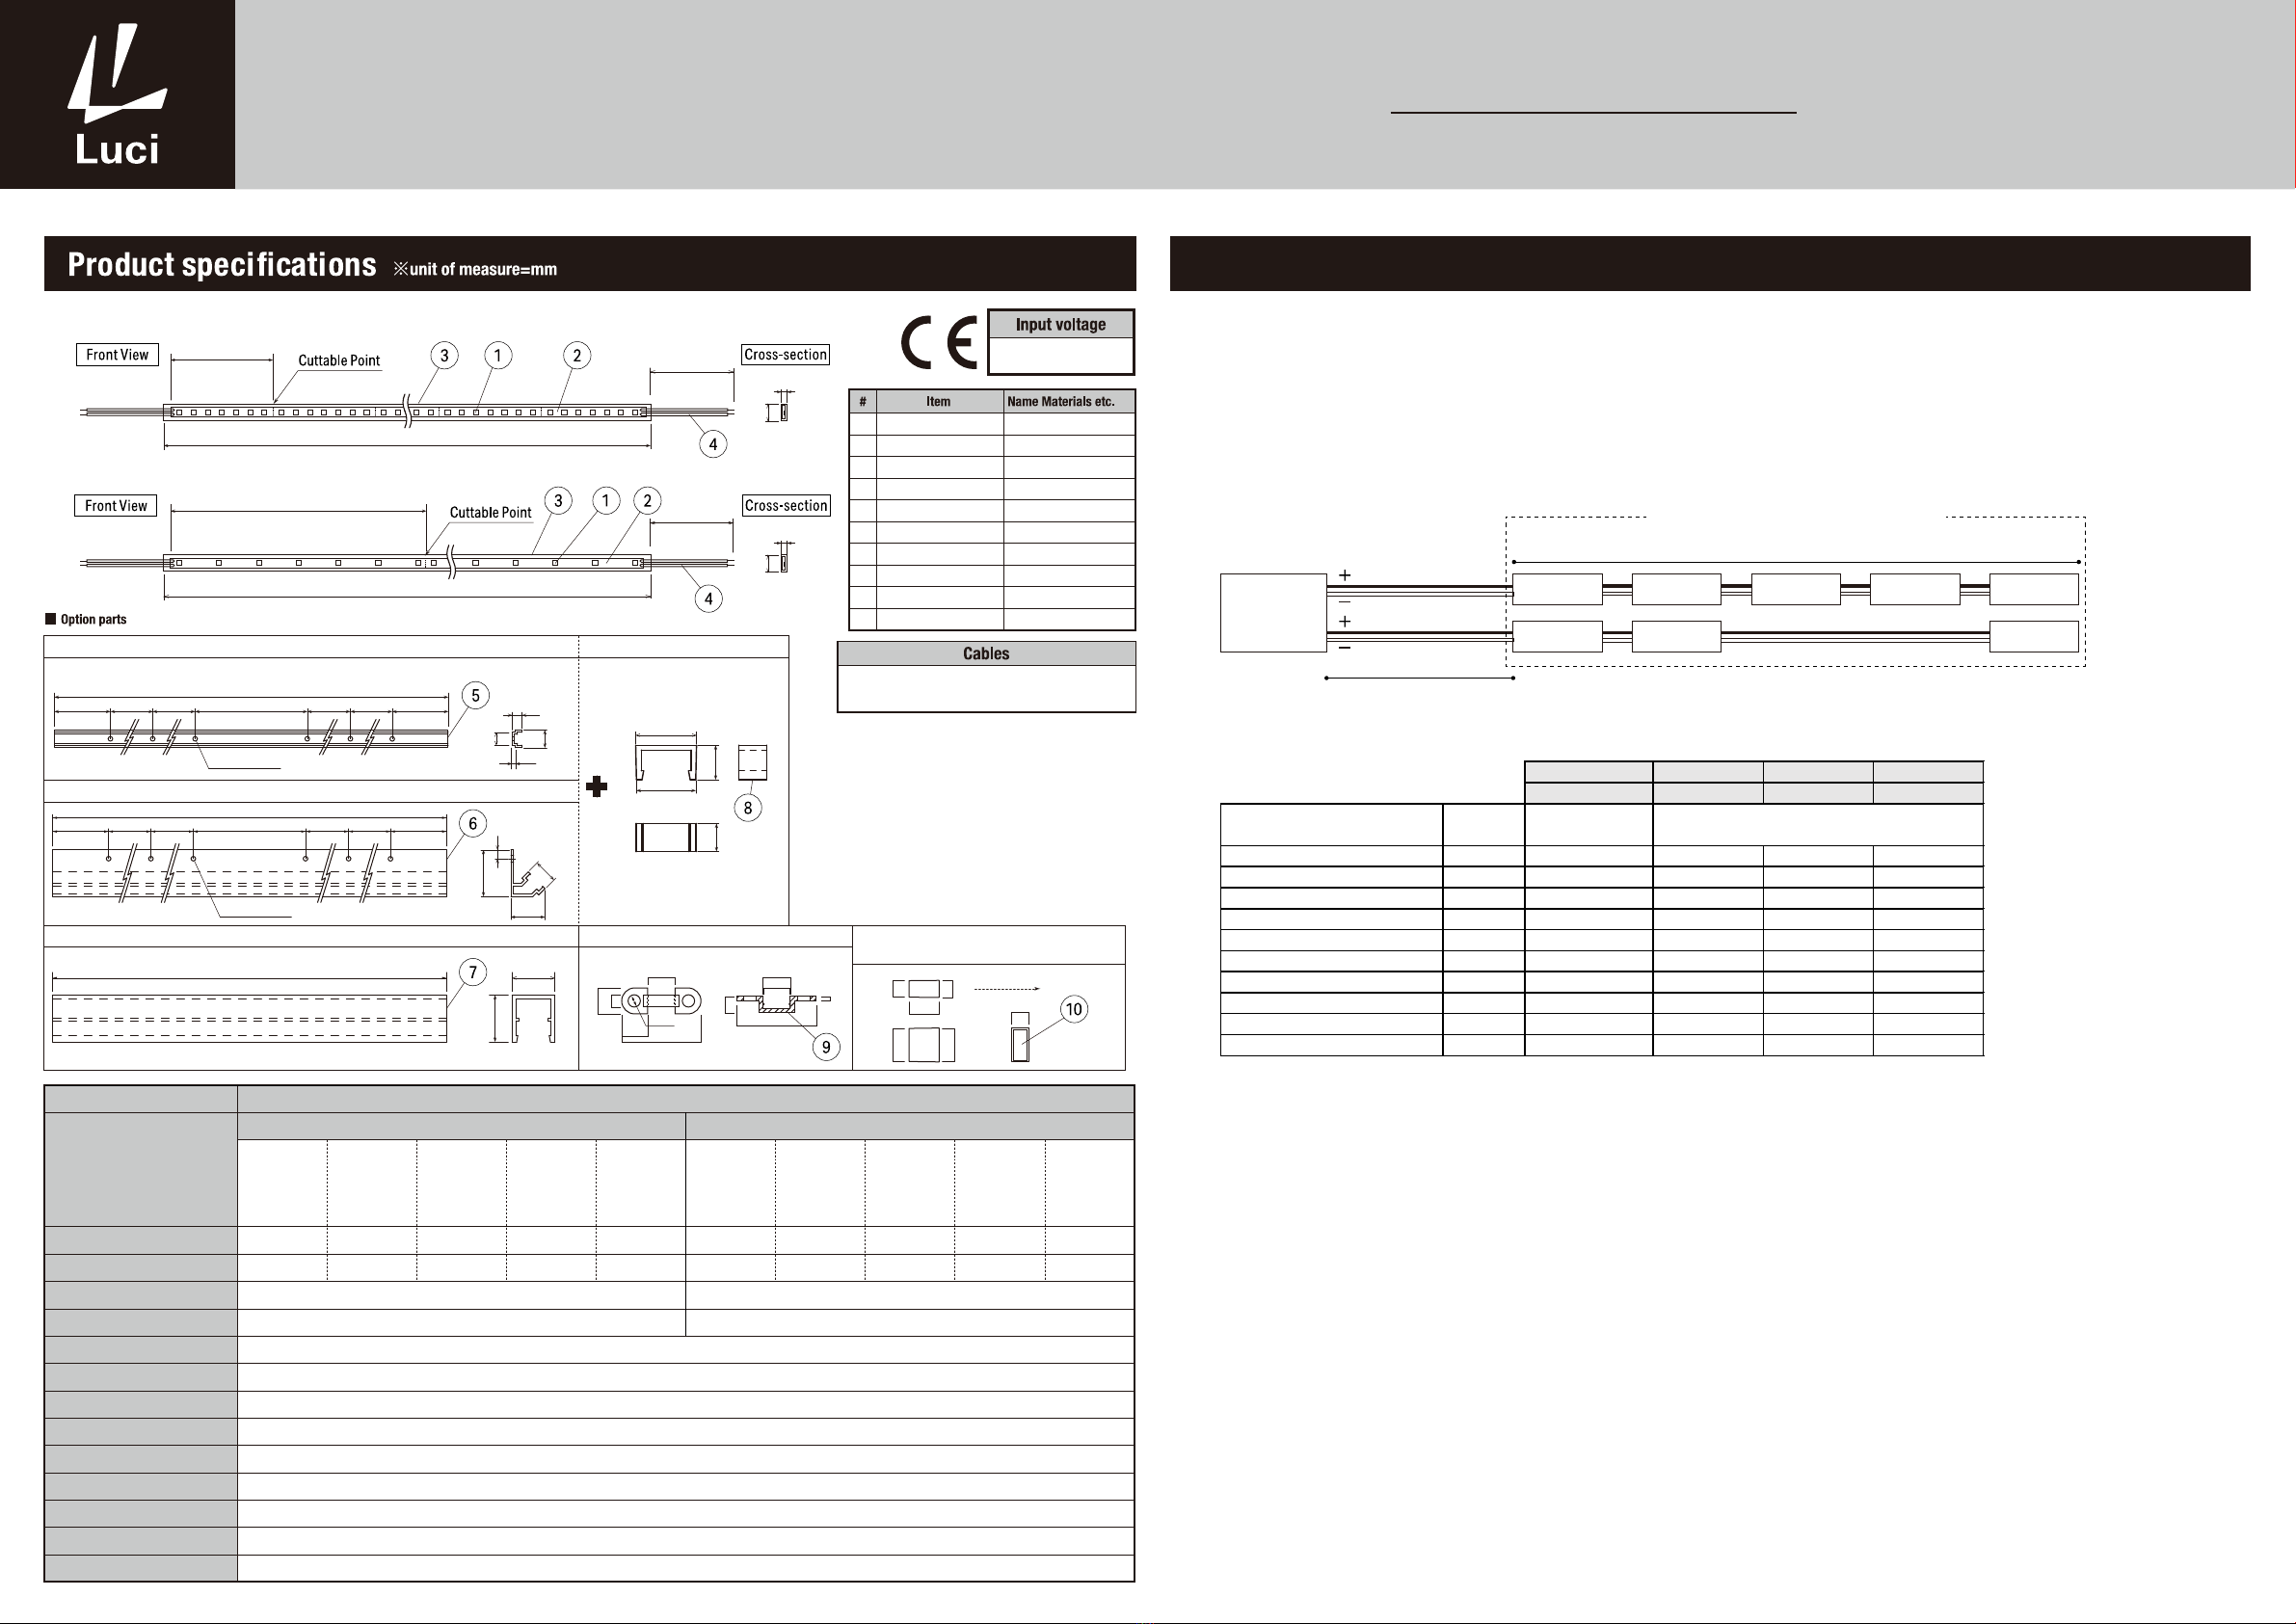
When this product is cut, please use endcaps to ensure
proper protection of the LED xture against dirt and moist.
Plesase use DC24V power supply.
Do not use other power supplies such as AC220〜240V.
Please tum off allthe powers when installation and inspection.
Do not connect or disconnect the lead wires with its power on.
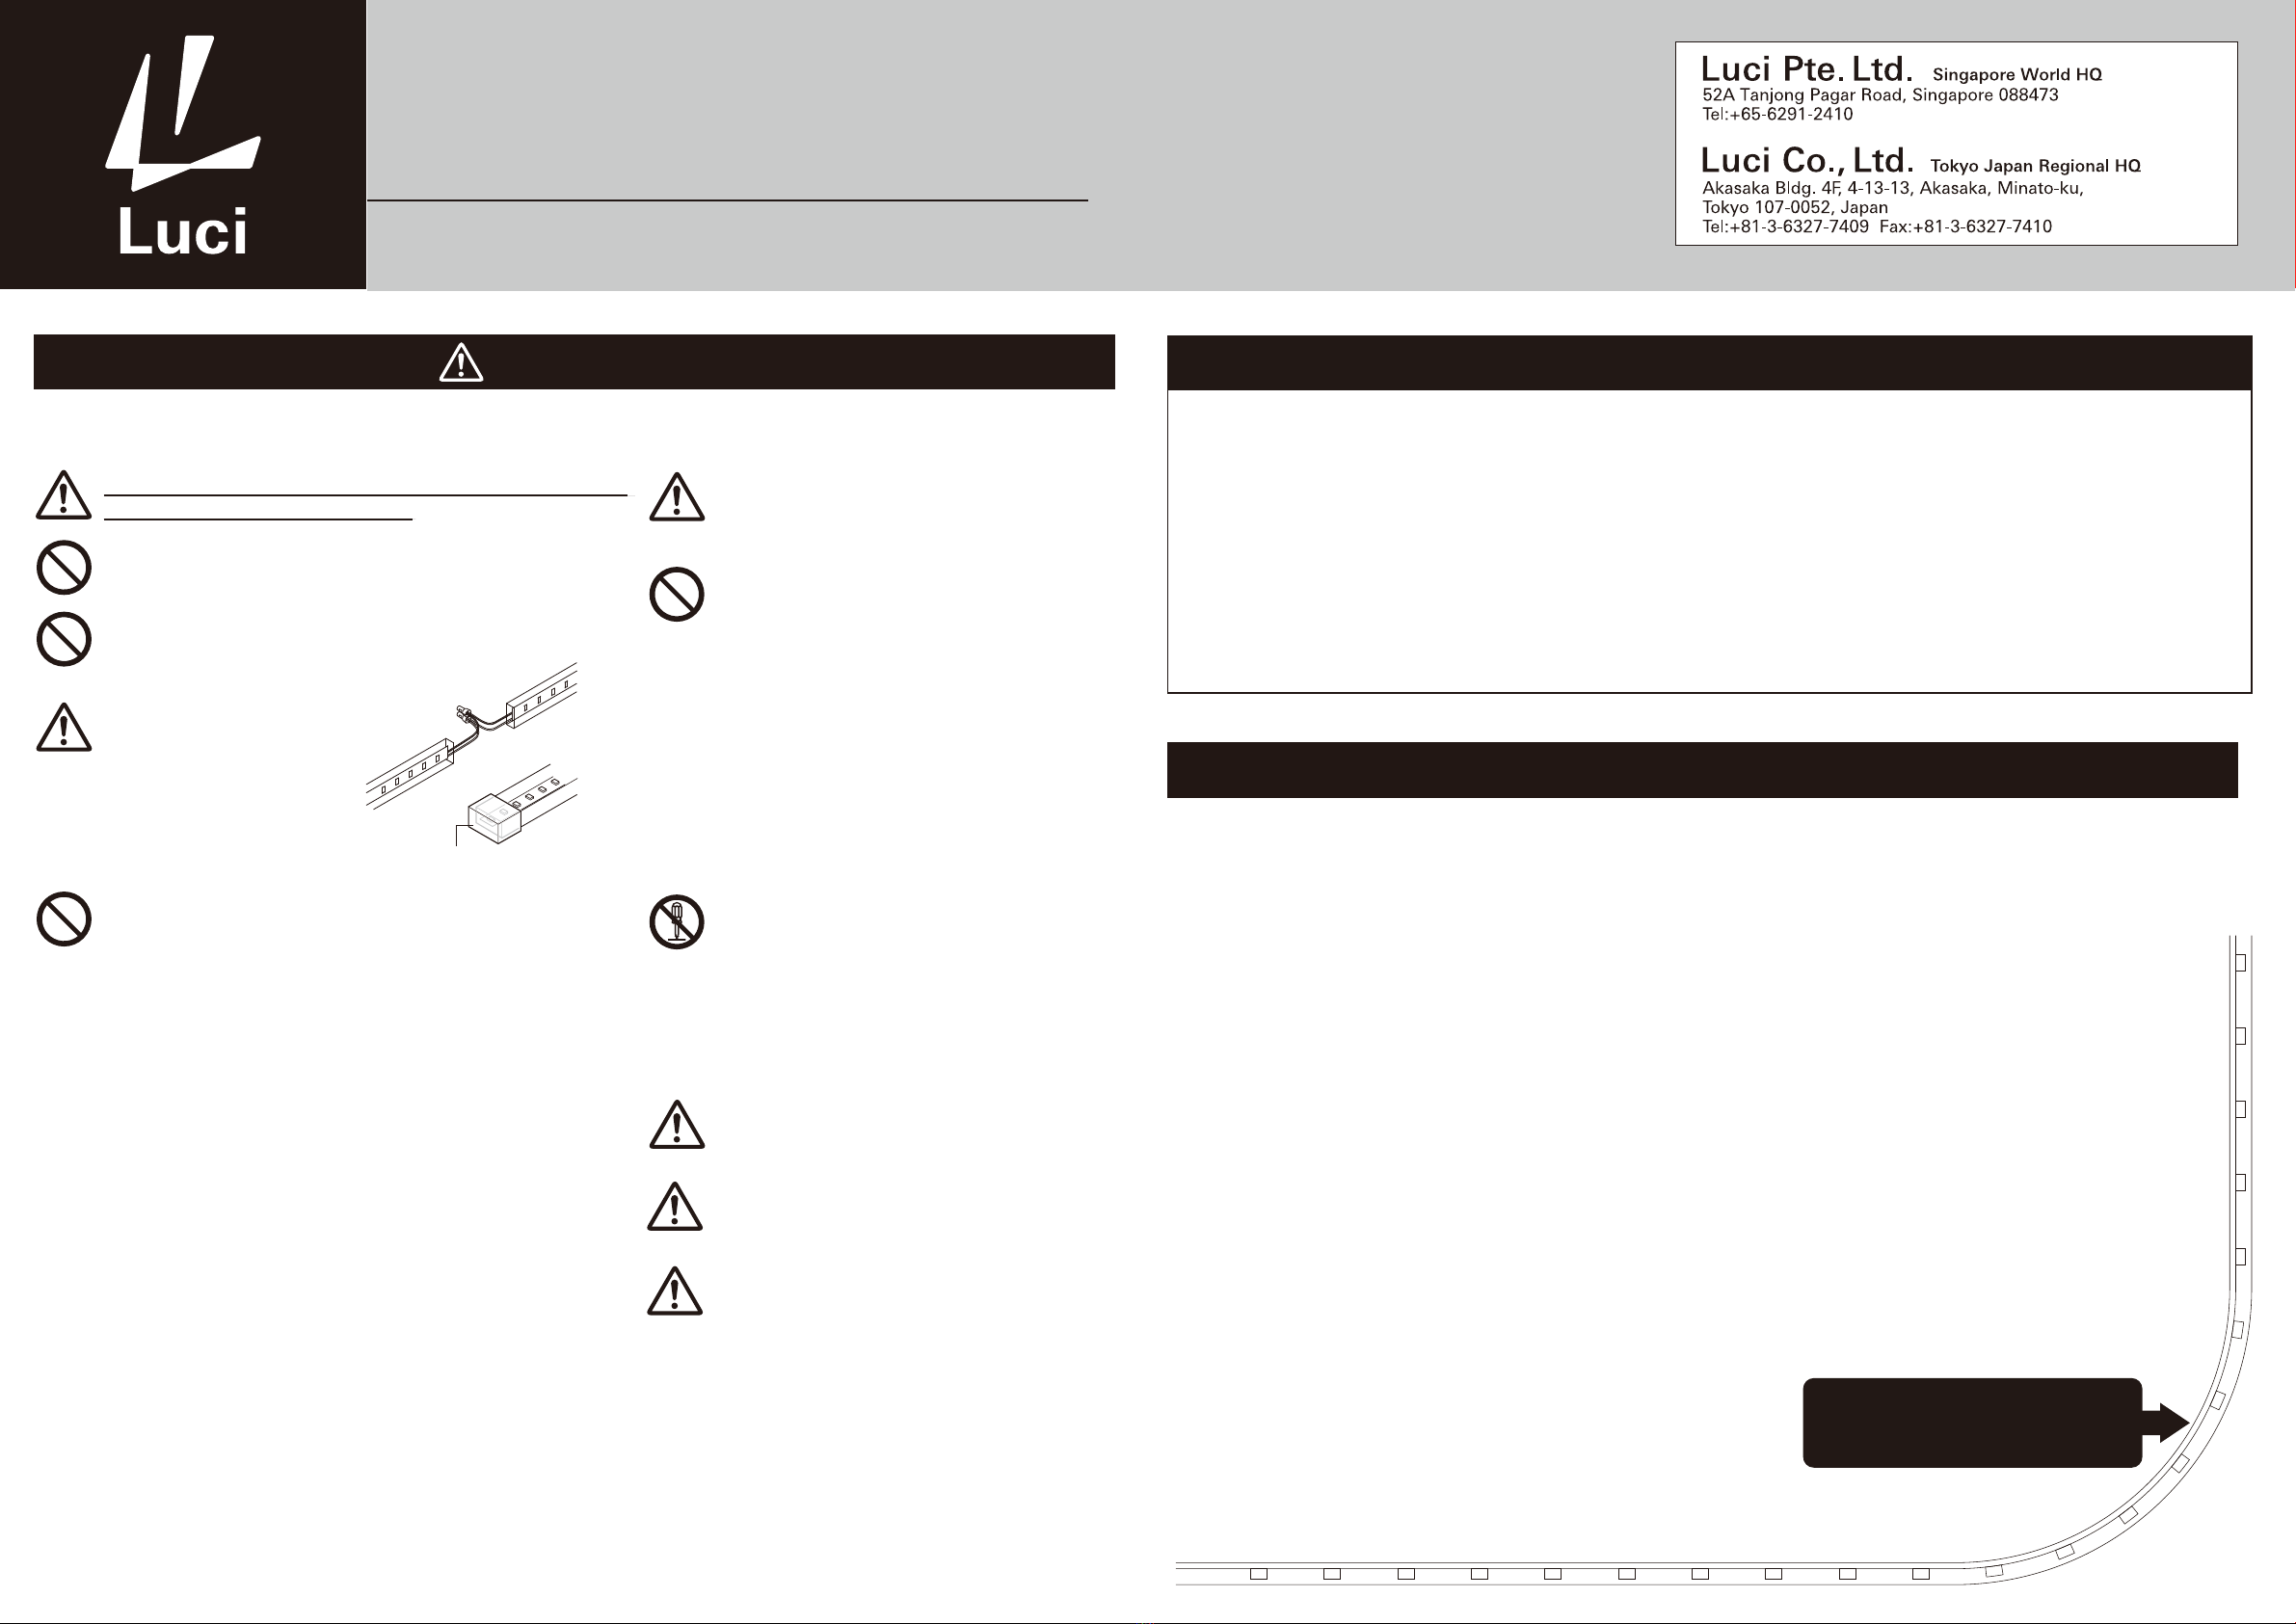
End cap (Sold seperately)
If the charges are in wrong direction,
electric resistances will become
hot and lighting will be destroyed.
Please connect the lead wires
with same color and insulate
with sleeverinsulation tapez.
shrinkage tube
This product is indoor use only.
Do not use in the following environments:
- A location at high temperature(+35℃or higher)
(usage emvironment temperature is 0℃ to +35℃).
- A location with high humidity.
- A dusty lovation.
- A location with corrosive or infammable gasses.
- A location where the product is exposed to direct sunlight.
- A highy airtight location.
- A location where the prosuct is directly exposed to salt water or
organic solvents.
- A location subject to the effects of electric or magnetic elds.
- A location subject to intense vibration or shock, or a location
subject to continuous vibration.
Please do not do the followings to the product.
- Cut where there is no cut-mark
-Forcibly remove the product after mounting.
- Disassemble, modify or add holes to the product.
- Forcibly pull or twist the product.
- Press down on the product.
- Drop the product or subject the product to intense vibration
or shock.
- Bend or fold beyond the minimum bending radius of 50mm
When there is abnormal situations, please cut off the power
immediately, consult with electricians,and do not touch
the LED xture with hands.
●For safety, do not directly view the LED light source.
● The minimum allowable bend range of this lamp tting is R 50 mm.
  This means that the lamp tting can be bent at most to a circle of diameter 100 mm.
 See the illustration in the lower right.
● When the air temperature is low, the lamp tting may become stiff.
  Forcibly bending the tting may cause damage. In this situation, it is recommended that you connect the lamp tting to the power supply, turn on the light, wait until it warms
up, and then bend.
●When handling the product, take care not to bend or twist it.
 This may cause malfunctioning. When mounting on a ceiling, under a shelf, or on a wall, mount tightly with no looseness or sagging.
● Use a mounting rail (option) to mount the lamp tting in the mounting position.
●To mount the mounting rail in the mounting position, use mounting clips (option) and screws (commercially available).
●If you are using an instantaneous adhesive agent, wipe off aii dust, moisture, and oil from the mounting rail and mounting surface.
 Dirt on the surfaces to be glued may cause the mounting rails to detach.
●The product has been manufactured with the utmost care;
however, please understand that slight deviantions in LED color are unavoidable due to the characteristics of the product.
・LED xture has a life span.
・Degradation occurs inside after 8-10 years of installation even when the LED xture looks ne from the outside.
Parts of the LED xture degrade due to heat when the light is on for a long time. This causes not only safety
issues, but also reduces power efficiency and it is recommended to have regular maintenance and inspection.
・ Cleaning and inspection should be performed at least once every 6 months.
・Inspection by a specialist, such as a product contractor, should be performed at least once every 3 years.
・If the LED xture is used for a long time without having an inspection, there a small possibility that it could lead to
smoke, re, electric shock.
・ Wipe the LED xture lightly with a soft cloth.
・ To best clean the LED xture, wipe dirt with a soft cloth with has been soaked in a neutral detergent diluted with
water squeegeed dry. To nish off, wipe it with a damp cloth and dry it.
・Is LED operating normally?
・Is there any unusual smell, sound or heat?
・Are there any cracks, aplits, or detached parts on any parts or joints?
Cleaning Method
Inspection Methods
Instruction Manual
Luci SHIN FLEX Indoor
7mm pitch・18mm pitch
Plese read befere the usage
Meintenance and Inspection
This product cannot be
bent less than this angle
When there is abnormal situations, please cut off the power
immediately, consult with electricians,and do not touch
the LED xture with hands.
Ensure sufficient space for ventilation (heat dissipation)
between the LED xture and the surrounding.
When installing the LED xture in a box or enclosure, please
provide an air ventilation hole to facilitate proper airow and
heat dissipation, ensuring that the surrounding temperature
does not exceed the specied operating temperature.
LFY*-*-*-CL-I-*
Recommended:VCTF-2C 0.5sq
※Cables are not included
Instruction Manual
Luci SHIN FLEX Indoor
7mm pitch・18mm pitch
Option parts:SHIN FLEX PC Cover H18mm 1050mm (LFY-C1050-A)
1050 16.4
18
Option parts:45°Mounting rail 1000 for SHIN FLEX (LFY-45RL1000)
13.4
Screw Holes φ3.5
970
42.5 200 200 85 200 200 42.5
26.5
5.1
19.4
9.5 29
29
4.5
6
1.5
9.5
10
9.2
10
Option parts :Mounting clip (LFY-RC)(10pcs/1bag)
φ4.5 10.9
12 6
6.2
6.2
12.3
Thickness:0.9 ~ 1.1
Put Sealing Glue
Inside The Body
Accessories, Option parts :Endcap (LFY-EC) (10pcs/1bag)
(2pcs attached upon request)
Option parts:Mounting rail 1000 for SHIN FLEX (LFY-RL1000)
Screw Holes φ3.5
970
42.5 200 200 85 200 200 42.5
13.4
7.5
10
2.5
Mounting clip for rail(5pcs/1bag)
16.4
16
9.3
7.5
LED
Tape Substrate
Body
Lead Wire
Mounting rail
45°Mounting rail
PC Cover
Mounting clip for rail
Mounting clip
End cap
①
②
③
④
⑤
⑥
⑦
⑧
⑨
⑩
SMD type
FPC
Flexible Acrylic,Clear
Black+,Whiteー
AES
AES
PC
Polycarbonate,Clear
Polycarbonate,Clear
Polycarbonate,Clear
System conguration diagram
Cross section 0.3 sq 0.5sq 0.75sq
Wire gauze AWG 22 AWG 20 AWG 18
Product code Power
(2) Max. product
length per circuit
LFY7-T1000W-*-CL-I-15
15.9 W/m 5m 2.0 m 3.3 m 5.2 m
LFY7-T1000W-*-CL-I-10
10.8 W/m 5m 3.0 m 4.8 m 7.5m
LFY7-T1000W-*-CL-I-6
6.4 W/m 5m 5.1 m 8.2 m 13.0 m
LFY7-T1000W-*-CL-I-4
4.2 W/m 5m 7.8 m 12.5m 20.0 m
LFY7-T1000W-*-CL-I-2
2.1 W/m 5m 15.5m 25.0 m 39.0 m
LFY18-T1000W-*-CL-I-12
12.7 W/m 5m 2.6m 4.2m 6.5m
LFY18-T1000W-*-CL-I-10
10.8 W/m 5m 3.2 m 5.1 m 8.0 m
LFY18-T1000W-*-CL-I-6
6.9 W/m 5m 4.8 m 7.7 m 12.0 m
LFY18-T1000W-*-CL-I-4
4.9 W/m 5m 7.2 m 11.5m 18.0 m
LFY18-T1000W-*-CL-I-2
2.9 W/m 5m 13.5m 22.0 m 35.0 m
(3) Max. cable length between PSU and the top of
luminaire at (2) Max. product length per circuit
DC24V
+: Black 
-: White
AWG22
+: Black 
-: White
AWG22
Model No.
LED pitch
Item / Product Name Luci SHIN FLEX
Indoors (No Condensation)
0℃~ +35℃ (No Condensation)
5m
Soft Acrylic
R50mm
End cap ×2
Mounting rail, 45°Mounting rail, PC Cover, Mounting clip, End cap, Magnet set
Day light(D), Natural light(N), White(W), Warm white 3500K(WW), Warm white 3000K(L30), Warm white 2700K(L27), Warm white 2500K(L25), Warm white 2200K(L22), Warm white 2000K(L20)
〇
140 LED
40 g
56 LED
40 g
LFY7 LFY18
Power consumption
Input current
Number of LEDs
Weight
Environment
Operating temperature
Max. sets connectable
Material (Body)
Min. allowable bend range
Accessories
Option parts
Light source color (*)
Dimmable
LFY7-T1000W
-*-CL-I-15
LFY7-1000W
-*-CL-I-10
LFY7-1000W
-*-CL-I-6
LFY7-1000W
-*-CL-I-4
LFY7-1000W
-*-CL-I-2
LFY18-1000W
-*-CL-I-12
LFY18-1000W
-*-CL-I-10
LFY18-1000W
-*-CL-I-6
LFY18-1000W
-*-CL-I-4
LFY18-1000W
-*-CL-I-2
15.9 W/m
663 mA
10.8 W/m
450 mA
6.4 W/m
267 mA
4.2 W/m
175 mA
2.4 W/m
100 mA
12.7 W/m
529 mA
10.8 W/m
450 mA
6.9 W/m
288 mA
4.9 W/m
204 mA
2.9 W/m
121 mA
1011±2
190
125
・LFY18
4
10
・LFY7
190
50
1011±2
4
10
PSU
DC24V
(2) Product length per circuit
(3) Cable length between PSU and
the top of luminaire (m)
(1) Total product length per power supply
1. Total product length per power supply depends on capacity of the power supply. Recommended loading factor is 70% (without
dimming) or 60% (with dimming).
2. Product length per circuit shall not exceed maximum product length per circuit. If the product length per circuit exceeds the
maximum, split into mulitple circuits
3. To minimize voltage drop, select appropriate wire gauge/diameter and consider the cable length between PSU and the top of
luminaire referring to the following table. If longer cable distances are required, use thicker wires or reduce the loading of the
lighting xtures in the circuit.
Instruction Manual
Luci SHIN FLEX Indoor
7mm pitch・18mm pitch
Mounting clip for SHIN FLEX rail
(LFY-RC)
Mounting clip for SHIN FLEX rail
(LFY-RC)
1. Fix the mounting rail by screws
(pan head scew M3 recommended)
supplied by installer. Insert the
lighting xture into the mounting
rail.
2. Push the mounting clip until click
sound. Recommended 5 pcs/m.
1: Fix the mounting rail by screws (pan
head scew M3 recommended) supplied
by installer. Insert the lighting xture
into the mounting rail.
2: Place the PC cover on the rail. Push
gently until you hear a clicking sound.
Make sure the cover is properly
hooked onto the rail.
Mounting clip(LFY-RC)
1: Fix the mounting clip by screws (pan
head scew M3 recommended) supplied
by installer. Recommended to use min.
5pcs/m.
Double-sided tape
supplied by installer
Cautions
The product is delicate electric equipment. Handle the lighting xtures with care.
-Do not twist, pull, fold, step on, or apply pressure to the lighting xtures during installation.
-Do not pull the lighting xture in the longitudinal direction when installing it on the rail.
-Do not use roller or other tool to install the lighting xture.
-When installing the lighting xture into the rail, do not press or extend the tube.
-Do not paint on the lighting xtures. It may cause color shifting.
24V dedicated power supply
Turn off the power off when connecting the lighting xture.
Caution: Installation environment of
power supply
Follow the instructions in the manual for the power supply regarding the temperature,
humidity, and other operating environment conditions.
- Cables used for connecting LED xtures and Power supply must be a
suitable type and gauge.
- Cables should be joined with suitable terminal block or methods as
appropriate to the installation and operating environment.
Caution: When using thin dimension cable in long extended length, the
resistance of cable will increase. Voltage drop and heat dissipating may occur
and result in brightness decreasing.
Caution: When separating one cable to multiple circuits in the same gauge,
the current loading focuses on the junction of the branch circuit and high
temperature will accumulate from there. Please consider the loading of the
power supply (quantity of LED xture) and review the wiring system to avoid
the above problem.
- When connecting the dimmer driver with power supply, unpredicted noise
might occur. It is a characteristic of electronic devices, not a malfunction of
the LED xture. Please choose an appropriate power supply and consider a
place to install. Reducing the loading factor of LED xture might improve the
noise from the power supply while the noise for the LED xtures might be
improved by splitting the circuit of LED xtures into multiple.
4th LED
5th LED
6th LED
7th LED
The minimum increment for cutting Luci Shin FLEX is
7 LEDs.
If cut in an incorrect position, non-illumination will
result. Take care to cut only in a correct position.
The lamp fitting can be shortened by cutting in increments of 7 LEDs.
Installation with mounting rail Installation with mounting rail and PC Cover
Mounting rail 1000 for SHIN FLEX
(LFY-RL1000) Mounting rail 1000 for SHIN FLEX
(LFY-RL1000)
SHIN FLEX PC Cover H18mm 1050mm
(LFY-C1050-A)
45°Mounting rail 1000 for SHIN FLEX
(LFY-45RL1000)
Installation with mounting clip
Installation with double sided tape
1. Ensure that the surfaces are clean and dry
before applying the tape. Dust, dirt, or
moisture may affect the adhesion and
cause the LED xture to fall off.
2. Properly align the LED xture before
sticking it with the tape. Repositioning
the LED xture after applying the tape
may damage it or the surface.
3. Select the appropriate double-sided tape
for installation by checking the manufac-
turer's instructions. Temperature range
and surface compatibility may affect the
adhesion.

Other Luci Lighting Equipment manuals

Luci RIMiT sm User manual

Luci

Luci RIMiT sm User manual

Luci FLEX a F IP65 User manual

Luci

Luci FLEX a F IP65 User manual

Luci silux K User manual

Luci

Luci silux K User manual

Luci UQ FLEX SAUNA User manual

Luci

Luci UQ FLEX SAUNA User manual

Luci UQ FLEX IP67 User manual

Luci

Luci UQ FLEX IP67 User manual

Popular Lighting Equipment manuals by other brands

VanGaa VG-SBW330CMY user manual

VanGaa

VanGaa VG-SBW330CMY user manual

O.N 59.8810.10 Instructions for use

O.N

O.N 59.8810.10 Instructions for use

Tamlite STADIA XL Installation & operating instructions

Tamlite

Tamlite STADIA XL Installation & operating instructions

Venture Lighting EMG016 Instruction

Venture Lighting

Venture Lighting EMG016 Instruction

Elation ELAR 162 TRI PAR manual

Elation

Elation ELAR 162 TRI PAR manual

LIGMAN LUNAR 2 installation manual

LIGMAN

LIGMAN LUNAR 2 installation manual

Aurora AU-ST901 installation instructions

Aurora

Aurora AU-ST901 installation instructions

Sealey LED3603 Series instructions

Sealey

Sealey LED3603 Series instructions

ADJ FLASH KLING BATTEN User instructions

ADJ

ADJ FLASH KLING BATTEN User instructions

Cooper IB519142EN installation instructions

Cooper

Cooper IB519142EN installation instructions

Federal Signal Corporation ILSFFVHL-CH08 installation instructions

Federal Signal Corporation

Federal Signal Corporation ILSFFVHL-CH08 installation instructions

QTX Light 151.269 user manual

QTX Light

QTX Light 151.269 user manual

CANTO USA Astro 250 operating instructions

CANTO USA

CANTO USA Astro 250 operating instructions

Almat STELLA Installation instruction

Almat

Almat STELLA Installation instruction

Autopilot POOL PILOT SOFT TOUCH OPERATING, TROUBLESHOOTING AND TECHNICAL CHEAT SHEET

Autopilot

Autopilot POOL PILOT SOFT TOUCH OPERATING, TROUBLESHOOTING AND TECHNICAL CHEAT SHEET

Miboxer LD1020260 quick guide

Miboxer

Miboxer LD1020260 quick guide

Eaton Crouse-hinds series Operating	 instruction

Eaton

Eaton Crouse-hinds series Operating instruction

Lightolier PRE-WIRED COMPACT FLUORESCENT Instructions for installation

Lightolier

Lightolier PRE-WIRED COMPACT FLUORESCENT Instructions for installation

manuals.online logo
manuals.online logoBrands
  • About & Mission
  • Contact us
  • Privacy Policy
  • Terms and Conditions

Copyright 2025 Manuals.Online. All Rights Reserved.