manuals.online logo
Brands
  1. Home
  2. •
  3. Brands
  4. •
  5. Luci
  6. •
  7. Lighting Equipment
  8. •
  9. Luci UQ FLEX IP67 User manual

Luci UQ FLEX IP67 User manual

13/05/2020
LFU-T1000*-*-DF-O-12
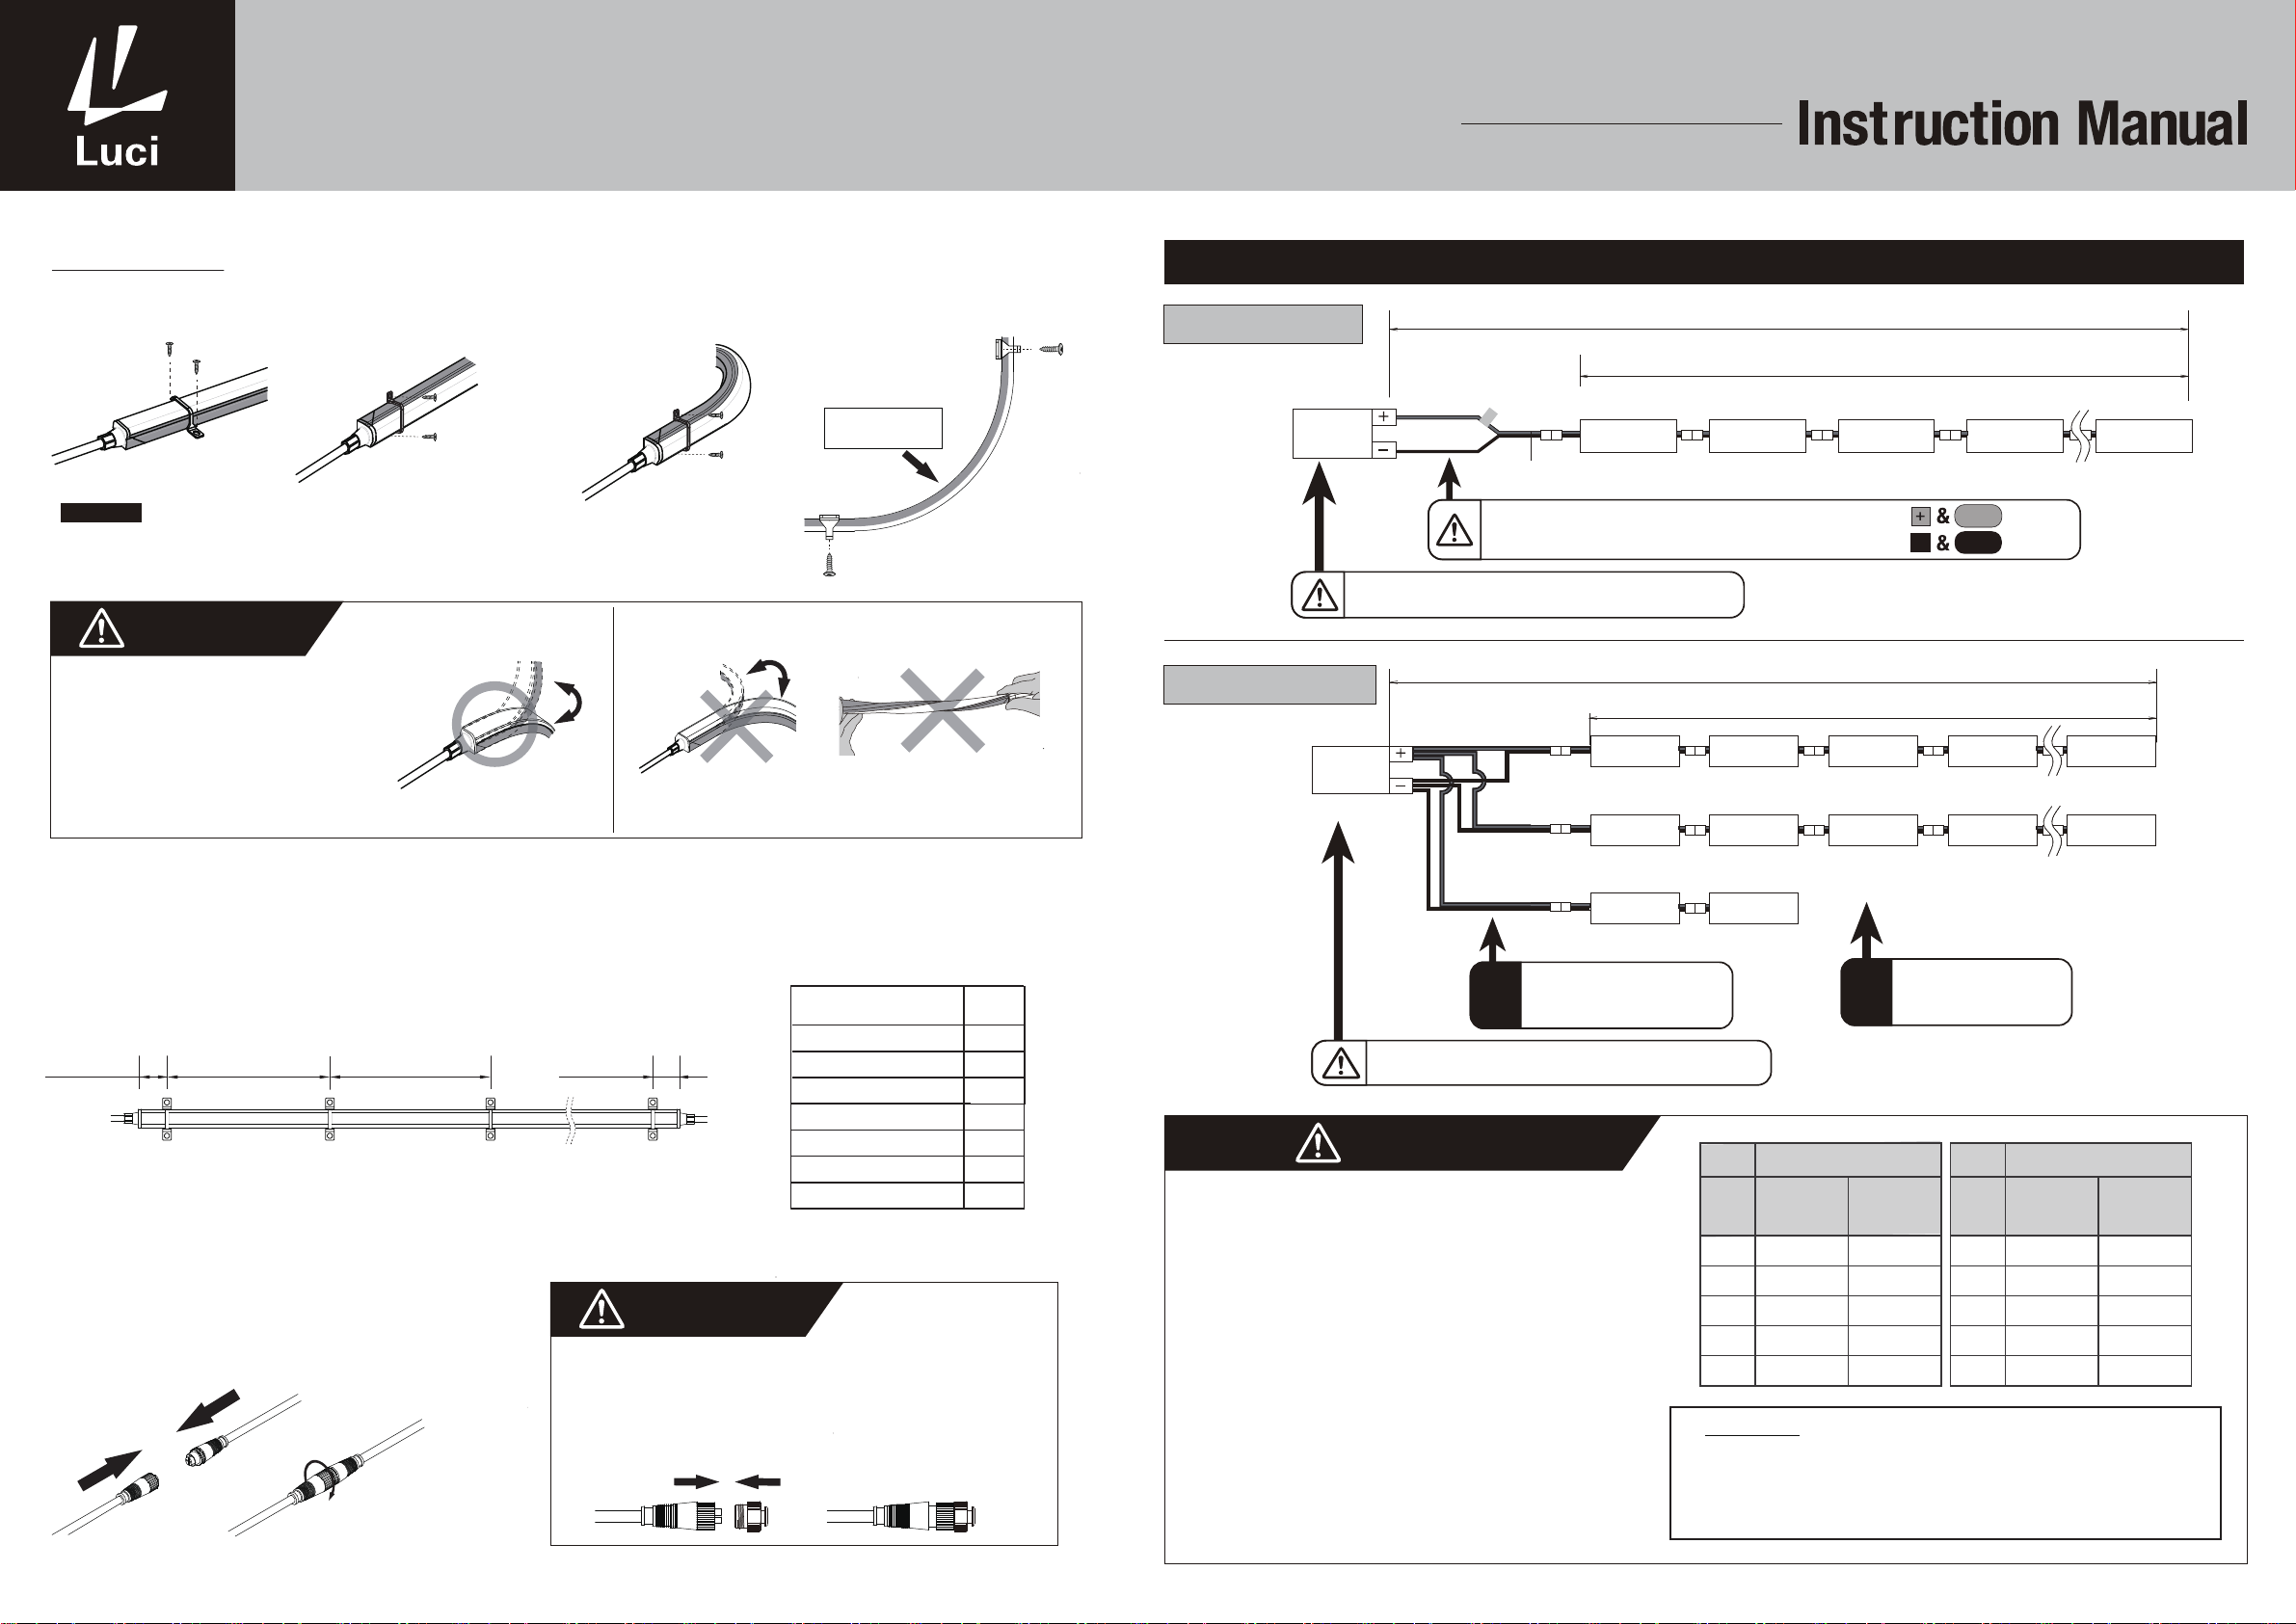
Only supply power through the lead wire on one side
using the dedicated connection cable for this product.
Supplying power through the lead wires on both sides may cause failure and fire. DC24V DC24V
Do not supply the power
through the lead wire from
both sides.
Supply the power through the
lead wire from one side.
DC24V Attach the
connector cap
To ensure safe usage
The following is the safety cautions to prevent any harms or damages to others.
If the product is used against cautions, it may cause damages・electrifications・smoke.
Please read before the usage
Caution regarding installation
environment of power supply
Regarding the temperature, humidity, and other conditions of the operating
environment, follow the instructions in the manual for the power supply.
●The product has been manufactured with the utmost care; however, please understand that slight deviations in LED color are unavoidable due to the
●To mount in the mounting position, use mounting clips (Accessories) and confirm that the mounting clip is securely fixed.
characteristics of the product.
Maintenance and Inspection
・LED fixture has a life span.
・Degradation occurs inside after a few years of installation even when the fixture looks fine from the outside.
 Parts of the LED fixture degrade due to heat when the light is on for a long time. This causes not only
 safety issues, but also reduces power efficiency and it is recommended to have regular maintenance and inspection.
・Cleaning and inspection should be performed at least once every 6 months.
・Inspection by a specialist, such as a product contractor, should be performed at least once every 2 years.
・If the LED fixture is used for a long time without having an inspection, there is a small possibility that it could lead to
 fuming, igniting, electric shock and the like.
Inspection Methods
・Is LED operating normally?
・Is there any unusual smell, sound or heat?
・Are there any cracks, splits, or detached parts on any parts or joints?
Cleaning Method
・Lightly wipe the LED fixture with a soft cloth.
・To best clean the LED fixture, wipe dirt with a soft cloth which has been soaked in a neutral detergent diluted with
 water and wrung firmly. To finish off, wipe it with a damp cloth and dry it.
Use a DC24 V power supply. Never connect to any other power supply.
Always use a Overcurrent breaker / circuit breaker of suitable capacity
in the power supply.
If the capacity is not suitable, the breaker may not workwhen
abnormal current occurs, creating risk of fire.
Always shut off the main power supply before performing work or inspection.
Do not connect ordisconnect the lead wires of the LED fixture while power is supplied.
Firmly insert and connect the connectors.
Incomplete connection may cause heating, smoke, and fire.
Do not touch the ends of the connectors. Risk of electrical shock.
When there is abnormal situations, please cut off the power immediately, consult
with electricians, and do not touch the LED fixture with hands.
The product must be allowed to dissipate heat.
Risk of shortened service life and fire.
Allow sufficient space for ventilation (heat dissipation) between
the LED fixture and building structure.
When installing the LED fixture in a box, please make sure to
provide the air ventilation hole.
Always test before connecting the LED fixture to a switch ordimmer.
Do not use the product if the cover is damaged.
Risk of an accident and electrical shock.
Avoid spraying detergent directly on the LED fixture.
If this happens, immediately rinse with water.
Do not use a brush or an abrasive to polish metal parts.
Risk of damage and corrosion.
Do not use in the following environments:
- A location where water collects,and under the water.
- A location at high temperature (+45°C or higher)
(usage environment temperature is -25°C to+45°C)
- A location with corrosive or inflammable gases.
- A highly airtight location.
- A location where the product is directly exposed to salt water or
organic solvents.
- A location subject to the effects of electric or magnetic fields.
- A location subject to intense vibration or shock, or a location subject
to continuous vibration.
Do not do the following to the LED fixture:
- Forcibly remove the product after mounting it.
- Disassemble, modify, or add holes to the product.
- Forcibly pull or twist the product.
- Cut or damage the power cable. Use a damaged cable.
- Press down on the product.
- Drop the product or subject the product to intense vibration or shock.
If the product is dirty, wipe with a dry cloth.
Do not use thinner, benzene, or other organic solvents to clean
the product, and do not wash with water.
Do not place a heatable object such as a cloth or paper or an insulating material
on top of the LED fixture or cover it with such a material. It may cause the
fixture not to turn on or fire.
Do not put a piece of metal or a flammable object in clearance of the LED fixture.
The outline of the LED fixture main unit must not contact equipment in or
out of the ceiling. It may cause fall, electric shock, or fire.
Do not operate the fixture with wet hands. It may result in an electric shock.
Electrical work certificate is needed to install and inspect this product.
Please ask electrician for the installation.
Important notice for storage
Observe the storing temperature of our LED fixtures: -35°Cto 65°C
Please do not store the carton or the packages of our LED fixtures in the following
conditions:
- wet location
- places of high humidity
- places with much litter or dust
- places of exposing against sun light directly
- places a solvent such as a paint liquid is stored
During storing period, please do not leave the cartons orindividual packages vertically.
Please do not open individual package until just before installing LED fixtures to
avoid any damage to the LED fixtures.
Please do not place heavy object on the carton.
Please do not use our LED fixtures as the working light during construction period.
Luci UQ FLEX IP67
○
10
16
15
3-1 3-2
1000
1009±15325±20 325±20
1
2
(1040)
(4.5)
(19.5)
(4.5)
(19.5)
2
1
(19.5)
325±20
Φ10
(4.5) (2)
16
15
3-1
1006.5±15
1000
(1022)
1009±15
1000
2
1
3-2
3-1
16
15
18
4
18
4
(4.5)(4.5)
2
1
3-1
16
15
18
4
(4.5) (2)
1000
1006.5
±15
【LFU-T1000WS-*-DF-O-12】
【LFU-T1000SS-*-DF-O-12】
【LFU-T1000WR-*-DF-O-12】
【LFU-T1000SR-*-DF-O-12】
Product specification
3-2
3-1
No Item Name Material etc.
1
2
4
5
6
7
8
9
10
Body
Lead wire
Connector
Connector
Diffuser
Aluminum
SUS
Input Voltage
DC24V
Mounting clip B
Aluminum mounting
rail C type
SUS hold clip C
Power supply cable
Connector cap
Joint cable
Joint Plate
SUS
SUS
+:Red 、−:Black
3-2
3-2 3-1
8
10000±100
15
Ø15
Option parts
Power supply cable 10M for UQ FLEX
(CAD-V010M-FPNN-O)
Aluminium mounting rail C type950 for UQ FLEX H13
(LFU-RL0950-AL-C)
Option parts:
Option parts:
Joint cable 1M for UQ FLEX
( CAD-1000-MPFP-O)
※Connector cap
is attached.
Accessories for rail & Option parts:
SUS hold Clip C for UQ FLEX AL rail C
(LFU-PT-C)(5pcs/ 1bag)
Accessories for rail & Option parts:
Joint plate for UQ FLEX AL rail C
(LFU-PT-D)(1pc/ 1bag)
Number of holes : 6
9
Ø14.5
16
12.8
M12
35
200 200
35
150 150
6- Ø 4.8 through hole
950 ±2
15.5
22.6
2 - Ø 4.8 oblong hole
2 70
140
1.2
2- 4.3
7.3 16
35.4
28.1
2.5
4
(23.2)
(10)
(13.8)
(12.1)
5
6
7
Option parts :
Mounting clip B for UQ FLEX
(LFU-RC-B) (5pcs /1bag)
10
1000±15
Ø15
Released in May 2020
Red : +
Black : -
■Option parts
Connecting to the power supply
OptionParts
Power supply cable 10M
for UQ FLEX
(CAD-V010M-FPNN-O)
+: Red
 
-: Black
→
DC output side
(Connected to LED fixture)
power supply
Connection to the product
Product lead wires
+: Red -: Black
with connector
↑AC input side
Cables used forconnecting LED fixtures and Power supply must be a suitable type and gauge.
■
Cables should be joined with suitable terminal block ormethods as appropriate to the installation and operating environment.
Caution: When using a long cable with thin dimension, the resistance of cable will
increase. Voltage drop and heat dispatching may occurand result in brightness decreasing.
Caution: When separating one cable to multiple circuits in the same gauge,the current loading focuses
on the junction of the branch circuit and high temperature will liberate on there.
Please considerthe loading of the power supply (quantity of LED fixture)
and reviewthe wiring system to avoid the above problem.
■
■
When connecting the dimmerdriver with power supply, unpredicted
noise might occur. It is a characteristic of electronic devices,
not a malfunction of the LED fixture.Please choose an appropriate
power supply and considera place to install. Reducing the loading
factorof LED fixture might improve the noise from the power supply
while the noise forthe LED fixtures might be improved by splitting
the circuit of LED fixtures into multiple.
Please do appropriate
treatment on the connection
of the cables depends on
the installation situation.
■When you adjust the length of the power supply cable, please be
careful not to damage the core wire.
※unit of measure=mm
Product specification
※unit of measure=mm
Luci UQ FLEX IP67
Luci UQ FLEX IP67
White(W), Warm white 3000K(L30), Warm white 2700K(L27), Warm white 2400K(L24)
Item / Product Name
Lead wire & Cable type
Model No.
Power consumption
Input current
Environment
Operating temperature
Max. Length
Material (Body)
Option parts
Dimmable
Light source color
Mounting clip B for UQ FLEX, Power supply cable 10M for UQ FLEX(Connector cap is attached), Joint cable1M for UQ FLEX
Released in May 2020
Silicon
In & Outdoor, IP67
-25℃〜+45℃
10m
12.6 W (Ta=25℃)
(0.53 A max)
Both ends lead wire-Straight feed One end lead wire-Straight feed Both ends lead wire-Side feed One end lead wire-Side feed
LFU-T1000WS-*-DF-O-15 LFU-T1000SS-*-DF-O-15 LFU-T1000WR-*-DF-O-15 LFU-T1000SR-*-DF-O-15
17.7
Aluminum Mounting Rail C Type 950 for UQ FLEX H13, SUS hold clip C for UQ FLEX AL rail C, Joint plate for UQ FLEX AL rail C
Released in May 2020
number
The length of the LED fixture
(mm)
250 2
500 2
510〜1000 5
①Fix the alminum rail by screws supplied by installer
(pan head screw M4 recommended)
In this time, do not screw both end holes.
Installation with mounting rail (When the length of the LED fixture is longer than 1m)
push
holesforinstalling
holesforconnectingJointplate
Donotscrewinthistime
②Put the Joint plate into bottom
of the rail.
MountingRail
③Put the second rail and slide the
Joint plate as below.
puttherail
slideJointplatetocrosstherails
④Fix the holes of rails and plate altogether by screws. ⑤Fix the holes of second rail for installation like ①...
dimension
①Fix the alminum rail by screws supplied by installer
(pan head screw M4 recommended)
In this time, do not screw both end holes.
Installation with mounting rail (When the length of the LED fixture is up to 1m)
holesforinstalling
holesforconnectingJointplate
Donotscrewinthistime
⑨ Ensure the pin holes in the connecters are positioned
correctly before joining them.
To fasten, rotate the metalic knobs until tightend.
The unenclosed connector at the terminal of UQ FLEX IP67 must
be sealed with connector cap which is enveloped in the power
supply cable(CAD-V010M-FPNN-O).
To fasten, rotate the metalic knobs until tightend.
⑤ Ensure the pin holes in the connecters are positioned
correctly before joining them.
To fasten, rotate the metalic knobs until tightend.
The unenclosed connector at the terminal of UQ FLEX IP67 must
be sealed with connector cap which is enveloped in the power
supply cable(CAD-V010M-FPNN-O).
To fasten, rotate the metalic knobs until tightend.
Optionparts
JointplateforUQFLEXALrailC
(LFU-PT-D)
Aluminum rail cut
The Aluminium Mounting Rail C type 950 for UQ FLEX H13(LFU-RL0950-AL-C)can be cut according to the length of lighting fixture.
Aluminum rail mounting holes can also be made at the site by the installer. Please cut properly with a cutting tool for aluminum.
Aluminum rail cut
The Aluminium Mounting Rail C type 950 for UQ FLEX H13(LFU-RL0950-AL-C)can be cut according to the length of lighting fixture.
Aluminum rail mounting holes can also be made at the site by the installer. Please cut properly with a cutting tool for aluminum.
⑦ Push the SUS hold clip (LFU-PT-C) until click sound and
make sure it is securely locked. SUS hold clip is recommended
in the environment where requires durability.
⑧Recommended number of hold clip as below.
Option parts
Hold Clip C for
UQ FLEX AL rail C type
(LFU-PT-C)
push
③ Push the SUS hold clip (LFU-PT-C) until click sound and make
sure it is securely locked. SUS hold clip is recommended in the
environment where requires durability.
④Recommended number of hold clip as below.
Option parts
SUS hold clip C for
UQ FLEX AL rail C
(LFU-PT-C)
Installing the product
②Hold one side of the LED fixture and push on the other
side, the LED fixture will gradually enter the aluminim rail.
Cautions
When insert the LED fixture into the rail,
do not press with excessive force, and exercise
caution not to damage the LEDs, electronic
components, board, and other parts with your
fingers or a tool. There are high risk of LED
unlighted, wire breakage and other failure occuring
due to above improper handling.
push
⑥Hold one side of the LED fixture and push on the other
side, the LED fixture will gradually enter the aluminim rail.
When insert the LED fixture into the rail,
do not press with excessive force, and exercise
caution not to damage the LEDs, electronic
components, board, and other parts with your
fingers or a tool. There are high risk of LED
unlighted, wire breakage and other failure occuring
due to above improper handling.
push
Luci UQ FLEX IP67
Cautions
Cautions
Cautions
2100〜3000
3100〜4000
4100〜5000
number
The length of the LED fixture
(mm)
10
15
20
25
1100〜2000
The power supply arrange by customers is not covered with the product warranty
by Luci and proper operation cannot be guaranteed.
It is recommended to check the power supply specification and manual when
choosing a power supply. Especially pay attention to the wire capacityif use a
150 W or higher wattage power supply.
Connecting LED fixtures
Up to 10 m
Series connection
Parallel connection
Up to 10 m
Up to 20 m
Up to 20 m
The number of LED fixtures that can be connected to the
power supply depends on the output (W) of the power supply.
For Luci UQ FLEX IP67, the maximum number connectable
in series is 10 m.
It can be connected in series or in parallel. However, please
observe the maximum number of connected units of 10 m
and use it.
It is recommended to connect the LED fixture at a load ratio
of 70% (without dimming) or 60%(with dimming) of the power
output since the load varies depending on the derating and
the usage environment of the power supply.
Please confirm the table on the right for details.
General installation
200〜300mm 200〜300mm
③Keep the distance between mounting clips the same.
(200 mm to 300 mm recommended).
Mounting clips at both ends should be far from about 50mm from the side cap
to prevent lifting of the LED fixture.
50mm
(recommend)
50mm
(recommend)
Min.R150mm
OK
NG
①Fix the mounting clip by 2pcs of screws supplied by installer
(pan head screw M4 recommended).
②UQ FLEX IP67 can be installed in curved surface as below picture.
The minimun bending radius is 150 mm.
Option parts
Mounting Clip B for UQ FLEX
( LFU-RC-B )
Do not bend the LED fixture to side
direction and twist.If bend it wrongly,
FPC will be damaged and
the LED fixture will not turn on.
Do not twist the LED fixture as it will
damage and break the FPC and LED
fixture will not tuen on.
④Recommended number of mounting clip
as below.
⑤ Ensure the pin holes in the connecters are positioned
correctly before joining them.
To fasten, rotate the metalic knobs until tightend.
The unenclosed connector at the terminal of UQ FLEX IP67 must
be sealed with connector cap which is enveloped in the power
supply cable(CAD-V010M-FPNN-O).
To fasten, rotate the metalic knobs until tightend.
Please connect the power with care.
Power
supply
DC24V
Turn off the power when connecting
CAD-V010M-FPNN-O
the labels indicate the current directions
Black
-
Red
Connect the same
lines in parallel
2Make‘line’with
less than 10 m
1
Power
supply
DC24V
Luci UQ FLEX IP67
Cautions
Cautions
Cautions
2100〜3000
3100〜4000
4100〜5000
10
15
20
25
1100〜2000
number
The length of the LED fixture
(mm)
250 2
500 2
510〜1000 5
Turn off the power when connecting
Length
Power output
With
dimming
Without
dimming
1m 18W~ 21W~
36W~42W~
54W~63W~
72W~84W~
90W~105W~
2m
3m
4m
5m
Length
Power output
With
dimming
Without
dimming
6m 108W~ 126W~
126W~147W~
144W~168W~
162W~189W~
180W~210W~
7m
8m
9m
10m

Other Luci Lighting Equipment manuals

Luci RIMiT sm User manual

Luci

Luci RIMiT sm User manual

Luci FLEX a F IP65 User manual

Luci

Luci FLEX a F IP65 User manual

Luci silux K User manual

Luci

Luci silux K User manual

Luci UQ FLEX SAUNA User manual

Luci

Luci UQ FLEX SAUNA User manual

Luci SHIN FLEX Indoor User manual

Luci

Luci SHIN FLEX Indoor User manual

Popular Lighting Equipment manuals by other brands

LANZINI EVO XL TORREFARO instructions

LANZINI

LANZINI EVO XL TORREFARO instructions

Martin MAC Aura FX Guide

Martin

Martin MAC Aura FX Guide

Feniex FUSION-S FS-8118 instruction manual

Feniex

Feniex FUSION-S FS-8118 instruction manual

LIGMAN ODESSA 24 installation manual

LIGMAN

LIGMAN ODESSA 24 installation manual

ProLights PFZ725 user manual

ProLights

ProLights PFZ725 user manual

Signtex Lighting Moonlite LED MOE-RE Series Installation instructions and owner's manual

Signtex Lighting

Signtex Lighting Moonlite LED MOE-RE Series Installation instructions and owner's manual

KaWe MASTERLIGHT HL user manual

KaWe

KaWe MASTERLIGHT HL user manual

E2S STExB2X05 instruction manual

E2S

E2S STExB2X05 instruction manual

CADMEN CM-AF142SO installation instructions

CADMEN

CADMEN CM-AF142SO installation instructions

Moree LOUNGE 45 LED PRO ACCU instruction manual

Moree

Moree LOUNGE 45 LED PRO ACCU instruction manual

avide ABLS12VCOB user manual

avide

avide ABLS12VCOB user manual

Ibiza JDL008R-LED instruction manual

Ibiza

Ibiza JDL008R-LED instruction manual

Aladdin AMS-FB350BI SQ manual

Aladdin

Aladdin AMS-FB350BI SQ manual

Hama 00176606 operating instructions

Hama

Hama 00176606 operating instructions

Hayward WFBRNDBRS owner's manual

Hayward

Hayward WFBRNDBRS owner's manual

Akurat lighting d2120 A1 manual

Akurat lighting

Akurat lighting d2120 A1 manual

ISSI LM4X operating instructions

ISSI

ISSI LM4X operating instructions

Traxon Osram Media Tube Go installation guide

Traxon

Traxon Osram Media Tube Go installation guide

manuals.online logo
manuals.online logoBrands
  • About & Mission
  • Contact us
  • Privacy Policy
  • Terms and Conditions

Copyright 2025 Manuals.Online. All Rights Reserved.