manuals.online logo
Brands
  1. Home
  2. •
  3. Brands
  4. •
  5. Luci
  6. •
  7. Lighting Equipment
  8. •
  9. Luci silux K User manual

Luci silux K User manual

Other Luci Lighting Equipment manuals

Luci FLEX a F IP65 User manual

Luci

Luci FLEX a F IP65 User manual

Luci UQ FLEX SAUNA User manual

Luci

Luci UQ FLEX SAUNA User manual

Luci SHIN FLEX Indoor User manual

Luci

Luci SHIN FLEX Indoor User manual

Luci UQ FLEX IP67 User manual

Luci

Luci UQ FLEX IP67 User manual

Luci RIMiT sm User manual

Luci

Luci RIMiT sm User manual

Popular Lighting Equipment manuals by other brands

Life 39.9F70020C quick start guide

Life

Life 39.9F70020C quick start guide

EuroLite LED ML-20 user manual

EuroLite

EuroLite LED ML-20 user manual

LIGMAN OD-50141 installation manual

LIGMAN

LIGMAN OD-50141 installation manual

Home Accents Holiday 1002461144 instructions

Home Accents Holiday

Home Accents Holiday 1002461144 instructions

Experia IRiS Ripple Light instruction manual

Experia

Experia IRiS Ripple Light instruction manual

Erco Gecko Mounting instructions

Erco

Erco Gecko Mounting instructions

Inter-lux ZTA.100.Surface Installation and maintenance instructions

Inter-lux

Inter-lux ZTA.100.Surface Installation and maintenance instructions

Whelen Engineering Company TN Series installation guide

Whelen Engineering Company

Whelen Engineering Company TN Series installation guide

IKEA BJÖRKSPIREA manual

IKEA

IKEA BJÖRKSPIREA manual

Toolland PM 6640 instruction manual

Toolland

Toolland PM 6640 instruction manual

GTD GTD-LP200 user manual

GTD

GTD GTD-LP200 user manual

LIVARNO home 1105-W-UK manual

LIVARNO home

LIVARNO home 1105-W-UK manual

ProLights EclPar IPMFC user manual

ProLights

ProLights EclPar IPMFC user manual

Velvet EVO Series user manual

Velvet

Velvet EVO Series user manual

IDTOLIGHT GENT installation instructions

IDTOLIGHT

IDTOLIGHT GENT installation instructions

MAYTONI S35 installation manual

MAYTONI

MAYTONI S35 installation manual

MaxLite MLFP14DP4535 user manual

MaxLite

MaxLite MLFP14DP4535 user manual

SLV Elektronik 550621 instruction manual

SLV Elektronik

SLV Elektronik 550621 instruction manual

manuals.online logo
manuals.online logoBrands
  • About & Mission
  • Contact us
  • Privacy Policy
  • Terms and Conditions

Copyright 2025 Manuals.Online. All Rights Reserved.

10/20/2020
Luci silux K(13.3W/m)
LSXK-XXXX-*-DF-I-13
Joint cable 1000mm / 5000mm for SL connector (CAD-1000-MCFC−I)(CAD-5000-MCFC−I)
9
3000+40
0
5-2 Check the label on the DC + side
for polarity.
9
5-2 5-1
L
CAD-1000-MCFC−I
Model No. L(mm)
1000±15
5000CAD-5000-MCFC−I +250
0
CAD-3000-MCNN-I
Multiclip K for silux(LSX-PTM-C)(3 or 5pcs / 1bag)
K K
143 2
19
6
Luci silux K(13.3W/m)
9.2
9.2
Luci Silux K(13.3W/m)
LSXK-0074-*-DF-I-13 LSXK-0259-*-DF-I-13 LSXK-0388-*-DF-I-13 LSXK-0509-*-DF-I-13 LSXK-0573-*-DF-I-13
3.3W
0.7W
0.03A
14
140 161 196 224 287
49 77 98 112
0.14A
5.2W
0.22A
6.6W
0.28A
7.6W
0.32A
84g76g59g
110g 120g 145g
40g15g
Luci Silux K(13.3W/m)
LSXK-0823-*-DF-I-13
LSXK-0702-*-DF-I-13 LSXK-1008-*-DF-I-13 LSXK-1451-*-DF-I-13LSXK-1137-*-DF-I-13
9.5W
0.40A
10.9W
0.46A
13.3W
0.56A
15.2W
0.64A
19.5W
0.82A
Power supply cable 3000mm, Joint cable 1000mm/5000mm, Multiclip K(3pcs / 1bag), Liftclip(2pcs / 1bag), Outerclip(5pcs / 1bag), Magnet attachment
CE
Natural white(N), White (W), Warm white 3500K(WW), Warm white 3000K(L30), Warm white 2700K(L27), Warm white 2400K(L24)
Multiclip K : 3pcs for 702mm or shorter, 5pcs for 823mm or longer
1. The mounting clip shoud be preset on the installation
spot with screws supplied by installer.
(Flat head screws M3 recommended)
Required number of clips is 4pcs per 1m. Each distance
of number of clips shoud not be exceeded 300mm.
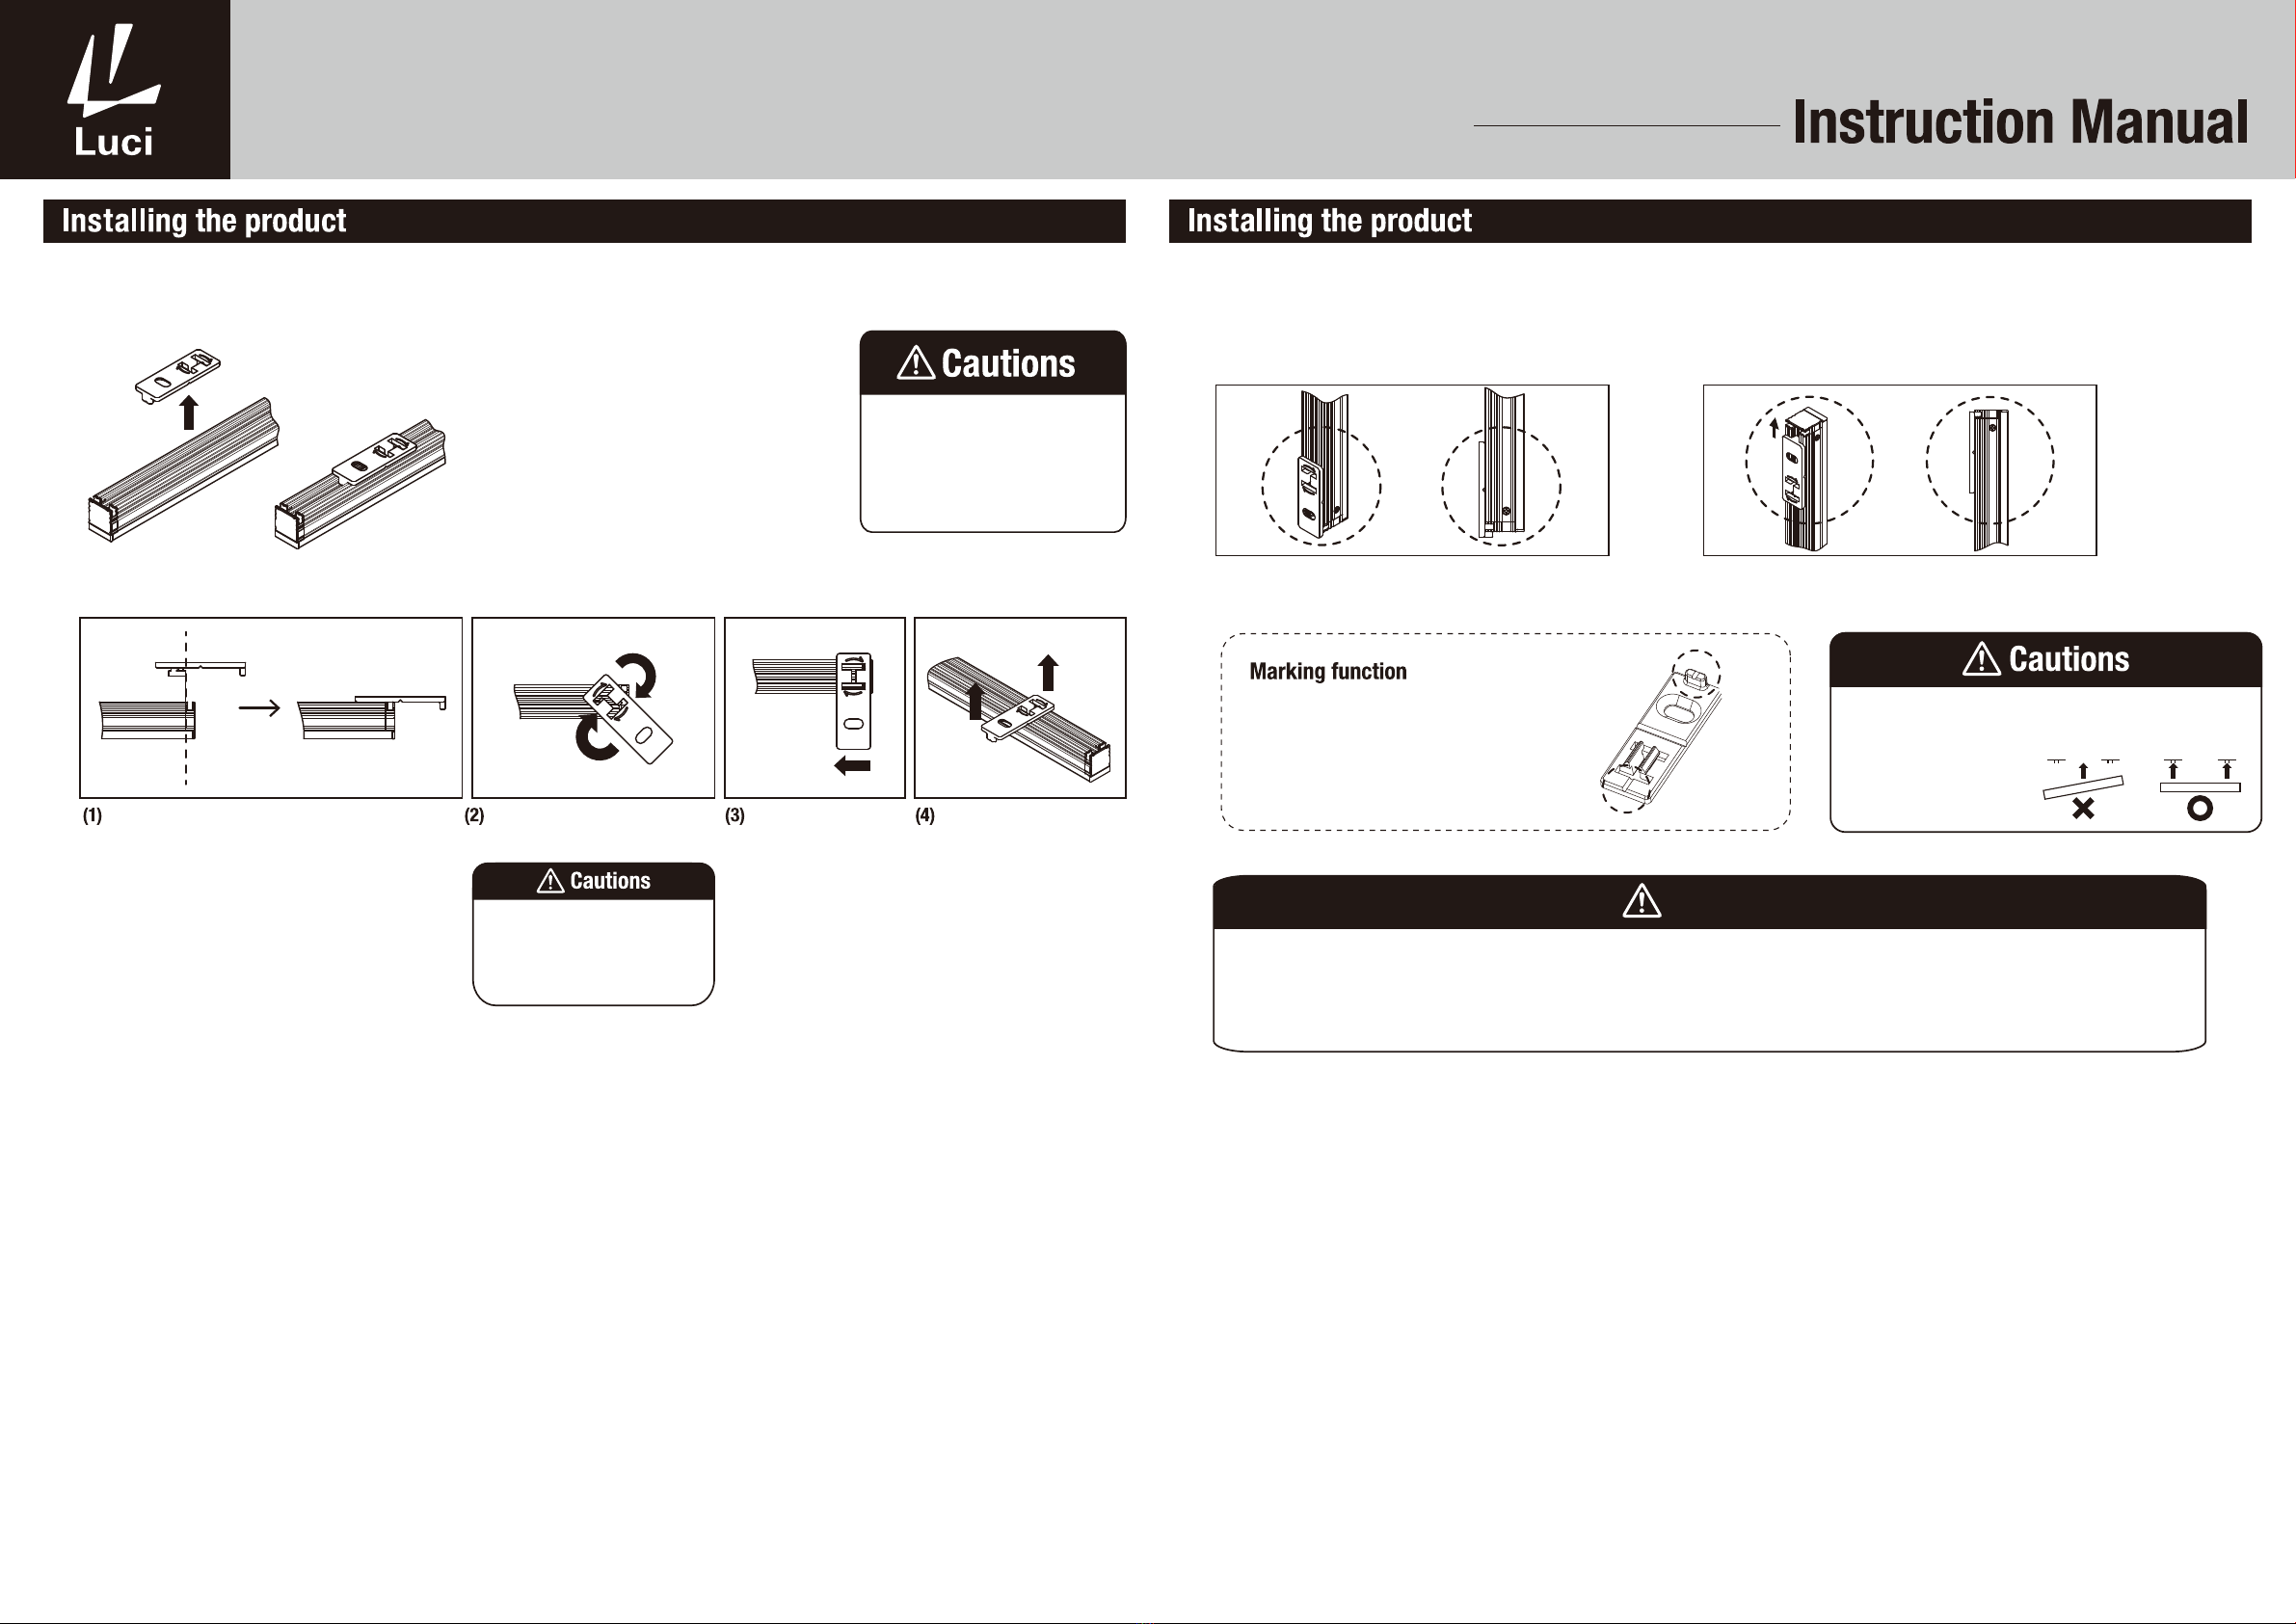
2. Snap the LED fixture on the mounting clip.
Ensure click should when inserting.
3. Check if the LED fixture is fixed surely, not being rattled
or having distortion.
When detaching LED fixture, please be careful not giving
any damage on clips.
Multiclip K installation: behind fixing
Multiclip K installation: side fixing
Insert the multi-clip K at the spot shown in the upper diagram.
Ensure click shoud when inserting.
For installation with protruding edge, Multiclip K installation shoud follow the diagram below.
Rotate the Multiclip K in 90 degrees
in the direction as the arrow mark
shown on the back of the Multiclip.
Slide the Multiclip to the
desired fixing position.
Use the recommended screws
supplied by installer to fix the
Multiclip with the LED fixture.
(Flat head screws M3
recommended.) Required number
of clips is 4pcs per 1m. Each
distance of clips should not be
exceeded 300mm.
For horizontal installation
Do not repeatedly attach and
detach the LED fixture to the
multiclip K. The clip tab may
be damaged in case repeating
it more than 5 times.
Do not rotate the clip more than 90
degree or opposite derection of the
arrow.
The clip may be damaged and
unusable.
Multiclip K installation: behind fixing
For vertical installation, make sure the top and bottom of LED fixture hook on the edge of the Multiclip K in accordance with the diagram.
Caution: If the weight of the LED fixture is not supported by the edge of the Multiclip, it may slide down fall.
The two grooves of Multiclip K can be used for installing
the clip straight aligned on the center line.
Bottom Top
For vertical installation
When installing the light appliance to the installation spot,
ensure that it is kept level and insert onto the clip tabs.
Check if it is completely attached.
Cautions
1) When install the mounting clips, ensure that those are installed in the same level on a plane surface and alined on the centre line.
2) When install the LED fixture on the mounting clip, ensure to insert onto the clip tab and check if it is completely attached.
Otherwise, caused by that distortion and incomplete attachment,
the LED fixture might have unexpected crack sound and fall down from the clips.
Luci silux K(13.3W/m)
CAD-3000-MCRN-I
~2.6m
~5.3m
~7.9m* ~6.8m*
~2.3m
~4.5m
The number of lamp fittings that can be connected to the power supply
depends on the output (W) of the power supply.
For Luci silux K, the maximum number connectable in series is 6 m.
If more than the maximum number must be connected, connect in
separate systems.
Lamp fitting lengths (74, 259, 388, 509, 573, 702, 823, 1008, 1137,
1451) can be combined freely; however,
the maximum number of meters connectable in series (6 m) must
be strictly observed.
Small noise may be emitted from the appliance and the dimmer while
using the dimmer, but it is normal. Load capacity of 60% is
recommended to reduce noise.(normal operation: 70%), or to connected with multiple systems.
* : split into multiple circuits
Follow the instructions in the manual for the power supply regarding the
temperature, humidity, and other operating environment conditions.
(CAD-3000-MCRN-I)
* Use the U terminal or O terminal for the power connection and make sure the
screw is tightened completely.
- When wiring, make your selection by paying careful attention to the cable
used at the input and output. When current flows in a longcable, the loss
(heat generation) is generated by resistance, etc.
- Thick, short wiring is ideal.
When the cable is bundled, heat dissipation becomes poor and the
temperature becomes extremely high. When bundling 5 cables ormore,
connect by lowering the load factor (number of connected devices).
- Divide connection to the DC output side terminals into 2 to 4 systems so that
wire of the same size asthe cable connecting to the Luci product bodyora
little thicker is connected. Connection with maximum VCTF-2C-2.0sq is
recommended.
-To prevent electrical shock and noise, be sure to correctly connect the
L (live), N (neutral), and FG terminal of the AC input correctly.
VCTF - 2C - _ sq
1.25
7 12
0.75
About the connection cable
Cable thickness and allowable current
(reference value according to manufacturer documentation)
Ambient temperature 30℃
Conductor nominal cross-section area
Max. allowable current (A)
Important!
Check with the labels indicating
the current directions and be sure
to correctly connect to the power
supply.